Salmon Quiche

I like canned salmon. There, I said it. I know it sometimes gets a bad rap, but I find canned salmon very convenient to have around. If you didn’t already know this- canned salmon is made from wild caught salmon and has all the nutritional benefits of fresh. If you are looking for something different to do with canned salmon, you might want to try this recipe.
If you prefer, you could use fresh salmon. About 12 oz. of cooked salmon, flaked, would be used in place of the canned salmon.
The crust is a breeze to make. It’s pressed into the pie pan, rather than being rolled out. The crust is made with whole wheat flour, almonds and cheddar cheese. Yum. You could use this crust recipe for other quiches.
Did I mention it also freezes well?
Salmon Quiche
1 c. whole wheat flour
2/3 c. shredded sharp cheddar cheese
1/4 c. chopped almonds
1/2 t. salt
1/2 t. paprika
6 T. oil
1 (15 oz.) can salmon, flaked, drained, liquid reserved, bones and skin removed
3 eggs, beaten
1 c. sour cream
1/4 c. mayo or salad dressing
1/2 c. shredded sharp cheddar cheese
1 T. grated onion
1/2 t. dillweed
3 drops Tabasco
For crust, combine first 5 ingredients in a bowl. Add oil and mix well. Press into a 9 inch pie plate. Bake in a 400 degree oven for 10 minutes. Remove pie crust from oven and reduce oven temperature to 325 degrees. Meanwhile, begin filling. If needed, add water to reserved salmon juice to measure 1/2 cup. Combine remaining ingredients in a bowl, including reserved liquid. Pour into prepared crust and bake for 45 minutes or until set in the center. Makes 6 servings.
Rich Blueberry Muffins

I froze a lot of blueberries when they were in season. I realized that recently when I defrosted my freezer. This time of year I often enjoy using some of those frozen berries in baked goods. Reminds me of warm summer days.
This muffin recipe is one of my favorites. The secret, I think, is the cup of melted butter that is folded into the batter. I also add a little cinnamon, which goes so well with the berries.
You end up with a rich muffin with a crumbly, tender texture and a great flavor. This recipe makes 36 muffins, so you will have extra to freeze. They freeze great.
Rich Blueberry Muffins
4 c. flour
2 T. baking powder
1 ½ t. salt
1 t. cinnamon
1½ c. sugar, plus extra for sprinkling
2 eggs
1 ½ c. milk
2 sticks (1 cup) butter, melted
4 c. blueberries -fresh or frozen
Paper line 36 muffin cups or grease lightly and preheat oven to 375 degrees. In large bowl mix dry ingredients. In smaller bowl mix eggs and milk and beat until smooth. Stir into flour mixture with a fork and mix until just moistened. Fold in melted butter and blueberries divide batter among cups. Sprinkle muffins with a little extra sugar. Bake 25 minutes, or until light golden. Makes 36.
Chicken Florentine

I love spinach. I always have, even when I was a kid. My Mom used to make Pork Chops Florentine and it was one of my favorite dishes. She had to add more spinach to her recipe because I loved the spinach so much.
Chicken Florentine is another spinach dish I just adore. It is a simple dish to prepare, too. Great for a weeknight, when you might not have a lot of time to get dinner ready. It is also special enough to serve to company. The most difficult part is getting all that spinach in the skillet.
A pound sounds like too much spinach, but trust me, it is the right amount. The spinach cooks down so much, you need more than you think.
The hardest part of making this dish is just getting all the spinach in the skillet. Don’t try to get it in all at once. As you add the spinach, it will cook down a lot. As the spinach wilts, keep adding more, until it is all in.
I served the Chicken Florentine on its own, but you can serve it over rice, pasta or potatoes. You can also cook it longer to thicken the sauce more, if that is how you prefer it.
I used boneless chicken breasts, because that is what I had. Boneless thighs work great in this dish, too.
So here is the recipe. I hope you give it a try. It is an easy way to get a lot of leafy greens in your diet, for sure.
Chicken Florentine
2 T. oil
1 c. sliced onion
1½ lbs. boneless chicken, I like thighs
Flour
Salt and pepper
1 c. chicken stock
½ c. half and half or milk
¼ c. sherry
1 lb. fresh spinach, washed
In large skillet, oven medium high heat, heat oil. Add onions and sauté until golden. While onions are cooking, season flour with salt and pepper. Dredge chicken pieces in the seasoned flour. Add chicken to the skillet. Cook until chicken is golden on both sides, turning once. Add stock, half and half and sherry to the skillet and bring mixture to a simmer. Add the spinach, a few handfuls at a time, until it wilts and will fit in the skillet. The spinach wilts down a lot. Turn down heat to medium and cook until spinach is cooked down, stirring to get spinach mixed in. Cook a few minutes more so sauce will reduce and thicken a little. Add more salt and pepper to taste, if needed. Serves 4.
Note: If you prefer, you can use frozen spinach instead. add 2 (10 oz. ) packages, thawed and drained a bit.
Whole Wheat Biscotti
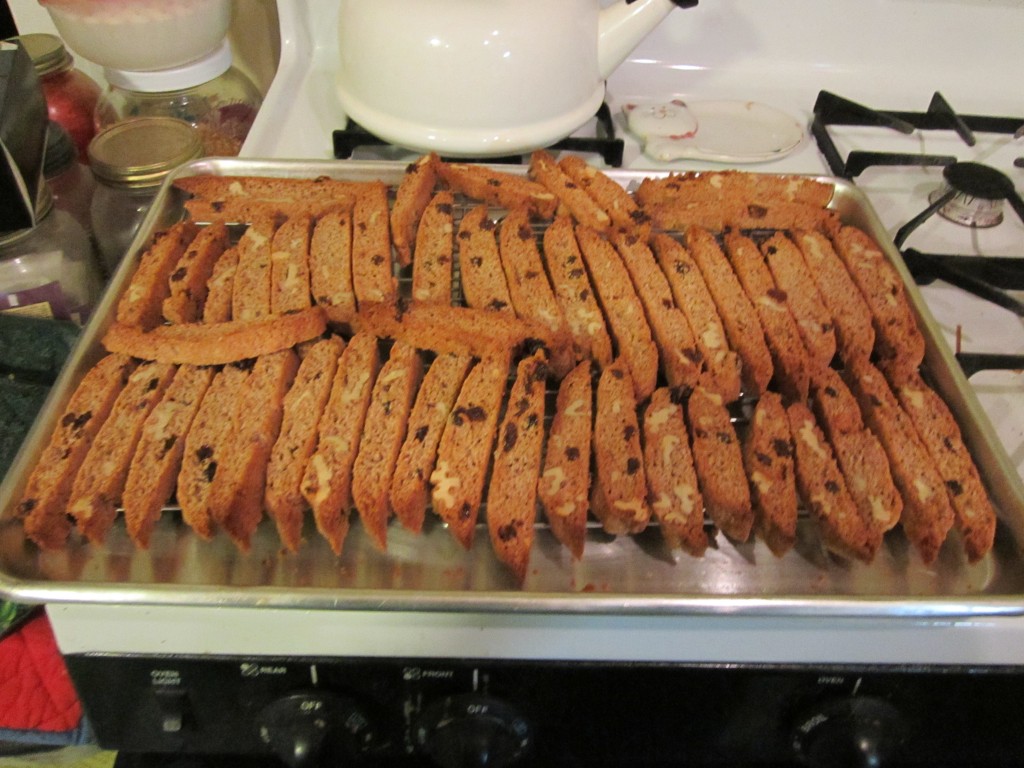
I love biscotti. They are so easy to make. I try to make a batch every couple of weeks. These are made with whole wheat flour. I think it gives them a nice flavor and texture. I like this recipe so much, I normally double the recipe when I make them. I store them in a cookie jar and they stay crisp for a couple of weeks.
Helpful hint: Since biscotti are twice-baked you bake the loaves until just firm, then slice and return the sliced biscotti to the oven to finish baking and get really crisp. Problem is you have to turn them half-way through the second bake to be sure they cook evenly. Tedious. Instead- place a cooling rack on the baking sheet then place the freshly sliced biscotti on them for the second bake. The air circulates under them and you don’t have to turn them over halfway through. Simple.
Whole Wheat Biscotti
¾ c. whole wheat flour
½ c. all purpose flour
1/3 c. sugar
1 t. baking powder
¼ t. salt
½ c. walnuts
¼ c. golden raisins
Combine all. Add.
2 eggs
1 t. vanilla
Shape into loaf (2”x11”) on oiled sheet. Bake at 350-degrees for 20 minutes. Remove loaf to cutting board. Slice thin and place slices on a cooling rack on a baking sheet then return to oven, reduce heat to 300-degrees bake 25 minutes.
Feel free to dip one end of cooled biscotti in melted chocolate or drizzle them with melted chocolate, if you like. You can also change which nuts and dried fruit you use. I also sometimes make these with all spelt flour in place of the whole wheat and white flour.
Homemade Vegetable Soup Base

I have made a lot of stuff from scratch- could I make my own soup base? I could, and I did! Not soup stock, but the stuff in jars that you just mix with water for instant broth. I wanted a no-meat soup base for when I was cooking meat-free.
I made a vegetable soup base that is a mixture of vegetables, both fresh and dried, herbs, mushrooms, nutritional yeast, spices and salt. There is pretty good amount of salt, but I wanted to be able to store it in the fridge and be safe.
It worked out that every teaspoonful of the finished base has less than 1/4 teaspoon of salt. Not great, but a lot less than bouillon cubes.
If you want to make yours with less salt or no salt- you’ll have to freeze the mixture in ice cube trays and take it out of the freezer as needed. Sort of like your own bouillon cubes.
The nice part is, I can now make a vegetable soup easily and I know exactly what is in it. It can also be added to chicken or other meat-based stocks, in place of the salt, to add extra flavor.
Homemade Vegetable Soup Base
4 carrots, peeled and cubed
3 celery ribs, washed and cubed
1 large sweet onion, peeled and cubed
3 green onions, washed and cut up
1 c. sun- dried tomatoes, soaked in water 30 minutes, and drained
1 c. dried mushrooms, soaked in water 10 minutes and drained
1 c. chopped cabbage
1 c. parsley, chopped
1/2 c. chopped sweet pepper
1/4 c. nutritional yeast, optional
2 T. turmeric
8 oz. salt- I used sea salt and used a scale to weigh it. It’s around a cup but will differ if you are using a coarse salt
Combine all ingredients, except the salt, in a food processor and blend until smooth. I have a decent size Cuisinart and still had to do this in batches. Combine in a bowl with the salt and stir well to blend. Store in a clean jar in the fridge until ready to use. I ended up with about 5 cups of soup base. To use, add about 1 teaspoonful to a cup of hot water for vegetable broth. Use less or more according to your taste. Use in place of salt in other soups, stews and sauces.
Peanut Soup – Vegan

This is one of the easiest soups I make. It is also one of my favorites. It’s a rich soup with a creamy texture and just a hint of heat. You could make it spicier, of course. The recipe is very versatile. As written, the soup is vegan, but you could make it with a meat-based stock, if you prefer.
If your only experience with eating peanut butter is on a sandwich or in cookies, you might be surprised at just how good this soup tastes. I have made it with almond butter. If you don’t have peanut butter, the almond butter works fine. Other nut butters would also work. but I still prefer it made with peanut butter. It freezes well, too.
Peanut Soup
2 c. chopped onions
1 T. oil
cayenne pepper to taste
1 t. grated fresh ginger
1 c. chopped carrots
1 c. chopped sweet potatoes
1 c. chopped white potatoes
5 c. vegetable stock or water
1 c. tomato sauce
1 c. smooth peanut butter
1 T. sugar, optional
1 c. chopped green onions
Sauté onions in oil until tender. Add seasonings and carrots and sauté 3 minutes more. Add potatoes and stock and simmer until vegetables are tender. Puree soup in blender in batches until smooth. Return to pot and add tomato sauce and peanut butter. Add sugar if soup is not sweet enough. I never add the sugar, but some people do. Warm gently and serve with green onions on top. You could also top with chopped peanuts, for a little crunch. Serves 6-8.
Beignets

Beignets are a fun addition to any Fat Tuesday/ Mardi Gras celebration. Beignets are the official fried dough of New Orleans. These squares of fried dough are often referred to as a fritter or doughnut.
Beignets can be made with a choux pastry- like the type of dough used for cream puffs. They can also be made from a yeast raised dough. I made mine with a yeast dough.
Once fried, beignets are drained on paper towels and then tossed in a bag with powdered sugar. They are served hot, or at least warm. The fresher the better.
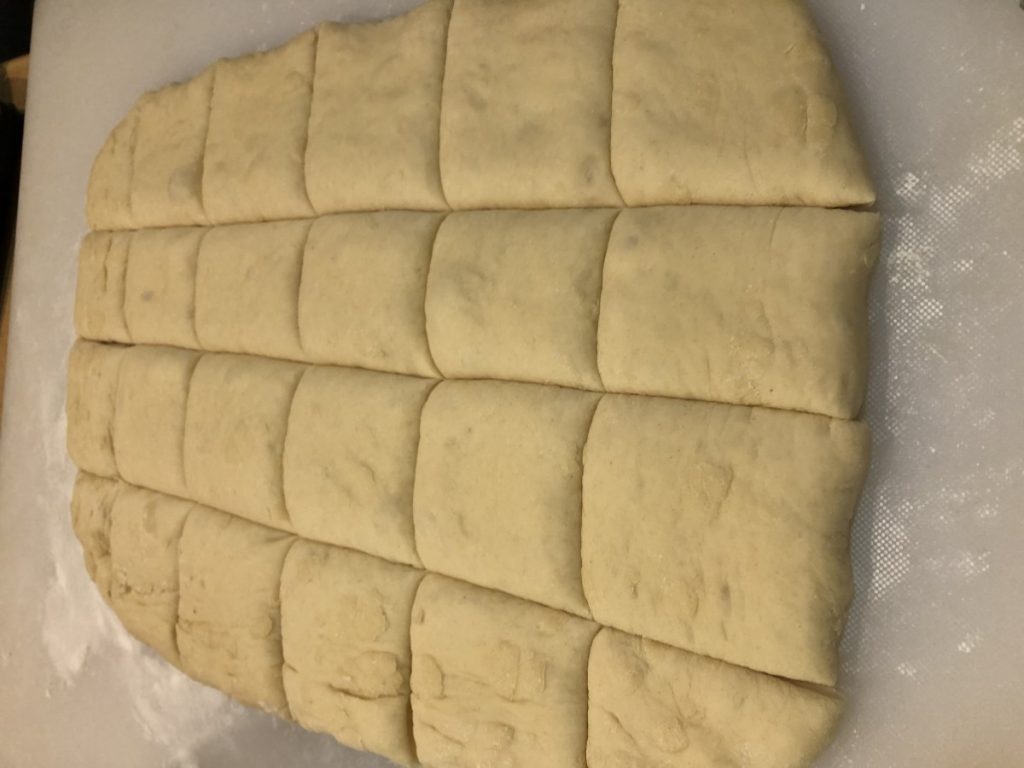
They really aren’t that difficult to make. The dough is soft and pliable. Very easy to handle. When you roll the dough into a rectangle to cut into squares, do your best to get the corners squared off. But don’t get too concerned. I always end up with the four corners a little misshapen. They still taste good. I use a pizza cutter to cut the dough into squares.
Beignets
1½ c. lukewarm water
½ c. granulated sugar
1 envelope active dry yeast
2 eggs, room temp, slightly beaten
1 c. half and half, warmed a little
¼ c. oil
7 -7½ c. flour
2 t. salt
Oil, for deep-frying
2-3 c. powdered sugar
Mix water, sugar, and yeast in a large bowl and let sit for 10 minutes. In another bowl, beat the eggs, half and half and oil together. Mix egg mixture to the yeast mixture. Add 3 cups of the flour and the salt to the yeast mixture and stir to combine. Add more flour, a little at a time until soft dough forms. Remove dough from the bowl, place onto a lightly floured surface and knead until smooth. Return dough into the bowl and cover with plastic wrap or a towel. Let rise in a warm place for at least 2 hours. Roll the dough out to about ½-inch thickness and cut into 2-inch squares Heat oil in a deep-fryer to 350 degrees. Add the confectioners’ sugar to a paper or plastic bag and set aside. Deep-fry, flipping every 30 seconds or so, until they become a golden color. After beignets are fried, drain them on paper towels. Once you are done frying them, toss them into the bag of confectioners’ sugar. Hold bag closed and shake to coat evenly. Makes about 4 dozen.
Note: This recipe makes a lot. I cut the recipe in half when I don’t need so many. You can cut them a little smaller, if you prefer. They puff up a lot when fried.

Spicy Shrimp and Grits

A fun way to celebrate Mardi Gras is with shrimp and grits. Everybody seems to love them. As an added bonus, they are fast and easy to make. It’s all in the timing. Get your grits simmering on the stove, while you clean and season the shrimp. Once the grits are ready, keep them warm and quickly saute the shrimp. Then just serve them up.
Some folks like to add cheese to the grits. I didn’t this time, but feel free to add a cup or two of shredded cheese, if you like. Sharp cheddar or Parmesan are good choices. Add the cheese when you add the cream and butter.
I didn’t get specific on how much of the seasonings to add. I dusted the shrimp with the seasonings and tossed to get them all coated evenly. I was generous with all but the cayenne. I used about a 1/4 teaspoon of cayenne. They still had a nice kick, but I think I could have used a bit more. You can always serve them with hot sauce on the side, so guests who like spicier foods can add that to their shrimp.
Spicy Shrimp and Grits
1 c. grits
4 c. water
½ t. salt
3 T. butter
1/3 cup heavy cream
1 lb. large raw shrimp, shelled and deveined
Salt
Pepper
Cayenne pepper
Garlic powder
Paprika
2 T. oil
2 T. butter
In saucepan, bring water to a boil and add the grits and salt. Turn down to a simmer and cover the pan. Stir every few minutes. Cook until grits are tender and water is absorbed, about 20 minutes. While the grits are cooking, place shrimp in medium bowl and season to taste with the salt, pepper, cayenne, garlic powder and paprika. Toss shrimp to coat evenly and set aside. Once grits are done cooking, stir in the cream and butter. Adjust seasoning. Cover and remove from the heat. Heat oil and butter in skillet and cook shrimp over medium high heat, turning to cook on both sides until shrimp are cooked, about 5 minutes. They should get a nice, golden color. Larger shrimp will take longer, but be careful not to overcook them. To serve, spoon some grits on a plate or in a shallow bowl. Top with some shrimp and serve. Serves 4.
Tiramisu Doughnuts

These doughnuts are inspired by the flavors of tiramisu, a traditional Italian dessert. They are a filled doughnut, like jelly doughnuts. I used the filling that I would normally use for making tiramisu. It is an egg custard, combined with mascarpone cheese and whipped cream. After the doughnuts are filled, they are topped with a mocha ganache. The end result is sublime.
I started making these doughnuts a number of years ago. It was Fat Tuesday and I was making jelly doughnuts, a family tradition. Not everybody likes jelly doughnuts and I wanted to switch things up. As a kid, I loved the cream filled doughnuts my folks would make. I decided to use the filling recipe I used for tiramisu. To finish it off, a little coffee is added to the ganache to give it the flavors of classic tiramisu.
You do need to store finished doughnuts in the fridge, assuming any are leftover.
I won’t lie, these doughnuts are a bit of work, but worth the effort. Here is the recipe.
Tiramisu Doughnuts
Filling:
5 egg yolks
1/4 c. sugar
1/2 c. Marsala wine (not cooking wine)
2 c. whipping cream
4 T. sugar
1 lb. mascarpone cheese
Make zabaglione (egg custard). In double boiler, over simmering water, beat together egg yolks and sugar until lemon colored. Stir in Marsala and continue cooking, stirring constantly until mixture thickens and will mound on a spoon. This will take about 10 minutes. Remove from heat and cool down. You can place in bowl in fridge 30 minutes or so. Beat together whipping cream and sugar until stiff peaks form. Beat in mascarpone and chilled zabaglione. Chill 1 hour.
Dough:
4 c. flour
2 T. sugar
1 t. salt
½ c. butter
1 packet yeast
¼ c. warm water
2 t. sugar
1 c. evaporated milk
2 eggs, beaten
Combine flour with sugar and salt. Cut in butter and set aside. Dissolve yeast in warm water and 2 t. sugar and set aside. Combine milk with eggs. Stir in yeast mixture and add to flour mixture stirring well. On lightly floured surface knead dough until dough is smooth, about 5 minutes. Dough will be very sticky. Cover and let rise until doubled, about 1½ hours. Remove dough from bowl and punch down. Using about a third of the dough at a time roll dough out to about an ½ -inch thickness and cut out with a 2½ -inch biscuit cutter. Re-roll scraps and cut out. You should get about 2 dozen. Place dough circles on a floured surface and cover with a towel until doubled, about an hour. Heat oil in a deep pan until it reaches 375 degrees. Cook doughnuts a few at a time until golden on both sides, about 1 minute per side. Drain on paper towels and cool before filling.
Note: You can also refrigerate the dough after kneading it if you would prefer. Just place dough in an oiled bowl, cover with plastic wrap and chill overnight. Roll and cut dough into doughnuts when cold from the fridge. Allow to rise, covered, until doubled in bulk, about 2-3 hours. Fry as directed.
To fill doughnuts use a pastry bag fitted with a long tube tip for filling. I have these handy plastic syringes which are easy to use. Insert tube tip into doughnut and squeeze gently until doughnut is filled with cream (or jelly). Be careful not to overfill or doughnut will split. Once filled doughnuts can be frosted or topped with a sugar glaze. For the Tiramisu Doughnuts I made a mocha ganache.
Mocha Ganache
2 c. chocolate chips
1 c. whipping cream
1 T. instant coffee powder
Combine all ingredients in a microwave safe dish and heat in microwave for 2 minutes. Stir mixture until smooth and return to microwave if chocolate is not fully melted. Heat in microwave for 30 seconds more at a time, stirring after each time until mixture is smooth. For extra smooth mixture strain before using. Dip the top of the filled doughnuts in ganache.
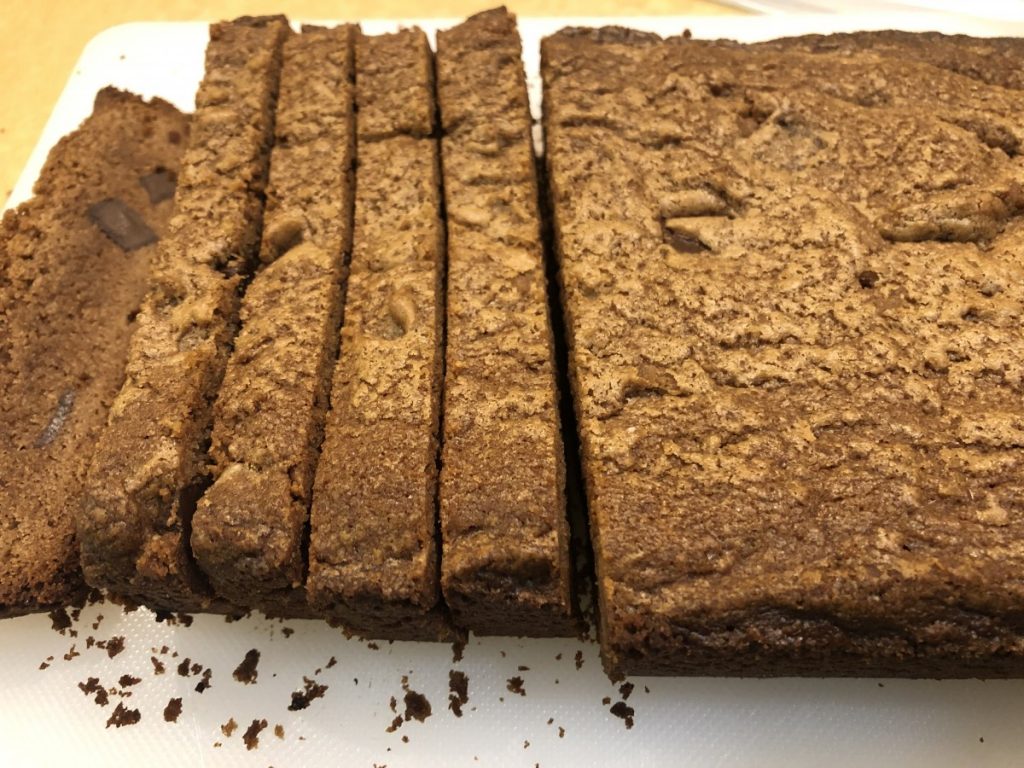
Nutella Biscotti

These biscotti are so good. Very crisp and full of a rich chocolate-hazelnut flavor. The not so secret ingredient is Nutella, the chocolate hazelnut spread that is so popular. I love it.
I created this recipe at the request of my friend Markeen. She asked if I had a biscotti recipe using Nutella. I didn’t. I did have a chocolate biscotti recipe. I used it as my starting point and went from there. The result came out just the way I wanted.
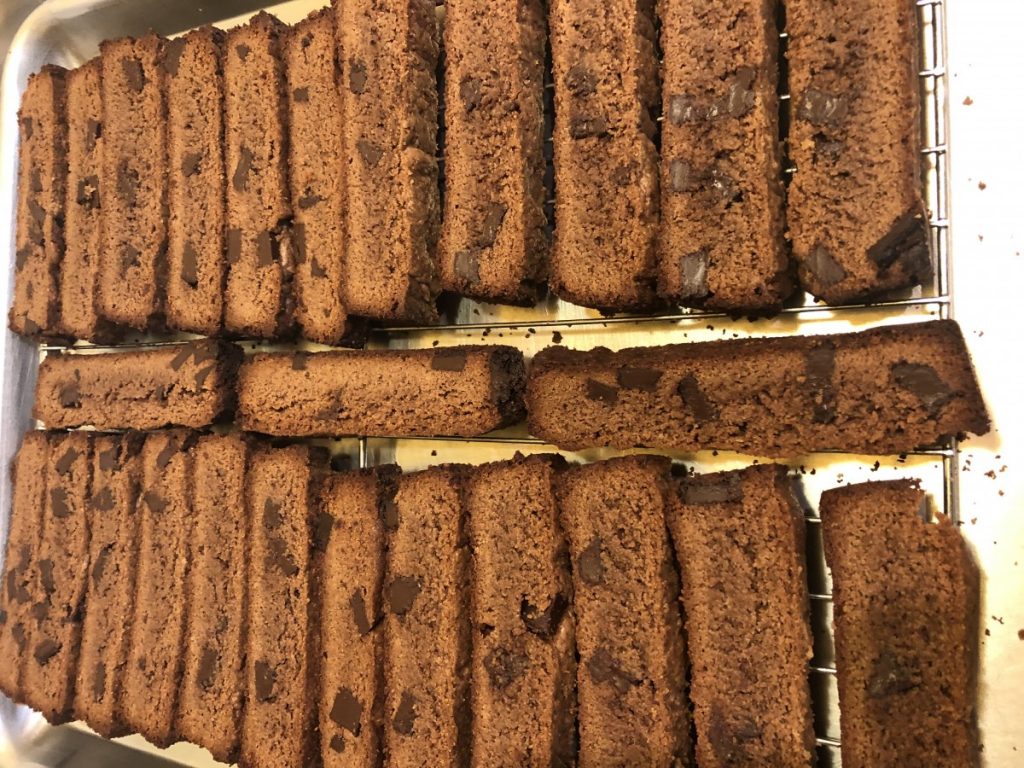
Biscotti are a type of cookie that are baked twice. Normally the dough is shaped into logs and baked until the dough is firm. Then they are sliced and returned to the oven- at a lower temp- to bake until the slices of biscotti get crisp. This makes them perfect for dunking in your coffee, tea or milk.
During the second bake, the slices are normally turned over halfway through the baking time, so they will crisp on both sides. A time saving tip: Place the slices of biscotti on a cooling rack on the baking sheet for the second bake. That way they bake on both sides at once.
This recipe is a little different in that the dough is baked the first time in loaf pans. So simple.
So here is the recipe. Enjoy!!
Nutella Biscotti
¾ c. brown sugar
½ c. butter, room temperature
1 c. Nutella
2 eggs
2½ c. flour
2 t. baking powder
½ t. salt
1 c. chocolate chips, I used dark chocolate chunks
1 c. chopped, toasted hazelnuts, optional
4 oz. dark chocolate
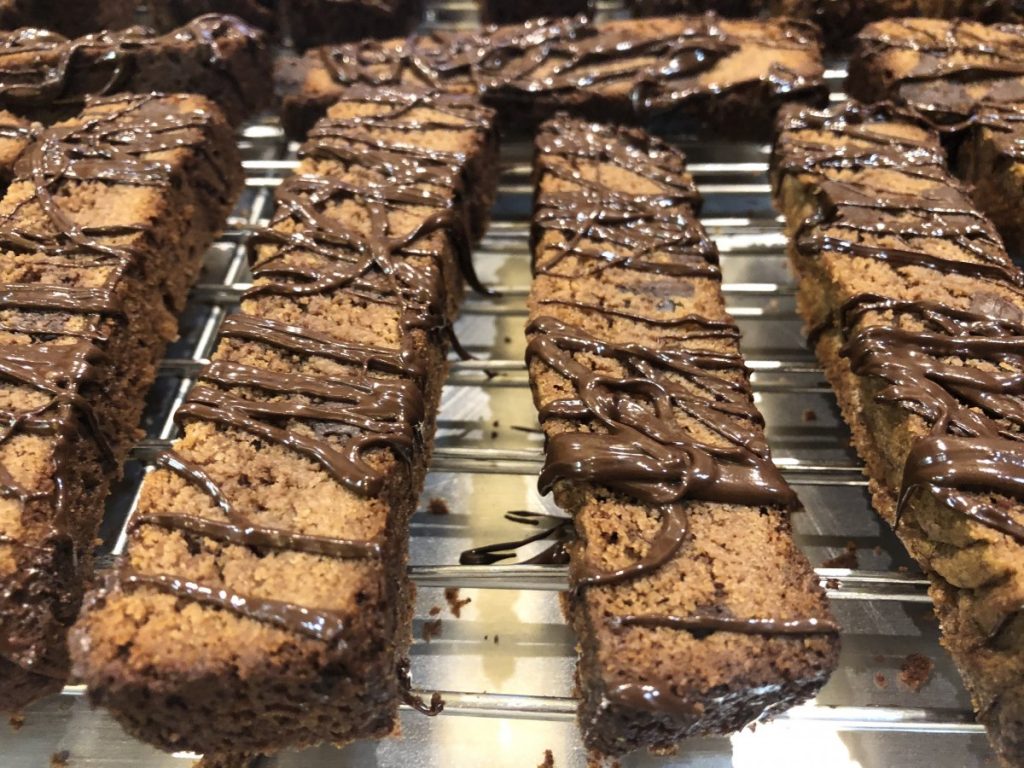
Grease 2 (9×5-inch) loaf pans and set aside. Cream sugar and butter together than mix in Nutella until smooth. Beat in the eggs. Stir in dry ingredients. Mix until smooth. Dough will be soft. Stir in chips and nuts (if using). Divide batter in prepared pans and use spatula to spread evenly. Bake in a 350-degree oven for about 35 minutes. Tester inserted in center should come out clean. Turn loaves onto rack and cool 15 minutes. Reduce oven temperature to 300-degrees. Using a serrated knife cut loaves into ¾-inch slices. Place a cooling rack on a large baking sheet. Place slices on the cooling rack. This way the biscotti will bake on both sides at once- so there is no need to turn them over during the second bake. Bake about 18-20 minutes. Biscotti should feel pretty firm in the middle. Cool completely. Melt dark chocolate and drizzle over biscotti. Allow to set up. Makes about 2 dozen.
True confession. I was going to add hazelnuts to my batter- but realized after I had already mixed the batter, that I not skinned or toasted the nuts yet. Oops.