Homemade Graham Crackers

I had made graham crackers before, but it had been a few years. They weren’t all that hard to make. Rolling them to the right thickness was the hardest part. You want them pretty thin, but not too thin. I think my first batch was too thin. It got easier as I went along.
They taste really good and are not as sweet as grahams crackers you get at the store. If you like a sweeter cracker, add a little more sugar. I like them the way they are.
It is fun to make S’Mores using both homemade marshmallows and homemade graham crackers. The marshmallow recipe is at the bottom of the post. Now I just have to get chocolate bars and we are good to go.
Graham Crackers
1 c. whole wheat flour or whole wheat pastry flour
1 c. all-purpose flour
1/3 c. sugar
½ t. salt
1 t. cinnamon
1 t. baking powder
1 large egg
¼ c. oil
¼ c. honey
2 to 3 tablespoons milk
additional milk for glaze
cinnamon-sugar (optional)
In a mixing bowl, combine whole wheat flour, all-purpose flour, sugar, salt, cinnamon and baking powder. In a separate bowl, beat egg till light, add oil, honey and 2 tablespoons milk. Stir into dry ingredients until you have a fairly stiff dough, adding additional milk if necessary. Wrap dough in waxed paper and chill until firm, about 1 hour (or longer, if it’s more convenient).
Turn the dough onto a floured surface and knead gently until it holds together. Roll dough out till it’s about 1/16-inch thick; make sure rolling surface is well-floured, or you’ll have trouble transferring crackers to baking sheet. Preheat your oven to 350°F.
Cut dough into 3-inch squares, prick each square several times with a fork, and place on lightly greased cookie sheets. Brush the tops with milk, sprinkle with cinnamon-sugar if you’re so inclined, and bake for 12-15 minutes, or until crackers are lightly browned. Remove crackers from oven, transfer to a wire cooling rack, and cool completely. Makes about 2 dozen graham crackers.
As promised here is the recipe for making marshmallows. I’ve used this recipe for ages and what I like about it is that it is super easy and still gives you yummy marshmallows. I’ve seen more complicated versions- but why make life harder than it already is? The recipe calls for packets of gelatin. If you want to use sheet gelatin instead, which I did, the adjustments are in the directions. Either works fine.
Marshmallows
1/2 c. cornstarch
1/2 c. powdered sugar
small amount of butter
2 envelopes unflavored gelatin, or 6 sheets of gelatin*
1/2 c. granulated sugar
1/3 c. water
2/3 c. corn syrup
1/2 t. vanilla
Combine cornstarch and powdered sugar in a small bowl. Butter an 8x8x2 inch-baking pan. Sprinkle with some of the cornstarch mixture. Reserve the rest of the mixture for use later on. Combine the gelatin, granulated sugar and water in a small saucepan and cook over low heat, stirring constantly until gelatin is dissolved.** Pour gelatin mixture into a large bowl, adding the corn syrup and vanilla. Beat with an electric mixer on high speed for 15 minutes. Be precise on the timing. The mixture will be thick and fluffy, marshmallow cream, actually. Pour mixture into the prepared pan, spread evenly and refrigerate overnight. The next day, sift some of the reserved cornstarch mixture over the marshmallows. Sprinkle some more of the coating mixture on a work surface and turn the marshmallow out onto the prepared surface. Cut the marshmallows into 1-inch squares, coating as you go. The marshmallows are very sticky until completely coated. Allow to dry on a rack. Store in an airtight container for up to 3 weeks. Makes about 4 dozen candies.
You can swap out flavorings- using maybe mint or lemon in place of the vanilla. You can also add a few drops of food coloring, if you like. Oh, and when you are at the rolling the pieces around in the cornstarch and powdered sugar stage of the process- don’t wear black. You’ll thank me later for that.
* Note: 3 sheets of sheet gelatin= one packet (1 tablespoon) of powdered gelatin.
** Note: If you are using sheet gelatin place it in the pan with COLD water and stir until dissolved. Then add the sugar and just cook, over medium-low heat until just warm, stirring often. Don’t let the mixture get too hot or the gelatin will not work.
Dissolve gelatin in water
Cook with water and sugar until warm
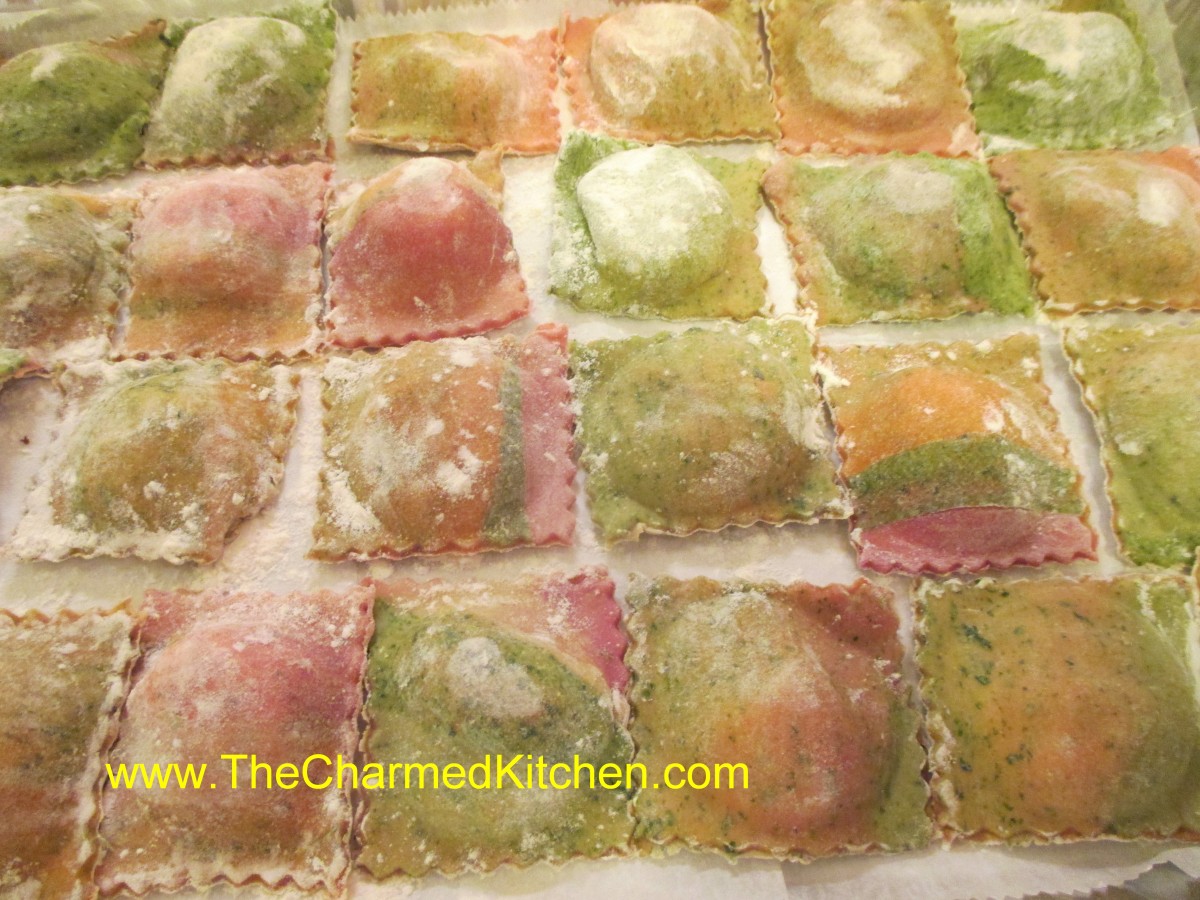
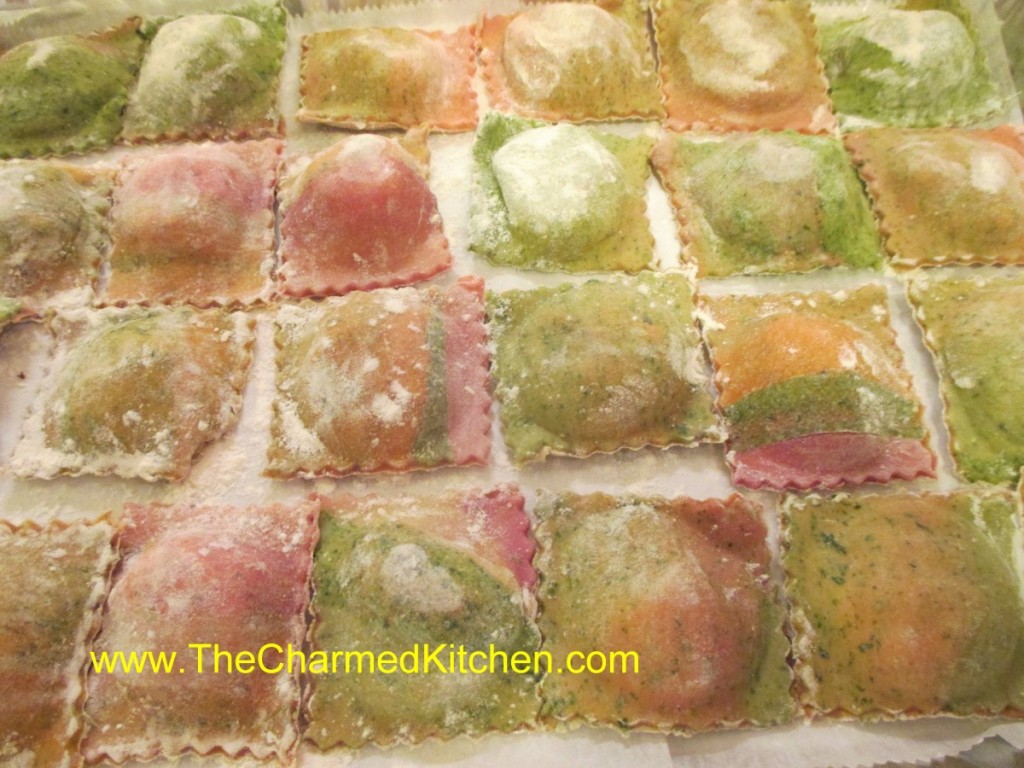
Rainbow Vegetable Pasta
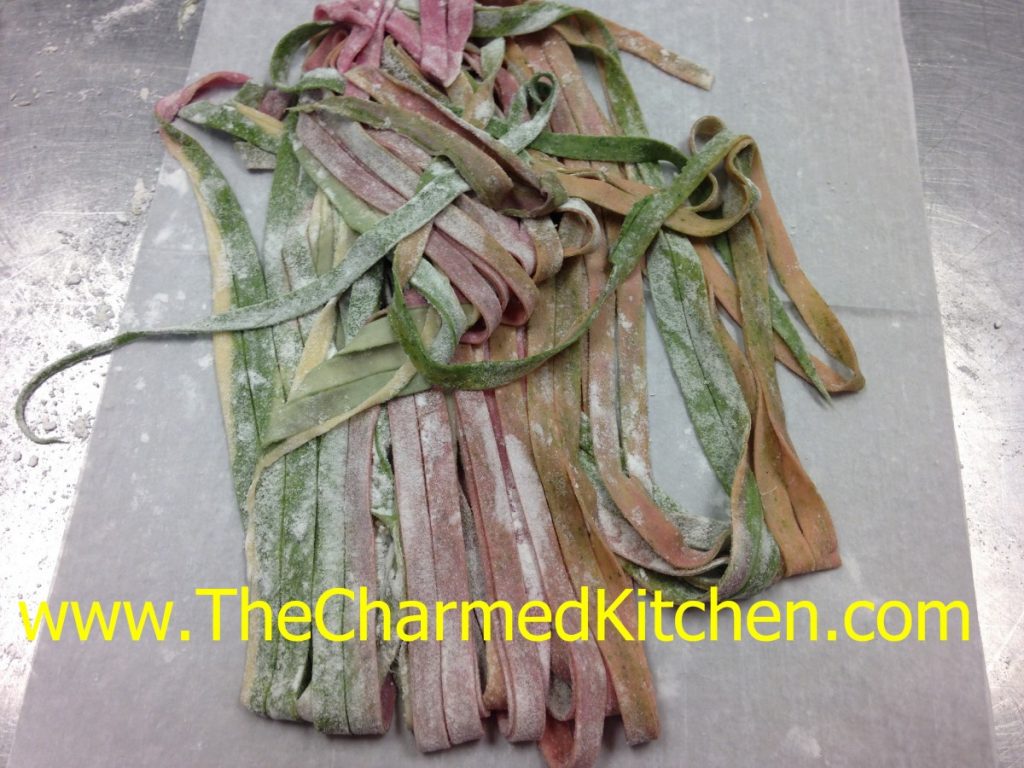
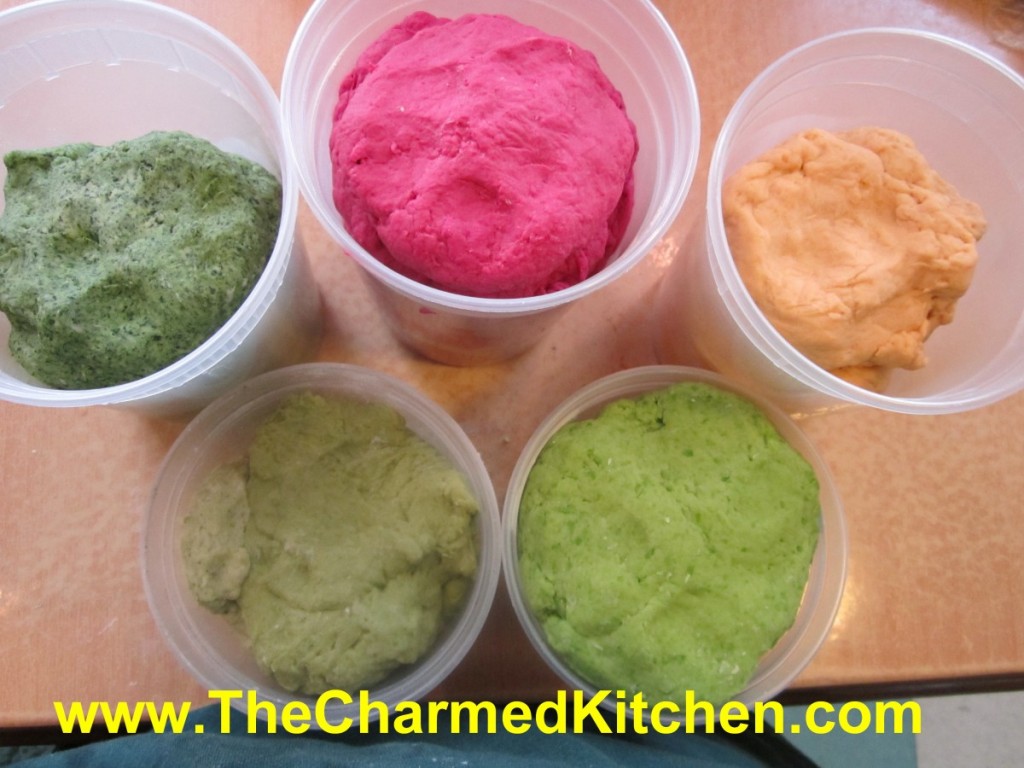
I love the taste of homemade pasta and I particularly like the colors and tastes of veggie pastas. Veggie pastas are sometimes a little softer than egg pasta and benefit from being mixed with some egg based pasta, for strength and ease of rolling. You can also use herbs and spices to flavor and color the dough.
I take pieces of several different doughs and roll them together. As you roll the dough out the colors blend together and create rainbow pasta. You can use sheets of the dough to make rainbow ravioli or just cut into noodles.
I often use a food processor to make pasta dough, especially the vegetable pastas because I am using vegetables that need to be pureed, pretty much. I have a small one which is perfect for small batches, no more than 1 cup of flour. I like to use my stand mixer for larger batches and for egg pasta dough. Always best to make pasta dough at least 30 minutes ahead and let it rest before rolling. You can even make it the day before and chill until ready to use.
Basic Homemade Pasta
3 c. flour, more if using electric pasta machine. See note.
1 1/2 t. salt
4 eggs
Water, if needed
Mix flour and salt and stir in eggs, kneading until dough is smooth and elastic. Dough will be very stiff. Add a little water if needed to hold dough together. You may wish to mix the dough in a mixer or food processor. Cover dough and let rest 15-20 minutes before rolling. Under kneading your dough will result in coarse, crumbly pasta. This batch makes about 1 pound. Serves 4-6.
Roll dough out on well floured board or in pasta machine (non-electric) until desired thickness in reached. Add flour as needed to prevent sticking. Cut into strips or whatever shapes are desired. Pasta can be hung to dry or separated and allowed to dry flat on a table. When pasta is not hanging to dry it must be turned occasionally to dry evenly. Although you may hear otherwise, homemade pasta, even when dried, should be frozen for long term storage. Storing at room temperature can lead to spoilage. Fresh pasta can also be stored in the refrigerator for a day or two.
Note: All electric pasta machines vary slightly and you should use their recipes as much as possible. Still, for most models, adding 1/4 c. flour for each cup in a hand rolled recipe works the best. Also recipes that contain seeds and vegetables may clog an electric pasta maker. Follow your manufacturer’s instructions.
These are smaller batches which can be mixed in a processor or by hand. If you want to mix a vegetable based pasta by hand, puree the vegetables first.
Curry Pasta
1 c. flour
1 t. curry powder
1 egg
1-2 T. water, if needed
Carrot Pasta
1 c. flour
1/2 t. dried dill
1/3 c. carrot puree
1-2 T. water, if needed
Beet Pasta
1 c. flour
1/2 t. dill
1/3 c. beet puree
1-2 T. water, if needed
Spinach Pasta
2 c. flour
1 10 oz. package frozen spinach, cooked, drained, reserving some of the liquid
Mix this dough as for other pastas, but don’t be too quick to add reserved liquid. While kneading you’ll get water out of the spinach. May require more kneading and rolling than other pasta doughs. Be patient, it’s worth the work.
Broccoli Pasta
1 c. flour
1/2 c. broccoli puree
Cheese Ravioli Filling
4 oz. cream cheese, softened
2/3 c. shredded mozzarella cheese
2/3 c. ricotta cheese
1/3 c. grated Parmesan or Romano cheese
Combine all ingredients well and chill until needed.
Roll a batch of dough into a rectangle, 18×12 inches and 1/16 inch thick. Arrange well rounded teaspoonfuls of the cheese filling two inches apart on the pasta sheet. Roll out additional dough into an 18×12 inch rectangle. With a pastry brush moisten bottom sheet of pasta around edges with water. Place second sheet of pasta on top, using fingers to seal the dough around the edges of the filling. With a pastry wheel or sharp knife, cut between the ravioli to separate them. You should have 24 ravioli.
Cooking Fresh Pasta
Fresh pasta cooks a lot faster than dry pasta. Fine pasta, like angle hair, is cooked almost as soon as it gets into boiling water. It cooks for just a minute. Larger noodles, like linguine, will take 3 minutes or so to cook. Fresh ravioli cook until they float- about 4 minutes. Watch carefully, so you don’t overcook your fresh pasta.
Storing Pasta Dough
You can keep fresh pasta dough in the fridge for a couple of days. For longer storage, pasta dough can be frozen. That way, you can thaw out dough whenever you are in the mood for fresh pasta.
Carrot Oat Bran Muffins

These muffins are really good for you, but they taste like a treat. I was never a big fan of bran muffins made with wheat bran. I didn’t like the flavor. But I love the way these muffins taste.
I prefer the taste of oat bran over wheat bran. I find it has a natural sweetness. With the addition of carrots and raisins these muffins are moist, light and slightly sweet. They remind me of a cross between a muffin and carrot cake. Vanilla and orange zest makes them fragrant and tasty, too. With plenty of oat bran, they also provide healthy dietary fiber. I make these often, then freeze some for later. They make a great breakfast and an easy snack.
Carrot Oat Bran Muffins
1 c. milk or buttermilk
1 c. oat bran
1 egg
1/3 c. oil
3 T. brown sugar
1 t. vanilla
1 t. orange peel
1 c. shredded carrots
1 c. flour (all purpose or whole wheat pastry flour)
1 t. baking powder
1 t. baking soda
½ t. salt
½ c. raisins
In mixing bowl combine oat bran and milk. Add egg, oil, sugar, vanilla, peel and carrots. Beat well. Combine remaining ingredients in small bowl and mix well. Gently fold into bran mixture. Divide batter in 12 muffin cups that are either greased or lined with paper cups. Bake in a preheated 375-degree oven for 20-25 minutes. Makes 12.
Amy’s Skillet Chicken Pot Pie
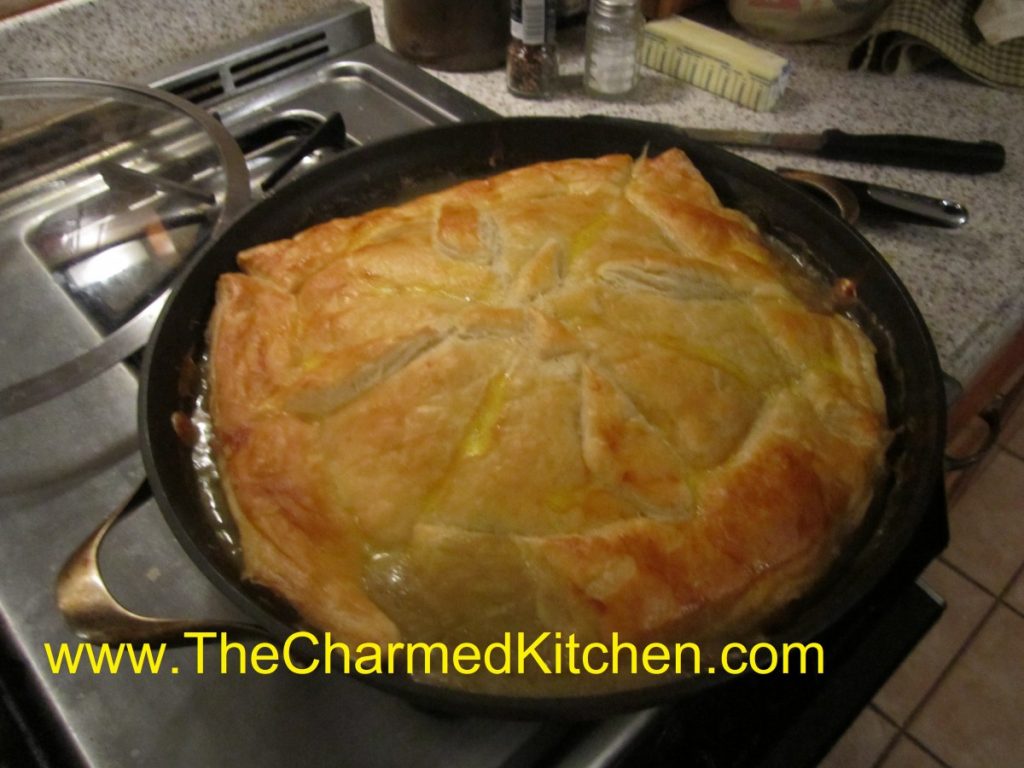
I am not sure there is better comfort food than chicken pot pie, at least not for me. Brings back very nice memories. Maybe we all need a little comfort right now.
This chicken pot pie is made in a cast iron pan. It is started on top of the stove, then finished in the oven. Kind of the ultimate one-pot dinner.
My friend Amy was so proud of how this recipe turned out. She found the original recipe somewhere, but changed it, to make it her own.
It was, and is, the best chicken pot pie I ever tasted. For our dinner that night, Amy doubled the original recipe, and used a larger skillet. You could easily cut it in half and use an 8 or 10-inch skillet
Here is Amy’s recipe. Enjoy!!
Amy’s Skillet Chicken Pot Pie
¼ c. olive oil
2 T. butter
1 sweet onion, chopped
4 parsnips, peeled and sliced
4 cloves garlic, minced
1 tablespoon chopped fresh sage, optional
1 small bunch kale, center ribs and stems removed, leaves chopped
Kosher salt
freshly ground pepper
¼ cup all-purpose flour
3 cups low-sodium chicken broth
2 T. sherry
½ small butternut squash, peeled, cut into 1/2-inch pieces (about 1½ cups)
½ of a roasted chicken- meat removed from bones, torn onto bite sized pieces – about 1½ cups of meat
1 sheet frozen puff pastry, thawed
1 large egg
Place a rack in upper third of oven; preheat to 425°. Heat oil in a deep 12-inch cast-iron or other heavy ovenproof skillet over medium-high heat. Add onions; cook, stirring occasionally, until beginning to brown, about 4 minutes. Reduce heat to medium-low. Add parsnips, garlic and sage to skillet and cook, stirring occasionally, until garlic begins to brown, about 2 minutes. Add kale and season with salt and pepper. Cook, tossing often, until wilted, about 4 minutes. Sprinkle flour over. Cook, stirring constantly, for 4 minutes. Stir in broth, 1/2-cupful at a time, then add squash. Bring to a boil, reduce heat, and simmer until squash is just softened and broth is thickened, 8-10 minutes. Add chicken to skillet, stir, and season with salt and pepper. Unfold pastry and smooth any creases; place over skillet, allowing corners to hang over sides. Whisk egg and 1 teaspoon water in a small bowl. Brush pastry with egg wash; cut four 1-inch slits in top to vent. Bake pot pie until pastry is beginning to brown, 15-20 minutes. Reduce oven temperature to 375° and bake until pastry is deep golden brown and crisp, 15-20 minutes longer. Let cool for 10 minutes before serving.
Dedicated with loving memory of Amy. Miss you forever, my friend.
Coconut Cracker Snacks

If your pantry picks are limited, there are still desserts and snacks you can make. This one is made with saltine crackers and just a few other ingredients.
If you are craving something sweet and are low on ingredients, these are really a fun snack to make. Super easy, they are also a great recipe for kids to make.
The base is saltine crackers topped with butter, brown sugar, coconut and cinnamon. They are ready in just a few minutes. Sweet and just a little salty, too. You could use chopped nuts in place of the coconut if you prefer. If you don’t have saltines, you can try them with a different cracker. One advantage of the saltines in that they are square and fit together nicely on the baking sheet. Try to use another square cracker, if you can.
They are super crunchy, too. Like a brittle, but with a cracker base. Great served alone, or with ice cream.
Store in a cool, dry place to keep them crunchy.
Coconut Cracker Snacks
36 saltine crackers
1/3 c. butter
1/3 c. brown sugar
1 c. coconut
1 t. cinnamon
Cover a baking sheet with foil. Place the crackers, touching, side by side in a single layer. Melt butter in microwave, then add sugar and heat together 1 minute on high. Stir butter and sugar mixture together until smooth and drizzle this over the crackers. Combine coconut and cinnamon and then sprinkle the coconut over the crackers. Bake in a 350 degree oven for 8-10 minutes, or until coconut is toasted. Cool on baking sheet on a cooling rack. Crackers will easily break apart from each other. Makes 36.
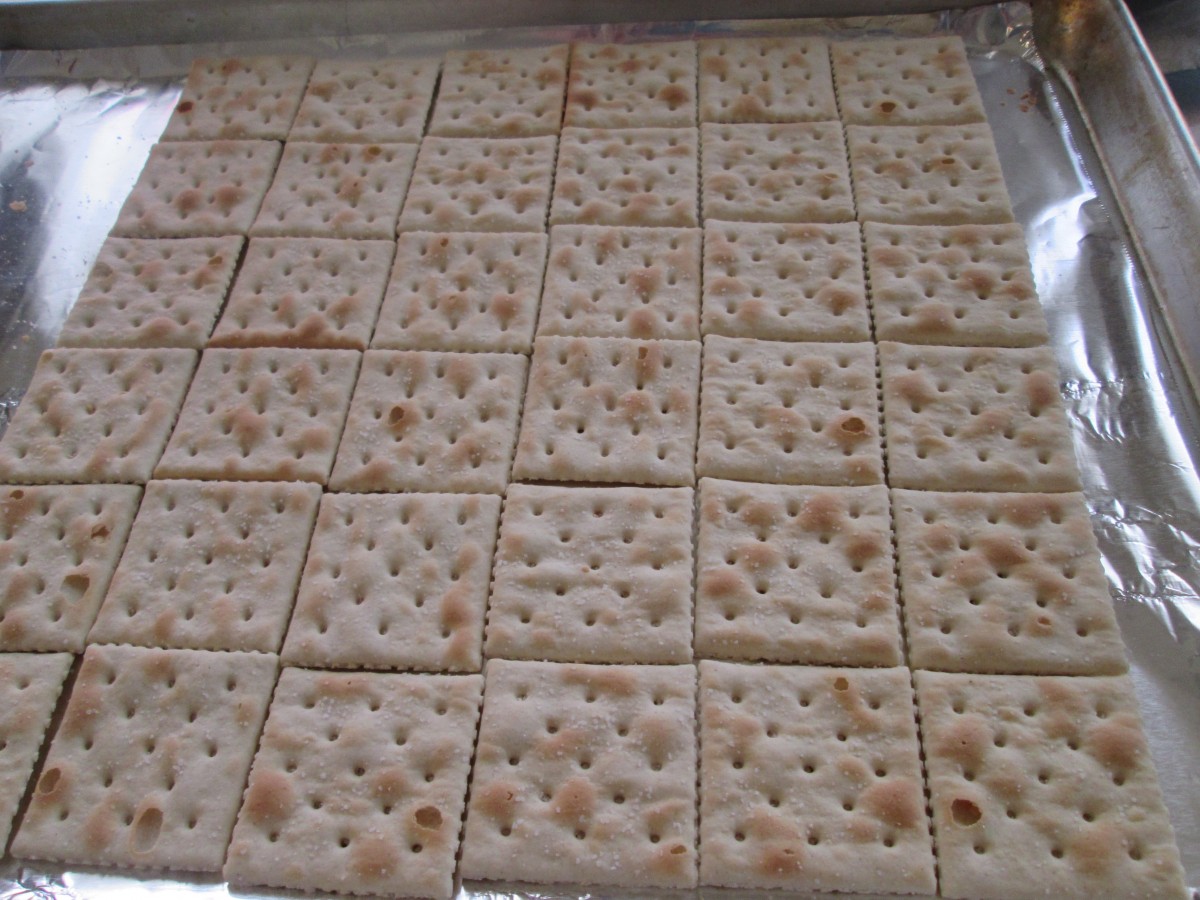
Arrange crackers on a baking sheet
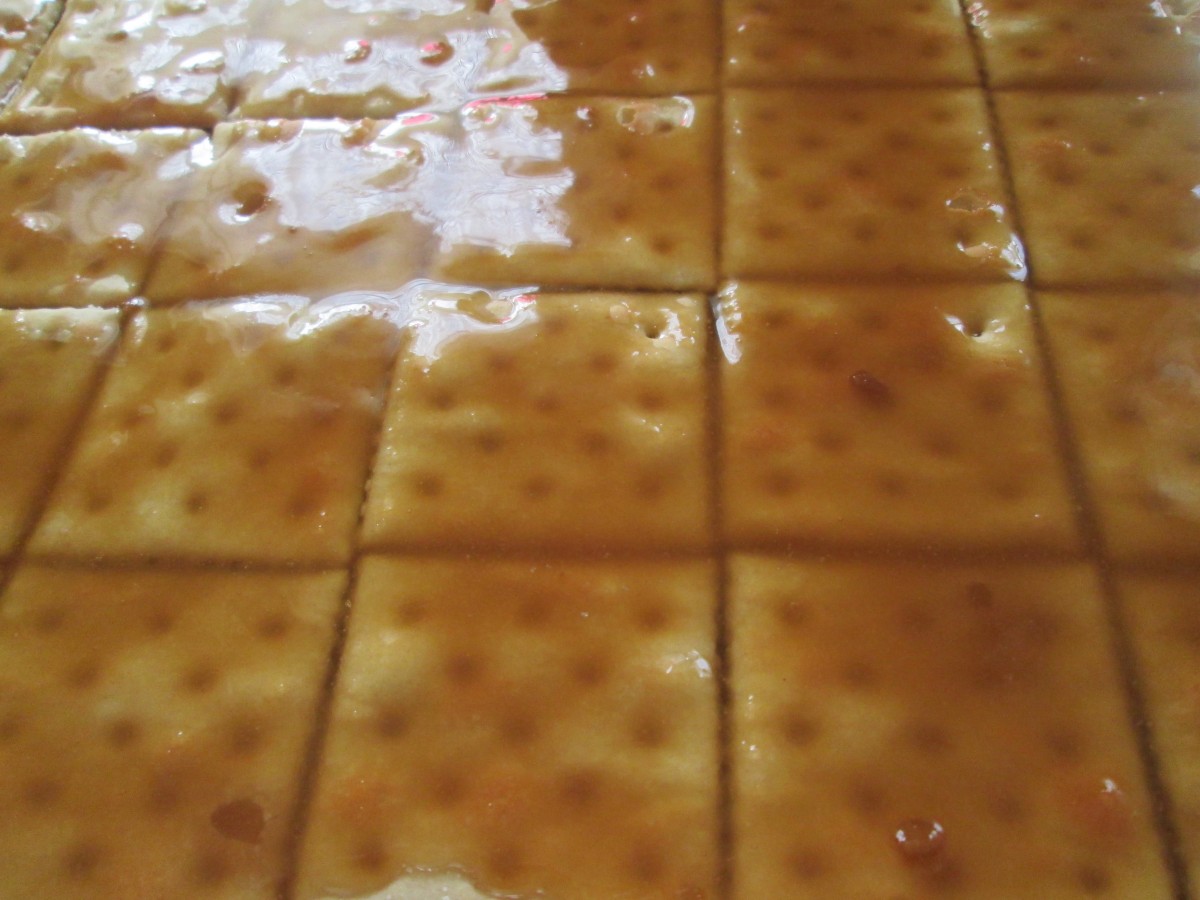
Drizzle crackers with the butter/brown sugar mixture
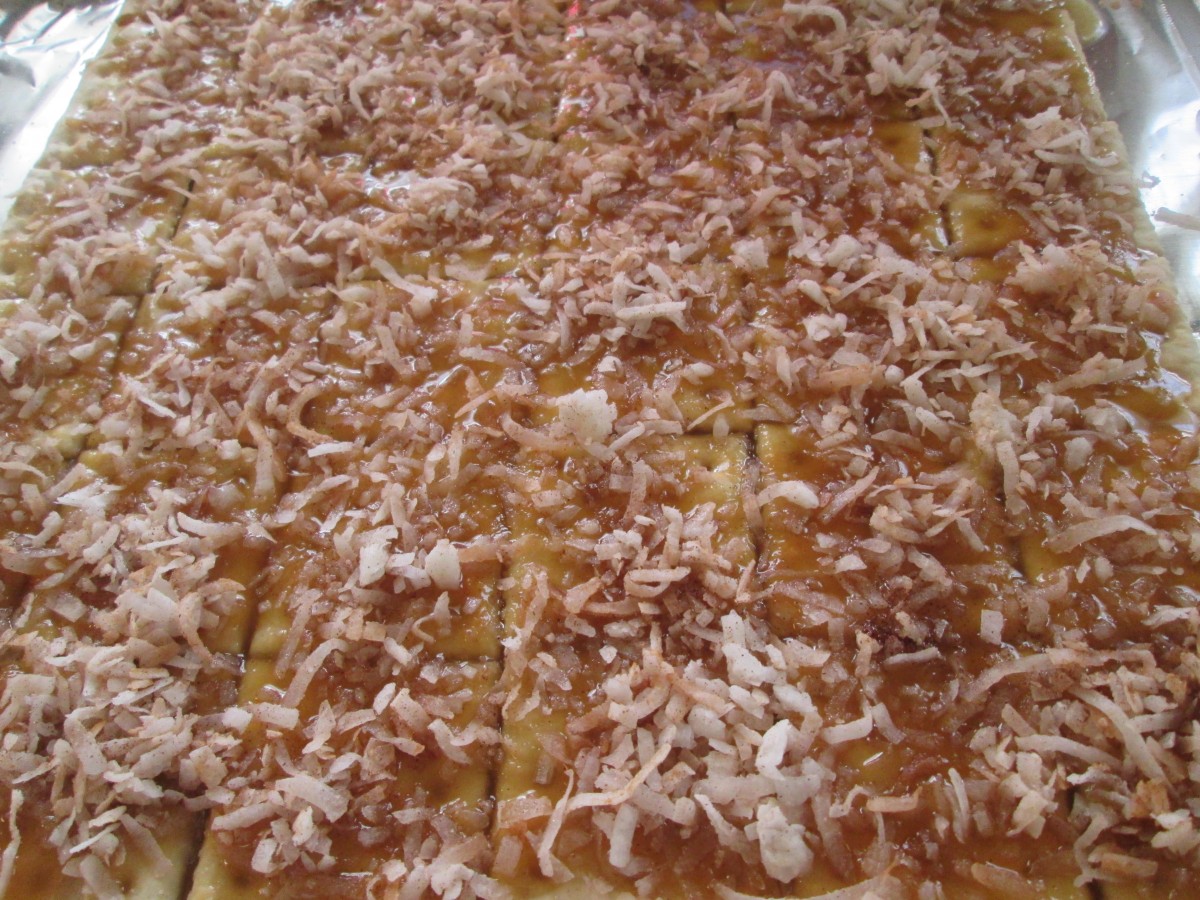
Sprinkle on the coconut and bake until coconut is toasted
Recipes Using Hard-Cooked Eggs

If you have hard cooked eggs leftover from Easter, you might want some recipes to use them up. I have put together a few of my favorites recipes, including a cookie recipe!!! Enjoy.
Scotch Eggs
6 hard-cooked eggs, well chilled
1 pound breakfast sausage
1/2 cup flour
2 eggs, beaten
3/4 cup fine bread crumbs
Vegetable oil for frying
Peel eggs and set aside. Divide sausage into 6 portions. Roll each egg in flour and with hands press a portion of the sausage around each egg. If the sausage sticks to your hands, dip your hands in a little water to make pressing the sausage easier. Dip sausage-wrapped eggs into beaten eggs and roll in bread crumbs. Heat vegetable oil to 350 degrees. Cook each egg in oil about 4-5 minutes or until sausage is cooked and browned. Drain on paper toweling. Serve warm. Makes 6.
Mom’s Macaroni Salad
1 lb. uncooked pasta, shells are preferred
Salt and pepper
Mayonnaise, about 1 cup
Salad dressing, like Spin Blend or Miracle Whip, about ½ cup
3-4 ribs celery, sliced thin
4-5 green onions, trimmed and sliced thin
8-12 hard-cooked eggs, cooled and peeled
Cook pasta according to package directions, but do not overcook. Rinse with cold water and drain well. Place drained pasta in a large bowl and sprinkle with salt and pepper to taste. Add dressings and vegetables and stir until well mixed. You may want to add more dressing to suit your taste. Chop eggs and stir into salad. Adjust seasonings if needed and chill before serving. Serves 8-10.
Polish Butter Cookies
This cookie dough includes cooked eggs yolks. I wish I remember where I got the recipe. It is a Polish recipe, at least according to the name, but my Mom never heard of it. So, wherever the source, it is a good cookie, with nice flavor and texture.
Dough:
1 c. butter
3/4 c. sugar
5 hard-cooked egg yolks, pressed through a fine sieve
1 t. vanilla
2 1/4 c. flour
1 t. salt
Glaze:
1 egg white
1 t. water
1/3 c. sugar
1/2-1 t. cinnamon
Beat together butter and sugar until light and fluffy. Beat in egg yolks and vanilla. Stir in flour and salt. Wrap dough and chill for at least an hour. Roll out 1/4 of the dough at a time into scant 1/4 -inch thickness. This dough is soft, so I use a pastry cloth to prevent sticking. Use extra flour sparingly and use a marble rolling pin or one with a cloth sleeve. I also keep extra dough chilled until ready to roll. Cut out with cookie cutters and place on greased baking sheet. Mix egg white with water and brush on cookies. Combine sugar and cinnamon and sprinkle on cookies. Bake in a preheated 350-degree oven for about 10-12 minutes. Cookies will be golden. Makes around 5 dozen, depending on the size of the cutters.
Wilted Kale Salad with Bacon
2-3 slices thick sliced bacon, chopped
1 onion, sliced
4-5 cups kale, washed and torn into pieces
2 T. cider vinegar
1 T. maple syrup
dash of hot sauce
2 hard- cooked eggs, peeled and cubed
In skillet cook bacon until crispy. Remove bacon from pan and set aside. Remove some of the fat from the pan- leaving about 2 tablespoonfuls. Add onion and cook until golden. Return bacon to pan and add the kale. Cook over medium-high heat, stirring often, until kale in wilted. I don’t mind my kale on the firm side-cook it longer if you like it more tender. Drizzle in the vinegar, maple syrup and hot sauce and stir to coat evenly. Place on a serving dish and top with the eggs. Enjoy!!
Curried Egg Sandwiches
These tiny sandwiches are perfect for a tea party.
3 T. mayonnaise
½ t. curry powder, or to taste
½ t. salt
¼ t. fresh ground pepper
4 hard-cooked eggs
6 T. butter, softened
¼ c. chutney, chopped, or sweet pickle relish
16 very thin slices whole wheat or pumpernickel bread, crusts trimmed
Combine mayo with seasonings. chop eggs and add to mayo mixture, stirring to blend. In small bowl combine butter with chutney. Spread a slice of bread with some of the butter mixture then top off with some of the egg mixture. Top with another slice of bread that has also been spread with the butter mixture. Cut sandwich into quarters, diagonally, making 4 sandwiches. Repeat with remaining ingredients. Makes 32 sandwiches.
Cornbread Salad
4 c. crumbled cornbread or corn muffins
1 c. shredded mild cheese
1 sweet red pepper seeded and diced
1 c. diced celery
½ c. diced green onion
4 hard-cooked eggs, peeled and chopped
¼ c. chopped parsley
1-1 ½ c. mayonnaise or salad dressing, sometimes I use potato salad dressing or even slaw dressing
2 c. diced fresh tomatoes
1 c. toasted pecans
paprika for sprinkling on the top, optional
Place cornbread and next 6 ingredients in a medium bowl. Stir in dressing until desired moistness is achieved. Chill and stir in tomato and nut just before serving. Sprinkle with paprika if you like. Serves 6.
Note: You can add whole kernel corn also if you like.
Mom’s Mustard Potato Salad
4 lbs. potatoes- I used Klondike Rose and I did not peel them
4 hard cooked eggs, peeled and chopped
1 sweet pepper, seeded and chopped, optional
1 c. mayo- maybe a little less
1/4 c. prepared mustard- I like a grainy brown mustard
salt and pepper to taste
dash of hot sauce
Bake whole potatoes until tender and allow to cool. Cube potatoes into large bowl and combine with remaining ingredients. Chill until ready to serve. Serves 8.
Deviled Eggs
12 hard cooked eggs, peeled and cut in half
¼ c. mayonnaise
1 T. mustard – I like Dijon or horseradish mustard- use what you like
Salt and pepper to taste
Pinch of cumin
Pinch of paprika
Pinch of garlic powder
Snipped chives, optional
Carefully scoop out the yolks and place them in a bowl. Set whites on a plate for now. Use a fork to mash up the yolks, adding the remaining ingredients, except the chives. Taste and adjust seasonings. I use a small cookie scoop to place the yolk mixture in each of the egg whites. You can also use a piping bag. Top with a sprinkle of chives, if you like. Chill until ready to serve. Makes 24.
Note: I have made deviled eggs with pickled eggs for extra flavor and color.
Pickled Eggs and Pickles with Eggs
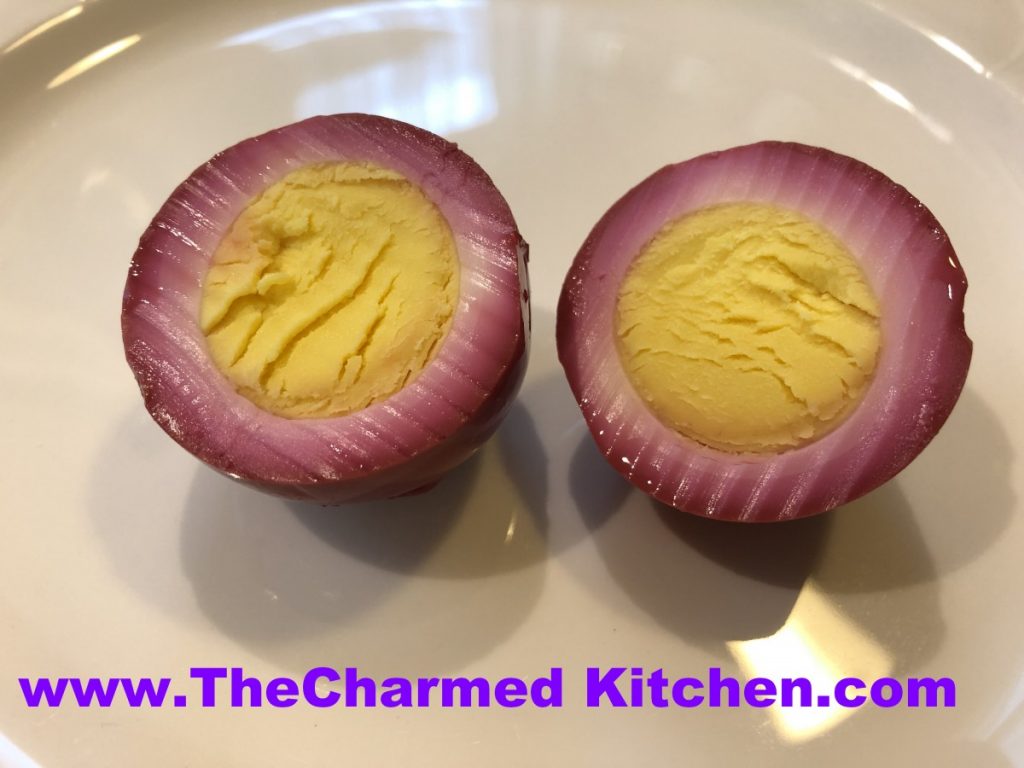
If you dyed eggs for Easter, you might be looking for ways to use hard cooked eggs. Deviled eggs are great, and I love egg salad, but you have more options.
Here are a couple of ways you might want to enjoy some of your eggs. The first recipe is for classic pickled eggs. The second recipe came from my friend Jimmy. It is a type of fresh relish made with beets, pickles and hard cooked eggs.
Pickled eggs are fun and easy to make. They are traditionally pickled with beet juice, so they turn a pretty pink color, too. The recipe can be made without beet juice, but what fun is that? Actually, you can leave out the beets, just use plain water.
Once the eggs are ready, I store them in a jar in the fridge. If you add beets to the jar, they will “pickle” along with the eggs. Pickled eggs will keep for a couple of weeks in the fridge.
To get beet “juice” you just cook peeled beets in water until tender. The water turns bright red from the beets. You can skip the cooking beets parts by using canned beets, if you prefer.
Pickled Eggs
1 c. beet juice (cooking liquid)
1 c. apple cider vinegar
1 c. sugar- you can use less
1 onion, sliced thin, optional
1 T. pickling spice
2 t. salt
6-12 hard cooked eggs, peeled
In saucepan, heat all ingredients together, except the eggs. Bring to a simmer and cook 5 minutes on low heat. Cool mixture down. Place eggs in a jar or other container with a tight fitting lid. Pour over the beet juice mixture. Cover jar and place in the fridge. Wait one day before eating. Eggs will keep a few weeks.
Eggs with Pickles and Beets
This recipe was given to my friend Jimmy, by an Ukranian co-worker of his. I don’t have an exact recipe. Jimmy said she took pickles, eggs and beets, all diced fine, and layered them. When I asked him what kind of pickles- sour or sweet- he said both.
It is served as a side with meals, or with bread or crackers as an appetizer. I played around with the ingredients and really loved the combination. I used both kinds of pickles and used pickled beets as well. You could use cooked, diced beets, either fresh or canned.
Pickles with Eggs and Beets
½ c. diced sweet pickles
½ c. diced dill pickles
½ c. diced cooked or pickled beets- if you made pickled eggs, you can use those beets
3 hard cooked eggs, peeled and diced
Pepper to taste
Combine all ingredients in a bowl- or layer in a glass dish. Chill before serving. Serve with crusty bread or crackers, or just as a side dish with meals. Makes 2 cups.

Goldenrod
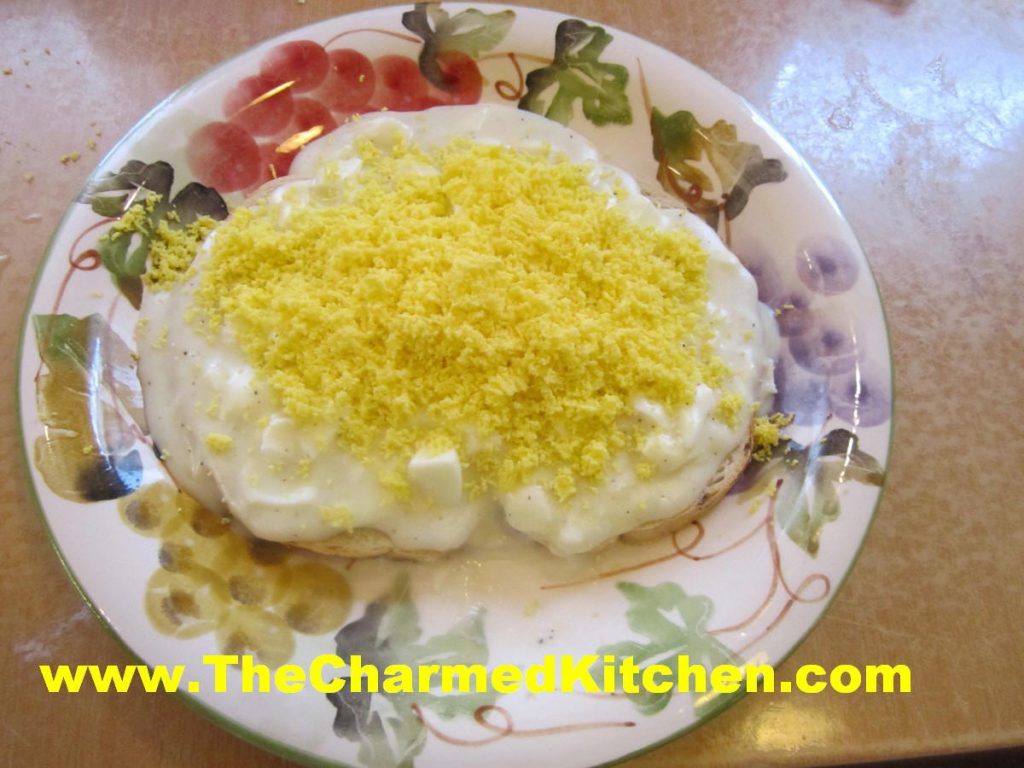
If you are looking for a recipe using hard-cooked eggs, you might want to make some Goldenrod. It is a simple dish, but very pretty and quite tasty.
You make a white sauce, then add chopped up egg whites. Season with salt and pepper. When ready to serve, pour the hot egg white mixture over toast and then put the egg yolks in a small strainer or sieve and press them through the strainer over the egg whites.
The yolks turn into a powder and the end result looks quite pretty. I like goldenrod served over English muffins, but you can serve it over toasted bread, biscuits or bagels.
This is a very sentimental dish for me. In my family, it was a tradition every year, after Easter. Goldenrod was a way of using up some of the eggs we had decorated. My Busha, (Polish grandmother) made it, as did my mother. I remember them both when I make goldenrod.
Goldenrod
4-6 hard cooked eggs
2 T. flour
2 T. butter
1-1 1/2 c. milk
salt and pepper to taste
2-4 slices bread, toasted
Peel eggs and separate whites from yolks. Chop egg whites and set aside. In saucepan cook flour and butter together until smooth. Stir in milk and cook until thickened and bubbly. Be careful not to burn the sauce. Season to taste and add reserved egg whites, heating through. Arrange toast on serving dishes and cover with the sauce. Place reserves egg yolks in a fine sieve and press through over sauce, dusting as evenly as possible. Serves 2-4.
Recipes for Leftover Ham

Of course, ham makes a great sandwich, but there are a lot more things you can do with it.
If you enjoyed a ham over the holidays, you may find yourself with leftovers. Here are some recipes for all that ham.
Ham is versatile and can be used in all sorts of dishes. Added to soups, stir fry, breads, salads and omelets, it adds a wonderful smoky flavor to every dish. And of course, the ham bone can flavor a whole pot of soup.
So here are some recipes you might want to try.
Ham and Asparagus Quiche
1 (9-inch) unbaked pie crust
1½ c. shredded cheese – I used Havarti
4 t. flour
1½ c. diced cooked ham
12 oz. asparagus, trimmed, cut in ½- inch pieces and steamed 3 minutes
4 eggs
1 c. milk or half and half
2 T. fresh chopped parsley or 2 teaspoons dried
¼ t. salt
1T. Dijon mustard
1 t. hot sauce
Toss cheese with flour in a bowl and place in pie crust. Sprinkle the ham and asparagus over the cheese and set aside. Combine remaining ingredients in a small bowl beating well to combine. Pour over the ham and asparagus mixture and bake in a preheated 400-degree oven for 15 minutes. Turn down heat to 350-degrees and bake until knife inserted off-center comes out clean, about 30 minutes more. Makes 1.
Note: This quiche freezes well. After adding the fillings just wrap in heavy foil and freeze solid until ready to bake. When ready to bake unwrap and allow to sit at room temperature for 30-60 minutes. Bake as with the fresh version, but add another 10-15 minutes to the baking time. If you don’t want to freeze the pie pan, you can line the pie pan with foil before you add the crust. Once it is frozen you can remove the frozen quiche from the pie pan and wrap, returning to freezer. When ready to use unwrap and put the quiche back in the pie pan before baking. Or, if you are planning on freezing it, you can use a foil pie pan.
Ham and Swiss Calzones
4 c. flour
2 c. rye flour
2 T. sugar
2 t. salt
2 packages quick-rising yeast
2⅓ c. hot water
2 T. oil
2 lb. thin sliced ham- more or less
1 lb. sliced Swiss cheese
Thousand island dressing- recipe follows
1 egg , beaten
Set aside 2 cups of the all-purpose flour. Combine remaining flour with the other dry ingredients in a medium bowl. Stir in water and oil and gradually stir in enough flour to make a soft dough. Turn onto lightly floured surface and knead until dough is smooth and elastic, about 5 minutes. Cover dough and let rest 20 minutes. Divide dough into 12 pieces and roll one piece into a 8 -inch circle. In the middle of the dough place 1 1/2 ounces of the Swiss cheese, a spoonful of the dressing and 2-3 ounces of the ham. Brush the edge of the dough with water. Fold over the dough in half and press the edges to seal. Brush the edge again with water and roll the edge over again. It will give you a prettier look and seal the calzone better. Repeat with remaining dough and fillings. Place calzones on greased baking sheets- or on a baking sheet with a silicone liner or parchment paper liner. You will end up with 12 calzones in all. Only put 4 on one baking sheet. Cover and let rest 15 minutes while preheating the oven to 400 degrees. Before placing calzones in the oven brush with beaten egg and make a few slashes with a knife to help steam to escape while baking. I put 2 baking sheets in the oven at the same time and switch them halfway through baking. Bake in a preheated 400-degree for 20-25 minutes or until golden brown. If baking 2 at once switch them after 10 minutes or so. Cool slightly before eating. Serve warm and refrigerate leftovers. Makes 12.
If you want to use regular yeast use warm, rather than hot water. Also, allow a little more time for the dough to rise the first time, about 40 minutes. Everything else will work the same.
Thousand Island Dressing
Combine equal parts of ketchup, mayo and sweet pickle relish. You likely need at least a cup for this recipe. I made extra so the sandwiches could be dipped in extra dressing, if desired.
Tortellini and Ham Salad
¼ c. olive oil
¼ c. red wine vinegar
1 t. fresh rosemary
1 clove garlic, minced
1 t. sugar, optional
1/2 t. red pepper flakes
12 oz. mushroom or cheese tortellini, cooked
1½ c. diced ham or turkey ham
1 red pepper, seeded and diced
1 c. sauteed, sliced mushrooms, cooled
4 green onions, chopped
Parmesan cheese, optional
Combine first 6 ingredients in large bowl and whisk to blend well. Add next 5 ingredients and toss to coat. Add salt and pepper to taste. Chill at least 30 minutes before serving. Serve with Parmesan cheese on the side. Serves 4.
Corn and Ham Saute
1 T. oil
1 small onion, diced
1 c. diced ham
4 c. corn- fresh or frozen
salt and fresh ground pepper to taste
In pan cook onion in oil until tender. Add the ham and cook a few minutes longer. Add corn and continue cooking until corn is heated through. Season to taste and serve. Serves 3-4.
Ham and Swiss Bread Florentine
3 ¼ c. flour
1 T. sugar
1 t. salt
1 package quick-rising yeast
1 c. hot water
1 T. oil
¼ c. Dijon mustard
6-8 oz. sliced ham
4 oz. sliced Swiss cheese
1 large bunch fresh spinach, rinsed and steamed a few minutes to wilt, drained well.
Set aside 1 cup of the flour. Combine remaining flour with the other dry ingredients in a medium bowl. Stir in water and oil and gradually stir in enough flour to make a soft dough. Turn onto lightly floured surface and knead until dough is smooth and elastic, about 5 minutes. Roll dough into a rectangle about 16 x 8. Spread mustard down center middle of dough. Top with meat slices, cheese and spinach. Cut one-inch wide strips of dough from filling to edge on both sides. It will sort of look like fringe. Alternating sides, fold strips up and over the filling at an angle. Carefully lift loaf onto greased baking sheet and place at an angle. Cover with a towel and place sheet on top of a roasting pan half-filled with simmering water for 15 minutes. Bake in a preheated 400-degree for 20-25 minutes or until golden brown. Cool slightly before slicing. Serve warm and refrigerate leftovers.
Note: The variations for this bread are almost endless. Some favorite combinations are Corned beef and Swiss with sauerkraut and thousand island dressing., roast beef and cheddar, chicken, broccoli and cheese, Spinach with ricotta or feta and onions, pizza, assorted fillings. You get the idea. Use your imagination and have fun. Just be careful not to overfill, or the bread will be hard to move, use fillings that aren’t too runny and always use cold fillings.
If you want to use regular yeast use warm, rather than hot water. Also, don’t let dough rise over boiling water. After kneading cover dough and let rise 45 minutes. Punch down and assemble as in original recipe. Cover with a towel and let rise until dough looks puffy, about 40 minutes. Bake as directed above. These breads can also be frozen.
Ham and Corn Chowder
I was looking for a quick soup for dinner the other night. Inspiration hit when I came across some corn in the freezer. I had blanched and frozen it during the summer at the peak of corn season. I had a little ham in the fridge I was wanting to use up and the pairing was a natural. I started by sauteing an onion in a little butter. Once the onion was tender I added a peeled and diced potato, the corn, the diced ham and about 2 or 3 cups of chicken stock. I covered the soup and let it simmer until the potato was tender, about 15 minutes. I then took 4 tablespoons of flour and put it in a jar. I added a cup of milk, put on the lid and shook it until the flour was well mixed in. I poured the flour mixture into the pot and brought the mixture up to a gentle boil. I stirred it as it thickened up. I cooked it for a few minutes and adjusted the seasonings adding salt, fresh ground pepper and a dash of hot sauce. I also added some chopped parsley. The end result was a wonderful chowder that took almost no time at all. Sometimes the best dishes come from just looking at what we already have. In this case some frozen veggies and a bit of leftover ham.
Ham and Veggie Stir Fry
2 T. oil
1 medium onion, sliced
1 medium carrot, peeled and sliced thinly
1 c. sliced cabbage
1 clove garlic, peeled and chopped
1 sweet red pepper, seeded and cut into thin strips
2 c. sliced bok choy
1 1/2 c. cubed cooked ham
2 green onions, trimmed and sliced
1/2 c. whole almonds
fresh grated ginger- or powdered, to taste
soy sauce to taste
dash of hot sauce
Heat oil in wok or skillet and cook onion and carrots for 3 minutes. Add cabbage add garlic and stir fry 2-3 minutes longer. Toss in the pepper and bok choy and cook 3 more minutes. Add ham, green onions and almonds along with seasonings and soy sauce and cook until ham is heated through. Serve over hot cooked rice or pasta. Serves 3-4.
Ham with Brussels Sprouts
I started by trimming the Brussels sprouts and cutting small ones in half. I quartered the larger ones. I heated a little butter in a skillet and added 3 cups of prepared Brussels sprouts. I cooked them until they were getting a little color on them. I think their flavor is enhanced by sauteing. I then added 1 1/2 cups of diced cooked ham and 1/2 cup of water. The water helps steam the sprouts so they are tender. I like Brussels sprouts tender. You can skip the water, if you like. The water evaporates quickly and as soon as the ham starts to brown a little the dish was pretty much done. I added a little freshly ground pepper- but it didn’t need salt. I also served it with fresh grated Romano cheese. You could serve it as is or toss in some cooked pasta with the ham. Simple and really good. You might even get a Brussels sprout hater to give this one a try.
Swedish Yellow Split Pea Soup
1 lb. yellow split peas, rinsed
2 qts. Boiling water or stock
1 bay leaf
2 c. chopped onion
2 c. sliced carrots
1 tsp. dried marjoram
1/4 t. ginger
dash nutmeg
1/2 t. pepper
1 T. salt, or to taste
2 cups diced ham
Note: you can use 1 teaspoon liquid smoke if omitting meat.
Combine peas, boiling water or stock and bay leaf and simmer, covered, about an hour, stirring occasionally. Remove bay leaf. Add remaining ingredients, except diced meat and salt, and cook, covered, over low heat for about 30 minutes. Add meat and cook 1 hour more, stirring occasionally. Season to taste. Serve with a pumpernickel bread. Freezes well. Serves 6-8.
Ham and Cheese Strata
12 slices bread, crusts removed if desired – I used rye
6 slices cheese – I used Swiss
1/4 c. diced green onions
1/2 c. chopped sweet pepper
2 c. diced cooked ham or turkey ham
3 eggs
2 c. milk
1 t. salt
1/8 t. pepper
Place six slices of bread on bottom of 2-quart oblong casserole. Top each slice of bread with a slice of cheese. Top cheese with the onions, peppers and ham. Top with remaining bread and cut each “sandwich” in half diagonally. Combine remaining ingredients and pour over sandwiches. Cover dish and let stand several hours or overnight in the fridge. Bake uncovered in a 350-degree oven for 40-45 minutes, or until puffed and set. Serves 6.
Ham and Swiss Quiche
1 (9-inch) unbaked pie crust
1½ c. shredded Swiss or Gruyere Cheese
4 t. flour
1 c. diced cooked ham or turkey ham
3 eggs
1 c. milk or half-half or evaporated milk
2 T. fresh chopped parsley or 2 teaspoons dried
¼ t. salt
¼ t. dry mustard
Dash of hot sauce
Toss cheese with flour in a bowl and place in pie crust. Sprinkle the ham over the cheese and set aside. Combine remaining ingredients in a small bowl beating well to combine. Pour over the ham and cheese mixture and bake in a preheated 400-degree oven for 15 minutes. Turn down heat to 350-degrees and bake until knife inserted off-center comes out clean, about 30 minutes more. Makes 1
Note: This quiche freezes well. After adding the fillings just wrap in heavy foil and freeze solid until ready to bake. When ready to bake unwrap and allow to sit at room temperature for 30-60 minutes. Bake as with the fresh version, but add another 10-15 minutes to the baking time. If you don’t want to freeze the pie pan, you can line the pie pan with foil before you add the crust. Once it is frozen you can remove the frozen quiche from the pie pan and wrap, returning to freezer. When ready to use unwrap and put the quiche back in the pie pan before baking. You can also use a foil pie pan.
Spring Lemon Tart

I wasn’t sure what to call this dessert. It started out as one thing, but sort of ended up somewhere else. I finally decided to just call it a tart. This is a perfect example of using what you have on hand. I was so pleased with the result.
I was leaning towards making a cheesecake. I already had cookie crumbs, I could use for the crust. Then, I discovered I only had one box of cream cheese. Not enough for a cheesecake.
While searching my fridge for cream cheese, I found a couple of lemons.
I suppose I could have made a lemon pie, but I decided to just make something up with what I had, including the cream cheese.
What I ended up with is a sweet/tart lemon dessert. Really nice, actually.
Before I get to the actual recipe, let me talk about the lemons, and including fresh lemon juice in recipe directions.
Recipes will often list the “juice of a lemon” in the ingredients. There is about the same amount of lemon juice in all lemons, so that a little difference, one way or the other, is no big deal. The amount is anywhere from 2-3 tablespoons of juice in a lemon. You might get 4 tablespoons, if the lemon is really big. I have used that phrase in recipes myself.
Sometimes, however, you have to recognize when you have lemons that aren’t “average”.
The two lemons I had on hand were big, really big. When I juiced them, I ended up with 2/3 of a cup of lemon juice. So, in this recipe I used the actual measurement of the juice, rather than saying, “the juice of 2 lemons.” Three or four average sized lemons should give you 2/3 cup of juice.
So here is the recipe for my lemon tart, the happy end result of using what I had, and making it work.
Spring Lemon Tart
Crust:
1½ c. crushed vanilla cookies
4 T. melted butter
Filling:
1 (8oz.) container cream cheese, softened
½ c. sugar
2/3 c. lemon juice
Zest of two lemons
3 eggs
¼ c. cornstarch
Combine crust ingredients in medium bowl. Press crumb mixture into a 9 –inch springform or tart pan. Bake in a preheated 350-degree oven for 10 minutes. While the crust is baking, make the filling. In mixing bowl combine the cream cheese with the sugar and beat until fluffy. Add the lemon juice and zest and beat well. Add the eggs and cornstarch and beat until smooth. Pour filling over the baked crust and return to oven. Bake for 35 minutes, or until golden on top. Center will be soft, but firms as the tart cools. Cool, then refrigerate until ready to serve. You can dust with powdered sugar, if you like.


