Homemade Liqueurs from Extracts
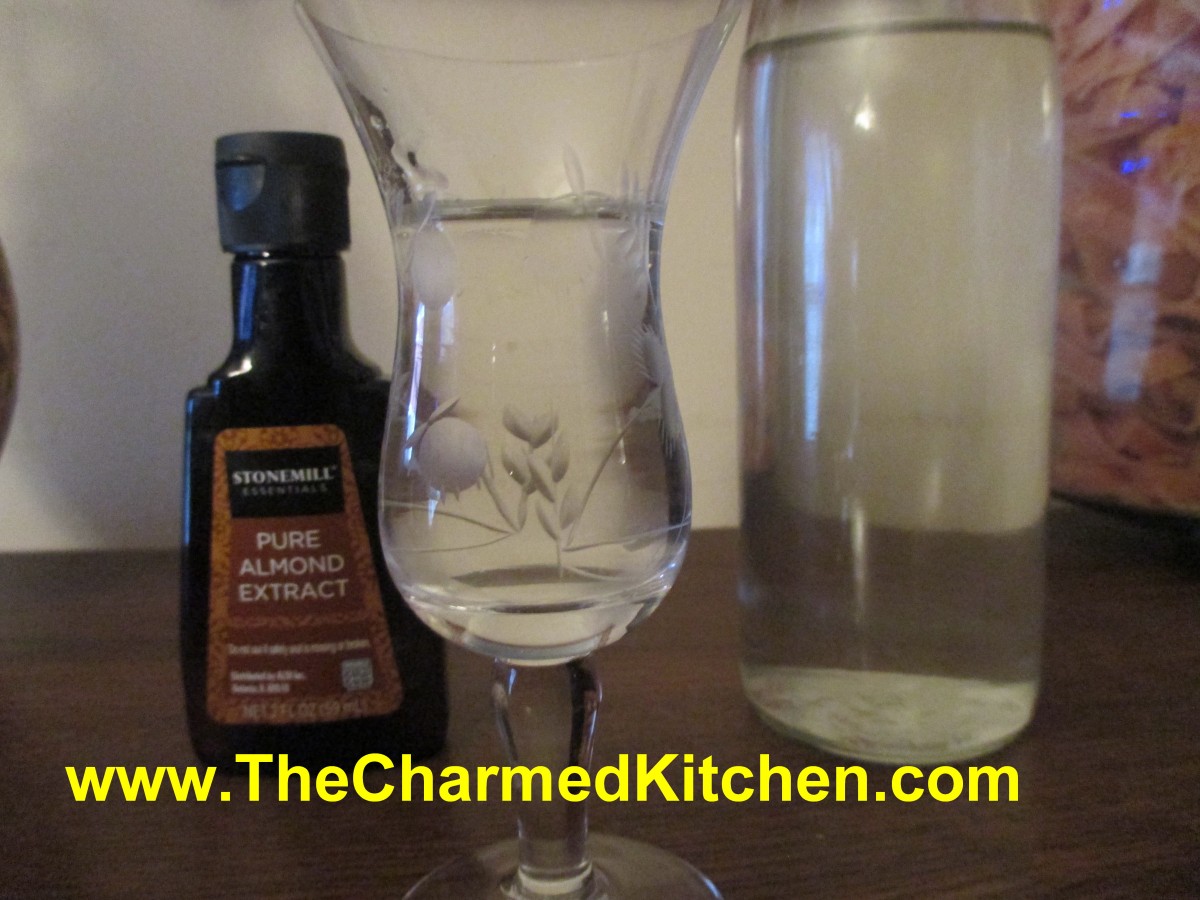
Homemade Almond Liqueur
Since I posted the Lemon liqueur recipe yesterday, I have gotten a question about using extracts in homemade liqueurs. Here is some information on how to do just that.
I enjoy making liqueurs with seasonal fruits, but when fruit is in short supply, you can also use extracts.
Pure extracts will give your liqueur a nice, true flavor, but no color. I have made almond, hazelnut, walnut and peppermint. You can use whatever flavors you think you might like.
One advantage is that liqueurs made from extracts are ready to drink in less than a week. Fruit based liqueurs often take weeks and weeks to fully develop.
Another advantage is that you can adjust the sweetness to your own taste as well. I have included the recipes for almond and peppermint, but the recipe is the same for any extract flavor you might want to make.
You can also add extracts to fruit based liqueurs. I make a cherry-vanilla liqueur that is amazing. Just be careful on the amounts. Pure extracts are loaded with flavor. Use a light hand, then add more later, if needed.
Almond Liqueur
1 t. pure almond extract
3 c. vodka
1 c. simple syrup
Combine all ingredients and let mature several days. Makes 4 cups.
Peppermint Liqueur
1 t. pure peppermint extract
3 c. vodka
1 c. simple syrup
Combine all ingredients and let mature several days. Makes 4 cups.
Sweetening- Simple syrup is made from 1 cup of sugar and ½ cup of water. Bring to a boil, then cool. You will have 1 cup of syrup. You can sweeten your liqueur with honey, if you prefer. Watch when you substitute honey for sugar, as it is sweeter and stronger flavored. Better to use orange or clover honey. Add to suit your taste.
Lemon Liqueur
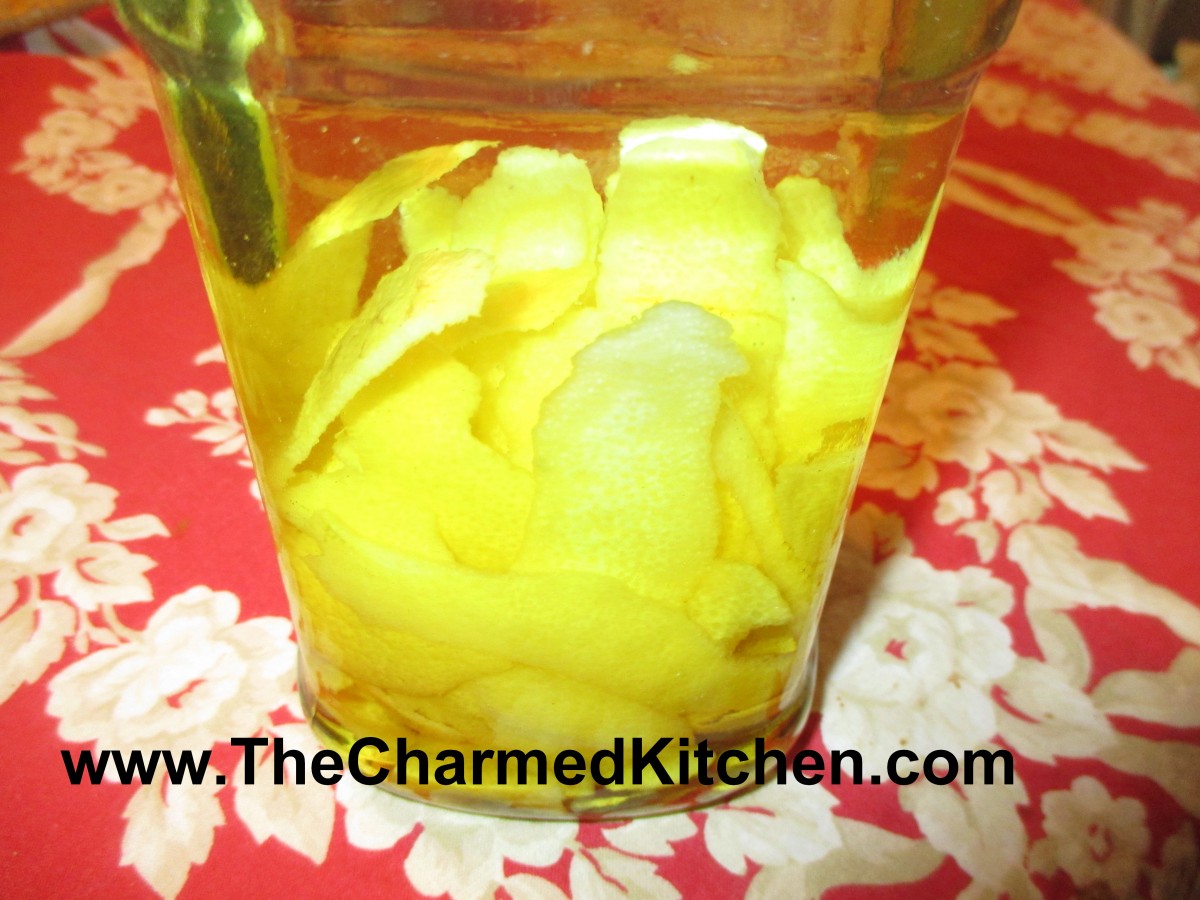
Lemon Peels in Vodka
I make homemade liqueurs throughout the year, using seasonal fruits. Winter is great for citrus, so it is lemon liqueur time!!! All you need to get started is a jar, some vodka and lemons. Since you are using the peels, best to use organic lemons, if you can find them.
Use a vegetable peeler to get just the yellow part of the lemon peel. A little of the white is OK, but too much will make your liqueur bitter. Combine the peels with the vodka in a jar with a tight-fitting lid. Now it’s just a waiting game.
Once the peels have steeped long enough to flavor the vodka, just sweeten, if you like, and let the liqueur mature a little longer. Well worth the wait. You can use the same recipe to make lime liqueur, too. You can also use half lemon and half lime peels in the same batch for lemon/lime liqueur. You can also add other flavors, like mint, to your mixture.
Homemade Lemon Liqueur
8 lemons
3 c. vodka
1 c. sugar syrup
Peel lemons using a vegetable peeler. Use only the yellow part of the peel. If you get larger pieces of the white pith, scrape off and discard. Place peels in jar with the vodka. Cover and place in a cupboard.
Steep peels 2-3 weeks. Strain and filter and add sugar syrup. Mature 1-2 weeks.
Note: you can also make lime liqueur with the peels of 8 limes, or use 4 lemons and 4 limes for a lemon-lime liqueur.
Variation: You can also use rum as the base for a great daiquiri!
Note: To make citrus flavors without the peels substitute 2 t. pure extracts for the fruit and add sugar syrup right away. Just steep a few days to mature a little.
Also, lemon or lime are terrific unsweetened, to add to other cocktails. You can make some without the added simple syrup.
Sugar Syrup: For the sugar syrup, combine 1 cup of sugar with 1/2 cup of water. Boil, then cool down before adding to your liqueur. Makes 1 cup.
Sage Advice

Fresh Sage
Sage deserves better. It is a wonderful herb, but I think it doesn’t get used enough. Like rosemary, sage has strong flavor, and can overpower a dish if used too liberally. The secret is to use a light hand with sage. Dried sage has a more concentrated flavor than fresh. If you haven’t cooked with sage lately, maybe you should.
Traditionally used in poultry stuffing, sage is wonderful with meats, stews, and soups. It can also be used with shellfish and other seafood. Sage pairs nicely with cheese, and in dips, in poultry seasoning, sausages, and with any wild game, especially venison. I love to add sage to winter squash soup and pumpkin dishes, too.
A fun addition to any plate is fried sage leaves. Just drop them in a pan with a small amount of hot oil. They crisp right up.
Sage is also one of the easiest herbs you can grow. It is a hardy perennial that thrives in a sunny location, although it will tolerate some shade. The reward is fresh sage leaves all season long. You can freeze or dry sage leaves for use year round.
So here are some recipes for using sage. Enjoy!!
Scotch Eggs
1 1/4 lbs. bulk country style or herb sausage
1 t. sage
1/2 t. thyme
1/4 t. cayenne pepper
4 hard cooked eggs, peeled
1/2 c. flour
2 raw eggs, beaten
1-c. fresh bread crumbs
vegetable oil for deep frying
Combine sausage and flavorings and mix well. Divide into 4 equal portions and flatten. Place an egg on each flattened sausage piece and press sausage to completely cover each egg. Dredge eggs in the flour, and then dip in the eggs. Roll in the breadcrumbs and fry in 2 1/2 inches of oil (heated to 350 degrees until well browned. This will take about 10 minutes. Drain. Keep warm until served. Makes 4.

Homemade Breakfast Sausage
Breakfast Sausage
2½ lbs. ground pork or turkey (leave on a little fat)
1 T. dried sage
2 t. salt
2 t. pepper
1 t. dried marjoram
½ t. dried thyme
¼ t. allspice
¼ t. nutmeg
¼ t. dry mustard
⅛ t. cloves
pinch of cayenne pepper
⅓ c. warm water
Mix herbs and spices with water and let stand 10 minutes. Add the water and spice mixture to the meat and blend thoroughly. Form into patties, and chill or cook immediately. Patties can be fried or baked. This sausage can also be frozen for later use. Makes almost 3 pounds.

Stuffing/ Dressing
Dressing/Stuffing
1 c. sliced mushrooms
¾ c. diced celery
3 T. minced onions
2 T. chopped parsley
4 T. butter
4-5 c. bread cubes
salt and pepper to taste
¼ – ½ c. turkey or chicken broth if making dressing
Sauté vegetables in butter until tender. Add bread and seasonings and toss to coat. Stuff into turkey just before cooking or add broth and place in covered casserole, cooking for 45 minutes to an hour at 350 degrees. When making stuffing allow ¾ c. per pound of turkey. You may want to stuff the bird and still make extra dressing for the next day. When making dressing be sure to cover the pan well to keep the dressing from drying out.
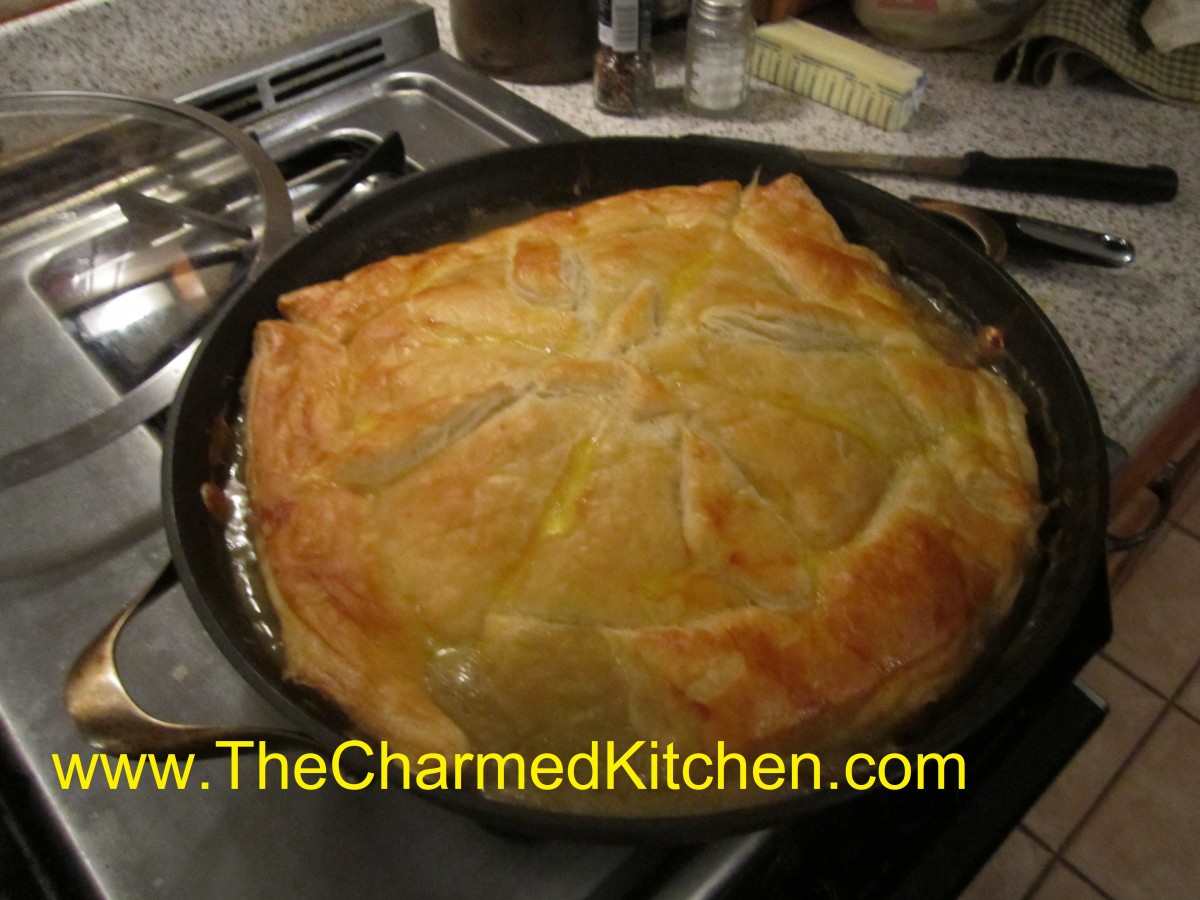
Amy’s Skillet Chicken Pot Pie
Amy’s Skillet Chicken Pot Pie
¼ c. olive oil
2 T. butter
1 sweet onion, chopped
4 parsnips, peeled and sliced
4 cloves garlic, minced
1 tablespoon chopped fresh sage
1 small bunch kale, center ribs and stems removed, leaves chopped
Kosher salt
freshly ground pepper
¼ cup all-purpose flour
3 cups low-sodium chicken broth
2 T. sherry
½ small butternut squash, peeled, cut into 1/2-inch pieces (about 1½ cups)
½ of a roasted chicken- meat removed from bones, torn onto bite sized pieces – about 1½ cups of meat
1 sheet frozen puff pastry, thawed
1 large egg
Place a rack in upper third of oven; preheat to 425°. Heat oil in a deep 12-inch cast-iron or other heavy ovenproof skillet over medium-high heat. Add onions; cook, stirring occasionally, until beginning to brown, about 4 minutes. Reduce heat to medium-low. Add parsnips, garlic and sage to skillet and cook, stirring occasionally, until garlic begins to brown, about 2 minutes. Add kale and season with salt and pepper. Cook, tossing often, until wilted, about 4 minutes. Sprinkle flour over. Cook, stirring constantly, for 4 minutes. Stir in broth, 1/2-cupful at a time, then add squash. Bring to a boil, reduce heat, and simmer until squash is just softened and broth is thickened, 8-10 minutes. Add chicken to skillet, stir, and season with salt and pepper. Unfold pastry and smooth any creases; place over skillet, allowing corners to hang over sides. Whisk egg and 1 teaspoon water in a small bowl. Brush pastry with egg wash; cut four 1-inch slits in top to vent. Bake pot pie until pastry is beginning to brown, 15-20 minutes. Reduce oven temperature to 375° and bake until pastry is deep golden brown and crisp, 15-20 minutes longer. Let cool for 10 minutes before serving.

Spiced Yellow Split Pea Soup
Spiced Yellow Split Pea Soup
1 lb. yellow split peas, rinsed
8 c. stock or water
2 c. chopped onion
2 carrots, peeled and sliced
3 potatoes, peeled and cubed
½ lb. sliced green beans
1 T. parsley
2-3 t. hot pepper sauce
1 t. chopped fresh sage- or ½ t. dried sage
1 t. dried thyme
1 t. ginger
1 t. cumin
1 t. turmeric
½ t. white pepper
2 cups diced ham
Salt to taste
Note: you can use 1 teaspoon liquid smoke if omitting meat.
Combine peas, water or stock and simmer, covered, about an hour, stirring occasionally. Add remaining ingredients, except salt, and cook, covered, over low heat for about 60 minutes. Add salt to taste. Freezes well. Serves 6-8.
Poultry Seasoning
¼ c. dried parsley
3 T. dried marjoram
3 T. dried rosemary
3 T. dried thyme
2 T. dried savory
1 T. celery seed
1 T. dried sage
2 t. dried oregano
2 t. dried basil
1 t. ground allspice
1 t. fresh ground pepper
Combine all ingredients in a blender. Store in a cool, dry place to maintain freshness.
Sage Rolls
¾ c. milk
½ c. sugar
1/3 c. butter
1 t. salt
2 packages active dry yeast
½ c. warm water
4½.-5 c. bread flour
½ c. chopped green onion or chives
1 T. dried sage
2 eggs, lightly beaten
Heat milk to almost simmering, being careful not to bum. Stir in sugar, butter, and salt. Cool milk to lukewarm. Dissolve yeast in warm water. Set aside. Place 2 cups of flour in a large bowl. Add the milk mixture, and beat together. Stir in yeast mixture, sage, and eggs. Beat with an electric mixer for 4 minutes. Gradually stir in enough of the flour to make a soft dough that leaves the sides of the bowl. Tum dough onto a floured surface and knead until the dough is smooth and elastic, about 8 – 10 minutes. Place the dough in oiled bowl, turning to grease the top. Cover, and allow dough to rise until doubled in bulk, about 45- 55 minutes. Punch dough down, tum onto a floured surface, and cover with the bowl. Allow the dough to rest 15 minutes. Divide dough into 24 – 32 pieces, depending on the size you like. Shape dinner rolls as desired. I like to roll pieces into 6 inch ropes, and then tie them into a loose knot. Place the rolls onto greased baking sheets, allowing them room to grow. Cover, and let rise until doubled in bulk, about 45 minutes. Bake rolls in a 350 degree oven until golden brown, 15- 18 minutes.
Lemon and Sour Cream Cupcakes

Lemon and Sour Cream Cupcake
I love the lemon flavor in these cupcakes. They are rich, without being too heavy, and full of zest. I had picked up a bunch of lemons recently. Since I need dessert for dinner, I thought I would bake up a batch.
Lemon zest in both the batter and the frosting, really makes them special. Cupcakes are also such a nice, easy dessert. If you try these, I am sure you will be pleased, as will your family and friends.
It makes a big batch, so you can freeze some for later.
Even though I normally frost these, you can also just combine powdered sugar with a little lemon zest and dust them with it, instead of the frosting.
Lemon and Sour Cream Cupcakes
1 cup butter, softened
2 cups sugar
3 eggs
2 teaspoons grated lemon peel
1 teaspoon vanilla extract
3½ cups all-purpose flour
1 teaspoon baking soda
½ teaspoon each baking powder and salt
2 cups sour cream
Frosting:
9 tablespoons butter, softened
6 ¾ cups confectioners’ sugar
6 tablespoons lemon juice
1 T. vanilla extract
¾ teaspoon grated lemon peel
3 tablespoon milk
In a mixing bowl, cream butter and sugar. Beat in eggs, one at a time. Add lemon peel and vanilla; mix well. Combine dry ingredients; add to creamed mixture alternately with sour cream (batter will be thick). Fill 30 greased or paper-lined muffin cups with 1/4 cup of batter. Bake at 350 degrees for 25-30 minutes or until a toothpick inserted near the center comes out clean. Cool for 10 minutes; remove to wire racks to cool completely. For frosting, cream butter and sugar in a small mixing bowl. Add lemon juice, vanilla, lemon peel and milk; beat until smooth. Frost cupcakes. Makes 30.
Pineapple Blintzes

Pineapple Blintzes
I needed a simple dessert the other day. I had a package of flour tortillas, so I started with them. I often use flour tortillas in place of crepes to make blintzes. The blintzes can be a dessert, breakfast or brunch dish. I rooted around the cupboard and found a can of crushed pineapple, so I used that to make the filling.
You could use any ready made pie filling, if you prefer.
I soaked the tortillas in milk. That is the secret to make this dish work. By soaking the tortillas in milk, they soften up, and can be used like a crepe. It changes their texture completely. Soak them for at least 10 minutes, or up to an hour. I placed the tortillas in a shallow baking pan and made sure to drizzle each one with milk as I added them to the pan. They will stick together if softened too long, so you might want to put the tortillas on sheets of plastic wrap or wax paper to keep them separate as they soften. You could also soak them in almond or rice milk, or even fruit juice.
For the filling, I used the can of crushed pineapple, sweetened with sugar, a little vanilla and thickened with Clear Gel- a type of cornstarch.* Here is the recipe for the pineapple filling along with directions on how to assemble and prepare them.
Pineapple Blintzes
Filling:
1 can ( 20 oz.) crushed pineapple, packed in juice, un-drained
½ c. sugar, or more to suit your taste
1 t. vanilla
¼ c. Clear Gel or cornstarch
2 T. cold water
Butter for frying
12 flour tortillas- 8-inch
Powdered sugar
In sauce pan, heat together pineapple, sugar and vanilla and bring to a boil. Combine Clear Gel with cold water and stir until smooth. Slowly drizzle this mixture into the pineapple, stirring constantly. Mixture will thicken quickly. You might not need to add all of the Clear Gel mixture. Once it thickens, remove from heat and cool down a little before making the blintzes. Makes about 3 cups, enough for about 12 blintzes.
To assemble the blintzes, place a softened tortilla on your work surface and spoon a little pineapple filling in the middle. You can do this with hot filling, but easier if the filling has cooled down or is even cold. Don’t over fill them or you won’t be able to fold them up. I used 8-inch tortillas and used about 1/4 cup of filling for each one. Fold the sides in until they almost meet in the middle and then roll the tortilla up to cover the filling. Place seam side down until ready to fry them.
Heat butter in a skillet, and brown the blintzes over medium heat until lightly toasted on both sides. They will be crispy on the outside, but tender in the middle. Put on a serving plate, sprinkle with powdered sugar and serve while warm.
Note: They can be assembled ahead of time, then kept in the fridge until ready to cook. You can also cook them up ahead of time, and just warm in the oven when ready to serve. If rewarming them, cover to keep them from drying out.
I have made these before and use different fruit fillings. I’ve also made a cheese filled version a few times. It seems I usually have a package of tortillas, so it is a go-to dessert for me in a pinch. Nice brunch or breakfast dish, too. For dessert, you can also top them with ice cream or whipped cream.
* Clear Gel is modified cornstarch. It is used in commercial pie fillings and in many frozen dinners. It looks just like regular cornstarch. The big difference between Clear Gel and traditional cornstarch is that Clear gel won’t get runny when reheated. If you have ever used cornstarch to thicken a stir fry, you know that the next day, if you reheat it, the sauce thins out. Clear Gel does not do that- it stays thick. Clear Gel is available at stores in Amish communities and on-line.
Creamy Tomato Soup

Creamy Tomato Soup
Snowy weather brings out my desire for comfort foods. The combination of tomato soup and a grilled cheese sandwich is one of my favorites. I had already baked a loaf of bread and I had cheese, so I could make a grilled cheese sandwich. All I needed was to make the soup.
I canned plenty of tomatoes in the summer, so I had them on hand. With the addition of a few other ingredients, I soon had a lovely soup to go with my grilled cheese sandwich. I ended up using a jar of yellow tomatoes, so my soup came out a bright orange color. Very pretty, although it didn’t look a lot like tomato soup!!
A simple soup, with lots of flavor, it is a favorite of mine. So much better than the canned tomato soup of my childhood.
Creamy Tomato Soup
2 T. oil or butter
1 c. chopped onion
1 pint canned tomatoes- or a 14 oz. can of tomatoes or 2 c. fresh tomatoes, chopped up
1 rib celery, chopped
1 small bay leaf
salt and pepper to taste
1 c. chicken or vegetable stock
1 c. half and half or milk
Hot sauce
In saucepan, heat oil and cook onions until a little golden. Add tomatoes with celery and bay leaf. Bring mixture to a boil; reduce heat and simmer 10 minutes. Remove the bay leaf. Add the stock and simmer 5 more minutes, allowing mixture to reduce a little. Add half and half and season to taste. Puree soup until smooth. Add hot sauce to taste. Serves 2.
Homemade Spelt Bread
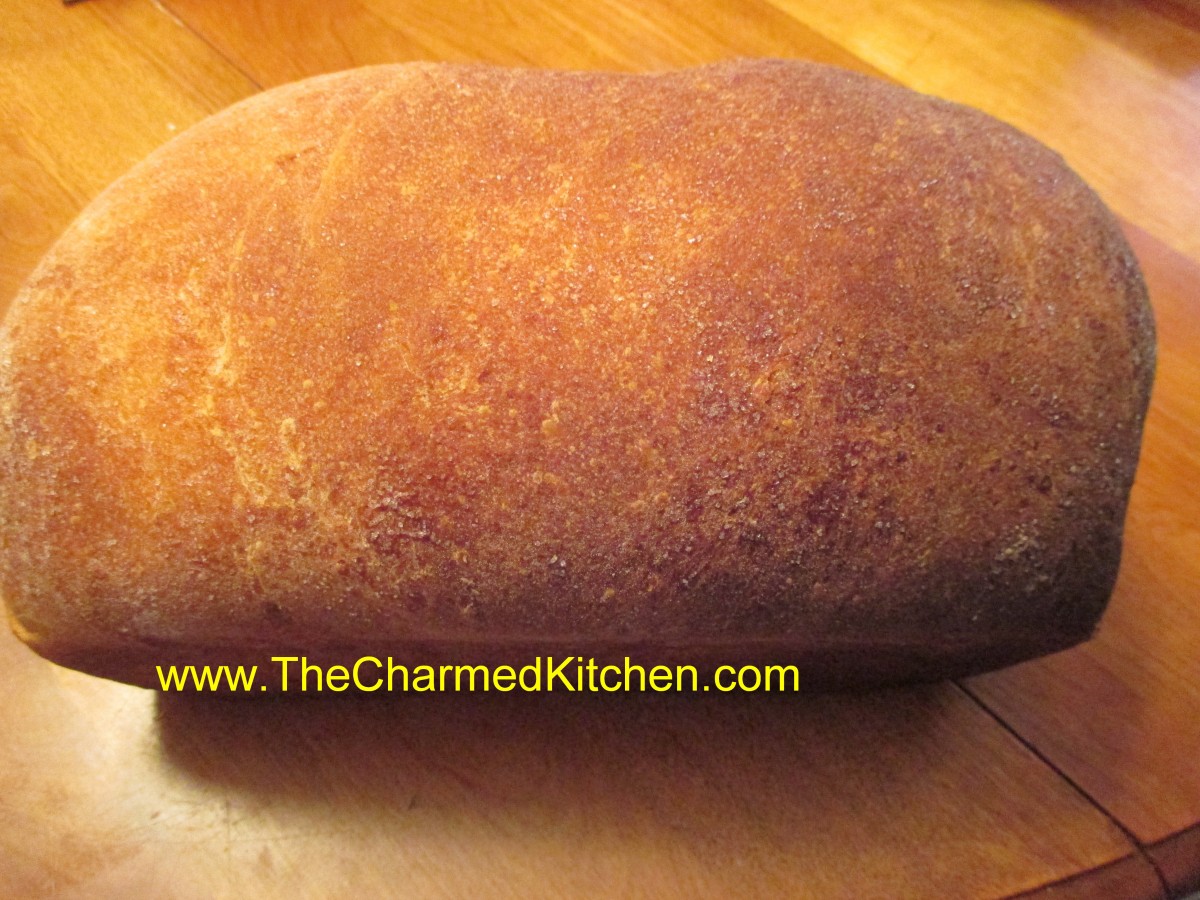
Spelt Bread
There is just something about homemade bread. I grew up in a house where we often had homemade bread. I love the way the house smells when bread is baking. I decided to bake some spelt bread last night. It is one of my favorites.
I always have at least a few people who ask me what spelt is.
Spelt flour is a close relative to wheat. I love cooking with it because it is so easy to work with. It doesn’t require much, if any, kneading when you make yeast bread out of it.
Spelt has a texture much closer to white flour in baking other things, like muffins or biscuits. It does contain gluten, so it’s not an answer for people with gluten issues.
For those who do cook with wheat, spelt provides whole grain nutrition in a delicate, less heavy package. The bread I baked was so easy to make and gives me all the taste and fiber of whole wheat bread with less work.
Spelt flour is still tricky to find. Some larger grocery stores carry it, but you might have to go to specialty markets. Bob’s Red Mill is my usual source, so if your store carries their products, you should be able to locate it.
Spelt Bread
3 ¼ c. whole spelt flour
1 pkt. Active dry yeast
1 c. water
1/3 c. honey
¼ c. oil
1 t. salt
1 egg
Place 2 c. flour, yeast and salt in a medium bowl. Heat together water, honey and oil until warm (120-130 degrees) Add water mixture to spelt mixture and beat on low speed of electric mixer for 30 seconds, or until moistened. Add egg and beat on high 3 minutes. Stir in enough spelt to make a soft dough. Cover bowl with towel and allow to rise until doubled, about 1 hour. Grease a 9×5 inch loaf pan and use a rubber scraper to transfer dough into prepared pan. Cover and let rise until doubled, another hour. Bake in a pre-heated 375 degree oven for 25-30 minutes. Cover top with foil during last 10 minutes of baking. Bread is done when it sounds hollow when lightly tapped. Remove from pan and cool on wire rack. Makes 1 loaf.
Mom’s Chicken Noodle Soup
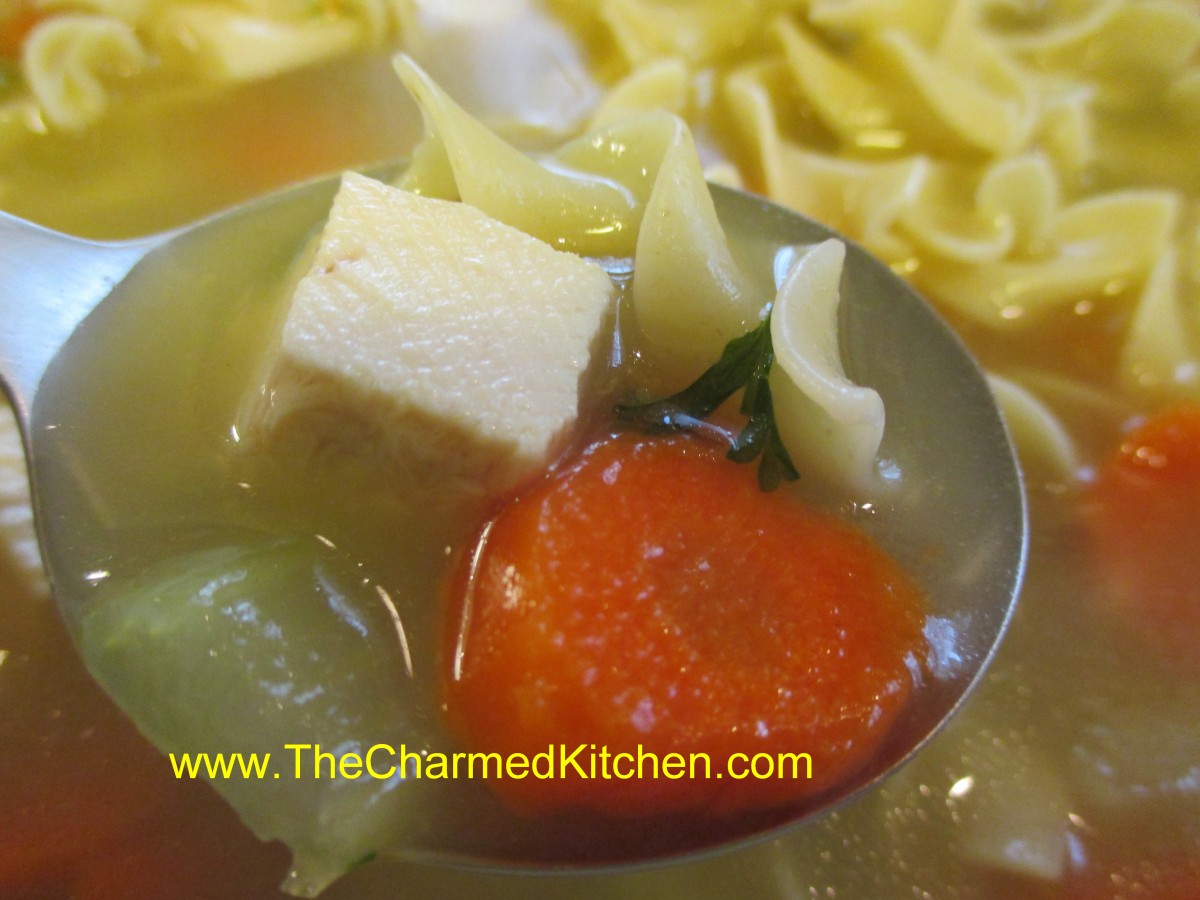
Mom’s Chicken Noodle Soup
I was asked recently for my recipe for chicken noodle soup. I teach several different classes on making soup but it wasn’t in there. That seemed odd. I mean with all the recipes I share, you would think I would have posted it somewhere by now.
I think the truth is that there really isn’t a recipe. Well, not a recipe I can share in the normal sense. I can guesstimate the amounts of this and that but every batch is a little different. That is part of the fun. The basic ingredients are the same, good stock, cubed chicken, carrots, celery and of course, noodles.
My Mom made wonderful chicken noodle soup, so I think of her every time I make it. I pretty much make mine the same way she did. She taught me well.
There is one pretty important thing about chicken noodle soup you should know- don’t cook the noodles in the soup. I know that sounds wrong. Trust me, if you cook your noodles in your soup you’ll end up with a goopy mess. Cook your noodles separately and add them when serving the soup. This does two good things. It keeps the noodles from getting overcooked and it lets each person add just the amount of noodles they like. Let’s face it some people just like a few noodles and others prefer a lot. This way each person gets their soup the way they like it.
So for directions here is what I do. I start with homemade chicken stock. Since I made the stock I’ll have the chicken I used to make it. I cube up some of the meat and add it to the stock. I also add some sliced carrots and sliced celery and let them simmer in the soup until tender. I sometimes add other veggies. Green beans or maybe a zucchini. I don’t get too crazy with the veggies here or it will become vegetable soup. I almost always remember to add some parsley. I love fresh ground pepper, too. Don’t put too much stuff in – you will be adding noodles after all. I cook my noodles and when the soup is ready to serve I warm them up a little- often just in a bowl in the microwave. That way they won’t cool down your soup. For little kids leave the noodles cold- they normally like their soup a little cooler. I ladle the soup into bowls and put the noodles on the table so everybody can add their own. Seems to work out pretty well.
My Mother was so funny when eating this soup. She had to have it come out “even”. She’d be nearly finished and realized she was out of noodles- so she would add a few. But then she needed more broth so she would add more of that. This went on several times. At the end she always insisted she only had one bowl.
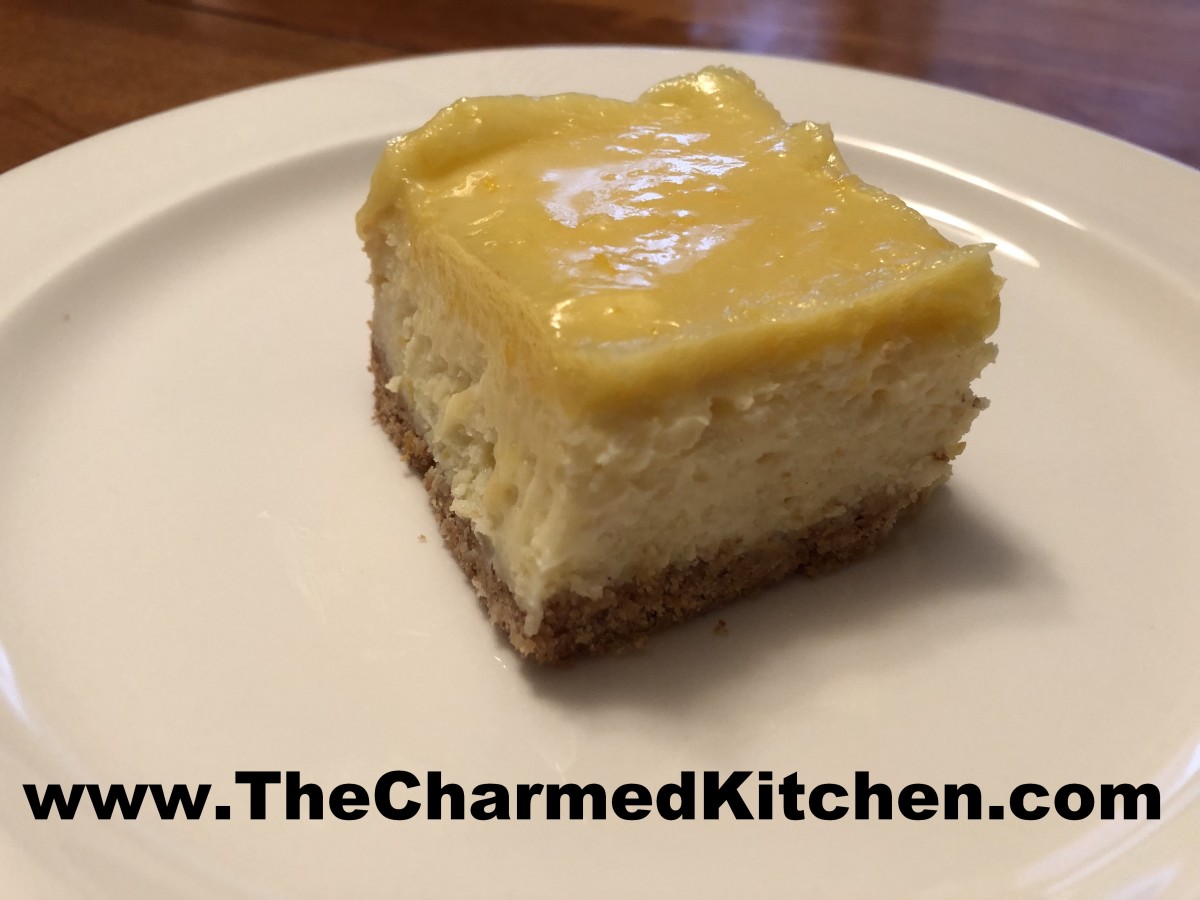
Lemon Lover’s Cheesecake
Lemon Cheesecake with Lemon Curd
This dessert was not planned. I am happy I made it, though. I had picked up a bag of Meyer lemons the other day, with no specific use in mind. I was probably going to use them in drinks, or maybe in a savory dish.
Later, a friend posted a picture of lemon bars she had baked. That got me thinking about lemon desserts. It also got me thinking about ingredients I already had. I had some graham cracker crumbs and I had cream cheese.
Lemon cheesecake made sense. But I couldn’t forget about my friend, and those lemon bars. So, I decided to also make a batch of lemon curd- and use it to top the cheesecake.
It worked out even better than I thought. Lots of lemon flavor in a creamy cheesecake. The lemon curd brought even more lemon to the party. Just wonderful.
You don’t have to use Meyer lemons. Other lemons are also going to work just fine. The Meyer lemons are a little less tart than other lemons, with floral notes in the zest.
So here is the recipe. I used a 9×9 inch glass pan to bake the cheesecake- rather than the normal spring form pan. Kind of an homage to the lemon bars.
Lemon Lover’s Cheesecake with Lemon Curd
Crust:
1½ c. graham cracker crumbs
3 T. sugar
4 T. melted butter
Filling:
2 (8oz.) packages cream cheese, softened
¾ c. sugar
2 T. flour
2 eggs
3 T. lemon juice
2 t. grated lemon peel
Lemon Curd: recipe below
Heat oven to 350-degrees. Grease a 9×9-inch baking pan- I used a glass pan. In medium bowl, combine crumbs and sugar, then add melted butter. Toss to distribute butter evenly. Press into bottom of prepared pan and bake 10 minutes. Beat cream cheese, sugar and flour until fluffy. Beat in eggs one at a time. Stir in juice and peel. Pour over crust and bake for 30 minutes, or until set. Cool then top with lemon curd. Chill well before cutting. Store covered in fridge. Serves 8-10.
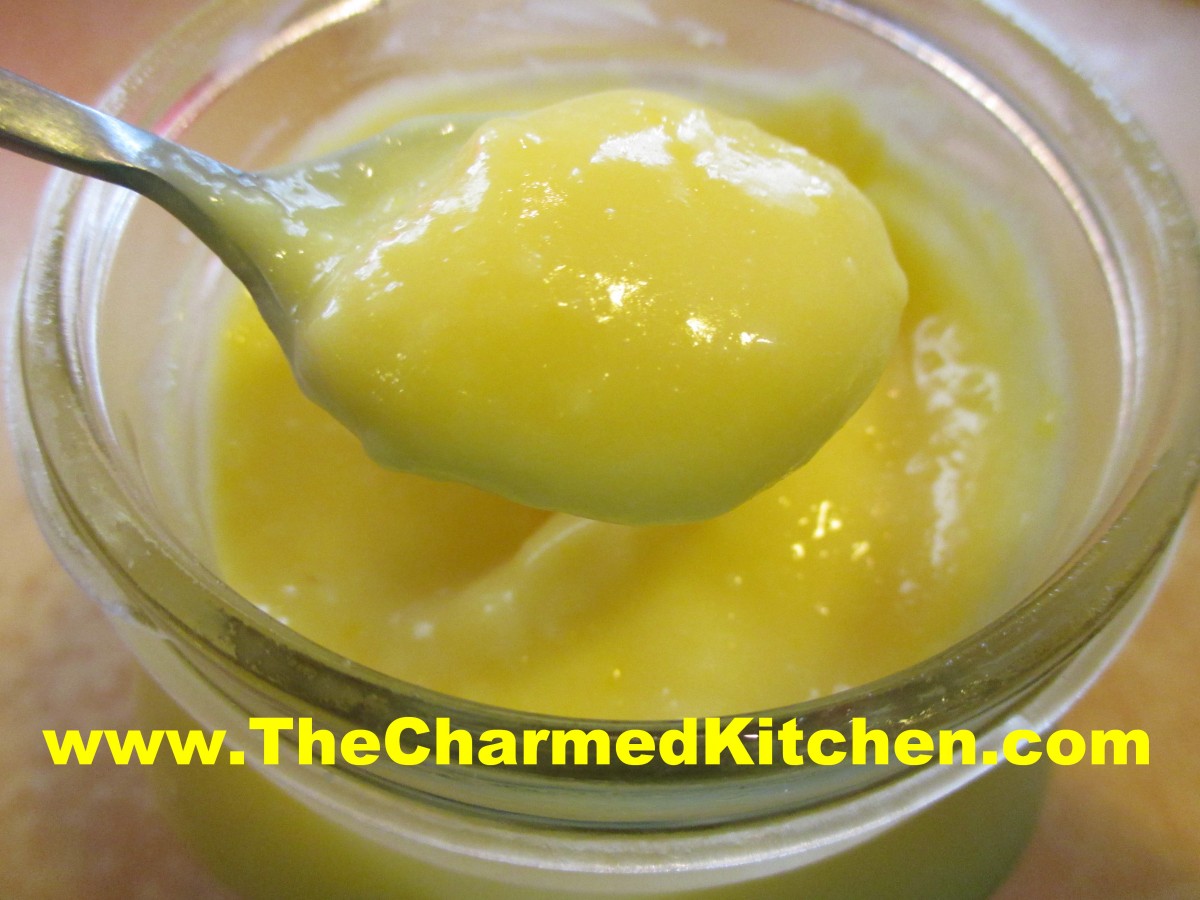
Lemon Curd
Lemon Curd
1/2 c. lemon juice
zest from one good sized lemon- you should have 2-3 teaspoons
1/2 c. sugar
3 eggs
6 T. unsalted butter- cut into little cubes
In medium saucepan, combine all ingredients. Whisk the mixture until the eggs are well blended. Cook over medium low heat, whisking often, until the mixture thickens. This will take 5-7 minutes. Whisk more often as mixtures warms and starts to thicken. Better to heat over lower heat and take longer than cook over too high a heat. You don’t want the eggs to scramble. Once the mixture is thickened , transfer to a bowl or jar. Cover the surface with a piece of plastic wrap to keep the surface from developing a skin- like any pudding will do. Chill until ready to use. Makes about 2 cups. Will keep in fridge a week or two.
Note: For using with this cheesecake, just make the lemon curd while the cheesecake is baking. Pour over the cheesecake while the curd is still a little warm, to make it easier to spread.
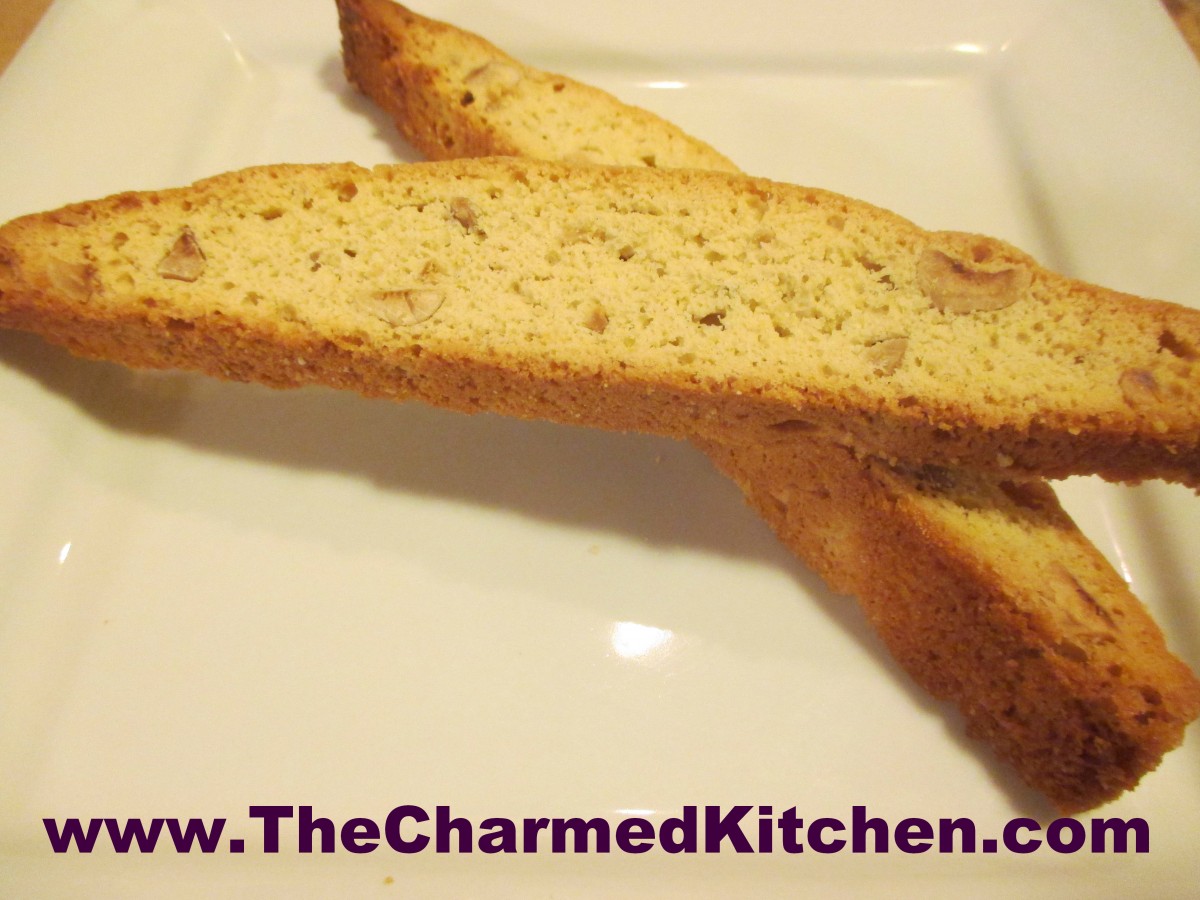
Hazelnut Biscotti
Hazelnut Biscotti
These biscotti are the perfect treat to have with your morning cup of coffee or tea. Crisp, but not too hard, they are studded with crunchy hazelnuts and flavored with vanilla and orange peel. I like them just the way they are, but you could dress them up with a drizzle of powdered sugar glaze. You can also dip one end of each biscotti in melted chocolate.
I don’t know why more people don’t make their own biscotti. They are so easy to make, and you can flavor them to suit your own taste. Once baked, store them in an air tight container. They stay crisp for weeks. Assuming you don’t eat them first!
Biscotti get their distinctive, extra crunchy texture, from being baked not once, but twice. The batter is spread on a cookie sheet and baked until firm. Once cooled and little, the loaf is sliced and the slices are returned to the oven to get baked until crisp and toasted. I put the slices on a cooling rack, placed on the baking sheet, before the second bake. That way, the biscotti toast on both sides evenly. No need to turn them all over half-way through the second bake.
So here is the recipe. I hope if you haven’t made biscotti before, you give them a try.
Hazelnut Biscotti
3 c. flour
2 t. baking powder
1/2 t. salt
3 eggs
1 c sugar
1/4 c. butter, melted
1/4 c. olive oil
1 1/2 t. vanilla
1 t. grated orange peel
1 c. hazelnuts, toasted, peeled and chopped
Combine dry ingredients and set aside. Mix together eggs, sugar, butter, oil, vanilla and peel. Beat until smooth and stir in flour mixture and nuts. Grease a large baking sheet, oil your hands, and place dough on sheet, forming into a 16×4-inch log. Bake at 325-degrees until tester inserted in center comes out clean, about 30 minutes. Loaf with spread a bit. Cool 15 minutes and leave oven on. Use serrated knife to cut into 1/2 -inch thick slices. Place cooling rack on a baking sheet. Place slices, cut side down, on cooling rack and return to oven for 20-22 minutes. Cool. Makes about 24.


