Alfajores Cookie
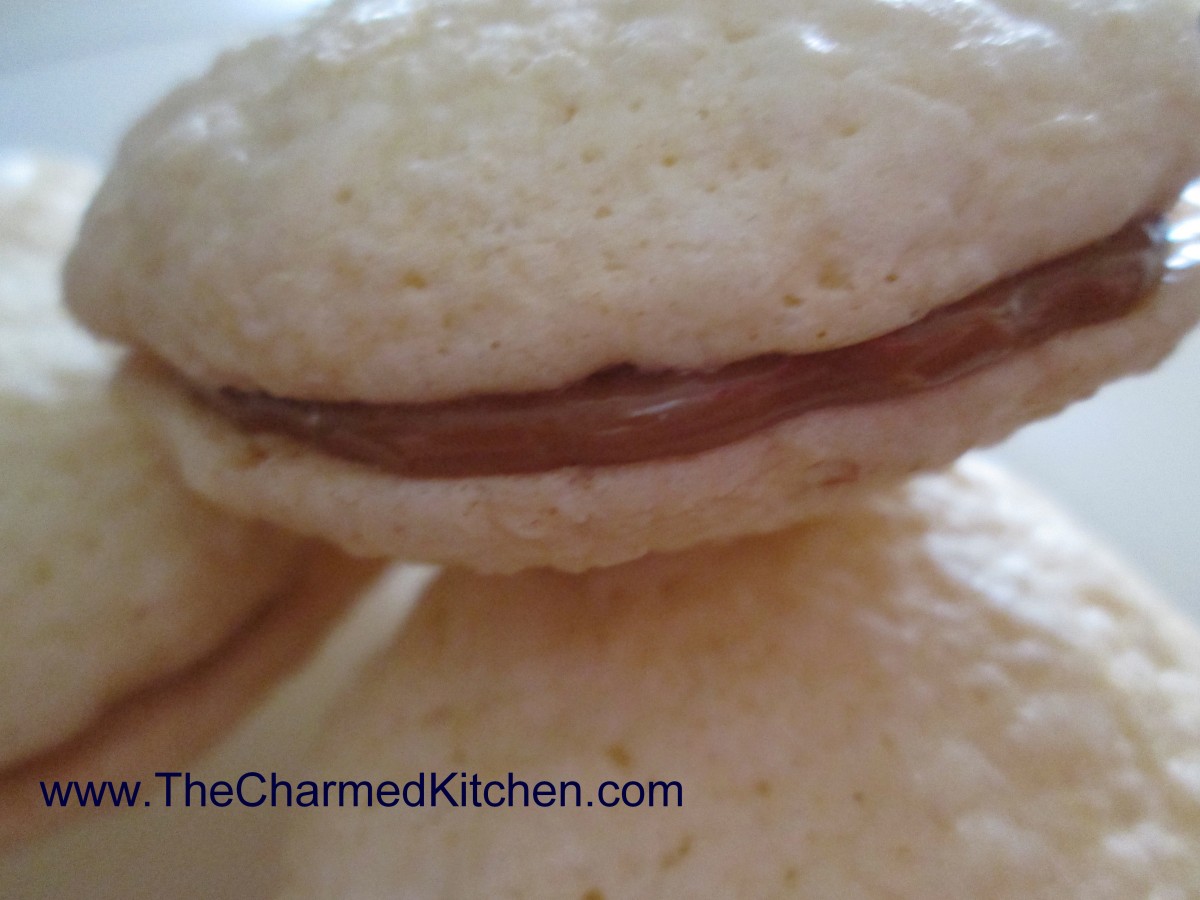
Alfajores Cookies
It is that time of year. Cookie baking time. There are the cookies we just have to make. Family favorites, traditional must haves. I get that. I have a list of cookies I bake every year. But, to keep it interesting, I like to add some new cookies to the list.
If you are looking for a new cookie you might want to try Alfojores. Made with cornstarch as a primary ingredient, they are very crispy and light. Sandwiched together with dulce de leche, they make a wonderful dessert. These cookies are popular in a number of South American countries and Spain, although the origin might be from the Middle East.
Alfajores Cookies
1/2 cup butter
1 cup sugar
1 egg
2 egg yolks
1 tsp. vanilla
2 tsp. lemon rind, grated
1 1/2 cup cornstarch
1/2 cup flour
1 tsp. baking powder
1/4 tsp. salt
Cream butter; add sugar and beat until fluffy. Add egg and egg yolks, one at a time, beating well. Beat in vanilla and lemon rind. Sift together cornstarch, flour, baking powder and salt. Add to mixture and mix well. Drop batter by small spoonfuls onto well-buttered baking sheet. Bake at 350 degrees for 15 minutes. Remove immediately. Sandwich the cookies together with (dulce de leche) sweet milk dessert. Makes 40 cookies.
Dulce de Leche (Milk Jam)
This is the easiest way to make Dulce de Leche…the taste is pretty authentic and the work is almost completely eliminated!
1 can sweetened condensed milk, label removed
Place the can inside a large pot on top of a wire rack. I use a round rack used for cooling cakes. If you don’t have a rack place a towel on the bottom of the pot. Add water to completely cover can, plus 1-2 more inches. Simmer, covered, for 4 hours, making sure the can is always completely covered with water…if not…there is an explosion!! Leave the can to cool several hours and only then open it and serve. Serve the golden-brown confection over flan, as a filling for crepes, cakes or just plain. For breakfast you can spread it on croissants, rolls or toast.
Brussels Sprout Truffles
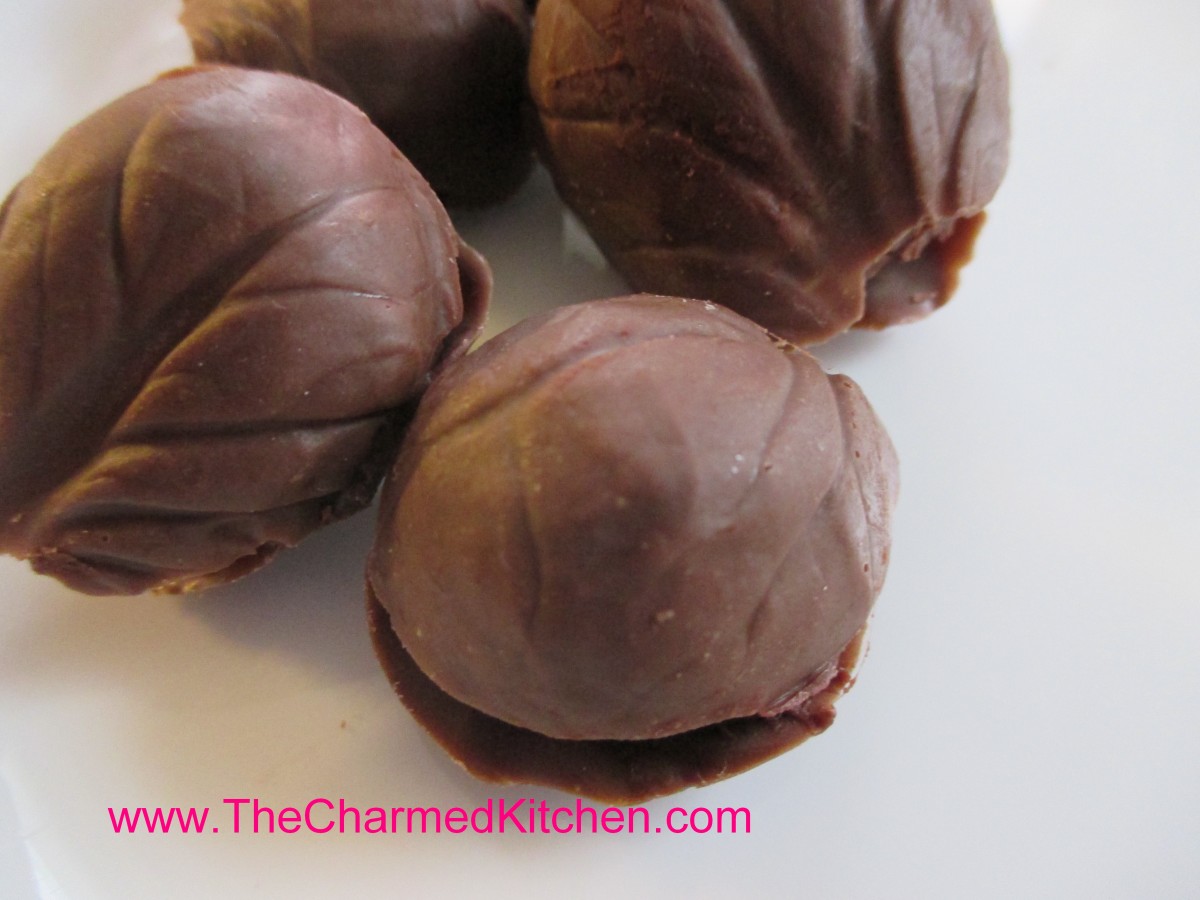
Brussels Sprout Truffles
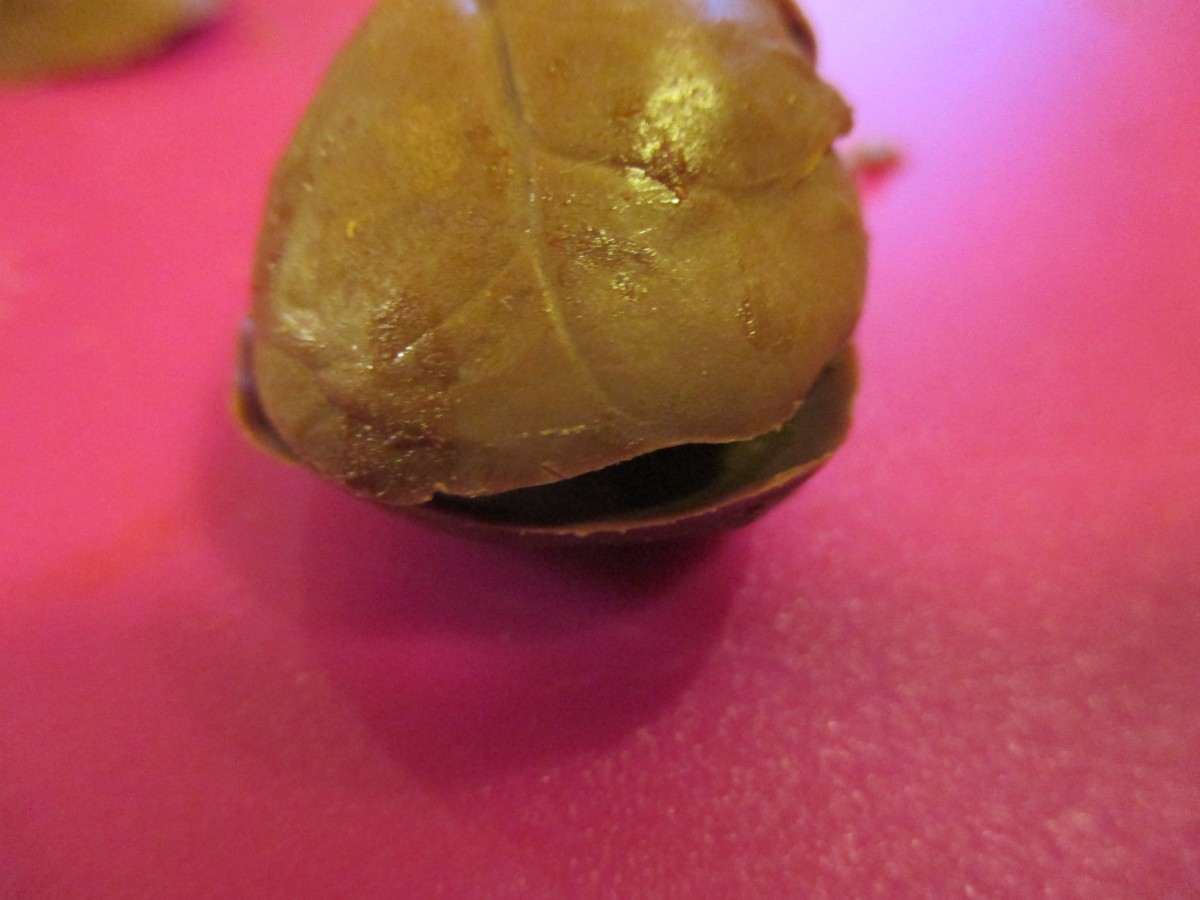
This might be one way to get someone to eat Brussels Sprouts!! This would make a nice hostess gift for your next holiday party. It is also a project kids could do, with a little practice. I made my truffle recipe and put it in the fridge to firm up. The recipe follows. Then I took some of the larger outer leaves off Brussels sprouts. I trimmed the bottoms off to make peeling of the leaves easier. You’ll need two leaves for each truffle so be sure to have plenty. I had about 60. You’ll also need a few ounces of chocolate, for coating the leaves. Use whatever chocolate you like. The better quality of chocolate you use, the better the truffles. I wiped the leaves clean, and then melted several ounces of chocolate. I used a pastry brush to brush the insides of the Brussels sprout leaves with the melted chocolate. Once the chocolate had hardened I gently peeled off the leaves and discarded them. Since the leaves were different sizes I rolled out portions of the truffles that would fit the size of the leaves I was using. I pressed the truffle mixture in one leaf and then placed another leaf, of similar size, over the filling. Normally I would roll the truffles in cocoa powder- but in this case, I didn’t. I wanted the truffles to stick to the leaves and leaving them plain seemed like the best way to do that. The end result was very cute. Store in fridge until ready to serve.
Chocolate Truffles
1/3 c. whipping cream
6 T. butter, cut into small pieces
2 c. chocolate chips- or 12 oz. bittersweet chocolate, grated or chopped coarsely
Unsweetened cocoa
Heat cream to boiling in small saucepan. Stir in butter and cook until melted. Remove from heat and stir in chocolate until melted. Place in shallow bowl and chill until firm, at least a couple of hours. Roll mixture into 1-inch balls and roll in cocoa. Sometimes the mixture is quite firm and hard to roll into perfectly smooth balls. You can roll them out as smooth as you can, roll in cocoa and then roll again to smooth out. You might want to give them another roll in the cocoa after that. Makes about 30.
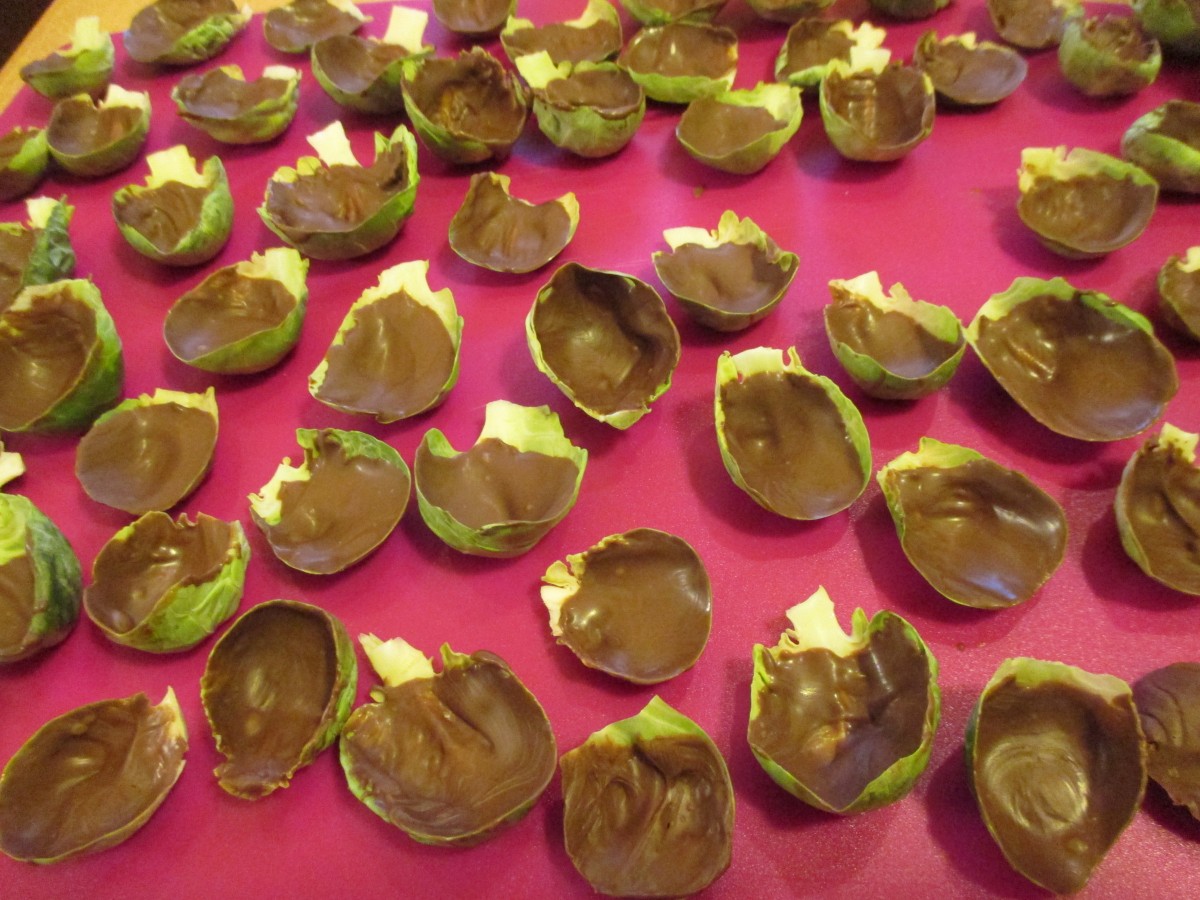
Leaves brushed with chocolate

Remove leaves gently
Press 2 leaves together over the truffle filling
Shaking Buddha’s Hand
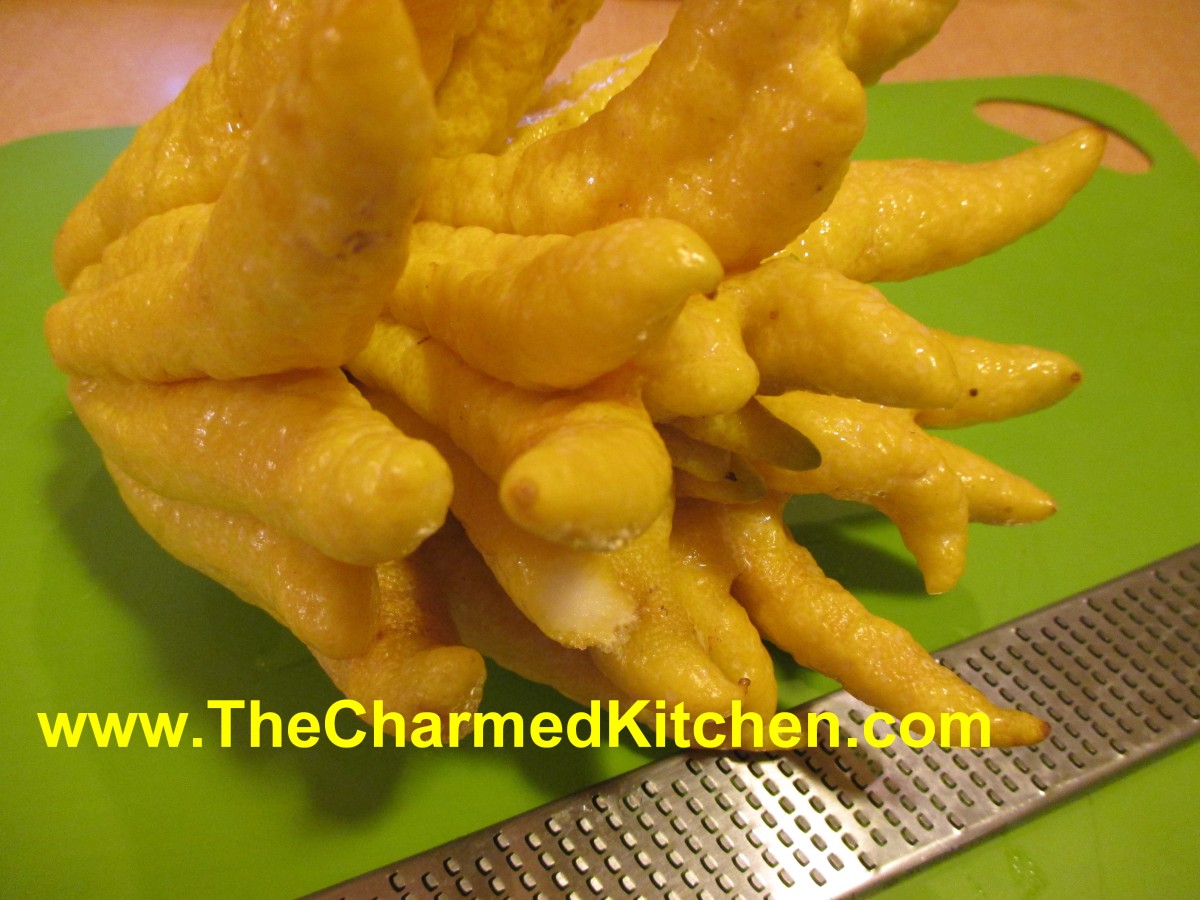
Buddha’s Hand
At a recent party, a dear friend brought me this exotic piece of fruit. Well, exotic to me. I’d seen them before, but never had one of my own. It is called Buddha’s Hand and it’s a type of citrus. Just holding it, you definitely get the smell of lemons. It is larger than a grapefruit, with these cool “fingers” that grow out from the base. Unlike lemons, Buddha’s Hand doesn’t have a juicy center.
I didn’t want to waste it so I looked into how to use it. I knew I wanted to zest it. When zesting most citrus fruit, you need to avoid the white pith, which is bitter. That is not the case with a Buddha’s hand. The pith is not bitter and can be used. I cut it in half and started zesting.
I used my microplane at first, but it was too difficult, so I went up a size to a slightly coarser grater. I tasted some and it had a nice, lemony taste and not at all bitter. I ended up with about 3 cups of zest- and I had only used about half of the Buddha’s hand. I put the zest in containers and tossed most of it in the freezer. I did use some on catfish for dinner that night and loved it.
Still, I had 3 cups of zest and had only used half of the fruit. It was time for plan B. I make candied orange peel, lemon peel and ginger. Why not candy the rest? I sliced the remaining fruit and put it in a saucepan, covering it with water. I simmered the sliced fruit for about 10 minutes, then drained off the water. This keeps it from getting bitter. I added fresh water to just cover the slices and added 1/2 cup of sugar. I boiled it down until the liquid was gone. I watched it carefully to make sure it didn’t scorch as the liquid evaporated. I put about a cup of sugar in a shallow pan and spooned in the sliced Buddha’s hand. I stirred it, kind of tossing it around until it was all evenly coated. I spread it out in the pan and allowed it to cool and dry a little overnight.
I tried it the next morning. The candied Buddha’s hand tastes really good. Very much like candied lemons. I also had a friend taste it, and he liked it, a lot!! I’ll use it as a snack and chopped up in baked goodies. I might try dipping some in melted chocolate, too. I thought that might make a nice gift.
In the end, I really had fun. Trying something that was new to me. Experimenting. I don’t think there is any profound message here. Maybe just to keep your mind open, to trying new things and keep learning new things. I could see myself getting one and doing this again- but I’ll have to use up all that zest, first.
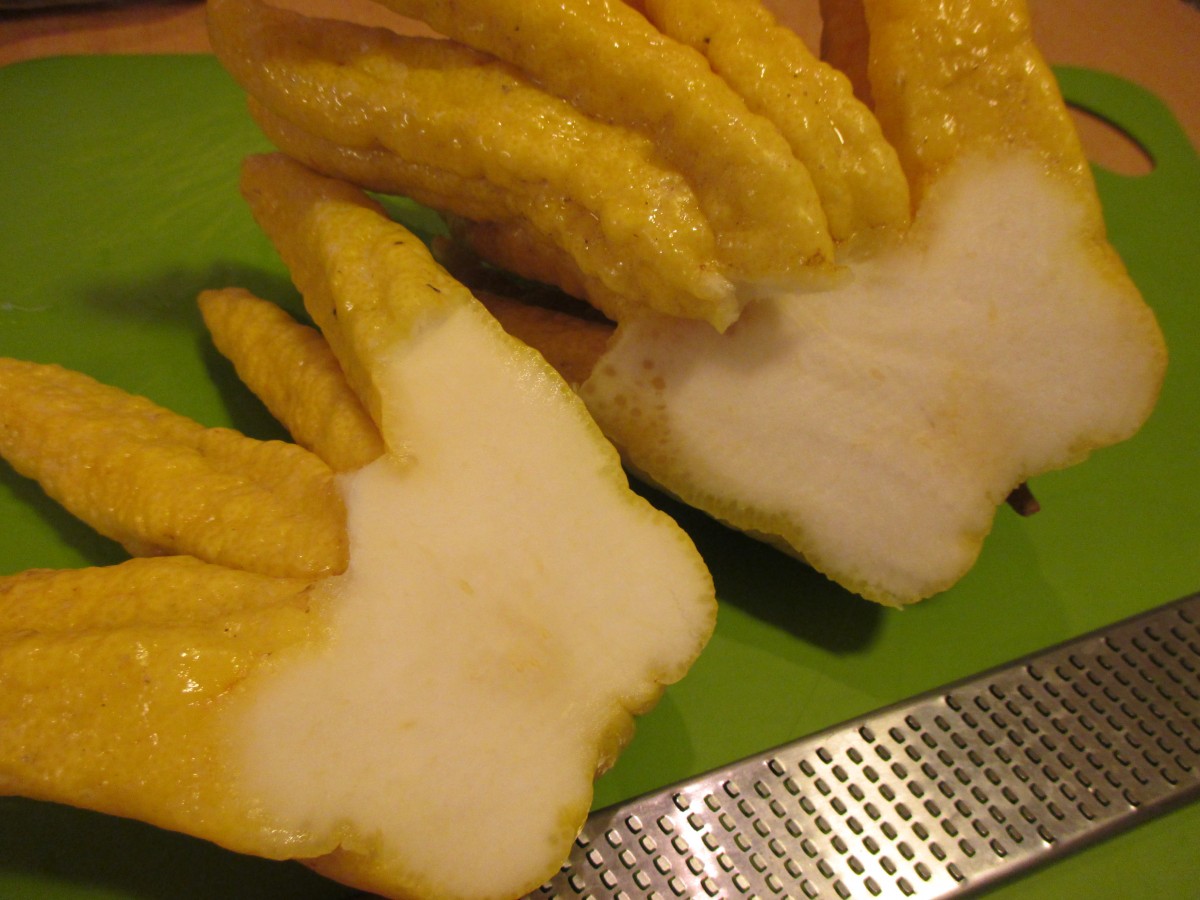
An inside view

One big pile of zest
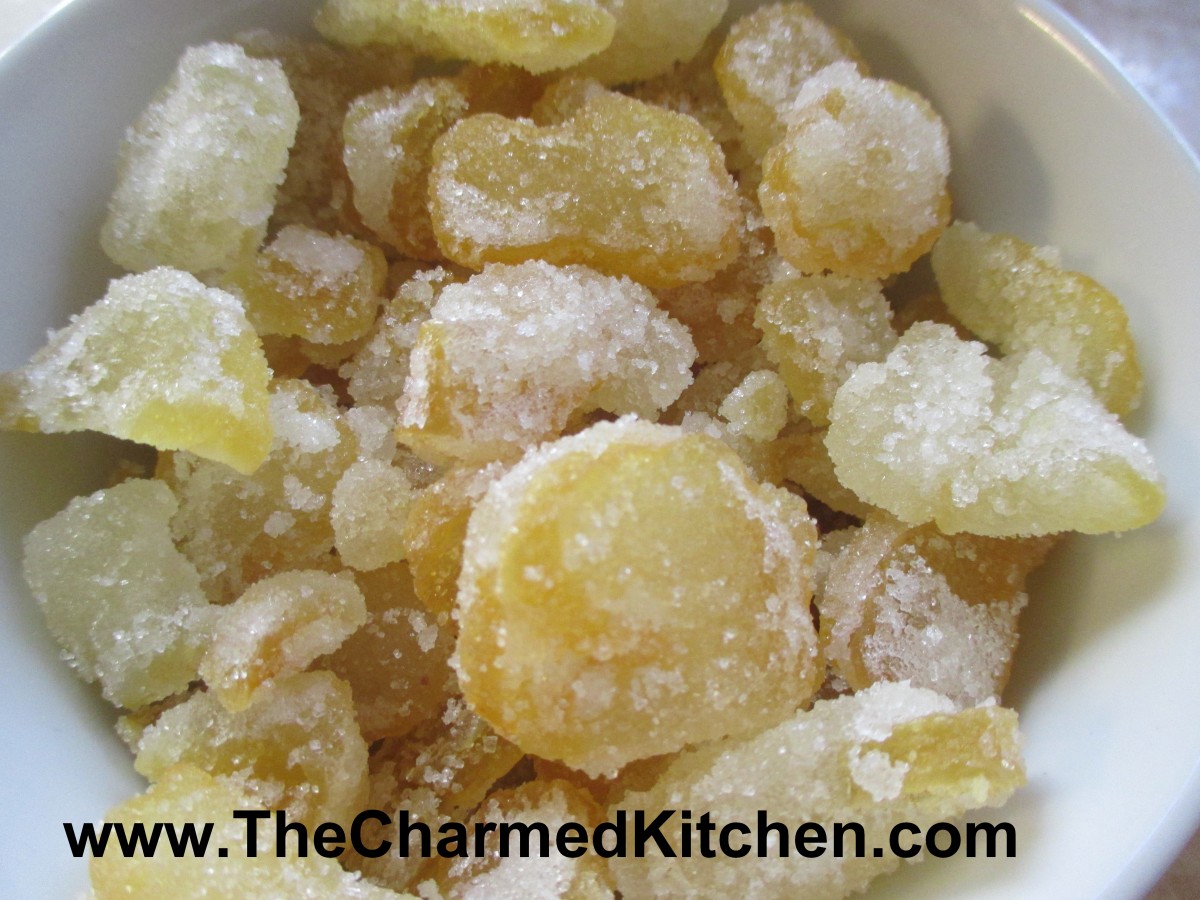
Candied Buddha’s Hand
Cream Wafer Cookies

Cream Wafer Cookies
Cream Wafers are a little more work than most cookies but they are worth it. They are the most requested cookies of all the ones I make. The secret is the dough, which contains no sugar. It is made from only three ingredients- flour, butter and heavy whipping cream. When baked they turn into flaky layers that melt in your mouth. Seriously, if you want to really impress this holiday season, show up at a party with these cookies. They are coated in sugar before baking and you can use tinted sugar, if you like. You can also tint the frosting if you like. Here is the recipe. Hope you enjoy!!
Cream Wafers
1 c. butter
1/3 c. heavy whipping cream
2 c. flour
extra fine or granulated sugar
Frosting:
¼ c. butter, softened
¾ c. powdered sugar
1 T. milk
1 t. vanilla
food coloring, if desired
Mix butter, cream and flour well. Wrap and chill at least an hour. Roll chilled dough 1/8 inch thick on lightly floured board. Cut out into 1½ inch rounds or even little hearts or stars. Transfer cookies to a sheet of wax paper heavily coated with extra fine or granulated sugar and coat both sides. Place on an ungreased baking sheet and prick each cookie 4 times with a fork. Bake at 375-degrees 7-9 minutes until lightly browned and puffy. Cool on rack. Mix frosting ingredients. Put 2 cookies together with frosting to make “sandwiches”.
Kale Fried Rice

Kale Fried Rice
Among the planters I brought in for winter was a big pot, filled with kale. I was watering my indoor garden, when decided I wanted some fresh greens for dinner. The chard tempted me, for a moment, but the kale won, in the end. I made fried rice, adding the kale and some scrambled egg. It was simple, but very satisfying. You could make it this way, or even add some (dare I say?) leftover turkey to it. Either way, it was pretty darn good. I like kale and other leafy greens, but tire of eating them the same way all the time. Pairing the kale with the rice was nice.
Kale Fried Rice
2 T. oil
1 egg, beaten
1 onion, sliced
4 c. chopped kale
3 c. cooked rice
1 c. diced cooked turkey – you could use shrimp, chicken, etc., optional
Chopped green onions
Dash of hot sauce
Soy sauce
Heat 1 tablespoon of oil and cook the egg- making it a sort of flat pancake. Cool and cut into strips. Set aside. Heat remaining oil in pan and cook onion until tender. Add kale and cook until wilted and tender. Add rice and turkey or other protein, if adding, and cook until heated through. Add onions, season and serve. Serves 4.
Turkey Tetrazzini
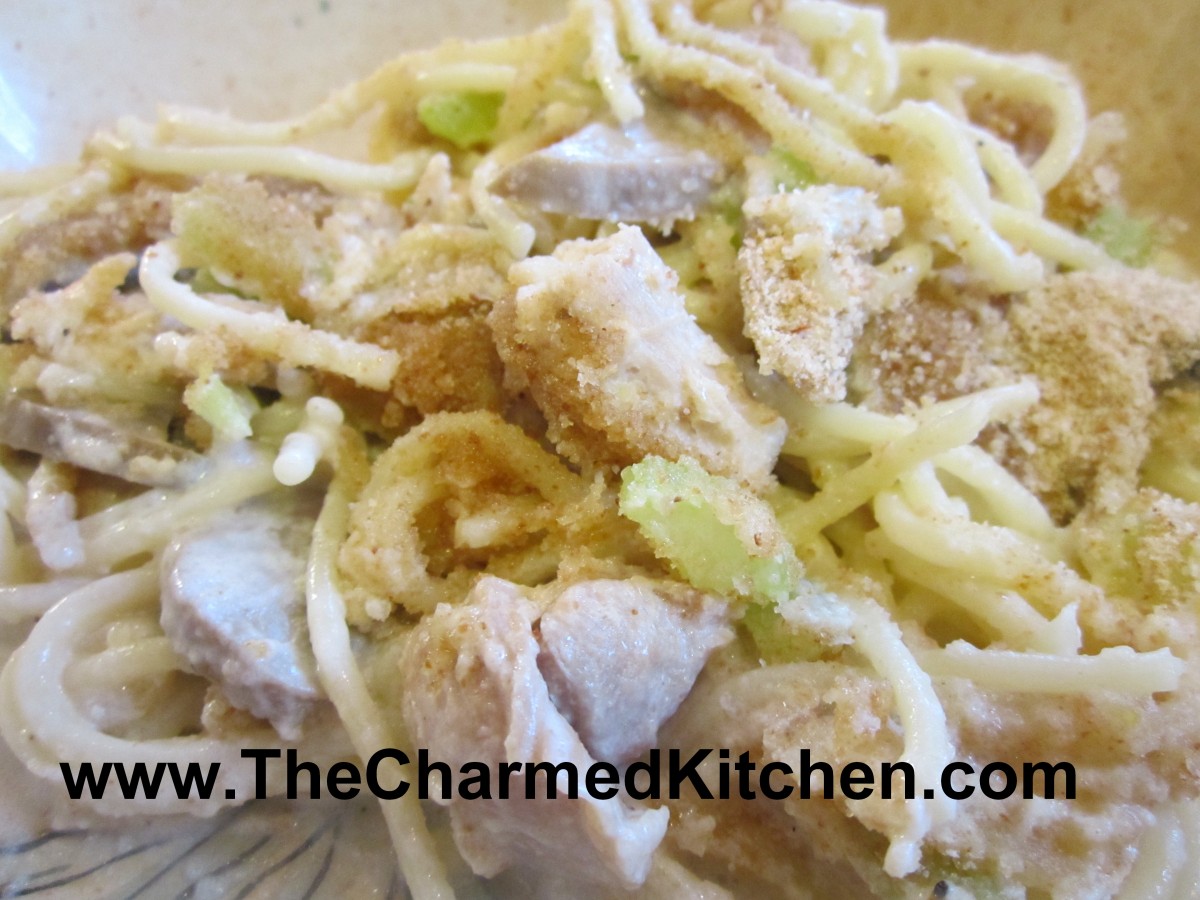
Turkey Tetrazzini
If you are looking for another recipe for leftover turkey, you can’t do much better than Turkey Tetrazzini. Cubes of turkey paired with pasta, mushrooms and celery in a creamy sherry sauce. The dish is finished off with bread crumbs and Parmesan cheese. Comfort food at its best. While normally made with white meat, dark meat works fine in it, too.
Turkey Tetrazzini
2 T. butter or oil
1 c. chopped celery
4 oz. sliced mushrooms
4 T. flour
1 1/2 c. chicken or turkey stock
1 c. half and half or milk
1/4 c. sherry
2 c. cooked turkey, cubed
4-6 oz. broken spaghetti, cooked
salt and pepper to taste
bread crumbs
butter
Parmesan cheese- optional
Heat butter or oil in pot and add celery and cook 3 minutes. Add mushrooms and cook 3 minutes more. Stir in flour and mix well. Add stock, half and half and sherry bring to a simmer- stirring often. Stir in turkey and pasta. Adjust seasonings. Place mixture in oiled casserole and sprinkle the top with bread crumbs and drizzle a little melted butter over the top. Add Parmesan cheese, if you like. Place in a 350 degree oven and bake until bubbly- about 25 minutes. Serves 4.
Five Recipes for Leftover Turkey

Turkey Chili
It is that time of year, when we find ourselves waking up to leftover turkey. A lot of leftover turkey. Here are five easy and tasty ways to make the most of all that turkey. I never get tired of turkey, but if your family does not feel the same way, these recipes could come in handy.
Turkey Chili
1 large onion, chopped
2 T. oil
2 ribs celery, sliced
1 sweet pepper, seeded and chopped
2 cans cannellini beans, drained and rinsed
2 cans lima beans, drained and rinsed
1 can ( 4 oz.) chopped green chilies
3-4 c. cubed turkey
2-3 c. stock- turkey or chicken
3 T. chili powder, or to taste
1 T. cumin, or to taste
Generous dash of hot sauce
Salt and pepper to taste
Fresh chopped cilantro
Toppings: Pick what you like. Some good toppers are shredded cheese, chopped green onions, salsa, sour cream or tortilla chips
.
In soup pot cook onion in oil until golden brown. Add the celery, peppers and chilies and cook 5 more minutes. Add the rest of the ingredients, except cilantro and bring to a boil. Turn heat down to medium and simmer until flavors blend, about 30 minutes but longer is fine. I usually cook it covered for 15 to 20 minutes and then remove the lid so it can thicken. Add the cilantro right before serving. Ladle into soup bowls add add toppings of your choice. Serves 6.
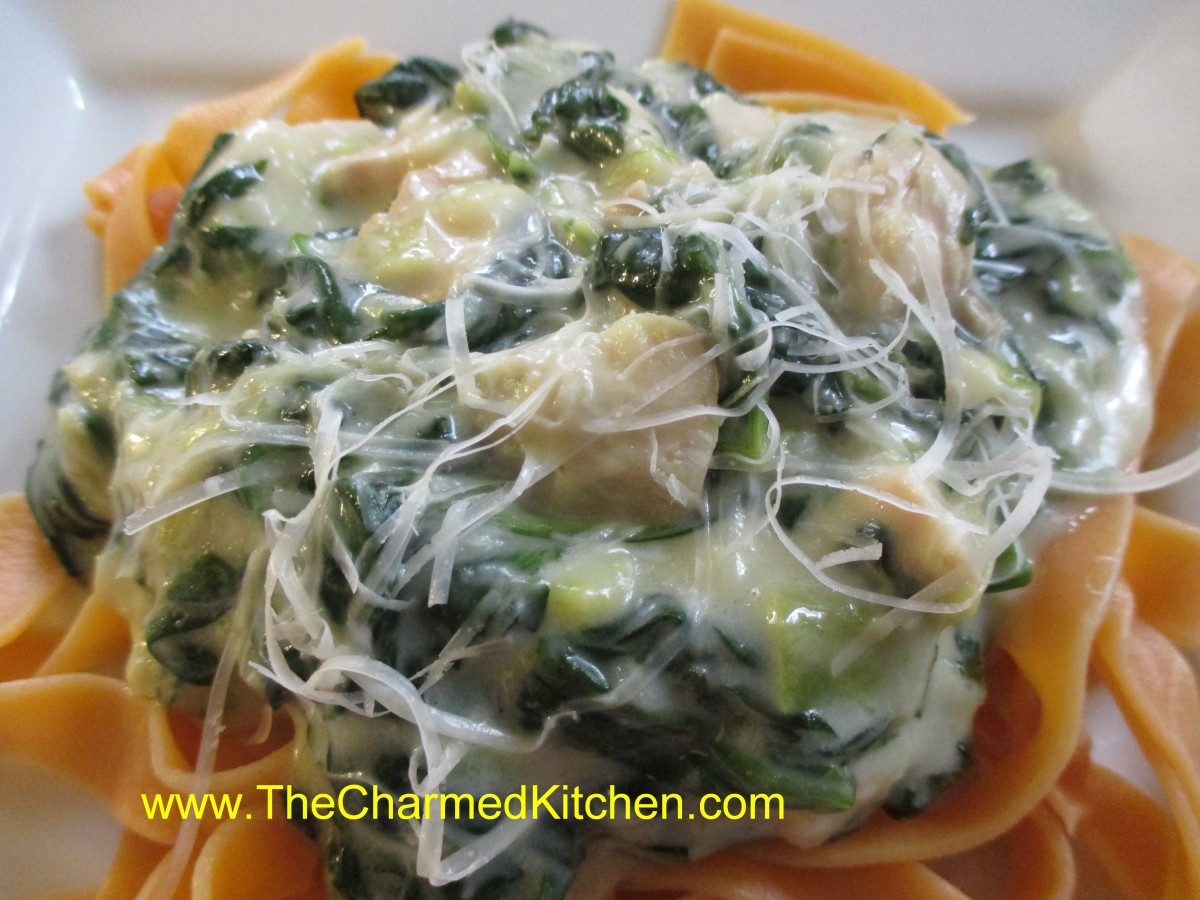
Turkey Florentine
2 T. oil or butter
1 large leek, cleaned, trimmed and chopped
4 T. flour
1½ c. stock – turkey or chicken
24 oz. fresh spinach, washed
¾ c. half and half- you could use milk instead
3 c. cubed cooked turkey
Salt and pepper to taste
2 t. hot sauce- or to taste
1 c. shredded Pecorino/ Romano cheese, plus extra for sprinkling on top
Hot cooked pasta
In large skillet cook leeks in oil or butter over medium heat until tender. Stir in flour and cook until smooth, but not brown. Add the stock and cook until mixture starts to thicken. Add the spinach and continue cooking, stirring often until the spinach is wilted. The spinach cooks down a lot- you might have to add it a little at a time to have room in the pan for all of it. As soon as the spinach is wilted add the half and half and the turkey and cook until heated through and bubbly. You might need a little more stock or half and half if the sauce is too thick for your taste. Season with the salt and pepper and the hot sauce. Stir in the cheese. Serve over hot pasta. Serves 4-6.
Turkey with Herb Dumplings
1 turkey thigh, cut off the bone and cubed
1 large onion, chopped
2 ribs celery, chopped
4 carrots, peeled and chopped
3 potatoes, peeled and cut into chunks
4 c. turkey stock
4 T. flour
salt and pepper to taste
1 c. baking mix- like Bisquick- I make my own
1/2 c. milk
2 T. chopped green onion
1 T. chopped parsley
1 t. dried basil
In Dutch oven or large pot, brown turkey thigh. Add the vegetables and brown them, too, turning to prevent burning. Add stock, cover pot, and simmer until veggies are tender, about 20 minutes. Season with salt and pepper to taste. Combine flour with some cold water or more stock until smooth. Add to the pot and stir well. Mixture will thicken. Meanwhile combine baking mix with milk and herbs. Drop dumpling batter by tablespoonfuls over the turkey mixture in pot. Reduce heat to low, cover pot and cook until dumplings are cooked, about 20 minutes. To serve place some of the turkey and vegetables with sauce in serving bowls and top with dumplings. Serves 6.
Turkey Lo Mein
1 onion, chopped
2 T. oil
1 can sliced water chestnuts, drained
1/2 c. green peas- you could also use green beans
2 c. diced cooked turkey
8 oz. angel hair pasta -I use a very fine noodle I get at the Asian market
soy sauce to taste
Hoisen sauce or oyster sauce to taste- you could also use stir-fry sauce
sesame oil
chopped green onions
Heat water for pasta. Heat oil in skillet and cook onion until browned. Add water chestnuts and cook 1 minute longer. While onion is cooking cook pasta. Add peas to onion mixture and stir to combine. Add the turkey and heat through. Drain pasta and toss into turkey mixture. Season with soy sauce and what ever Asian sauce you have on hand. Drizzle with sesame oil and top with green onions. Serves 4.
Turkey With Tortellini
1 lb. cheese tortellini, cooked and drained
2-3 c. cubed cooked turkey
2-3 c. cooked broccoli, chopped
2 T. butter or oil
2 T. flour
1 c. half and half or milk, warmed
2 c. stewed tomatoes- I used my canned tomatoes- you could substitute a 14 oz. can of tomatoes
salt and pepper to taste
fresh chopped parsley
In bowl combine tortellini with turkey and broccoli and place and a lightly greased casserole. In saucepan melt butter and add flour whisking until smooth. If using oil just combine oil and flour in pan and whisk until smooth. Add half and half and cook, stirring often until thickened and bubbly. Add tomatoes and heat through. Season to taste. Puree sauce and pour over the turkey mixture. Sprinkle with the parsley. Bake in a 350 degree oven until heated through and lightly browned around the edges- about 40 minutes.
Turkey Florentine

Turkey with Herb Dumplings

Turkey Lo Mein

Turkey with Tortellini
Uncle Art and the Giant Turkey
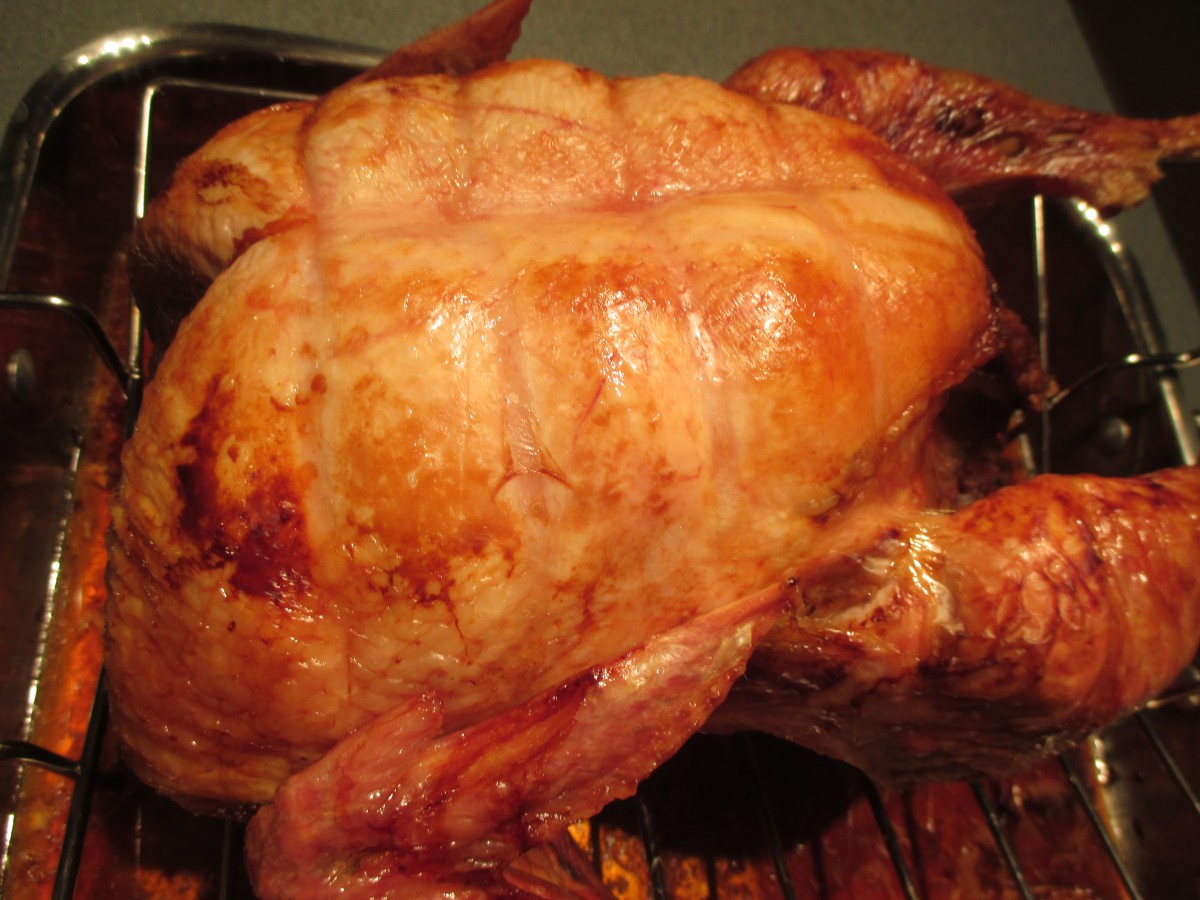 Rather than posting a recipe today, I wanted to share a fun Thanksgiving memory with you. Through most of my younger life, Thanksgiving was spent with my family and my Aunt Tillie and Uncle Art’s family. My mother and my Aunt Tillie were sisters. They were as close and loving as sisters could be. We took turns at each others homes, and shared the cooking duties.
There was a friendly rivalry every year to come up with a special dessert or to have a new side dish. The biggest part of this challenge though, was to get a really big turkey. My mother was convinced that a big bird was tastier than two small ones. Aunt Tillie agreed. So every year it was the quest of the host family to score a really large turkey.
My mom and dad would go to the local butcher to order the bird weeks in advance. I am sure Tillie and Art did the same. They always seemed to end up around 25 pounds, give or take. My dad and uncle kept track. Last year was 26 pounds and 4 ounces, but two years before, closer to 27 pounds. I swear, these birds had to be part ostrich.
The ultimate goal was to get a 30 pounder. It had eluded them all, until one year. Uncle Art had found a new guy. A turkey guy, who promised him the 30 pound bird of his dreams. We knew days before the big day, that the really big bird dream was going to happen. Then my mom got a phone call from Aunt Tillie.
My uncle had picked up the beast. He proudly brought it home. He looked at it, lovingly at first. Then he looked again. This was not Uncle Art’s first turkey. He felt something was wrong. Remember, this was something they had all dreamed about finding. Finding it first was cause for bragging rights, for sure. He was convinced that he had been duped, that the bird fell short of its promised weight. He told my aunt about his suspicions and they weighed the bird. It was too big for their kitchen scale, so my uncle weighed himself on the bathroom scale and then weighed himself again, this time holding the turkey.
Uncle Art had been right. He was short at least a couple of pounds of the promised 30 pounds. He went back to the turkey guy, irate. The man was defensive at first, but weighed the bird again. It weighed in somewhere in the area of 28 pounds. The man gave him some money back and lacking a bigger bird, Uncle Art brought it back home.
As I recall it was a perfectly lovely bird, cooked to juicy perfection. To my Uncle Art it was both a failure and a success. On one hand, he had not gotten the 30 pound bird he was hoping for. He did, however, take pride in the fact that he spotted it. That in the world of turkeys, he could see the difference between a 28 pound and a 30 pound bird.
I believe, some years later, a 30 pound bird was found. The story that year, around the Thanksgiving dinner table, was not so much about the 30 pound bird before us, but about the one that nearly was.
I hope you all have a great day, spent with those you love. I also hope you make memories to make you smile, when some of those we love are no longer here. Love and best wishes to all.
Happy Thanksgiving.
Pumpkin Roll
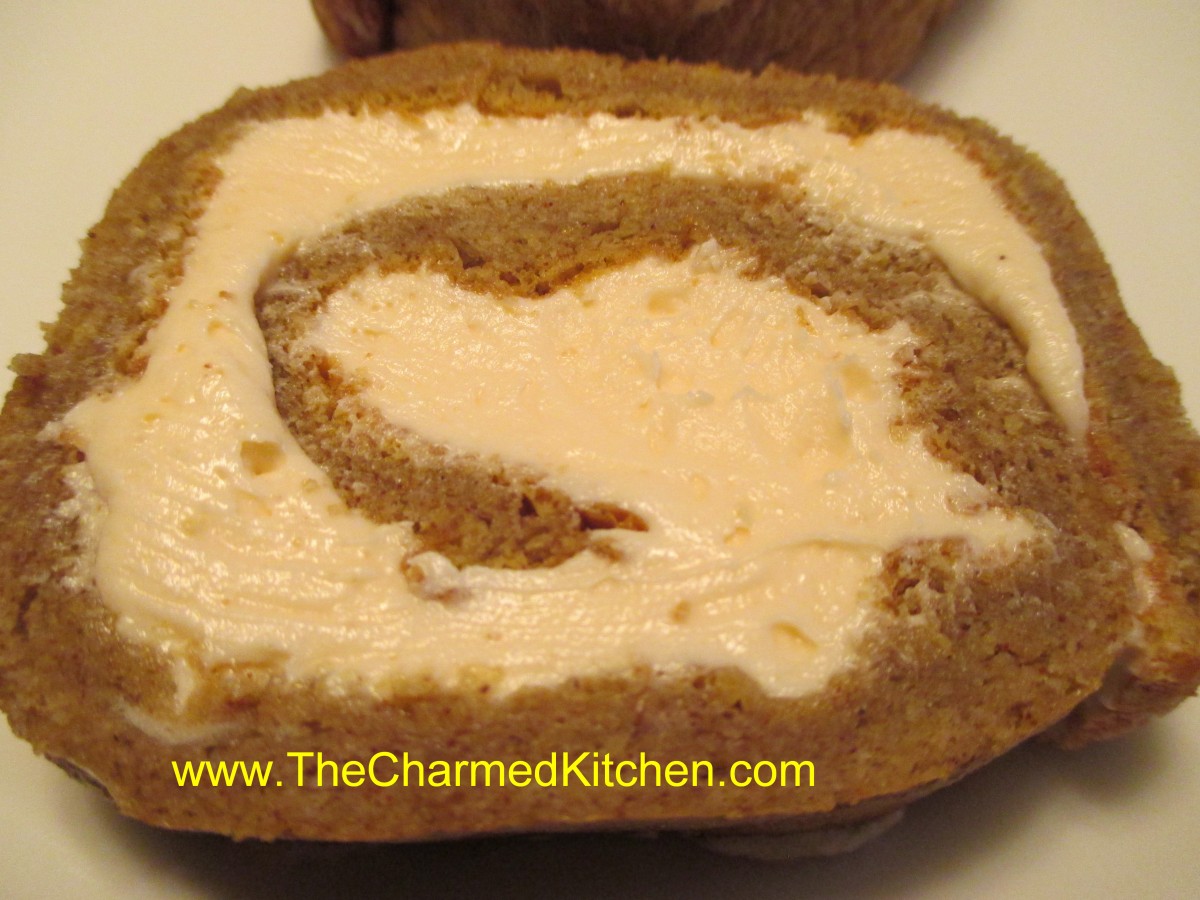
Pumpkin Roll
This is a favorite dessert of mine this time of year. I made it recently, but switched the filling from my usual one. It was a big hit at a recent dinner with friends. The filling swap was kind of an accident. I made a custard filling for a different dish and used it for my filling, just adding cream cheese and a bit more sugar. It was really worth the extra effort. Rather than baking the pumpkin rolls in two smaller jelly roll pans I baked it in my largest pan, then divided it into two rolls after filling. It seemed so much easier. Plus, I had two desserts for the effort of one. I had one for a dinner with friends and one for a dinner party at my house the next day. The pan I used was 17×12 inches. Here is the recipe. Even though the recipe calls to bake the cake first, the filling needs cool down time, so you might want to make it first. You’ll still need to let the cake cool down, but that does not take all that long.
Pumpkin Roll
6 eggs, separated, at room temperature
1 c. sugar, divided
1 c. flour
1 c. cooked, pureed pumpkin
2 t. cinnamon
1 t. baking powder
1 t. ginger
½ t. nutmeg
½ t. salt
Filling
2 eggs
½ c. granulated sugar
½ c orange juice
½ c. pineapple juice
2 T. flour
juice of half a lemon
1 c. whipping cream, whipped
2 cups powdered sugar
8 oz. cream cheese, softened
1 t. vanilla
Preheat oven to 375 degrees. Grease 1 large jellyroll pan (17×12) and line with wax paper. Grease and flour paper and set aside. In large bowl beat egg whites until soft peaks form. While beating, add ½ cup of the sugar, 2 tablespoons at a time. Beat until peaks are firm and glossy. In small bowl on low speed mix together flour, pumpkin, spices, baking powder, salt, remaining sugar and egg yolks. Gently fold flour mixture into egg whites. Spread batter in prepared pan and bake 13-15 minutes or until cake springs back when touched lightly. Meanwhile, prepare a tea towel by laying on a clean surface and dusting generously with powdered sugar. When cake is done immediately turn onto prepared towel and remove wax paper. Starting at wide end roll up cake in the towel and allow to cool.
Prepare filling by combining eggs with granulated sugar, juices and flour, in a saucepan and cook, stirring constantly, until thickened. Mixture should coat a spoon. Cool and chill. Fold cooled mixture into whipped cream. In mixing bowl beat cream cheese with powdered sugar and vanilla until light and fluffy. Fold in whipped cream mixture and chill until ready to use.
To finish cake, carefully unroll and remove towel. Spread filling on the cake and re-roll. Cut into two cakes. Wrap in plastic wrap. Chill. Makes 20 servings and can be frozen.
Cindy’s Squash Pie

Cindy’s Squash Pie
At first glance you would think my sister made a pumpkin pie. It looks like pumpkin pie. It also tastes a lot like pumpkin pie. When I was a kid, and tasted this pie for the first time, it was the first time I liked “pumpkin” pie My sister has been making this squash pie recipe for years. I love it. It is part of our Thanksgiving tradition. Cindy made it clear, from the beginning, that she used cooked butternut squash for her pie and not pumpkin. She liked the flavor better. I can’t argue with her success. The pie is yummy. Of course, you could use pumpkin or other winter squash, if you like. I use Hubbard sometimes. The recipe has the right mix of spices and just enough sugar without being too sweet. What ever squash you use, I am sure this pie will be a hit with your family, too.
Cindy’s Butternut Squash Pie
1 (9″)unbaked pie shell brushed with 1 egg white
2 eggs slightly beaten
1/2 cup brown sugar
1/4 cup white sugar
1 1/2 tsp cinnamon
1/2 tsp nutmeg
1/2 tsp ginger
1/4 tsp allspice
1/4 tsp cloves
1/2 tsp salt
1/2 tsp vanilla
2 cups (1lb) cooked, butternut squash (mashed or pureed)
3 Tbsp molasses
1 can evaporated milk (12 oz can)
Combine filling ingredients and pour into shell. Bake at 400 degrees for 55-60 min., or until custard tests done.
Cindy added: I find this to be a very generous recipe; could make 2 smaller pies or just bake the extra custard in a baking cup. I suppose it could be frozen and used in another recipe, but I’ve never tried to freeze the raw filling, so I don’t know.
This can be used with pumpkin, too.


