Cauliflower Flatbread

I have made this recipe before, but it had been awhile and I knew I wanted to make it again. I love cauliflower and eat it often. I had picked up a, huge cauliflower from a local produce market and I just wanted to do something different with it this time. It isn’t that hard to make. It is easier than making bread.
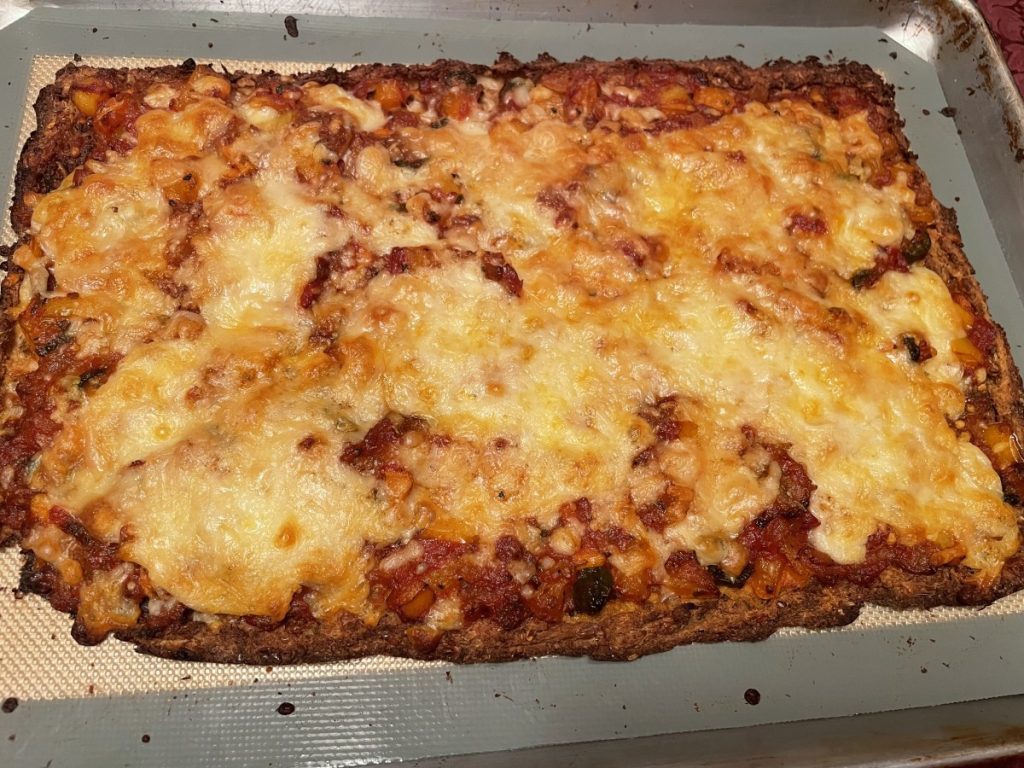
I was torn about what to call it. Often it is called a cauliflower pizza crust, but I think that gives you unrealistic expectations. It is after all, just a cauliflower. Somehow flatbread works better for me, but call it whatever makes you happy. In spite of not want ing to call it a pizza crust. I ended up treating it like a pizza.
The most time consuming part of this recipe is “ricing” the cauliflower. It involves cutting the cauliflower into flowerets and then chopping them in a food processor until the pieces are about the size of rice grains. Still, not that hard, just takes a few minutes. You can also buy cauliflowwer already chopped up, so you can even skip this step, if that helps.
After I made the crust, I cooked down a couple of jars of home canned tomatoes, sauteed onions, garlic and peppers and put it all together for the topping. Like a chunky pizza ssauce. added pizza seasoning to it, too. I spread it ocver the crust then topped with mozzarella and Parmesan cheeses. It was actuaslly very good and was eaten quickly by my guests.
So here is the recipe.
Cauliflower Flatbread Crust
2½ pounds cauliflower florets, riced
2 eggs, beaten
2 oz. cream cheese, softened
½ c. shredded mozzarella cheese
2 t. pizza seasoning- or seasoning of your choice
1 t. salt
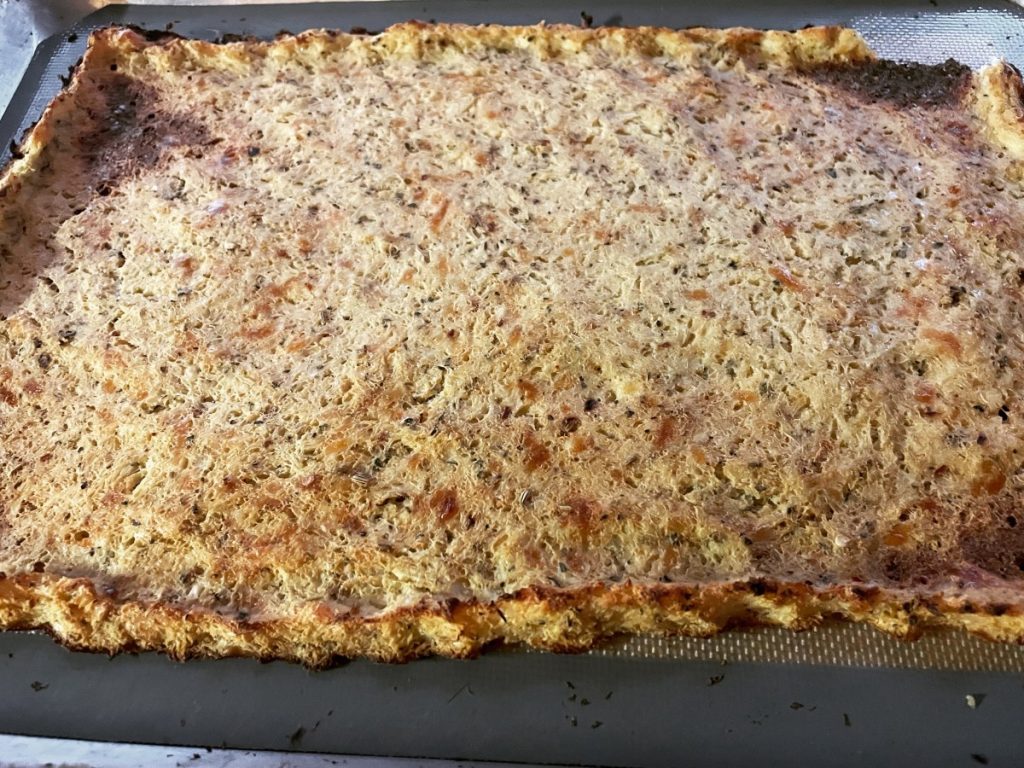
To make the cauliflower “rice”, pulse batches of raw cauliflower florets in a food processor, until a rice-like texture is achieved. Fill a large pot with about an inch of water, and bring it to a boil. Add the “rice” and cover; let it cook for about 4-5 minutes. You can also steam the cauliflower or even bake it in the oven at 350 for 10-15 minutes. Just get the cauliflower cooked. Drain into a fine-mesh strainer. Once you’ve strained the cauliflower, let it cool down, then transfer it to a clean, thin dishtowel or several layers of cheesecloth. Wrap up the steamed “rice” in the dishtowel, twist it up, and squeeze all the excess moisture out! It’s amazing how much extra liquid will be released, which will leave you with a nice and dry crust.
In a large bowl, mix up your strained cauliflower, beaten eggs, cheeses, and spices. (Don’t be afraid to use your hands! You want it very well mixed.) It won’t be like any bread dough you’ve ever worked with, but don’t worry– it’ll hold together! Press the dough out onto a baking sheet lined with parchment paper or a silicone liner. (It’s important that it’s lined, or it will stick.) Keep the dough about ⅓” thick, and make the edges a little higher for a “crust” effect, if you like. Bake for 35-40 minutes. The crust should be firm, and golden brown when finished. Now’s the time to add all your favorites– sauce, cheese, and any other toppings you like. Return to the oven, and bake an additional 5-10 minutes, just until the cheese is hot and bubbly. Slice and serve immediately!
Note: I used the cream cheese because I had some leftover from another recipe and it made sense to use it up. I honestly think the recipe would be fine without it- maybe add a bit more mozzarella cheese. I also added a second egg, which I did not do the last time I made the “crust”. I think it helped the crust to hold together better.
Butternut Squash Soup


I have been making versions of this soup for a long time. I tend to make a lot of it, then freeze some for later. I tend to use the veggies I am likely to have on hand. Some, like onions, carrots, garlic and celery are always used.
I used a fresh squash that I peeled and cubed up, but you can use frozen or canned squash instead. Pumpkins work, too. Here is my latest version of this wonderful soup.
Butternut Squash Soup
2 qts. Water, or a bit more
1 ham bone or smoked turkey on the bone (1 small turkey drumstick)
2 onions, peeled and halved
3-4 cloves garlic, peeled- the ones I had were very large
3-4 carrots, peeled and chunked
4 c. chopped cabbage
2 ribs celery, sliced
1 c. tomato sauce – or a couple of cups of chopped fresh or canned tomatoes
8 cups cubed butternut squash- you could use pumpkin or most any winter squash
-OR- 3-4 c. cooked pumpkin or winter squash
Paste-type soup base to taste, about 3-4 tablespoons
1 fresh sage leaf or ¼ teaspoon dried
Hot sauce to taste
Place all ingredients, except soup base and seasonings, in a large pot and bring to a boil. Cover and simmer until vegetables are very tender and meat is cooked and tender, at least 1½ hours and up to 3 hours. Remove bone or meat to cool and add soup base and sage. Use an immersion blender to puree the vegetables. It does not have to be completely smooth, but it should be close. If it is too thick, you can add a little more water. Density is a personal preference. Add hot sauce to taste. Puree a little more. Adjust seasonings if needed. Optional: Cut the meat off the bones and return meat to the soup once pureed. Serves 6-8. Freezes well.
Note: I make it in even larger batches because this soup freezes well. You can add other vegetables like sweet potatoes, corn, potatoes, green beans or whatever else you have around. I often add cauliflower and zucchini. If you want thicker chowder add a potato or two to the recipe. For a smoky taste you can also add smoked turkey sausage and the soup will be cooked in less time. Just remove the sausage, puree the soup, slice sausage and return to the pot. Smoked paprika or liquid smoke can also be used to add a smoky flavor. This is a good way to use up a ham bone or leftover ham.
Bacon, Corn and Shrimp Chowder


I love the combination of shrimp and bacon. When I was looking for a quick lunch for today, I knew I would be using them together. It is a chilly rainy day, so I decided to go with a chowder.
I rooted around my fridge and pantry for the ingredients and ended up with a very satisfying meal.
Some of my favorite dinners have happened by accident. Just looking at what I have on hand, and creating something tasty with it.
Bacon, Corn and Shrimp Chowder
6 thick slices bacon, cut into 1-inch pieces
1 onion, sliced
2 carrots, peeled and sliced
2 medium potatoes, peeled and cubed
1½ c. chicken stock
1 can cream corn*
½ c. corn- fresh or frozen_ I had sweet corn frozen from last summer
1½ c. half and half
½ c. chopped fresh parsley
12 oz. raw shrimp, peeled and deveined
Salt and fresh ground pepper to taste
Dash of hot sauce
In soup pot, cook bacon until almost done. Add onion and continue cooking until onion is cooked. Spoon out most of the bacon fat. Add the carrots, potatoes and stock and simmer, covered, until the veggies are tender. Add cream corn, corn and half and half and bring up to a simmer. Add parsley and simmer, covered, 10 minutes. Add shrimp and cook another 5 minutes or until shrimp is just cooked. Adjust seasonings and serve. Serves 3-4.
*I decided to use a can of cream corn as the base. When I was a kid my Mother would make me something she called cream corn soup. She rarely used prepackaged foods and made wonderful homemade soups all the time. I think it was on one of those days when she was just really busy. To make her cream corn soup she would empty the can of corn into a saucepan. Then she filled the can with milk and added that, too. A little salt and pepper and the soup was done. Just before serving she’d put a small pat of butter in the soup. As a kid I just loved it. I must admit I don’t eat cream corn soup anymore, but as a base, the cream corn can really make a nice chowder.
Rosemary Biscuits – New Day Cleveland

Here is my television appearance on New Day Cleveland. Just click on the link to watch. Thanks David Moss and the whole crew for making me feel welcome.
https://fox8.com/on-air/new-day-cleveland/rosemary-biscuits/
Carrot Oat Bran Muffins


These muffins are really good for you, but they taste like a treat. I was never a big fan of bran muffins made with wheat bran. I didn’t like the flavor. But I love the way these muffins taste.
I prefer the taste of oat bran over wheat bran. I find it has a natural sweetness. With the addition of carrots and raisins these muffins are moist, light and slightly sweet. They remind me of a cross between a muffin and carrot cake. Vanilla and orange zest makes them fragrant and tasty, too. With plenty of oat bran, they also provide healthy dietary fiber. I make these often, then freeze some for later. They make a great breakfast and an easy snack.
Carrot Oat Bran Muffins
1 c. milk or buttermilk
1 c. oat bran
1 egg
1/3 c. oil
3 T. brown sugar
1 t. vanilla
1 t. orange peel
1 c. shredded carrots
1 c. flour (all purpose or whole wheat pastry flour)
1 t. baking powder
1 t. baking soda
½ t. salt
½ c. raisins
In mixing bowl combine oat bran and milk. Add egg, oil, sugar, vanilla, peel and carrots. Beat well. Combine remaining ingredients in small bowl and mix well. Gently fold into bran mixture. Divide batter in 12 muffin cups that are either greased or lined with paper cups. Bake in a preheated 375-degree oven for 20-25 minutes. Makes 12.
Beet Dumplings


I had beets that I wanted to use in something different. So I made these dumplings with cooked beets. The color came out so vibrant. We had them in soup last night.
The flavor of the beet is somewhat muted in this little dumpling. These would be a nice side dish for all sorts of dishes. I will make more and serve them with a roast chicken this weekend.
I do a very rustic version- just slice dough off into 1/2 -inch thick pieces and boil them up. These could be made ahead and frozen, too.
Beet Dumplings
2 small russet potatoes, 11-12 oz. total, peeled, diced into 1/2-inch cubes
2 medium/small beets, roasted, skin on, cooled
1 egg
1/4 c. whipping cream
1 1/4 t. salt
¼ t. dill weed
1 1/2 c. (about) flour
Steam potatoes over boiling water until tender, about 12 minutes. Place in bowl and mash or put potatoes through a ricer. Place in bowl and cool about 10 minutes. Remove skins from cooled beets and dice. Place beets in a food processor or blender. Add the cream and process until smooth. Combine beet mixture with potatoes, egg, salt and dill and mix well. Stir in flour and combine until slightly sticky dough forms. Add more flour a tablespoon at a time if the mixture is too moist. Turn dough onto lightly floured work surface and divide into 6 equal portions. Roll out 1 piece into a rope about 20-inches long by 3/4 inch. Cut dough into 3/4 -inch pieces and arrange finished dumplings in a single layer on a floured baking sheet and repeat the process with the remaining dough. Boil the dumplings in well-salted boiling water, about 1/3 at a time. Boil for 4-5 minutes. They will come to the surface and be tender. Check after 4 minutes. Serve with butter or with your favorite sauce. Serves 6.
Creamy Spinach Pasta Sauce

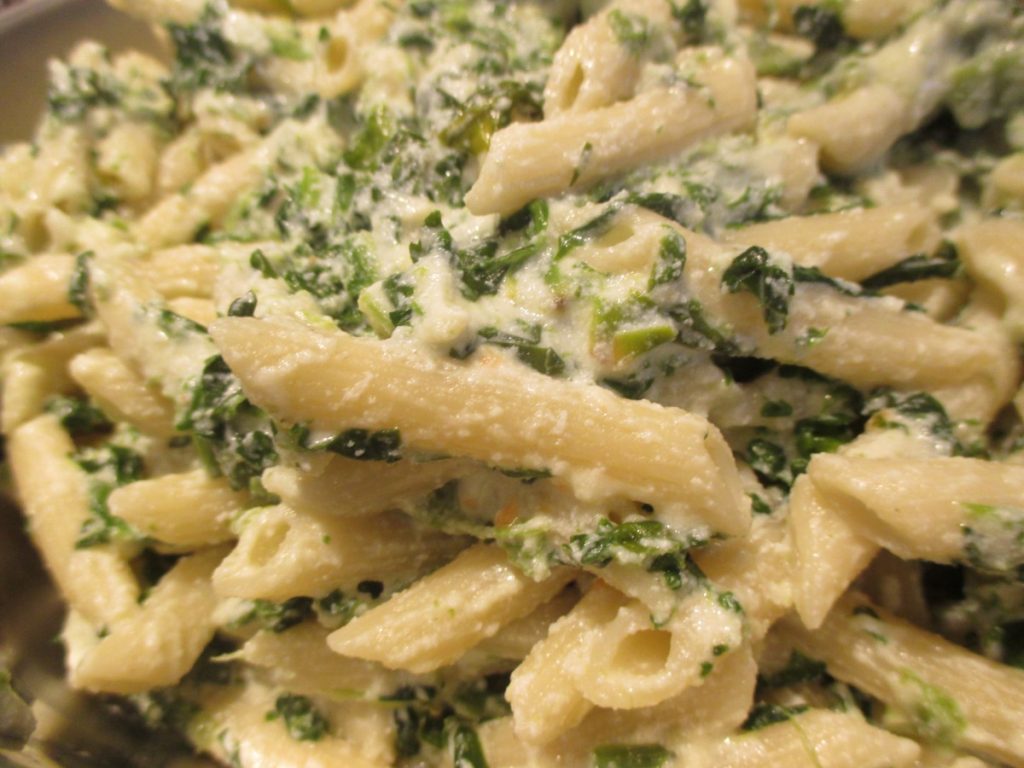
The sauce reminds me of creamed spinach, a favorite childhood dish of mine. The recipe makes enough to generously sauce a pound of pasta. It is very tasty and easy to make. Great when you need a home made meal, but don’t have a lot of time. You can also use this sauce on hot cooked rice or baked potatoes.
The recipe uses frozen spinach, but you can use fresh spinach , if you prefer. Just cook down 12-16 oz. of fresh spinach and use like the frozen spinach.
There is Parmesan cheese in the sauce. I like to serve extra on the side.
Creamy Spinach Sauce
1/4 c. butter
1 (10 oz.) package frozen spinach, thawed and drained
1 t. salt
1 c. ricotta cheese
1/4 c. grated Parmesan cheese
1/4 c. milk
Heat spinach in butter for 5 minutes. Add remaining ingredients and heat gently until warmed through. Do not boil sauce. Toss sauce over hot, cooked pasta. Makes 2 1/2 cups, enough for about a pound of pasta.
How to Make Ghee


Ghee, if you haven’t had it before, is a kind of clarified butter, often used in Indian cooking. You can buy it at stores that carry international foods, but it is easy to make. I had a lot of butter left over from holiday baking, so I used some to make ghee.
Ghee has a wonderful, toasted, nutty flavor and it can be used in all sorts of dishes. You can add it to veggies or spread it on toast. I love to add ghee to rice or pasta.
A wonderful bonus when using ghee, because the milk solids have been removed, you can fry foods in it. It doesn’t burn quickly, like regular butter.
Because the solids have been removed, you can store ghee at room temperature. Although, it is recommended to use up home made ghee in a month or so. For longer storage, you can pop it in the fridge, but you don’t have to.
The difference between ghee and clarified butter is that ghee is cooked longer, to develop a darker color and wonderful toasted flavor. The longer cooking also removes any water in the butter, leaving just the fat behind.
There are several methods for making ghee. Some suggest long, slow cooking. Others a little more heat and less cooking time. I prefer the latter. I am not the most patient person.
Here is how I made my ghee.
Start with a pound of unsalted butter. Place the butter in a heavy bottomed, medium sized saucepan. Melt the butter over low heat. As soon as the butter is melted, turn the heat up a bit- to medium. It will start to form foam on the top at this point. After a few minutes, the foaming will stop. Turn up the heat a little more- not high heat, but a little higher medium, if that makes sense. Watch for the second foam to form on the top. This takes about 7-8 minutes. It will have turned a pretty, golden color. At this point, your ghee is done. You’ll have to strain it, to keep out the solids, which will have settled to the bottom of the pan. I strained my ghee twice, through several layers of cheesecloth. Be sure the container you are straining the ghee into is heat proof- it is pretty hot at this point. I used a stainless steel bowl, then transferred the ghee to a canning jar. You could also use a fine mesh strainer, if you don’t have cheesecloth. Store in a container with a tight fitting lid- you don’t want moisture to get to your ghee. It will get more solid as it cools down.
One last thing. I used a stainless steel pot and the brown bits took a bit of scrubbing to get out of the pot. Small price to pay for your own ghee.
That’s all there is to it. Try to use within a month or store in the fridge. Trust me, it never lasts that long around here!!
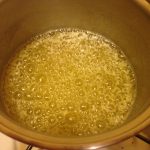
first foam
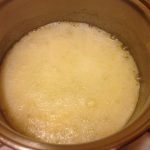
second foam
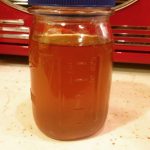
strained, still warm
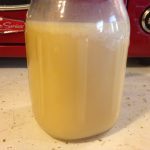
All cooled down
Chicken Florentine


I love spinach. I always have, even when I was a kid. My Mom used to make Pork Chops Florentine and it was one of my favorite dishes. She had to add more spinach to her recipe because I loved the spinach so much.
Chicken Florentine is another spinach dish I just adore. It is a simple dish to prepare, too. Great for a weeknight, when you might not have a lot of time to get dinner ready. It is also special enough to serve to company. The most difficult part is getting all that spinach in the skillet.
A pound sounds like too much spinach, but trust me, it is the right amount. The spinach cooks down so much, you need more than you think.
The hardest part of making this dish is just getting all the spinach in the skillet. Don’t try to get it in all at once. As you add the spinach, it will cook down a lot. As the spinach wilts, keep adding more, until it is all in.
I served the Chicken Florentine on its own, but you can serve it over rice, pasta or potatoes. You can also cook it longer to thicken the sauce more, if that is how you prefer it.
I used boneless chicken breasts, because that is what I had. Boneless thighs work great in this dish, too.
So here is the recipe. I hope you give it a try. It is an easy way to get a lot of leafy greens in your diet, for sure.
Chicken Florentine
2 T. oil
1 c. sliced onion
1½ lbs. boneless chicken, I like thighs
Flour
Salt and pepper
1 c. chicken stock
½ c. half and half or milk
¼ c. sherry- Not cooking sherry
1 lb. fresh spinach, washed
In large skillet, oven medium high heat, heat oil. Add onions and sauté until golden. While onions are cooking, season flour with salt and pepper. Dredge chicken pieces in the seasoned flour. Add chicken to the skillet. Cook until chicken is golden on both sides, turning once. Add stock, half and half and sherry to the skillet and bring mixture to a simmer. Add the spinach, a few handfuls at a time, until it wilts and will fit in the skillet. The spinach wilts down a lot. Turn down heat to medium and cook until spinach is cooked down, stirring to get spinach mixed in. Cook a few minutes more so sauce will reduce and thicken a little. Add more salt and pepper to taste, if needed. Serves 4.
Note: If you prefer, you can use frozen spinach instead. add 2 (10 oz. ) packages, thawed and drained a bit.
100% Whole Wheat Bread

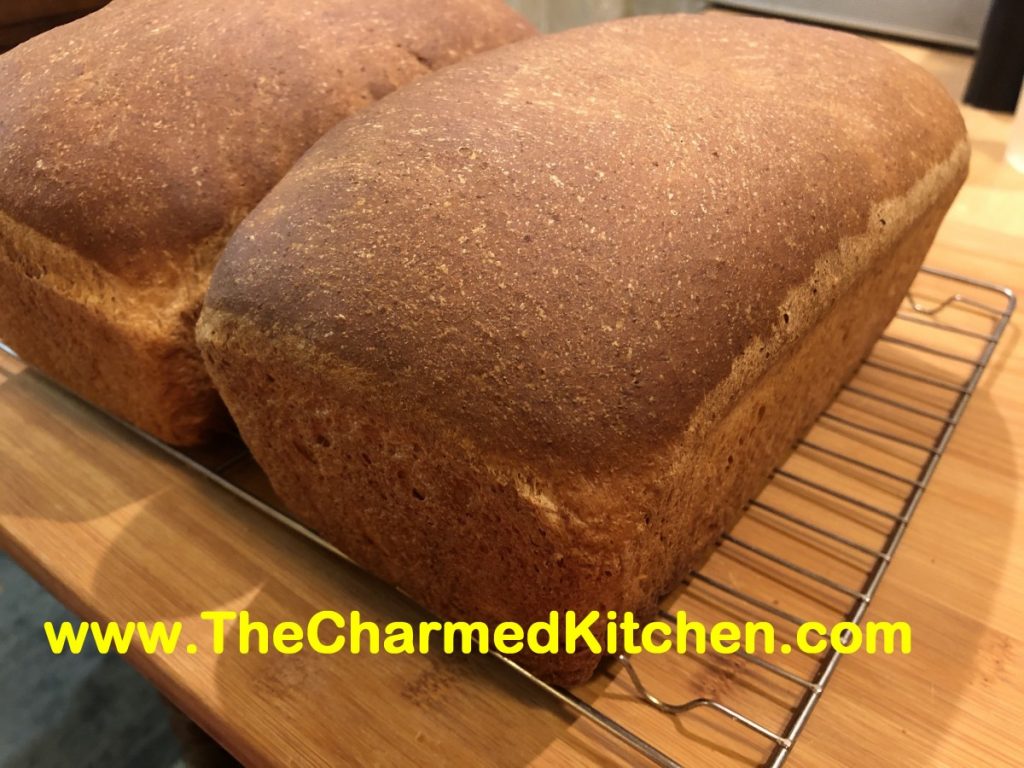
A lot of us want to eat more whole grains, but are unhappy when we try to make 100% whole wheat bread at home. There is a secret to baking whole wheat bread that is both tender, and slices easily.
Whole wheat flour, high in gluten, also is high in fibers, which make it harder to get the gluten to that stretchy state. If you knead whole wheat bread dough for 5- 10 minutes, like white bread dough, you’ll have a dough that is far from elastic.
The secret? Knead it longer. I knead my whole wheat bread dough about 20 minutes. That is easy if you have it in a stand mixer. Just set it on low and let the dough hook do the work. Not so easy if you are kneading by hand. When kneading for 20 minutes by hand, more and more flour gets added to the dough, to keep it from sticking. The extra flour results in a heavy dough, and a loaf of bread that is best used as a door stop. If you have to knead by hand- knead on a wet surface. The dough won’t stick to your hands or the board and you can knead it long enough to get a properly worked dough. How do you know your dough has been worked long enough? Hold the dough up to light and pull it. It should stretch thin enough so that you can see the light through it, without tearing. Here is one of several recipes I have for 100% whole wheat bread. I love it and I think you will, too.
100% Whole Wheat Bread
2 packets active dry yeast
2 2/3 c. warm water
½ c. oil
½ c. honey, molasses or maple syrup
6 ½ -7 c. whole wheat flour
½ c. non fat dry milk
2½ t. salt
Combine first 4 ingredients in a mixing bowl and stir in 3 cups of the flour, the dry milk and the salt. Beat with electric mixer for 3 minutes. Stir in enough flour for mixture to form a thick batter and continue mixing on low in mixer for 15-20 minutes. Dough takes time to become elastic. Add extra flour slowly until dough comes away from the sides of the work bowl, but not too soon. Note: if you must do this by hand add flour until dough starts to come away from the sides of the bowl and knead with wet hands on wet work surface for 15-20 minutes. Transfer dough to lightly greased bowl and cover, allowing to rise until puffy, about 1 hour. Punch dough down and transfer to a lightly floured surface. Divide in half and shape each half into a loaf. Place in a lightly greased 9×5 – inch pan. Brush top with oil and place a piece of plastic wrap over the top. Allow to rise until doubled. Bake in a preheated 350 degree oven for 40 minutes. Tent with foil after 20 minutes to prevent over browning of the top. Test for doneness by removing bread from pan and thumping on the bottom. Bread should sound hollow. Makes 2.


