Asian Turnip Cakes

If you are planning a party for the Lunar (Chinese) New Year, you might want to make turnip cakes.
I first had turnip cakes at a local Asian restaurant. I loved them, and was intrigued at how to make them. They were little squares, lightly crisped on the outside, smooth and creamy in the middle.
When I first heard turnip cake- I was thinking of the purple and white turnips I knew. That is not what these turnip cakes are made from. It helped a lot when I realized the “turnip” cake was actually made from Daikon radish. Daikon radishes are also called Chinese turnips. They are really big, white radishes. They are available at Asian grocery stores and other grocery stores. Now that I knew the ingredient I needed, I had to find a recipe.
I searched the internet and found a lot of different variations for how to make them.
The first recipe I tried was more like a potato pancake. Shredded radish paired with eggs and bread crumbs. They were good, but not what I had at the restaurant. The turnip cake I had enjoyed was smooth and sort of starchy. Plus, it was a neat square shape.
I found several recipes that included the steaming step. This enabled the cakes to be set up with a starch, cooled and sliced before the final frying step. This was what I wanted!!
The most promising recipe included rice flour- but I was out of rice flour, so I improvised with cornstarch and a little wheat flour. It worked really well.
Many recipes included shrimp or Chinese sausage and sometimes green onions. I decided, this time, to make them vegetarian. That worked well, but you certainly could add meat or shrimp to yours.
I shredded the daikon pretty fine, but you could still discern the radish in the final dish. I liked that a lot. I did not grate them as some recipes suggested. So here is my version of turnip cakes. They sound like a bit of work, but it really is worth the time. I also like that all the prep can be done a day or two ahead of time, then just slice and fry when you want them.
Turnip Cakes
1 large Daikon radish- about 1¼ lbs., give or take
1 c. water
½ c. minced onion
1 t. salt
½ t. white pepper
½ c. cornstarch
2 T. flour
Oil for frying
Oyster sauce for dipping, optional
Peel and shred radish. I used a fine shredding blade. Squeeze out some of the liquid from the radish. Place shredded radish in bowl with the water and onion and steam in microwave for 4-5 minutes- you can also place radish and onion in saucepan with water and simmer 4-5 minutes. Set aside to cool. Combine the radish mixture with the cornstarch, flour salt and pepper. Oil an 8×4-inch loaf pan. Place the radish mixture in the prepared pan and steam for 50 minutes.* I placed plastic wrap over the pan to prevent water from dripping into the pan. Remove pan from steamer and cool down for at least 30 minutes. . At this point you can finish preparing the turnip cakes- or place in fridge until ready to make them. When ready to fry the turnip cakes, remove from the pan and cut into slices- about ¾ -inch thick. Heat oil in a skillet over medium high heat. Cook cakes in oil on both sides until golden brown and crisp. Drain on paper towels. Serve with oyster sauce- or whatever dipping sauce you prefer. Makes about 10.
* To steam the mixture- I just used a large stock pot with a cooling rack in it. I brought about 2 inches of water to a boil, placed the pan on the rack and covered the pan. You could also steam in the oven with a roasting pan, with an inch of boiling water in it and covered with foil.

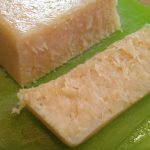
Slicing the turnip cakes before frying

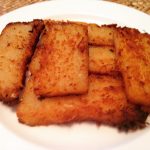
Ready to serve
Sweet and Sour Pork

I have to admit to loving all things sweet and sour. It takes a bit of work- but it is worth the effort. I used a fresh pineapple, which I prefer, but canned pineapple could be used, too. You can buy sweet and sour sauce in most grocery stores, but I like my own better.
Make the sauce first, so you can just toss it over the pork and veggies when ready to serve.
The pork is cubed and marinated overnight in a mixture of soy sauce, cornstarch and an egg. The pork comes out very tender, when prepared this way. You could substitute cubed chicken, for the pork, if you prefer.
Sweet and Sour Pork
1-2 lbs. boneless pork
1 egg
1 t. cornstarch
2 t. soy sauce
Additional cornstarch for dredging
oil for frying
1 medium onion, chopped
1 sweet red or yellow pepper, seeded and chopped
2 cups peeled and cubed fresh pineapple, or 1 can pineapple in juice, drained, reserving juice for sauce
Sweet and Sour Sauce, recipe follows
Chopped green onions
Cut meat into cubes and place in bowl. Combine egg, 1-t. cornstarch and soy sauce and pour over the meat, stirring to coat. Allow marinating at least 1 hour in fridge, but best if done the day before, or early in the day.
When ready to cook, heat 1-2 inches of oil in a medium sauce pan to 350 degrees. Dredge the pork in corn starch to coat. Set aside. Heat 1T. oil in large skillet or wok. In wok, sauté onions on high until tender. While you are cooking the onions and other vegetables, start cooking the cubed pork in the sauce pan in the 1-2 inches of hot oil. It will take several batches to cook the pork. As the pork cooks- it will take about three minutes per batch- remove the pork from the pan and drain on paper towels. Continue to cook the pork in batches while finishing the veggies and pineapple in the wok. Add pepper to onion and sauté 3 minutes more. Add pineapple and cook until pineapple starts to brown a little. Add the cooked pork to the onion mixture. Then and some of the sweet and sour sauce and toss until coated. There is usually extra sauce for a later use. Serve over rice, and top with some green onions. Makes 4-6 servings.
Sweet and Sour Sauce- see note
1/2 c. apple cider vinegar
1/2 c. sugar
1/2 c. pineapple juice
3 T. ketchup
2 T. soy sauce
2 T. cornstarch
1 t. dried minced garlic
1-t. fresh grated ginger
Hot pepper flakes to taste
In saucepan combine all ingredients. Cook over medium heat, stirring as mixture gets hot, until sauce begins to bubble. It will also get much clearer. Boil gently 1 minute, stirring constantly before removing You may also want to use only some of the sauce and save the rest for another use.from heat. Makes 1 1/2 c. Keeps in the fridge for a couple of weeks.
Note: If you make the sweet and sour sauce ahead of time it will get runny when reheated if made with regular cornstarch. Either use modified cornstarch (Clear Gel ) or make sauce just before using.


