Thanksgiving side dishes

Cindy’s Squash Rolls

Cindy’s Squash Rolls

I love these dinner rolls.  I think you will, too. The addition of squash is what makes them so special. The squash adds beautiful color to the rolls. It also creates a soft texture and an earthy sweetness.

These rolls are wonderful for any fall or winter dinner or holiday. They are especially nice for Thanksgiving.

We have them every Thanksgiving. My sister Cindy always makes them, and has been making them for years. They are rich, soft and sweet and make a perfect addition to the dinner table. Even with all the other foods at Thanksgiving dinner- you always save room for these dinner rolls.

While I use cooked butternut squash in mine, pumpkin could be used, as well as other winter squashes.

The recipe makes a pretty big batch. You can bake them, then freeze some for later use.

I love slicing them in half, and making mini turkey sandwiches with them the day after Thanksgiving.

Cindy’s Squash Rolls

1 c. milk

4 T. butter

½ c. sugar

¼ c. brown sugar

1 t. salt

1 pkt. Yeast

4-5 c. flour

1 ½ c. cooked butternut squash, strained, or 1 (16oz.) can squash or pumpkin

2 eggs, room temperature

Scald milk and butter. Place sugar and salt in large bowl and pour in milk mixture. Cool to lukewarm. Add yeast and 2 cups of flour. Beat at medium speed with mixer for 2 minutes. Add squash and eggs and mix until smooth. Add flour gradually to form a stiff dough. Knead on floured board for 7-8 minutes. Place in a greased bowl, turning dough to coat evenly. Cover with a towel and allow to rise until doubled. Punch dough down and shape into rolls. Dough can be placed in a greased cake pan where they will touch each other as they rise making softer rolls. You can also place them in muffin tins, or shape into rolls and place on greased baking sheet for crispier rolls. Cover and let rise until doubled. Bake at 375 degrees for about 25 minutes. Butter tops while warm. Makes 2 ½ -3 dozen.

Variation: you can also add ½ t. ground nutmeg, 1-2 T. chopped chives, or 1T. parsley flakes for a little different flavor.

Stuffing or Dressing?

Mushroom Dressing

This time of year, everyone seems to be planning for Thanksgiving. Most of that planning is around the dinner. There are people who make stuffing and those who make dressing. The difference between the two, is where you cook it.

When you stuff the bird, it is stuffing. Cooked outside of the turkey, it is dressing. Over the years I’ve had a lot of variations on both. My Mom always bought Pepperidge Farm stuffing mix as a base. The she added onions, celery, sausage and sometimes mushrooms. She also made a pretty darn good cornbread stuffing. I tend to use a good quality bread, often homemade, that I toast and combine with veggies and stock and then bake as dressing.

I love stuffing, too. The only problem is that by stuffing the bird you must increase the cooking time to be sure the stuffing has reached a safe internal temperature ( 165 degrees).  I prefer to stuff smaller birds, like chicken, where the cooking time isn’t as long. We always had stuffing when I was little. Eventually Mom switched over to dressing to make it faster to cook the bird. Keep in mind, my family normally had turkeys that weighed over 25 pounds. The cooking time for a stuffed bird of that size is pretty long.

There are also people who add eggs to their stuffing/dressing. That wasn’t something I’ve done. It is something I need to try at some point. They swear by the moistness and texture of their recipe. I will admit to being intrigued. It reminds me of making bread pudding. I love the texture of bread pudding.

So how do you make your stuffing/dressing? Eggs, no eggs? In the bird or out? I love to hear what others are doing. I have my recipe, which I will share with you, but I am open to trying something new.

Dressing/Stuffing

Basic Bread Stuffing/ Dressing
1 c. sliced mushrooms
¾ c. diced celery
3 T. minced onions
2 T. chopped parsley
4 T. butter or margarine
4-5 c. bread cubes
salt and pepper to taste
¼ – ½ c. turkey or chicken broth if making dressing

Sauté vegetables in butter until tender. Add bread and seasonings and toss to coat. Stuff into turkey just before cooking or add broth and place in covered casserole, cooking for 45 minutes to an hour at 350 degrees. When making stuffing allow ¾ c. per pound of turkey. You may want to stuff the bird and still make extra dressing for the next day. When making dressing be sure to cover the pan well to keep the dressing from drying out.

Variations:

Oyster dressing: Add 12 ounces of oysters, cooked in their own liquid for 3 minutes and drained to the stuffing. For the dressing you may want to reserve some of the cooking liquid and add it in place of turkey broth.

Cornbread Stuffing: Omit bread cubes and add 4-5 cups of cornbread crumbs.

Fruit Stuffing: Omit parsley and add 1 ½ c. chopped tart apples and ½ c. chopped prunes.

Sausage: Add 1 cup cooked and crumbled sausage

Of course there is always the prepared stuffing mixes on shelves everywhere. I make no judgements. Time is a precious commodity. If you are going to use Pepperidge Farm or any of the other dry mixes watch what liquid you use as the mixes tend to be saltier and adding broth could make them too salty. Also when you use pre-seasoned mixes, add the same vegetables you would have added to homemade for a better taste. My mom always uses the Pepperidge Farm stuffing mix and by the time she adds all of her little touches it tastes great.

A Trio of Mashed Potatoes

A trio of mashed potatoes

I am perfectly happy just mashing up potatoes and adding warm milk or cream and butter to them along with salt and pepper. Still, sometimes it is nice to switch things up a little. There are certainly countless variations for what you could add to mashed potatoes. If you are making mashed potatoes for Thanksgiving, and want to try something new, you might consider one of these recipes.

They are three of my favorites.

I can remember the first time my Mother added roasted garlic to mashed potatoes.  They were so good. I think she added roasted garlic to them all the time after that.

Roasted Garlic Smashed Potatoes

6 cloves garlic, peeled
1/4 cup olive oil
3 lbs. potatoes, peeled and cubed
½ c. milk, warmed
¼ c. grated Parmesan cheese
2 tablespoons butter
½ t. salt
¼ t. ground black pepper
Preheat oven to 350 degrees. Place garlic cloves in a small baking dish. Drizzle with olive oil, cover, and bake 45 minutes, or until golden brown. Bring a large pot of lightly salted water to boil. Add potatoes, and cook until tender but firm. Drain, and transfer to a large mixing bowl. Place roasted garlic, milk, Parmesan cheese, and butter into the bowl with the potatoes. Season with salt and pepper. Mash to desired consistency.

Cheesy Bacon Smashed Potatoes

3 lbs. potatoes, peeled and cubed
½ c. milk or half and half, warmed
2 c. shredded cheese- I like cheddar
3 T. butter
12 oz. bacon, cooked, drained and crumbled
Salt and pepper to taste

Bring a large pot of lightly salted water to boil. Add potatoes, and cook until tender but firm. Drain, and transfer to a large mixing bowl. Place milk, cheese, and butter into the bowl with the potatoes. Season with salt and pepper. Mash to desired consistency. Stir in bacon, reserving some for the top.

Sour Cream and Green Onion Smashed Potatoes

3 lbs. potatoes, peeled and cubed
1 c. sour cream
3 T. butter
½ c. chopped green onions or chives
Salt and pepper to taste

Bring a large pot of lightly salted water to boil. Add potatoes, and cook until tender but firm. Drain, and transfer to a large mixing bowl. Place sour cream and butter into the bowl with the potatoes. Season with salt and pepper. Mash to desired consistency. Stir in green onions, reserving some for the top.

One more thing: A note about peeling. I still mostly peel potatoes that I am going to mash. My sister, Cindy, does not. She likes the flavor and texture the peel adds. Either is fine by me.

Butternut Squash Saute
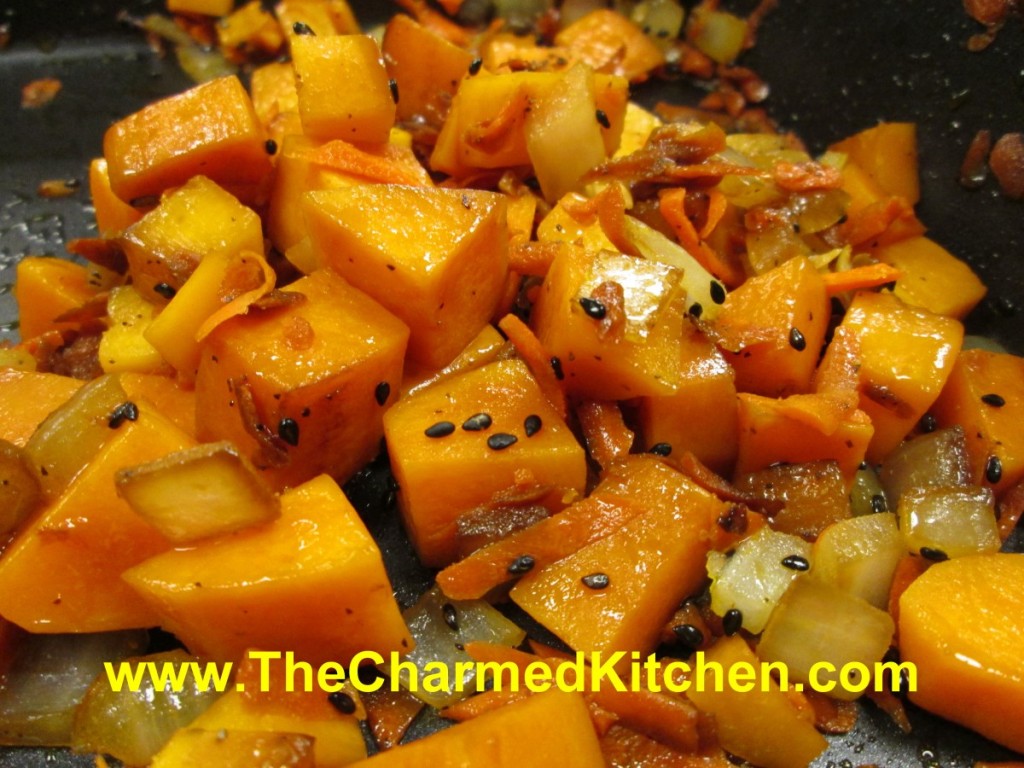
Butternut Squash Saute

Winter squash season is here, and I could not be happier. I love the variety of squash (and pumpkin) at the markets this time of year. They are both beautiful and tasty.

This dish is a combination of butternut squash with onions, garlic, carrots and finished off with black sesame seeds. It makes a great, seasonal side dish.

I used butternut squash, but you could use any number of hard squashes, or even pumpkin. If you are looking for a different way to cook some of those squash- try this dish. I think you might be surprised at just how good it is.

When cutting up hard squashes, you have to be careful not to cut yourself. A round, hard  squash, with a tough outer skin can be a recipe for disaster. I trim a small slice off one end of my squash, creating a flat side. Then I lay it down on that side, to make it more stable for cutting. With the butternut, once it was sliced on one side, I was able to cut in in half pretty easily.

To peel a hard squash, so you can cut it into cubes, and use a vegetable peeler to remove the skin. You will need to run the peeler over the skin a few times to get off all of it. Then cut into cubes.

Butternut Squash Sauté

3 tablespoons olive oil

1/2 cup chopped onion

1 teaspoon minced garlic

4 cups cubed fresh butternut, acorn or Hubbard squash or pumpkin

1/2 cup grated carrot

2 tablespoons soy sauce

1 teaspoon salt

1 teaspoon ground black pepper

2 teaspoons black sesame seeds

Heat the oil in a large skillet. Add the onion and garlic; cook and stir until the onions begin to brown. Stir in the squash, carrot, soy sauce, salt, and pepper; cook, covered, another 5 to 7 minutes, until squash is tender. Sprinkle with sesame seeds before serving.

Sweet and Sour Baked Onions
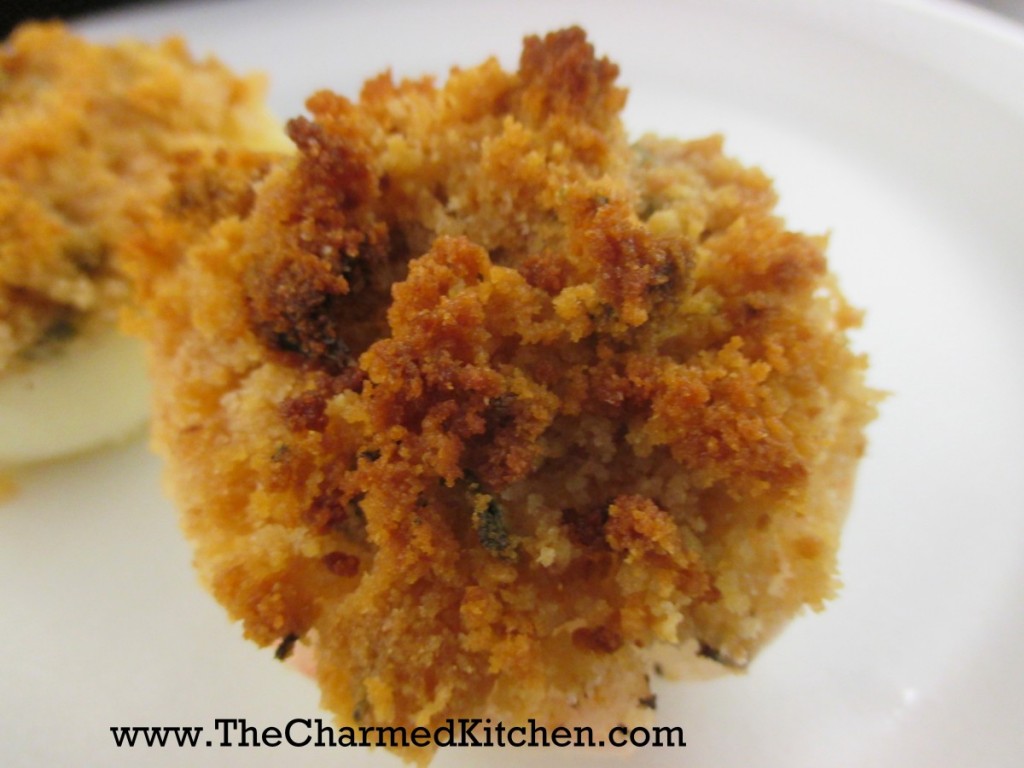
Sweet and Sour Baked Onions

I never met an onion I didn’t love. Most of my savory dishes start with sauteing onions in a pan. But in many ways, the onions are in the supporting role, making the other ingredients taste better.

In this recipe, the onions are the star. Plain old yellow cooking onions are elevated to a tasty side dish I think you will like. This would make a great side dish for Thanksgiving or any holiday meal.

The onions are peeled, halved and drizzled with a vinegar/sugar mix. Then, they are topped with a bread crumb and herb mix that gets crispy, while the onions roast and become tender. The recipe reminds me of onion rings in flavor. The presentation is so pretty, though. Much more elegant than onion rings.

If you never tried baking onions this way, you might want to try it. Just a warning- they are addictive. Bake a few more than you think you need. People go for seconds on this dish.

Sweet and Sour Baked Onions

4 large onions, peeled and halved- I use yellow onions, but you can use red or white
2 tablespoons cider vinegar
2 teaspoons sugar
1 cup dried bread crumbs
1/2 cup olive oil
1 teaspoon dried rosemary
1/4 cup chopped fresh parsley
Salt and pepper to taste
Preheat oven to 375 degrees. Arrange the onions in a 9×13 inch baking pan. Arrange the onions round side down. In a small mixing bowl mix together the vinegar and sugar. Spoon the mixture onto the flat surface of the onions. Sprinkle with a little salt and pepper. In another mixing bowl combine the breadcrumbs with 1/4 cup oil, rosemary and parsley. Mix until well combined. Pat the mixture evenly onto the flat side of the onions. Drizzle the remaining 1/4 cup of oil over the onions and bake for 45 minutes or until the onions are tender when pierced. Let the onions cool a little at room temperature. Serve with extra salt and pepper to taste.
Sweet and Sour Baked Onions

Sweet and Sour Baked Onions

I never met an onion I didn’t love. Most of my savory dishes start with sauteing onions in a pan. But in many ways, the onions are in the supporting role, making the other ingredients taste better.

In this recipe, the onions are the star. Plain old yellow cooking onions are elevated to a tasty side dish I think you will like.

The onions are peeled, halved and drizzled with a vinegar/sugar mix. Then, they are topped with a bread crumb and herb mix that gets crispy, while the onions roast and become tender. The recipe reminds me of onion rings in flavor. The presentation is so pretty, though. Much more elegant than onion rings.

If you never tried baking onions this way, you might want to try it. Just a warning- they are addictive. Bake a few more than you think you need. People go for seconds on this dish.


Sweet and Sour Baked Onions

4 large onions, peeled and halved- I use yellow onions, but you can use red or white
2 tablespoons cider vinegar
2 teaspoons sugar
1 cup dried bread crumbs
1/2 cup olive oil
1 teaspoon dried rosemary
1/4 cup chopped fresh parsley
Salt and pepper to taste
Preheat oven to 375 degrees. Arrange the onions in a 9×13 inch baking pan. Arrange the onions round side down. In a small mixing bowl mix together the vinegar and sugar. Spoon the mixture onto the flat surface of the onions. Sprinkle with a little salt and pepper. In another mixing bowl combine the breadcrumbs with 1/4 cup oil, rosemary and parsley. Mix until well combined. Pat the mixture evenly onto the flat side of the onions. Drizzle the remaining 1/4 cup of oil over the onions and bake for 45 minutes or until the onions are tender when pierced. Let the onions cool a little at room temperature. Serve with extra salt and pepper to taste.

Subscriber to our Mailing List

Follow us on Social Media

Support This Site

Donate Now

New Release: