Monthly Archives: May 2017

City Chicken

City Chicken

If you never had City Chicken, you don’t know what you are missing. Meat on a stick- always a good thing. But not just meat on a stick- breaded meat on a stick!  If you like breaded pork chops, you should love City Chicken.

This is a dish I grew up with. When my Mom made City Chicken, I knew dinner was going to be special.

In case you don’t know, City Chicken is normally made with chunks of pork- or chunks of pork and veal- skewered on wooden sticks. I used pork.  After skewering, the meat is dipped in seasoned flour, egg wash and then bread crumbs- or cracker crumbs. No chicken in the dish at all. Odd, but well, I didn’t name the dish, I just like eating it.

You can just bake them or brown in a little oil first, before baking- for a crispier coating.

I read an article recently about City Chicken. The link is at the bottom of this post. The article reminded me that I hadn’t had City Chicken in years, and how much I had loved it. The article inspired me to make some, so I did.

I didn’t have my Mom’s recipe, so I recreated it as I remembered it. I invited a few friends over to try them, and all my guests enjoyed them. So here is my recipe. A tasty dish, and also a trip down memory lane.


City Chicken


2 lbs. boneless pork – I used Western style ribs

½ c. sherry – not cooking sherry

2 T. soy sauce

¾ c. flour

Salt and pepper

3 eggs

½ c. milk or half and half

2 T. chopped parsley

Hot sauce

½ t. garlic powder

1-2 c. bread crumbs

2 t. dried basil

2 t. dried oregano

½ t. dried thyme

Oil

6 –inch Wooden sticks or skewers

Cube pork into 1-inch cubes. Place in a bowl and add the sherry and soy sauce. Stir to combine, cover bowl and place in fridge. You can do this a couple of hours ahead or even a day ahead. You might not really need to do this step, but I like the flavor of the sherry, so I chose to marinade my pork in it before breading. Your choice, completely.

Take pork and skewer it onto wooden sticks. I used skewers that were a little thicker than what I normally use. Since they were long, I cut them in half before using. I ended up with 9.

Place flour in a bag with salt and pepper to taste. Add one pork skewer at a time to the flour, shaking to coat evenly. Place floured pork skewers on a tray. Once finished, combine eggs with the milk, parsley, hot sauce, garlic powder and a little more salt and pepper. Place bread crumbs in a bag with the basil, oregano and thyme. Shake to combine. Dip each floured skewer into the egg mixture, remove from egg mix and allow excess to drip off a little. Then place in the bag of bread crumbs, shaking to coat evenly. Repeat until all the city chicken is breaded.

Now I know I already asked you to wait to marinade the pork in the beginning. I am going to ask you to wait again. If you fry up the city chicken right away, the breading is likely to fall off. If you bread the city chicken early in the day- then leave it in the fridge at least a couple of hours before cooking it, the breading will stay on much better. I actually marinade a day ahead, in the morning. Then I bread them in the evening the night before. But even breading them a couple of hours before makes a big difference. Just keep in the fridge until you are ready to cook.


When ready to cook them- I know you were giving up hope we would ever get to this step- heat oil in a large skillet. You don’t need much oil- a few tablespoons, at most. Brown the city chicken on all sides in the hot oil. Transfer them to a baking dish as you finish browning them. Place in a preheated 350-degree oven for about 30 minutes. Don’t bake them too long- you don’t want them to dry out. Pork has to reach a minimum internal temp of 145 F. Serves 6.

The article that inspired me.

https://www.eater.com/2017/5/5/15551870/city-chicken-cleveland-pittsburgh



Whoopie Pies- Surprise Ingredient

Whoopie Pies

I always get a smile when I offer someone a Whoopie Pie. Although baked liked cookies, Whoopie Pies are really more like small cakes, held together with a soft and creamy filling. I added an unexpected ingredient to these, but it worked out pretty well. I make a chocolate beet cake, so adding beets to baked goods is something I have done before. I had cooked, shredded beets leftover from another recipe, so I decided to add them to my Whoopie Pies. Worked out well. They are really moist. Here is the recipe for my beet version, and the original recipe, too. Just in case you don’t have cooked shredded beets laying around.


Chocolate Beet Whoopie Pies

Cookies:
2 c. flour
2 t. baking soda
2 t. baking powder
1/2 t. salt
1 stick unsalted butter, at room temp.
1 c. packed brown sugar
1 t. vanilla
2 eggs
½ c. cocoa
2/3 c. half and half or milk
½ c. cooked shredded beets
Cream filling
3 T. flour
1 c. milk
1 stick unsalted butter, at room temp.
2 t. vanilla
2 1/4 c. powdered sugar

Heat oven to 375-degrees. Line baking sheets with foil and coat with non-stick spray. Combine dry ingredients and set aside. Beat butter and sugar together until creamy. Beat in vanilla and eggs then beat in cocoa. Beat in beets. Alternately beat in flour mixture and milk. Drop 2 tablespoons of dough on prepared sheets for each cookie, spacing 3 inches apart. Shape into 2 1/4-inch rounds, trying to keep them even as they will be sandwich cookies later. Bake 12-14 minutes, cookies should spring back when touched lightly. Let sit on baking sheet 5 minutes then transfer to rack to cool. Prepare filling: Combine flour and milk in saucepan until smooth. Heat over medium, stirring until thickened and bubbly. Cook 1 minute. Remove from heat and whisk in 2 tablespoons of the butter. Place wax paper directly on surface of the mixture and let sit until cool to the touch about 45 minutes. Beat in remaining butter, vanilla and powdered sugar until smooth and fluffy. Sandwich cookies together in pairs with about 2 tablespoons of the filling. Store between wax paper in airtight container. Makes 15.

Whoopie Pies

Cookies:
2 c. flour
2 t. baking soda
2 t. baking powder
1/2 t. salt
1 stick unsalted butter, at room temp.
1 c. packed brown sugar
1 t. vanilla
2 eggs
1/3 c. cocoa
3/4 c. milk
Cream filling
3 T. flour
1 c. milk
1 stick unsalted butter, at room temp.
2 t. vanilla
2 1/4 c. powdered sugar
Heat oven to 375-degrees. Line baking sheets with foil and coat with non-stick spray. Combine dry ingredients and set aside. Beat butter and sugar together until creamy. Beat in vanilla and eggs then beat in cocoa. Alternately beat in flour mixture and milk. Drop 2 tablespoons of dough on prepared sheets for each cookie, spacing 3 inches apart. Shape into 2 1/4-inch rounds, trying to keep them even as they will be sandwich cookies later. Bake 12-14 minutes, cookies should spring back when touched lightly. Let sit on baking sheet 5 minutes then transfer to rack to cool. Prepare filling: Combine flour and milk in saucepan until smooth. Heat over medium, stirring until thickened and bubbly. Cook 1 minute. Remove from heat and whisk in 2 tablespoons of the butter. Place wax paper directly on surface of the mixture and let sit until cool to the touch about 45 minutes. Beat in remaining butter, vanilla and powdered sugar until smooth and fluffy. Sandwich cookies together in pairs with about 2 tablespoons of the filling. Store between wax paper in airtight container. Makes 15.

Posted in Cooking |

Homemade Fruit Soda

Homemade Fruit Sodas

I drink a lot of water. Truth is, most days I am perfectly content to just drink water. But I get that most people aren’t like that.

When friends stop over, I want to offer them something more than just ice water.  Alternatives might include fruit juice or soda pop. I sort of combined the two into a fruity, fizzy drink that is fun to drink.

When it’s hot- and even when it’s not- cold, fizzy drinks are fun to drink. No special equipment is required to make these, and they are better for you than commercial soda pop. I use 2 ingredients- club soda and either concentrated fruit juice or fruit syrups. In every grocery store you can find juice concentrates in the freezer section. Just place a spoonful of the concentrated juice in your glass- add club soda and stir gently to mix. Add ice and serve. Ready when you want it.

One benefit is that you can control how much juice to add. Make it more, or less sweet, to suit your taste. Sometimes I add just a little, so it is more like infused water than soda. If you like it sweeter, fine.

You can also use fruit syrups- sold in lots of grocery stores and beverage stores. Read the label. The ones I buy have 2 ingredients- fruit juice- which is listed first and sugar which is listed second. That’s  it. No high fructose corn syrup or a bunch of artificial ingredients and most of what is in the bottle is juice.

I’ve make “soda” from frozen concentrated grape juice, orange juice, apple juice and pineapple juice. I’ve used fruit syrups made from blueberries, sour cherries, strawberries and blackberries.  You can use them individually or do combos. They are fun for kids to make, too.

Dress them up with fancy ice cubes. I add small pieces of fruit or mint leaves to ice cube trays and then fill with water and freeze.  Also nice when guests stop over.

Is this stuff better for you than water? I suppose not.  But sometimes we all want something more than plain water. For me, this is a nice option- fizzy fruit juice.

Posted in Cooking |

Phyllo Chocolate Fans

Phyllo Chocolate Fan Cookies

For a recent memorial for a friend, I was asked to make these cookies. They are a “fan” of everyone who tries them. If you want a cookie that is really going to impress, make these Chocolate Fans. They are crisp, not too sweet, and tipped with chocolate and fine chopped nuts.

While they look difficult to make, they are actually quite easy. For starters, you don’t have to make dough. These are made with phyllo dough. Phyllo is found in the freezer section at the grocery store. Phyllo dough (also spelled filo)  can be a little fussy. Be sure to keep extra dough covered with a damp towel so it won’t dry out and get brittle.

It is best to work quickly when making these. I made these dipped in finely chopped toasted walnuts. Other nuts could be used. You could also use white chocolate, if you prefer. .


Phyllo Chocolate Fan Cookies

1 lb. phyllo dough, thawed*
1 c. butter, melted
12-oz. chocolate chips
2 T. shortening- you can use coconut oil instead
1 c. finely chopped nuts or coconut, pistachios are extra nice

Remove phyllo from box, still rolled up and cut crosswise into 5-6 equal pieces. Keep unused dough covered in a damp towel to prevent drying out. Take one piece of dough and open it up, cutting it in half crosswise. Take 1 sheet and brush with butter. Place another sheet on top and brush again with butter. Place third piece of dough on top and butter again. Starting at short end begin to fold the dough in ¾ inch folds, accordion style. Pinch together at one end and fan out the dough at the other. It should look like a little fan. Place on ungreased baking sheet and repeat with remaining dough. Bake at 375 degrees for 5 minutes. Cool. Melt chocolate and shortening together in microwave or on top of double boiler. Stir to smooth. Dip tip of wide end of fans in melted chocolate and then in the nuts or coconut. Place on a rack to cool and harden. Makes about 65 fans. Can be frozen.


*I buy frozen phyllo dough but be sure to get the right one. Around here there are 2 different sizes. You’ll need the long box- where the dough is 15 inches long.


These are for you, Amy, with love.

Posted in Cooking |

Remembering Amy

Amy and Martha

For Mother’s Day this year, I will be spending the day remembering Amy Merrick McWilliam. Friends and family will be gathering together to celebrate her life, her spirit and her love.

She was a dear friend, like a sister to me. She was  a wonderful mother, wife, sister, aunt and friend. Her loss was sudden and unexpected, just a few weeks ago. I still find myself thinking of things I want to tell her. Still miss her a lot.

I’d like to share some things I will always remember about her.

Amy was one of the most generous and caring people I  will ever know. She was always there to help, if needed. She was there for family, for her friends, for anyone who needed a hand. If someone needed help, she would drop everything to step in.

It is fitting that her final party be on Mother’s Day. Amy was a great Mom and loved her boys so much. She was always there for them, in good times and bad. She never faltered in her determination to raise two wonderful young men. She did that.

Amy was brilliant. She could talk to you about almost any subject. You would never be bored chatting with Amy. She always had interesting things to say.

Amy was creative. She could design kitchens and jewelry. She had an artistic sensibility that was amazing.

Amy loved music. Her party will be filled with music today, just as she would have wanted.

Many of the dinner party pictures and recipes I shared, were because of Amy.  She was my partner in crime. We spent many happy hours discussing what ingredients we had, and what we would do with them. Sometimes she would call me from a local farm market, to discuss the produce she was getting.

Amy became so good at plating the food. I can’t tell you how many times I was about to take a picture and she would stop me. There was something she wanted to add. Some subtle tweak she felt the food needed. She would have me pick which serving pieces to use. No detail was too small. She had everybody trained to ask if the pictures had been taken, so they could start eating.No one set a prettier table, especially for holidays.

Our dinner parties were about more than food. They were about friendship and sharing and laughter. Lots and lots of laughter. Evenings spent with the people who could make you laugh so hard, you could barely breathe.

No one told a story better than Amy. She had a way of bringing her stories to life. They were often quite funny, often at her own expense. Amy could laugh at herself and bring you along for the ride.

So today, I will spend time with the people who loved her. We will share stories and listen to stories. We will laugh and we will cry. Amy would want more laughter, than tears, so that is the goal.

I love you Amy- now and forever.


Posted in Cooking |

Vegetarian Bean Salad

Layered Bean Salad

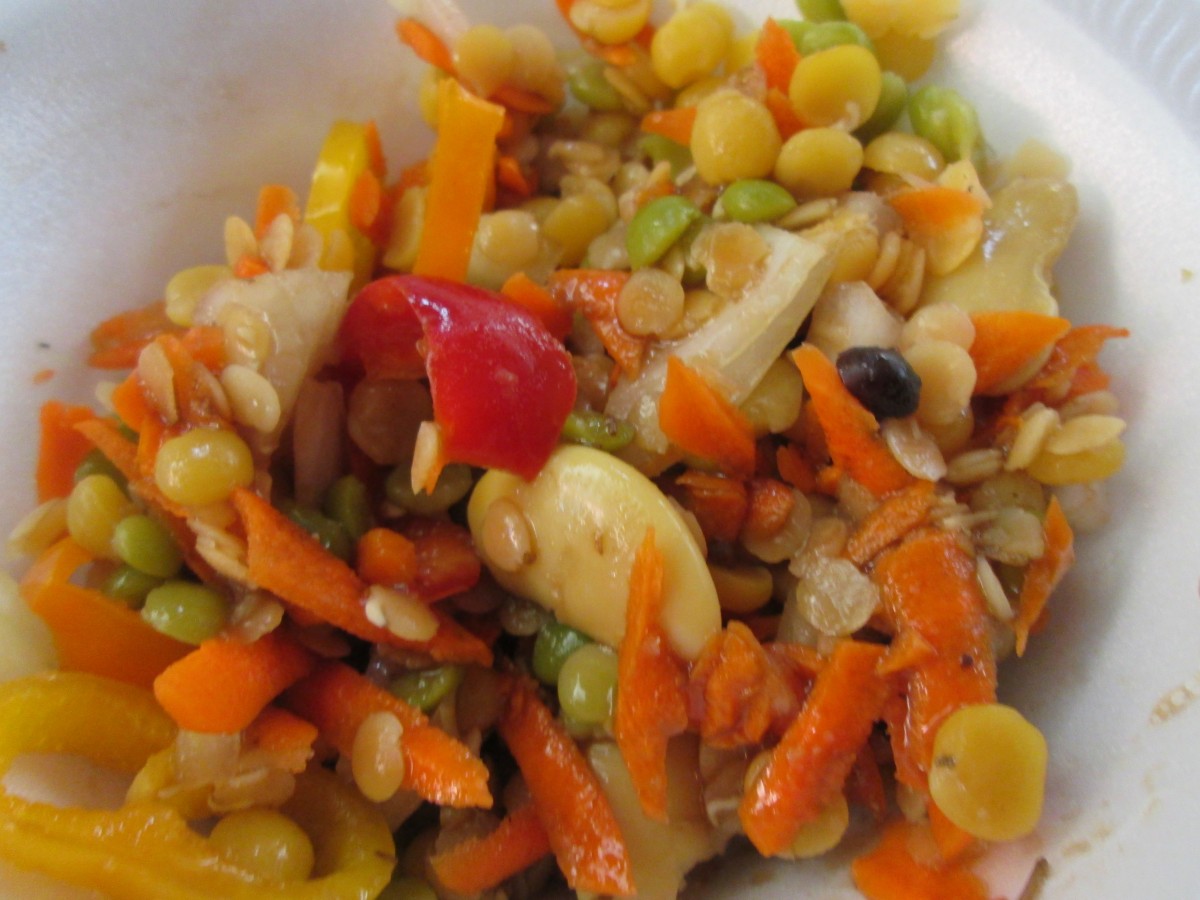
If you hear green or yellow split peas- do you think of soup?  You probably do. But when cooked until just tender, split peas make a great salad ingredient.

This is one of the dishes we made in class last night. Fresh and colorful, it was a big hit. It you are looking for a new salad to take to summer parties, this one is a great option.

The salad uses both green and yellow split peas, along with black beans, butter beans, red lentils and assorted veggies. It is a great combination of colors and textures.

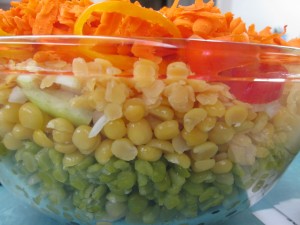
You can scale back the amounts- it does make a lot. The dish was inspired by my nephew  Danny’s love of sand art and the layered salads of my youth.


  Layered Bean Salad

 1 c. each green split peas, yellow split peas and red lentils

1 can black beans, rinsed and drained

1 can butter beans, rinsed and drained

1 c. diced sweet onion

1 c. diced sweet pepper

1 c. grated carrot

Cook split peas and lentils separately just until tender. Split peas, both green and yellow will take 20 minutes. Red lentils will take about 8-10 minutes. Drain and rinse each under cold water when done and set aside until ready to use, or you can cook them a day ahead and keep chilled. Each will yield about 2 1/2 c. cooked.

In large glass bowl, place the following ingredients in this order.

Black beans, butter beans, green split peas. yellow split peas. onion, red lentils. carrots and peppers. Pour over dressing and chill several hours or overnight. Serve on a bed of greens.

Dressing *

1/2 c. oil

1/2 c. vinegar

1 (14 oz.) can diced tomatoes, undrained

2-3 T. sugar

1/2 c. parsley or cilantro

1 t. each chili powder, cumin and salt

dash hot sauce

Combine in a blender or food processor until smooth.

*Note: Any bottled dressing you like can be used. Balsamic works very well. In class I served it with Italian dressing.


IMG_0226

Posted in Cooking |

Chocolate Pecan Cupcakes

Chocolate Pecan Cupcakes

These cupcakes are full of chocolate flavor and the crunch of pecans. Topped with a silky chocolate frosting, they are a treat for any of the chocolate lovers in your life.

I toasted the pecans first, for more crunch. I just placed the pecans on a baking sheet and baked them in a 3oo degree oven for 10-12 minutes. Watch so they don’t burn. Cool before adding to the batter.

You don’t have to toast the nuts, but it adds a wonderful texture and a stronger pecan flavor.

You can also top the cupcakes with a few chopped pecans, if you like.


Chocolate Pecan Cupcakes


4 oz. semisweet chocolate

1 cup butter

1 cup all-purpose flour

1 3/4 cups sugar

4 eggs

1 teaspoon vanilla extract

2 cups chopped pecans, toasted if you like


Preheat oven to 325 degrees. Line 24 muffin cups with paper liners. In the top of a double boiler, combine chocolate and butter. Heat, stirring occasionally, until mixture is melted and smooth. Remove from heat and allow to cool to lukewarm.

Sift flour and sugar together into a large bowl. With mixer on low speed, beat in eggs one at a time. Stir in chocolate mixture, vanilla and pecans. Fill muffin cups 2/3 full. Bake in the preheated oven for 25 minutes. Do not over bake. Tops should be shiny but give slightly when touched. Makes 24.


Chocolate Silk Frosting


4 ½ c. confectioners’ sugar

1 cup butter, softened

3 (1 ounce) squares unsweetened chocolate, melted

1 teaspoon vanilla extract

3 tablespoons milk

In a medium bowl, blend confectioner’s sugar, butter, melted chocolate and vanilla on low speed. Increase speed to high. Gradually add milk; beat until smooth and fluffy.

Posted in Cooking |

Herb Cocktails

Lemon Verbena Gimlet

If you don’t think of using herbs in drinks, maybe you should. They add a depth of flavor that can take things to a whole new level.

For a recent herb class at Graf Growers, I was asked to do a program on herbal cocktails. I must say the recipe testing was a lot of fun. We ended up sampling three drinks. We started with a classic Mojito, then followed up with two gin-based cocktails. One was made with a lavender syrup, the other, a Lemon Verbena Gimlet, includes lemon verbena syrup.


These are great drinks for summer, or any time, really. So here are the recipes. I hope you enjoy them. Try adding other herbs to your cocktails. You might be surprised at just how tasty they can be.


Classic Mojito


10 mint leaves, I used a variety called Mojito mint, that has a slight lime flavor

½ a lime, cut in 4 wedges

2 T. sugar

1½ oz. rum

1 c. ice cubes

½ c. club soda

In glass place mint leaves and one wedge of lime. Muddle to release juices and bruise mint leaves. Add sugar and 2 more wedges of lime. Muddle until limes are crushed. Add rum, stir well. Add ice, stir and top with club soda. Garnish with lime wedge.


Lemon Lavender Cocktail


2 oz. gin

1 ½ oz.  lemon juice

1 ½ oz.  lavender syrup (recipe follows)

splash of club soda

some ice

one lemon slice, for garnish

Pour gin, lemon juice and lavender syrup into a glass and stir. Top with club soda, add some ice and garnish with a lemon slice.


For the lavender syrup:

¾ c. water

¾ c. sugar

1 tablespoon dried lavender buds


Combine sugar and water in a small saucepan. Add lavender and cook on low heat until sugar is dissolved. Bring to a boil and cook for 2-3 minutes, just until it starts to thicken a bit. Then set to the side to cool. Strain out the lavender and refrigerate. Yields just under a cup of syrup.


Lemon Verbena Gimlet


1 cup water

¼ c. sugar

¼ c. torn verbena leaves

¾ c. dry gin

¾ c. club soda, chilled

¼ c. fresh lime juice (about 2 limes)

Lemon verbena sprigs (optional)

Lime slices (optional)


Combine 1 cup water and sugar in a small saucepan. Rub torn verbena to bruise; add to pan. Bring sugar mixture to a boil, stirring gently as needed to dissolve sugar evenly; cook 30 seconds. Remove from heat; cool completely. Strain mixture through a sieve over a bowl; discard solids. Combine sugar mixture, gin, soda, and juice. Serve over ice. Garnish with verbena sprigs and lime slices, if desired.


Posted in Cooking |

Chocolate Day with Kids

Chocolate Cabbage Cake

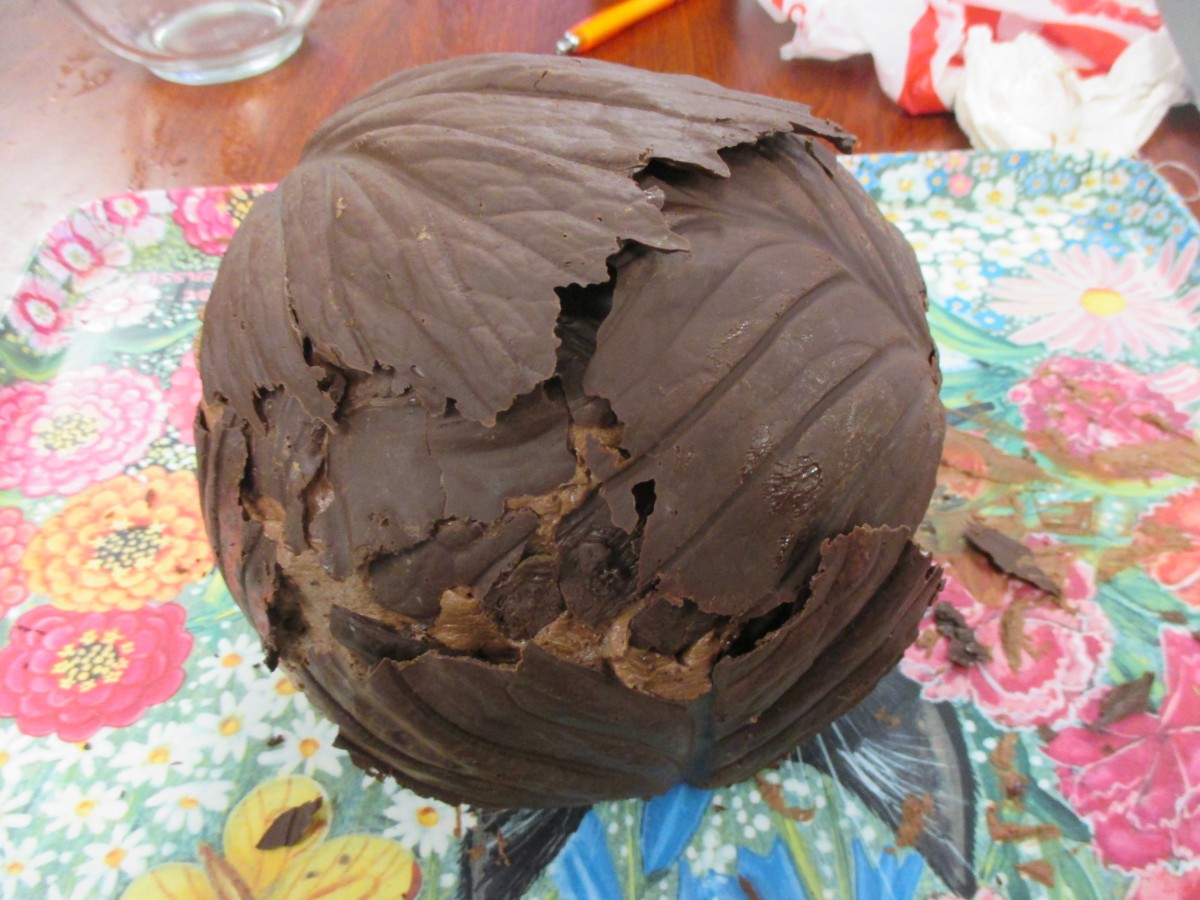
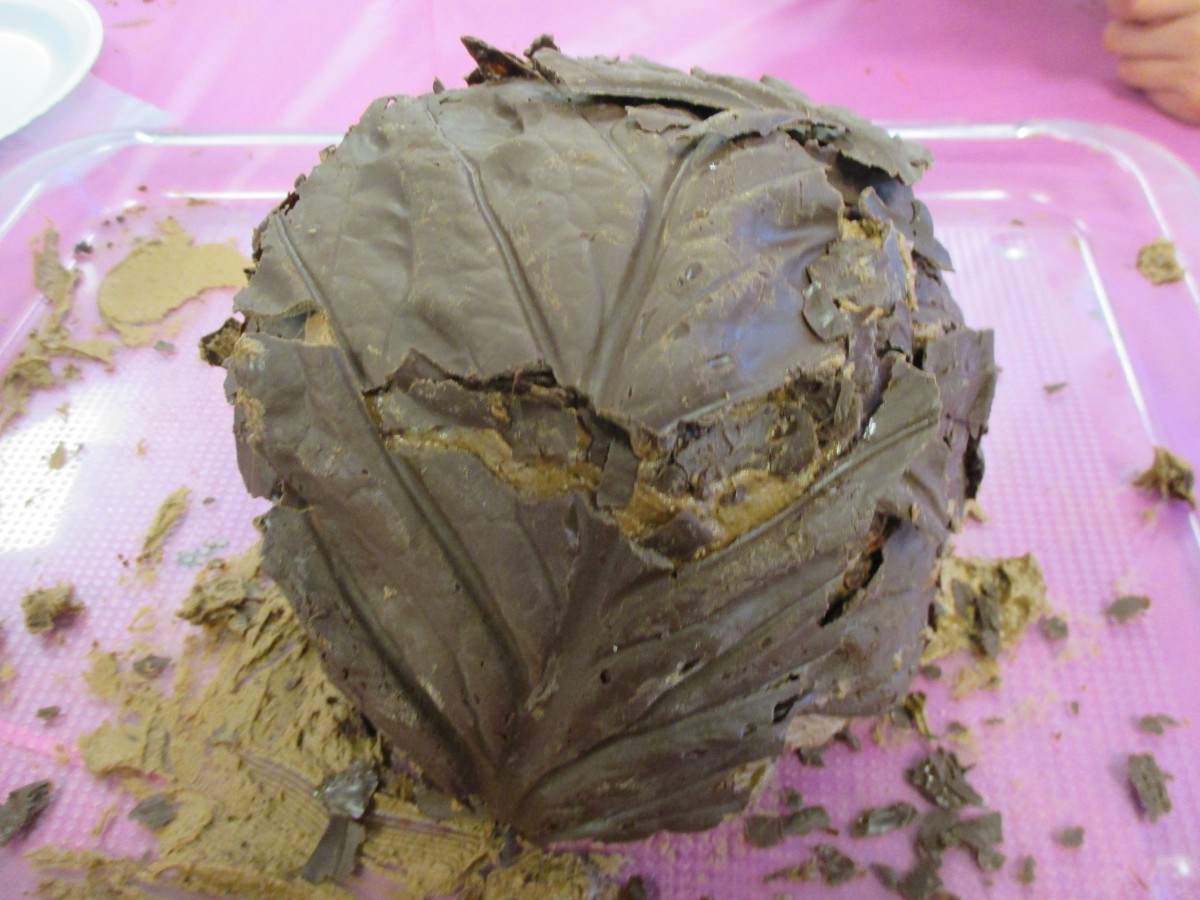
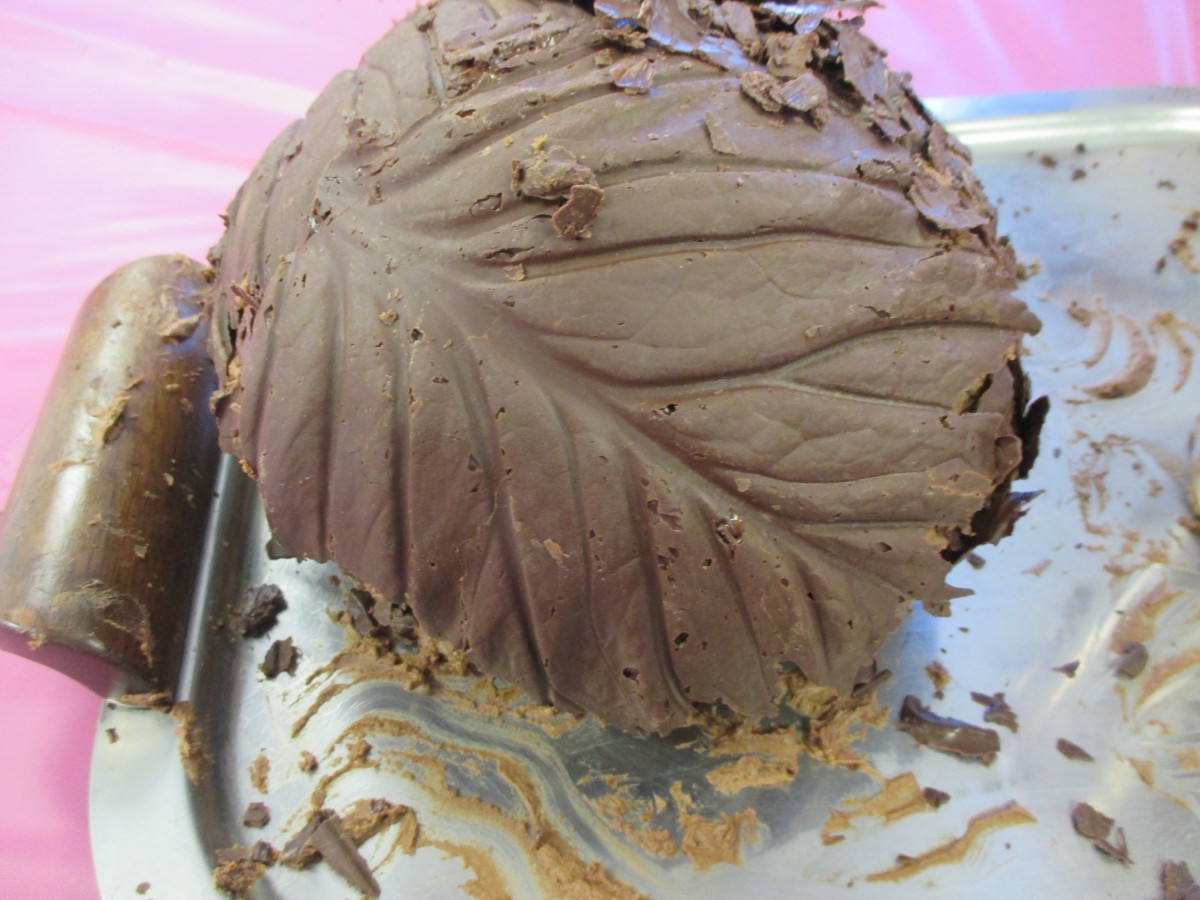
We wrapped up the cooking camp in Hudson yesterday with a celebration of chocolate. The kid’s challenge was to create a chocolate cabbage cake. They worked in teams to produce these masterpieces. Except for giving directions- I was hands-off. The kids made them themselves. Some kids are as young as 6.

We started by prepping the “leaves”. I had melted semi sweet chocolate chips and each of the kids got their own cabbage leaf. Using pastry brushes, they coated the insides of the leaves with the melted chocolate. While the leaves were  set aside to harden, the kids created their cakes.

I had baked 6 cakes- in bowls so two cakes could be frosted together to make a round cake as the base. They frosted them all on their own- with a little guidance here and there.

Once they had their cakes frosted, the kids carefully peeled away the cabbage leaves- and discarded them. What they were left with was a “leaf” of chocolate. Then, they placed their chocolate leaves all over the cakes.

I was so proud of how well they all did. We left the cakes intact until parents came for pick-up, so pictures could be taken. Did I mention we only had an hour top do this?


For more details on how to create your own cabbage cake, here is a link.

Chocolate Cabbage Cake


Posted in Cooking |

Homemade Tortillas

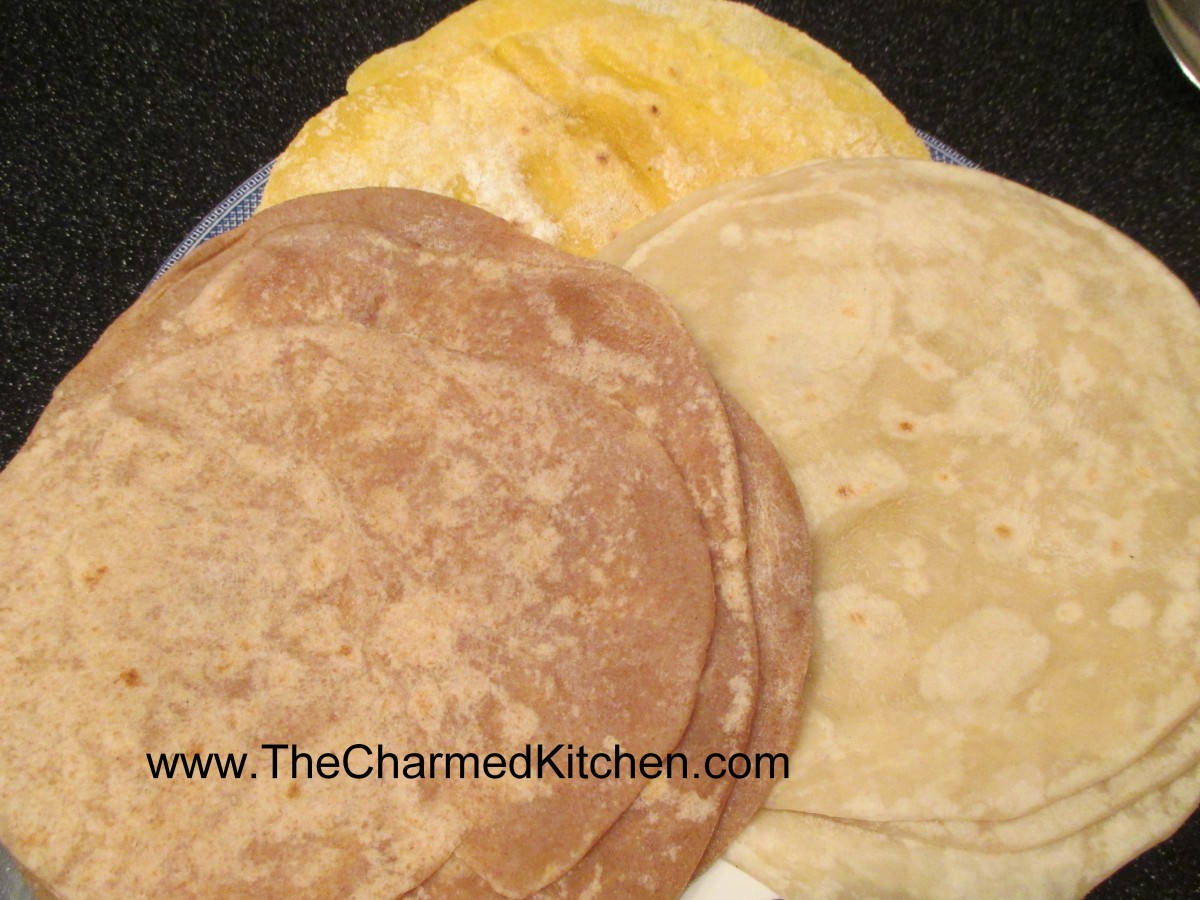
A Trio of Homemade Tortillas

With Cinco de Mayo coming up, I thought it was time to re-post the recipes for homemade tortillas.

If you never made tortillas because you thought they were too hard to make, I hope I can change your mind. Tortillas are pretty easy to make. They only have a few ingredients- although you can get creative and add more stuff.  The dough is simple enough. Once made, you just need to roll it out into circles. Heck, you only need to roll them into something resembling a circle. They will taste the same, even if they aren’t perfectly round.

Cooking involves a hot skillet and 30 seconds per side. The flavor and texture are so much fresher than most of what you can buy. Certainly fresher than what is at the local grocery store.


While it is easier if you have a tortilla press, I roll mine out by hand all the time. You could also use a pasta machine for rolling- although that will limit their width.

There is a little fat in most recipes- traditionally lard- but you have wiggle room here, too. I used coconut oil and was very happy with the taste and texture. So here are three recipes for tortillas- corn, wheat and whole wheat.

Corn Tortillas

1 3/4 cups masa harina ( corn flour) it is finer than cornmeal and will give you a nicer end product
1 1/8 cups hot water

In a medium bowl, mix together masa harina and hot water until thoroughly combined. Turn dough onto a clean surface and knead until pliable and smooth. If dough is too sticky, add more masa harina; if it begins to dry out, sprinkle with water. Cover dough tightly with plastic wrap and allow to stand for 30 minutes.
Preheat a cast iron skillet or griddle to medium-high. Divide dough into 15 equal-size balls. Using a tortilla press, a rolling pin, or your hands, press each ball of dough flat between two sheets of plastic wrap. Immediately place tortilla in preheated pan and allow to cook for approximately 30 seconds, or until browned
and slightly puffy. Turn tortilla over to brown on second side for approximately 30 seconds more, then transfer to a plate. Repeat process with each ball of dough. Keep tortillas covered with a towel to stay warm and moist until ready to serve.

Whole Wheat Flour Tortillas

1 cup all-purpose flour
4 cups whole wheat bread flour
1/2 cup fat, you could use lard,  shortening or coconut oil – something solid at room temp- not oil
2 tablespoons salt
1 1/2 cups boiling water
flour for rolling

In a large bowl, stir together 1- cup all-purpose flour, whole wheat flour and salt. Rub in the fat by hand until the mixture is the texture of oatmeal. Make a well in the center, and pour in the boiling water. Mix with a fork until all of the water is evenly incorporated. Sprinkle with a bit of additional flour, and knead until the dough does not stick to your fingers. The dough should be smooth. Make balls the size of golf balls, about 2 oz. each. Place them on a tray, and cover with a cloth. Let stand for at least 1 hour, or up to 8 hours. Heat a griddle or large frying pan over high heat. On a lightly floured surface, roll out a tortilla to preferred thinness. Fry one at a time. Place on the griddle for 10 seconds, as soon as you see a bubble on the top, flip the tortilla over. Let it cook for about 30 seconds, then flip and cook the other side for another 30 seconds. Roll out the next tortilla while you wait for that one to cook. Tortillas can be refrigerated or frozen. Makes 18.

Flour Tortillas

2 c. flour
1/4 c. fat, you could use lard,  shortening or coconut oil – something solid at room temp- not oil
1 t. salt
2/3 c. warm water

Combine flour and fat by cutting in to resemble coarse crumbs. Dissolve salt in water and stir into flour mixture. Form into a ball and knead on a lightly floured surface 2-3 minutes or until it is smooth. Divide dough into 12 equal pieces and wrap each in plastic wrap. Allow dough to rest 30 – 60 minutes. On lightly floured surface roll out a piece of dough into a 7-inch circle. Cook dough on griddle or in a skillet over medium high heat until puffy and golden on both sides, 1-2 minutes. Wrap in a kitchen towel and repeat process with remaining dough, stacking and wrapping as you go. Makes 12.

Posted in Cooking |