Monthly Archives: March 2018

Avocado Gelato

Avocado Gelato

I needed a dessert and somehow this is what I came up with. It worked out so well. The gelato is silky smooth, not too sweet and has a rich, buttery flavor.

It started awhile back, when a sweet lady gave me a dozen perfect avocados. I knew I would not be able to use them up quickly enough, so I froze some of them.

It is easy to freeze avocados. Just cut them open, remove the pit and the skins. Then just place avocado in small freezer bag or container and drizzle with a little lemon juice. That will prevent the avocados from discoloring. Freeze until you want to use them.

You could, of course, use fresh avocados as well.

I just blended the gelato twice, for a creamy texture. If you have an ice cream machine, you can  blend up the mixture, then freeze in the ice cream maker. Either way will give you a wonderful finished project.

Since I still have some frozen avocados, I will definitely be making this recipe again.

Avocado Gelato

3-4 avocados- you want to end up with 2 c. avocado

1 ½ c. half and half

¾ c. sugar- or to your taste

2 T. lemon juice

2 t. vanilla

Place all ingredients in a blender or food processor, then process until smooth. If you use frozen avocado, you will have something like an avocado milkshake at this point. Taste it for sweetness level. Once frozen it will taste less sweet, so keep that in mind. You could use honey to sweeten, if you prefer. Just use less. Honey is a lot sweeter than sugar. Put in the freezer. Sometime after it is frozen, you are going to want to process it again. Remove from the freezer. Let stand a few minutes to soften a little. Break into chunks and place in a food processor and process until smooth and creamy. Freeze again until ready to serve- or eat right away. Makes 1 qt.

Blueberry and Cheese Coffee Cake

Blueberry and Cheese Coffee Cake

One of the perks of defrosting the freezer, is finding stuff you forgot about. Apparently, I froze more blueberries than I thought. Seemed like the perfect time to make this wonderful coffee cake, and share the recipe with you.

Even though I love eating fresh berries when they are in season, there is something special about baking with berries as snow flies outside. Makes me think about warm, summer days.

This blueberry cake is not too sweet, and the combination of cream cheese, with the blueberries reminds me of a blueberry blintz. It is a wonderful dessert, but can also be served as a breakfast or brunch dish.

You can also freeze leftovers, to be discovered and enjoyed another day.

Blueberry and Cheese Coffee Cake

1 1/4 c. sugar

1/2 c. butter

2 eggs

2 1/4 c. flour

1 T. baking powder

1 t. salt

1 c. milk

2 c. fresh or frozen blueberries

8 oz. cream cheese, cubed

1 t. grated lemon peel

Topping:

1/4 c. sugar

1/4 c. flour

1 t. grated lemon peel

2 T. butter

Preheat oven to 375. Grease and flour a 13×9 inch baking dish. Cream together sugar and butter until fluffy. Beat in eggs. Combine 2 cups of the flour with baking powder and salt and beat into batter alternately with the milk. Toss berries with the remaining flour and fold into the batter along with the cheese and lemon rind. Pour batter into prepared pan. Combine sugar, flour and lemon peel for topping and cut in butter to resemble coarse crumbs. Sprinkle over batter and bake for about 45 minutes. Use toothpick to test for doneness. Serves 12.

Jambalaya

Creole Jambalaya

There are so many variations for Jambalaya. I don’t think I ever had a Jambalaya I didn’t like.

This Creole dish varies a little with each person who makes it. The assortment of ingredients adds so many layers of flavor.

Traditionally, Jambalaya would include smoked sausage or ham, chicken, shellfish, rice, tomatoes and assorted veggies and seasonings.You can see why there are so many variations. For me, it just isn’t Jambalaya without mussels. Lots and lots of mussels.

It is definitely a great dish for a party. It is impossible to make a small batch of Jambalaya!!!

This recipe is a tweaked version I got from a boss of mine a long time ago. I must say, every time I make this for friends or family it gets rave reviews.

The heat level in this dish is really about personal preference and for the people who are going to be eating it. I like it a bit spicier, so I add more cayenne. If I am making it for friends who like their food less spicy, I use less. Of course, you can always serve it with hot sauce on the side, so people can spice it up a little more.


                             Creole Jambalaya

1 lb. smoked sausage, sliced into 1 inch pieces

1 c. chopped onions

1 c. chopped celery

2 garlic cloves, chopped

1/4 c. oil

2 c. cubed uncooked chicken

3 c. chicken stock

1 1/2 c. uncooked rice

1 16 oz. can tomatoes

2-3 t. paprika

Cayenne pepper to taste

Black pepper to taste

1/4 t. ground turmeric

1 lb. medium shrimp, peeled and deveined, uncooked

1 1/2 c. frozen peas

1/2 c. chopped red pepper

1-2 lb. mussels, scrubbed

In Dutch oven cook sausage, onion, celery and garlic in oil until onion is tender. Add remaining ingredients, except shrimp, peas, sweet red peppers and mussels. Bring to a boil, turn down to simmer and cook 20 minutes. Stir in shrimp, and peppers, cover and cook 10 minutes. Stir in peas and stick in mussels. Cover and cook 5 more minutes. Discard any mussels which have not opened in 5 minutes. Serves 8.

Posted in Cooking | Tagged |

Pressed Duck

Pressed Duck

Pressed duck is a bit of work, but a very fun dish to serve. It is a really nice dish for special occasions. To prepare pressed duck, cooked duck in de-boned, pressed into a pan and steamed. Then the duck is cut into squares and fried. The result is a real treat- crispy on the outside with tender duck meat in the middle.

The process does take two days. The duck is cooked, shredded and steamed on the first day. Then it is refrigerated overnight, before frying. That’s not really a bad thing. All the messy stuff is out of the way the day before. When you want to prep the duck, just slice and fry. I pan fried the duck squares, but you could deep fry it, if you prefer.

I had a couple of friends over for dinner and decided to  make pressed duck. I hadn’t made it in ages. The dish came out quite well, but there is one thing I might change for the next time I make it. I used an 8×8 inch square pan. It was tricky to fit the pan in my stock pot for the steaming. Next time, I would a 9×5-inch loaf pan or two, which would make the steaming easier. My pan ended up a little tilted during the steaming process. Or, I could have used a bigger stock pot.

Except for the steaming issues, it was not a difficult dish to prepare. It was kind of fun.  Another bonus is that I had a pot of duck stock, from cooking the duck. I strained it, cooled it down and removed the fat on top. The next day, I used to stock to cook my rice in. The rice was so flavorful.

So here is the recipe. I kept in the directions using square pans, but feel free to use a loaf pans instead.


Pressed Duck

1 (4-5 lb.) duck

Water to cover

2 green onions

1 ( 1-inch) piece ginger root

2 T. fennel seeds- or two star anise

2 T. dark soy sauce

1 t. hoisen sauce

1 t. salt

2-3 T. cornstarch

Oil for frying

Sweet and sour sauce- recipe follows


The day before you want to serve pressed duck, in soup pot, combine duck with just enough water to cover. Add green onions, fennel seeds, soy sauces and salt. Cover and simmer until duck in very tender, at least a couple of hours. Remove duck and allow to cool down. Remove skin and meat from the bones. Discard the bones. Shred the meat. You can add a little of the skin, if you like. I actually removed most of the skin from the duck before I cooked it. Then I rendered down the skin to have duck fat for cooking. In baking pan, sprinkle half the cornstarch to cover the bottom of the pans. Be generous with the cornstarch. If you use an 8×8-inch pan, you will need a little less cornstarch than if you use a 9×9-inch pan. Press the shredded duck meat firmly into the pan. Sprinkle with the rest of the cornstarch. Set up a pot to steam the duck mixture. I used a large stockpot with a steamer rack in it. Place the pan in the steamer, cover and steam for 30 minutes. Remove duck from steamer, cool and refrigerate overnight. The next day remove the duck from pan and cut into squares. Pat off extra moisture to reduce splattering. Heat oil to 350 degrees and fry duck pieces for about 5 minutes, or until crispy and golden on the outside. Drain and serve with sweet and sour sauce- or a dipping sauce you like.  Serves 4.


Sweet and Sour Sauce


1/2 c. vinegar- I like apple cider vinegar or rice vinegar

1/2 c. sugar

1/2 c. pineapple juice

3 T. catsup

2 T. soy sauce

2 T. cornstarch

1 t. dried minced garlic

1-t. fresh grated ginger

Hot pepper flakes to taste

In saucepan combine all ingredients. Cook over medium heat, stirring as mixture gets hot, until sauce begins to bubble. It will also get much clearer. Boil gently 1 minute, stirring constantly before removing from heat. Makes 1 1/2 c. Keeps in the fridge for a couple of weeks.


Posted in Cooking | Tagged |

Rich Crescent Rolls

Rich Crescent Rolls

These soft rolls are a perfect addition to any dinner. They are rich, buttery and very tender. I made them last night for a dinner with friends, later today.

Homemade rolls and bread just always taste better than store bought. They are totally worth the time it takes to make them.

Another perk is the way your house smells when they are baking.

These should not be confused with croissants. Croissants are made over a period of time with the dough and butter being folded, rolled and chilled a number of times to create flaky layers.

These are a soft, slightly sweet yeast dough, shaped into crescent shapes. Of course, you can make them in different shapes, if you like. I just like the way the little crescents look.

They are brushed with melted butter before being rolled up into the crescents. I also like to brush them with melted butter when they come out of the oven.

These are great served warm, with butter. I admit to loving to dip them in gravy, too.

So here is the recipe.


Rich Crescent Rolls

¾ c. milk

½ c. each butter and sugar

1 t. salt

2 packages active dry yeast

½ c. warm water

4-5 c. flour

2 eggs

Extra melted butter for brushing on the rolls

Heat together milk and butter until warm. Stir in sugar and salt. Dissolve yeast in warm water and add to milk mixture with 2 cups of flour. Beat 3 minutes. Beat in eggs. Stir in flour until soft dough forms. Knead on floured surface until dough is smooth and elastic. Place in oiled bowl and cover. Let rise until doubled.  Turn dough onto lightly floured surface and knead a few strokes. Divide into fourths and roll each into a circle. Divide circle into 8 pieces (in wedges like a pie) and brush with melted butter. Starting at wide end roll up loosely and place on greased baking sheet with point tucked under. Allow 2-3 inches between rolls and curve slightly into an arc, if desired.  Cover with a towel and allow to rise in a warm place for an hour, or until nearly doubled. Bake in a preheated 375-degree oven for 12-15 minutes. Brush with melted butter, if you like. Serve warm. Makes 32.

Posted in Cooking | Tagged , |

Applesauce Oatmeal Muffins – Vegan

Applesauce Oatmeal Muffins

I had a request from a friend, for more vegan baking recipes. I came up with these muffins and thought I would share it.

The muffins came out moist and light. Baking powder and baking soda gave them plenty of “lift”. They rose beautifully.

I also have a lot of applesauce that I canned, so I am  interested in recipes using applesauce. I was happy to use some of it in these muffins.

I added both raisins and walnuts for more texture and flavor. You could omit them, or add different dried fruit or nuts. You can also sprinkle a little cinnamon sugar on top of the muffins before baking, if you like.

I used olive oil in this recipe. I like the way olive oil tastes in baked goods. It almost tastes like I used butter. The secret is to use a mild flavored olive oil. A strong olive oil will over power the muffins.

I actually kept these fairly simple. Here is the recipe. Enjoy!!


Applesauce Oatmeal Muffins

2 c. applesauce- I used homemade with cinnamon in it

1/2 c. oil

1 c. sugar

1 t. vanilla

2 c. flour  Note: You can use all purpose, I used whole wheat pastry flour.

1 c. rolled oats

2 t. baking soda

2 t. cinnamon

1/2 t. baking powder

1 c. dried cranberries or raisins

1 c. chopped nuts


Preheat oven to 375 degrees. Line 24 muffin cups with paper liners or grease lightly. Set aside. Combine applesauce with the oil and stir in sugar and vanilla. Add flour, oats, soda, cinnamon and baking powder. Stir to mix well. Stir in fruit and nuts. Spoon batter in to muffin cups, filling just over half-full. Bake for 18-20 minutes or until golden brown on top. Makes 24.

Crab Cakes

Crab Cakes

I had a few good friends over for dinner the other night. I wanted to make something special- so I made crab cakes. I had a can of lump crab meat I was saving, just to use for crab cakes. Everyone loved them.

The secret to crab cakes it adding just enough ingredients to hold the crab meat together, without  losing the beautiful texture of the crab in the process. These crab cakes did all that.

I had chives in the freezer, so I used them in my crab cakes. They added such nice flavor. I would prefer to use fresh, but we are a few weeks away from Spring. I had frozen these last fall.

I also used a little sour cream to help hold them together and to add moisture. I know many who prefer mayo as a binder. Either works, I just like sour cream.

I have pan fried them in the past, but decided to bake these in the oven. Either method works. It just comes down to what you prefer. By baking them, I had more time to get the rest of the dinner together.

We had them with fresh asparagus, coleslaw and creamed leeks and spinach. It was a truly special meal.


Crab Cakes


2 eggs

2 T. sour cream or Greek yogurt

1 t. thyme

1 t. lemon juice

½ t. cayenne pepper

½ t. dry mustard

Salt to taste

¼ c. fresh chopped parsley

¼ c. fresh chopped green onions or chives

About ½ c. breadcrumbs

1 lb. lump crab meat

Olive oil


Mix all the ingredients together, except oil. Start with about ¼ cup of the breadcrumbs and add just enough to hold the mixture together. Mixture will be crumbly. Form into patties- you can make 4 large or 8 small.

You can cook them one of two ways.

To bake: Place the crab cakes on a lightly oiled baking sheet and brush the cakes with a little more oil. Bake in a preheated 450- degree oven for 15 – 18 minutes, for small cakes. Bake 20-24 minutes for large cakes. Turn them once during baking to brown both sides.

To pan fry: Heat skillet to medium hot. Add oil and gently add the cakes. Cook for 4-5 minutes per side, or until golden brown and crispy. Turn once, carefully, to brown on both sides.


Posted in Cooking | Tagged |

Creamed Leeks

Creamed Leeks with Asparagus and Chicken

I needed a side dish for dinner the other night. I ended up making this leek dish and I loved how it turned out. This dish was an experiment that just worked. I love when that happens.

I had picked up some leeks at a local market the other day. They looked great, and I thought I might use them in soup. It is normally how I would use them. I am not sure where the idea to “cream” them came from, but I am glad it did.

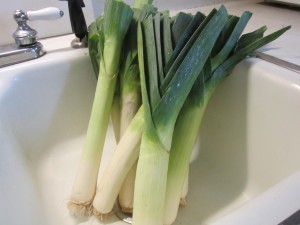
Leeks are a member of the onion family. They look like green onions on steroids. You want to pick leeks with long, white stems.

Leeks have an onion flavor, but with lovely sweetness. I get asked all the time about how to prep them. They are full of sand and have to be prepped properly so you don’t get any grit in your food. The only edible part is the white and light green parts. The dark green leaves are tasty, but tough and can be used for making stock. Peel off the first layer of leaves. There is often a lot of sand there. Cut off the bottom about 1/2 -inch from the root. You should be able to see the rings, or layers, of the leek when you do this. Trim off any dark green parts at the top. You’ll have a trimmed leek at this point.

Now you have to clean it. Cut the leek lengthwise in half. Hold one half at a time under running water while fanning the leaves to dislodge any dirt. Take the rinsed halves and cut them into 1/2-inch slices. You could also cut them into thin strips, if you like. Place the slices in a large pan or bowl filled with cold water and agitate them to loosen any remaining sand. Use your fingers to separate the layers. Make sure the bowl is deep enough for the leeks to float several inches from the bottom. The leeks will float and the sand and dirt will sink. Let them stand a few minutes and then lift them out of the water to drain. Any grit will be at the bottom of the bowl.

If there is a lot of grit in the bottom of the bowl you might want to repeat the rinsing process one more time. It might sound like a lot of work but it really doesn’t take that much time and the leeks will be completely clean. I often buy a lot of leeks when they are on sale, then clean them all at once. I saute the cleaned leeks in oil and freeze for later use.

For the creamed leeks, I cooked the leeks in butter until soft. Then I added flour, half and half and seasonings. That was pretty much it. I will make these again soon.


Creamed Leeks

2-3 large leeks, trimmed and cleaned, cut into 1/2-inch slices

4 T. butter

5 T. flour

1 1/2 c. half and half

1 T. chopped parsley

salt,  pepper, hot sauce and dill to taste

In pot, combine leeks and butter and cook, covered,  over medium low heat until leeks are tender. Stir every few minutes. Add the flour and stir well. Turn heat up to medium. Slowly add the half and half, cooking until mixture is thickened and bubbly. Simmer a few more minutes to completely cook the flour. You can add a little more half and half if you like. Season to taste and serve. Serves 4.


Fresh Leeks


Irish Soda Bread Scones

Irish Soda Bread Scones

If you are in the mood for the flavor of Irish Soda Bread- you can get the same wonderful experience in a scone. I made a batch of these scones this morning. I had one with a cup of hot tea. It was the perfect breakfast.

I will admit that most mornings, breakfast is a bowl of oat bran. Scones are so much more fun. They don’t take a lot of time to make, either. These would be a great addition to your St. Patrick’s Day meal.

While traditionally served for breakfast or tea time, scones are really good any time of the day. They certainly can also be served with dinner.

I used golden raisins, but you could use regular raisins, currants, or even leave them out.


  Irish Soda Bread Scones

2 c. flour

3 T. sugar

2 t. baking powder

1 t. baking soda

½ t. salt

1/3 c. butter

½ c. golden raisins

1 t. caraway seeds

2/3 c. buttermilk

1 egg

Milk

Extra sugar for sprinkling

Preheat oven to 425 degrees and lightly grease a baking sheet. Combine dry ingredients in medium bowl and cut in butter to resemble coarse crumbs. Stir in raisins and caraway seeds. Beat together buttermilk and egg and add to flour mixture, stirring with fork until mixture just coming together. Turn onto floured surface and knead 5-6 strokes or until ball of dough holds together. Dust an 8-inch round cake with  flour. Press dough into cake pan. Invert pan over onto prepared baking sheet. I find if I do this quickly the dough comes out more easily. Remove cake pan. This will give you a perfect 8-inch circle of dough. With a sharp, floured knife cut dough into 8 wedges. Brush top with milk and sprinkle with extra sugar. Bake 14-16 minutes. Makes 8.

Pecan Crusted Salmon

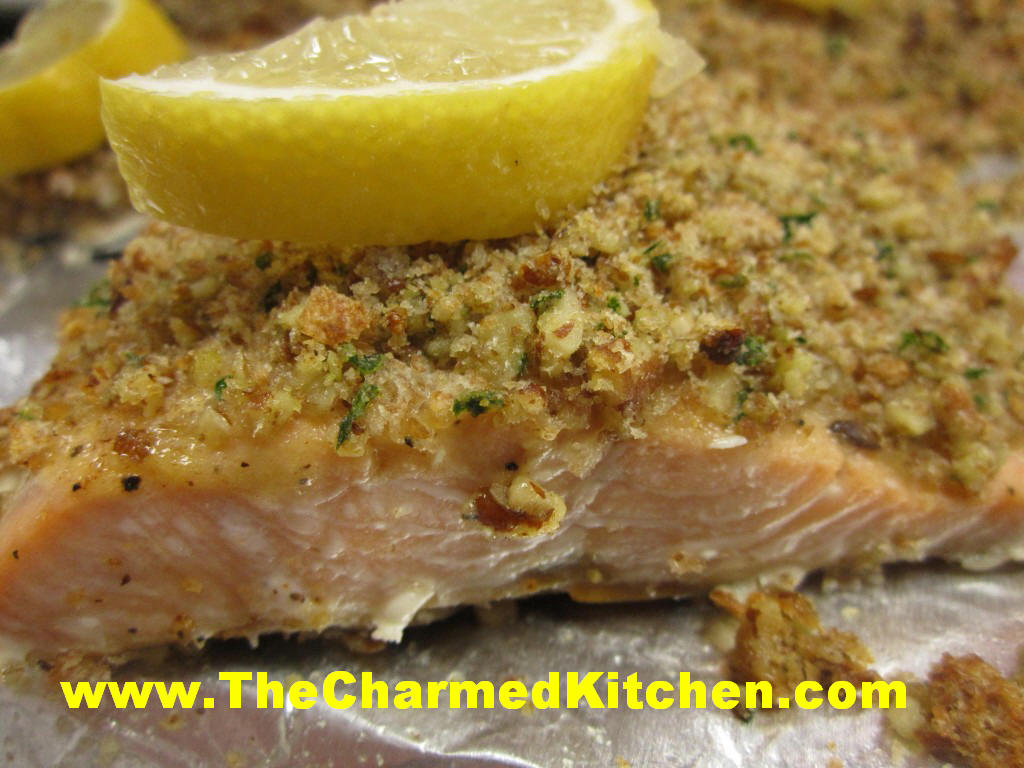
Pecan Crusted Salmon

If you love salmon like I do, this is a fun way to prepare it. The crunch from the nuts adds a nice contrast to the texture of the fish. The flavors work well together, too.

You don’t have to use pecans. I prefer them, but finely chopped walnuts, hazelnuts, almonds or even pumpkin seeds might be fun.

A combination of Dijon mustard, butter and honey helps the nuts to stick to the fish. There are a few bread crumbs in there as well.

This dish is simple enough to prepare any night of the week, but special enough to make for company.

I used salmon fillets. You could use a whole side of salmon. You just have to increase the baking time to about 20-25 minutes and reduce the oven to 425 degrees. Depending on the size of the piece of salmon, it might take a few more minutes.


 Salmon Bake with Pecan Crunch Coating

 2 T. Dijon Mustard

2 T. melted butter

4 t. honey

1/4 c. fresh bread crumbs

1/4 c. finely chopped pecans or walnuts

2 t. chopped parsley

4 salmon fillets

Salt and pepper

Lemon wedges

Mix together mustard, butter and honey and set aside. Mix together bread crumbs, nuts and parsley and set aside. Season each fillet with salt and pepper. Place on lightly greased baking or broiling pan. Brush each fillet with mustard mixture. Divide crumb mixture among fillets, patting to hold. Bake in 450 degree oven for 10 minutes per inch thickness of fillets. Serve with lemon wedges. Serves 4.

Posted in Cooking | Tagged |