Spare Rib “Baked” Beans

This recipe came about by accident. I was working on menu ideas for a dinner with friends. I had leftover spare ribs, but not really enough to serve on their own. I wanted to use them in something, and decided that the meat would be really good in baked beans. They already had barbecue sauce on them- and those flavors go well with beans. I used home canned beans. It was faster than starting with dry beans. Canned beans worked fine and made it a faster cooking recipe. Even though I think of this dish as baked beans- they were never really baked. I did the whole dish on top of the stove in about an hour. Of course, I could have moved them to the oven to cook as some point. I just didn’t this time.
They did taste great. I’ll serve them as a side dish, but they could be a meal all on their own.
Spare Rib “Baked” Beans
1 c. sliced onion
2 T. oil or butter
1 qt. tomatoes – I used home canned- you can use 1 (28 oz.) can
1 can garbanzo beans, rinsed and drained
1 can black beans, rinsed and drained
1 can kidney beans, rinsed and drained
¾ c. apple cider vinegar
½ c. brown sugar
¼ c. maple syrup
2 T. molasses
3-4 c. cubed meat from cooked spare ribs
1 T. minced garlic
1 T. hot sauce, or to taste
1 T. Worcestershire sauce
1 t. ground cinnamon
1 t. ground turmeric
½ t. allspice
Salt and pepper to taste
In pot, add onions to oil or butter and cook over medium heat until tender. Add tomatoes, beans, vinegar, brown sugar, maple syrup and molasses. Cook over medium heat, stirring occasionally, until mixture thickens. This will take about 30 minutes. Add meat with remaining ingredients and cook over medium low heat about 30 minutes longer. Stir from time to time to prevent sticking. Adjust seasonings and serve. Makes 6-8 servings.
Note: The whole mixture can also be cooked in a slow cooker, on high for 2 hours, then low until ready to serve.
Coconut Almond Sorbet
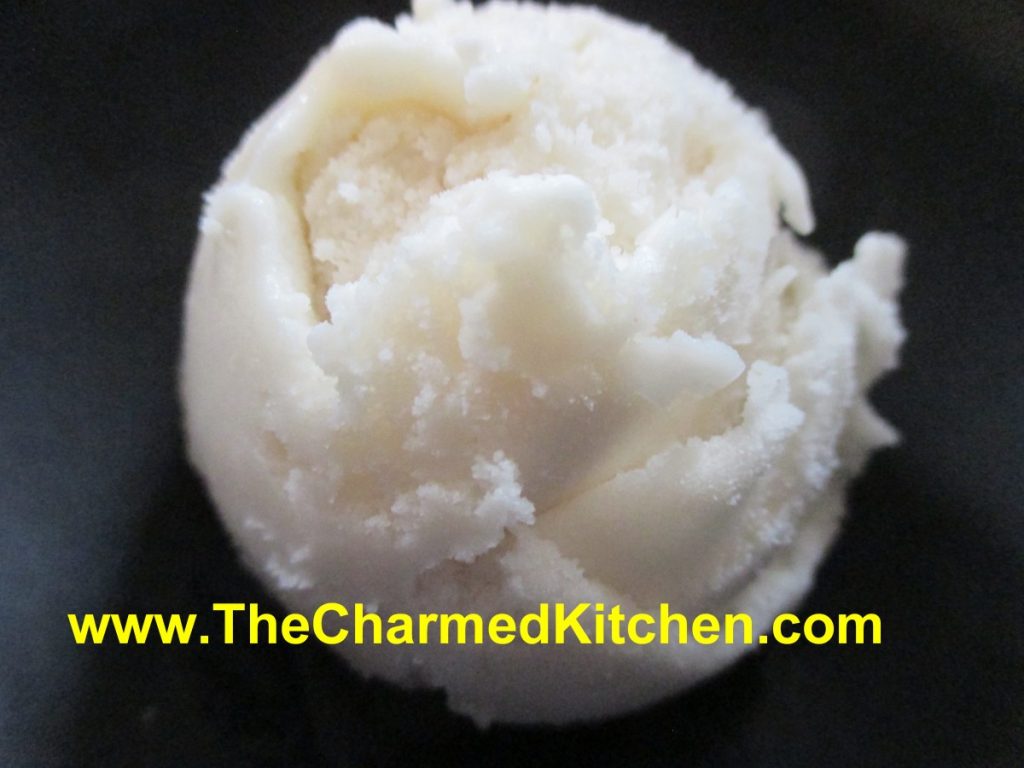
Inspired by a friend who can’t have dairy, I made this coconut sorbet. I started with a can of coconut milk, added some almond milk, sweetened it, and added vanilla for a little added flavor. So simple and really tasty.
It has a lot of the creaminess of a dairy based dessert. In fact, if you didn’t know, you would probably think there is some milk or cream in this sorbet, even though there isn’t.
Looking forward to making some for my vegan niece the next time she comes to town.
Coconut Almond Sorbet
1 can (13.5 oz.) coconut milk
1 c. almond milk
¼ c. sugar- or to taste
2 t. vanilla
Combine all ingredients in bowl and stir until sugar is dissolved. Place in an ice cream maker and freeze according to manufacturer’s instructions. Makes 1 quart.
Note: If you don’t have an ice cream machine, you can freeze the sorbet in a shallow tray. Once frozen, remove from freezer and let it soften a few minutes. Break into chunks and process in a food processor to soften. Return to freezer until ready to eat.
Honey-Pomegranate Glazed Ribs

I like my ribs to be tender, but still have a crispy exterior glaze. I decided to use a combination of moist and dry heat to get the result I wanted. I finished them off with a sauce made from pomegranate molasses and honey. They were really good.
While I prefer cooking ribs on the grill, you can cook them indoors with good results. Sometimes the weather isn’t right for cooking them outside. Sometimes, you realize too late, that you are out of charcoal. You might be forced to cook your ribs indoors.
Honey-Pomegranate Glazed Ribs
1 slab ribs, cut into 3-4 rib portions
salt and pepper
1 c. apple cider vinegar
2 T. soy sauce
1 T. hot sauce
1 t. garlic powder
1 t. smoked paprika
Glaze:
3/4 c. pomegranate molasses*
1/2 c. honey- or more to taste
1 T. hot sauce, or more to taste
Place rib portions in a large pan and season with salt and pepper. Pour over the vinegar, soy sauce, hot sauce, garlic powder and smoked paprika. Cover and chill for a couple of hours. You could even do this the night before. Preheat oven to 425 degrees. Place rack in large baking dish. Pour 2 cups of water into the bottom of the pan. Place rib portions on the rack. Pour over the marinade. Season with salt and pepper then place in the oven and bake for 1 hour. Turn heat down to 400 degrees. Remove ribs from oven. Place ribs in a fresh baking pan. Combine glaze ingredients and brush all over the ribs. Return to oven and bake 20-30 minutes longer, or until glaze has gotten sticky and browned a little.
*Pomegranate molasses is available in some specialty stores, or you can make your own by boiling down pomegranate juice until it gets thickened.
A Trio of Potato Salads

If you are looking for a side dish for Labor Day, why not bring a potato salad? Everybody loves potato salad. I love potato salad.
Actually, I love potatoes pretty much any way they are prepared. With so many cookouts and picnics, you can never have enough potato salad recipes, right? I am sharing three of my favorite potato salad recipes. The first one is really simple, enhanced with fresh thyme leaves. Thyme pairs well with the potatoes. The second one uses some of my fresh basil in a pesto sauce that is tossed with the potatoes. Who says pesto is just for pasta? The third salad is the way I remember my Mom making potato salad. She never wrote down her recipe, but I think I got it right.
Just in Thyme Potato Salad
With my herb garden growing like crazy right now I thought this was the perfect dish to make. This salad can be served warm or cold and goes well with so many dishes. I find when I have leftovers, I’ll even brown it in a skillet and serve it like hash browns with eggs for breakfast.
2 lbs. boiling potatoes, cut into bite sized pieces*
½ c. olive oil
¼ c. red wine vinegar
1 T. fresh lemon juice
2 t. fresh thyme leaves
Salt and pepper to taste
Cook potatoes until tender. Drain and toss with the rest of the ingredients and serve right away or chill to serve later. Serves 6-8.
* You can really use any potato you like. I often bake the potatoes whole and then peel and cut up. Cook them any way you prefer.
Pesto Potato Salad
This salad always makes me think of a warm summer day. I think it’s because of the basil. During the summer, my driveway is lined with pots of basil. I cook with it almost every day. Pesto can be used in a lot of different dishes beyond pasta. Here I’ve paired it up with potatoes. The combination works great together. I always freeze extra basil so I can enjoy it year round.
2 lbs. Boiling potatoes, cut into bite sized pieces
1 c. basil leaves
3 T. pine nuts
3 T. olive oil
2 garlic cloves, minced
1/3 c. Parmesan cheese
Salt to taste
Cook potatoes until tender. Cool. In blender combine remaining ingredients, except 1 tablespoon of the pine nuts. Pour blended mixture over potatoes and sprinkle with the reserved nuts. Chill. Serves 6-8.
Mom’s Mustard Potato Salad
When I was a kid I did not like the taste of mustard- except in this recipe. It adds such a wonderful flavor.
4 lbs. potatoes- I used Klondike Rose and I did not peel them
4 hard cooked eggs, peeled and chopped
1 sweet pepper, seeded and chopped, optional
1 c. mayo- maybe a little less
1/4 c. prepared mustard- I like a grainy brown mustard
salt and pepper to taste
dash of hot sauce
Bake whole potatoes until tender and allow to cool. Cube potatoes into large bowl and combine with remaining ingredients. Chill until ready to serve. Serves 8.

Pesto Potato Salad

Mustard Potato Salad
Vanilla Cupcakes with White “Chocolate” Frosting

I must admit to being a sucker for the classics. This cupcake is certainly a classic. I made these the first time several years ago when two dear friends were getting married. I offered to make a dessert for the party after and Jon requested white cupcakes with white frosting. I agreed that these are perfect for any reception.
I normally top them with a vanilla buttercream, but decided to make a white chocolate frosting instead. Yes, I know white “chocolate” is not really chocolate. But when I say white chocolate, everyone knows what I am talking about.
I used a white chocolate bar- and broke it into pieces, before melting, but you could you use white chocolate chips instead. The frosting has a really nice flavor and fluffy texture, without being too sweet. Jon and Jim loved them, as did their guests.
So here is the recipe.
Classic White (Vanilla) Cupcakes
1 cup sugar
1/2 cup butter
2 eggs
2 teaspoons vanilla extract
1 1/2 cups all-purpose flour
1 3/4 teaspoons baking powder
1/2 cup milk
Preheat oven to 350 degrees. Line a muffin pan with 12paper liners. In a medium bowl, cream together the sugar and butter. Beat in the eggs, one at a time, then stir in the vanilla. Combine flour and baking powder, add to the creamed mixture and mix well. Finally stir in the milk until batter is smooth. Pour or spoon batter into the prepared pan. Bake 20 to 25 minutes. Cupcakes are done when they springs back to the touch. Makes 12.
White Chocolate Frosting
6 oz. white chocolate – if using bars, chop before melting
1 stick (4 oz.) cold butter, cut into cubes
1-2 c. powdered sugar
1 t. vanilla
Melt chocolate. I just melt mine in a microwave safe dish, but you can use a double boiler. Let chocolate cool down a little. Beat butter into the melted chocolate. Beat until smooth and then beat in the powdered sugar and vanilla. Whip until frosting is smooth and fluffy. I normally beat for 5 minutes or longer. If too thick, add a few drops of water or milk.
This post in dedicated to my dear friend Jon. Love you bunches, always.
Zucchini Pancakes
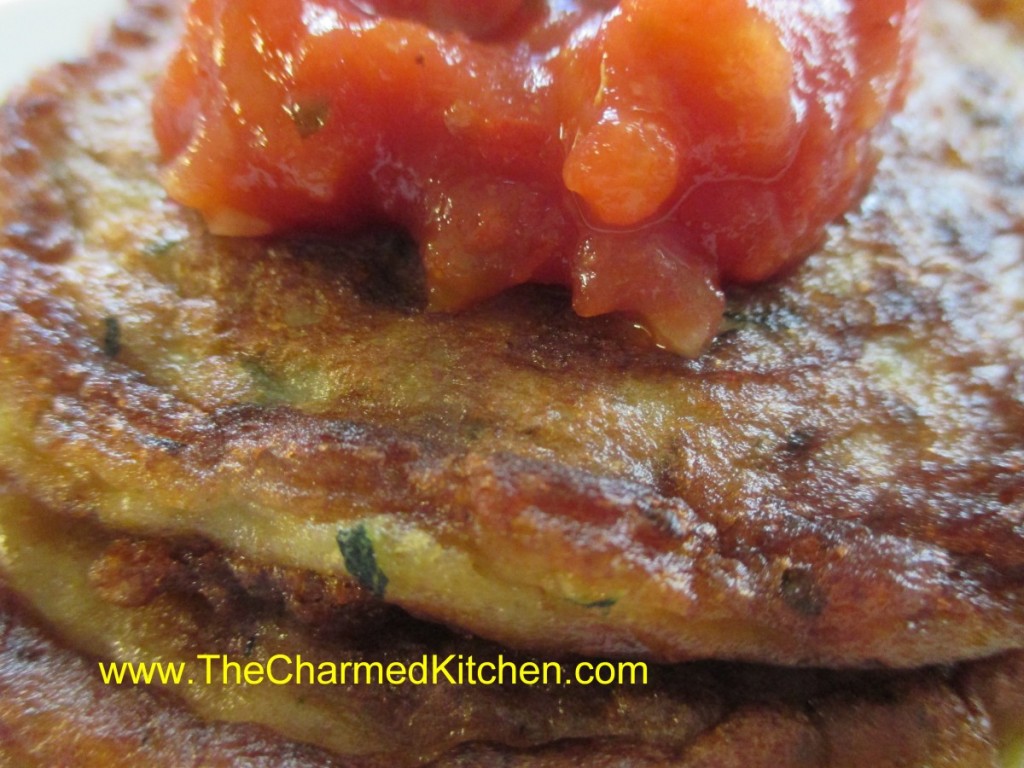
You can never have too many zucchini recipes. Especially this time of year. This simple recipe uses zucchini to make tender and flavorful pancakes.
They aren’t the type of pancake you would pour maple syrup over. They are wonderful topped with some fresh salsa, though. These pancakes make a nice lunch or main dish meal. They can also be served as a side dish. Similar to potato pancakes. I have been known to have them for breakfast.
I think they taste best when golden on the outside, a little crisp. They will still be tender inside.
So if you have more zucchini than you know what to do with, and you don’t want to bake zucchini bread, here is a recipe you might want to try.
Zucchini Pancakes
2 c. shredded zucchini
1 medium onion, diced
2 eggs
1/2 c. flour- you made need a little more or less depending on how moist your zucchini is
2 t. hot pepper sauce, or to taste
1 t. baking soda
salt to taste
oil for cooking
Combine all ingredients, except the oil, in a medium bowl. Heat oil in skillet and spoon batter in. I used a little over 1/4 cup for each. Cook over medium heat until lightly browned around the edges. Flip and cook until golden on both sides and pancake springs back when touched lightly. Remove to platter and keep warm. Repeat with remaining batter. Serve with salsa or sour cream. Makes 8.
Peach Streusel Muffins

I can’t get enough of peaches these days. I have been eating them fresh, making preserves, freezing peaches and cooking with them. This recipe is one of my favorites.
I hadn’t made them in a long time, so I decided today was the day. Now I remember why I liked them so much. Perfect crumbly texture, not too sweet, and that streusel topping.
They can be for more than breakfast, too. Split, topped with sweetened fruit and ice cream, these muffins make a great “shortcake” dessert.
While they are really great warm from the oven, these muffins are still fine the next day, or even the day after that, assuming they last that long. They freeze, well, too.
Peach Streusel Muffins
Streusel topping:
1/3 c. flour
1/3 c. brown sugar
½ t. nutmeg
4 T. cold butter
Batter:
2 c. flour
½ c. sugar
¼ c. brown sugar
1 T. baking powder
1 t. cinnamon
½ t. nutmeg
½ t. salt
½ c. cold butter- 1 stick
2 eggs
¾ c. half and half or buttermilk
1 t. vanilla
1 c. finely chopped fresh peaches, about 1 large
½ c. finely chopped pecans, optional
Heat oven to 375. Line 15 muffin tins with paper liners or grease them. Set aside. Make streusel by mixing together flour, sugar and nutmeg in a small bowl. Use your fingers, or a pastry blender, to cut the butter into the flour mixture until it resembles coarse crumbs. Set aside. Make batter: In medium bowl combine flour with sugars and other dry ingredients. Mix well. Cut in butter until mixture resembles coarse crumbs. In small bowl beat eggs and add half and half and vanilla. Stir into flour mixture and fold in until just mixed. Mixture will look lumpy. Fold in peaches and nuts, if using. Scoop batter into prepared tins, filling about ¾ full. I get more than 12 from this recipe- normally about15, but it depends on how full you fill them. Sprinkle the tops with streusel. Place muffin tins on a baking sheet and bake for 20 or until golden brown. Cool a little before serving, if you can wait.
Fresh Peach Chutney
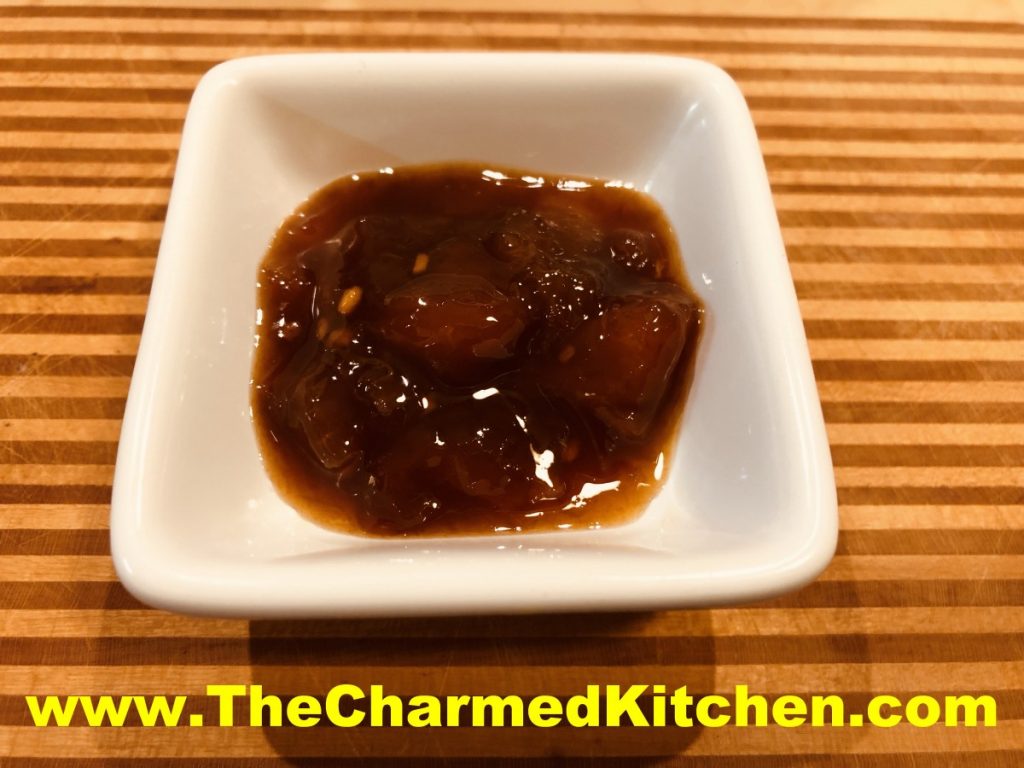
Peaches are in season and I am loving it. Besides eating them fresh, I have been enjoying them in all sorts of dishes. Peach jam, peach ice cream, peach scones…. the list goes on.
This chutney is one more way to take advantage of peach season. Chutney is a dish that walks the line between savory and sweet. I made this batch a little spicy. The heat pairs well with the sweetness of the fruit. Feel free to adjust heat to suit your own taste.
You can serve this chutney like a relish, on the side. Or, use it like a sauce, adding to meats when cooking. Another option is to use it as a glaze, brushing it on meats while baking or grilling. A vegetarian option is brushing it on grilled portobello mushrooms or eggplant slices.
I have served chutney with a cheese board, too. Fun and easy addition to the appetizer menu.
So here is the recipe.
Fresh Peach Chutney
5 medium peaches, peeled, pitted and diced
1 medium onion, peeled and chopped fine
½ c. cider vinegar
½ c. sugar
½ c. water
2 T. honey
2 T. lemon juice
2 T. minced garlic
1 T. soy sauce, or a little more to suit your taste
½ t. red pepper flakes, or more for a spicier chutney
1 T. cornstarch
2 T. cold water
Combine all ingredients in a saucepan, except cornstarch and the 2 tablespoons of cold water, and cook over medium heat until peaches are tender and onion is translucent, about 15 minutes. Stir occasionally to avoid burning. Combine cornstarch with the cold water and stir until smooth. Slowly add to simmering chutney while stirring constantly. Mixture will thicken. Adjust seasonings, if needed. Makes about 3 cups. Will keep in fridge a couple of weeks- can be frozen.
Serve with pork or lamb. Great with duck or chicken, too. You can also serve as an appetizer with cheese and crusty bread.
Reduced Sugar Peach-Pineapple “Jam”
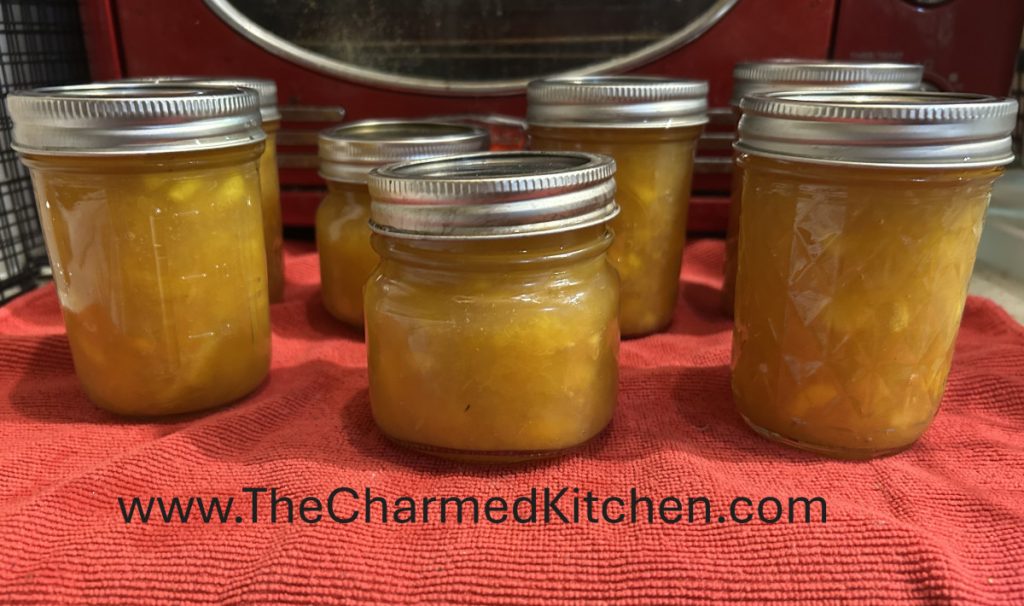
I love jams and make them all the time. A friend asked me if I could make peach jam with less sugar. I did a search and found plenty of recipes using artificial sweeteners, but that wasn’t what I was looking for. Then I found this recipe on the NCHFP website. It was just what I had been looking for and it was from a trusted and safe site. They did not call it jam, but rather a spread.
The recipe sounded quite simple. Almost too simple. Fruit, sugar and lemon juice. No added pectin. I knew I wanted to try it with some ripe peaches I needed to use up very soon. I wasn’t positive it would work. I was pleasantly surprised. It came out really nice. Plenty sweet and only 2 cups of sugar for a whole batch. You can use less or no sugar at all, if you prefer.
It did require a slightly longer cook time than my higher sugar recipes. More fruit was needed, too. It also is not straight peaches. The recipe is a combination of fresh peaches and canned, crushed pineapple. But in the end I have a tasty spread that tastes good. That is the goal. Thanks, Joe, for inspiring me to make this recipe in the first place.
So here is the recipe. Enjoy.
Reduced-Sugar Peach-Pineapple Spread
4 cups drained peach pulp, from 4-6 pounds of fresh peaches
2 cups drained unsweetened crushed pineapple
1/4 cup bottled lemon juice
2 cups sugar (optional)
This recipe may be made with any combination of peaches, nectarines, apricots, and plums.
Yield: 5 to 6 half-pints
Thoroughly wash 4 to 6 pounds of firm, ripe peaches. Drain well. Peel and remove pits. I did not blanch the peaches before peeling. I just used a vegetable peeler and it worked fine. Grind fruit flesh with a medium or coarse blade, or crush with a fork (do not use a blender). I used a knife and coarsely sliced, then chopped the peaches fine. Place chopped, ground or crushed fruit in a 2-quart saucepan. Heat slowly to release juice, stirring constantly, until fruit is tender. This took about 10 minutes. Place cooked fruit in a strainer lined with four layers of cheesecloth. Allow juice to drip about 15 minutes.
While the peaches are draining, start heating up water in a water bath canner. Wash lids and jars and set aside.
Save the drained juice for jelly or other uses. The volume of peaches goes down a lot with the cooking and draining. I measured 8 cups of chopped fruit before cooking and draining and ended up with just over 4 cups of the pulp. Measure 4 cups of drained fruit pulp for making spread. Combine the 4 cups of pulp, pineapple, and lemon juice in a 4-quart saucepan. Add up to 2 cups of sugar, if desired, and mix well. Heat and boil gently for 10 to 15 minutes, stirring enough to prevent sticking. Fill jars quickly, leaving 1/4-inch headspace. Wipe rims, screw on lids and place jars in the canner. Once water returns to the boil start timing. Process half pints for 15 minutes. After 15 minutes, turn off heat and allow jars to remain in canner 5 minutes, before removing to a cooling rack or onto a towel. After jars cool completely, check seals. Makes 5-6 half pint jars.
Source : NCHFP
Spicy Pickled Beets
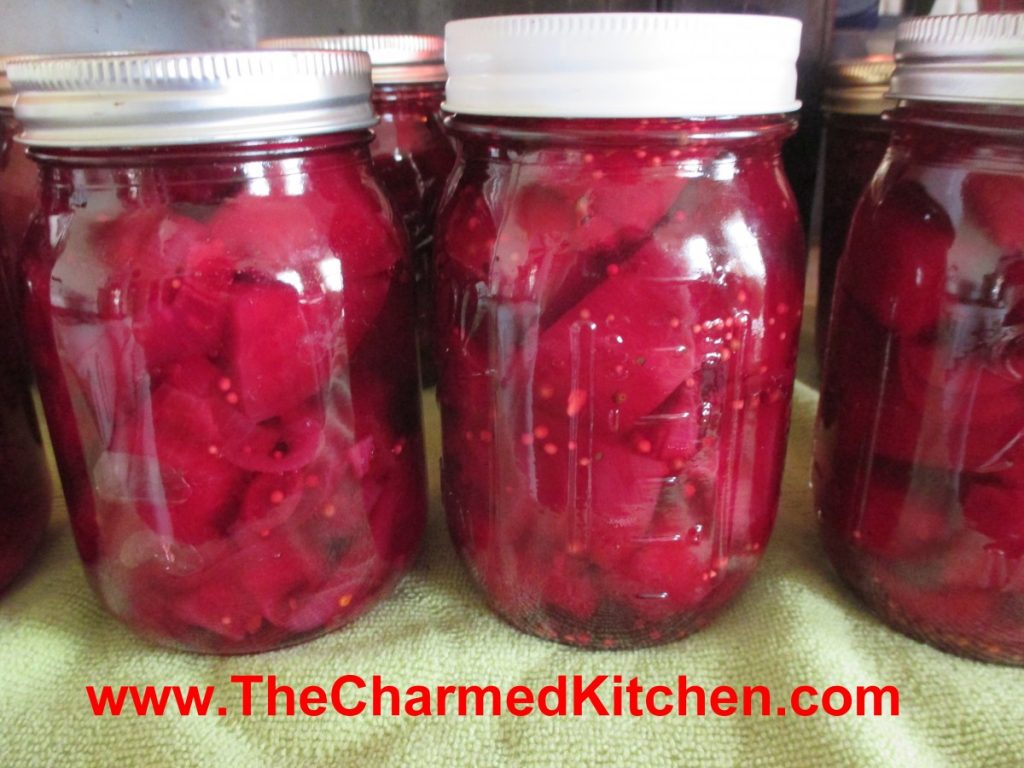
Beets are just one of those foods. People seem to love them, or hate them. I am a beet lover. I enjoy them in all sorts of dishes. The nice thing about making a batch of pickled beets is being able to open up a jar whenever you want.
This recipe is a pretty classic way to preserve beets. The brine is a sweet and sour mixture with pickling spice, salt and red pepper flakes for added flavor and heat. You could play around with the seasonings a little. Maybe adding more heat or less, depending on your preference. Keep in mind that spices tend to intensify in flavor when canned.
Pickled beets are great served as a side dish with all sorts of foods. I like them served with cheeses, crackers and other pickled foods as an appetizer. I also like to add them to salads. If you don’t want to can them- you can store them in the fridge for up to a couple of months.
Spicy Pickled Beets
4 lbs. beets, smaller sizes preferred
3 c. thin sliced onions
2 c. sugar
2 T. Pickling spice
1 T. canning salt
2 t. red pepper flakes
2½ c. cider vinegar- 5% acidity
1½ c. water
Wash and trim beets, leaving a couple inches of stem attached. Cook in boiling water until tender. Cool beets down so you can handle them. Peel beets and cut into 1½- 2-inch diameter pieces, if beets are large. Leave whole if beets are small. Set aside. Combine the rest of the ingredients in a pot and bring to a boil. Reduce to simmer and simmer 5 more minutes. Add beets and cook a few minutes, until beets are warmed through. Ladle hot beets into clean pint jars, leaving ½ inch headspace. Ladle in hot liquid, leaving ½-inch headspace. Remove air bubbles, wipe off rim, screw on lid to finger-tip tightness. Repeat with remaining beets and liquid. You should fill about 5 pint jars. Process in a boiling water bath for 30 minutes. Turn off the heat and leave jars in water bath 5 minutes before removing to counter to cool. Yield: 5 pints.


