Ethiopian Chicken

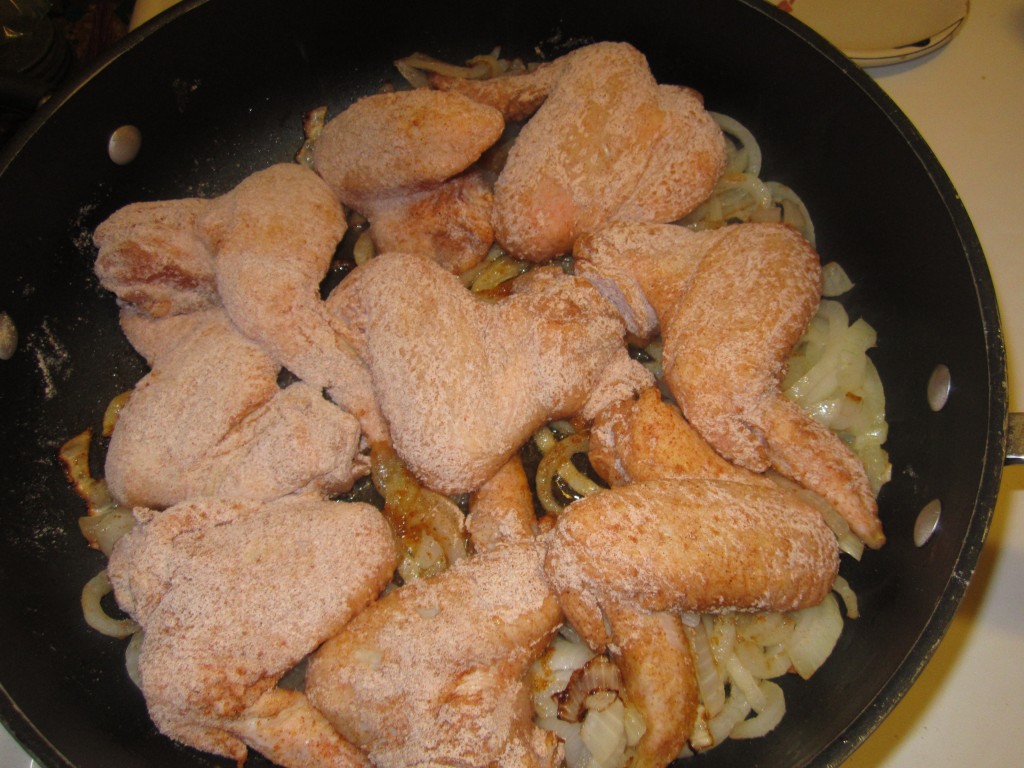
With a mix of warm and sweet spices Ethiopian Chicken is full of rich flavor. Easy to make, too. You can make it with any cut of chicken. I used wings in this batch. Traditionally the chicken should be on the bone, but feel free to swap out boneless chicken, if you prefer. Just reduce the cooking time by 15 minutes.
Ethiopian Chicken
1 chicken, cut into pieces or 3-4 lbs. chicken pieces
1 T. paprika
1 t. each cayenne pepper, cumin, garlic powder, salt and ginger
1/2 t. allspice
1/4 t. cinnamon
1/2 c. flour
3 T. oil
2 large onions, sliced thin
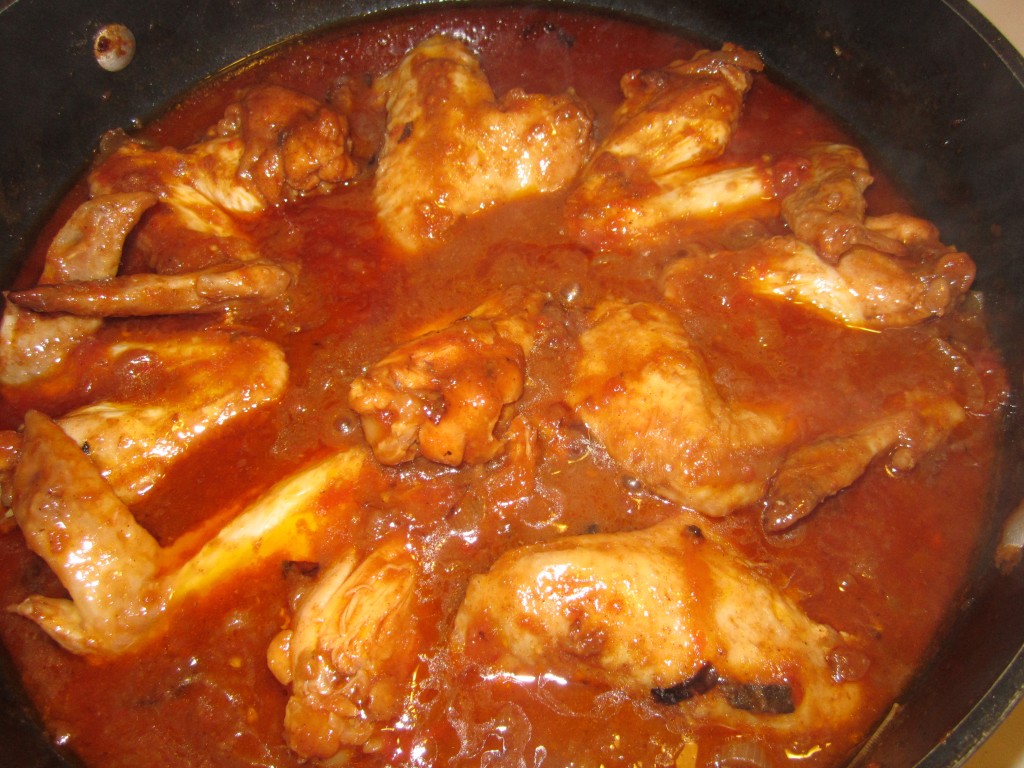
1 c. tomato sauce or 2 c. stewed tomatoes
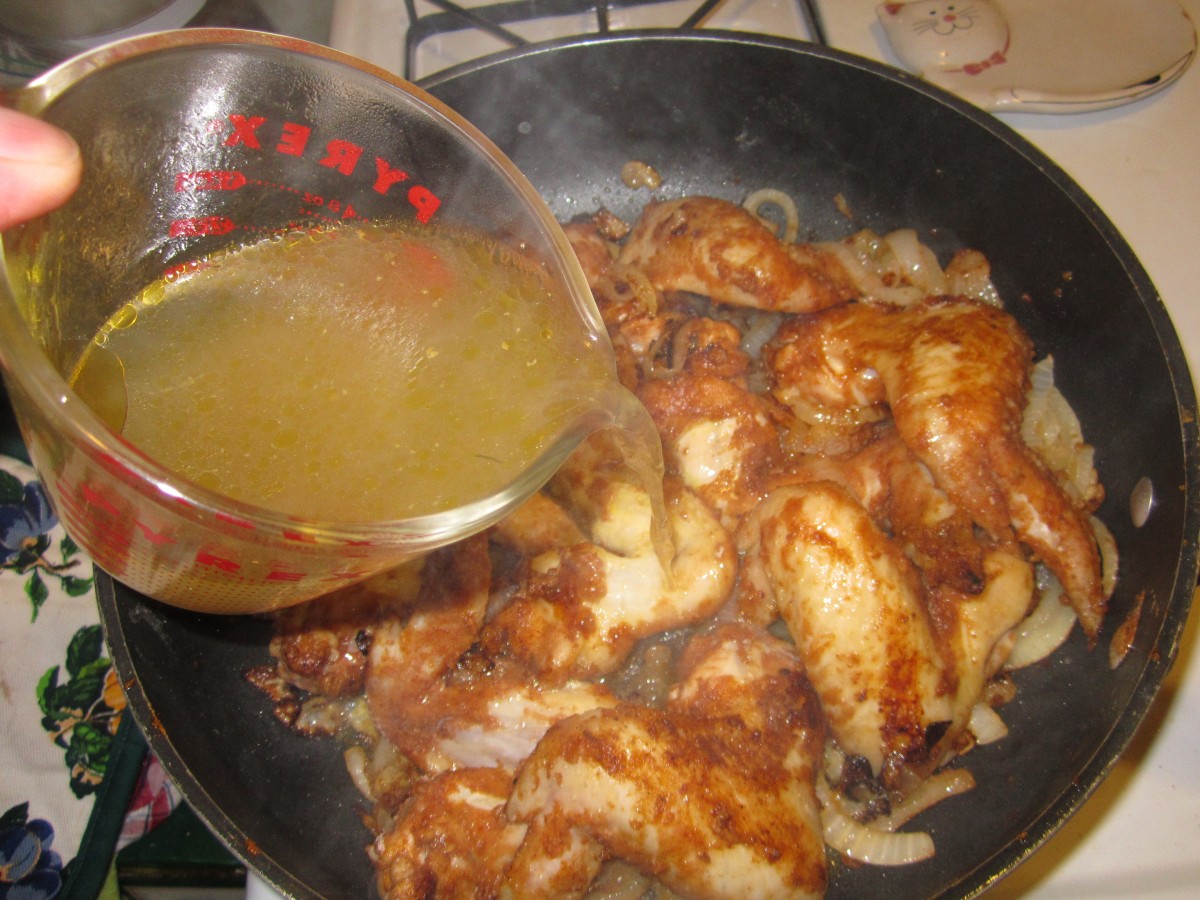
1 c. chicken stock
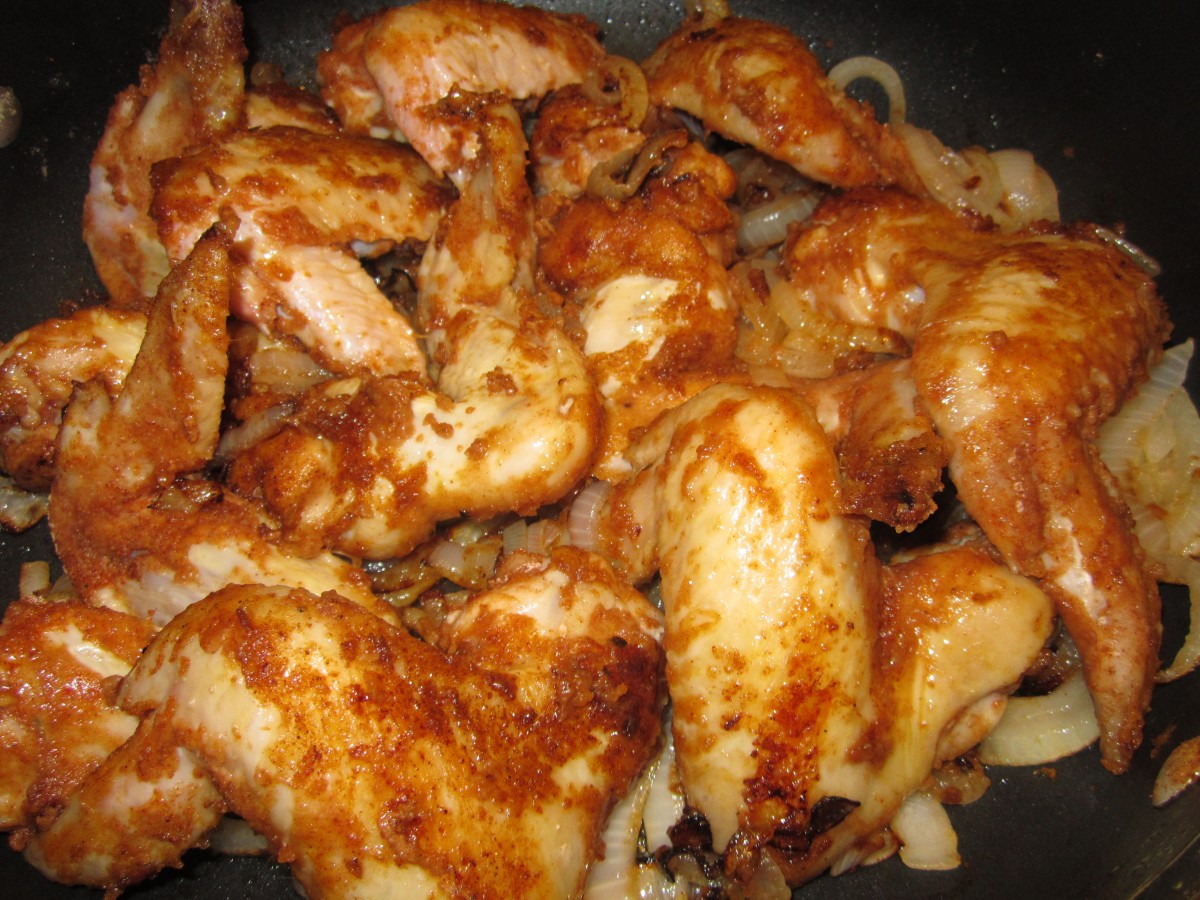
Combine spices with flour in a plastic bag. Add the chicken a few pieces at a time and shake to coat. Set aside. Add onion to hot oil in large skillet and cook until onions are browned. Add chicken pieces and brown on all sides. Add sauce and stock. Cover and simmer 35 minutes, adding water if sauce gets too thick. Serve with a cooked grain such as rice, millet, quinoa, wheat berries etc. This dish is also good served with lentils and cooked greens. Serves 4.
Carrot Pasta Sauce

This pasta sauce is one of my favorites. Most people don’t think of carrots, when they think of pasta sauce, but maybe they should. It tastes wonderful and looks pretty, too. It’s a simple sauce that packs a lot of flavor.
We made this sauce in cooking camp this summer. The kids seemed to doubt that they would like it. Turned out, most of them loved it. I made it for a friend the other night. He enjoyed it, too.
The process is easy. Just cook carrots, with sauteed onions and garlic in stock, until the carrots are really tender. Most of the liquid cooks off. Puree, adding cream or half and half, and some dill. Adjust seasonings and you are done!
I used chicken stock, but you could use a vegetable stock for a vegetarian version of this dish. Toss the sauce with pasta, rice, or even with veggies or meats. You can add some fresh grated cheese, too, if you like. For the version we did in camp, I was going to have the kids sprinkle some cheddar cheese over the pasta once it was tossed with the carrot sauce. The cheese got dumped in the carrot sauce instead, so we just mixed it in until it melted. The carrot sauce tasted like mac and cheese.
Here is the recipe. I hope you try it.
Carrot Pasta Sauce
1 T. oil
1 onion, chopped
1 garlic clove, minced
1 lb. carrots, peeled and sliced
2 c. chicken or vegetable stock
Salt and pepper to taste
1/2 c. cream, half and half or evaporated milk
1T. fresh dill or 1 t. dried
Hot cooked pasta
Sauté onion in oil until tender. Add garlic, carrots and stock and cook until carrots are very tender. Much of the liquid should have evaporated by then. Place mixture in blender and add cream or milk, mixing until smooth. Add dill and adjust seasonings, tossing over hot pasta to serve. I sometimes top with some shredded Parmesan cheese, too.
Variations: Use sweet potatoes, pumpkin, winter squash or even peas for different tastes.
Peach Scones

I’ve really been in the mood to make scones lately. Since I had some beautiful peaches, I decided to use them in the batter.
They worked out even better than I had hoped. I added cinnamon, nutmeg and cloves into the dough, for a little extra flavor. Nicely complimented the sweetness of the peaches.
These are wonderful for breakfast, brunch or with tea or coffee. They would also make a nice base for shortcake. I could see them with berries and whipped cream for a perfect summer dessert.
I used a 2 oz. cookie scoop and got 25 scones. You could make them bigger, just increase the baking time a couple of minutes. I also placed only one baking sheet in the oven at a time. You could put both in at once, but reverse the rack you have them on- half way through baking- so they bake more evenly. Also, if both trays are in the oven at once, increase baking time a couple of minutes.
Peach Scones
3 cups flour
½ c. sugar
1 tablespoon baking powder
1 t. cinnamon
1 t. nutmeg
Pinch of cloves
½ t. salt
10 T. cold butter (1 stick plus two tablespoons)
¾ c. half and half or milk
1 egg
1½ t. vanilla
1½ c. peeled, chopped peaches – about 3-4 peaches
Glaze:
2 c. powdered sugar
About 2-3 T. half and half
1 t. vanilla
Preheat oven to 425. Line 2 baking sheets with parchment paper, or use silicone liners. In a bowl, place the dry ingredients and stir to mix. Cut in butter to resemble coarse crumbs. Make a well in the center and stir in half and half, vanilla and egg. Stir to make a soft dough. Fold in peaches. Use ice cream scoop to make scones, placing scoops of dough onto baking sheets. Bake until browned – 14-16 minutes. Cool on a rack. Make glaze and dip tops of scones in glaze or drizzle it over them. Makes 22-25 depending on size.
Braided Herb Breads
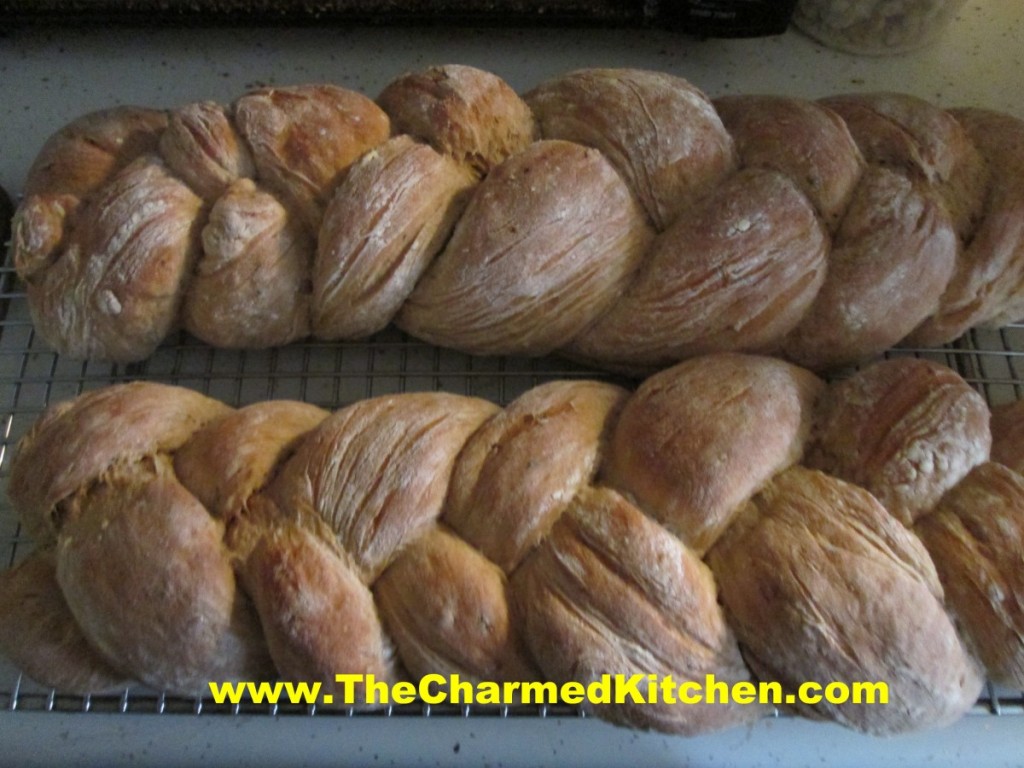
One of the benefits about baking your own bread is the aroma. The house gets filled with the most wonderful smells. In this case, the experience is even better because the breads I baked are filled with herbs and shallots, so those fragrances are also in the mix.
I like to make these loaves in braids and place them on a baking sheet- but they could just as easily be baked in bread pans for more traditional loaves. Great for sandwiches.
I like to toast some of this bread, and use as croutons or as a base for stuffing.
You can also slice the bread, brush with softened butter, then toast, for a twist on garlic bread. The garlic is already in the bread, but feel free to add more to the butter, before brushing it on the bread.
Braided Herb Bread
5 ½ -6 ½ c. flour
2 packages quick rising yeast
¼ c. sauteed shallots
2 T. each dried marjoram and parsley
1 T. each dried oregano and minced garlic
1 T. honey
2 t. dried thyme
2 t. salt
¼ c. olive oil
2 ¼ c. hot water
In a mixing bowl combine 2 c. of flour with the rest of the ingredients and mix until smooth. Beat with electric mixer 4 minutes then add 1-cup additional flour and beat 1 minute longer. Stir in flour ½ cup at a time until soft dough forms. Turn onto surface and knead, adding flour gradually until dough is smooth and elastic. Place dough in lightly greased bowl and turn to cover. Cover with a towel and let rise until doubled, about 30 minutes. Turn dough onto surface and cut in half. Cut each half into thirds. Roll each piece of dough into an 18-inch rope. Loosely braid three ropes together and repeat with the remaining dough. Place on greased baking sheet and cover until doubled in size, about 20 minutes.
Bake in a preheated 375-degree oven for 25-30 minutes, or until bread sounds hollow when tapped lightly. Makes 2.
Variation: Whole wheat: Add 2 cups of whole-wheat flour to replace 2 cups of white flour. Also try adding ¼ c. of wheat germ, oat bran or 2 tablespoons of seeds (sesame, pumpkin, sunflower, poppy, etc.)
Regular yeast can be used, but rising times will be longer and water should be warm, not hot.
Coffee Waffles

Yes, you read that right. Coffee waffles. Waffles with coffee already inside them. They are quite wonderful actually. Great for breakfast, which is obvious, I suppose. These waffles also make a fun base for desserts. I am serving them with honey ice cream as a dessert.
I wanted to add coffee flavor to waffles, but I knew even strong coffee would water down the batter too much. The only solution was to use either instant coffee or espresso powder. I knew I could get enough coffee flavor into them, without affecting the batter in a negative way.
It worked!! Plenty of coffee flavor and a nice, crispy waffle. I was thinking it might be fun to add cinnamon to the next batch. I got 10 rectangular waffles out of the recipe. Froze most of them for later.
You can serve them topped with butter, syrup, whipped cream or powdered sugar.
So here is the recipe. Hope you give them a try.
Coffee Waffles
1¾ c. flour
¼ c. brown sugar
1½ t. baking powder
½ t. salt
1½ c. half and half or milk
1 egg, beaten
1/3 c. oil
1 T. instant coffee or espresso powder
1 T. vanilla
Non-stick spray or oil for coating the waffle iron
In medium mixing bowl, mix dry ingredients together and set aside. In a separate bowl, combine the half and half with the remaining ingredients. The dry coffee granules will not dissolve right away. You can let the wet ingredients sit a few minutes and whisk again, if you like. While they are just sitting there, you can heat up the waffle iron. Coat the waffle iron with a non-stick cooking spray or brush with a little oil. Add the wet ingredients to the dry ingredients and stir until mixed together. Don’t get crazy over mixing. That will give you tough waffles, and nobody wants that. Just stir until you don’t see any dry bits in the mix. I like to use a rubber scraper to get to the bottom of the bowl. Ladle some batter into the waffle iron and cook until golden brown. When the steam stops coming out of the waffle iron, or lessens a lot, it is usually good indicator that your waffles are done. Yield depends on the size of your waffle iron. I got 10 waffles, about 4×5 inches.
Note: The instant coffee breaks down more when mixed with the dry ingredients. Espresso powder will dissolve quickly, but if you use instant coffee like I did, expect a few “flecks” of coffee in the batter. I kind of liked the way it looked.
Honey Ice Cream

I love this ice cream. The richness of the custard works wonderfully with the sweet flavor of the honey. I don’t use all that much honey in this recipe. It is sweet, but not overly so. You could make it sweeter if you like.
I think about ice cream as a summertime treat, but honestly, I would eat ice cream in a blizzard!!!
So here is the recipe.
Honey Ice Cream
1 ½ c. whipping cream
1 ½ c. half and half
2/3 c. honey
6 large egg yolks
pinch of salt
Heat together cream and half-and-half to simmer . Whisk honey, yolks and salt in a medium bowl. Gradually whisk in hot cream mixture. Return to pan and heat until mixture thickens (about 170 degrees). Do not boil. Strain into large bowl. Chill until cold. Process in ice cream maker. Makes about 5½ c.

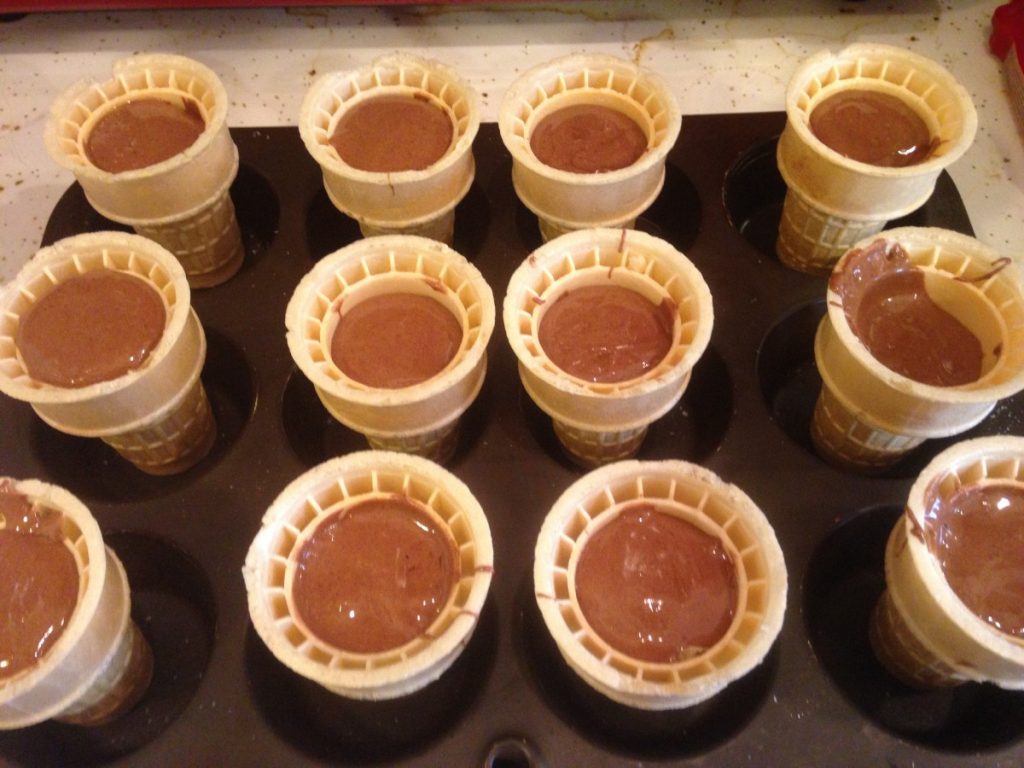
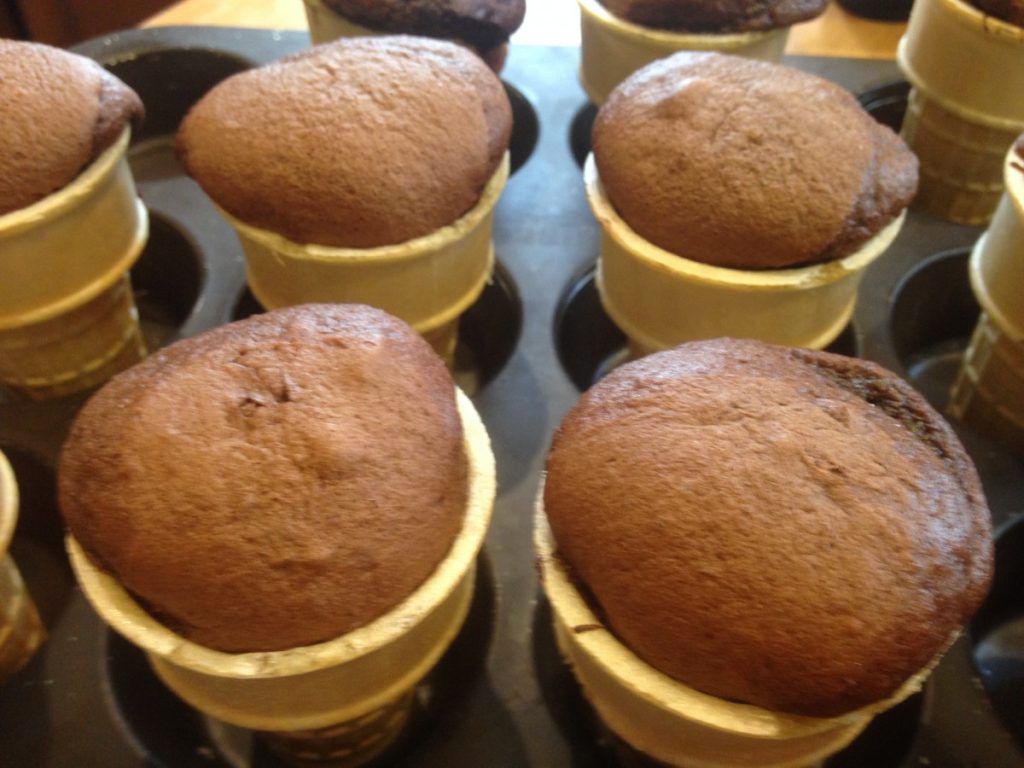
Ice Cream Cone Cupcakes

This might look like an ice cream cone, but it isn’t. It is a cupcake!! The batter is baked inside ice cream cones, then decorated to look like ice cream cones. I used from scratch recipes for both the cupcake batter and the frosting, but feel free to use what ever recipe you like. This is such a fun twist on a cupcake. Great for summer parties.
Because you use more frosting than you might normally use for more traditional cupcakes, make sure to have extra. I chose the recipe I did because it makes plenty of frosting. I did not tint my frosting, but you can, if you like.
These are fun for kids to make. You can let them decorate their own “cone”. For a kid’s party you can even have a couple of different cupcake flavors and frostings to pick from- and some assorted toppings, like cherries, tiny candies and assorted sprinkles.
Once you frost the cupcakes, they become a little top heavy. I find setting them together, letting them touch each other a little, helps to keep them from tipping over.
Sometimes, some of the batter drips over the edge of the cone when baking. Just pretend some of the “ice cream” has melted and cover drips with frosting.
Here are the recipes I used, with the directions for baking the cupcakes.
Chocolate “Ice Cream Cone” Cupcakes
4 oz. semisweet chocolate
1 cup butter
1 cup all-purpose flour
1 3/4 cups sugar
4 eggs
1 teaspoon vanilla extract
24 flat bottomed ice cream cones
Preheat oven to 325 degrees. In the top of a double boiler, combine chocolate and butter. Heat, stirring occasionally, until mixture is melted and smooth. Remove from heat and allow to cool to lukewarm.
Sift flour and sugar together into a large bowl. With mixer on low speed, beat in eggs one at a time. Stir in chocolate mixture and vanilla. Place 24 cones in muffin tins to hold them up and fill 2/3 full with batter. Bake for about 20 minutes, or until cupcakes puff to top of cones. Test with a toothpick. Cool and frost to look like ice cream. Decorate with sprinkles. Makes about 24.
Super Fluffy Frosting
1½ cup butter
1 1/2 tablespoons vanilla extract
1½ lbs. confectioners’ sugar –
1/8 teaspoon salt
3 T. milk
In a mixer, combine the butter, vanilla and 1 tablespoon milk. Add the sugar and salt, beat until well mixed. Add a tablespoon or two more of milk, if needed. Turn mixer to the highest speed and beat for 15 minutes.

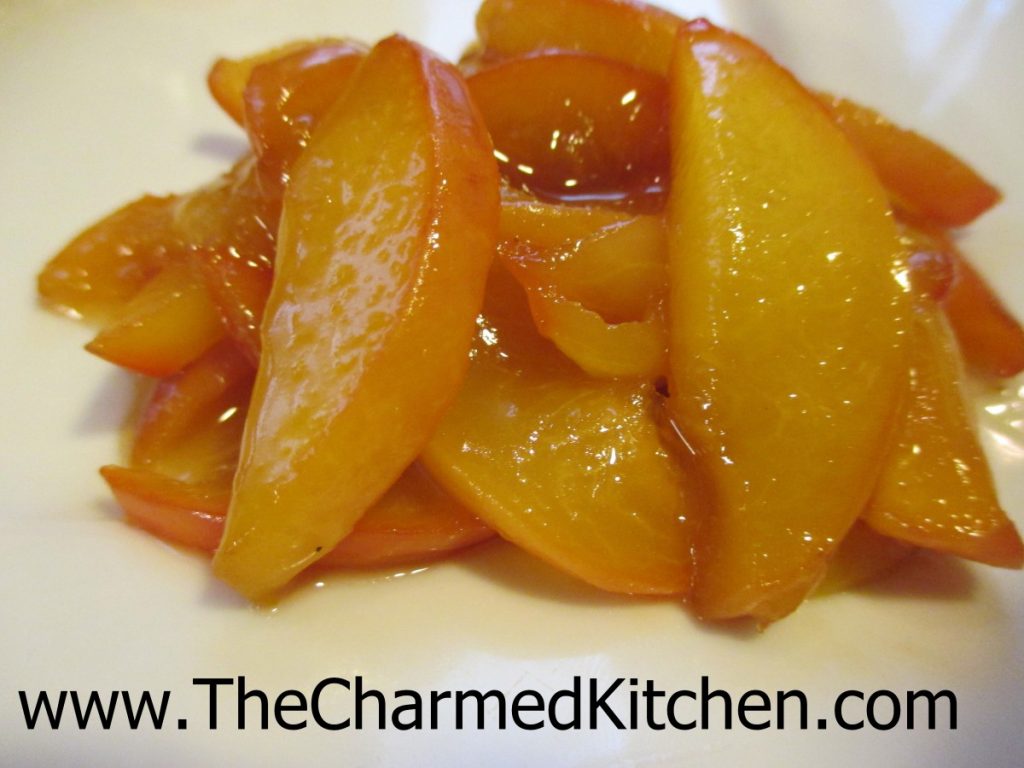
Honey Ginger Glazed Peaches
I am always looking for new ways to cook with old favorites. Peaches are a great example. When they are in season, I can’t get enough of them.
I have made peach ice cream, peach pie, peach pancakes, peach preserves, peach liqueur….. you get the idea. I wanted to enjoy peaches with dinner the other night. I decided, rather than just slicing them up and adding them to a salad, I would do a little more to transform them.
So I glazed them, the way you might glaze carrots. So simple. Why had I never thought of it before? The peaches were soft, slightly sweet, and a perfect side dish for the broiled chicken. I want to try these with lamb, pork or maybe duck next time.
I kept it pretty simple- peaches, butter, honey, ginger, salt and a dash of sriracha. I could see adding other herbs and spices. Might have to do a little experimenting. For now, here is the recipe for glazed peaches. I did not have any leftovers, so a hit, for sure. I did not peel my peaches, but feel free to, if you like.
Honey Ginger Glazed Peaches
4 medium peaches, pitted and sliced thin
2 T. butter
4 T. honey
1/2 t. fresh grated ginger
pinch of salt
Hot sauce to taste
Place peach slices in a small skillet. Add butter and remaining ingredients. Cook over medium heat until peaches start to get tender. This will take about 5 minutes. Stir once in a while to prevent sticking. Be gentle so you don’t mash the peach slices. Reduce heat to low and continue cooking a few more minutes. Peaches should be soft and the sauce thickened. Adjust seasonings.
Candied Bacon
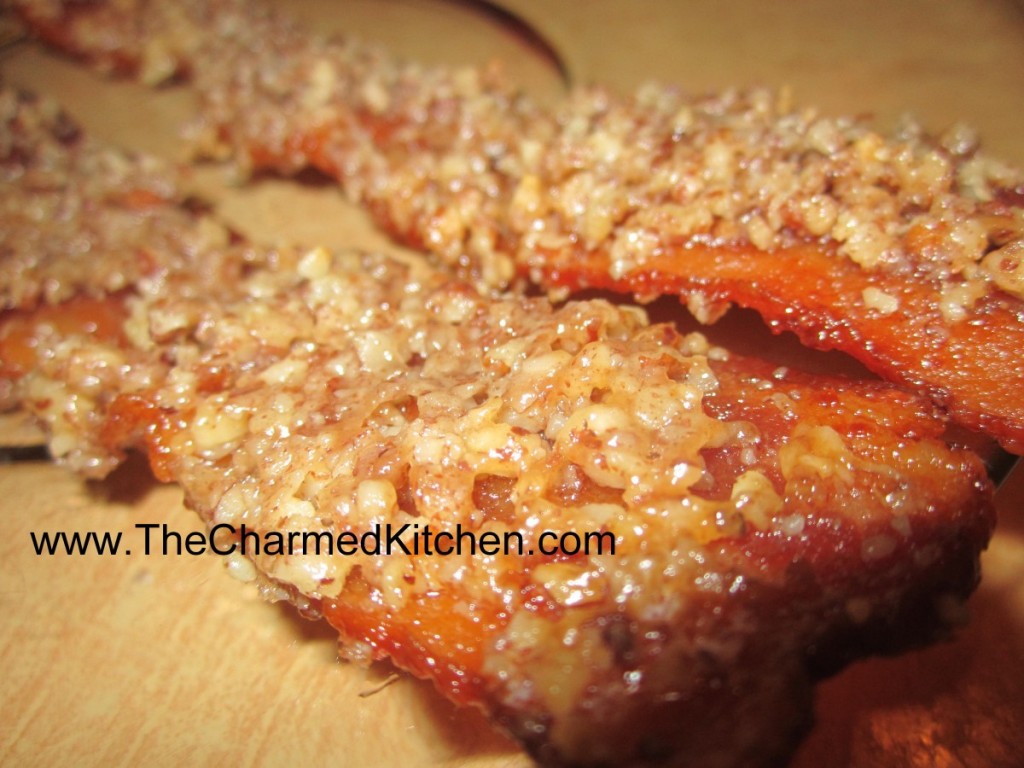
This candied bacon only has three ingredients- bacon, maple syrup and chopped nuts. The combination in sublime. Salty, sweet, smoky all in one crunchy bite. Friends and family love it!! We made it in class the other night. It came out perfect.
The bacon is baked, then coated with maple syrup and chopped nuts. It is returned to the oven, where it bakes until the bacon is crisp and the coating it toasted, almost caramelized. It gets crisper once it cools down.
You can make a spicier version by sprinkling with a little cayenne pepper or adding hot sauce to the maple syrup.
Candied Bacon
1 lb bacon
3/4 c – 1 c maple syrup
3/4 c – 1 c crushed pecans (or any nuts you like! I like to leave some
larger pieces and then mix in some more finely ground)
Preheat oven to 350. Put bacon in baking pan and bake about halfway through (about 5-7 minutes or so). Drain most of the grease and allow to cool slightly. Coat each piece in syrup, roll in nuts and put back on pan. You may need more nuts as you go along, though it’s up to you how much to cover them. Bake another 7-9 minutes, until desired crispness. If you do like crisper bacon, just be sure to move the cooked bacon quickly off the baking sheet onto parchment paper, since the syrup will harden. Allow longer cooking times with thicker bacon.
Smoky Brussels Sprouts Salad

I know some people don’t like Brussels sprouts. I am not one of them. I have always loved them, even when I was a kid. I like them steamed with butter, roasted, pan fried and even raw. This salad is a great way to enjoy their crunchiness in raw form. The smoky flavor come from the bacon. The dressing, sweetened with maple syrup, really makes the dish.
The nice thing about this salad, is that it tastes good even the next day. The sprouts are like little cabbages. Unlike leaf lettuce, which wilts quickly once dressed, the sprouts soften some, but retain most of their crunch.
Smoky Brussels Sprouts Salad
8- 10 oz. Brussels sprouts
1 large orange, peeled and cubed
4 slices bacon, cooked and crumbled
¾ c. dried cranberries
½ c. toasted slivered almonds*
Dressing:
¼ c. olive oil
¼ c. apple cider vinegar
2 T. maple syrup
1 T. fresh chopped parsley- or 1 t. dried
2 t. hot sauce, or to taste
½ t. dried thyme
½ t. dried basil
Salt and pepper to taste
Trim bottoms off the sprouts, cut in half and slice thin. You should end up with about 4 cups of sliced sprouts. Place in large bowl with the remaining salad ingredients. Place dressing ingredients in a jar with a tight fitting lid and shake well to combine. Toss over Brussels sprout mixture.
Note: The salad ingredients can all be assembled a day ahead, then just dressed when ready to serve. This salad is also good the next day.
*To toast the almonds, place in a skillet over medium low heat and stir occasionally, until toasted. Be careful, once they start to brown, they can burn easily. In class last night, the ladies making the salad toasted the almonds in the bacon fat. They came out perfect!!!


