Sous Vide Ribs

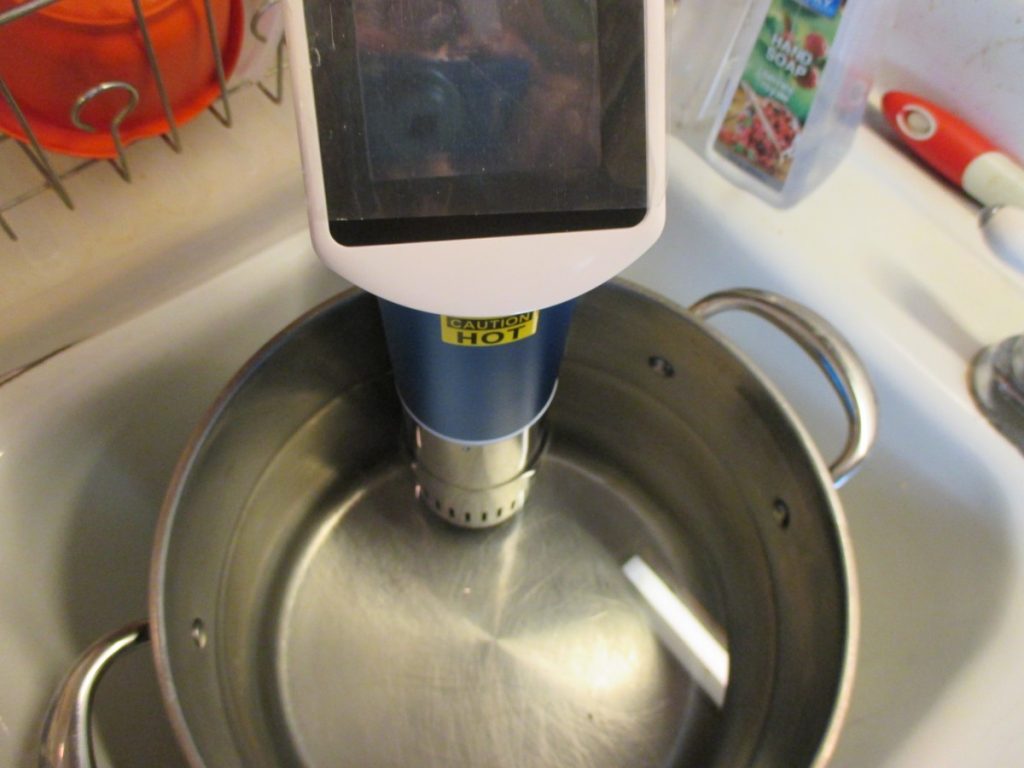
I have this fun kitchen machine called an immersion circulator, also known as a sous vide immersion circulator. They are used to cook food at very exact temperatures. It is a kitchen tool that is becoming more popular, but still unknown to a lot of people. They can be expensive, although prices seem to be coming down as more models hit the market. The one I have costs around $200, but you can find them for a lot less these days.
So why would you want to use/invest in one and how exactly is the food cooked?
Sous vide involves cooking your food in a bag, submerged in water. I know that doesn’t initially sound all that appealing, but it is pretty cool and has some advantages.
Have you ever fretted about overcooking a really expensive cut of meat? Or do you have trouble with the ends getting too done before the middle is cooked?
In an immersion circulator, you set the temperature that the water will be. If you like medium rare beef, you would set the temp at around 135 degrees F (57 Celsius). That means the water would maintain a temp of 135 degrees. When you put the meat in the circulator it can’t overcook. It will only get to a max of 135 degrees, or whatever temperature you like. The meat can’t overcook, even if you leave it in for several hours. It also will be cooked the same from one end the the other. This gives you the opportunity to cook less expensive cuts of meats for long periods, making them tender, but still rare. The leg of lamb we had for Easter was wonderful. When a guest was delayed, I didn’t have to worry about it getting overdone, either.
The sous vide machine is attached to a pot that is filled with water. Once you set it to the temperature you want, you place the bag with the meat in it, in the water. Set the timer and let the circulator do its job. You can also buy machines that are self contained. Check water levels once in awhile, but they don’t go down very much, even after long cooks.
One disadvantage is that the meat will not get that nice sear on the outside that comes from more traditional methods of cooking. To remedy that, you remove the meat from the bag, once it has cooked, and brown it then. I like to use a smoking hot skillet for this. You brown the meat over high heat, turning it until it looks the way you want it to look. This actually worked great for the ribs. You could also place the meat under the boiler for a few minutes or even on a hot grill.
Another slight disadvantage, is not smelling the meat cook. Because everything is sealed up in bags, there are no yummy aromas in the house. At least, not until you open the bags to brown the meat. I have confused guests, who arrived for dinner, but smelled nothing cooking.
It is a nice way to cook in hot weather. Sous vide does not nearly generate the heat that an oven would.
Cooking the Ribs
So for my spare ribs, I wanted them to be very tender, but not mushy. I set the pork to cook at 145 degrees Fahrenheit or 60 degrees Celsius. That is the minimum safe temperature for pork. You can cook it at a slightly higher temperature- but not lower. I seasoned the meat with salt and my Ethiopian seasoning. I used a freezer Ziploc bag. I made sure I got as much air out of the bag as I could, and made sure it was sealed. I then double bagged the ribs, to be safe. Using a vacuum sealer or pump will help remove more air. Nice, but not a must.
I cooked my ribs for 12 hours the first time I made them. I have cooked them for as long as 24 hours. There is a lot of leeway for how long you have to sous vide meat. Tougher cuts should be cooked longer, to make them more tender. The 12 hour ribs were very tender, but the 24 hour ribs were better. Once the time was up, I took the ribs out, heated up my skillet, and browned the ribs on both sides. This is when you can add sauce, if you like. I added a sweet and sour sauce to this batch. They were tender and very juicy.
Unlike poaching, the meat is never in contact with the water, so all the flavor stays in the meat. Because you have such precise control, you don’t end up with overcooked meat, either.
There are videos all over the internet that discuss and share sous vide cooking as well as groups on Facebook. I am still learning and don’t consider myself an expert. I just wanted to try cooking my ribs this way. I was very happy with the result. I can’t say whether an immersion circulator is a good investment for you or not. I will say that I love mine and am using it several times a week.
Broccoli and Cauliflower Salad

I make broccoli salad pretty often, but sometimes like to switch it up a little by adding cauliflower. The result is a salad that has a great mixed of flavors, colors and textures. The addition of bacon also adds a wonderful smoky flavor. Certainly, feel free to omit the bacon for a vegetarian salad. With or without the bacon, this is a great salad for the warmer days ahead. Fun to make for your next cook out or picnic, too.
Broccoli and Cauliflower Salad
4 c. cauliflower, broken into bite- sized pieces
2 broccoli crowns, cut into bite- sized pieces
1 can water chestnuts, drained and sliced
1 sweet pepper, seeded and chopped
1 c. shredded cheese, optional
8- 10 slices of bacon, cooked and chopped
1/2- 3/4 cup of mayo, adjust to your preference
salt and pepper to taste
Steam the cauliflower and broccoli until just tender/crisp. About 5 minutes in a microwave steamer, 6 minutes in a conventional steamer. Place in a bowl to cool down then combine with remaining ingredients and stir to combine well. Adjust seasonings, if needed. Serves 6-8.
Sweet Potato Gnocchi
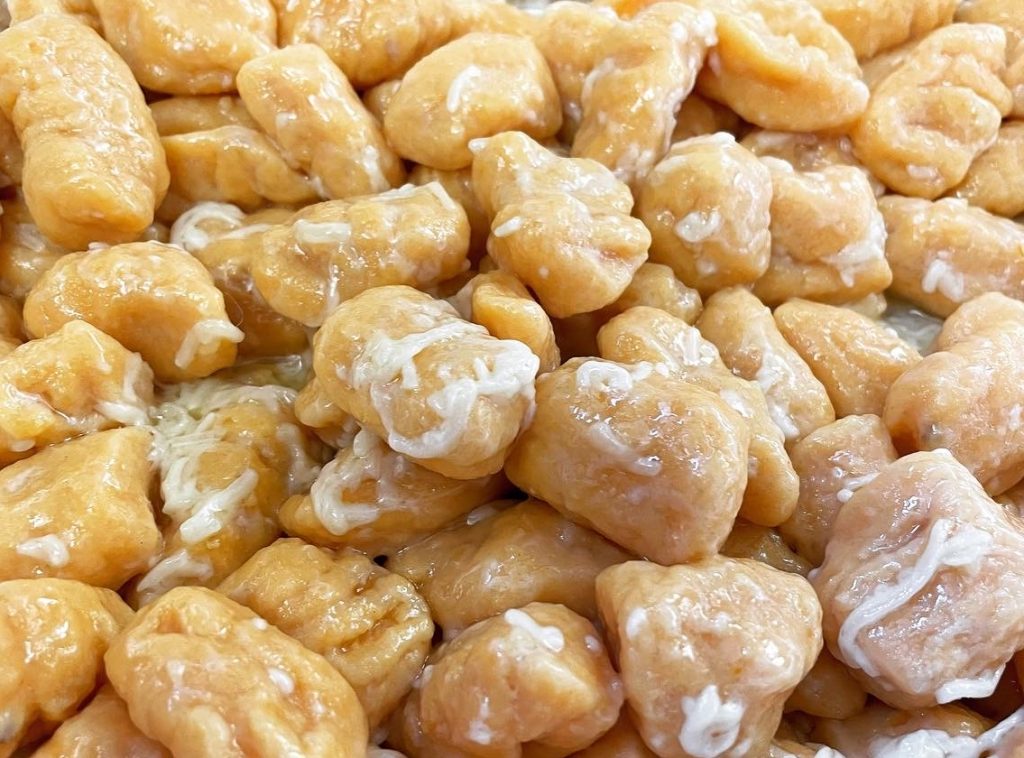
These tasty dumplings are easy to make and taste just wonderful. We made some in a class on dumplings the other night. In many ways I think they are easier to make than pasta. The dough is mixed and rolled into ropes, then cut into individual pieces and boiled. No rolling pins or heavy lifting required. You can add the traditional gnocchi ridges by rolling the cut pieces of dough over the back of a fork before cooking. It is optional, but does look nice.
They can be served as a side dish, with butter and salt, We added some Parmesan cheese. You can also toss them with your favorite pasta sauce.
The dough is a combination of cooked sweet potato, cooked russet potato, eggs, flour and salt. I have made them without the russets and liked them best with a little added. Other white potatoes could also be used. You can certainly add additional seasonings, if you like. Turmeric can be added for color, rather than flavor.
Sweet Potato Gnocchi
1 c. mashed, cooked sweet potatoes
½ c. mashed, cooked russet potatoes
2 eggs
1 t. salt
1 t. turmeric, optional
2 c. flour or more
Get a pot of water boiling. In mixing bowl combine the sweet potatoes with the eggs and seasonings. Add about 1½ cups of the flour and stir until a soft dough forms. Continue adding flour, a little at a time, until the dough can be handled without sticking to your hands but is still soft. Take about ¼ of the dough at a time and roll into a rope, about 15 inches long, on a floured work surface. Cut dough into ½ inch thick pieces. You can leave them as is, or add ridges by rolling each gnocchi over the tines of a fork. Place gnocchi in a pot of boiling water and after a few minutes the they will float to the top. Cook them for several minutes after they have risen to the top of the pot. Remove with a slotted spoon and drain. If you aren’t going to use them right away drizzle with a little oil to prevent sticking or toss with butter. You can also run a little cold water over them instead. Repeat with the remaining dough.
Chicken and Herb Dumplings
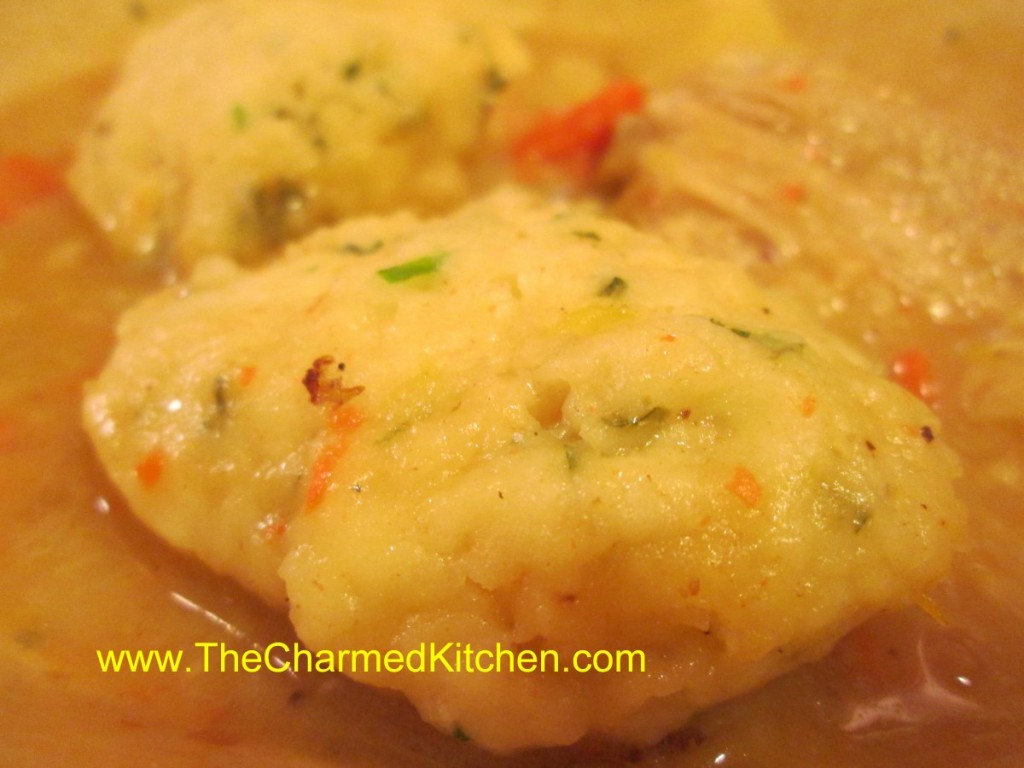
There are foods I will always associate with my childhood. Chicken and dumplings is one of those dishes. I can remember watching my Mom spooning the dumpling batter over the simmering pot of chicken and vegetables. She’d cover the pot and wait.
When she uncovered it, the dumplings had puffed up, and pretty much covered the whole dish. It was magical to me. The dumplings were so tender and light. I can’t make this dish, all these years, later without thinking of her.
My mom made her dumpling batter with a buttermilk baking mix- like Bisquick. Eventually, she started making her own baking mix, like I do today.
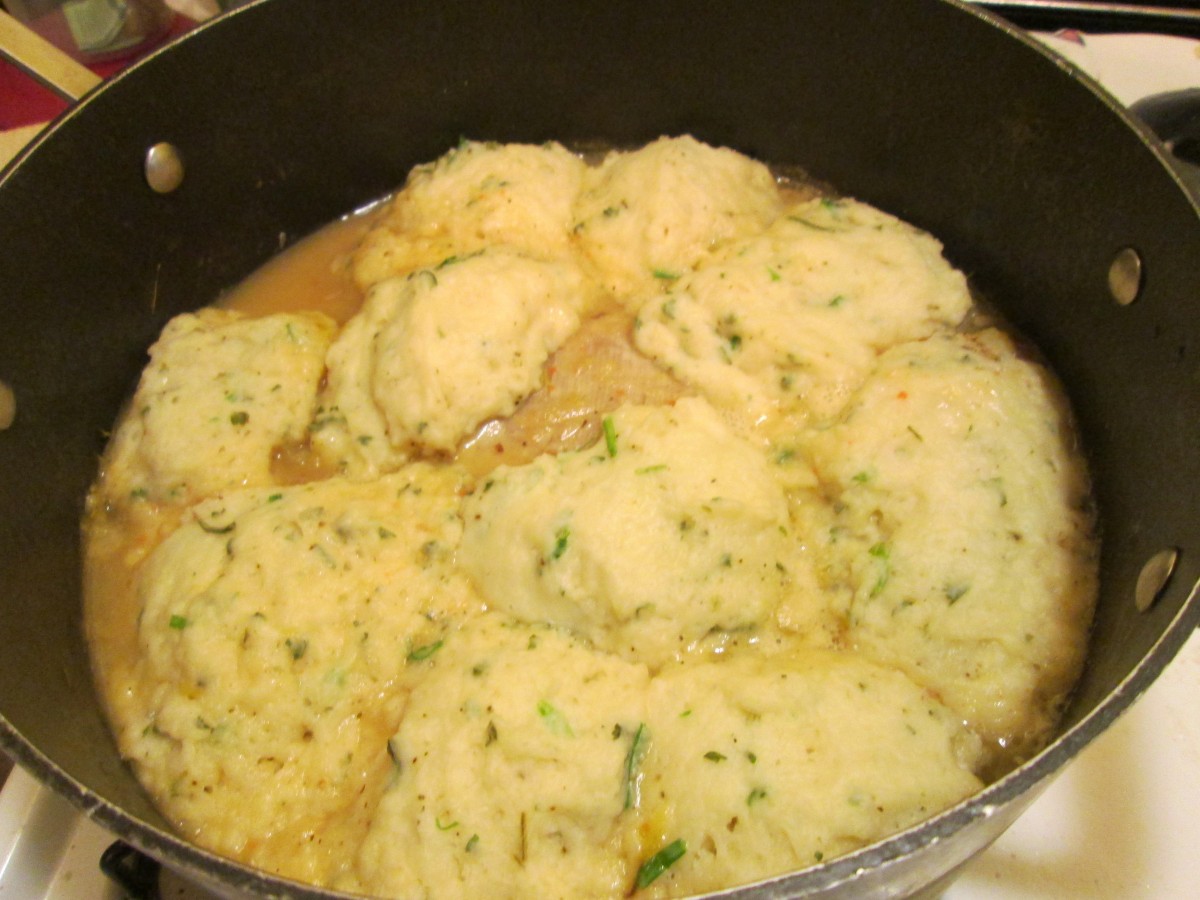
Dumplings will puff up when cooked
Mom’s Chicken and Herb Dumplings
1 T. oil
1 (3 lb.) broiler, cut into pieces
salt and pepper
flour for dredging
1 medium onion, chopped
2 carrots, peeled and sliced
3-4 potatoes, cut into chunks
2-3 c. chicken stock
1 t. each marjoram and thyme
1 c. buttermilk baking mix* , like Bisquick,I make my own, recipe follows
1/3 c. milk
2 t. fresh parsley
2 t. snipped chives or green onions
1/2 t. red pepper flakes
Season chicken pieces with salt and pepper and dredge pieces in flour. Heat oil in large skillet and brown chicken pieces on all sides. Remove chicken pieces and sauté onion until tender. Add carrots, potatoes, broth and chicken to skillet and cook, covered, 20 minutes. Sprinkle herbs over the chicken. Combine baking mix with milk, parsley, chives and red pepper flakes and spoon batter in skillet in 8 mounds. Cover and cook over low heat 20 more minutes. Serves 4.
*Here are two versions of the biscuit mix.
Chef Pastry Mix/ Biscuit Mix
8 cups sifted, all-purpose flour
1 c. powdered milk
1 c. powdered buttermilk
¼ c. baking powder
1 T. salt
2 c. shortening, coconut oil or butter- if using butter store in the fridge- coconut oil version should be stored in fridge in warm weather
Sift dry ingredients together 3 times. Cut in fat to resemble cornmeal. Keep in an airtight container. Store in a cool dry place and use within six months.
Whole Wheat Baking Mix
5 c. flour
3 c. whole wheat pastry flour
1 c. whole wheat flour
1/3 c. baking powder
1 c. powdered milk, not non-fat
2 t. salt
3 1/2 sticks butter
Mix dry ingredients together well, then cut in butter. Store in fridge for up to 3 months and can be frozen for up to a year. Makes about 12 cups.
Rhubarb Barbecue Sauce

It is rhubarb season around here. Rhubarb is turning up at local farm markets and even in some grocery stores.
Like a lot of people, when I think of rhubarb, I first think of dessert, like pie or cobbler. But rhubarb’s tangy, tart flavor, lends itself to lots of savory uses.
I had some rhubarb and could not decide what to do with it. I chopped it up, and cooked it in a little water until tender. I ended up with 2 cups of cooked rhubarb.
I used this as the base for the sauce. I added the other ingredients, cooked it down until it was thick, and ended up with about 2 cups of sauce. It had a nice balance of sweet, tart and heat.
I used some of it as a glaze for chicken I was cooking. I froze the rest. The sauce would be good on other meats or even on grilled veggies.
Rhubarb Glazed Chicken
8 chicken thighs or 1 whole chicken, cut up
1 cup rhubarb sauce (recipe follows)
salt and pepper to taste
Place chicken pieces in roasting pan, season to taste and bake in a preheated 375 degree oven for 30 minutes. Remove from oven and drain any fat out of the pan. Pour over the rhubarb sauce and return chicken to oven for an additional 35 minutes. Baste the chicken with some of the sauce in the pan and return to oven for 15 minutes more. Serves 4.
Rhubarb Sauce
2 c. cooked rhubarb*
1 c. apple cider vinegar
1/4 c. brown sugar
2 T. honey
2 T. dried minced onion
1 T. hot sauce
1 T. paprika
2 t. minced garlic
1 t. Worcestershire sauce
1 t. cumin
1 t. cinnamon
salt to taste
Place all ingredients in a saucepan and cook over medium heat until thickened. Stir more often as mixture thickens. Cook until sauce has reduced to about 2 cups. Use as a glaze on meats and vegetables. It was great on chicken but would also go well on pork or duck. I could also imagine it on portobello mushrooms. It would make a nice dipping sauce, too. Note: I liked the tang of it but you could make it a little sweeter to suit your own taste. Makes 2 cups. Will keep a few weeks in the fridge or can be frozen.
*To cook the rhubarb, cut the stems into 2-3 inch pieces and simmer in a little water until tender. You can also steam until tender.
Pink and Purple Potato Salad
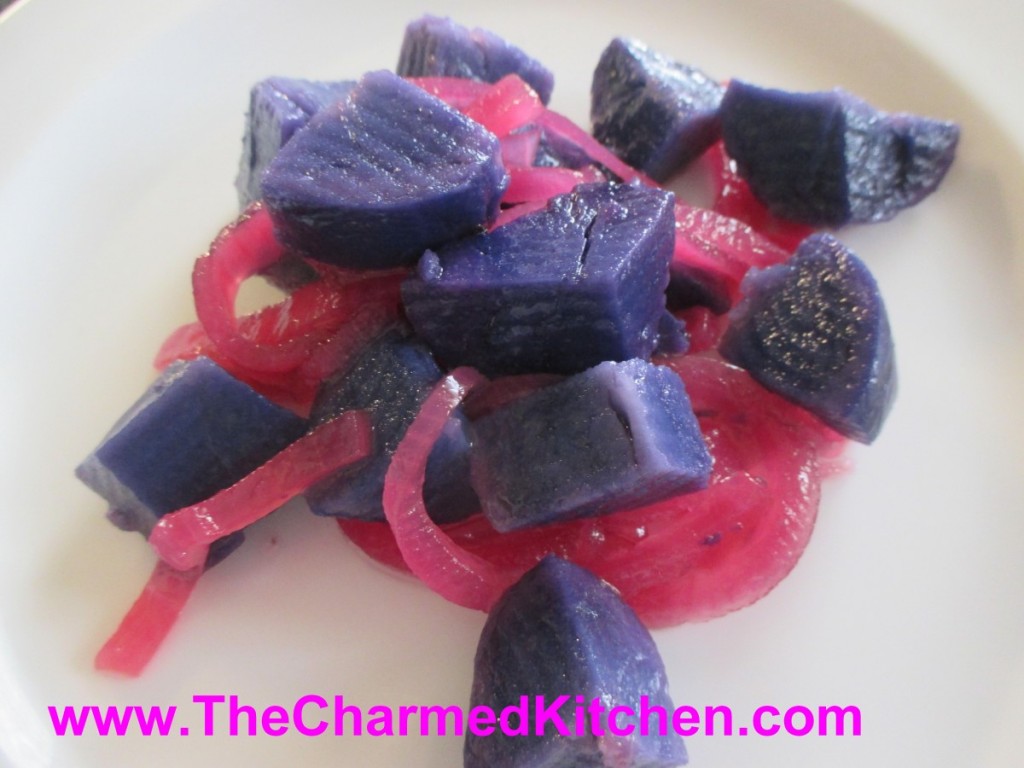
Sometimes we just need a little extra color in our day. My pop of color came in the form of a potato salad. Yes, a potato salad. I had picked up some purple potatoes at a local produce market. I’ve had them before. Normally, the purple potatoes lose a little color once cooked. For whatever reason, these potatoes retained all of that purple color. I cooked them in the microwave, and maybe that is why. Maybe they were just a brighter color to begin with. All I know, is that when I started cutting them up for my salad, I was amazed at how purple they were.
Since I had some red onions, I decided to use them with the potatoes for my salad. I ended up with a purple and pink salad. Pretty and quite tasty.
A salad made with less colorful veggies, would still taste as good, but it would not be nearly as much fun to eat.
Pink and Purple Potato Salad
1 lb. purple potatoes
1 lb. red onions
1 c. apple cider vinegar
1/2 c. sugar
1/4 c. water
salt and pepper to taste
1 t. celery seed
1/4 c. oil
Bake potatoes until tender. I used the microwave and it took about 7 minutes, but you can bake in a conventional oven, too. While potatoes are baking, peel, then slice onions thin and place in a saucepan with the rest of the ingredients, except the oil. Bring to a boil, then simmer for about 5-8 minutes until onions are just tender. Some of the liquid will cook off. Peel and cube potatoes and place in a bowl. Drizzle with the oil. Add the onion mixture and stir gently. Adjust seasonings, if needed. Chill. Serves 4.
Homemade Bagels
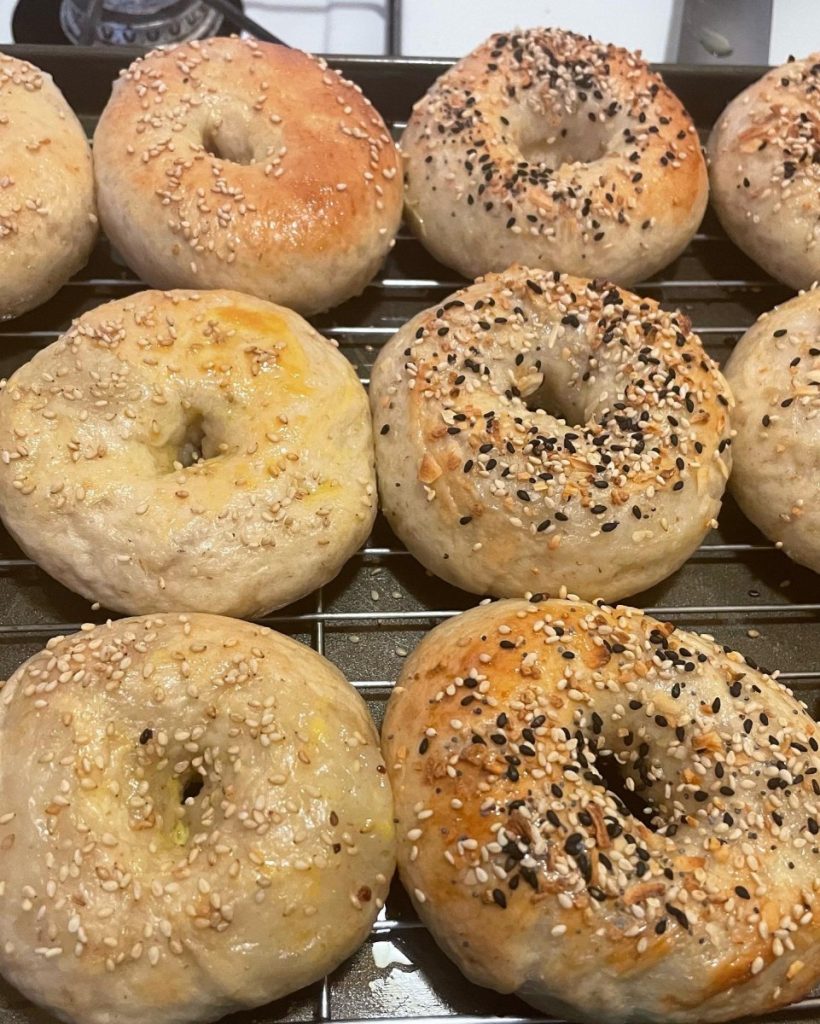
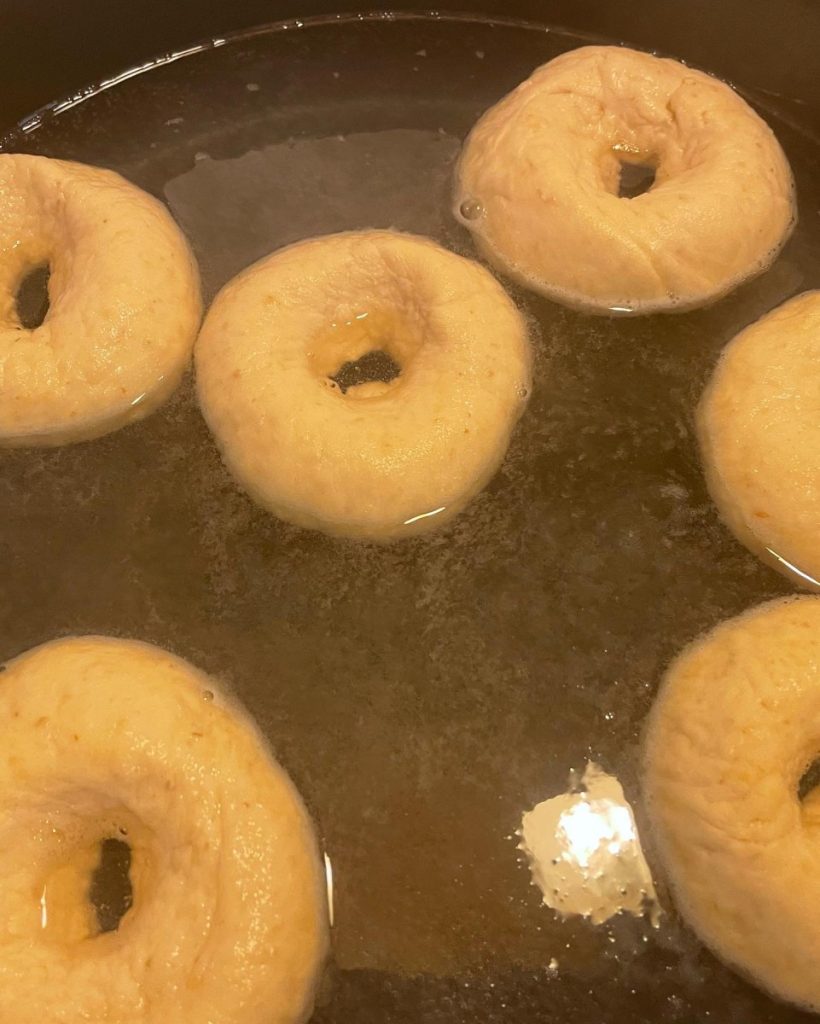
I taught a class last week on making bagels. It was a lot of fun. I think people were surprised on how easy the are to make. The chewy texture in bagels comes from boiling the bagels before baking them.
Bagel History
Bagels began in Austria when a baker in Vienna in 1683 wanted to honor the visiting president of Poland. He created a roll that was round, or shaped like the stirrup on the King’s saddle. The new creation was called beugel, which was a variation of the German word for stirrup. Over time the word evolved into bagel. Because they were made with white flour, everyone, other than the rich considered bagels a special treat for special occasions. Today bagels are found in almost every grocery store throughout the country.
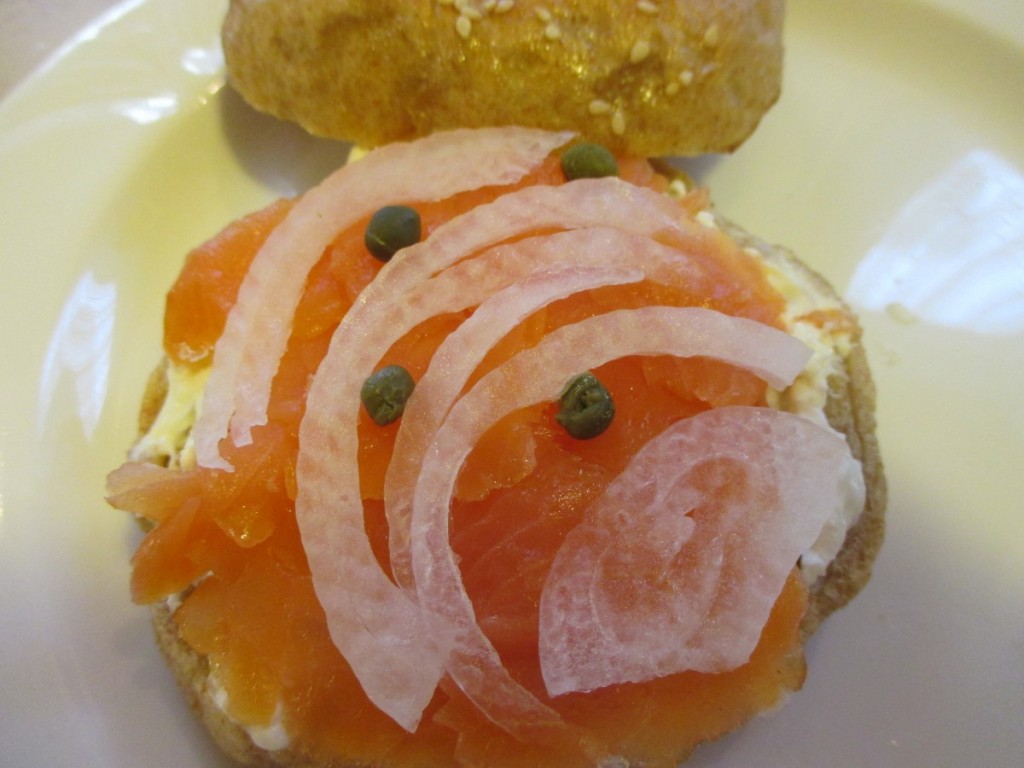
Lox and Cream Cheese
Probably the most traditional way to top a bagel. A toasted bagel is spread with cream cheese and then a few thin slices of lox (salt cured salmon). Some people like to also add thin slices of sweet onion. I do. I also like to add a few capers. Years ago this became a tradition in my family. My niece and I always have bagels with lox on Thanksgiving morning.
Bagels
4 ½ -5 c. flour, bread flour preferred
3 T. sugar
1 T. salt
2 pkgs. Yeast
Water
2 t. butter
1 T. sugar
2 t. salt
1 egg white
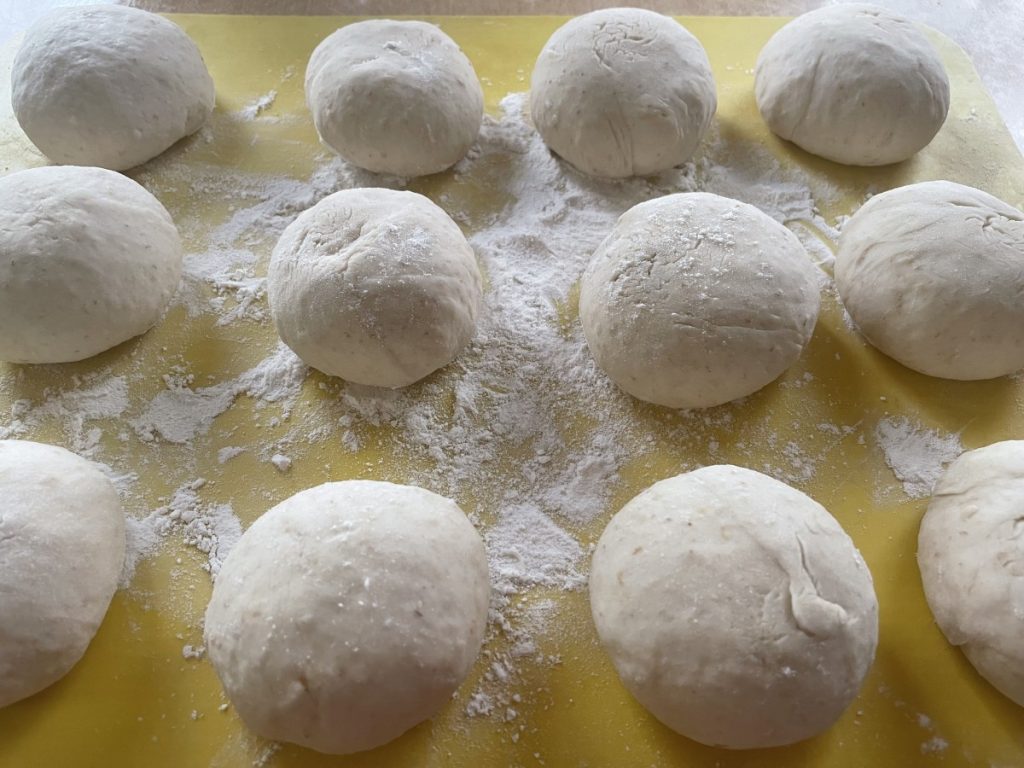
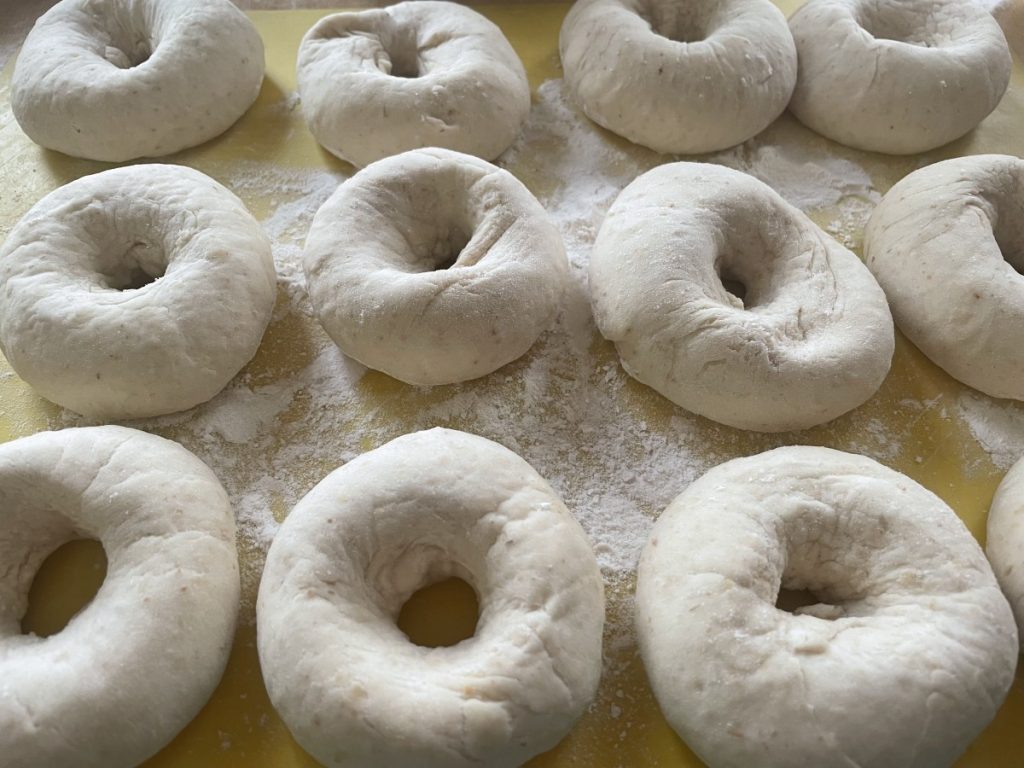
Mix 1½ cups flour, 3 tablespoons sugar, 1-tablespoon salt and yeast in a medium bowl. Heat 1½-cup water with butter and add to flour mixture. Beat 2 minutes at medium speed. Add ½ c. flour and beat 1 minute. Stir in enough flour to make a soft dough. Turn onto a floured surface and knead until smooth and elastic, about 8-10 minutes. Set in greased bowl and turn to grease top. Cover and allow to rise in a warm place 1 hour. Punch dough down cover and let rest 15 minutes. Divide dough into 12 pieces and form into smooth balls. Cover with towel and let rest 10 minutes. In large skillet heat 1 inch of water to a simmer. Add remaining sugar and salt to water. With floured finger poke a hole in the center of three of the dough balls. Drop into simmering water cooking 3 minutes. Turn over and cook 2 minutes. Turn to first side and simmer 1 more minute. Remove to greased baking sheet and repeat with remaining dough. Mix egg white with 1 tablespoon of water and brush tops of bagels. Sprinkle with seeds if desired. Bake in a 375 –degree oven for 20 –25 minutes. Makes 12.
Note: if you want a chewier bagel, you can boil them an extra minute per side.
Cinnamon-Raisin: Add 1-2 T. cinnamon to flour/yeast mixture. Add ½ cup raisins when you start to knead dough.
Everything Bagel Seasoning
Poppy Seeds
White Sesame Seeds
Black Sesame Seeds
Minced Dried Garlic
Minced Dried Onion
Kosher Salt or Coarse Sea Salt
Combine equal amounts of each ingredient.
Toasted Pecan and Orange Waffles

These orange- pecan waffles are sure to make anyone smile. They are really tasty. They aren’t hard to make, either.
You can serve them just on their own, or perhaps with a side of crispy bacon or some breakfast sausage and some fresh fruit.
I started with my basic vanilla waffle recipe and had some fun with it. I enjoyed the combination of pecans with orange juice. Serve them with warm maple syrup, powdered sugar or perhaps orange marmalade..
Here is the recipe.
Toasted Pecan and Orange Waffles
2 cups flour
4 teaspoons baking powder
2 tablespoons sugar
1 teaspoon salt
1 t. orange zest
2 eggs
1 cup orange juice
½ c. milk
½ c. melted butter
1 T. vanilla
¾ c. toasted pecans, chopped*
Whisk together dry ingredients and set aside. Beat together remaining ingredients and add to dry ingredients mixing until smooth. Cook in a waffle iron until crisp.
* To toast the pecans, place on a baking sheet and bake in a 350-degree oven for about 10 minutes. Toast them before you chop them- smaller pieces can burn easily.
Rainbow Salad
When you hear green or yellow split peas- do you think of soup? You probably do. But when cooked until just tender, split peas make a great salad ingredient. I often just add some cooked split peas to a tossed salad. They add flavor, protein and a nice texture to salads. An added bonus is that split peas can be cooked from dry to tender in about 20 minutes. That makes them a great choice when time is tight.
This is one of my favorite salads using both green and yellow split peas. Fresh and colorful, it is a big hit with vegetarian and non-vegetarian friends. If some of you are looking for new meatless meals ideas, this one is a winner.
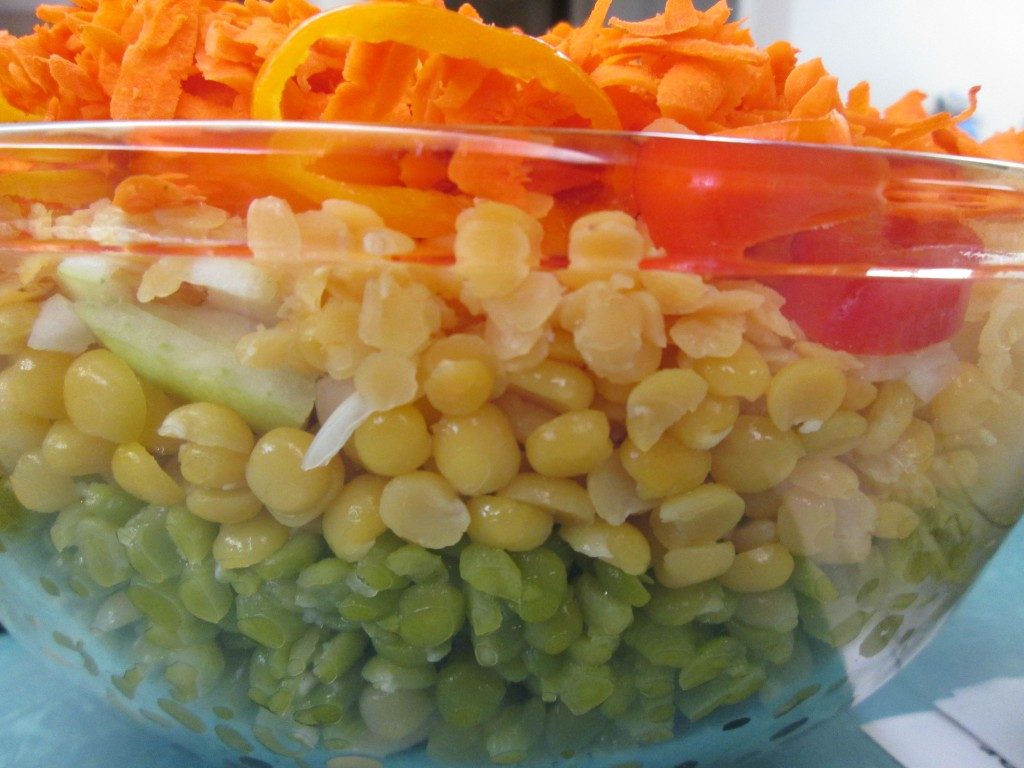
The salad uses both green and yellow split peas, along with black beans, butter beans, red lentils and assorted veggies. It is a great combination of colors and textures. It does make a lot, but you can easily cut the recipe in half.
The dish was inspired by my nephew Danny’s love of sand art when he was a kid. The ingredients are layered in the bowl for a pretty presentation. It is also an homage to the layered salads I remember from my youth. I like this one a whole lot more.
Rainbow Salad
1 c. each green split peas, yellow split peas and red lentils
1 can black beans, rinsed and drained
1 can butter beans, rinsed and drained
1 c. diced sweet onion
1 c. diced sweet pepper
1 c. grated carrot
Cook split peas and lentils separately just until tender. Split peas, both green and yellow will take 20 minutes. Red lentils will take about 8-10 minutes. Drain and rinse each under cold water when done and set aside until ready to use, or you can cook them a day ahead and keep chilled. Each will yield about 2 1/2 c. cooked.
In large glass bowl, place the following ingredients in this order.
Black beans, butter beans, green split peas. yellow split peas. onion, red lentils. carrots and peppers. Pour over dressing and chill several hours or overnight. Serve on a bed of greens. You can also leave the salad plain and serve dressing on the side.
Dressing *
1/2 c. oil
1/2 c. vinegar, I like apple cider vinegar or red wine vinegar
1 (14 oz.) can diced tomatoes, undrained
2-3 T. sugar
1/2 c. parsley or cilantro
1 t. each chili powder, cumin and salt
dash hot sauce
Combine in a blender or food processor until smooth.
*Note: Any fresh or bottled dressing you like can be used. Balsamic works very well. I often serve it with homemade Italian dressing.
Peanut Butter and Jelly Hand Pies
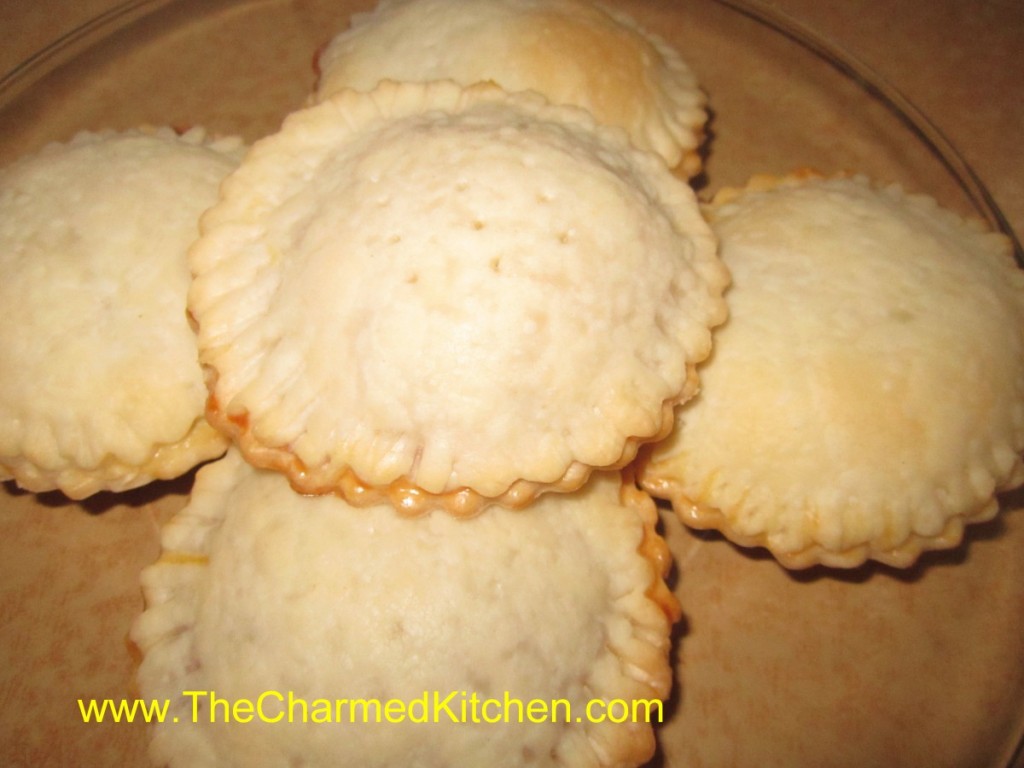
These little pies are a fun way to take peanut butter and jelly on the road. They are just cut out circles of pie crust, filled with peanut butter and jelly, sealed, then baked. Very easy to make, and a fun cooking project for kids as well as adults.
I prefer home made pie crust, but use store bought, if you like.
A nice treat, these little pies can be a snack, breakfast, lunch or even a dessert.
They are also great to take along for picnics and road trips. You can fill them with just jelly, if you like. I have filled them with peanut butter and a few chocolate chips for a fun dessert. You can use almond or cashew butter, if you prefer.
Get creative and have fun.
Peanut Butter & Jelly Mini Pies
1 (15 oz.) package pie crusts or homemade crust for 2 pies*
1 egg
1 T. water
½ c. peanut butter
½ c. preserves, any flavor
Powdered sugar, optional
Preheat oven to 400-degrees. On lightly floured surface roll out one of the crusts into a 12-inch circle. Using a 2½-inch round cookie cutter cut out about 12-14 circles, re-rolling scraps and set aside. Roll out second piece of dough so you will have about 24-28 circles altogether. Beat together water and egg and set aside. Place a circle on work surface and place 1 teaspoon each of peanut butter and preserves in the center. Brush edges of the circle with egg wash. Place second circle on top and press edges together to seal. Prick crust with a fork a few times. Repeat with remaining circles. Place “pies” on lightly greased baking sheets and bake for 12-15 minutes or until golden brown. Cool on wire rack and dust with powdered sugar, if desired.
Martha Stewart’s Pie Crust Recipe
2½ c. flour
1 t. salt
1 t. sugar
2 sticks (1 cup) butter, very cold
About 6 T. ice water
Combine dry ingredients and cut in butter to resemble coarse crumbs. Using a fork to mix the dough start to add the ice water a tablespoon or 2 at a time until mixture just holds together. Wrap and chill until ready to use. Makes 2.


