Two Trees and a Roll of Duct Tape
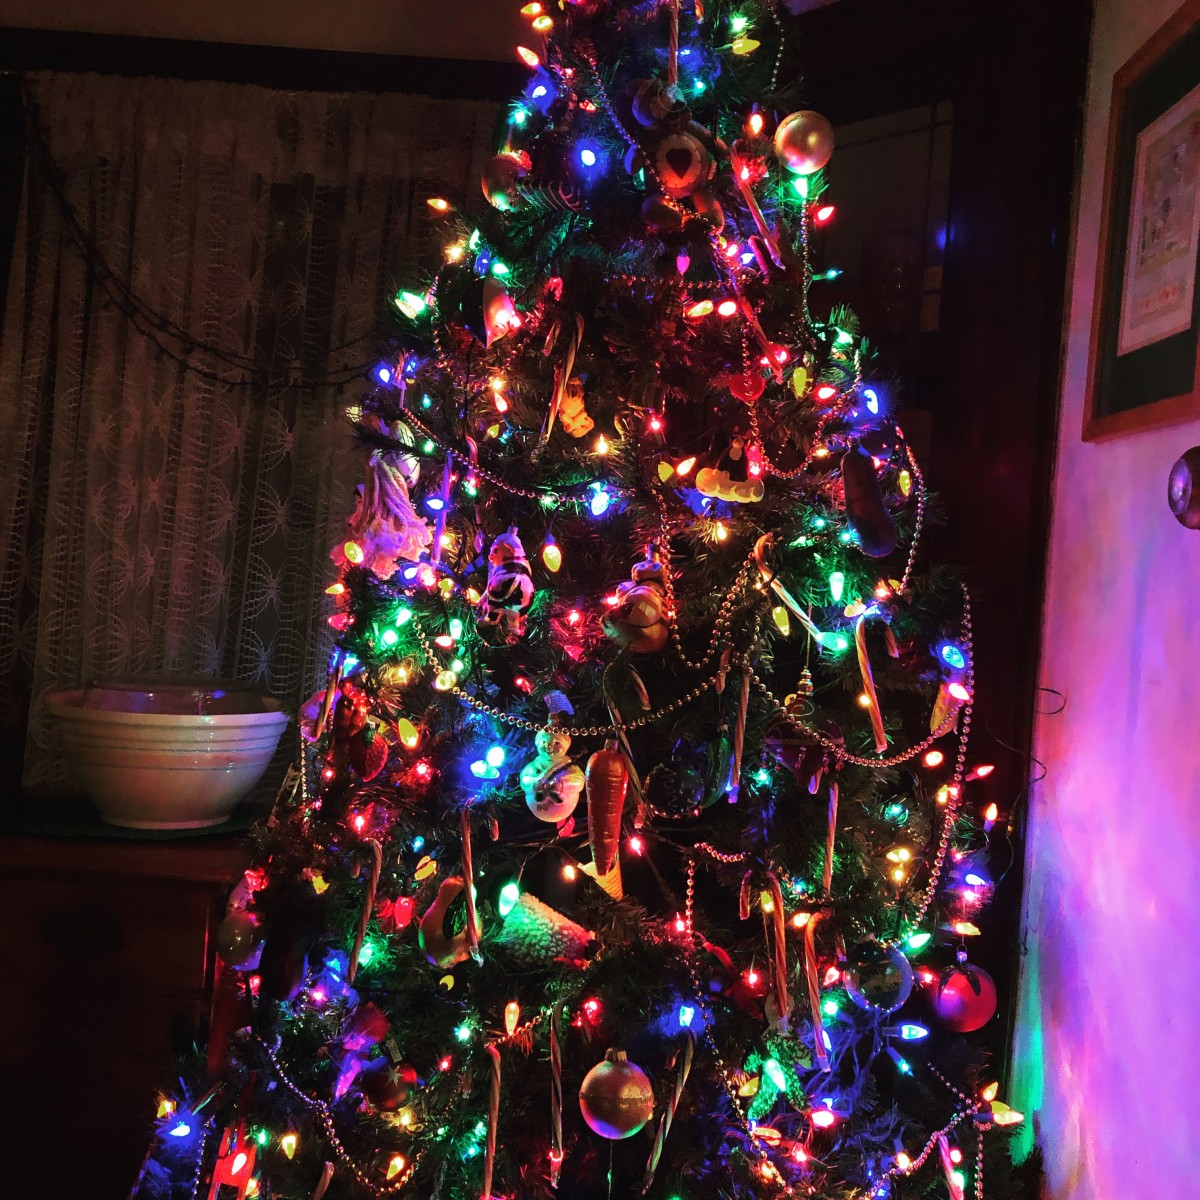
I have some really fun childhood holiday memories. Perhaps the most fun was getting our own Christmas tree. What really made the trip fun was going with Uncle Frank.
Uncle Frank was my dad’s baby brother. He was always so much fun. He had a great sense of humor, too.
The one thing Uncle Frank never seemed to have- at least at tree cutting time- was a car with a working heater. I am not sure if he and my dad thought it was more of an adventure that way. I mean, we could have gone in my family’s car- but we never did.
One year in particular, will always stand out for me. There were 7 of us in a Volkswagen beetle. Two adults, my Dad and Uncle Frank, three of my cousins, my brother and me. Of course, no heater in the car. It was also a very snowy December, so the car was cold.
We were all bundled up as we headed out to get a couple of Christmas trees. There is a small space behind the back seat in an old Beetle. That is where my cousin Laurie and I sat. My brother and two cousins shared the back seat. Dad and Uncle Frank sat in front.
When we got to the tree farm, the dads pretty much left us kids on our own. There was a lot of snow on the ground and I remember sliding down a snowy hill, over and over. When we were called back to the car- we were all pretty cold- and our boots were full of snow.
I don’t want you to think that my Dad and Uncle Frank were not good parents or reckless. They were the best- and so much fun. They insisted we all take off our wet boots when we got in the car. Everyone tossed them in the area in back were Laurie and I had been sitting. We joined the others in the back seat. My cousin Gary sat on my Dad’s lap. Well, that was after my Dad and Uncle Frank got in the car.
See, there was this problem with the trees. For some reason they didn’t have enough rope- or any rope. I don’t really remember that part.
I just know, that at some point, with the kids shivering in the car- we were now wet and had removed our boots- My Uncle Frank and my father started taping two pine trees to a VW Bug. I remember them passing the tape over and under the car, making sure the trees were not going anywhere.
I feel the need to point out, that the rounded top of the beetle was not an easy place to secure a tree- or two. So the trees ended up more on the sides of the car, taped securely into place. I learned at a very early age, the value of duct tape. The guys had to come in through open windows, since the trees were pretty much blocking the doors.
When my Uncle started up the car- the windows were all frosted up. The heater did not work, so no defroster for the windows. He used his thumbnail to scratch off an area of ice about the size of a silver dollar. He closed one eye, put the open eye up to the little circle he had cleared on the windshield and declared – it was fine- he could see just fine.
We all laughed. He was laughing, so was my Dad. We took our cues from the adults and joined in the merriment. It was a cold, but laughter- filled ride home. When we got back, my uncle crawled out the window and un-taped the trees so we could all get out of the car.
My Mom and Aunt quickly got us into dry clothes and I am guessing they were not as amused by our condition as we were. The point is, no one got hurt and it probably toughened us up a little.
I am glad there are car seats and seat belts and air bags in cars today. I think kids and adults should be safely secured in all moving vehicles. But way back when- we didn’t have those safety features. It isn’t like they decided not to strap us in- they couldn’t.
While my Uncle Frank was laughing and joking around that day, he was also a police officer. I am sure he knew how to drive in snowy conditions. Maybe he was nervous. Maybe my dad was, too. But if they were, they didn’t show it.
I know there was a lot of love and laughter in the Beetle that day. I can only imagine the looks we got from other drivers on our way home. I couldn’t actually see other cars, however, as the view was blocked by the tree branches and frosty windows.
If there is any lesson- perhaps it is to be brave enough to be silly sometimes. While I don’t want anyone to put a child in harm’s way- don’t be so careful that your kid’s miss out on adventures, too.
Be the person that gives a kid a really good memory this holiday season. Perhaps, using duct tape and a couple of trees.
Candied Orange Peels
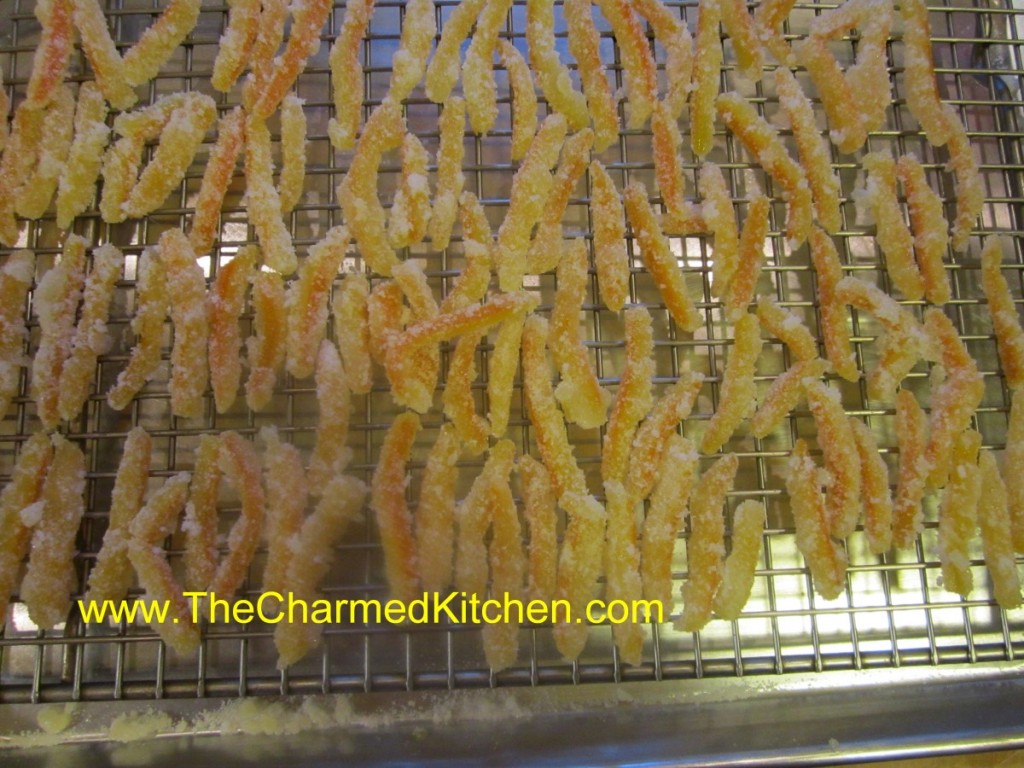
During the winter months, when citrus is in season, I find myself eating a lot of oranges. I also find myself with a lot of orange peels. I dry some and powder them up for use in baking and cooking. Another fun use for orange peels is to turn them into a candy.
Candied orange peels are pretty easy to make and a nifty way of turning something that might otherwise be discarded into something tasty. You can also candy other citrus peel this way like grapefruit and lemons. The same process can be used to make candied ginger. Best to use organic oranges, since you are eating the peels.
Once finished, the candied peels can also be dipped in dark chocolate for a special treat.
They make a nice gift, too.
Candied Orange Peel
2 large oranges ( you can also use 1 grapefruit or 3 lemons)
or 1 lb. of ginger root*
¾ c. water
¾ c. sugar, plus extra for rolling
3 T. light corn syrup, optional
Remove peel from fruit using a sharp knife. Try to get the peel off in 4 pieces. Cut the peel into ¼-inch wide strips. Place peel in a pot with cold water and bring to a boil. Boil 1 minute, drain and rinse under cold water. Repeat process 2 more times. Return to pan with fresh water and boil 15 minutes. Drain and pat dry. Bring ¾ c. water and ¾ c. sugar to boil in sauce pan with the corn syrup. Boil 2-3 minutes and then add the peel. Simmer, stirring occasionally until all but a spoonful of the syrup is left. This should take about 10 minutes. On a wax-paper lined baking sheet sprinkle 1 cup of sugar and arrange the peels on top of the sugar. Toss the peels around until cooled adding more sugar if needed. Place peels on a drying rack for 24 hours before storing. Once dried you can also dip one end of the peels in dark chocolate. Makes ½ pound.
* If making the candied ginger root, peel and cut into 1/4- inch slices. Then cut the slices into 1/4-inch thick strips
Snow People
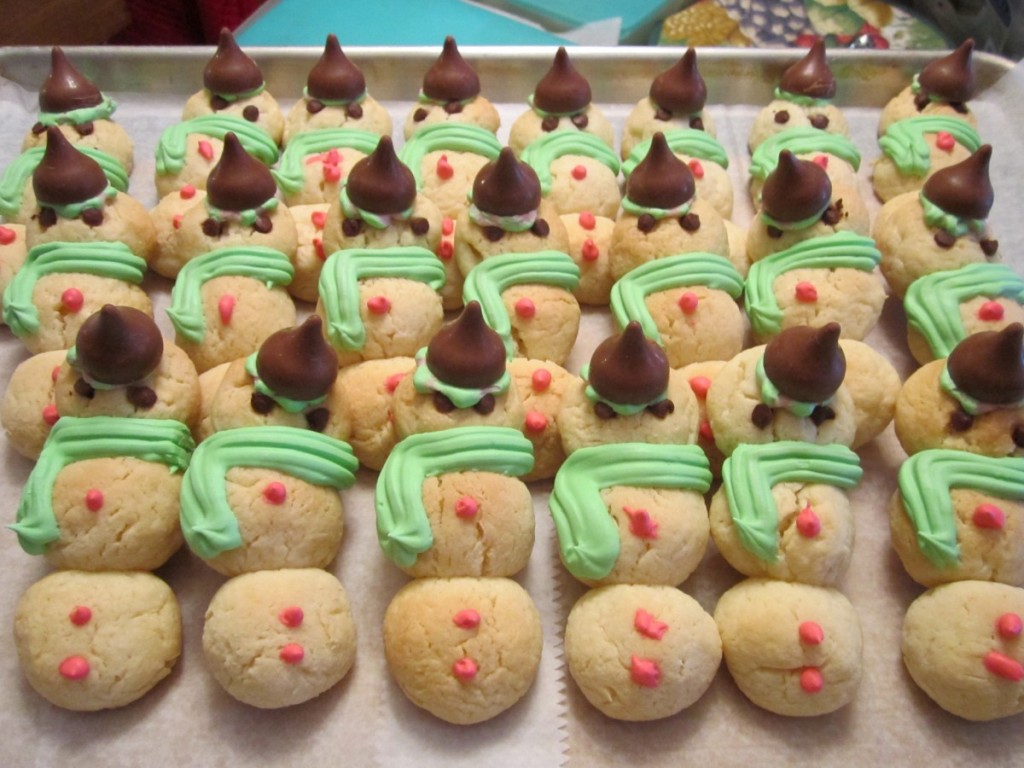
These cookies are adorable and fun to make. They also taste really good. They are a fun cookie for kids to make. The cookies are made from a rich, cream cheese dough. They stay soft in the middle, with a little crunch on the outside. They are even cuter if you use the candy-striped kisses available this time of year.
Snow People
Dough:
4 c. flour
1 t. baking powder
1 c. butter, softened
1 (8oz.) package cream cheese, softened
2 c. sugar
1 egg
1 t. vanilla
¼ t. almond extract
Decorations:
Mini chocolate chips or mini M&Ms
Kisses, whole, or mini peanut butter cups, halved
Frosting:
2 c. powdered sugar
Few drops green food coloring
Milk
Extra powdered sugar for sprinkling
Mix dry ingredients and set aside. Cream together butter and cream cheese until smooth. Beat in sugar until light and fluffy. Beat in egg and flavorings then stir in dry ingredients. Chill dough overnight. For each snow person rolls out 3 balls of dough, 1-inch, ¾-inch and ½-inch in diameter. Place balls in descending order on ungreased baking sheet. Press together lightly. Use 2 mini chocolate chips for eyes in smallest ball and use either chips or mini M&Ms for buttons (2 on largest ball and 1 in medium). You can also add a tiny dot of frosting once they are cooled for the buttons, too. Bake in a preheated 325-degree oven for about 18 minutes or until edges are firm and bottoms are lightly browned. Cool on baking sheet 1 minute then remove to rack to finish cooling. Combine powdered sugar with green food coloring and just enough milk to make a frosting that can be piped. Use a little dab of frosting to attach either a chocolate kiss (unwrapped) or half of a peanut butter cup as a hat. Pipe a small amount of frosting to form a scarf. Dust cookies with a little extra powdered sugar for snow when finished decorating. Makes about 48 cookies.
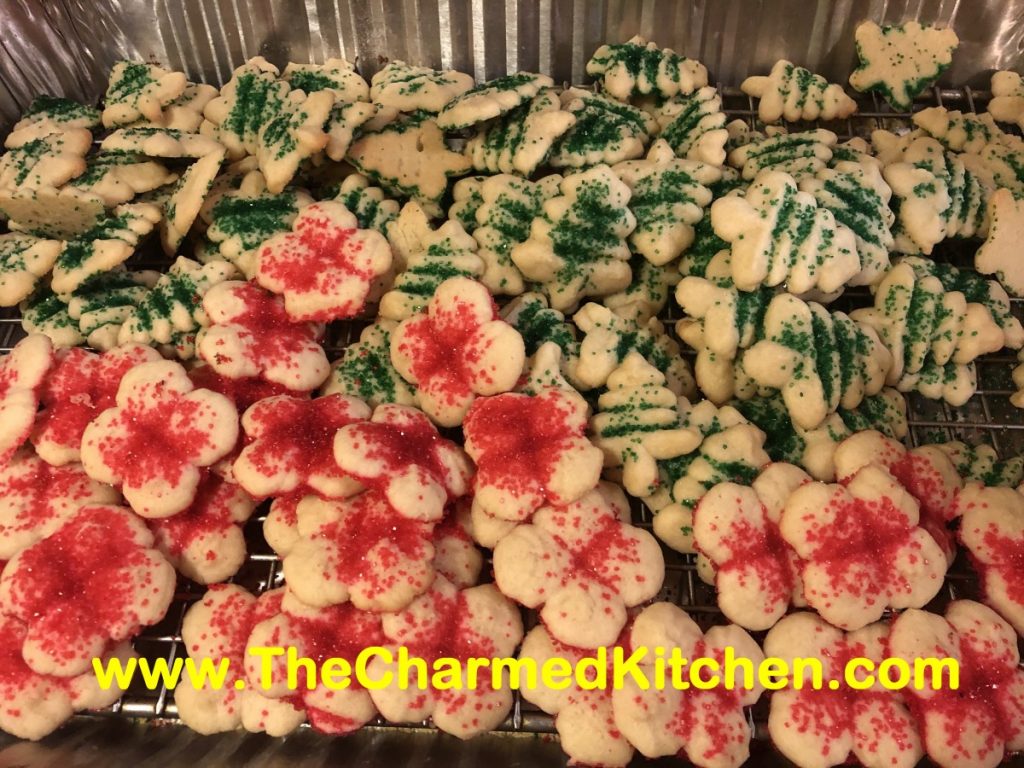
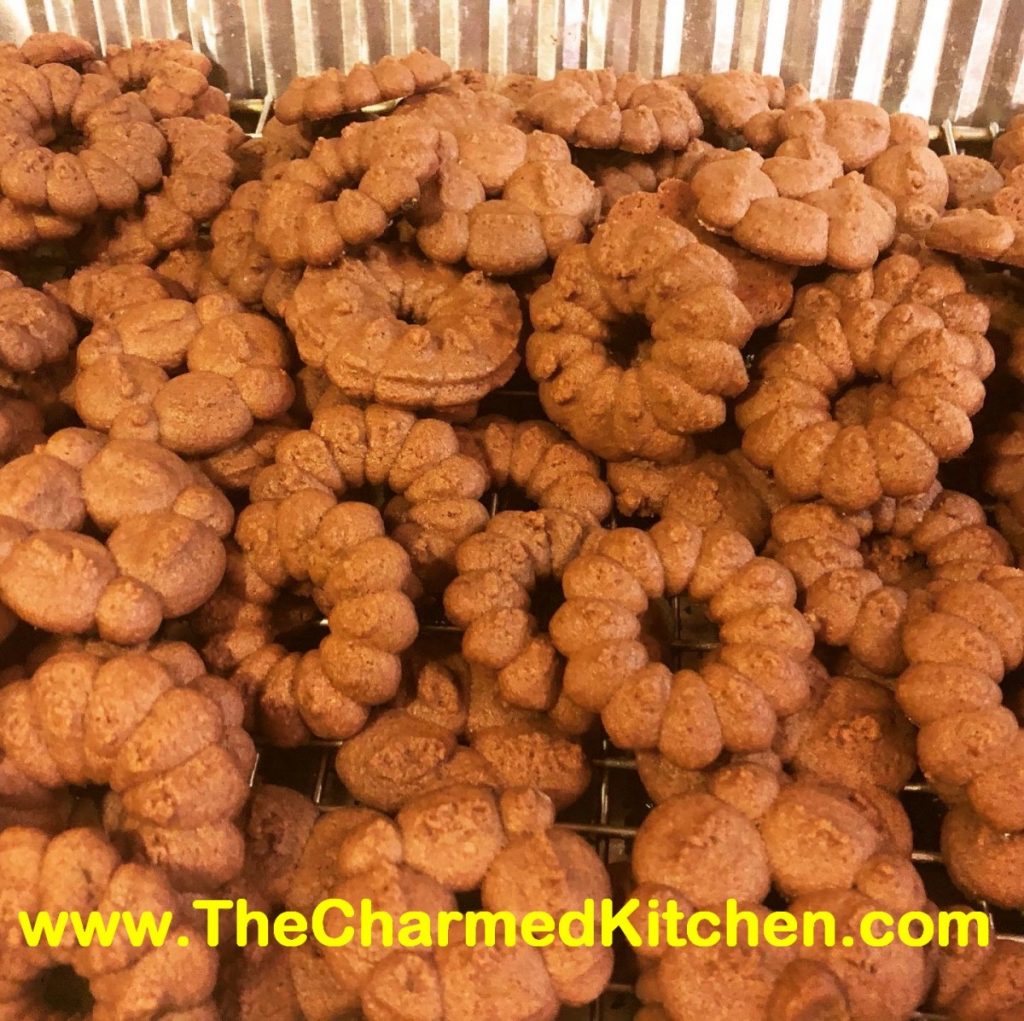
Spritz Cookies
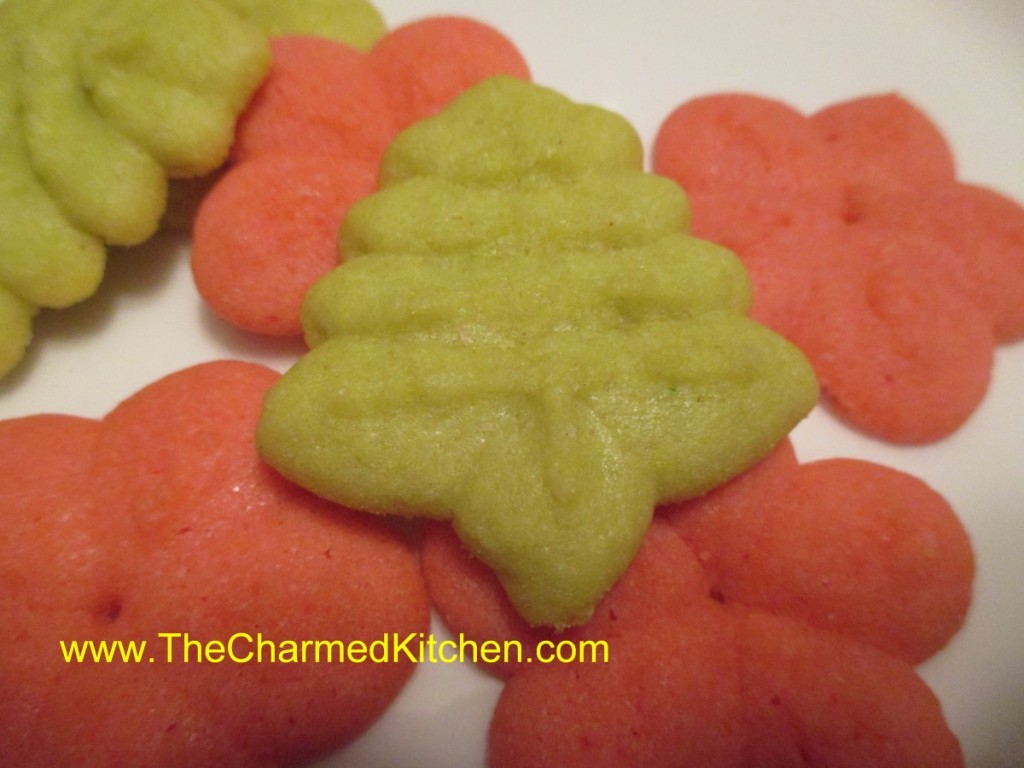
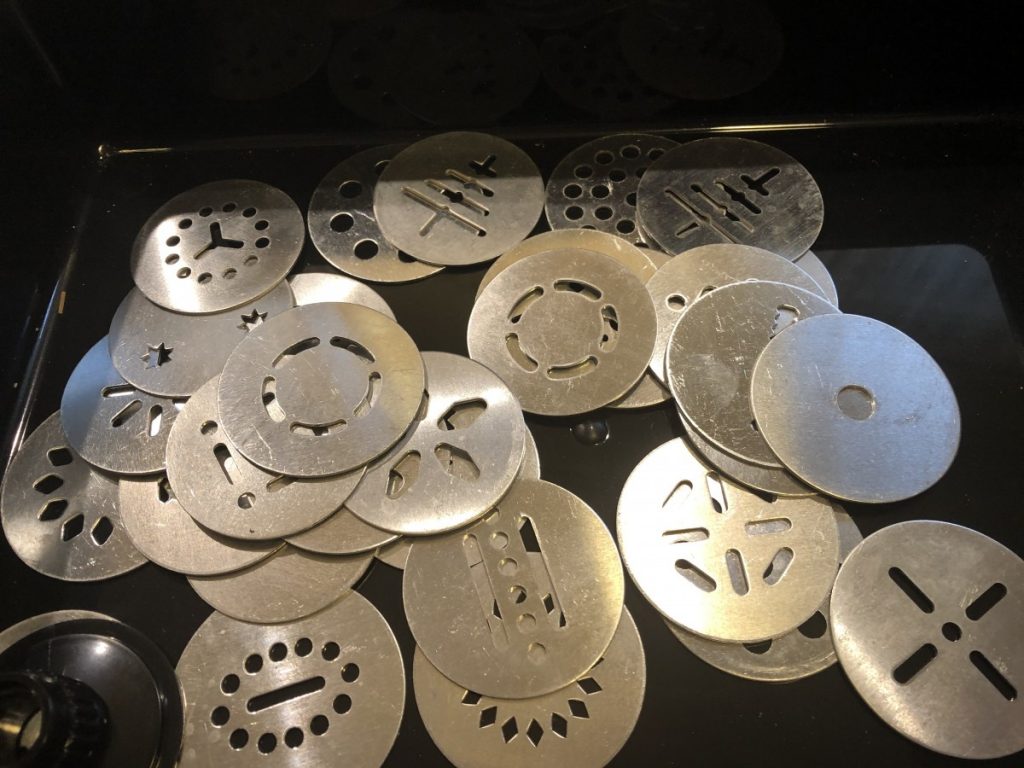
Spritz cookies are so fun to make. Delicate, tender and buttery, they are also so pretty. The dough is squeezed through a cookie press with different discs to produce a wide variety of shapes.
I have been making a lot of different variations of Spritz cookies in the last few days. I’ve also received a few messages from people who have issues with using their cookie presses.
Hope I can answer a few questions and make your Spritz cookies easier to create. The big problem is getting the dough to stick to the cookie sheet. There is a balance you need to get where there is enough friction to get the dough to stick, but not too much, so the cookies will release after baking.
I use silicone liners on my cookie sheets. Parchment paper works well. You can also squeeze the dough onto ungreased baking sheets. Hold the cookie press firmly down on the baking sheet. Click the ratchet once or twice and lift up. The dough, hopefully, will be on the sheet. Sometimes I can click 10 or 15 cookies with no problem, then get one that sticks. Just remove the excess dough from the end of the cookie press and start over. Little gaps or air pockets in the dough can cause that to happen.
The dough has to be soft enough to go through the press. Make the dough with room temperature butter and don’t chill the dough after mixing it. A good spritz dough should be soft, but easy to shape into a roll shape and put in the cookie press. It should not be dry or crumbly.
Within certain parameters, dough for Spritz cookies are all pretty similar. At least in that the texture is all pretty much the same. My classic recipe uses egg yolks. Some of the recipes I tried used whole eggs instead. Both variations produced tender, tasty cookies. Some have a little more or less sugar. Sweetness level is a personal preference.
You can vary them by adding different flavorings or extracts. You can’t add ingredients like nuts or chips because the dough would not go through the press. You can also tint the dough to produce colorful cookies.
So here are some of the Spritz cookies I have been making. Enjoy.
Classic Spritz Cookies
1 c. butter
1 c. sugar
3 egg yolks
2 t. vanilla
½ t. salt
2½ c. flour
In mixing bowl, beat together butter and sugar until fluffy. Beat in egg yolks. Stir in vanilla and salt. Tint dough, is desired. Add flour and stir until smooth. Using a cookie press with desired shape press cookies on to ungreased baking sheet. Leave about 1-inch between cookies. Bake in a preheated 375-degree oven for about 8-10 minutes- cookies should be a light golden color around the edges. Cool on a wire rack. Makes about 4-5 dozen.
Vanilla Spritz
1 c. butter, room temp
¾ c. sugar
1 egg
1 t. vanilla
1 t. almond extract
2¼ c. flour
½ t. salt
Mix butter and sugar until well mixed. Beat in egg and extracts. Stir flour and salt together in a medium bowl, then add to butter mixture. Mix well. Don’t chill dough. Place dough in cookie press and press dough onto parchment or silicone lined baking sheets. Bake in a preheated 350-degree oven for 8-10 minutes. Cookies should be lightly toasted on the edges. Cool on the baking sheet for a few minutes. Makes 6-7 dozen tiny cookies.
Chocolate Spritz
Make the Vanilla Spritz or Classic Spritz dough, but add 2 oz. of unsweetened chocolate (baking chocolate) melted, when you combine the butter and sugar.
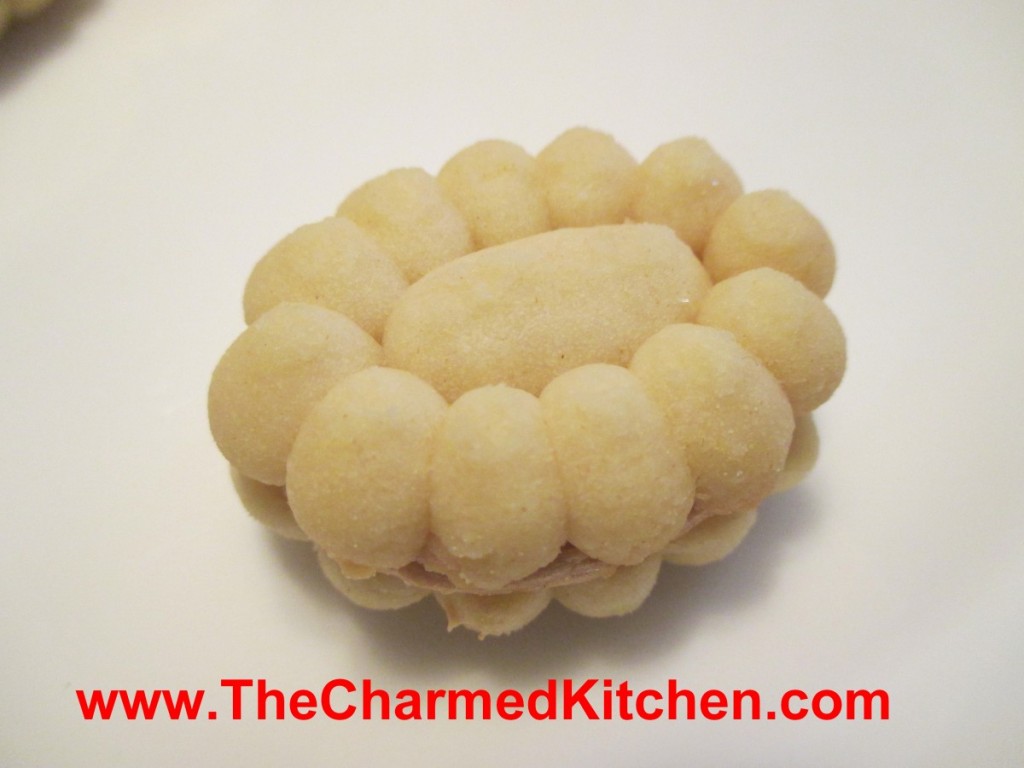
Viennese Shortbread with Coffee/Cinnamon Filling
1 c. butter
½ c. powdered sugar
½ t. vanilla
2 c. flour
¼ t. baking powder
Heat oven to 375-degrees. Cream together butter, sugar and vanilla. Blend in flour and baking powder. Using flower design of cookie press to make 1- inch cookies on ungreased baking sheet. Bake about 7 minutes, or until very lightly browned. Cool and then put two cookies together with coffee filling.
Note: You can make these cookies in almost any cookie press design that is symmetrical. I have made strips, trees and stars among others. Makes about 2 dozen double cookies.
Coffee/Cinnamon Filling
2/3 c. powdered sugar
2 T. butter, softened
1 t. instant coffee dissolved in 1 t. boiling water
1 t. cinnamon
Beat all ingredients together until smooth. Add a few drops of water if too dry.
Chocolate Sparkles

These cake-like cookies are always a favorite in my house. they are full of chocolate flavor and easy to make. The sparkle comes from the sugar they are roll in just before baking. So if you are looking for a chocolate cookie for your holiday cookie collection- you might want to try these.
Chocolate Sparkles
1 c. butter, softened
1 ¼ c. sugar
2 eggs
2 oz. unsweetened chocolate, melted
½ t. vanilla
2 2/3 c. flour
2 t. cream of tartar
1 t. baking soda
½ t. salt
¼ c. sugar
Cream together butter and sugar. Beat in eggs, chocolate and vanilla. Stir in next four ingredients. Chill dough. Shape dough into 1” balls and roll in ¼ cup sugar. Place about 2 inches apart on ungreased baking sheet. Bake in a preheated 400- degree oven for 8-10 minutes. Makes 5-6 dozen.
Old Fashioned Gingersnaps
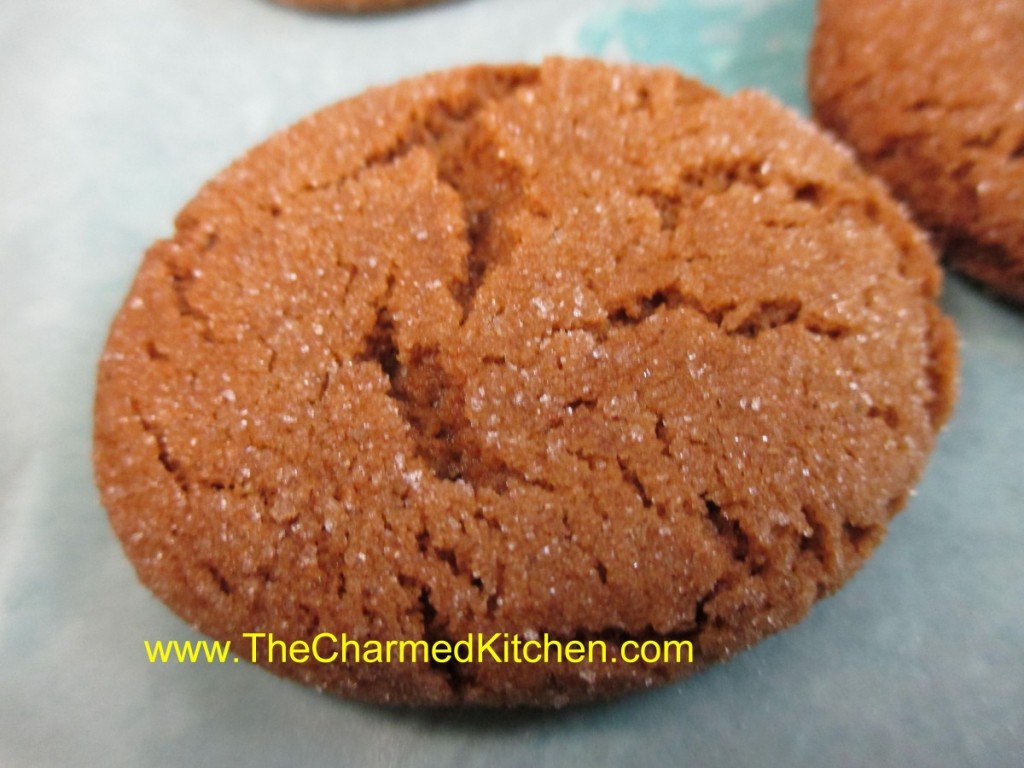
Gingersnaps are one of those cookies- the people that love them – REALLY love them. I will admit to being one of those people. The mixture of spices and crunchy texture just work together so well.
I cannot remember where I first got this recipe. This richly spiced cookie is perfect with a cup of coffee or a cup of tea. They are not too sweet, which I also like.
You can use either dried or fresh grated ginger. I really prefer fresh. I keep a piece of ginger root in my freezer, then just grate what I want, whenever needed. The ginger lasts nearly forever that way.
The original recipe called for shortening. I use butter, but chill the dough at least an hour before baking. You can use shortening, if you prefer.
So here is the recipe. Enjoy!!
Gingersnap Cookies
2 c. flour
2 t. baking soda
1 t. cinnamon
¾ t. ginger (fresh grated preferred)
½ t. cloves
¼ t. salt
1 c. sugar, plus extra for rolling
¾ c. butter
¼ c. molasses
1 egg
Mix together dry ingredients and set aside. Beat together sugar with butter, molasses and egg until light. Stir in dry ingredients and chill dough at least an hour. When ready to bake, roll dough into 1-inch balls. Roll balls in additional sugar. Place 2 inches apart on ungreased baking sheet. Bake in a preheated 350-degree oven for 10-12 minutes. Edges should look dry. Cool on sheet for a few minutes and then move to rack. Makes about 36.
Sugar Cookies with Non-Royal Icing
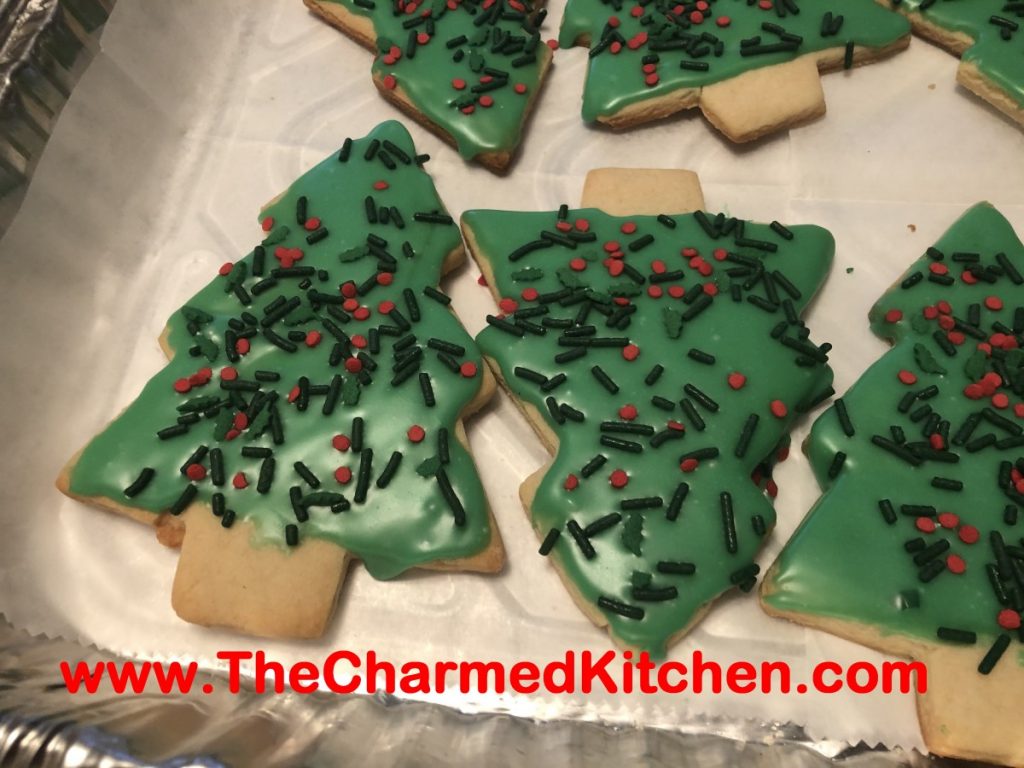
These cut-out cookies are a classic, and always part of my holiday cookie baking. I will confess to having an enormous assortment of cookie cutters, so there is almost no end to the shapes I might use. This time of year I am making trees, stars, snowmen and more.
These cookies are crisp and sturdy enough to stand up to frosting, without being too hard. They also hold their shape well when baking.
I normally use royal icing to frost them, and an assortment of sprinkles and other candies. Royal icing is made with egg whites or powdered egg whites. The advantage over a butter cream, is that royal icing hardens, making the cookies easy to pack and stack. You don’t need much- just a thin layer. Tinting the frosting different colors is a big part of the fun. Depending on how much time you have, you can get really creative with decorating.
I tried a different frosting this year. Several friends had said they didn’t have, or couldn’t find, powdered egg whites and wondered if there was an alternative. There is. This one has just a few easy to find ingredients, and hardens up as nicely as royal icing, with a bit of a shine. The recipes for both icings follow the recipe for the cookies.
Sugar Cookies
1 c. butter
1 c. sugar
1 egg
1 t. vanilla
3 c. flour
2 t. baking powder
3 T. milk
Extra sugar for sprinkling, if desired
Beat butter and sugar until fluffy. Beat in egg and vanilla. Combine dry ingredients and add to butter mixture. Beat in milk. Heat oven to 375-degrees. Roll dough on lightly floured surface to about 1/3- inch thickness. Cut out with lightly floured cutters and sprinkle with sugar or colored sugar if you like and if you are not going to frost them. Bake on an ungreased baking sheet for 10-12 minutes. Cool on baking sheet 3 minutes before placing on wire rack to cool completely. Frost when cooled. Makes about 4 dozen.
Decorating your cookies:
You can use a buttercream frosting, if you like, however the topping I prefer is royal icing. Because royal icing contains egg whites it gets hard. Cookies have a smooth appearance and can be stacked. When making royal icing, use pasteurized egg whites or powdered egg whites. Raw egg whites pose a risk of salmonella.
You can also use colored sugar and sprinkles and mini chocolate chips for eyes.
Non-Royal Icing
4 c. powdered sugar 3 T. corn syrup 2 t. vanilla extract 1/3 c. lemon juice- about
Combine the first three ingredients then add the lemon juice, a little at a time until the icing gets to the consistency you want. You might need a little more. Stir until smooth and add food colorings, if you like. Spread or pipe out, allowing to dry before adding new layers of icing.
Royal Icing
1 lb. powdered sugar
½ t. cream of tartar
5¼ t. egg white powder
6 T. water
½ t. vanilla, optional
Assorted food coloring
In large mixing bowl combine dry ingredients and mix well. Add water and vanilla and beat until light and fluffy, about 10 minutes. Divide into small bowls and tint each batch as needed. Keep bowl covered with a damp towel while waiting to use so frosting will not dry out.
Chocolate Chip Shortbread Cookies

It is the time of year when a lot of people are baking cookies. I thought I would share one of my favorite cookie recipes with you. It takes the chocolate chip cookie to another level. Kind of dressed up for the holidays.
These little cookies are delicate and full of flavor. I will admit to being a big fan of shortbread cookies. I make a lot of different shortbread cookies for Christmas. This one is always on my list.
These are enhanced with mini chocolate chips and just melt in your mouth. I leave them as is, but you could add a drizzle of melted chocolate if you like. The cornstarch in the dough makes them extra tender.
Other options could include using mint chocolate chips or adding mint extract, almond extract, or even orange zest. These cookies are very versatile.
Chocolate Chip Shortbread Cookies
1 c. butter (no substitutions), softened
½ c. brown sugar
1 t. vanilla extract
2 c. flour
¼ c. cornstarch
½ c. mini chocolate chips
2-3 T. granulated sugar
With electric mixer beat butter, brown sugar and vanilla until well mixed. Stir in flour and cornstarch and then stir in chips. Form into 1-inch balls and place on an ungreased baking sheet. Pour granulated sugar on a small plate and dip bottom of drinking glass into the sugar and use this to gently flatten down the cookies. Press small indent in each cookie with a teaspoon. Bake in a preheated 300-degree oven for 15-20 minutes or until the cookies start to brown on the bottom. Cool on sheets 5 minutes before removing to a cooling rack. Makes about 3 ½ dozen.
Cookie Candies
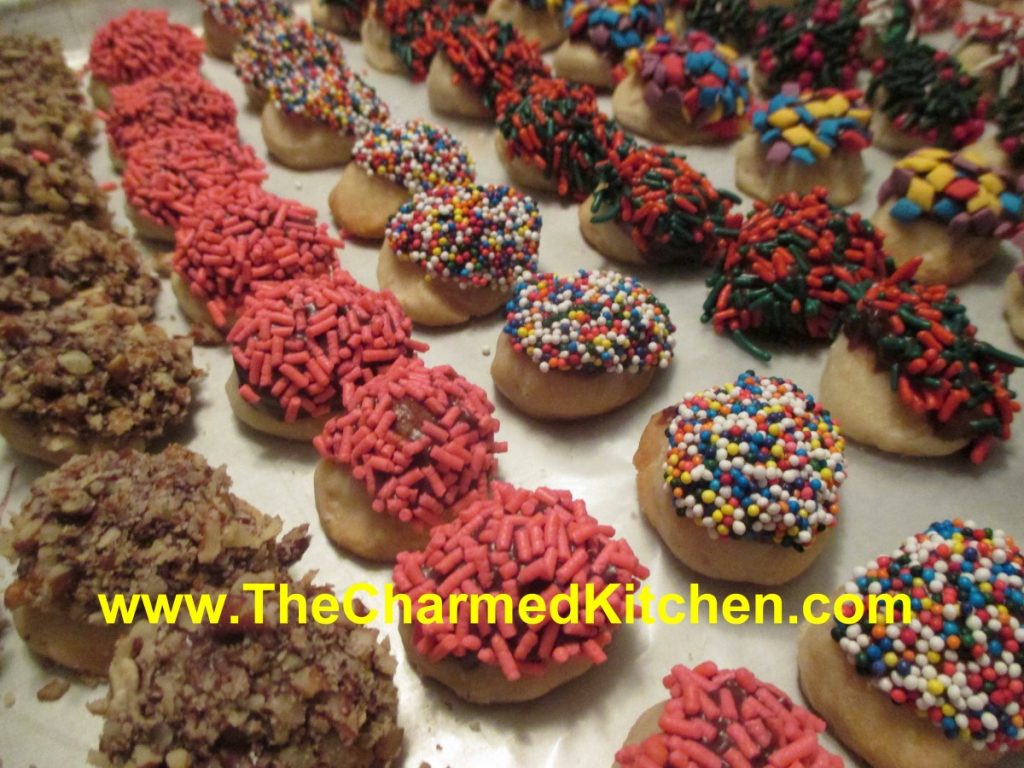
There are so many cookies I bake this time of year, I could never pick a favorite. There are some cookies that are a MUST bake, however.
These cookie-candies are one of them. They get their name because, once decorated, they look like little pieces of candy.
Under the sprinkles are rich and tasty oatmeal shortbread cookies. Shortbread cookies are always a favorite of mine. I think I make half a dozen varieties of shortbread.
The dough is easy to handle. You just shape small amounts into shapes like circles, squares and ovals. They hold their shape. Like most shortbread, they bake at a lower temperature than other cookies. They also bake a bit longer. They should be a little golden on the bottom when done.
After they are baked and cooled, the cookies are dipped in melted chocolate and then in assorted toppings. You can dip them in sprinkles, finely chopped nuts and coconut. Pretty and tasty.
Cookie-Candies
1 c. butter
¾ c. powdered sugar
1 T. vanilla
2 c. flour
½ c. rolled oats
½ c. chocolate chips
¼ c. milk
finely chopped nuts
assorted sprinkles
shredded coconut
Cream together butter, sugar and vanilla. Stir in flour and oats. Shape teaspoonfuls of the dough into different shapes like rounds, ovals, cones cubes etc. Try to make them look like little candies. They will hold their shape very well while baking. Bake in a 325- degree oven for 20-25 minutes on an ungreased baking sheet. Cool. In microwave safe dish combine chocolate and milk and melt. Dip tops of cookies in chocolate mixture and then in one of the toppings you have. Chocolate topping will harden up after a while. Makes about 4 dozen.
Peanut Butter Thumbprint Cookies
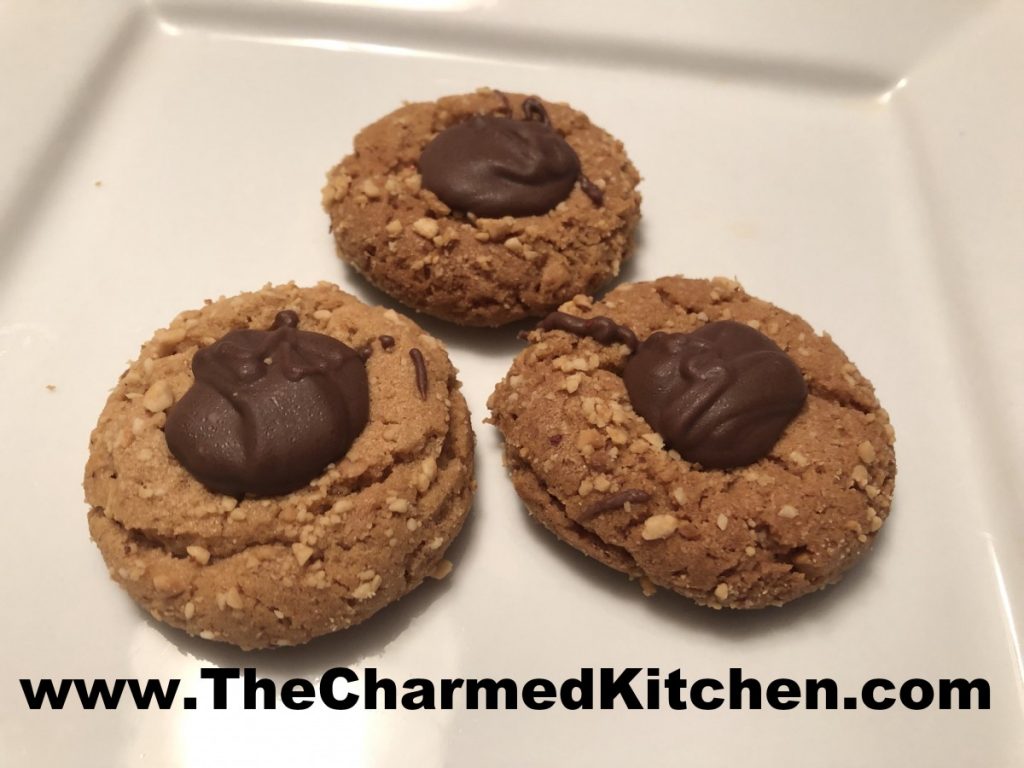
The combination of peanut butter and chocolate is a classic. This cookie brings those two flavors together perfectly. The cookie itself has a wonderful outer crunch, but is also tender and melts in your mouth. The addition of a dollop of chocolate finishes the cookie just right.
While making cookies for this holiday season I came upon this recipe. I couldn’t remember the last time I had made them, so I decided to bake up a batch.
I forgot just how much I loved these cookies. I am definitely going to be making them more often.
Of course, you could also use a spoonful of jam or jelly to fill in the cookies. Peanut butter and jelly are also a classic combo. No matter what filling you use, these thumbprint cookies are going to be a big hit.
Peanut Butter Thumbprints
1 c. butter, softened
2 c. packed light brown sugar
1 1/2 c. peanut butter (smooth or crunchy)
2 eggs
1 t. vanilla
2 1/2 c. flour
1 t. baking powder
1/2 t. baking soda
1 3/4 c. finely chopped unsalted, dry roasted peanuts
Melted chocolate, about 2 cups
In mixing bowl, cream together butter, sugar and peanut butter. Beat in eggs and vanilla. Combine flour with dry ingredients and mix into butter mixture. Stir in peanuts. Shape dough into 1-inch balls and place on ungreased baking sheets. Bake in a 350-degree oven for 8-10 minutes or until cookies are just set. Press thumb gently into the middle of each cookie and cool on rack. Spoon about a teaspoon of melted chocolate into each cookie. Makes about 8 dozen.


