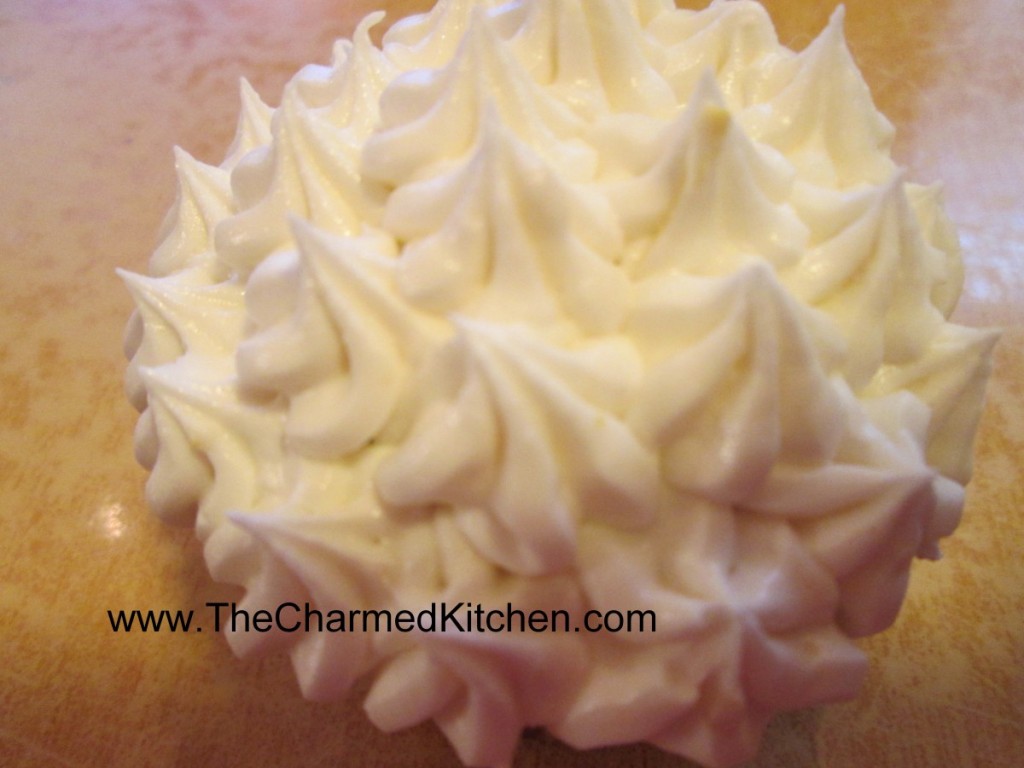
Sweet Corn Ice Cream
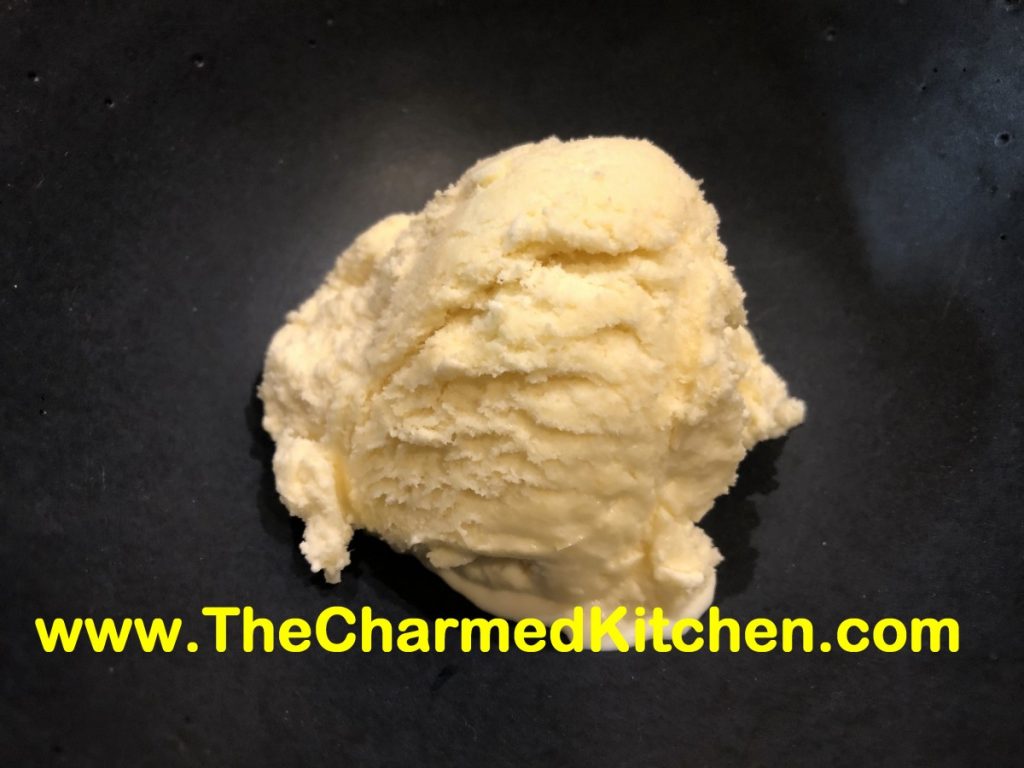
This is one of those times when you just need to trust me. Ice cream flavored with sweet corn might sound odd to you, but it is really quite tasty. The corn flavor actually works very well when added to traditional ice cream ingredients like cream, sugar and eggs.
What a fun dessert to make for your next summer barbecue. You can even let people taste it to see if they can guess the secret ingredient!
I had heard of ice cream being made with corn before, but only tasted it recently. A cousin of mine made some and I was lucky enough to try it. It was really good. Corn ice cream is popular in Mexico, at least that is what I read.
I decided to make some of my own. It was perfect timing. I had some cream and half and half that needed to be used soon. I also had 2 ears of corn in the fridge. You can just cut the corn from the cob and add it to the recipe. That will leave you with kernels of corn in the finished ice cream. Nothing wrong with that. I pureed the corn mixture, because I wanted a smoother finished ice cream. Either is fine, based on your preference. I used 2 ears of corn- that was all I had. I could see adding another ear of corn for a more corny flavor. Frozen corn could also have been used.
Sweet Corn Ice Cream
2 ears sweet corn
1½ c. half and half
1 c. heavy whipping cream
¾ c. sugar- or a little more or less, to taste
4 egg yolks
1 t. vanilla
Scrape the corn kernels off the cobs and place in a medium saucepan. Add the half and half and the cream and bring to a simmer. You can leave the kernels as is, or puree the mixture at this point. I wanted a smoother ice cream, so I used my immersion blender to puree the corn in the pot. In a medium bowl, beat together the egg yolks, sugar and vanilla. Add ½ cup of the hot cream mixture to the eggs, whisking in well. Add another ½ cup of the cream mixture, whisking again. Add one last ½ cup of the hot cream and again, whisk until smooth. Pour the egg mixture into the saucepan with the cream and while whisking, simmer until mixture starts to thicken and will coat the back of a spoon. This will take about 5 minutes. Don’t use too high a heat, or you will scramble your eggs. Mixture should reach 160 degrees to be sure eggs are cooked. Remove from heat and pour mixture into a bowl. Allow ice cream base to cool down, then chill in fridge. Chilled mixture can be frozen in an ice cream maker once cold- in a few hours- or even the next day. Once mixture has been frozen in ice cream maker, place in a container and freeze until ready to serve. Makes about 5-6 cups of ice cream.
Strawberry Liqueur

This strawberry liqueur is like summer in a bottle. I make a lot of different liqueurs and strawberry is one of my absolute favorites. It is wonderful for sipping or over ice. It is also a fun addition to any number of cocktails. A friend adds it to ice cream with extra berries and blends it up for an adult strawberry milkshake.
With strawberries in season, this is the time of year to enjoy them. I have been eating strawberries in breakfasts, desserts, and salads.
I want to preserve some for later, too. I made strawberry jam and dehydrated some. I will also freeze some.
Another way to preserve strawberries, is by making a liqueur with them. It is pretty simple. Just combine berries with vodka and a small amount of powdered sugar. I use half gallon canning jars for this, but you could use any food safe container with a tight fitting lid.
Let the mixture steep long enough for the berries to infuse the alcohol with their flavor. You can sweeten it later on, or even leave it unsweetened, if you prefer. I like to sip the liqueur as is, or serve on the rocks with a splash of club soda.
Strawberry Liqueur
3 cups fresh strawberries, sliced
3 T. powdered sugar
3 c. vodka
1 c. simple syrup*
Sprinkle powdered sugar over berries and let dissolve. Pour over vodka and let steep 2 weeks. Crush berries and strain then filter. Add sugar syrup and mature 1 week. Makes 5 cups.
*Simple syrup is made from 1 cup of sugar and ½ cup of water. Bring to a boil, then cool. You will have 1 cup of syrup. You can sweeten your liqueur with honey, if you prefer. Watch when you substitute honey for sugar, as it is sweeter and stronger flavored. Better to use orange or clover honey. Add to suit your taste.
Growing and Cooking with Lavender
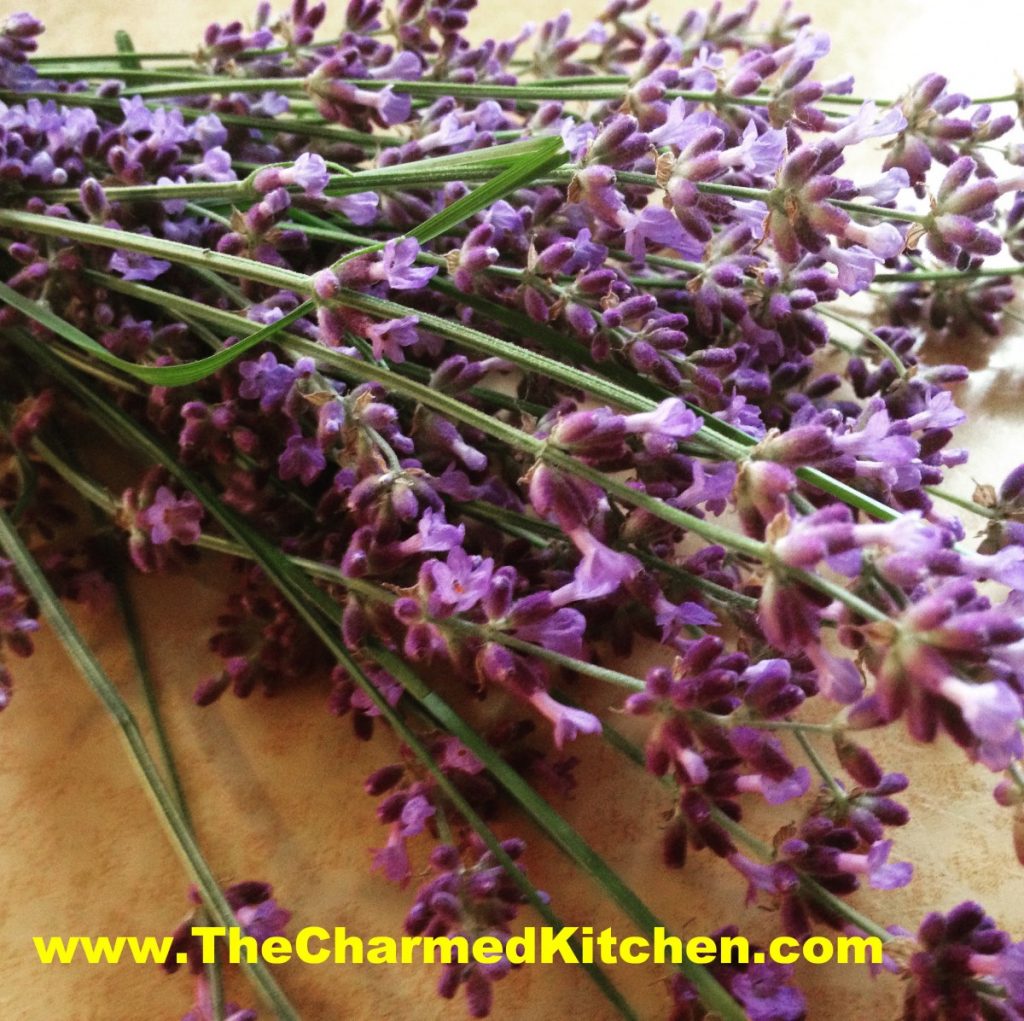
Lavender is such a joy to grow. Besides being a pretty plant, it attracts bees and deer don’t eat it! There are 2 main types of lavender you can grow in your garden, English or French. English lavender is a perennial; in northern climates, French lavender is grown as an annual. You can also bring French Lavender inside for the winter. Both require full sun and good drainage. Both can be started from seed, although English lavender is slow to germinate and can be a little tricky. Both types can also be started from cuttings and layering. There are many cultivars of both lavenders, although some may be difficult to find. An English lavender variety you may wish to try is Munstead, which grows to a height of 2′ and bears true lavender-colored flowers. Other varieties include Hidcote, with dark purple spikes; Alba, with white blooms; Jean Davis, with pink flowers; and Dutch with deep blue flowers. All are wonderfully scented. The foliage of French lavenders is greener than that of English types.
Lavender grows quickly once it is established, and can get quite tall in mild climates. French lavender can also be grown as a houseplant during cold winter months, and moved outdoors during the summer.
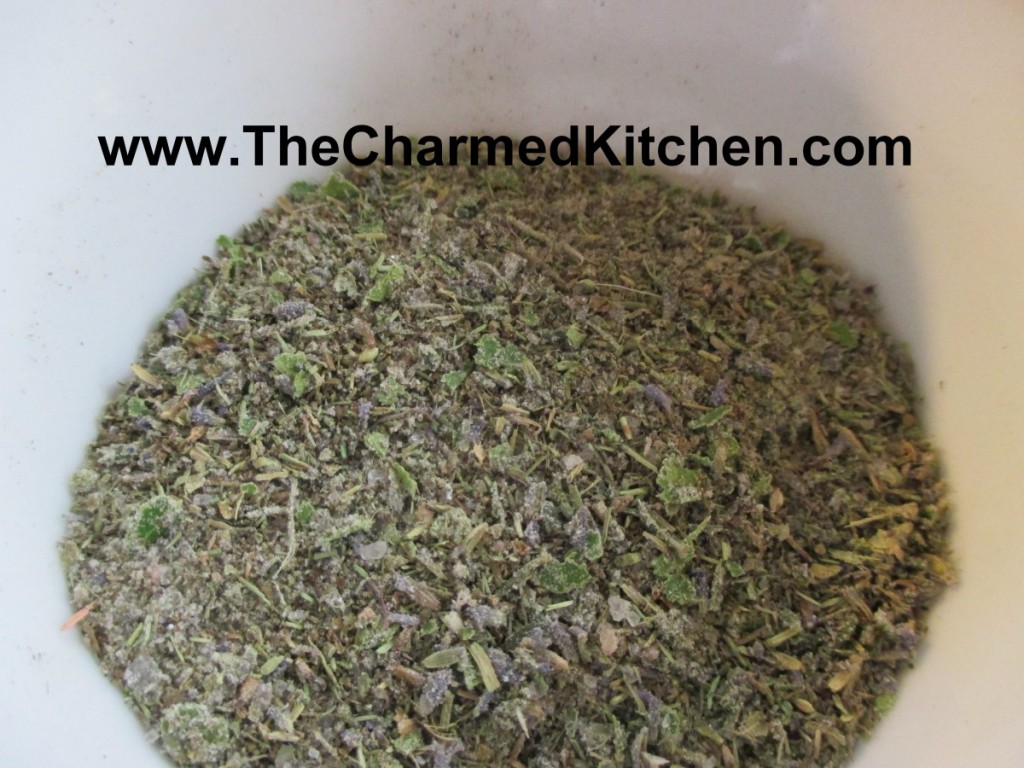
Lavenders are grown for their intoxicating fragrance. Some say that the smell of lavender can reduce headaches. The flowers are harvested just as they begin to open, and are dried on the stalk. These dried blooms can then be used in arrangements, or the blooms can be stripped from the stem and used in potpourri and sachet.
While the fragrance of lavender lends itself to all sorts of cosmetic uses, it is a wonderful ingredient to cook with, too. The secret is to use enough lavender to impart flavor, without having your food taste like soap. That can be a tricky balance.
Lavender is a traditional ingredient in Herbes de Provence, a French seasoning blend, often used with meats like lamb or pork. Lavender can be used for so much more. I love using lavender is sweet dishes, like shortbread and in syrups that can be added to cocktails. All the recipes are using lavender blossoms that have been harvested and then allowed to dry. You can use fresh blossoms, too.
Harvest blossoms before they are fully open, if you can. Cut them with at least a few inches of their stems attached. I tie them together in small bunches, hang them up. and allow them to air dry. Once dry, I strip the blossoms off the stems and store in an airtight jar. Store in a reasonably cool location.
So here is a compilation of some of my favorite lavender recipes. I hope you enjoy them as much as I do.
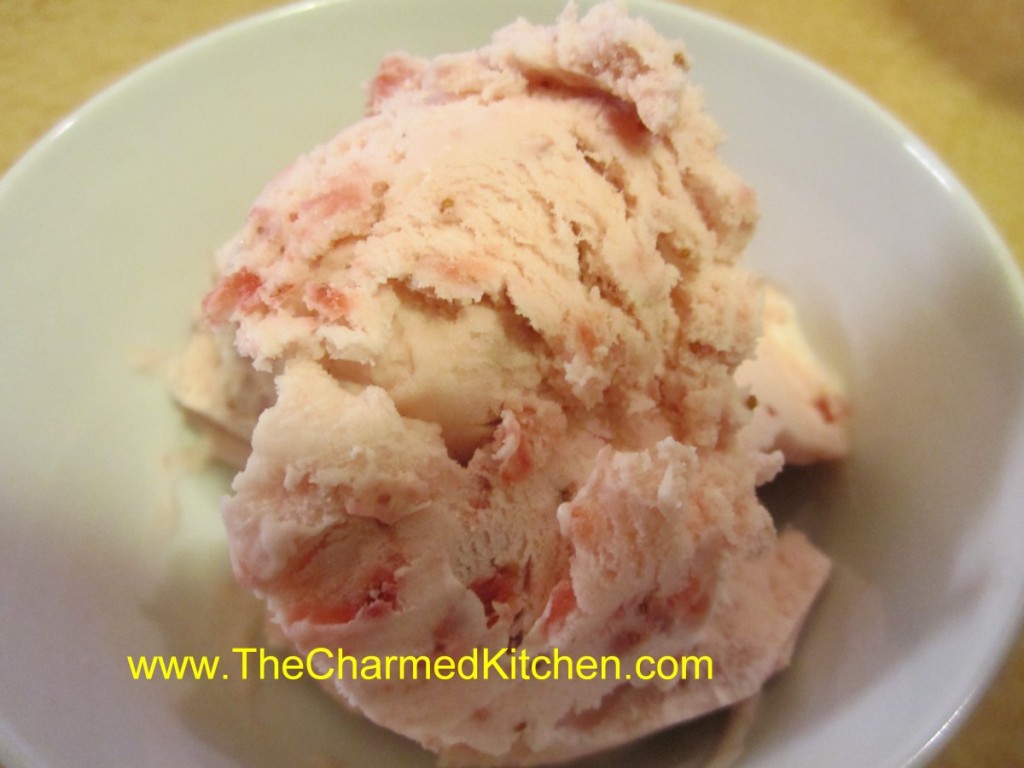
Strawberry and Lavender Ice Cream
2 c. chopped strawberries
1 c. sugar
1 T. lavender blossoms
1 T. vanilla
2 c. cream or half and half or a combination. You can also use some milk or even almond or rice milk.
Additional sugar to taste
Place strawberries, lavender, vanilla and sugar in saucepan and bring to a simmer, stirring occasionally. Remove from heat and chill. Combine chilled berry mixture with cream. Add additional sugar if you like. Remember that once it is frozen the ice cream will not taste as sweet so make this mixture a little sweeter than you want the final product to be. How much sugar you add varies with personal taste and how sweet the berries are. Place in an ice cream maker and process according to manufacturer’s directions. Once finished put in an sir- tight container and place in freezer. Makes about 1 quart.
Strawberry- Lavender Sorbet
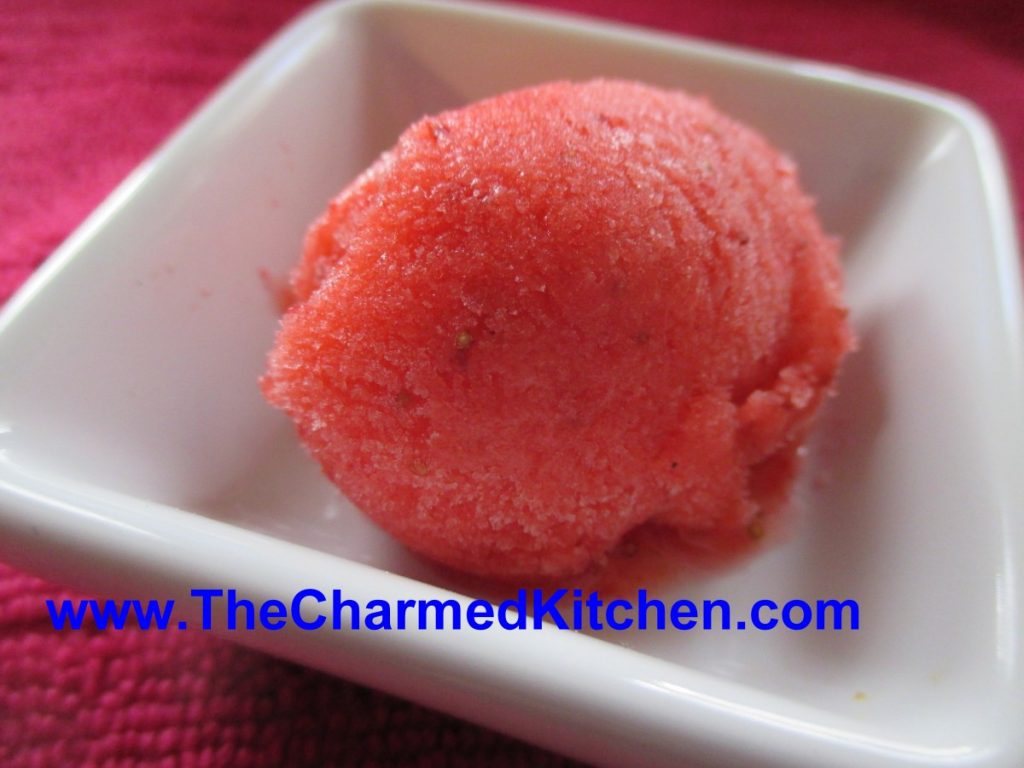
1 1/2 lbs strawberries
1/2 c. sugar, or to taste – you could also sweeten with honey, if you prefer, or use no sweetener
2-3 T. lavender syrup- recipe follows
Wash and stem berries. Place in food processor and blend until smooth. Sweeten to taste, stirring until sugar is dissolved. Place in a container with a lid and freeze. Once frozen, remove strawberry mix from freezer and sit it on the counter to soften a little bit. This is really the important part. You don’t want it to thaw, but you do want it soft just enough to break into chunks. Place chunks in food processor and blend it again, adding lavender syrup to taste. The liquid of the syrup also helps the sorbet to blend better. It will actually start to look a little creamy and lighter in color. You can serve it right away- or put it back in the freezer to serve later. At this point the sorbet is ready- but you can repeat the soften/process step once more, if you like, for even creamier sorbet. Makes 3-4 cups.
Lavender Syrup
¾ c. water
¾ c. sugar
1 tablespoon dried lavender buds
Combine sugar and water in a small saucepan. Add lavender and cook on low heat until sugar is dissolved. Bring to a boil and cook for 2-3 minutes, just until it starts to thicken a bit. Then set to the side to cool. Strain out the lavender and refrigerate. Yields just under a cup of syrup. Will keep in the fridge for weeks and weeks.
Another recipe using lavender syrup
Lemon Lavender Cocktail
2 oz. gin
1 ½ oz. lemon juice
1 ½ oz. lavender syrup (recipe follows)
splash of club soda
some ice
one lemon slice, for garnish
Pour gin, lemon juice and lavender syrup into a glass and stir. Top with club soda, add some ice and garnish with a lemon slice.
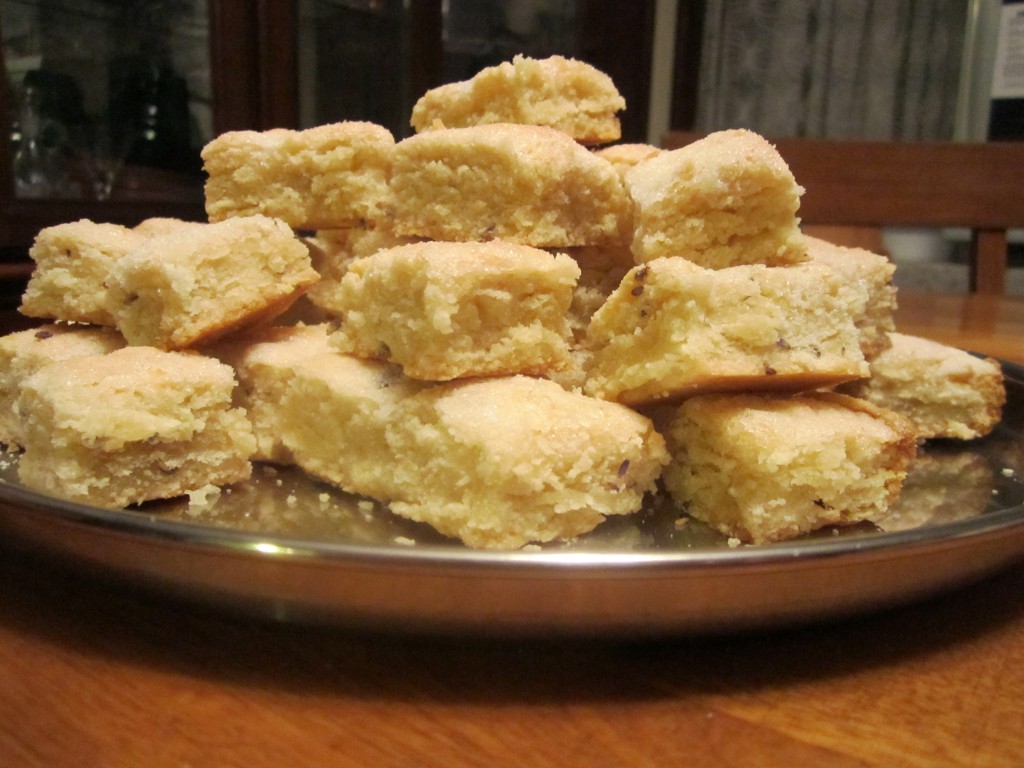
Lavender and Vanilla Shortbread
1 c. vanilla sugar, plus extra for sprinkling*
2 c. butter
4 c. flour
2-3 T. lavender blossoms
Cream together the one-cup of sugar and butter. Stir in the flour and lavender blossoms. Press mixture in to a greased 9×13 inch-baking dish. Cut or score into small squares, or on the diagonal for diamond shapes. Sprinkle with extra sugar and bake in a preheated 300-degree oven for 50-55 minutes or until lightly browned around the edges. Re-cut the squares as soon as you remove the shortbread from the oven. Cool before removing from pan. Make about 100 small squares.
* If you don’t have vanilla sugar just use granulated sugar and add 2 teaspoons of vanilla extract to the dough.
Making Vanilla Sugar
Some specialty stores sell vanilla sugar and it is expensive. I find it easy to just make my own. Vanilla sugar can be used in baking or to top desserts, in tea, and other drinks. I love to sprinkle vanilla sugar on sugar cookies and on muffins, too.
I buy vanilla beans by the pound online and use them in cooking and to make my own vanilla extract.
To make vanilla sugar just cut vanilla beans in half lengthwise and then into 1 inch pieces. Place granulated sugar in a jar and add the vanilla beans. Cover jar and shake once in awhile. The sugar is fragrant in about a week but will get stronger the longer it sits. I use one vanilla bean per cup of sugar. You can add more sugar to the jar as you use it. The beans will continue to flavor new sugar added to the jar for some time.
Herbes de Provence
I make my own herb and spice blends often, because it gives me control over what I put in it. I also grow a lot of herbs, so it just makes sense. You can use dried or fresh herbs in this recipe. If you are using any fresh herbs, then store your mix in the freezer.
1 T. thyme, or 2 T. fresh
1 T. rosemary or 2 T. fresh
1 T. savory or 2 T. fresh
2 t. basil or 2 T. fresh
1 t. lavender or 1 T. fresh
2 bay leaves
Blend fresh or dried herbs until bay leaves are powdered. Rub this mixture on grilled meats, roasts, chicken, or fish. If using fresh herbs, make small amounts and freeze what is unused.
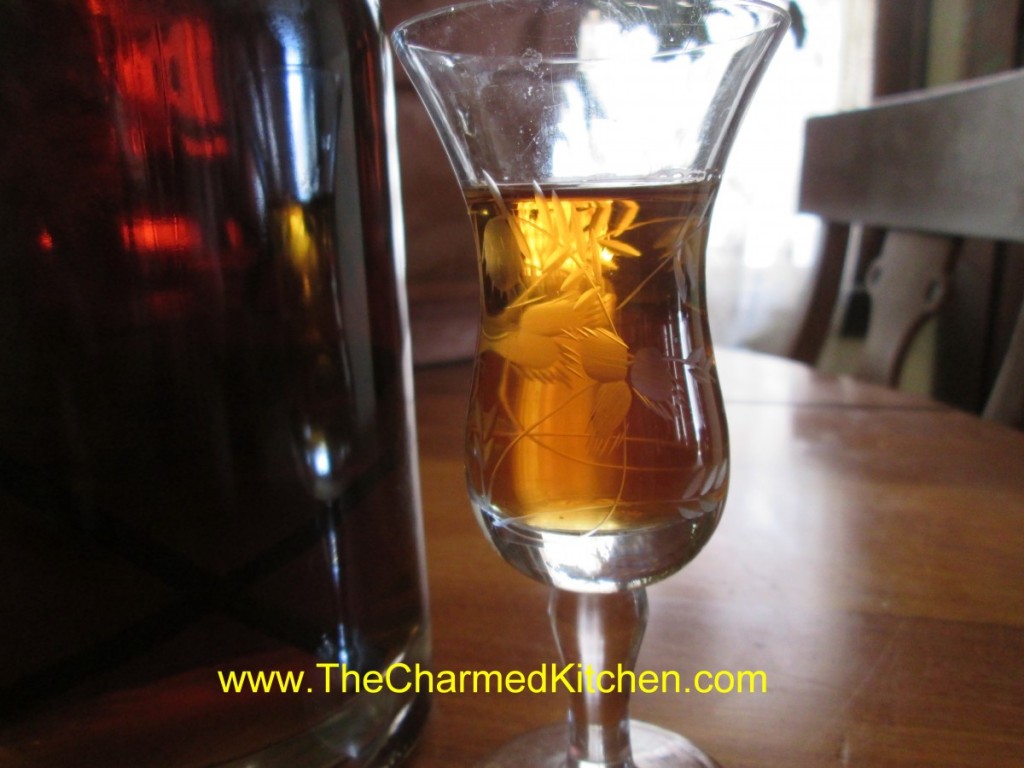
Lavender Liqueur
I started by combining 2 cups of lavender blossoms with about 4 cups of vodka in a large Mason jar. These were dried blossoms from last year’s harvest. I put the lid on the jar and let it steep together for a few weeks. After a few weeks I strained out the blossoms. Then I poured the mixture through a strainer lined with a coffee filter to get out any fine particles so my end product would be clear. I had expected the mixture to be a lavender color. It ended up a pretty honey brown color instead. It also had a very strong fragrance and flavor of lavender. Quite pleasant.
After tasting the lavender vodka I decided to add sugar to the mixture. I made a cup of sugar syrup by combining one cup of sugar with 1/2 cup of water in a small pot and brought it to a boil. This gave me a cup of sugar syrup. Once the sugar syrup cooled to room temp I added it to the lavender vodka and allowed this to mellow for another week.
The odd thing was that at first the sugar syrup and lavender vodka would not blend. The sugar syrup settled to the bottom of the bottle. No amount of stirring and shaking seemed to matter. I’d all but given up when a friend was over and tipped the bottle a few times. Amazingly it finally combined. On the advice of another friend I decided to add a couple of vanilla beans as well. The flavor is pretty interesting.
Lavender Vinegar
It’s easy to make. Just add 2 cups of vinegar for every cup of blossoms. If you are using dried flowers use 1/3 cup for every 2 cups of vinegar. Store in a cool, dark place in a container with a tight-fitting lid.Steep for at least 2 weeks- or longer.
Be sure to use vinegar that is 5% acidity- it will say that on the label. I like to use white wine vinegar, red wine vinegar or cider vinegar.
Memories of Dad
One of my favorite memories of my Dad, involved a very special breakfast. It was a breakfast only he and I shared.
Every summer, there was a park we would go to for family picnics. It was called Pine Way Trails. It has long ago been sold and the land developed.
The place would get very crowded, so we had to go early to get a prime location by the lake, and enough picnic tables for everyone. My Dad and I would go before anyone else.
Back then, it made me feel so special to go and to help. I am guessing it was because I was the baby, and no one else wanted to get up so early.
Dad and I would get there just as Pine Way Trails opened. The mist would still be rising off the lake. I’d help him unpack the car and place stuff on the tables we were claiming for the day. We would move them together and make sure they were level. Dad didn’t want wobbly tables.
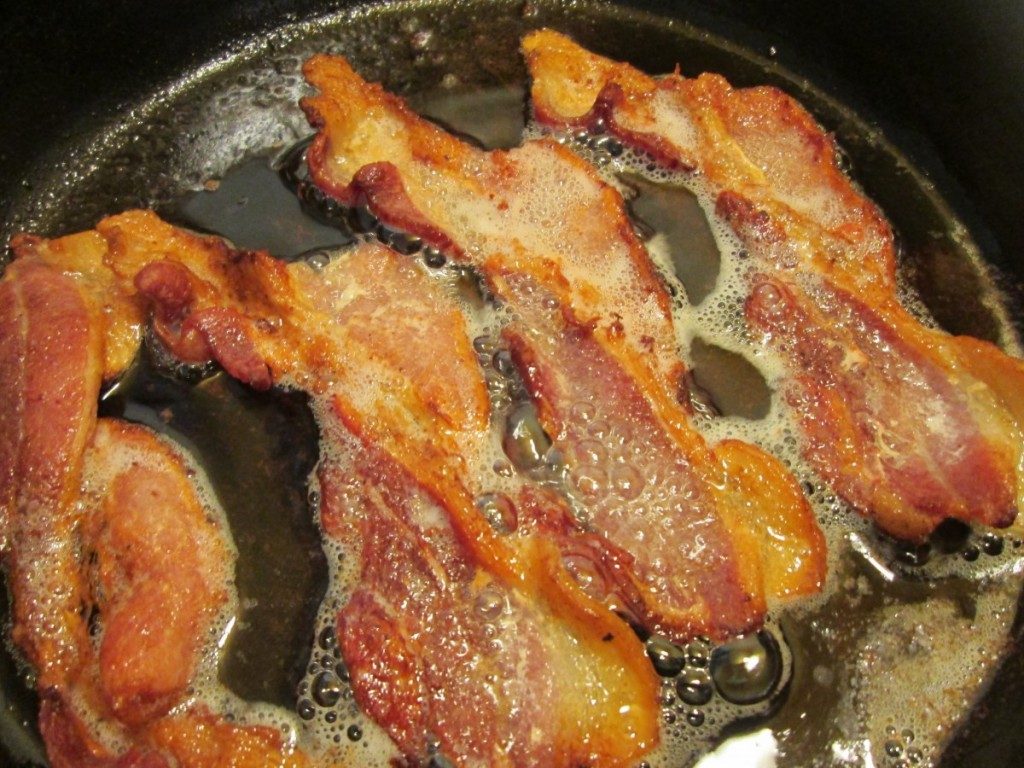
Then, he’d get a fire started in one of the grills. He always brought his cast iron skillet. Over the fire, he’d cook us bacon and then cook a couple of eggs. Dad had his thermos of coffee, and I had orange juice.
On paper plates we’d sit and enjoy our breakfast together. I don’t think, as a kid, I really appreciated the skill it took to get that fire just right. The bacon was crisp, but never burnt and the eggs would be sunny side up- with the yolks warm, yet runny. I’d use my bacon to get the last of the yolk off my plate.
Later in the day, everyone else would arrive. My mom, sister and brother, aunts, uncles, cousins, friends. We’d have a wonderful day together swimming and fishing and eating grilled hot dogs and hamburgers, chicken and salads and fresh melon. It was noisy and so much fun.
That special part of the day for me, was the breakfast my Father and I shared, quietly by the lake.
I got out the cast iron skillet this morning- cooked some bacon and eggs and thought of him.
Honey-Pomegranate Glazed Ribs

I like my ribs to be fall off the bone tender, but still have a crispy exterior glaze. I decided to use a combination of moist and dry heat to get the result I wanted. I finished them off with a sauce made from pomegranate molasses and honey. They were really good.
While I prefer cooking ribs on the grill, you can cook them indoors with good results. Sometimes the weather isn’t right for cooking them outside. Sometimes, you realize too late, that you are out of charcoal. With so many rainy days lately, you might be forced to cook your ribs indoors.
Honey-Pomegranate Glazed Ribs
1 slab ribs, cut into 3-4 rib portions
salt and pepper
1 c. apple cider vinegar
2 T. soy sauce
1 T. hot sauce
1 t. garlic powder
1 t. smoked paprika
Glaze:
3/4 c. pomegranate molasses*
1/2 c. honey- or more to taste
1 T. hot sauce, or more to taste
Place rib portions in a large pan and season with salt and pepper. Pour over the vinegar, soy sauce, hot sauce, garlic powder and smoked paprika. Cover and chill for a couple of hours. You could even do this the night before. Preheat oven to 425 degrees. Place rack in large baking dish. Pour 2 cups of water into the bottom of the pan. Place rib portions on the rack. Pour over the marinade. Season with salt and pepper then place in the oven and bake for 1 hour. Turn heat down to 400 degrees. Remove ribs from oven. Place ribs in a fresh baking pan. Combine glaze ingredients and brush all over the ribs. Return to oven and bake 20-30 minutes longer, or until glaze has gotten sticky and browned a little.
*Pomegranate molasses is available in some specialty stores, or you can make your own by boiling down pomegranate juice until it gets thickened.
Lemon and Sour Cream Cupcakes
I love the lemon flavor in these cupcakes. They are rich, without being too heavy.
Lemon zest in both the batter and the frosting, really makes them special. Cupcakes are such a nice, easy dessert. If you try these, I am sure you will be pleased, as will your family and friends. These could be a nice dessert for Fathers’ Day.
It makes a big batch, so you can freeze some for later.
Even though I normally frost these, you can also just combine powdered sugar with a little lemon zest and dust them with it, instead of the frosting.
Lemon and Sour Cream Cupcakes
1 cup butter, softened
2 cups sugar
3 eggs
2 teaspoons grated lemon peel
1 teaspoon vanilla extract
3½ cups all-purpose flour
1 teaspoon baking soda
½ teaspoon each baking powder and salt
2 cups sour cream
Frosting:
9 tablespoons butter, softened
6 ¾ cups confectioners’ sugar
6 tablespoons lemon juice
1 T. vanilla extract
¾ teaspoon grated lemon peel
3 tablespoon milk
In a mixing bowl, cream butter and sugar. Beat in eggs, one at a time. Add lemon peel and vanilla; mix well. Combine dry ingredients; add to creamed mixture alternately with sour cream (batter will be thick). Fill 30 greased or paper-lined muffin cups with 1/4 cup of batter. Bake at 350 degrees for 25-30 minutes or until a toothpick inserted near the center comes out clean. Cool for 10 minutes; remove to wire racks to cool completely. For frosting, cream butter and sugar in a small mixing bowl. Add lemon juice, vanilla, lemon peel and milk; beat until smooth. Frost cupcakes. Makes 30.
Bacon Waffles for Dad

If you are looking for a special breakfast for Father’s Day, maybe dad would like some waffles. Even better, make him waffles with bacon inside them. Then serve your bacon waffles with extra bacon on the side!!!
For me, breakfast doesn’t get much better than waffles. Well, unless maybe you add bacon to the waffle batter.
Truth is, I don’t treat myself to waffles all that often, but if I am going to eat waffles, I go all out.
These are truly wonderful waffles. Light, crispy on the outside and studded with bacon. A drizzle of warm maple syrup and you are good to go.
So, if you are looking for a special treat for dad for breakfast, or lunch, or dinner or a snack… try these bacon waffles. You can thank me later.
Bacon Waffles
1 pound sliced bacon
1 3/4 cups all-purpose flour
1 tablespoon sugar
2 teaspoons baking powder
1/2 teaspoon salt
3 eggs, separated
1½ cups milk
¼ cup butter, melted
In a skillet, cook bacon until crisp. Drain; crumble and set aside. In a mixing bowl, combine the flour, sugar, baking powder and salt. Beat egg yolks, milk and butter; stir into dry ingredients until smooth. Beat egg whites until stiff peaks form; fold into batter. Add bacon. Before making each waffle, stir batter. Bake in a preheated waffle iron according to manufacturer’s directions until golden brown.
Sweet Potato Salad
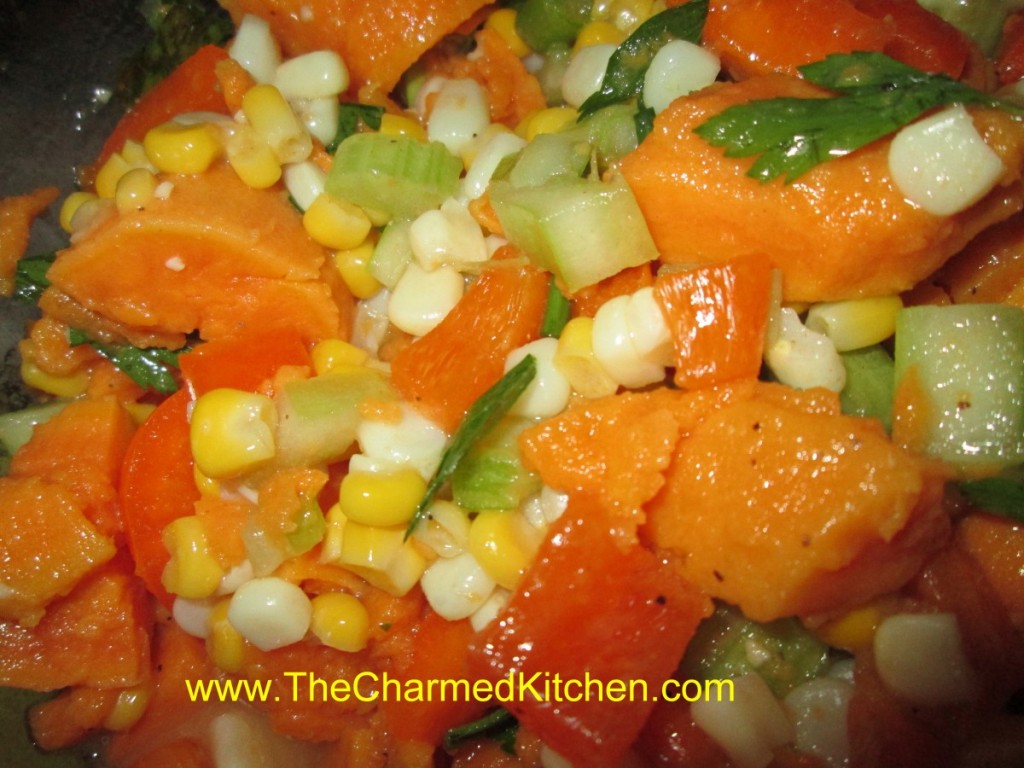
I thought I would post one of my favorite salad recipes. We made it in class last night and everyone liked it a lot. This sweet potato salad is always a hit. It goes so well with grilled foods, too. I always make a double batch – it goes fast. The tricky part is not to overcook the sweet potatoes. They cook fast. Keep an eye on them and get the potatoes into cold water to stop the cooking once they are tender.
Sweet Potato Salad
3 large sweet potatoes
2 c. corn kernels, fresh off the cob preferred but frozen is O.K.
2 ribs celery, sliced
1 sweet onion, diced
1 c. sweet pepper, seeded and chopped
2-3 T. fresh parsley
1/3 c. oil
1 t. Dijon mustard
3 T. apple cider vinegar
1 T. lemon juice
1 clove garlic, minced
Salt and pepper to taste
½ c. roasted peanuts
You have several options in how to cook the sweet potatoes. I like to bake them whole in the microwave. I also like to cook the corn in the microwave. You can also cut the potatoes into large pieces and boil or steam until just tender. Corn can be boiled, grilled or steamed. No matter what method you choose to cook the veggies, place in ice water bath to cool down quickly after they are cooked. This will save you time and help the sweet potatoes to firm up. Once the vegetables have cooled down drain them and peel and cut the potatoes into bite-sized pieces. Place potatoes and corn in a mixing bowl with remaining vegetables. Combine remaining ingredients, except peanuts, in a jar with a tight-fitting lid and shake well before pouring over the sweet potato mixture. Toss to blend and chill until ready to serve. Add nuts just before serving. Serves 6.
Garlic Scapes Hummus

Around here, garlic scapes are in season and being eaten a lot. I find myself cooking with them in everything I can. Everyone seems to be talking about scapes and looking for new ways to use them. There is even a word for it – scorpacciata.
Scorpacciata is an Italian word that means consuming large amounts of a particular local ingredient while it’s in season.
Scapes, if you didn’t know, are the tops of hard-neck variety garlic. They are cut off this time to year- to help the plants produce larger heads. They curl as they grow. You should be able to find them at your local farm market. They can be eaten raw or cooked. They can be a little woody when raw.
This time, I steamed the scapes, and added them to my hummus. The end result was really good. The scapes replaced the garlic cloves, adding their own personality to the dish. I switched the dish up a little more, by using avocado oil, instead of the traditional olive oil.
So here is one more recipe to use those lovely, seasonal garlic scapes.
Garlic Scapes Hummus
1 can garbanzo beans, drained- I used a one pint jar of home canned
½ c. chopped garlic scapes- 1 or 2 garlic scapes- steamed 5 minutes and chopped
¼ c. olive oil or avocado oil
2 T. lemon juice – about 1 lemon
2 T. tahini (sesame seed paste)
salt and hot pepper sauce to taste
Combine all ingredients in a blender or food processor until smooth. Adjust seasonings. Chill. Serve with pita bread, crackers or fresh vegetables. Also nice spread in a pita bread with sliced tomatoes, cucumbers and lettuce. Freezes well.
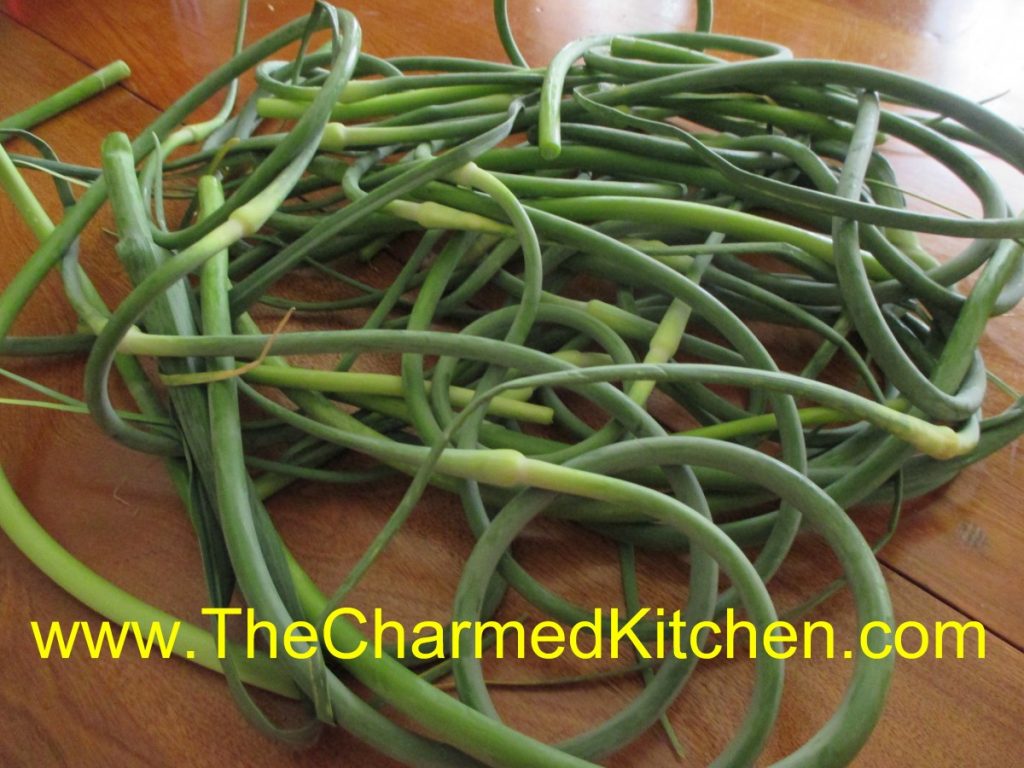
Cooking with Garlic Scapes
If you have never had garlic scapes, you don’t know what you are missing. Garlic scapes are the green shoots removed from hard-neck varieties of garlic. By removing the shoots, the bulbs will get bigger. So farmers and gardeners remove them. Garlic scapes curl as they grow, and are good served raw, or barely cooked. They are showing up at farm markets around here right now.
When cooked, the flavor mellows a lot. I love to steam garlic scapes for about 5 minutes, then just eat like fresh green beans, with butter and salt. I steamed a bunch of scapes the other day- then chopped them up and added to potato salad. So tasty!!
They have a rich, garlic flavor that is all the sweeter because of the short time they are around. Enjoy them when you can- they will be gone soon.
I sometimes use scapes in place of basil, in my pesto recipe, or combine them with parsley in a garlic scapes-parsley pesto. You can also combine the garlic scapes with cottage cheese in the blender- add a little lemon juice and hot sauce for a tasty dip. Here are some more recipes for cooking with garlic scapes.

Garlic Scapes Potato Salad
4-5 garlic scapes
2 lbs. red skinned potatoes*
½ cup minced sweet pepper
½ c. olive oil
½ c. apple cider vinegar
2 T. sugar
2 T. chopped parsley
2 t. fresh dill weed
Salt and pepper to taste
Hot sauce to taste
Steam the scapes for 5 minutes. Cool a little, and cut into ¾ -inch slices. You should end up with about 1½ of sliced scapes when done. Place in a medium bowl. Cook potatoes until tender. I baked mine in a microwave until tender and then cut into cubes. Baking them is also a nice way to cook the potatoes. You can also opt to cut into cubes first and boil the potatoes. Whatever method to cook the potatoes is fine with me. Take the potatoes, while still warm, and place in the bowl with the scapes. Mix the rest of the ingredients together in a small bowl and stir until sugar dissolves. Pour over warm potato mix, tossing to coat evenly. Adjust seasonings. Chill and serve. Serves 6-8.
* You can really use any potato you like.
Garlic Scape Pesto Sauce
1 c. chopped scapes – you can also use half scapes, half parsley
1/4 c. olive oil
3-4 cloves garlic
Salt to taste
1/2 c. pine nuts, sunflower seeds, pecans or walnuts
1 c. fresh grated Parmesan cheese
Combine all ingredients, except the cheese, in a blender and mix until smooth. Stir in the cheese and toss over hot, cooked pasta or use as a sauce on meat and poultry. Sauce will keep a few days in the fridge and makes about 1 1/2 cups, enough for 1 lb. of cooked pasta.
Lebanese Garlic Sauce
1/2 c. chopped garlic scapes
1 cup lemon juice
1 teaspoon salt
3 cups olive oil
In the container of a blender, combine the garlic scapes, lemon juice and salt. Blend at medium speed until smooth. Continue blending while pouring olive oil into the blender in a thin stream. The mixture should become thick and white almost like mayo. Store refrigerated in a glass container. Nice on hot pasta, cooked rice or grains or brushed on meats while cooking. It also is a great salad dressing.
Garlic Scapes with Broccoli
1 c. chopped garlic scapes
1 1/2 teaspoons salt
1 bunch broccoli, cut into florets, steamed 5 minutes, cooled
1/3 cup olive oil
1/4 cup red wine vinegar
1 tablespoon Dijon mustard
1/2 cup grated Parmesan cheese, or to taste
Place garlic scapes in a food processor with the salt and blend into a paste. Add olive oil, vinegar, and mustard. Pulse until smooth. Place garlic scapes mixture in a bowl and add the broccoli. Stir to coat. Chill for 3 hours to marinate, stirring occasionally. Sprinkle with Parmesan cheese before serving. Tastes even better the next day!!!


