Spiced Pear and Oatmeal Muffins
Spiced Pear and Oatmeal Muffins
It is pear season. While apples seem to get more attention, pears are a wonderful, versatile fruit.
Pears will ripen off the tree and are often picked unripe and allowed to ripen after harvest. Unlike a lot of other fruits, pears do not suffer from being picked before they are ripe. As they ripen, pears become very sweet.
I like to pick out both ripe and unripe pears at the local market. That way, I’ll have ripe pears over a longer period of time.
I had some ripe pears and wanted to do something with them. Since I had a friend coming for over breakfast, I thought muffins. It’s always nice to have an easy breakfast option on hand.
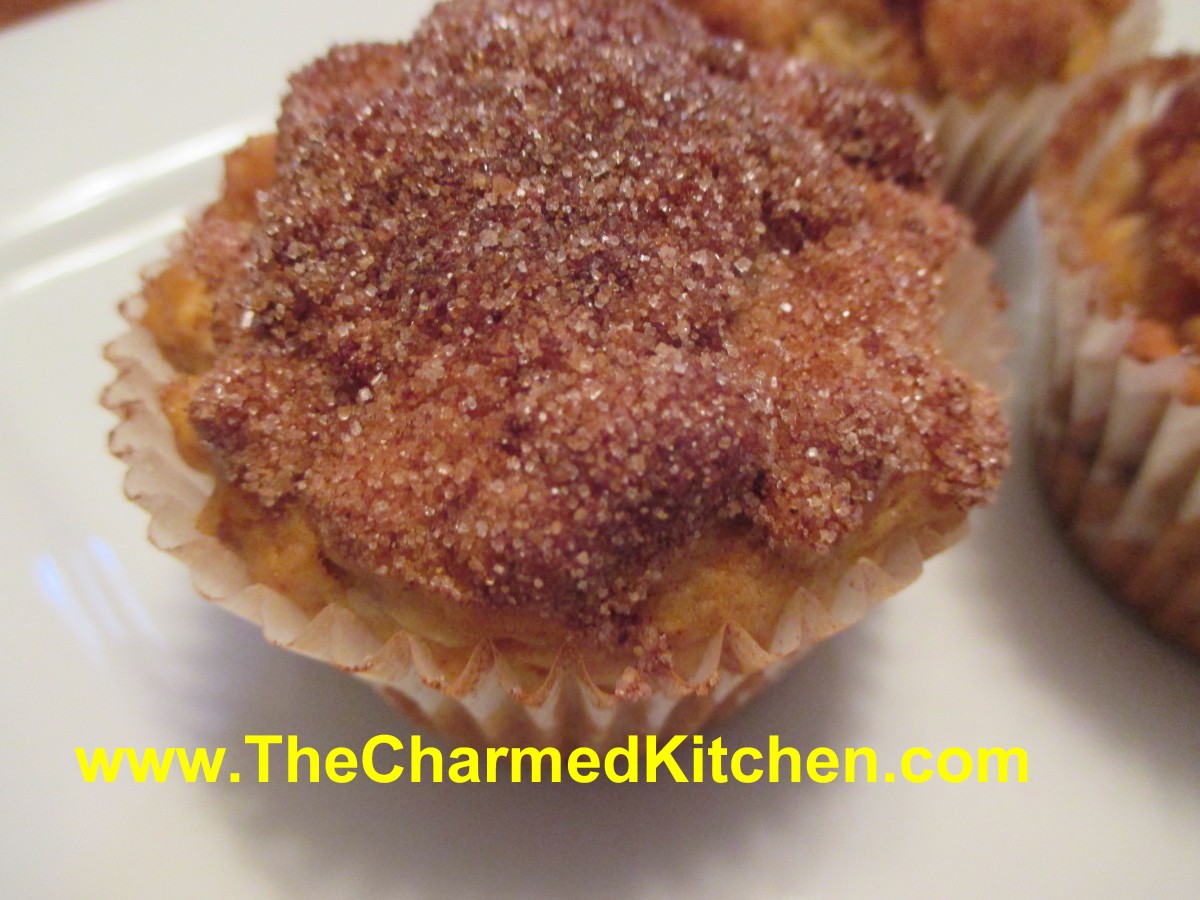
I started with a basic muffin recipe, and added some diced pears, cinnamon, orange zest, nutmeg and a cinnamon sugar topping, to make them special. And yes, you could substitute apples for the pears!!!
I was really happy with how they turned out. Not overly sweet, moist and tender. Here is the recipe.
Spiced Pear and Oatmeal Muffins
1 ½ c. flour
1 c. rolled oats
1 T. grated orange peel
2 t. baking powder
1 t. cinnamon
½ t. each nutmeg and salt
½ t. baking soda
1 egg, beaten
1/3 c. honey
1/3 c. oil
¼ c. orange juice
1½ cups of peeled, diced pears – 2 or 3 pears should do it
2 T. melted butter, optional
cinnamon sugar, optional
Combine flour with the dry ingredients. Set aside. Combine egg with the honey, oil and juice. Add egg mixture to flour mixture and stir until flour is just moistened. Fold in pears. Batter will be thick. Divide batter among 12 greased muffin cups. Bake in a preheated 375- degree oven for 20-25 minutes. While the muffins are warm, dip tops in melted butter and then dip in the cinnamon sugar, if you like. They are tasty, with or without the cinnamon sugar topping, but I like to add this last step. Makes 12.
Pineapple Scones

Pineapple Scones
This is one of my favorite scone recipes. Pineapple gives them a wonderful flavor, then they are topped with a crunchy cinnamon and nut combination. What’s not to love?
We made these in class last night. Everyone loved them.
I am always surprised when someone tells me they don’t like scones. Often, the comment is that they are too dry. My reply is that you haven’t had a good scone.
Good scones are slightly crisp on the outside and tender on the inside. These scones never disappoint. These are great served warm from the oven, topped with jam.
Pineapple Scones
3 c. flour
1/3 c. sugar
1 T. baking powder
½ t. salt
¾ c. butter
1 (8 oz.) can crushed pineapple in juice, un-drained
milk
3 T. chopped nuts
1 T. sugar
½ t. cinnamon
In medium bowl mix together dry ingredients and cut in butter to resemble coarse crumbs. Stir in pineapple and stir until dough starts to hold together. Place dough on lightly floured surface and knead 10-12 strokes until dough holds together, but is tender and soft. When you first start to mix this dough- you might think there is something wrong- that you need to add more liquid. Be patient. There is a lot of moisture in the pineapple and as you mix the dough it WILL come together. Roll or press dough ½ inch thick and cut out with 2-2 ½ inch biscuit cutter. Place on ungreased baking sheet. Re-roll scraps and cut out remaining dough. Brush scone with milk. Combine remaining ingredients and sprinkle over scones. Bake in a preheated 400-degree oven for about 15 minutes. Makes 21.
Apple Crumb Cake
Apple Crumb Cake
I love apple season. I will go to local farm markets and orchards several times, picking out different varieties.
Several of my favorite varieties won’t be around until October, but there is a great selection already.
I eat plenty of apples fresh, but I also cook with them. This is one of my favorite apple recipes.
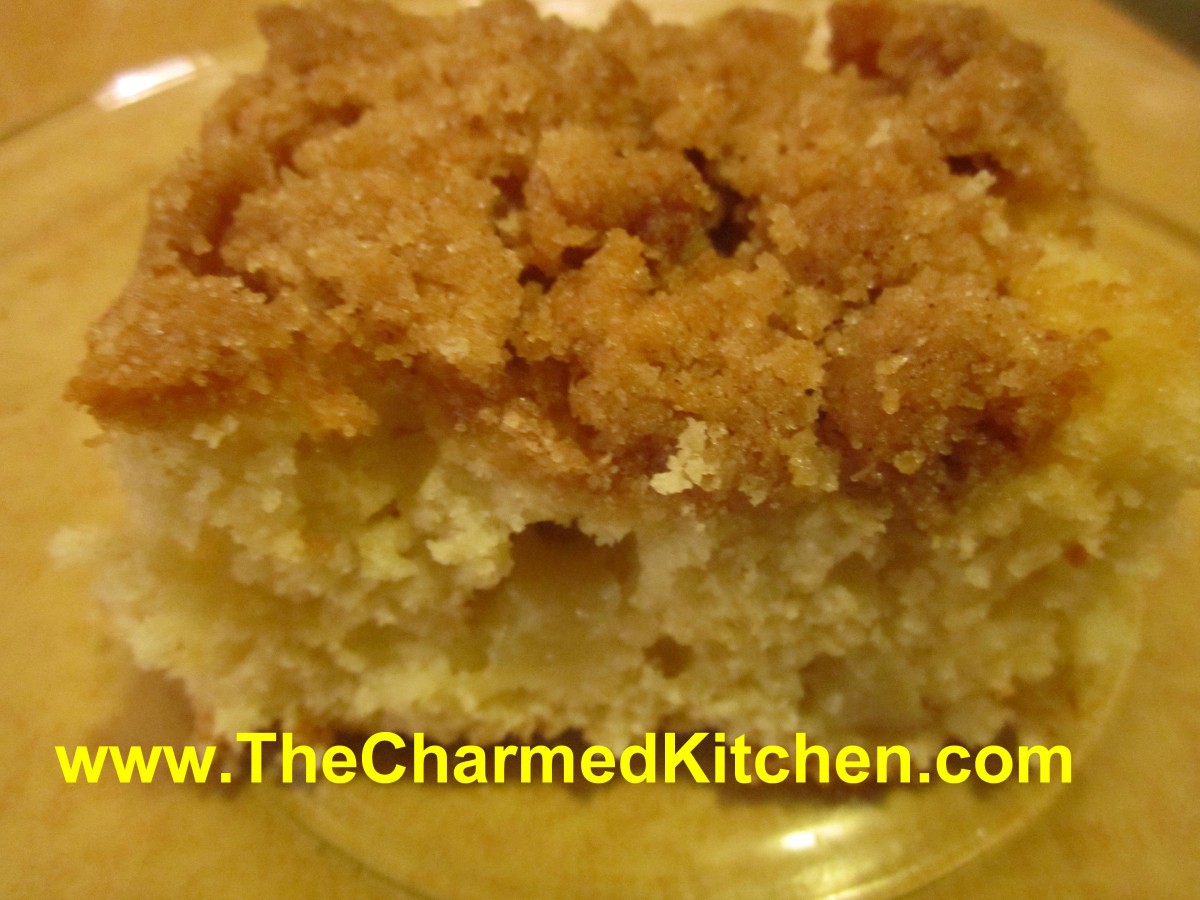
The tender cake and crunchy topping seem like the perfect combination. Most days I would rather have a crumb topping on a cake than frosting.
This recipe hits all the right notes. Sweet with apple chunks throughout, a nice touch of cinnamon and that crunchy topping that I love.
Apple Crumb Cake
For cake batter:
2 c. flour
2 t. baking powder
½ t. salt
½ stick (¼ cup) butter, softened
¾ c. sugar
1 egg
½ c. milk
2 c. chopped peeled, cored apples
For topping:
½ c. sugar
¼ c. flour
2 t. cinnamon
½ stick (¼ c. butter, chilled and cut into bits)
Combine dry ingredients and set aside. In mixing bowl with electric mixer, beat butter and sugar until light and fluffy. Beat in egg and milk. Add flour mixture gradually until just mixed in. Fold in apples. Grease and flour an 8 or 9-inch pan and add prepared batter. Combine topping ingredients until they resemble coarse crumbs. Sprinkle over the batter in pan and bake in a preheated 375-degree oven for 35-45 minutes. Use toothpick to test.
Note: I used a 9-inch square pan and it worked fine.
Crumpets
Crumpets
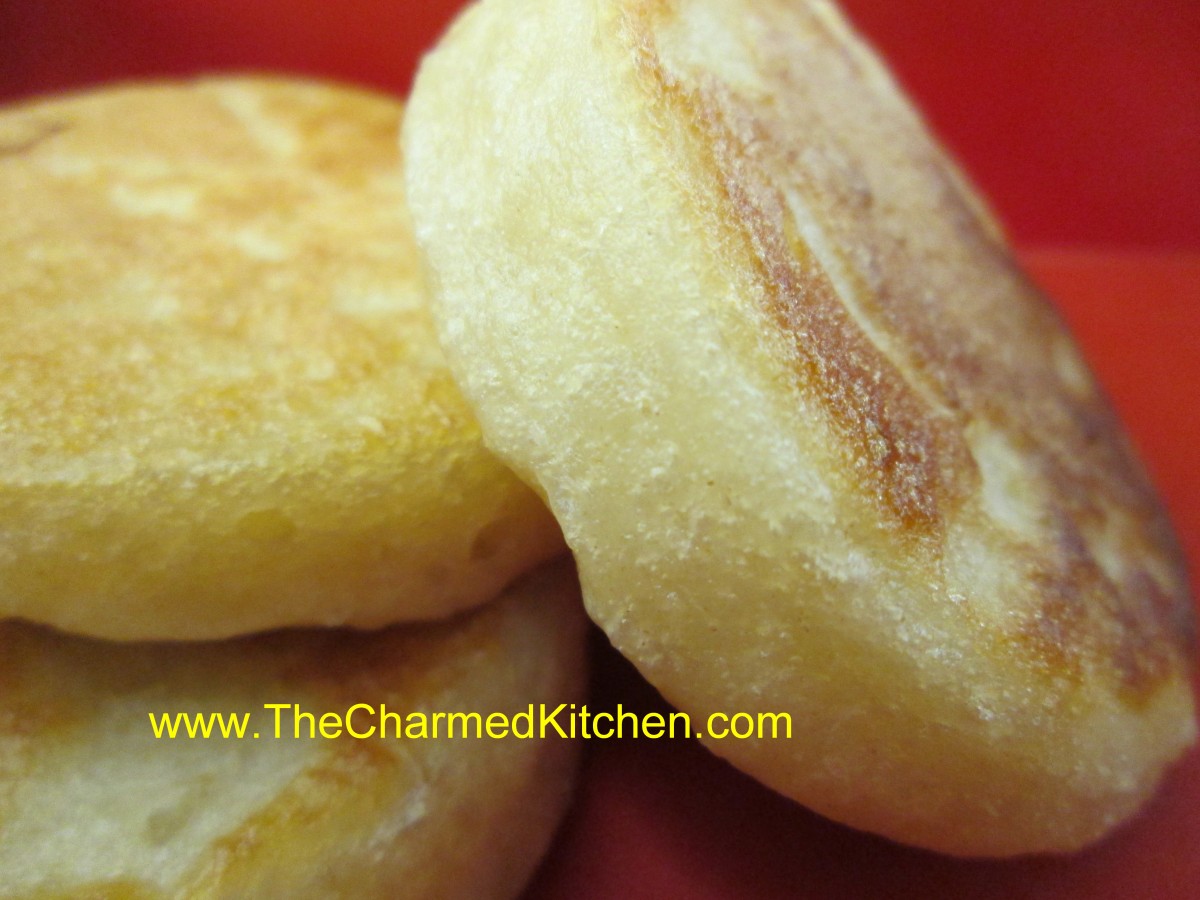
I love crumpets when I make them myself. They are a cross between a pancake and an English muffin. Crumpets should be moist, soft and light. The ones I’ve tried from the grocery store are heavy and dry. If the only crumpets you have ever tried were from the store, you probably don’t like them either. I think if you make your own, you will be surprised at just how tasty crumpets can be.
I’d suggest serving them with jam and clotted cream.
You will need crumpet rings to cook them in. Crumpet rings and English muffin rings (they are pretty much the same thing), can be purchased online and in some specialty cooking supply stores.
The rings are greased and set in a skillet to warm. Then, the crumpet batter is spooned into the rings. They cook in the rings, right in the skillet. This helps them to keep their shape and to rise nice and high.
Many years ago my father made rings for me from cans. We saved cans from things like canned tomatoes or corn. He cut off the lids on both sides and then cut the cans to about 1 1/2 inches in height. There is a rough edge, so I am always very careful when handling them. Buying them is probably a better idea.
Crumpets
2 c. skim milk, scalded
3 c. flour
1 t. salt
1 package active dry yeast
¼ c. warm water
¼ c. butter, melted
Cool milk to lukewarm, then stir in flour and salt, beating until smooth. In small bowl place water and sprinkle over with the yeast. Let stand 5 minutes until bubbly. Stir in butter then add this to the flour mixture, beating well. Cover and let rise in a warm place until doubled in bulk, about 1 hour. Grease 2 ½ inch muffin rings, or use 3 ½ oz. tuna fish cans and place in a hot, lightly greased skillet. Spoon 2 tablespoonfuls of batter into each ring, reduce heat to low and cook crumpets 12 minutes per side. Remove from rings and set aside to cool. Repeat procedure with remaining batter. Makes about 32 crumpets. Serve split and topped with jam or preserves and Devonshire clotted cream. You can make a mock version of clotted cream- recipe follows.
Mock Clotted Cream
1 c. whipping cream
¼ c. sour cream
Just beat together whipping cream and sour cream until soft peaks form.
Mini Cheesecakes
Mini Cheesecakes with Raspberries
These miniature cheesecakes are a wonderful dessert. The recipe just makes 6, so you can make cheesecake anytime. No need for a party or special occasion. Also, no need for a springform pan. These are baked in muffin tins.
The recipe is very simple. The little cheesecakes are baked in less than half and hour. Once baked and cooled, you can top them with all sorts of fruits, jams, chocolate sauce or whipped cream.
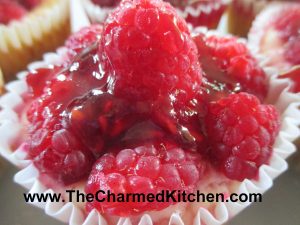
I used some raspberries for this batch. The creamy filling works so well with the tart/sweet berries. I brushed a little raspberry jam over the top, but you could also sprinkle the berries with a little sugar, if you prefer.
You can use a mix of berries and seasonal fruit. Raspberries and blueberries would make a great combination. I like fresh peaches with berries, too. They bake quickly and can be frozen. I freeze them plain, then top with fruit or jam when ready to serve.
Mini Cheesecakes
6 vanilla wafers
Filling
1 (8 oz.) pkg. Cream cheese, softened
1/4 c. sugar
1 t. vanilla
1 egg
Preheat oven to 350 degrees. Line 6 muffin tins with paper or foil liners and place a vanilla wafer in each cup. Beat the cream cheese with the sugar until well blended. Beat in vanilla, then egg. Spoon the cheese mixture into the muffin tins and bake for 20 minutes, or until set. They will be pretty full and will puff up while baking. They will also settle when cooling. Once cooled, arrange fruit on the top of each little cheesecake.Makes 6.
For the raspberry topping, I used about a cup of raspberries and 1/2 c. of raspberry jam. I placed a few berries on each cheesecake. Then I warmed the raspberry jam and brushed it gently over the tops. Chill before serving.
Corn, Black Bean and Pepper Salad

Corn, Black Bean and Pepper Salad
I had some friends over for dinner the other day. I made this salad as one of the sides. It was so tasty. I love a dish I can prepare ahead of time, especially when I have company.
The salad was a last minute addition to the menu. A friend who was bringing a bean salad could not attend. I needed a dish to fill the gap. I used ingredients I already had around.
I used frozen corn in this dish. Fresh corn season is too short around here. I always buy extra corn for freezing. I just blanch the shucked corn for a few minutes in boiling water, then drop into ice water. Once the corn is cool enough to handle, I cut the corn off the ears. Then I package up the corn and freeze it.
You could also grill corn and cut it off the cob to freeze.
I like to boil the cobs after the corn is cut off, for a corn stock, which I also freeze. The cobs have a lot of flavor.
When using the frozen corn in a salad, you’ll want to drain it after thawing.
So here is the recipe. Pretty simple. You could add some sweet onion, if you like, too.
Corn, Black Bean and Pepper Salad
4 c. cooked corn
1 can black beans, rinsed and drained
1 sweet pepper, seeded and chopped
¼ c. olive oil
3 T. red wine vinegar
1 T. Balsamic vinegar
2 t. Italian seasoning- I used my Tuscan blend
Salt and pepper to taste
Hot sauce to taste, optional
Combine all ingredients in medium bowl. Stir to combine well. Chill before serving. Serves 6-8.
Lemon Tea Cake
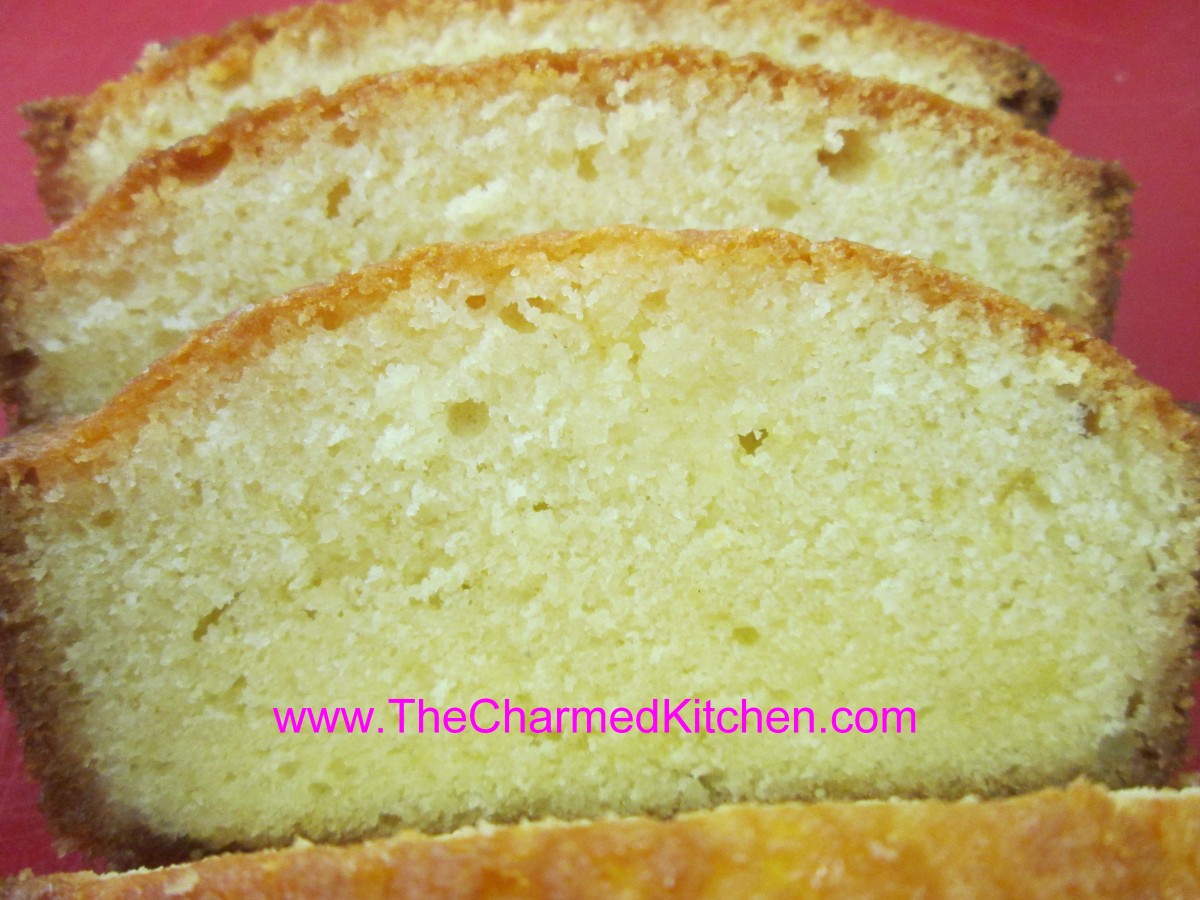
Lemon Tea Cake
This is one of my favorite cakes of all time. It is a simple cake, enhanced with the flavor of lemon juice and lemon zest. Once out of the oven, you poke the hot cake with a large fork or a skewer, and pour a lemon syrup over it.
Moist, tangy and fragrant, it is a perfect addition to afternoon tea.
Great all on its own, this cake is also wonderful served with fresh berries and whipped cream for a light dessert. On a hot day, I have been known to top it with a scoop of ice cream.
Before you ask, the measurements are correct- only 3/4 cup of flour. The cake does not rise a whole bunch, but the texture is still very nice. The denseness of the cake helps it to stand up to the lemon syrup.
I hope you will give it a try.
Lemon Tea Cake
2 lemons
3 T. sugar for topping
½ c. butter, softened
¾ c. sugar
2 eggs, beaten
3/4 c. flour
6 T. milk or half and half
Preheat oven to 375 degrees. Grease an 8- inch loaf pan and line with wax or parchment paper. Grate the lemon rinds and set aside. Combine the juice of 1 of the lemons with the 3 tablespoons of sugar, stirring to dissolve sugar. Set aside.
Cream together the butter with the rest of the sugar and beat until fluffy. Beat in the eggs, a little at a time until well mixed. Stir in the flour and lemon peel and beat well. Add the milk and beat well. Pour batter into prepared pan and bake at least an hour. The cake should spring back when touched lightly. As soon as you remove the cake from the oven pierce it all over with a long-tined fork or a skewer. Pour over the reserved lemon juice mixture. Cool cake in pan before serving. Cake will be moist and tangy.
Cooking for 1 or 2 – New Day Cleveland

Carrot Soup
I had a fun on the show today. The theme was cooking for one or two- scaling down recipes for smaller households.
Here it is.
Curry Cauliflower Salad

Curry Cauliflower Salad
Long before cauliflower became trendy, I was a fan. I love it steamed, served with a little butter and salt or pan fried and mixed with garlic and a bit of Parmesan cheese. I have enjoyed cauliflower in any number of salads as well.
I picked up a huge cauliflower from a local produce market. I was having friends over and wanted to use it in some sort of recipe. The high heat made me think of making a salad.
Here is the recipe I made with a head of cauliflower.
I used curry powder- I make my own- but you can use a store bought one. I also added some green onions and peanuts for crunch. It came out quite nice.
I have used curry powder in hot cauliflower dishes before, but the salad was a pleasant change of pace.
Curry Cauliflower Salad
1 head cauliflower, cooked
½ c. chopped green onions
¾ c. mayo – or less or more depending in the size of the head of cauliflower
1 T. curry powder- or to taste
1 t. hot sauce, or to taste
Salt and pepper to taste
1 c. peanuts
First break the cauliflower into florets. Cook the cauliflower any way you like. I steamed mine for about 5 minutes. You could roast it, or sauté it in a little oil. You want it tender, but still a little crisp. Don’t cook it to mush. I would also advise against boiling it, as it gets too wet. Once the cauliflower is cooked, let it cool down before proceeding. Combine the cauliflower with the green onions, the mayo and seasonings. It was hard to be exact because your head of cauliflower might be bigger or smaller than mine. I could have said 5 cups of cooked cauliflower- but would that really help? Then you’d have leftover cooked cauliflower. Or perhaps not enough. So add a little more mayo, if needed, and adjust the seasonings to suit your taste and the amount of cauliflower you have. Chill and toss the peanuts in closer to serving time. They are fine, even when in the salad for a while, but the peanuts crunchier when first put in.
Strawberry Sorbet

Strawberry Sorbet
With unseasonably warm weather, a sorbet was in order. If you are looking for a versatile dessert, sorbets are a great option. Almost any fruit can be used, and you can sweeten, or not, to suit your own taste. If you start with frozen fruit, you can blend up your sorbet and serve it right away. Even better if you can process and freeze it a couple of times.
Sorbets can be served on their own, with cake, or drizzled with chocolate sauce. I sometimes add a scoop of sorbet to a glass of lemonade or ice tea on a hot day. So refreshing. I sometimes combine a couple of fruits in one sorbet.
I made this strawberry sorbet the other day. I had some strawberries in the freezer and I needed a quick dessert. It came out just wonderful.
You can make the sorbet in an ice cream machine, if you have one, but you don’t need to. I don’t. It really is simple. As an added bonus, once your sorbet is made, you have it on hand whenever you need a dessert. The secret is to blend the sorbet a couple of times after it is frozen, if you can. Each time, the sorbet gets smoother and creamier. I use my food processor.
So here is the recipe for my strawberry sorbet. You can substitute any number of different fruits.
Strawberry Sorbet
1 1/2 lbs strawberries, fresh or frozen
1/2 c. sugar, or to taste – you could also sweeten with honey, if you prefer, or use no sweetener
1 T. lime or lemon juice
Wash and stem berries. Place in food processor with juice and blend until smooth. Sweeten to taste, stirring until sugar is dissolved. Place in a container with a lid and freeze. Once frozen, remove strawberry mix from freezer and sit it on the counter to soften a little bit. This is really the important part. You don’t want it to thaw, but you do want it soft just enough to break into chunks. Place chunks in food processor and blend it again. It will actually start to look a little creamy and lighter in color. You can serve it right away- or put it back in the freezer to serve later. At this point the sorbet is ready- but you can repeat the soften/process step once more, if you like, for even creamier sorbet. Makes 3-4 cups.


