Vegetable Soup Base

Vegetable Soup Base Ingredients
I have made a lot of stuff from scratch- could I make my own soup base? I could and I did! Not soup stock, but the stuff in jars that you just mix with water for instant broth. I wanted a no-meat soup base for when I was cooking meat-free.
I made a vegetable soup base that is a mixture of vegetables, both fresh and dried, herbs, mushrooms, nutritional yeast, spices and salt. There is pretty good amount of salt, but I wanted to be able to store it in the fridge and be safe. Figured out that every teaspoonful of the finished base has less than 1/4 teaspoon of salt. Not great, but a lot less than bouillon cubes.
If you want to make yours with less salt or no salt- you’ll have to freeze the mixture in ice cube trays and take it out of the freezer as needed. Sort of like your own bouillon cubes.
The nice part is, I can now make a vegetable soup easily and I know exactly what is in it. It can also be added to chicken or other meat-based stocks, in place of the salt, to add extra flavor.
Homemade Vegetable Soup Base
4 carrots, peeled and cubed
3 celery ribs, washed and cubed
1 large sweet onion, peeled and cubed
3 green onions, washed and cut up
1 c. sun- dried tomatoes, soaked in water 30 minutes, and drained
1 c. dried mushrooms, soaked in water 10 minutes and drained
1 c. chopped cabbage
1 c. parsley, chopped
1/2 c. chopped sweet pepper
1/4 c. nutritional yeast, optional
2 T. turmeric
8 oz. salt- I used sea salt and used a scale to weigh it. It’s around a cup but will differ if you are using a coarse salt
Combine all ingredients, except the salt, in a food processor and blend until smooth. I have a decent size Cuisinart and still had to do this in batches. Combine in a bowl with the salt and stir well to blend. Store in a clean jar in the fridge until ready to use. I ended up with about 5 cups of soup base. To use, add about 1 teaspoonful to a cup of hot water for vegetable broth. Use less or more according to your taste. Use in place of salt in other soups, stews and sauces.

Finished Soup Base
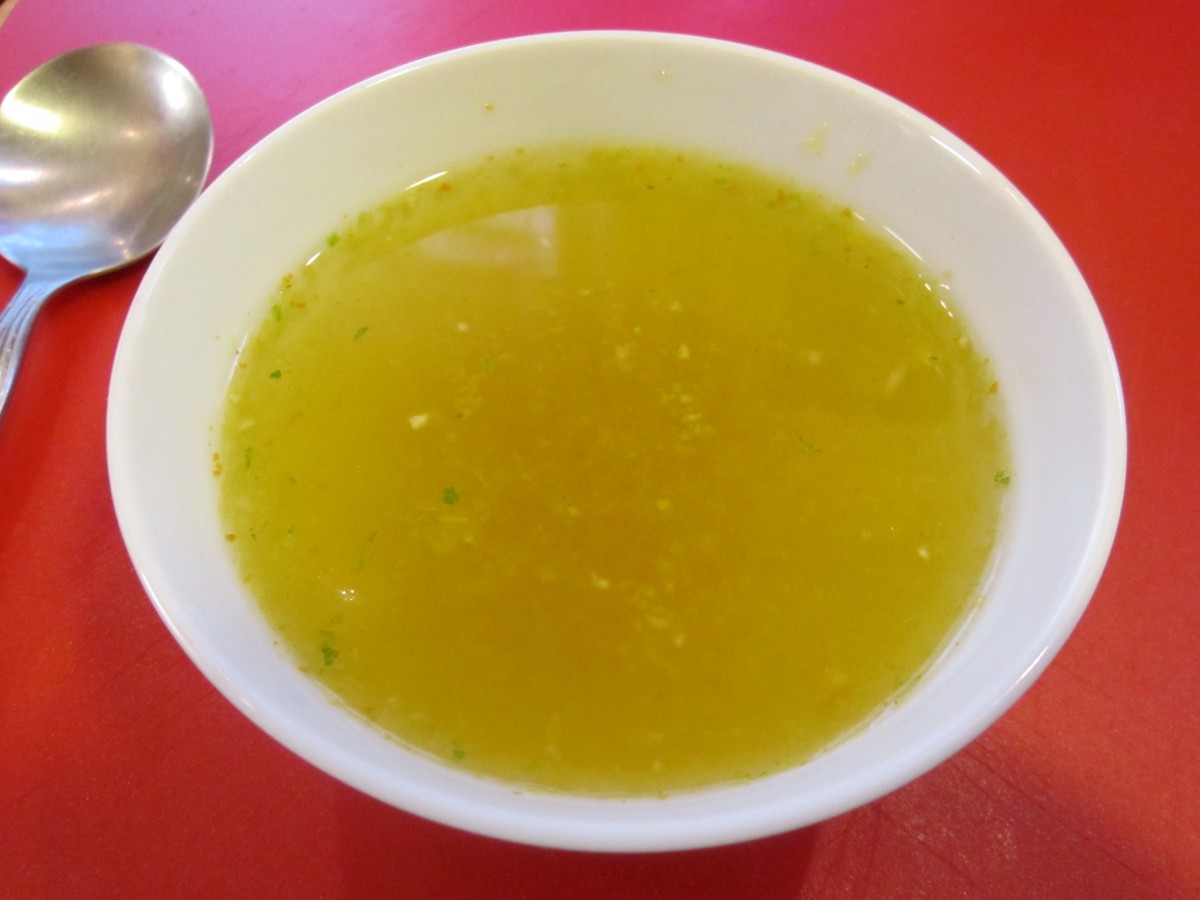
Vegetable broth made from the base
Blueberry Pie Filling
Blueberry Pie Filling
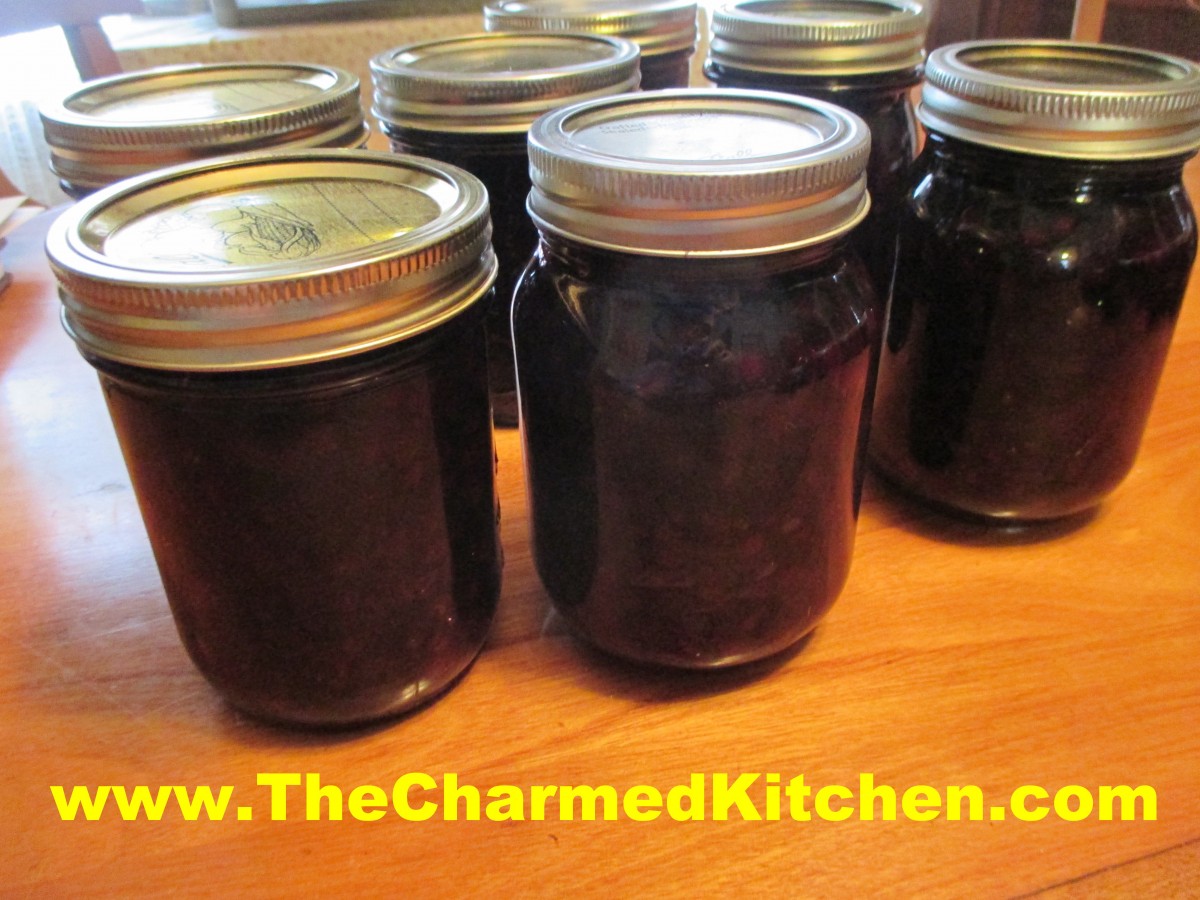
I don’t normally find myself making blueberry pie filling in March, but stuff happens. Sometimes really good stuff. After being gifted a large quantity of blueberries. I had to figure out what to do with them. My friend Mari, needed to free up some space in her freezer. She offered me some frozen blueberries. I didn’t ask her how many. I was delighted to find 5 (2 quart) bags of wild Maine blueberries!!! I didn’t have freezer space, either, so I knew I was going to can them. I made blueberry jam. I also decided to make pie filling.
There is something very satisfying in making your own pie filling. It is so much better than anything you would find in a can. It is a convenient ingredient to have on hand, too. A good quality pie filling can be turned into any number of desserts in no time- even pie!!
You do need to have Clear Gel to can pie filling. It is modified cornstarch. You can’t use regular cornstarch and you can’t use other thickeners. You could just can the berries, then thicken them later, but the Clear Gel makes it so much more convenient to use. I just order mine online, but it is available in some stores- primarily in Amish communities.
I opted to can my filling in pints. I find that size more convenient for me. Let the jars stay in the canner 5 or 10 minutes after they finish processing. It will reduce siphoning. Some foods, hot in the jars- will leak out of removed from the heat too quickly. Pie fillings are known for issues with siphoning.
Blueberry Pie Filling
6 qts. Blueberries
6 c. sugar
2 1/4 c. Clear Gel (modified cornstarch, not regular cornstarch)
7 c. water
1/2 c. lemon juice
Wash and drain berries. In large sauce pot combine sugar and Clear Gel. Stir in water and cook on high heat until mixtures bubbles and thickens. It is going to be really thick- don’t panic, just keep stirring so it won’t stick. Add lemon juice and boil 1 minute, stirring constantly. Fold in berries and ladle in hot, clean canning jars immediately. Leave 1/2 -inch headspace and remove any air bubbles with a knife. Wipe rims clean and put on lids. Place jars in boiling water bath and process for 30 minutes. Start timing when water returns to the boil. Turn off heat and let jars sit in the water bath 5-10 minutes before removing to counter to cool. Cool jars on counter on rack or towel, free from drafts. Check seals next day. remove rings and wipe down jars with a soft, damp cloth before storing. Makes 14 pints or 7 quarts.
Source NCHFP
Colcannon

Colcannon
I am not sure you can find a more comforting comfort food than colcannon. This traditional Irish dish is a combination of potatoes, cabbage, onions, parsley and butter. I was inspired to make it when my friend, Jill, mentioned she was making it for St. Patrick’s Day. It certainly doesn’t have to be St. Patrick’s Day to enjoy this traditional Irish dish, though. This dish is always a crowd pleaser.
I changed it up a bit by using Brussels sprouts, in place of the cabbage. It was for a dinner with a friend of mine, and since she doesn’t eat bacon, I left it out. But a lot of people do add some bacon to colcannon.
The recipe is pretty simple. I used a combination of chicken stock and half and half to cook the potatoes, but you could use all milk, if you prefer.
Colcannon
4 T. butter
1 onion, peeled and chopped
2 lbs. of potatoes, peeled and sliced
1 c. chicken stock
1 c. milk or half and half- I used half and half
1 lb. Brussels sprouts, ends trimmed and quartered
1/2 c. chopped green onions
1/2 c. chopped fresh parsley
salt and pepper to taste
extra butter for adding when serving
I large sauce pan or skillet, heat the butter and cook the onion until tender. Add the potatoes and cook a few minutes. Add the stock and milk or half and half and cook, uncovered over medium low heat, for about 10 minutes, stirring occasionally. The potatoes should be pretty tender. Add the Brussels sprouts, cover, and continue cooking until the sprouts are tender. This will take 10-15 minutes. If the mixture is soupy, remove the lid. Most of the liquid should cook off. You should mash the potatoes a bit before serving, so use a potato masher or a large fork to smash them up a bit. This will also thicken the dish up a bit more. Add the green onions and parsley and cook a few more minutes, over low heat, stirring to keep mixture from burning. Adjust seasonings and serve with extra butter on top. Serves 4-6.
Blueberry Liqueur

Blueberry Liqueur
I always stock up on blueberries when they are in season. I end up with a lot of frozen berries to enjoy throughout the year. I was cleaning out the freezer and decided to use some of my frozen berries to make blueberry liqueur.
What can I say? It’s been unseasonably cold and I needed something to remind me of warmer days. Not that I need an excuse to make blueberry liqueur.
I made two different ones, actually. One is unsweetened- just blueberries, vodka, lemon zest and a clove. It is sometimes called an eau de vie- French for water of life- or just blueberry vodka.
The other is sweetened a little with a sugar syrup- but you could use honey. That is called blueberry liqueur or blueberry cordial. Both are wonderful. The color is so pretty and they can be sipped, as is, or used in cocktails. You can use blackberries, too, if you prefer.
It may be cold and snowy outside, but a glass of blueberry liqueur will warm you right up.
Blueberry Liqueur
4-c. fresh or frozen blueberries
Sliced and scraped peel of one lemon, optional
1 clove, optional
3-c. vodka or 2 c. vodka and 1 c. brandy
1 c. sugar syrup, optional, recipe follows
Lightly crush berries with a fork. Combine with peels and clove and vodka and steep 3 months. Strain and filter and add sugar syrup. Mature 4-6 weeks.
Sugar Syrup
Simple syrup is made from 1 cup of sugar and ½ cup of water. Bring to a boil, then cool. You will have 1 cup of syrup. Some recipes call for plain sugar and others for honey. Watch when you substitute honey for sugar, as it is sweeter and stronger flavored. Better to use orange or clover honey.
Irish Soda Bread Scones

Irish Soda Bread Scones
If you are in the mood for the flavor of Irish Soda Bread- you can get the same wonderful experience in a scone. I made a batch of these scones this morning. Perfect with some recently made strawberry jam and a fresh cup of tea. Now, if I only had some Devonshire clotted cream.
I will admit that most mornings, breakfast is a bowl of oat bran. Scones are so much more fun. They don’t take a lot of time to make, either. These would be a great addition to your St. Patrick’s Day meal. While traditionally served for breakfast or tea time, scones are really good any time of the day.
I used golden raisins, but you could use regular raisins, currants, or even leave them out.
Irish Soda Bread Scones
2 c. flour
3 T. sugar
2 t. baking powder
1 t. baking soda
½ t. salt
1/3 c. butter
½ c. golden raisins
1 t. caraway seeds
2/3 c. buttermilk
1 egg
Milk
Extra sugar for sprinkling
Preheat oven to 425 degrees and lightly grease a baking sheet. Combine dry ingredients in medium bowl and cut in butter to resemble coarse crumbs. Stir in raisins and caraway seeds. Beat together buttermilk and egg and add to flour mixture, stirring with fork until mixture just coming together. Turn onto floured surface and knead 5-6 strokes or until ball of dough holds together. Dust an 8-inch round cake with flour. Press dough into cake pan. Invert pan over onto prepared baking sheet. I find if I do this quickly the dough comes out more easily. Remove cake pan. This will give you a perfect 8-inch circle of dough. With a sharp, floured knife cut dough into 8 wedges. Brush top with milk and sprinkle with extra sugar. Bake 14-16 minutes. Makes 8.
Reuben Strata

Reuben Strata
If you need a new recipe for corned beef- I would suggest making this strata. It contains all the ingredients found in a traditional Reuben sandwich, but with a twist. These “Reubens” are baked, after being soaked in an egg custard.
The dish is assembled at least a few hours before baking, so you can make it the day before, or in the morning. Just pop in the oven about an hour before you want to serve it.
Strata just means layers. Ingredients are layered before pouring over an egg/milk mixture. These layers add flavor to the final dish. In this strata, layers include rye bread, Swiss cheese, corned beef, sauerkraut and thousand island dressing. Of course, you can play around with the ingredients you use. If you don’t like sauerkraut, you can leave it out- or only put in on some of the sandwiches. Strata can be served for breakfast, brunch, lunch or dinner.
I used very thinly sliced corned beef from the deli. You can also use home-cooked corned beef. Just dice it or shred it up. I also used homemade Thousand Island dressing, but use what you like. You can also serve extra dressing on the side.
Reuben Strata
12 slices rye bread
6 slices Swiss cheese
12 oz. thinned sliced corned beef- or 2 cups chopped corned beef
1 c. sauerkraut, squeezed dry
½ c. Thousand Island dressing*
3 eggs
2 c. milk
½ t. salt
½ t. hot pepper sauce, or to taste
Lightly grease a 9×13-inch baking dish. Place six slices of bread on bottom of the dish. You might have to trim the bread to fit. Top each slice of bread with a slice of cheese. Top cheese with the corned beef and sauerkraut. You can use a little more or less sauerkraut, depending on your taste. Spoon about a tablespoon of the dressing over each “sandwich”. Top with remaining six slices of bread, trimmed to fit pan, if needed. Combine remaining ingredients and pour over sandwiches. Cover dish and let stand in the fridge, several hours or overnight. Bake, uncovered, in a 350-degree oven for 40-45 minutes, or until puffed and set. Let sit a few minutes before serving. Serves 6.
*Homemade Thousand Island Dressing is just equal parts of sweet pickle relish, ketchup and mayo. You can make your own pretty easily.
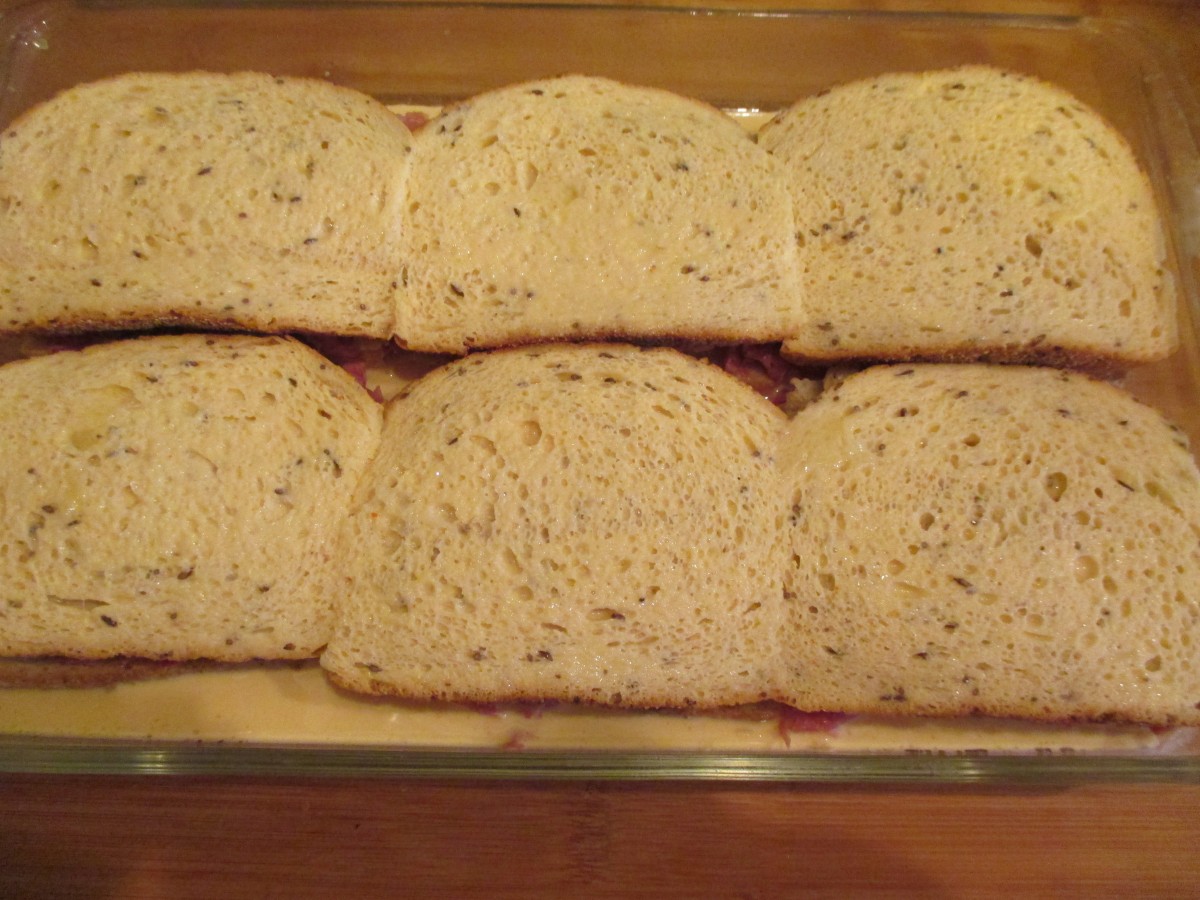
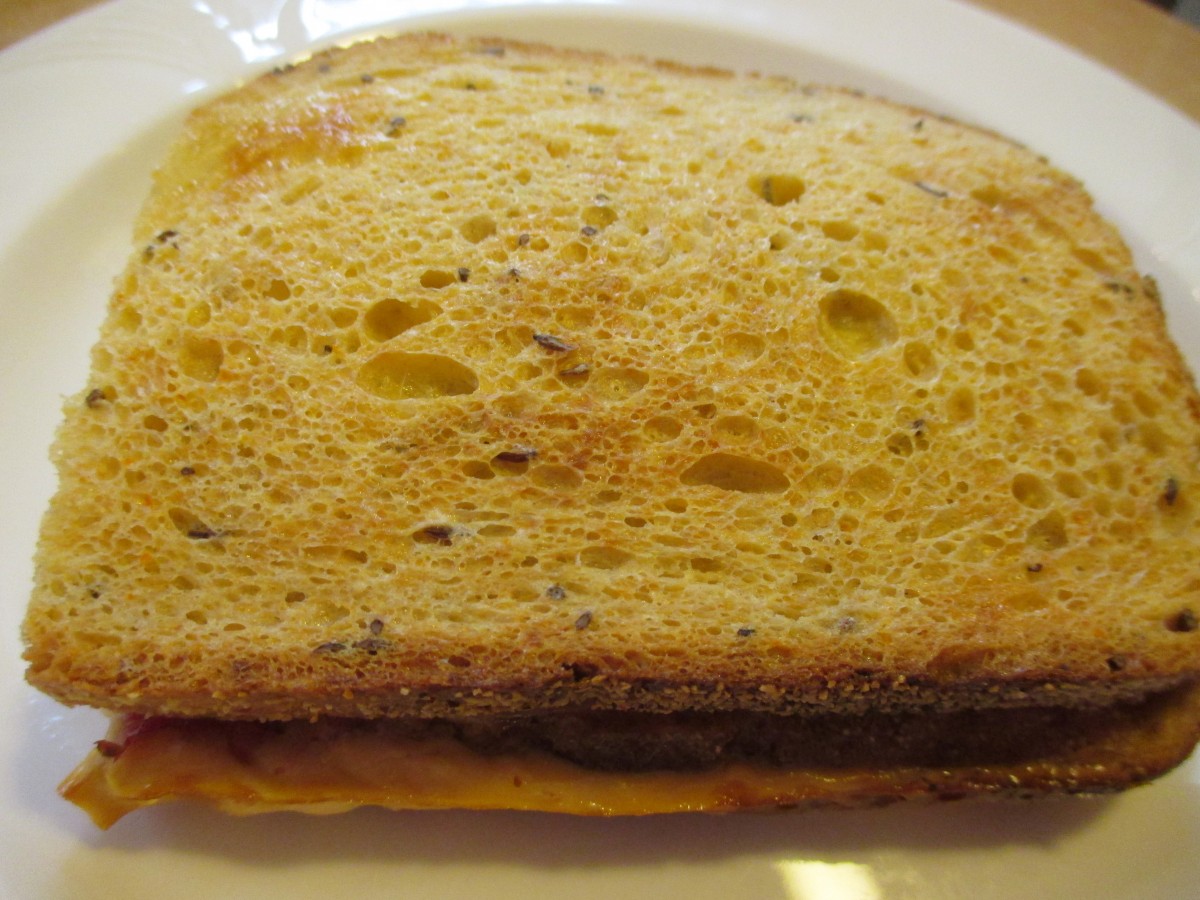
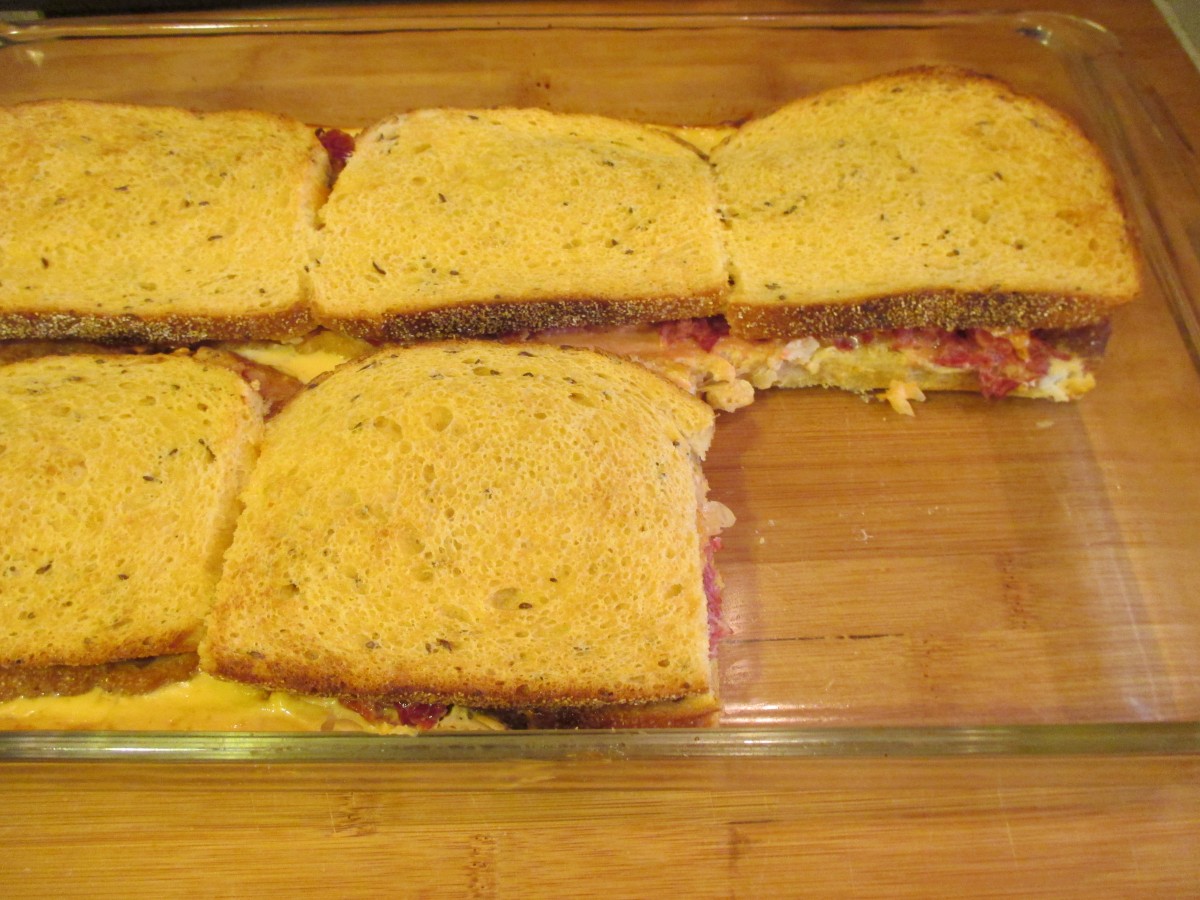
Strata, before baking
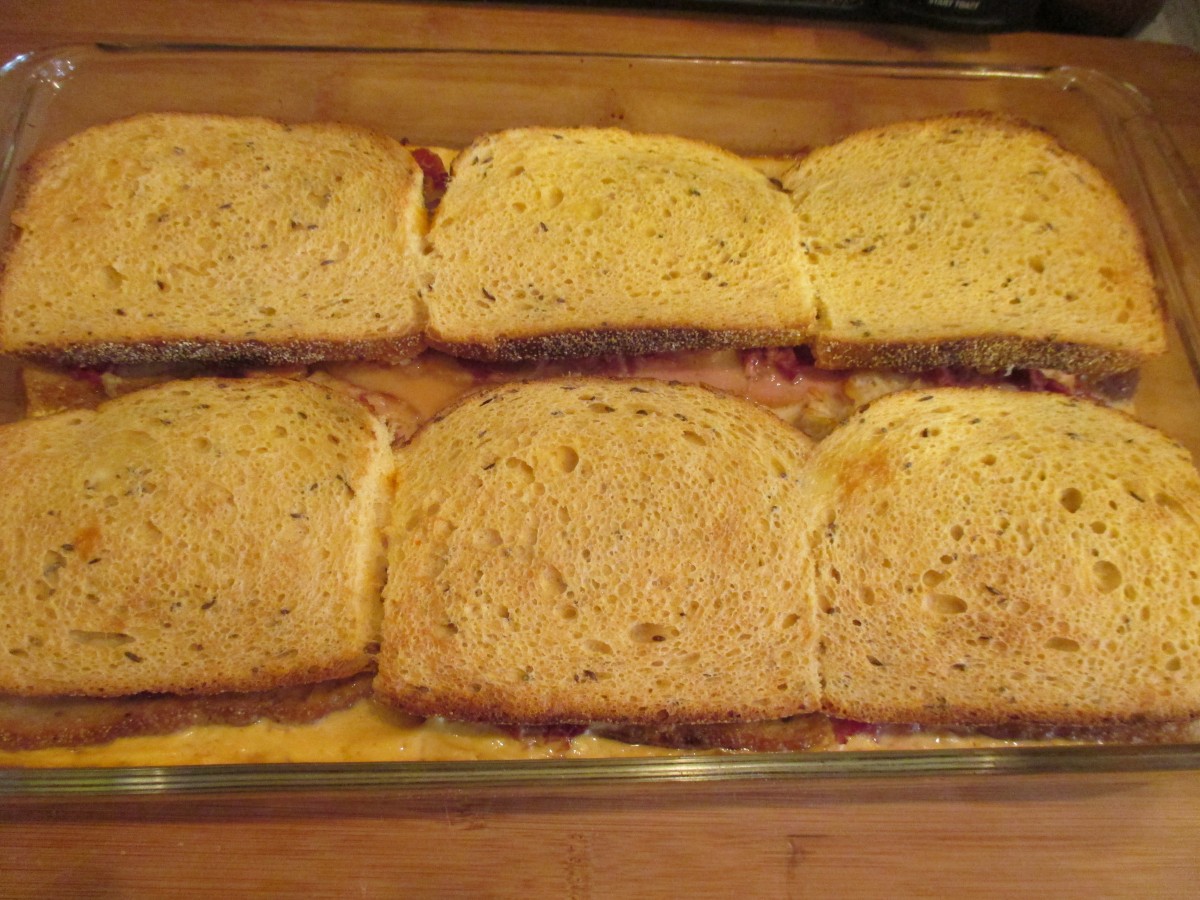
Right out of the oven
“Pi” Day Blueberry Pie
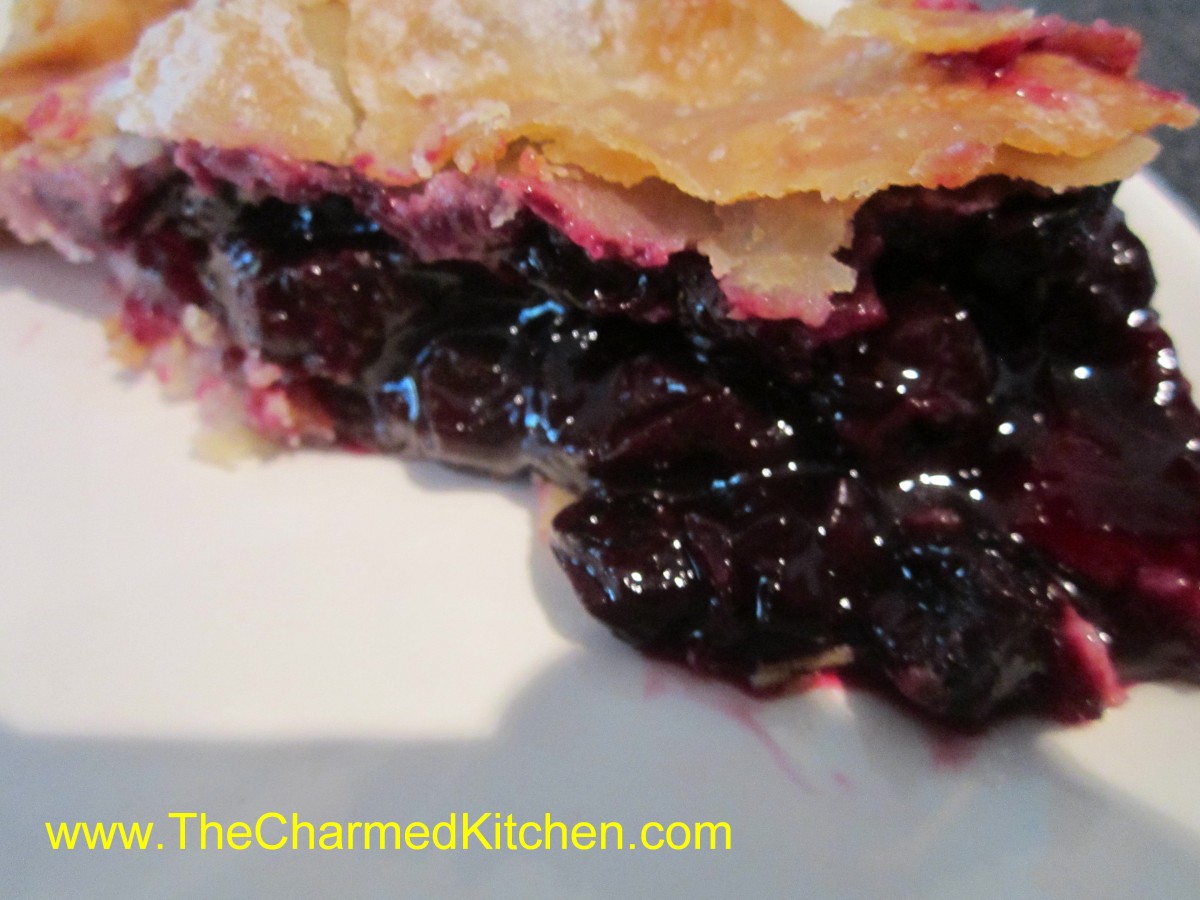
Blueberry Pie
March 14th is sometimes referred to as Pi day. It’s a math nerd kind of thing. 3.14 being the value of pi and March 14 is 3/14. I was explaining it to a friend last night. My friend’s response was that ANY day was Pie Day!! I had some blueberries in the freezer and decided maybe today was Pie Day after all.
You could certainly use fresh berries for this pie, but frozen was what I had. Also, since it is a snowy day today, baking a pie seemed like a nice way to spend the morning. My friend is home from work today. I think she will be happy when I invite her over to have some “Pi” Day blueberry pie. It is time to put on a pot of coffee, and make a call.
Blueberry Pie
Pastry for 2 crust pie- recipe- The crust recipe I used is at the bottom of the page
2 ½ T. cornstarch
1 c. sugar
3 c. fresh or frozen blueberries
1 T. lemon juice
1 T. butter
1 T. sugar, for sprinkling
Roll out half of the crust and place in 8 or 9-inch pie pan. You can roll out the top crust ahead of time, or even cut into strips for a lattice top. Cover remaining crust to keep it from drying out. In medium bowl mix cornstarch and sugar. Toss in berries and then sprinkle in the lemon juice. Allow to stand 15 minutes. If berries were frozen be sure they are not clumped together. Spoon mixture into prepared crust and dot with the butter. Top with the second crust or place strips on in a lattice design. If using a whole crust cut in decorative slits for ventilation. I used a tiny heart-shaped cutter for my pie. Moisten then crimp edges and shape decoratively or use a fork to seal. Place pie in lower half of hot oven. Bake in a preheated 425-degree oven for 15 minutes. Reduce heat to 375 and bake an additional 40-50 minutes or until crust is brown and juices begin to bubble through the slits. Cool a little before serving.
Flaky Pie Crust
2 c. flour
1 t. salt
3/4 c. butter, chilled – you can use coconut oil, lard or shortening
1 T. cider vinegar
4-5 T. cold water
Combine flour and salt and cut in butter. Toss in vinegar and water 1 tablespoon at a time until dough holds together. Use a fork to toss the ingredients together and as soon as the mixture holds together stop adding water. Makes 2. Chill well before using.
Sous Vide Roast Beef

Sous Vide Roast Beef
A while back I was given an immersion circulator, sometimes known as a sous vide immersion circulator. They are used to cook food at very exact temperatures. It is a kitchen tool that is becoming more popular, but still unknown to a lot of people. They can be expensive, although I have friends who have made their own, with some success.
So why would you want to use/invest in one and how exactly is the food cooked?
Sous vide involves cooking your food in a bag, submerged in water. I know that doesn’t initially sound all that appealing, but it is pretty cool and has some advantages.
Have you ever fretted about overcooking a really expensive cut of meat? Or do you have trouble with the ends getting too done before the middle is cooked?
In an immersion circulator you set the temperature that the water will be. If you like rare beef, you would set the temp at around 135 degrees F (60 Celsius). That means the water would maintain a temp of 135 degrees. When you put the meat in the circulator it can’t overcook. It will only get to a max of 135 degrees, or whatever temperature you like. The meat can’t overcook, even if you leave it in for several hours. It also will be the same from one end the the other. This also gives you the opportunity to cook less expensive cuts of meats for long periods, making them tender, but still rare.
The machine is attached to a pot that is filled with water. Once you set it to the temperature you want, you place the bag with the meat in it, in the water. Set the timer and let the circulator do its job.
Now, the one disadvantage is that the meat will not get that nice sear on the outside that comes from more traditional methods of cooking. To remedy that, you remove the meat from the bag, once it has cooked and place in a smoking hot skillet. I like to use a cast iron pan for this. You brown the meat over high heat, turning it often until it looks the way you want it to look. I did a roast, but you can do steaks and chops this way, too.
So for my boneless rib roast, which weighed about 3 pounds, I placed it in the circulator for 3 hours. I seasoned the meat with salt, pepper and garlic. I used a freezer Ziploc bag. I made sure I got as much air out of the bag as I could, and made sure it was sealed. Once the time was up I took the roast out, heated up my skillet and using two wooden spoons, I turned the meat over in the pan to brown the sides. I let it rest about 15 minutes before slicing. The meat was perfectly pink throughout. Tender and very juicy, too.
Unlike poaching, the meat is never in contact with the water, so all the flavor stays in the meat.
There are groups on Facebook that discuss and share sous vide cooking. I am no expert. I just wanted to try cooking my roast this way. I was very happy with the result. I can’t say whether an immersion circulator is a good investment for you or not. I will say that I love mine and will be using it again.
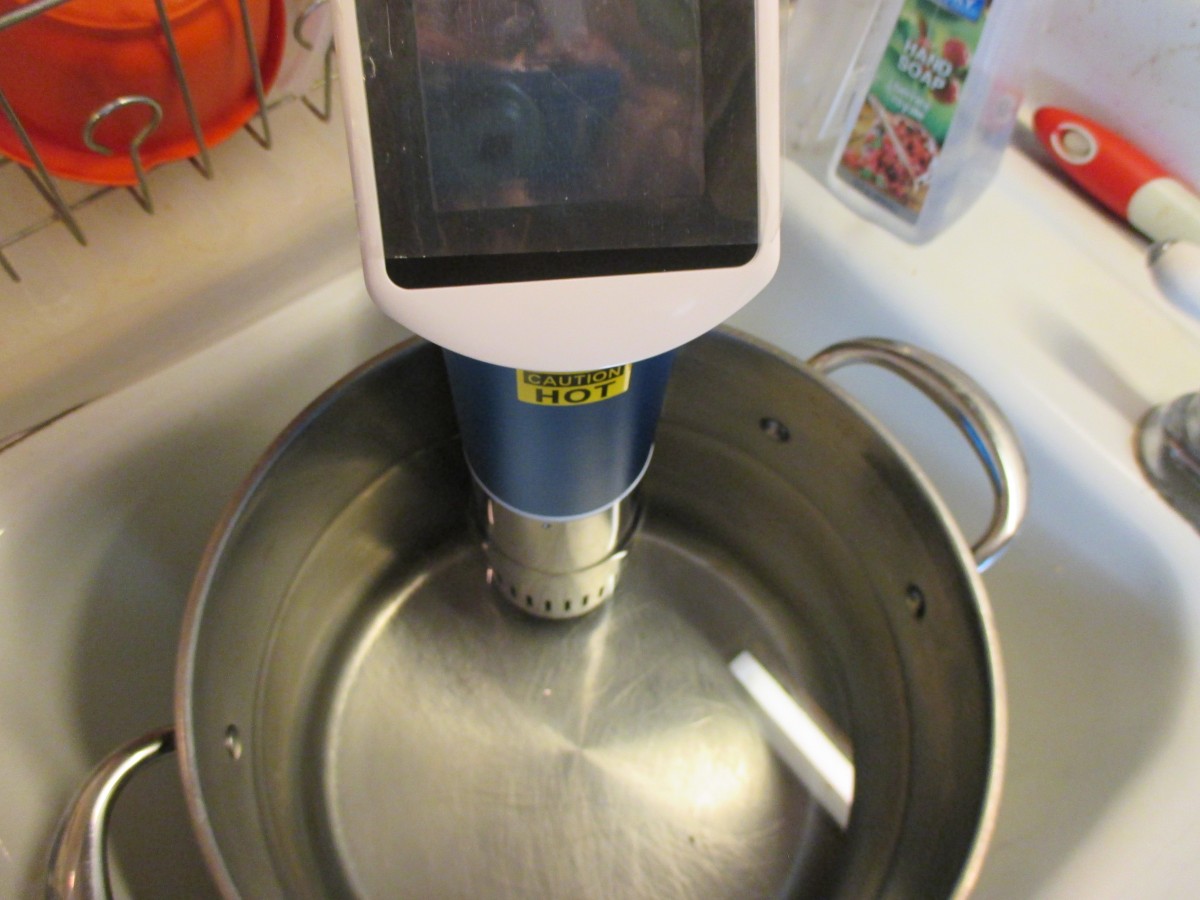
Circulator in a pot of water- ready to use. I kept mine in the sink.
Fresh Fish Chowder

Fresh Fish Chowder
When I think of seafood chowder, I usually think about a creamy mix of some sort of shellfish, like clams or shrimp, with assorted veggies. This chowder is a little different. It is a mix of fish and veggies, but there is no dairy or shellfish. Almost like a Manhattan style clam chowder, minus the clams!! It is a nice alternative to those who can’t eat shellfish, but still want to enjoy a bowl of chowder. The chowder is both hearty and light at the same time, if that makes sense.
You can use any mild fish you happen to like. I have used salmon, catfish, cod and flounder in the past, and liked the way all of them tasted in the chowder. The recipe calls for Roma tomatoes, but any tomatoes would work. I used a pint of my home canned tomatoes, since I don’t have fresh this time of year.
Fresh Fish Chowder
1 medium carrot, sliced
2 ribs celery, diced
2 medium potatoes, peeled and sliced
1 large leek, white part only, cleaned and chopped
5 c. chicken, vegetable or fish stock
2 c. plum tomatoes, chopped
Salt and pepper to taste
1 1/2 lb. firm white fish cut into 1/2 inch cubes – I used flounder
1/4 c. flour
1/2 t. paprika
2 T. oil
In broth cook the carrot, celery and leeks 10 minutes. Add tomatoes and potatoes and simmer, covered, for 15 minutes longer. Season to taste. Meanwhile mix the flour and paprika together and dredge the fish in it. Heat oil in a skillet over medium high heat and cook the fish until lightly browned on both sides. Drain on paper towels. Before serving add fish pieces to the soup and simmer 5 minutes. Serve with crusty bread. Serves 6.
Ham and Swiss Quiche

Ham and Swiss Quiche
Quiches are so versatile. You can fill them with almost any ingredients. They can also be served for breakfast, brunch, lunch or dinner. You can also bake it right away, or freeze it for later. I often make two quiches, just so I can freeze one for later use.
This is one of my favorite quiche recipes. The mix of ham and Swiss cheese works well together. The thing with ham, is there always seems to be so much of it. If you have ham for a holiday meal, there are a lot of leftovers. This is a fun and tasty way to use some of the ham.
I use a homemade crust, but you can use a store bought crust, if you prefer.
Ham and Swiss Quiche
1 (9-inch) unbaked pie crust
1½ c. shredded Swiss or Gruyere Cheese
4 t. flour
1 c. diced cooked ham or turkey ham
3 eggs
1 c. milk or half-half or evaporated milk
2 T. fresh chopped parsley or 2 teaspoons dried
¼ t. salt
¼ t. dry mustard
Dash of hot sauce
Toss cheese with flour in a bowl and place in pie crust. Sprinkle the ham over the cheese and set aside. Combine remaining ingredients in a small bowl beating well to combine. Pour over the ham and cheese mixture and bake in a preheated 400-degree oven for 15 minutes. Turn down heat to 350-degrees and bake until knife inserted off-center comes out clean, about 30 minutes more. Makes 1
Note: This quiche freezes well. After adding the fillings just wrap in heavy foil and freeze solid until ready to bake. When ready to bake unwrap and allow to sit at room temperature for 30-60 minutes. Bake as with the fresh version, but add another 10-15 minutes to the baking time. If you don’t want to freeze the pie pan, you can line the pie pan with foil before you add the crust. Once it is frozen you can remove the frozen quiche from the pie pan and wrap, returning to freezer. When ready to use unwrap and put the quiche back in the pie pan before baking.
You can also use a foil pie pan.


