Crab Rangoons

These tasty bundles of crabby/ cheesy goodness are so simple to make. Because they are small- I don’t use a lot of oil to deep fry them. Just a couple of cups of oil in a small saucepan- fry a few at a time and you are done in no time at all. Of course, if you have a big crowd over, you might want to use a bigger pot, with more oil. A wok works well for frying them, too. I just had some with friends at a local restaurant and they were so good. It reminded me of how good they can be.
There are two ways you can go with the filling- real crab or surimi, the faux crab. That is not my call to make. It is up to you. I prefer real crab meat. I made some for friends a while back. Several people remarked on how much they liked the flavor. I explained that most crab rangoons you get at restaurants use surimi.
I have baked them. You can. I fried them.
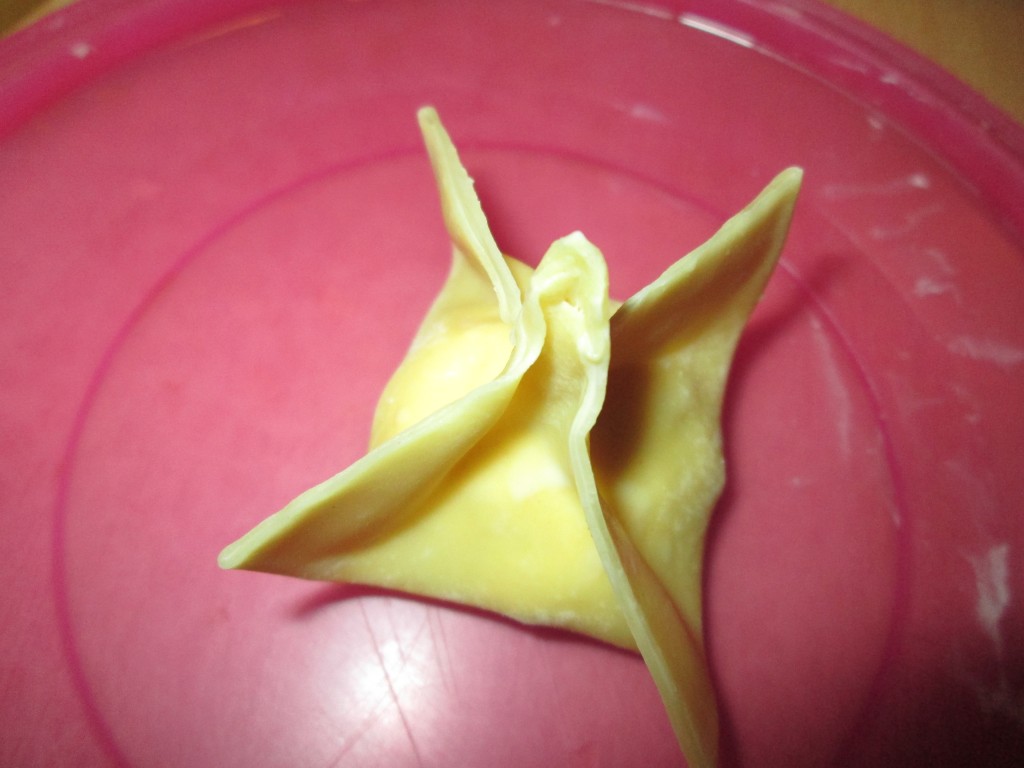
You have some options with folding them. I used pre-made wrappers I bought at the local Asian market. You can fold them into triangles, like the picture above, or into little bundles like the picture at the end of this post. They taste wonderful no matter how you shape them.
So here is the recipe I like to use.
Crab Rangoons
1 can (6 oz.) crab meat, drained well
1 (8 oz.) package cream cheese
1 t. horseradish
dash of hot sauce
wonton wrappers
oil for frying
Combine crab meat with cream cheese, horseradish and hot sauce. Place a wonton wrapper on work surface and place a teaspoonful of the crab filling in the middle. You have several option for how to fold them. You can do a simple fold by dampening the edges with a small amount of water, adding some of the crab mixture to the middle and folding in half, press edges to seal or crimp edges. This works great with round wrappers, but square wrappers can also be used. For the classic bundle shape, dampen the edges with a little water. Bring 2 opposite corners together and press so they stick. Bring the other two corners up and do the same thing. Press any gaps together. See picture below. You will have a little bundle. You can also make them into tiny rolls, like a mini spring rolls. To do that fold 2 corners in to just touch. Take one of the remaining corners and roll up into a tiny roll. Dampen edge with a little water to affix. Repeat with remaining filling. You should get a several dozen. Pour 1-inch of oil into a small saucepan and heat to 350 degrees. Fry rangoons a few at a time until golden and drain on paper toweling. Keep warm in 300-degree oven until ready to serve- but best served right after you make them. Serve with Sweet and Sour Sauce.
Note: If you don’t want to fry them, you can also bake the rangoons until crisp, about 8 minutes at 425 degrees.
Wonton Soup
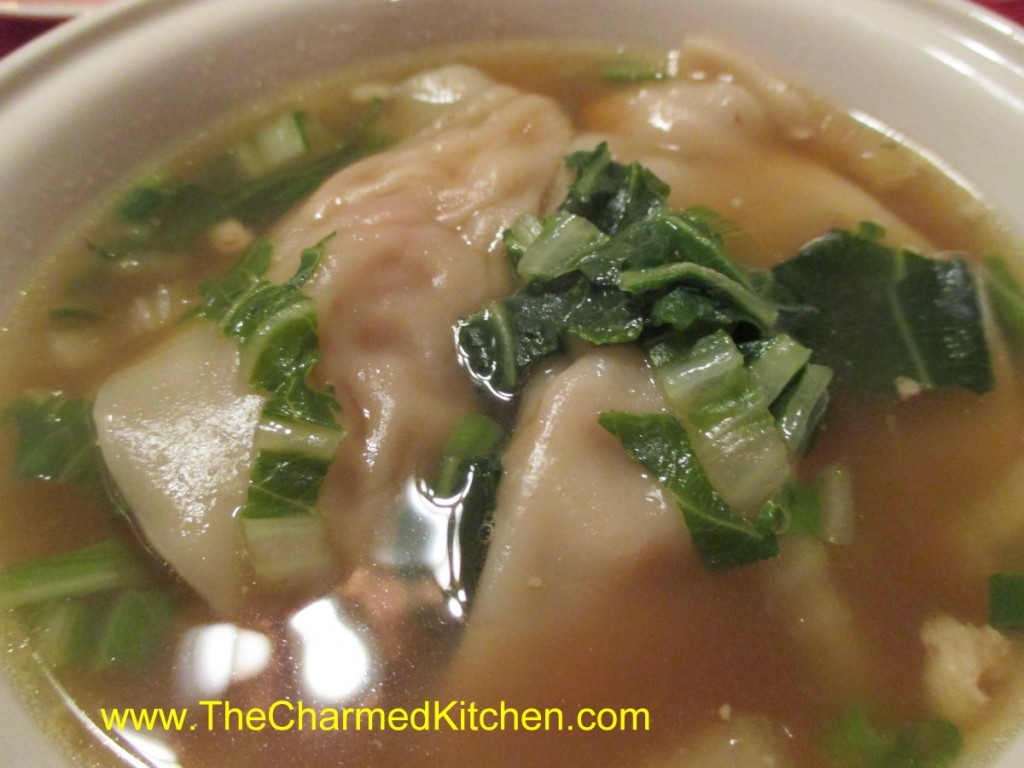
For me, Wonton soup always brings back memories of going out for Chinese food with my family, when I was a kid. The restaurant would serve it family style, and my mom or dad would ladle out everyone’s soup. It always looked and smelled wonderful. Tasted wonderful, too. Even more special, because we only had it when we out to dinner.
The one problem I find when trying to make this soup at home is finding wonton wrappers that are thick enough. The square ones I find at the neighborhood grocery store are OK, but thinner than the ones in Wonton Soup at a restaurant. At a local Asian grocery I have found round wrappers that are labelled for dumplings and are thicker. That is what I used. They worked out better. You can play around with fillings. I often add shrimp as both a filling, and to the soup itself.
Wonton Soup
1½ lb. chicken
1 head bok choy, or 4-5 baby bok choy
3 T. hoisen sauce
1 clove garlic, minced
24 won ton wrappers
2 qts. chicken stock
1 t. ginger
1 t. hot pepper sauce
Chopped green onions
Sesame oil
Bake the chicken until cooked. I used boneless chicken thighs, but even leftover roasted chicken would work. You can also used pork. Once cooled, I minced enough of the chicken to give me 1 cup of meat. The rest I cut into thin strips. I then took stems from the bok choy and minced enough of them to make 1 cup. Combine the minced chicken with minced bok choy, the hoisen and the garlic. This is the filling for your wontons. Slice more of the bok choy- using mainly the leaves, into thin shreds. This will go into the soup later, along with the strips of chicken. You should have at least a couple of cups of the shredded bok choy, but more is OK, too. To make the wontons place one on your work surface and spoon a rounded teaspoon of the filling into the middle of it. Moisten edge with water, fold in half and press to seal. I used round wrappers, but square wrappers are fine, too. Repeat with remaining wontons and fillings until done. Bring stock to a boil and add the ginger and hot sauce. Add the wontons to the simmering stock. Simmer gently for 3-4 minutes, stirring occasionally, then add the strips of chicken and the shredded bok choy greens. Cook about 5-6 minutes longer. Finish soup with chopped green onions and a drizzle of sesame oil. Serves 6-8
Cooking with Jade/Egg Tofu

What is jade tofu? The simplest way to describe it, is that jade tofu is a custard, made with soy milk and eggs. It is also known as egg tofu or Japanese egg tofu.
If you have had any sort of custard before, you know the texture- smooth, creamy, tender. Jade tofu is creamy and soft. But it is not like the custard you might have had in the past. In the west, custard is sweet, a dessert. That is the big difference here. Jade tofu is not sweet. Although, I could see it being used in sweet applications.
I first had jade tofu at a local Asian restaurant. It was in a dish with fried fish in a light, thickened sauce. Wow, I loved it. So did friends. I looked it up and even tried to make it once. It did not go well.
So on the advice of a couple of friends, I looked for it at an Asian grocery store. There it was!!! I was so happy. Now I could enjoy jade tofu whenever I wanted.
Jade tofu is sold in tubes. Kind of like slice and bake cookies. I first just pan fried the slices and served it with a dipping sauce. They sort of look like scallops on the plate. The texture is what it is all about, crisp on the outside and creamy in the middle. It makes a nice appetizer served that way.
You can just slice, season with salt and pepper and pan fry, or season, then coat with rice flour or cornstarch before frying. I like the crust you get when using cornstarch or rice flour.
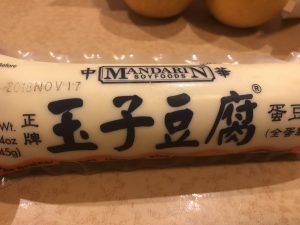
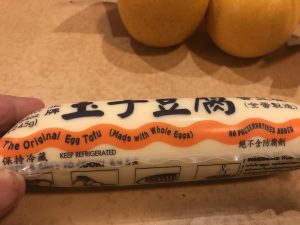
This is the brand that my store carries. I like that the soy milk is non-GMO.
Honestly, the flavor of jade tofu is pretty neutral. You add it to other ingredients to get flavor. It is a texture element in your dish.
I’ve served it to friends a couple of times now, to good reviews. I even made it the other night with fish, like at the restaurant. It came out really good. I used catfish, which was what I had. Other fish would certainly work, too.
Here is that recipe
Catfish with Jade Tofu
oil- I used avocado oil
1 tube egg tofu, sliced
salt and pepper
1 pound catfish, cut into 2 oz. portions
cornstarch
1 c. stock- I used shrimp stock, but chicken, fish or vegetable stock would work
soy sauce- to taste
2 green onions, sliced
Heat a couple of tablespoons of oil in a skillet. Add the tofu and fry until golden brown on both sides. Remove from pan. Add a little more oil, if needed. Season the fish with salt and pepper, then dredge in cornstarch to coat. Fry in skillet until cooked. Add stock to the fish along with the green onions. Stir until sauce thickens. Return tofu to the pan. Adjust seasonings and serve.

For the pan fried versions, I just sliced the tofu and browned it in oil, in a medium-hot skillet. They are tender, so turn gently. You don’t want to break them. For added texture, I sometimes dust the tofu with rice flour or cornstarch before frying.

Cashew “Cheese”

With my vegan goddaughter and her boyfriend coming for a visit, I wanted to try out a new recipe. I had decided on making a cashew “cheese”. Of course, this isn’t an actual cheese. There is no dairy in it. Its a mixture of soaked, raw cashews, nutritional yeast, almond milk and a few more ingredients. Its a nice alternative for anyone who does not or cannot consume dairy products.
There were plenty of recipes out there and I ended up with a recipe that was a mix of several of the ones I came across. The final product can be used as a “cheese” sauce or dip, depending on how thick or thin you make it. Its very easy to make. The longest part of prep is soaking the cashews in water before blending.
We made it in class the other night. For Gwen and Brian, we spooned it over vegan enchiladas and brown rice. They loved it. I have made it with almond milk, but also tried it with oat milk. Any non-dairy milk can be used. You can use less than the recipe calls for if you want a thicker consistency. Add more “milk” if you want a runnier sauce. I found the oat milk made a thicker “cheese” than almond milk.
So here is the recipe. Enjoy!!
Cashew “Cheese”
1½ cups raw cashews
3-4 garlic cloves
1/4 cup nutritional yeast
1 cup unsweetened almond or oat milk, plus more to thin if necessary
1 jalapeno, chopped (feel free to de-seed or leave out if sensitive to spice) I love what it adds
1 teaspoon ground turmeric
1 teaspoon paprika
1 t. smoked paprika
1 teaspoon onion powder
1 teaspoon Dijon mustard
1 teaspoon salt, to taste
Freshly ground black pepper
Soak the cashews in 4 cups of water for at least 2 hours; otherwise I’ve found that you can easily speed up the process by adding the raw cashews to a pot with water and placing over high heat. Bring water to a boil, then immediately turn off the heat; let the cashews sit for 30-45 minutes in the warm water, then drain. Add drained cashews with remaining ingredients to a blender. Blend until a thick sauce comes together. If you want a thinner sauce, add a bit more almond milk. Taste and adjust seasonings as necessary. Enjoy! Serves 6-8, depending on how you use it.

Chili Bean Spoon Bread -Vegetarian

This is a great dish when you want to go meat free, but still have a hearty meal. It combines the flavors of chili with a cornbread topper. A classic combination, for sure. We made this in class a few days ago. It was such a great dish to serve on a very cold night.
The base is a lentil chili that you place in a casserole dish, then top with a cornbread batter. The dish is finished off in the oven until the cornbread is baked.
To serve, spoon some of the cornbread onto your plate and top with the lentil chili. I have made it for friends and it is always a big hit, even for the meat eaters. Perfect to warm you up on a chilly day.
You can serve this as a vegetarian main dish, or as a side dish.
Chili Bean Spoon Bread
1/2 lb. lentils
pinch of ground cloves
2 c. milk
1/2 t. salt
2/3 c. cornmeal
4 T. butter
4 eggs
4 T. oil
2 large onions, chopped
1 clove minced garlic
1 T. chopped parsley or 1 t. parsley flakes
1 T. chili powder
1 t. ground cumin
1 (14 oz.) can diced tomatoes, undrained
salt and pepper to taste
In saucepan cover lentils with about 2 cups water and add cloves. Bring to a boil, turn down to a simmer and cook, covered, until lentils are tender, about 20 minutes. You may need to add a little more water. Meanwhile in another saucepan heat milk and salt almost to boiling. Stir in cornmeal and continue cooking, stirring constantly until thickened. Remove from heat. Stir in butter and eggs and set aside. In oil sauté onions and garlic until tender. Add seasonings, tomatoes and lentils and heat until bubbly. Adjust seasonings. Pour lentil mixture into greased 2-quart casserole dish. Spoon over the cornmeal mixture. Set casserole dish in larger pan and add 1 inch of hot water to larger pan. Bake in a 350-degree oven for 30-40 minutes, or until bread is firm and golden. Serves 4-6.
Basque Soup- Vegetarian

This soup has a hearty and rich flavored. We made it in a vegetarian cooking class the other night. In class we used oil and almond milk, so the soup was vegan. You could use milk and butter, if you prefer. It tastes great, either way. It also comes together quickly, with ingredients you can keep on hand, so it is a great homemade soup when you don’t have a lot of time. The combination of milk, tomatoes and corn also makes it a pretty dish to serve. I used a jar of my home canned tomatoes.
While the soup calls for canned butter beans, you can also cook up dry beans and add them to the soup after cooking them. If using dry beans, cook 1 pound of dry beans.
Basque Soup
1 c. chopped onions
1 1/2 c. chopped celery
1/4 c. oil or butter
1/4 c. flour
3 c. milk*
1 (16 oz.) jar stewed tomatoes, undrained
1 can whole kernel corn, undrained- I often use frozen corn
3-4 cans butter beans, drained and rinsed
3-4 cups water and 1T. paste-type vegetable soup base
or 3-4 cups vegetable broth
pepper to taste
hot pepper sauce to taste
shredded mild cheese, optional
Sauté onions and celery in oil until tender. Stir in flour until smooth and add milk, stirring to keep lumps from forming. Stir over medium heat until milk has thickened and begins to boil. Stir constantly as mixture simmers for an additional minute or two. Add remaining ingredients, except cheese and bring up to a simmer. Adjust seasonings. Ladle into bowls and top with cheese, if desired. Serves 8-10.
Note: You can use almond, rice, oat, coconut or soy milk in place of the dairy milk, if you like.
Curried Mixed Vegetables

On a cold winter day, a bowl of curried veggies can really warm you up. There is something about curried dishes that always feel like comfort food to me. The flavor and fragrance of curry always warms me up. It was very cold last night when we made this dish in cooking class. Seemed like a great night to make these veggies.
This dish is really a simple one to make. Saute some veggies, then added curry powder and let them all cook together until the veggies get tender. I wouldn’t call it a stew- there is no added liquid, sauce or gravy. Feel free to use the veggies you have around. I use what I have and what I like.
Curry is one of those flavors people seem to love or hate. I am a curry lover. Curry is a blend of spices, so it may vary from one recipe to the next. Depending on the ingredients used, curry can be mild (sweet) or hot. You can buy curry powder at most grocery stores, but the selection will be better at stores that carry international foods. I actually prefer to make my own curry powder. That way I can adjust the seasonings to my taste preference. A recipe for homemade curry powder follows the recipe for the curried veggies.
This dish can be a side dish, a main dish, served on its own or spooned over rice or pasta.
Here is the recipe. Hope you give it a try.
Curried Mixed Vegetables
2 T. oil
1 large onion, cut into chunks
2 cloves garlic, minced
2 medium carrots, peeled and cut in thick slices
2 ribs celery, cut into chunks
4 c. cauliflower, broken into flowerets
1 medium sweet potato, peeled and cut into chunks
2 sweet peppers, any color, seeded and cubed
salt to taste
1T. curry powder, or more to taste
¼ t. cloves
Heat oil in skillet. Add onions and cook until tender. Add next four ingredients and cook until tender, about 15-20 minutes. Add remaining ingredients and cook, covered until vegetables are tender, about 10-15 minutes. Adjust seasonings to taste. Serve as a side dish or over pasta or rice. Serves 6-8.
Curry Powder
2 t. ground cumin
2 t. ground coriander
2 t. ground turmeric
1 t. nutmeg
1 t. salt
½ t. cinnamon
¼ t. cayenne pepper
¼ t. ground black pepper
Combine all ingredients and store in a cool dry place.
“Chili” Stew

This is a great dish when time is short. Also nice to enjoy when the weather is cold. It is fast to make and still has plenty of flavor. It falls somewhere between a chili and a stew, so that is where the name came from. I like it because it can be made from so many ingredients I already have in my pantry/freezer. This is a fun dish to serve for Super Bowl Sunday!!
Can be served as is, or topped with cheese, sour cream or chopped onions. Perfect dinner for a “chili” night.
Chili Stew
1 pound ground beef or turkey
1 medium onion, chopped
1 small sweet pepper, chopped
1 (15 ounce) can black beans
2 (16 ounce) cans kidney beans, rinsed and drained
2 c. corn, fresh, frozen or canned (drained)
1 (14.5 ounce) can diced tomatoes
1 (8 ounce) can tomato sauce
1 (4 ounce) can chopped green chilies
1 envelope taco seasoning
2 tablespoons chili powder
1/2 teaspoon salt
In a Dutch oven or large saucepan, cook the meat, onion and pepper over medium heat until meat is no longer pink; drain. Stir in remaining ingredients. Bring to a boil. Reduce heat; simmer, uncovered, for 15 minutes, stirring occasionally. You can cook it even longer, if you like. Serves 4-5.
Coconut Chocolate “Snowballs”

I have wonderful memories of my Aunt Josie making these for every family gathering. Aunt Josie cut the cake into squares. They were all perfectly even. I asked her how she did that. She told me that she used her cooling racks to get the lines even. She would set the cooling racks on her cake and use the wires as guides. So clever.
I never could seem to get them even, so I bake my cake in cupcake tins and call then snowballs. Whatever the shape, these little cakes are a favorite treat in my family.
In bakeries, you’ll find them in squares or rectangles. She shared her recipe with me a long time ago, and I am sharing it with you.
You can bake the batter in mini muffin pans or standard muffin pans. It just depends on what size you want your snowballs to be. After the cupcakes are baked, freeze them. The frozen cakes are dipped in a chocolate sauce and then rolled in desiccated coconut.
Desiccated coconut is dried and unsweetened. It looks like coarse, white bread crumbs. You can find it in stores that carry baking supplies and at Asian markets. It is the same kind of coconut used to make coconut shrimp.
Here is the recipe for making the “snowballs”. The recipe for the cupcakes is listed below, as well. I just doubled my classic white cupcake recipe, but you could use a box mix, if you prefer.
Aunt Josie’s Coconut Cake Squares aka “Snowballs”
1 white cake, prepared and frozen solid* or cupcakes
Chocolate Sauce
1 c. unsweetened cocoa
1 1/4 c. sugar
2 c. water
1 t. vanilla
1 c. desiccated coconut (available at cake supply stores and some health food stores)
Cut cake into small squares, or cake can be baked in regular or mini cupcake tins. Freeze until ready to use. Meanwhile, make the chocolate dipping sauce. Combine remaining ingredients, except coconut, in a medium saucepan. Bring to a boil then simmer 5 minutes. Remove from heat and cool completely.
Using toothpicks or fondue forks, dip frozen cake in sauce let drain a few seconds, then roll in the coconut. Can be enjoyed right away or frozen again for later use.
*If you make a box cake in muffin tins you’ll get 24 cupcakes or about 60 mini cupcakes. The recipe below will yield half that amount.
Classic White Cupcakes
1 cup sugar
1/2 cup butter
2 eggs
2 teaspoons vanilla extract
1 1/2 cups all-purpose flour
1 3/4 teaspoons baking powder
1/2 cup milk
Preheat oven to 350 degrees. Line a muffin pan with 12paper liners. In a medium bowl, cream together the sugar and butter. Beat in the eggs, one at a time, then stir in the vanilla. Combine flour and baking powder, add to the creamed mixture and mix well. Finally stir in the milk until batter is smooth. Pour or spoon batter into the prepared pan. Bake 20 to 25 minutes. Cupcakes are done when they springs back to the touch. Makes 12.
