A Trio of Potato Salads
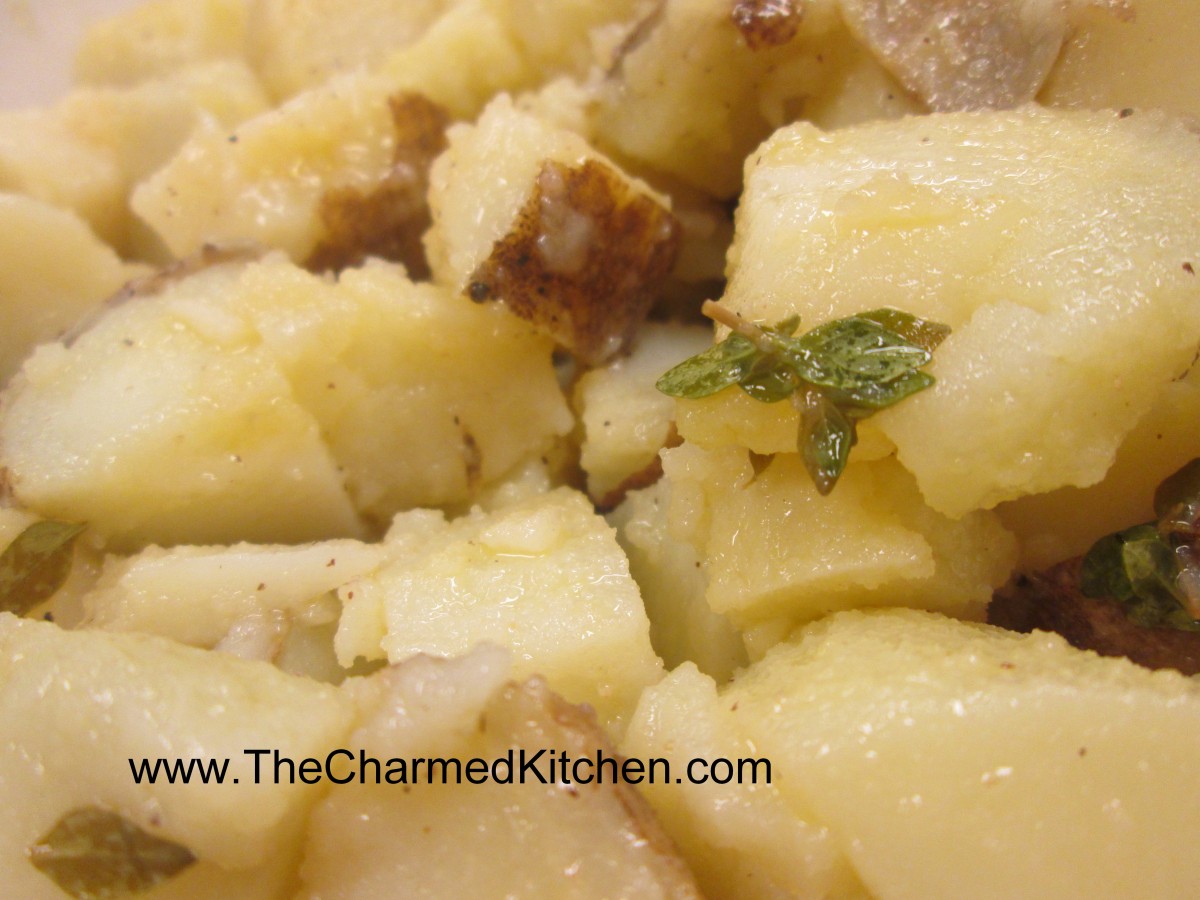
Just in Thyme Potato Salad
I love potato salad. Actually, I love potatoes pretty much any way they are prepared. With so many cookouts and picnics, you can never have enough potato salad recipes, right? I am sharing three of my favorite potato salad recipes. The first one is really simple, enhanced with fresh thyme leaves. Thyme really pairs well with the potatoes. The second one uses some of my fresh basil in a pesto sauce that is tossed with the potatoes. Who says pesto is just for pasta? The third salad is the way I remember my Mom making potato salad. She never wrote down her recipe, but I think I got it right.
Just in Thyme Potato Salad
With my herb garden growing like crazy right now I thought this was the perfect dish to make. This salad can be served warm or cold and goes well with so many dishes. I find when I have leftovers, I’ll even brown it in a skillet and serve it like hash browns with eggs for breakfast.
2 lbs. boiling potatoes, cut into bite sized pieces*
½ c. olive oil
¼ c. red wine vinegar
1 T. fresh lemon juice
2 t. fresh thyme leaves
Salt and pepper to taste
Cook potatoes until tender. Drain and toss with the rest of the ingredients and serve right away or chill to serve later. Serves 6-8.
* You can really use any potato you like. I often bake the potatoes whole and then peel and cut up. Cook them any way you prefer.
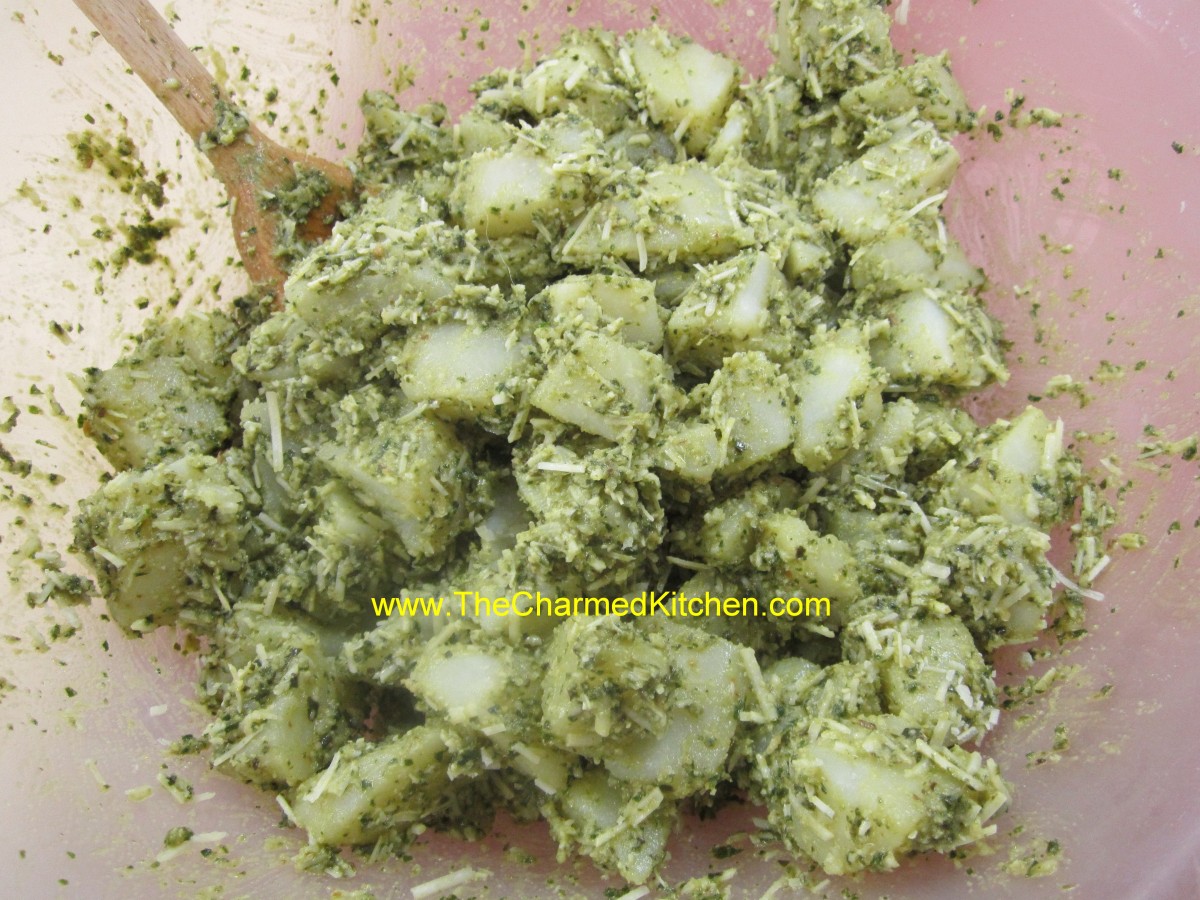
Pesto Potato Salad
This salad always makes me think of a warm summer day. I think it’s because of the basil. During the summer, my driveway is lined with pots of basil. I cook with it almost every day. Pesto can be used in a lot of different dishes beyond pasta. Here I’ve paired it up with potatoes. The combination works great together. I always freeze extra basil so I can enjoy it year round.
2 lbs. Boiling potatoes, cut into bite sized pieces
1 c. basil leaves
3 T. pine nuts
3 T. olive oil
2 garlic cloves, minced
1/3 c. Parmesan cheese
Salt to taste
Cook potatoes until tender. Cool. In blender combine remaining ingredients, except 1 tablespoon of the pine nuts. Pour blended mixture over potatoes and sprinkle with the reserved nuts. Chill. Serves 6-8.
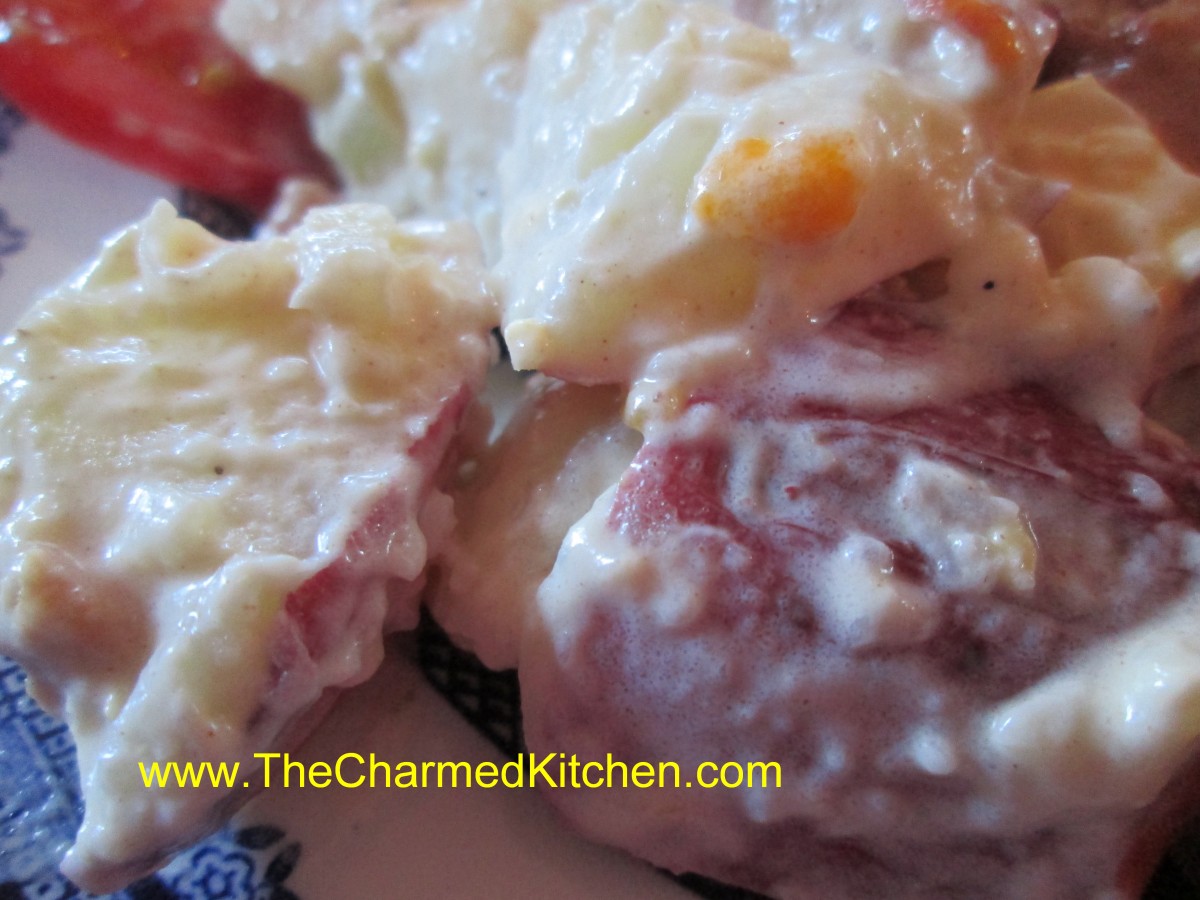
Mom’s Mustard Potato Salad
When I was a kid I did not like the taste of mustard- except in this recipe. It adds such a wonderful flavor.
4 lbs. potatoes- I used Klondike Rose and I did not peel them
4 hard cooked eggs, peeled and chopped
1 sweet pepper, seeded and chopped, optional
1 c. mayo- maybe a little less
1/4 c. prepared mustard- I like a grainy brown mustard
salt and pepper to taste
dash of hot sauce
Bake whole potatoes until tender and allow to cool. Cube potatoes into large bowl and combine with remaining ingredients. Chill until ready to serve. Serves 8.
Pesto Potato Salad
Mustard Potato Salad
Coconut Orange Cupcakes
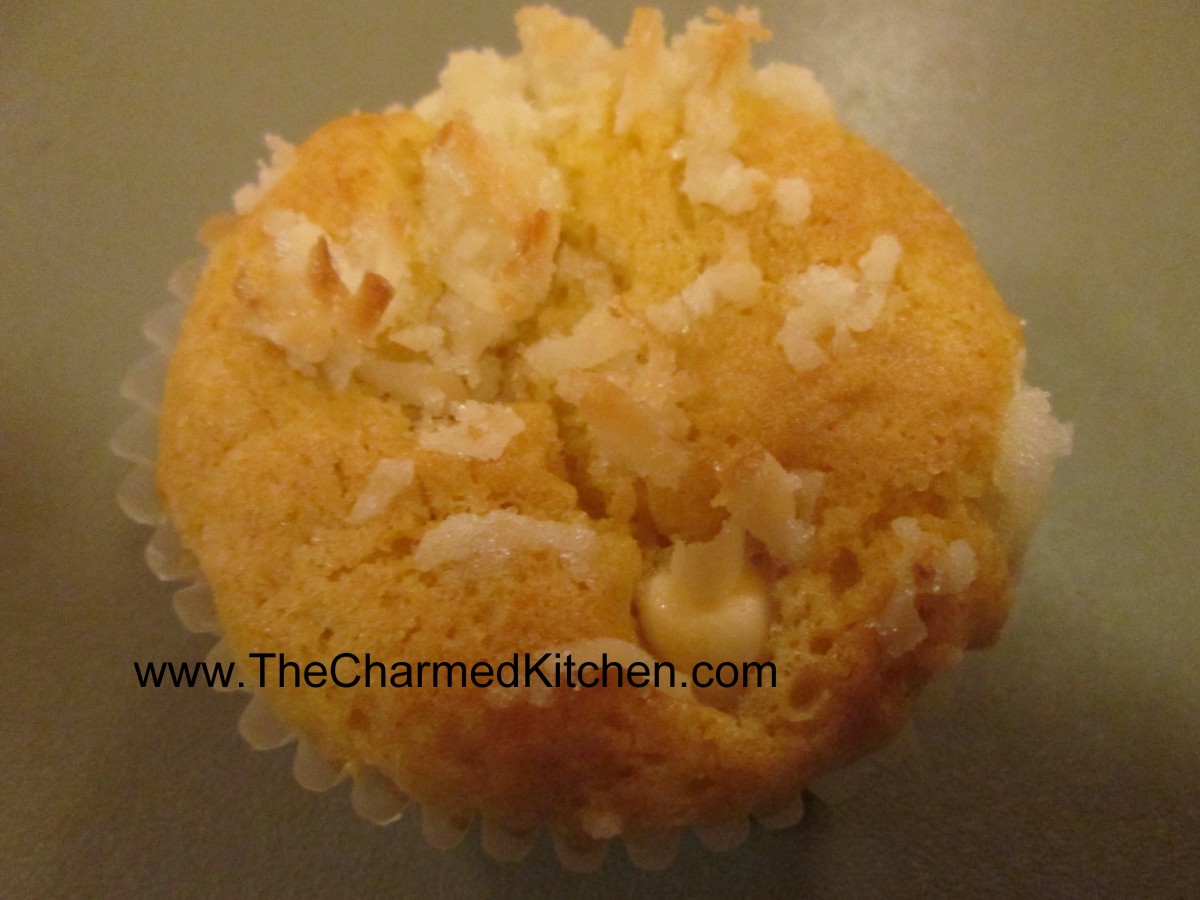
Coconut Orange Cupcakes
This is a great dessert to take along on picnics, when the weather might be too warm for frosted treats. A cupcake without frosting? Well, if it is this Coconut Orange Cupcake you will never miss it. The cupcake batter is made with orange juice and enriched with vanilla chips and mandarin oranges. Before baking a slightly sweet coconut and butter mixture is sprinkled on the top. The end result is a cupcake with a toasted coconut topping and enough flavor and moisture to carry the day without frosting. They are also very simple to make. You can have the batter mixed and ready in the time it takes to preheat the oven.
Coconut Orange Cupcakes
1 cup sugar
2/3 cup oil, I use a light flavored olive oil
2 eggs
1 cup orange juice
3 cups all-purpose flour
1 tablespoon baking powder
1 teaspoon baking soda
3/4 teaspoon salt
1 cup diced fresh oranges
1 cup vanilla or white baking chips
TOPPING:
1 cup flaked coconut
1/3 cup sugar
2 tablespoons butter, melted
In a mixing bowl, combine the sugar, oil, eggs and orange juice; mix well. Combine dry ingredients; stir into orange juice mixture just until moistened. Fold in oranges and chips. Fill 24 greased or paper-lined muffin cups two-thirds full. Combine topping ingredients; sprinkle over cupcakes. Bake at 375 degrees for 15-20 minutes or until golden brown. Makes 24.
Herbes de Provence
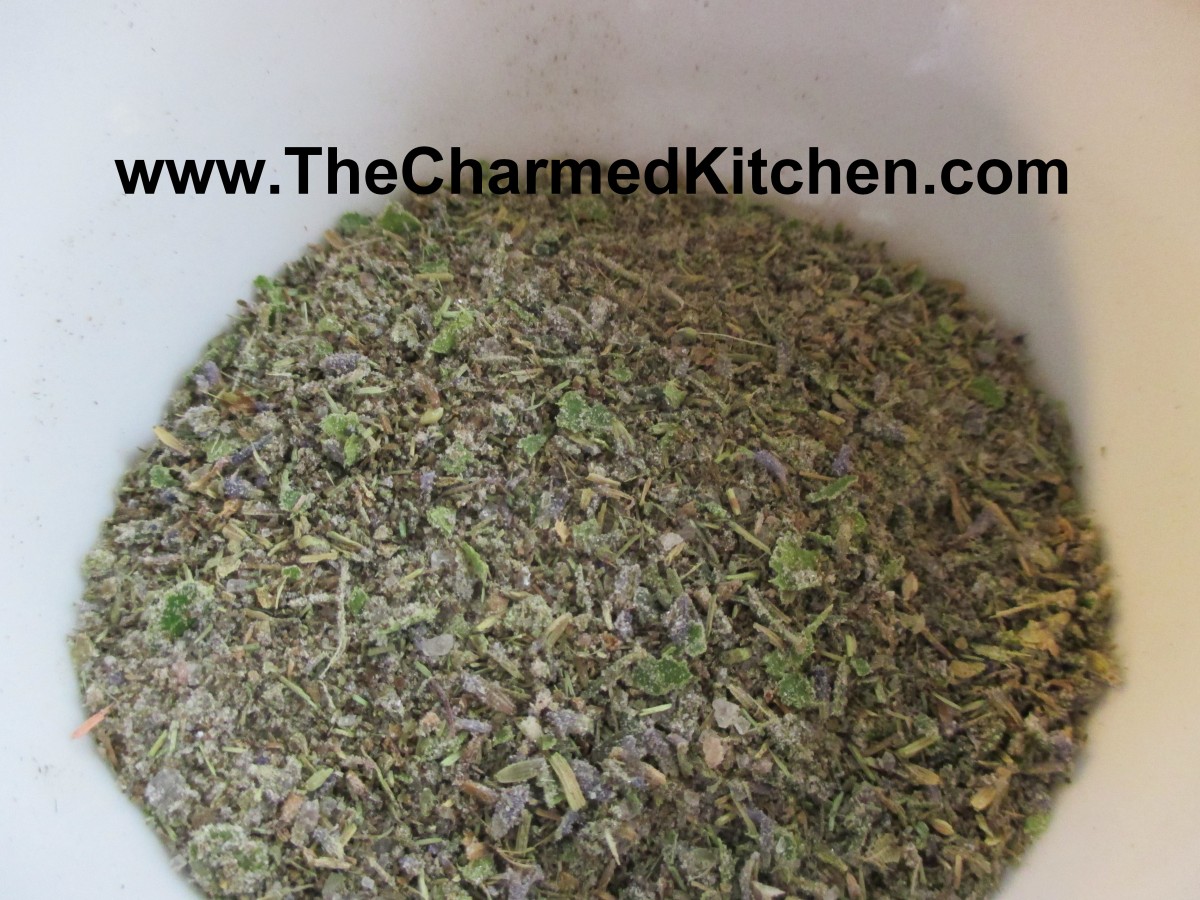
Herbes de Provence
I like making my own herb and spice blends. It gives me the chance to use my own fresh seasonings and to make them to suit my taste. Since I harvested lavender today, I will be making a batch of Herbes de Provence soon. Herbes De Provence is a blend of thyme, basil, bay leaves, lavender, savory and rosemary. It had a rich, almost floral flavor that goes well with lamb, beef, pork, duck and fish. I use a mix of both fresh and dried herbs, so it will be stored in the freezer. Dried herbs can also be used, if you prefer to store it at room temp. The amounts in the recipe are based on using dried herbs. I have included the amounts of fresh herbs you would use instead.
With the last batch I made, I used some of the Herbes de Provence on a lamb roast. It was for a dinner with friends. My friend, Amy, really loves this seasoning blend. I always share some with her when I make it.
I rubbed the Herbes de Provence all over the lamb roast before roasting. I also added some pink salt. The lamb came out great and was a big hit.
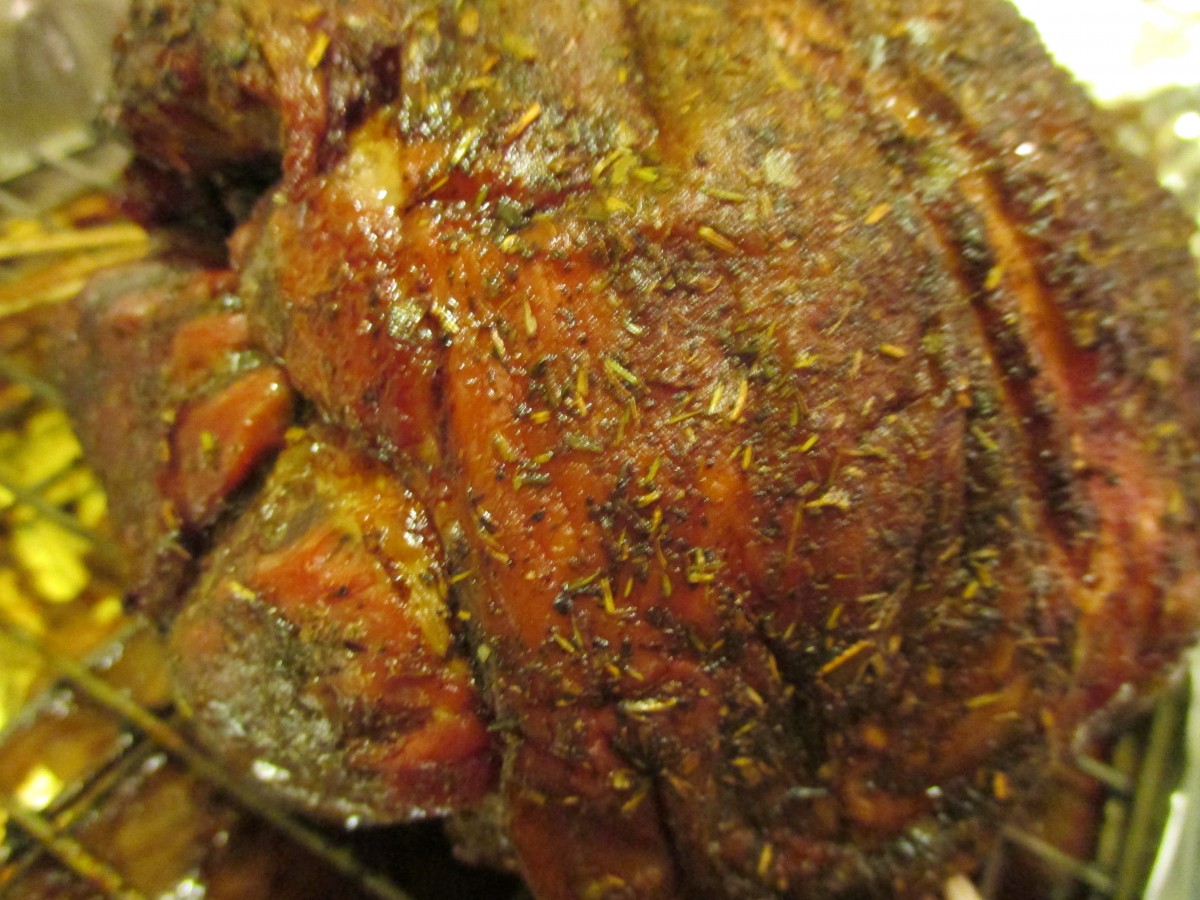
Lamb roast with Herbes de Provence
Herbes de Provence
1 T. thyme, or 2 T. fresh
1 T. rosemary or 2 T. fresh
1 T. savory or 2 T. fresh
2 t. basil or 2 T. fresh
1 t. lavender or 1 T. fresh
2 bay leaves
Blend fresh or dried herbs until bay leaves are powdered. Rub this mixture on grilled meats, roasts, chicken, or fish. If using fresh herbs, make small amounts and freeze what is unused.
Homemade Strawberry Liqueur

Strawberry Liqueur
With strawberries at their peak I have been eating them every day. I have been enjoying them in desserts and salads. I will be making strawberry jam and freezing berries, too. Another way to preserve strawberries is by making a liqueur with them. It is pretty simple. Just combine berries with vodka and a small amount of powdered sugar. I use half gallon canning jars for this, but you could use any food safe container with a tight fitting lid. Let the mixture steep long enough for the berries to infuse the alcohol with their flavor. You can sweeten it later on, or even leave it unsweetened, if you prefer. I like to sip the liqueur as is, or serve on the rocks with a splash of club soda.
Strawberry Liqueur
3 cups fresh strawberries, sliced
3 T. powdered sugar
3 c. vodka
1 c. simple syrup*
Sprinkle powdered sugar over berries and let dissolve. Pour over vodka and let steep 2 weeks. Crush berries and strain then filter. Add sugar syrup and mature 1 week. Makes 5 cups.
*Simple syrup is made from 1 cup of sugar and ½ cup of water. Bring to a boil, then cool. You will have 1 cup of syrup. You can sweeten your liqueur with honey, if you prefer. Watch when you substitute honey for sugar, as it is sweeter and stronger flavored. Better to use orange or clover honey. Add to suit your taste.
Maple Ginger Carrots
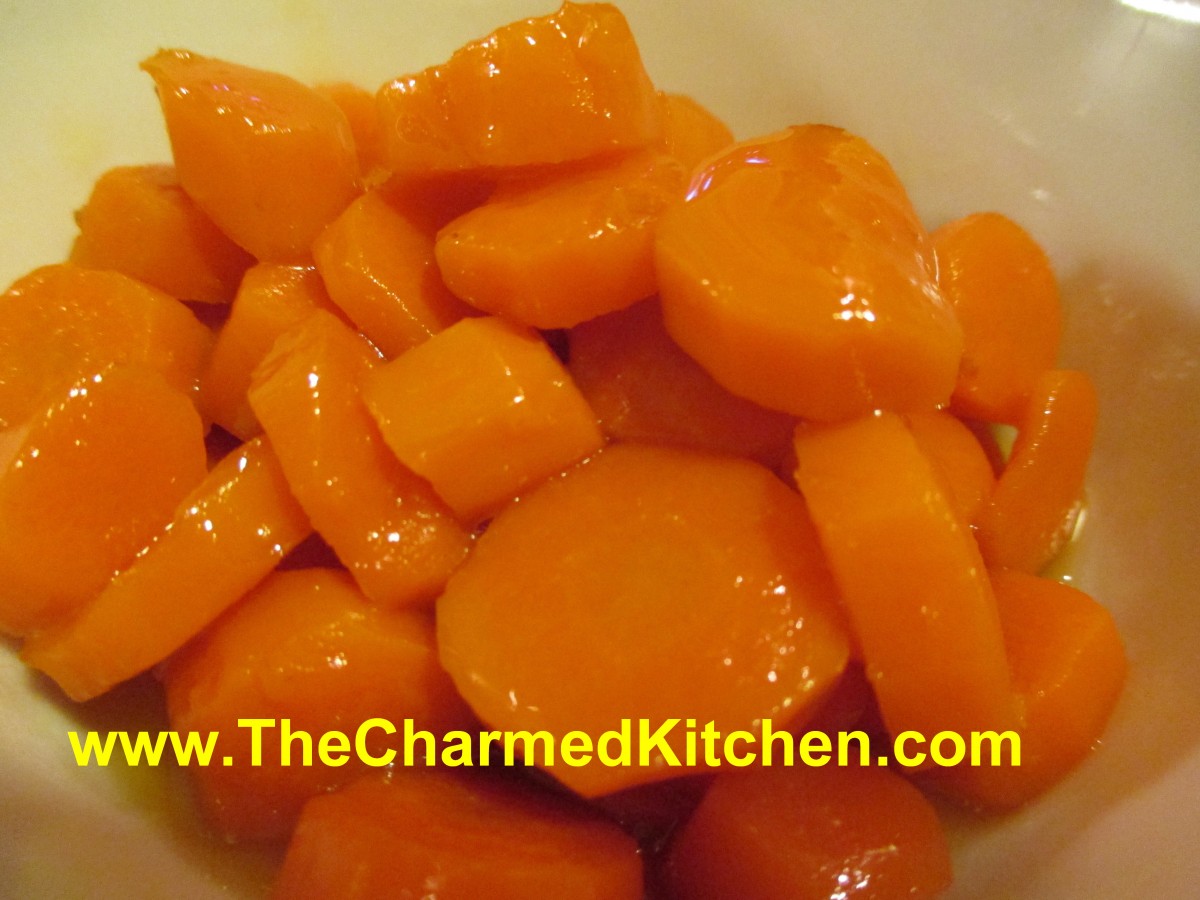
Maple Ginger Carrots
Sometimes simple just works. I was making food for a recent family event. I decided to make carrots as one of the sides. Afterwards, people came over to say how much they liked the food. I was surprised at how many people specifically mentioned the carrots. They loved them. They were super simple – and the flavors worked together well. I combined them with maple syrup, butter, ginger and some salt and pepper. That was it. So here is the recipe.
Maple Ginger Carrots
1 lb. carrots, peeled and sliced
1/4 c. water
4 T. butter
1/2 c. maple syrup
1 t. grated ginger
salt and pepper to taste
Place carrots in a pan with the water. Cover and cook over medium heat until carrots are almost tender. Add the butter and cook a few minutes more. Add remaining ingredients and cook, covered, until carrots are tender. Remove lid and cook until most of the liquid evaporates. Adjust seasonings and serve. Serves 4-6.
Rose Petal Jelly
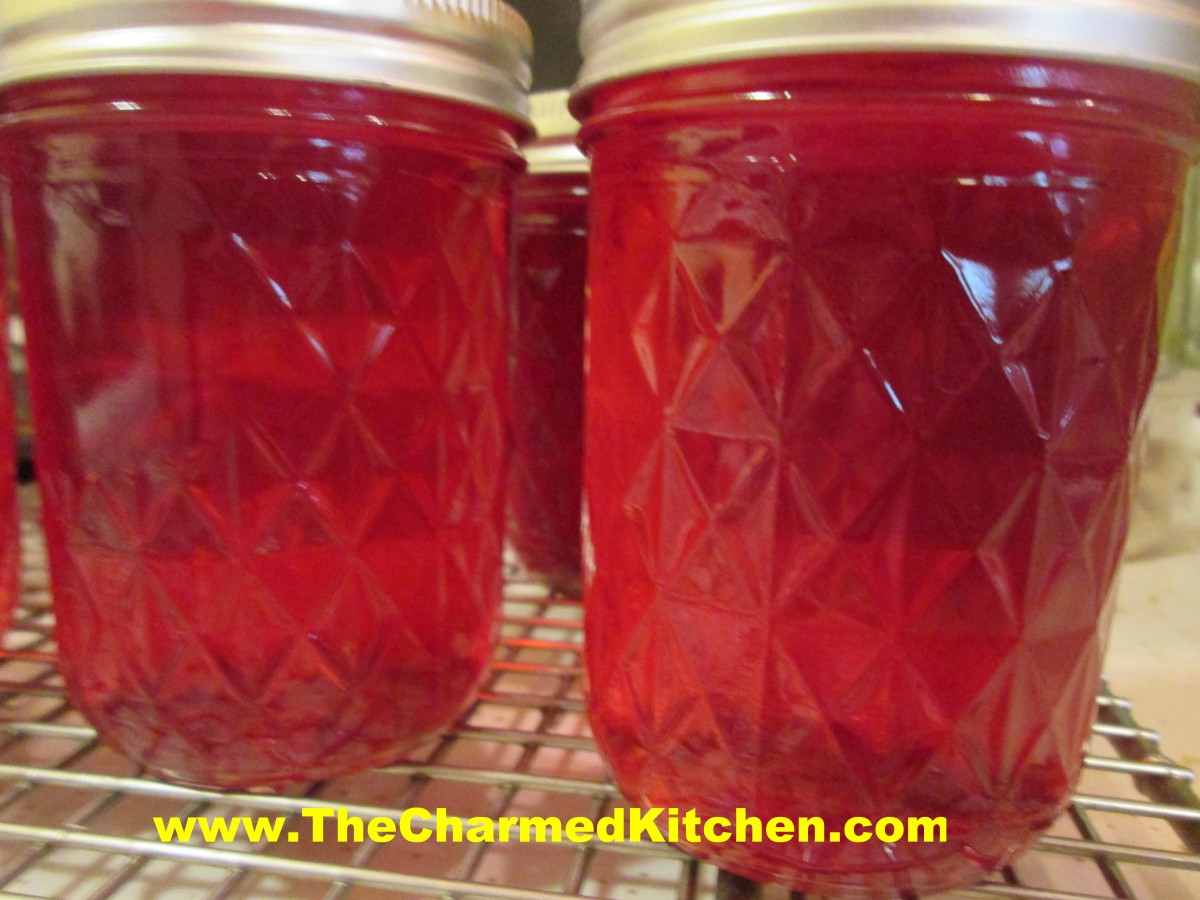
Rose Petal Jelly
I must admit I was really pleased at the color of the rose petal jelly. I have dark red roses and while I knew the jelly would not end up that dark I wasn’t exactly sure what color I would get. To start one of my floral jellies I always make a vinegar/petal infusion first.* I prefer a jelly that isn’t too sweet and the vinegar really helps. Here is the recipe- directions for making the rose vinegar are at the bottom of the post.
Rose Petal Jelly
3 1/2 cups rose petal vinegar**
1/2 c. lemon juice
1 package powdered pectin
5 c. sugar
Wash and prep jars and get water bath heating up. Place rose vinegar in pan and add lemon juice and pectin. Bring mixture to a rolling boil over high heat. Add sugar and return to the boil. Stir often. Once mixture gets to a full rolling boil, boil 1 minute. Remove jelly from heat and skim off any foam. Ladle hot liquid into jars leaving 1/4 inch headspace. Wipe rims and adjust lids. Process in a boiling water bath for 10 minutes for 4 oz. and 8 oz. jars. Remove jars to cooling rack and check seals once they have cooled down. Yield: about 7 half pint jars or 13-14 (4 oz.) jars.
*To make the infusion just put rose petals in a clean jar and cover with vinegar. Close up the jar and let the mixture steep for a week or longer. When you are ready to use the vinegar, strain it and then pour through a coffee filter to get it really clear. Use roses that are not sprayed with anything and vinegar that is 5% acidity. I like a cup of petals for every cup of vinegar for a nice strong flavor. I have gone with 1 cup petals and 2 cups vinegar and it was still pretty good.Because some roses are more fragrant than others results may vary.
**For 3 1/2 cups of rose petal vinegar you will need 3-4 cups of blossoms and 3 1/2 cups of vinegar.
Garlic Scapes
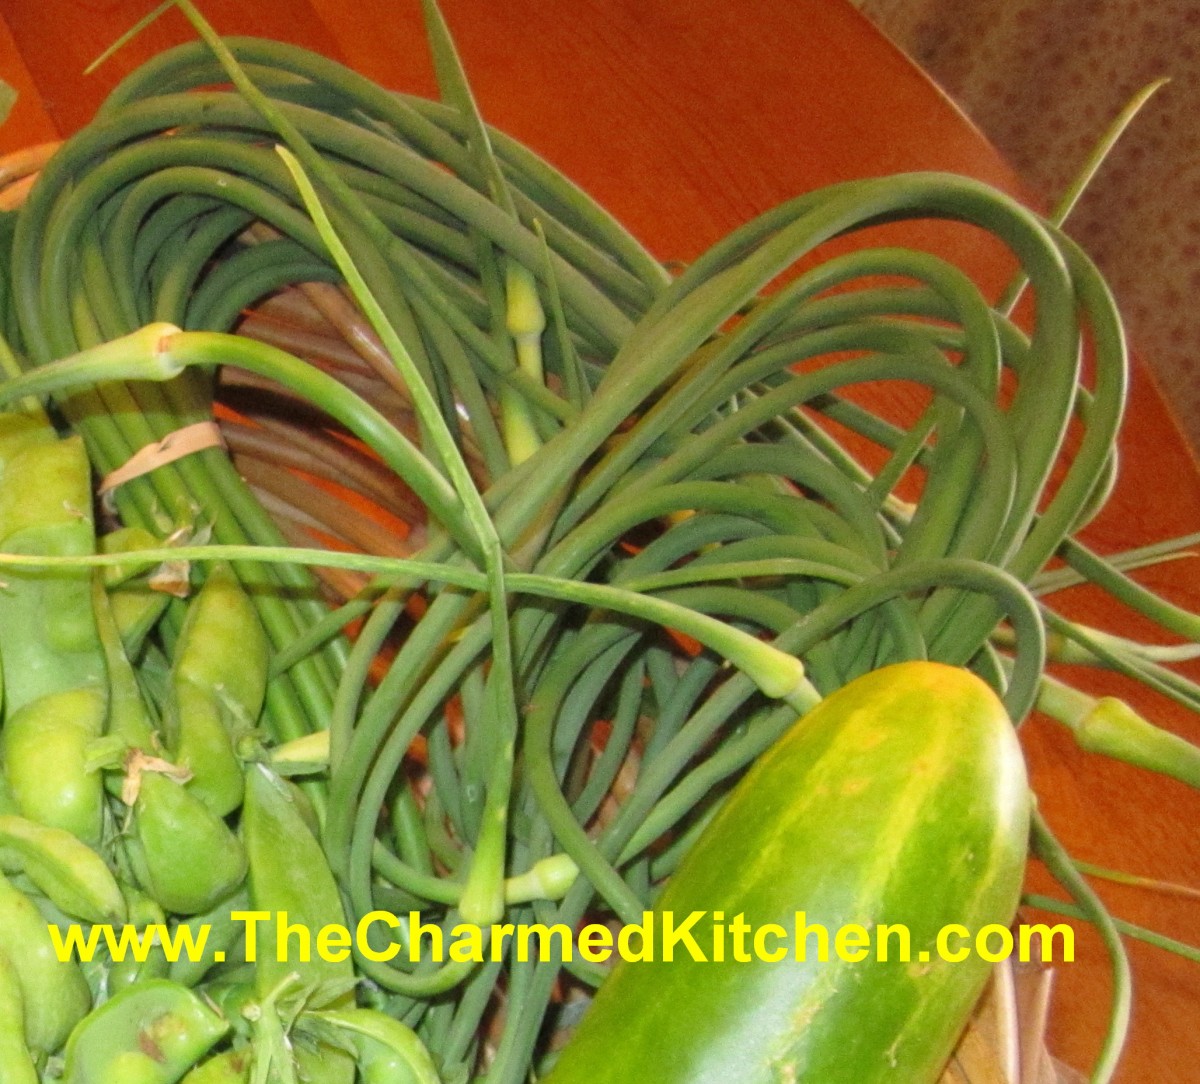
Garlic Scapes
If you have never had garlic scapes you don’t know what you are missing. Garlic scapes are the green shoots removed from hard-neck varieties of garlic. By removing the shoots, the bulbs will get bigger. They curl as they grow and are best served raw- or barely cooked. Like ramps- they have a mild flavor that is all the sweeter because of the short time they are around. Enjoy them when you can- they will be gone soon. I use scapes in place of basil in my pesto recipe or combine them with parsley in a garlic scape-parsley pesto. You can also combine the garlic scapes with cottage cheese in the blender- add a little lemon juice and hot sauce for a tasty dip. Here are some more recipes for cooking with garlic scapes.
Lebanese Garlic Sauce
1/2 c. chopped garlic scapes
1 cup lemon juice
1 teaspoon salt
3 cups olive oil
In the container of a blender, combine the garlic scapes, lemon juice and salt. Blend at medium speed until smooth. Continue blending while pouring olive oil into the blender in a thin stream. The mixture should become thick and white almost like mayo. Store refrigerated in a glass container. Nice on hot pasta, cooked rice or grains or brushed on meats while cooking. It also is a great salad dressing.
Garlic Scapes with Broccoli
1 c. chopped garlic scapes
1 1/2 teaspoons salt
1 bunch broccoli, cut into florets, steamed 5 minutes, cooled
1/3 cup olive oil
1/4 cup red wine vinegar
1 tablespoon Dijon mustard
1/2 cup grated Parmesan cheese, or to taste
Place garlic scapes in a food processor with the salt and blend into a paste. Add olive oil, vinegar, and mustard. Pulse until smooth. Place garlic scape mixture in a bowl and add the broccoli. Stir to coat. Chill for 3 hours to marinate, stirring occasionally. Sprinkle with Parmesan cheese before serving. Tastes even better the next day!!!
Peanut Butter and Jelly “Pies”
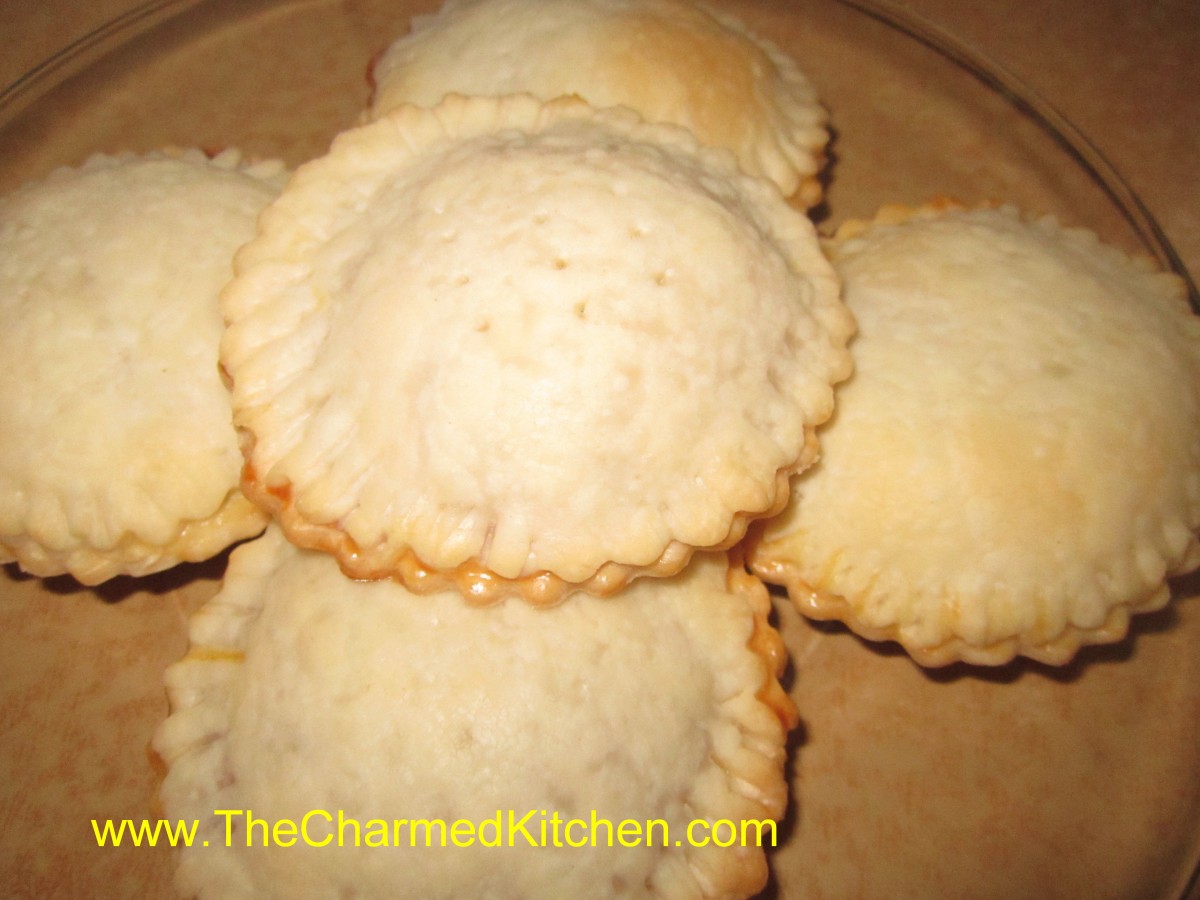
Peanut Butter and Jelly “Pies”
These are a great way to take peanut butter and jelly on the road. These little “pies” are just cut out circles of pie crust, filled with peanut butter and jelly, sealed, then baked. Very easy to make and a fun cooking project for kids as well as adults. I prefer home made pie crust, but use store bought, if you like. A nice treat, they can be a snack, breakfast, lunch or even a dessert. These are also great to take along to the pool, for picnics and road trips. You can fill them with just jelly, if you like. I have filled them with peanut butter and a few chocolate chips for a fun dessert, too.
Peanut Butter & Jelly “Pies”
1 (15 oz.) package pie crusts or homemade crust for 2 pies*
1 egg
1 T. water
½ c. peanut butter
½ c. preserves, any flavor
Powdered sugar, optional
Preheat oven to 400-degrees. On lightly floured surface roll out one of the crusts into a 12-inch circle. Using a 2½-inch round cookie cutter cut out about 12-14 circles, re-rolling scraps and set aside. Roll out second piece of dough so you will have about 24-28 circles altogether. Beat together water and egg and set aside. Place a circle on work surface and place 1 teaspoon each of peanut butter and preserves in the center. Brush edges of the circle with egg wash. Place second circle on top and press edges together to seal. Repeat with remaining circles. Place “pies” on lightly greased baking sheets and bake for 12-15 minutes or until golden brown. Cool on wire rack and dust with powdered sugar, if desired.
*Flaky Pie Crust
2 c. flour
1 t. salt
3/4 c. shortening, chilled – I used chilled coconut oil- you can also use butter or lard
1 T. cider vinegar
4-5 T. cold water
Combine flour and salt and cut in shortening. Toss in vinegar and water 1 tablespoon at a time until dough holds together. Use a fork to toss the ingredients together and as soon as the mixture holds together stop adding water. Makes 2. Chill well before using.
Vidalia Onion Relish
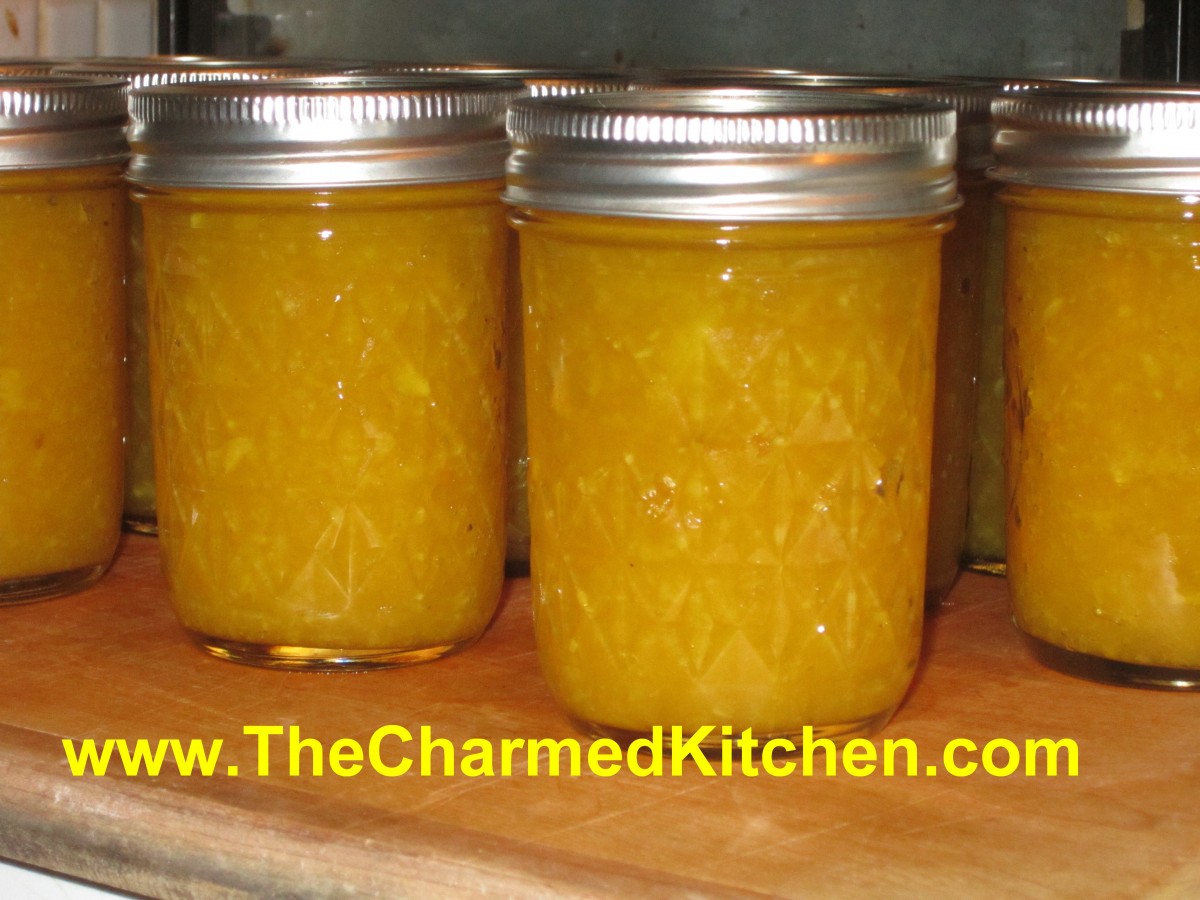
Vidalia Onion Relish
Every year I make at least a few batches of this relish recipe. I used Vidalia onions, but any sweet onion will work. The relish itself has a nice balance of sour and sweet, with plenty of onion flavor. I use it on sandwiches, in potato and pasta salads and as an appetizer with cheese and crusty breads. It also makes a great gift. As you cook it down, the onions get quite tender, but actually crisp back up a little as the liquid cooks off.
Vidalia Onion Relish
6 qts. ground Vidalia sweet onions (14 to 16 med. onions)
1/2 c. canning salt
1 qt. cider vinegar
2 t. turmeric
1T. pickling spice
2 T. minced sweet pepper, any color
4 1/2 c. sugar
Grind enough Vidalia onions to yield 6 quarts. Add 1/2 c. salt and let stand thirty minutes. Squeeze juice from onion‑salt mixture and discard juice. Sterilize canning jars. To onions, add vinegar, sugar, spices, and pepper. Bring to boil and cook for thirty minutes, stirring often. Pack both onions and cooking liquid to cover in hot jars, leaving 1/2 inch head space. Remove air bubbles. Wipe jar rims. Adjust lids. Process 10 minutes in a boiling water bath. Yield: About 8 pints or 16 half-pints.
Source: So Easy To Preserve
Strawberry Chocolate Tart
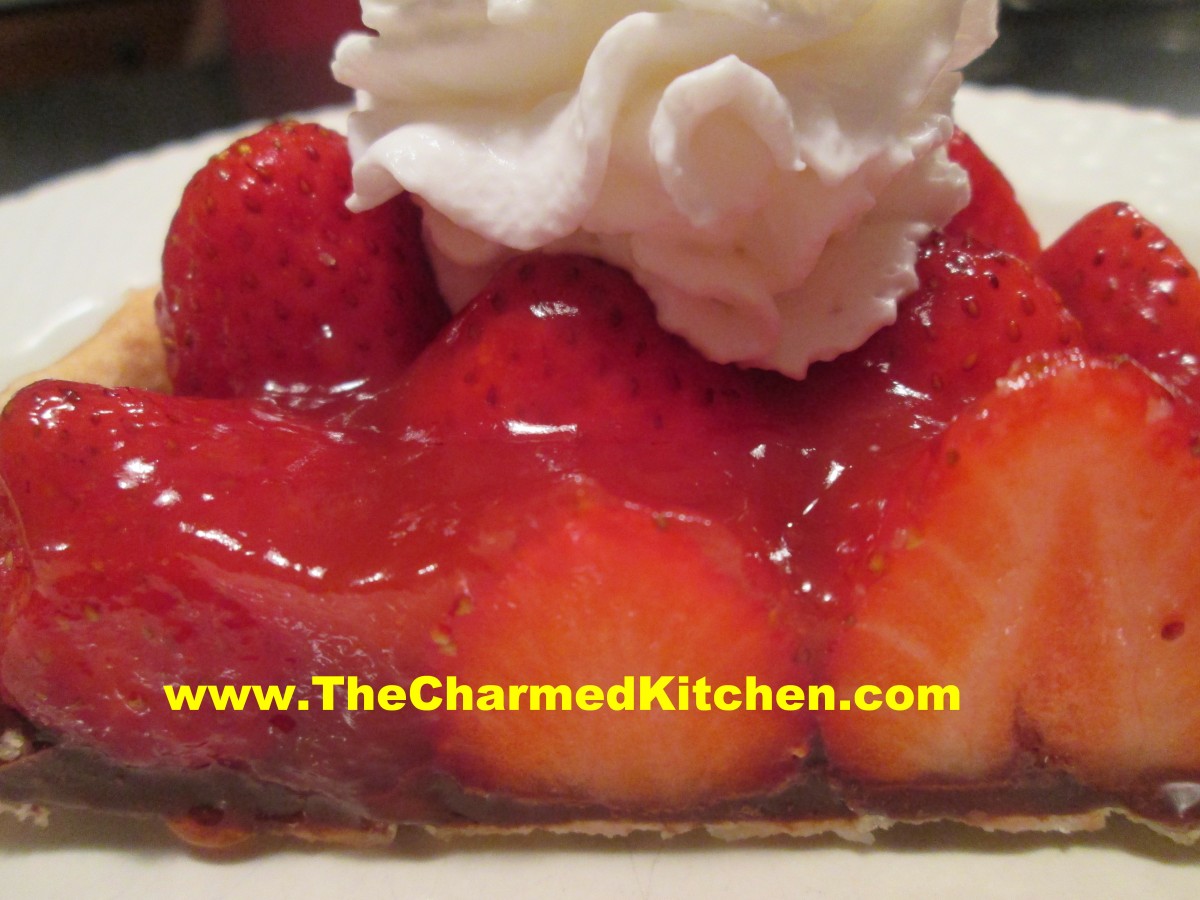
Strawberry Chocolate Tart
Since it is strawberry time, I thought I would share another recipe that I love. If you are looking for a special occasion dessert, this one really works. It was inspired by my friend, Amy. I needed dessert for a dinner with Amy and some friends. I combined some her favorite things into one dessert- strawberries, chocolate, a flaky pie crust and whipped cream. The tart was a big hit at dinner that night and I am sure your friends and family will love it, too. The crust is baked, then topped with a layer of melted chocolate, berries and a light glaze. Easy, but elegant.
Amy’s Strawberry Chocolate Tart
1 pie crust- homemade or store bought*
1 cup chocolate chips- or 6 oz. bittersweet chocolate
2 T. butter
1 qt. fresh strawberries, washed and stem ends sliced off
Strawberry glaze:
1 c. strawberries, chopped
1/2 c. sugar, or to taste
1/4 c. water
1 T. cornstarch
Using a tart pan, roll out your crust and fit it into the pan- trim off any excess. Pre-bake your crust. To do this the prepared pie crust should be pricked all over with a fork. Cover the surface with foil and then pie weights. I use dry beans for my pie weights. Pre-heat oven to 400-degrees. Bake crust for 15-20 minutes. Check to be sure it doesn’t get too brown. Remove weights and foil and cool until ready to use. While crust is baking you can prepare the strawberry glaze. Combine 1 cup berries and sugar in small saucepan and bring to a simmer. Cook five minutes, mashing the berries a little. Strain out the solids and return the liquid to the pan. Combine the water with the cornstarch and add to the strawberry liquid, cooking until thickened and bubbly. Remove from heat to cool. Combine chocolate and butter in microwave- safe dish and microwave on high for 45 seconds to a minute . Stir mixture until smooth- you might need to nuke it a few more seconds. Spread melted chocolate over the bottom of the tart crust. Press the berries into the chocolate- pointed side up. Once the tart is full of berries spoon some of the glaze over the berries and chill at least an hour before serving. Serve with whipped cream, if desired. Serves 6.
Half and Half Dough*
This is a great crust for liquid fillings like custard type pies and fresh fruit pies.
¼ c. butter, room temp
½ c. shortening, room temp- you can use lard or coconut oil instead
¼ c. sugar
½ t. salt
2½ c. pastry or all purpose flour
1/8 t. baking powder
¼ c. milk
1 t. lemon juice
Cream together the first 4 ingredients until smooth. Mix together the flour and baking powder. Set aside. Combine milk with the juice and set aside. Stir ½ c. of the flour into butter mixture. Stir until smooth. Add a little of the milk, stirring until smooth. Add remaining ingredients alternately until finished. Dough will firm up once chilled. Chill at least 4 hours before using. Makes 2 crusts.


