Creamy Fresh Tomato Soup


Tomatoes are in season and I am loving it. I have been enjoying tomato sandwiches, tomato salad and fresh tomato sauce.
This is a great recipe for some of those tomatoes. A simple soup, with lots of flavor, it is a favorite of mine. So much better than the canned tomato soup of my childhood.
I enjoy it served hot, but this soup can also be served cold. On a hot day, this soup, served chilled, is a wonderful change from a salad with dinner.
I prefer to use fresh tomatoes, but I have used my home canned tomatoes, in a pinch.
If you want a stronger tomato flavor- use a couple extra tomatoes.
Creamy Fresh Tomato Soup
3 medium-sized ripe tomatoes
1 small onion, chopped fine
1 rib celery, chopped fine
1/4 t. ground cloves
1 small bay leaf
3 T. butter
3 T. flour
1 t. salt
3 c. milk or half and half
Peel and chop tomatoes. Place tomatoes in saucepan with onion, celery, cloves and bay leaf. Bring mixture to a boil; reduce heat and cover, simmering 15 minutes. Melt butter in a large saucepan then stir in flour and salt. Cook mixture until bubbly. Add milk and cook until thickened, stirring constantly. Remove bay leaf. Puree tomato mixture through a strainer, food mill or in a blender or processor. Add to milk mixture and heat through. Serves 6.
Zucchini Pancakes

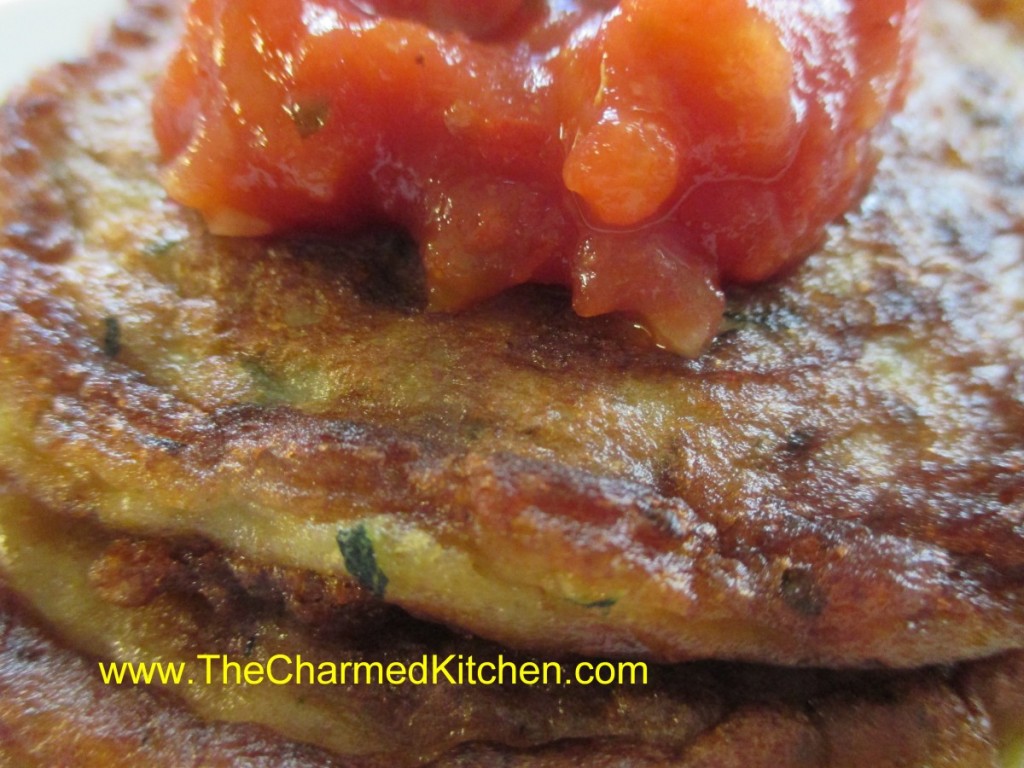
You can never have too many zucchini recipes. Especially this time of year. This simple recipe uses zucchini to make tender and flavorful pancakes.
They aren’t the type of pancake you would pour maple syrup over. They are wonderful topped with some fresh salsa, though. These pancakes make a nice lunch or main dish meal. They can also be served as a side dish. Similar to potato pancakes. I have been known to have them for breakfast.
I think they taste best when golden on the outside, a little crisp. They will still be tender inside.
So if you have more zucchini than you know what to do with, and you don’t want to bake zucchini bread, here is a recipe you might want to try.
Zucchini Pancakes
2 c. shredded zucchini
1 medium onion, diced
2 eggs
1/2 c. flour- you made need a little more or less depending on how moist your zucchini is
2 t. hot pepper sauce, or to taste
1 t. baking soda
salt to taste
oil for cooking
Combine all ingredients, except the oil, in a medium bowl. Heat oil in skillet and spoon batter in. I used a little over 1/4 cup for each. Cook over medium heat until lightly browned around the edges. Flip and cook until golden on both sides and pancake springs back when touched lightly. Remove to platter and keep warm. Repeat with remaining batter. Serve with salsa or sour cream. Makes 8.
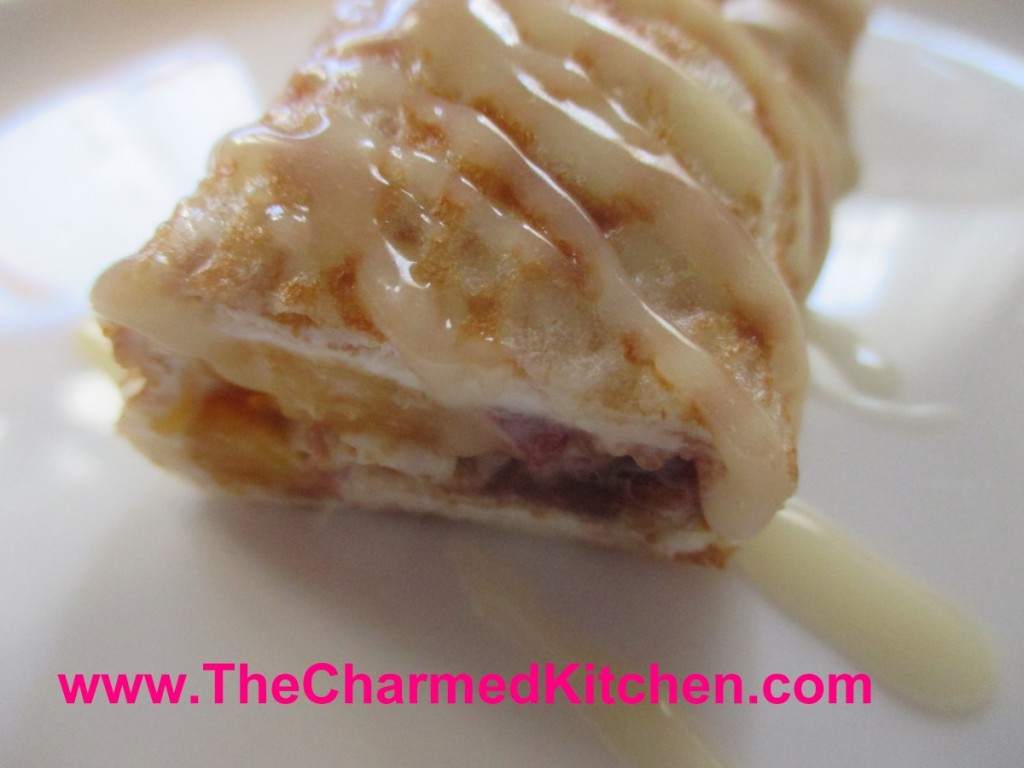
Peaches and Cream Crepes

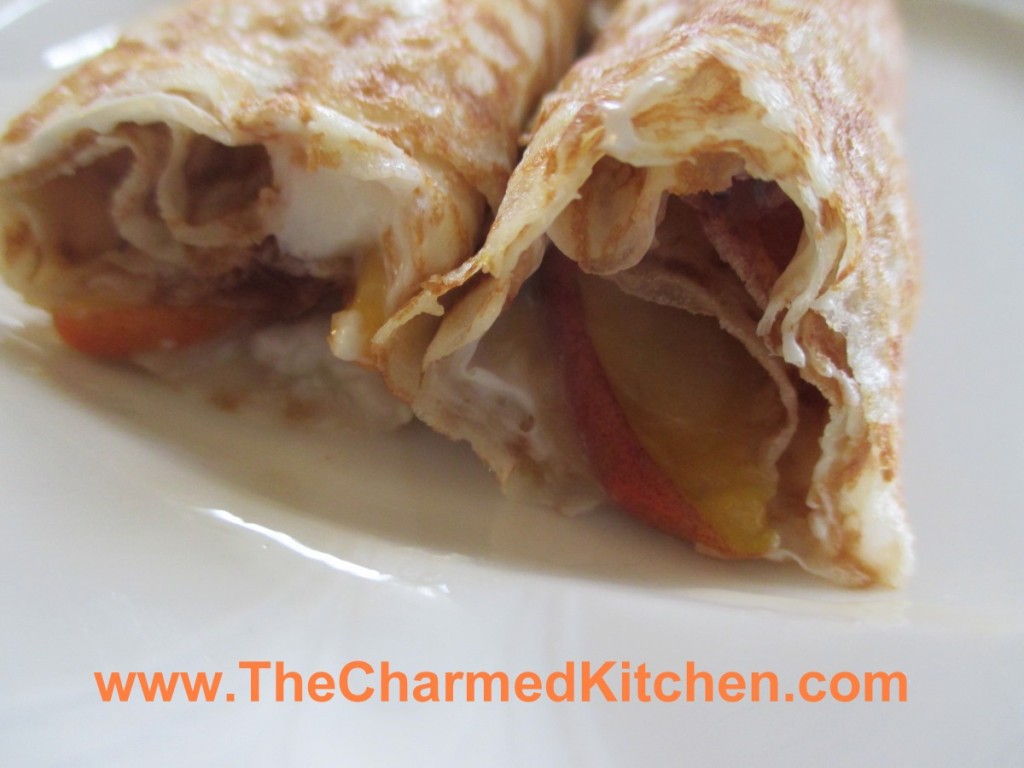
Peaches are such a natural addition to any summer dessert. I decided to use some of my fresh peaches in crepes. Crepes are a nice dessert any time of the year. I think especially nice in summer, using fresh, seasonal fruit.
The crepes were filled with unpeeled, sliced peaches that had been tossed with sugar ahead of time. The sugar softens the peaches a little. I also added some sweetened cream cheese and a little strawberry jam to the filling. We loved them.
They can be assembled ahead of time, and just kept chilled until ready to serve. Serve as is, with a dusting of powdered sugar or even a vanilla caramel drizzle- recipe follows.
Peaches and Cream Crepes
1 recipe basic crepes- recipe follows
2-3 peaches, pitted and sliced thin
¼ c. sugar
1 t. vanilla
1 t. cinnamon
8 oz. cream cheese, softened
¼ c. powdered sugar
Strawberry jam, optional
Make a batch of basic crepes and set aside until ready to use. Place sliced peaches in a bowl with sugar, vanilla and cinnamon and stir until sugar is dissolved. Best to do this at least a couple of hours before you want to use them. This softens the peaches and allows juices to come out of the peaches. You need the juices for the cream cheese. You can do this the day before, then just finish the cream cheese and assemble.
Place cream cheese in a bowl and start beating with an electric mixer. Drain juices off the peaches and add the juice to the cream cheese. Add the powdered sugar, too. Beat until cream cheese is fluffy.
To assemble the crepes: Place a crepe on work surface. Spread with some of the cream cheese. Along one side of the crepe place a small amount of strawberry jam, like a stripe. Place several slices of peach in a row, on top of the strawberry jam. Starting on the side of the crepe with the peaches gently roll up the crepe. Repeat with remaining ingredients. You will have 12. Serve as is, or you can top with powdered sugar, peach slices, warm jam, whipped or caramel sauce – recipe follows.
Basic Crepes
3/4 c. flour
1/8 t. salt
3 eggs, beaten
2 T. melted butter
3/4 c. milk, approximately
Butter or oil for pan
Beat together flour, salt and eggs until smooth. Stir in melted butter and then stir in milk until batter consistency is that of cream. Let stand for 30 minutes before using, or can be refrigerated, covered, overnight. Beat again, just before using.
Heat 6 or 7 inch skillet. Brush with butter or oil and pour in about 2 teaspoons of batter, tipping pan to cover bottom of pan completely with batter. Cook until edges start to brown, turn over and cook until lightly browned (about 2 minutes per side.)
Crepes can be made day ahead or even frozen between sheets of waxed paper and frozen. Makes 12.
Vanilla Caramel
I made a light caramel sauce for the crepes. I just put 1/4 cup of water in a small saucepan with a cup of sugar. Boiled it all together for about 3 minutes. Removed from the heat and added a teaspoon of vanilla, 4 tablespoons of butter and a 1/4 cup of half and half. Stirred until smooth, then added a pinch of salt, for extra flavor.
Zucchini Brownies – Gluten Free

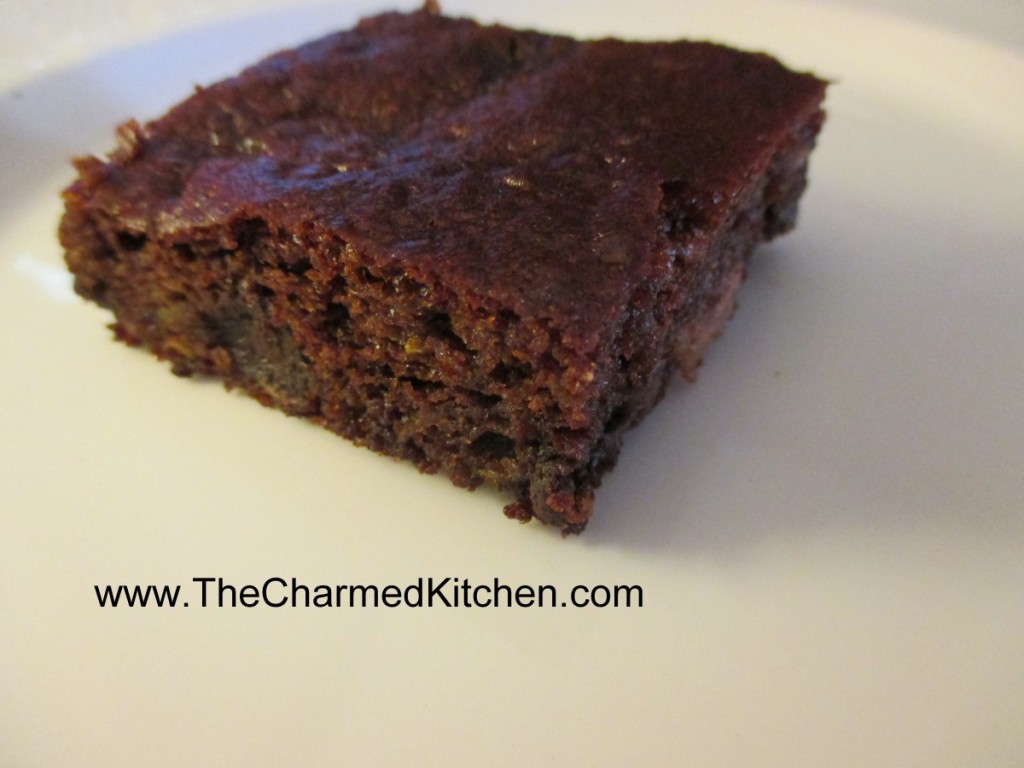
These brownies are everything you want in a brownie. Sweet, moist and very tender. The fact they are also flour and gluten-free is a nice bonus for those who can’t have gluten.
You might think, when you read the ingredients, that I left something out. I didn’t. They baked up beautifully and had a wonderful texture. I think the next time I make them, I might also add some chopped nuts.
Gluten-Free Zucchini Brownies
1½ c. shredded zucchini
1 c. almond butter- but you could use peanut butter instead
1 c. chocolate chips
1/3 c. honey – but you can use 1/2 cup if you want a sweeter brownie
¼ c. unsweetened cocoa powder
1 egg
1 t. vanilla
1 t. baking soda
1 t. cinnamon
½ t. allspice
Preheat oven to 350 degrees. Grease a 9×9 inch pan, set aside. Combine all ingredients in a medium bowl and stir until well blended. Pour batter into pan and spread evenly. Bake 25-30 minutes, or until toothpick inserted comes out clean. Cool before cutting. Makes 16.
Creamy Zucchini Soup – Hot or Cold


You can never have enough recipes for zucchini. If you have ever planted zucchini, you know what I mean. I decided to post a number of my favorite zucchini recipes all week.
This is a recipe I’ve had for ages, but had not made in a while. I forgot how much I liked it. As an added bonus, it can be served hot or cold.
I leave the skins on my zucchini, I like the way the little green flecks look in the soup, but you can peel, if you prefer. You can also use a combo of green and yellow summer squash.
Here is the recipe.
Creamy Zucchini Soup
1 medium onion, chopped
2 T. butter
4-6 medium zucchini, sliced
1 large potato, peeled and diced
1 T. chopped parsley
½ t. each basil, marjoram and thyme
1 t. hot sauce, or to taste
salt and pepper to taste
6 c. chicken or veggie broth
1 c. milk or half and half- I prefer the half and half
In Dutch oven cook onions in butter until tender. Add vegetables and seasonings and cook until hot. Add broth, heat to a simmer and cook 15 minutes. Puree mixture in blender in batches and return to pot. Add milk and heat through. Adjust seasonings. Serve hot or cold. I topped mine with some fresh chopped parsley and a little hot sauce. Serves 6-8.
Zucchini and Carrot Cupcakes

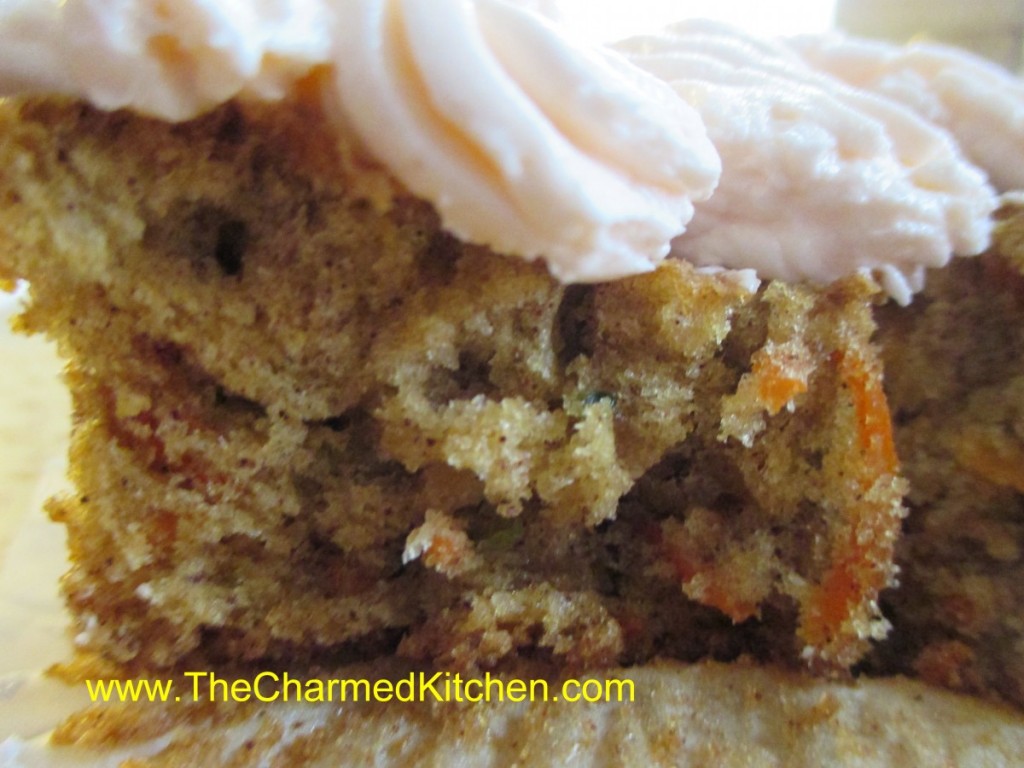
These are really good cupcakes. They are moist and not too sweet with a slightly dense texture. Sort of a cross between carrot cake and zucchini bread, they have more texture than a traditional cupcake and plenty of flavor. I had an abundance of zucchini and carrots and figured they might play well together.
I got 24 cupcakes out of the recipe but they were a little small. Perhaps 18 would be a better way to go. I used simple vanilla buttercream to finish them off. I whipped the frosting a long time so it was extra fluffy. Here are the recipes for both the cupcakes and the frosting.
Zucchini Carrot Cupcakes
2 eggs
1 c. sugar
2/3 c. oil
1¼ c. flour
1 t. baking powder
1 t. baking soda
1 t. cinnamon- I think I would use a little more next time
½ t. salt
1 c. grated carrot
1 c. grated zucchini, squeezed dry and packed tightly
½ c. chopped nuts, optional
Beat eggs with sugar until frothy. Beat in oil then add dry ingredients. Beat on high for 4 minutes. Stir in veggies and nuts. Pour batter into 18- 24 paper lined muffin tins, filling them 2/3 full. Bake in a 350-degree oven for about 15 minutes or until top springs back when lightly touched. Cool and frost. Makes 24.
Note: These cupcakes deflate a little while cooling.
Classic Vanilla Buttercream
3/4 cup butter
6 cups confectioners’ sugar
1/3 cup milk
1 1/2 teaspoons vanilla extract
1/4 teaspoon salt
2 tablespoons milk
Beat butter in a large bowl until fluffy. Gradually add 3 cups of the sifted confectioners’ sugar, beating well. Slowly beat in the vanilla, salt, and 1/3 cup of the milk. Gradually beat in the 3 remaining cups of confectioner’s sugar. Beat in additional milk (1 to 2 tablespoons) if needed, to make frosting of spreading consistency. You can also tint the frosting with juice (like pomegranate or raspberry) or food coloring.
Zucchini Bread Pudding

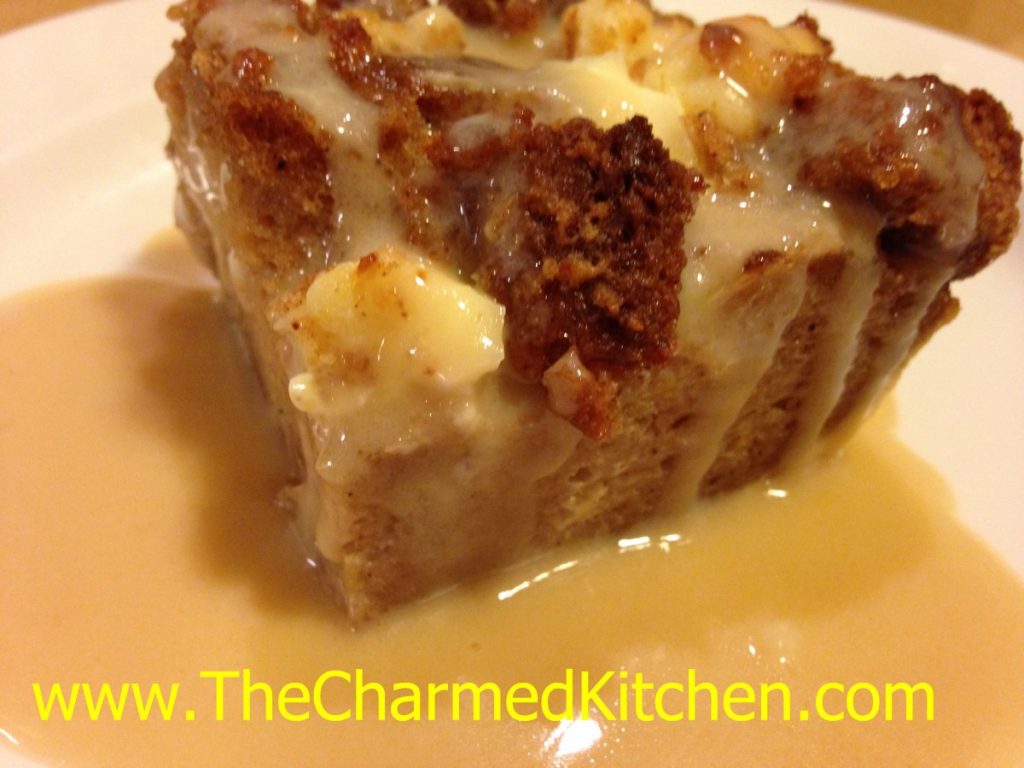
I had some extra zucchini bread and wanted to do something different with it. I ended up making this zucchini bread pudding. It came out even better than I thought it would. Rich, not too sweet. A simple, classic dessert.
I felt it needed some sort of topping or sauce. I made a vanilla caramel sauce to dress it up a little. It worked great. Ice cream or whipped cream would have worked, too.
I guess I should really call it a zucchini bread bread pudding. After all, it is bread pudding made from zucchini bread. My spell check hates it when I type the same word twice, so zucchini bread pudding it is.
I know this would also work with other quick breads, like pumpkin or banana bread.
So here is the recipe- for the bread pudding, the zucchini bread and the caramel sauce.
Zucchini Bread Pudding
6-8 cups cubed zucchini bread- recipe follows
8 oz. cream cheese- cubed
2 c. half and half
3 eggs
1 T. vanilla
1 t. cinnamon
Vanilla Caramel sauce- recipe follows
Butter a 2-quart casserole. Preheat oven to 350 degrees. Place half the cubed zucchini bread in the prepared pan. Add half the cubed cream cheese, scattering over the bread. Repeat with remaining bread and cheese. In bowl, combine the remaining ingredients, beating until well mixed. Pour over the zucchini bread mixture. Place casserole in oven and bake for 30 minutes, or until bread pudding is set. Allow bread pudding to cool a little before serving. Serve with the vanilla caramel sauce or top with ice cream or whipped cream. Serves 8.
While often served warm, this bread pudding is tasty served chilled, too. Heck, I just had some for breakfast.
Zucchini Bread
3 c. flour
3 eggs
2 c. sugar
2 c. shredded zucchini
1 c. oil
1 c. chopped nuts or raisins
½ c. sour cream or strained yogurt
1 t. each vanilla, cinnamon, baking powder, salt and baking soda
Preheat oven to 350 degrees and grease 2 (9×5 inch) loaf pans. Set aside. Place flour in large bowl. Beat eggs and add with remaining ingredients to flour, mixing well and scraping bowl. Pour batter into prepared pans and bake 1 hour and 20 minutes, or until browned and toothpick in center emerges clean. Cool in pans on wire rack. Freezes well. Makes 2.
Vanilla Caramel Sauce
1 c. sugar
¼ c. water
4 T. butter
2 t. vanilla
¼ c. half and half
Pinch of salt
Combine sugar and water in a small saucepan. Bring to a boil and cook for about 3 minutes. Remove from the heat and add the remaining ingredients. Stir until smooth.
Giant Zucchini Bread

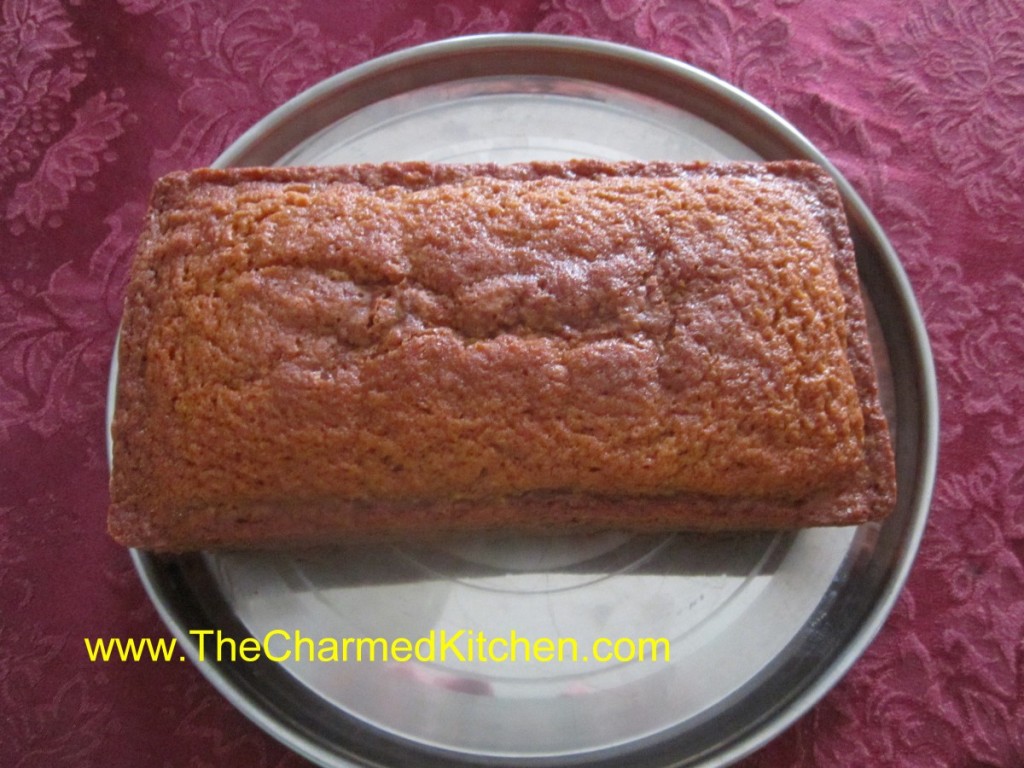
Let me be clear. The bread is normal size- the zucchini are giant. Even the most diligent of gardeners will have a few zucchini get away from them.
Zucchini seem to go from too small to gigantic in the blink of an eye. A friend just brought me a really big zucchini. I knew it would make nice zucchini bread.
This time of year I get a lot of questions about overgrown zucchini. People seem to think there is nothing you can do with them. That’s not true. Even older squash can be eaten in all sorts of ways.
You can determine if the skin is too tough to eat by trying to pierce it with a fingernail. If you can easily poke the skin- it is tender enough to eat. If it isn’t, just peel before using.
Cut the zucchini in half lengthwise and look at the seed cavity. If the middle looks spongy, hollow or if the seeds are developing scoop out the middle and discard. The remaining zucchini can be cubed or sliced and added to stews, soups, stir fries and all sorts of dishes.
One of my favorite things to make with the bigger zucchini, is zucchini bread. I shred up a whole zucchini and portion it out in amounts I will need for my bread. I freeze what I won’t be using that day. It is really nice in the dead of winter to be able to make zucchini bread. Here is the recipe I use. It is a favorite and makes 2 loaves, which is a bonus.
Zucchini Bread
3 c. flour
3 eggs
2 c. sugar, I use less
2 c. shredded zucchini
1 c. oil
1 c. chopped nuts or raisins, optional
½ c. sour cream or Greek yogurt
1 t. each vanilla, cinnamon, salt and baking soda
Preheat oven to 350 degrees and grease 2 (9×5 inch) loaf pans. Set aside. Place flour in large bowl. Beat eggs and add with remaining ingredients to flour, mixing well and scraping bowl. Pour batter into prepared pans and bake 50-60 minutes, or until browned and toothpick in center emerges clean. Cool in pans on wire rack. Freezes well. Makes 2 .
Fresh Peach Chutney

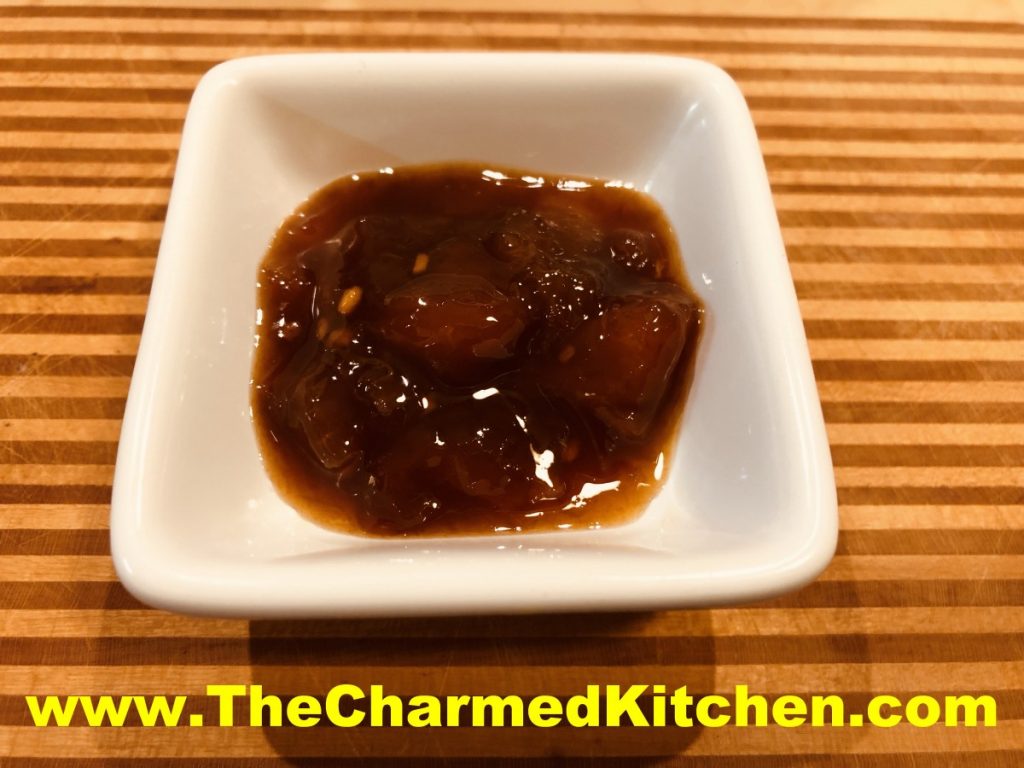
Peaches are in season and I am loving it. Besides eating them fresh, I have been enjoying them in all sorts of dishes. Peach jam, peach ice cream, peach scones…. the list goes on.
This chutney is one more way to take advantage of peach season. Chutney is a dish that walks the line between savory and sweet. I made this batch a little spicy. The heat pairs well with the sweetness of the fruit. Feel free to adjust heat to suit your own taste.
You can serve this chutney like a relish, on the side. Or, use it like a sauce, adding to meats when cooking. Another option is to use it as a glaze, brushing it on meats while baking or grilling. A vegetarian option is brushing it on grilled portobello mushrooms or eggplant slices.
I have served chutney with a cheese board, too. Fun and easy addition to the appetizer menu.
So here is the recipe.
Fresh Peach Chutney
5 medium peaches, peeled, pitted and diced
1 medium onion, peeled and chopped fine
½ c. cider vinegar
½ c. sugar
½ c. water
2 T. honey
2 T. lemon juice
2 T. minced garlic
1 T. soy sauce, or a little more to suit your taste
½ t. red pepper flakes, or more for a spicier chutney
1 T. cornstarch
2 T. cold water
Combine all ingredients in a saucepan, except cornstarch and the 2 tablespoons of cold water, and cook over medium heat until peaches are tender and onion is translucent, about 15 minutes. Stir occasionally to avoid burning. Combine cornstarch with the cold water and stir until smooth. Slowly add to simmering chutney while stirring constantly. Mixture will thicken. Adjust seasonings, if needed. Makes about 3 cups. Will keep in fridge a couple of weeks- can be frozen.
Serve with pork or lamb. Great with duck or chicken, too. You can also serve as an appetizer with cheese and crusty bread.
Zucchini and Cheese Tartlets

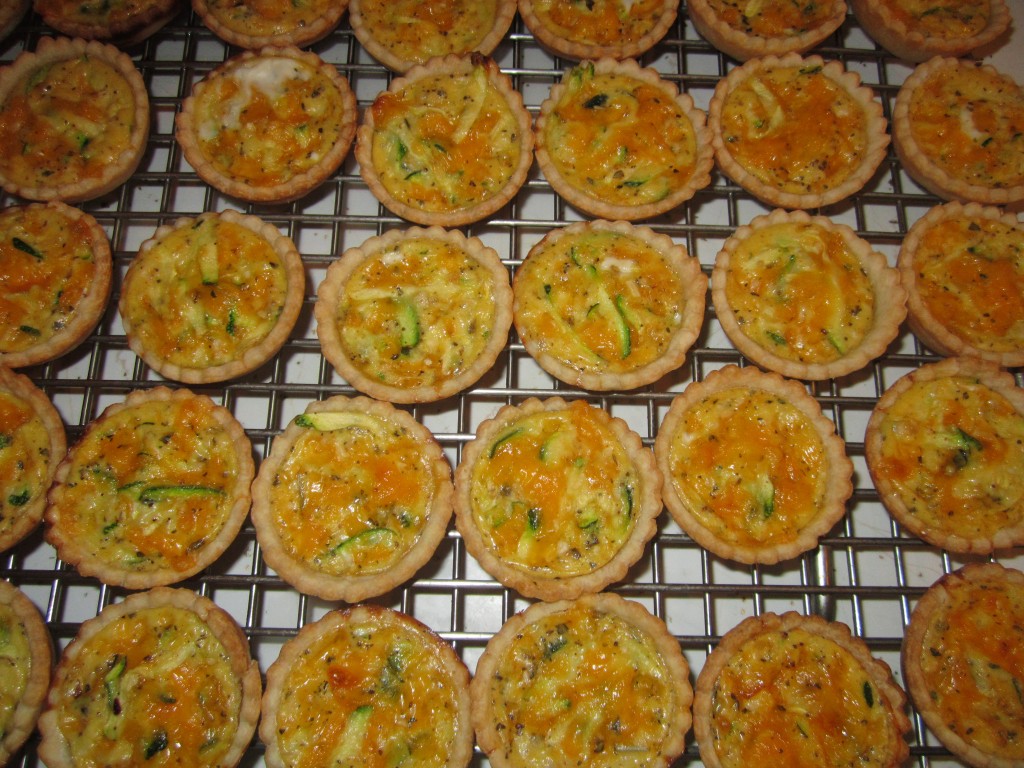
Since zucchini are so prolific, there never seem to be enough recipes for them. I like this one as an appetizer. You can make up a big batch, bake and then freeze some for whenever you need them. Served with a salad they make a nice lunch or light dinner.
Zucchini and Cheese Tartlets
1 recipe of pie crust dough, enough for 2 pies, home made or store bought, recipe follows
1 medium zucchini shredded, about 1 1/2 cups
1 T. flour
1 c. shredded cheese- any kind you like. I like cheddar.
2 eggs, beaten
1/2 c. minced onion
1 t. Italian seasoning
salt and pepper to taste
hot pepper sauce to taste
Preheat oven to 375 degrees. Roll out dough to 1/8-inch thick. Use a 2 1/2-inch biscuit cutter to cut out circles of dough. Place dough circles in mini muffin pans. Press them in gently being careful not to tear them. Repeat with remaining dough and re-roll scraps. You’ll end up with about 3 dozen in all. If you don’t have enough pans, keep the extra dough circles under a towel or plastic wrap so they don’t dry out until you are ready to use them. In mixing bowl combine zucchini and toss in the flour. Add remaining ingredients and mix well. Adjust seasonings to your taste. Place a rounded teaspoonful of zucchini mixture into each of the tartlet shells in the prepared pans. Don’t over fill. Bake for 12-15 minutes or until golden brown on top. They will puff up while baking but flatten when cooling. Can be served hot, warm or at room temperature. Makes about 3 dozen.
Can be frozen. To reheat take straight from the freezer and place on a baking sheet. Bake in a preheated 325 degree oven and bake for about 20 minutes, but check after 15 minutes.
Layered Crust
Somewhere between a crust and a puff pastry this crust is very flaky but also fragile. Great for small pies, turnovers, tarts and tartlets.
6 T. unsalted butter, room temperature
¾ c. vegetable shortening or lard, room temp. – you can even use chilled coconut oil
2½ c. pastry or all-purpose flour
1 t. salt
½ t. baking powder
1 t. lemon juice or vinegar
6 T. ice water, about
Start by mixing the 2 fats together and spreading them out into a ½ -inch thick rectangle. Chill at least 30 minutes before proceeding. Measure dry ingredients into a bowl and toss to mix. Score the chilled rectangle and cut the fat into ½ – ¾ -inch cubes. Drop into the flour mixture and toss to make sure all of the cubes are coated in flour. Combine liquids and toss in 2 tablespoon increments until dough will just hold together. You will see the lumps of fat. Wrap and chill dough for at least 2 hours. Now the fun begins: On a lightly floured surface roll the dough into a rectangle about ½ inch thick and 10 inches long. Fold the sides in, making 3 layers, like folding a piece of paper to put in an envelope. Turn the pastry ends to be at 6 and 12 o’clock and roll again into a rectangle. Fold again, turn again and repeat one more time for 3 turns in all. Cover and chill at least 4 hours. Makes 2.


