Mom’s Oxtail Soup


I always loved when my mom made oxtail soup. It took hours to cook and the house smelled good all day. Oxtails were cheaper back then and we had the soup often. Now, I almost look at oxtails as a splurge. Still, life is too short not to enjoy the things we love.
Oxtails can also be braised and stewed. They hold up well to pressure cooking, too, so they are great cooked in an Instant Pot. They just need the time or proper cooking method to get tender. The stock their long simmering produces is so tasty. Great meal on a stormy, winter day.
As a child, I thought oxtails came off of an ox. Seemed to make sense to me. I pictured a huge, almost feral beast. I was kind of sad to find out they were just another part of a cow.
Wherever they come from, oxtails are one of my favorite meats ever. This recipe is how my mom made the soup. You can tweak which veggies you add, depending on what you have around. Just be patient and let the soup simmer long enough for the oxtails to get tender and the stock to get filled with all that flavor. Enjoy!!
Oxtail Soup
5-7 lbs. Oxtails
6 qts. Water or beef stock* see note
2-3 small onions, peeled and halved
¼ c. chopped parsley, or to taste
handful of celery tops or two celery ribs
1 large tomato, or three small, fresh or canned, cut-up
4 large cabbage leaves
1 lb. carrots, peeled and trimmed, leave whole
3 cloves garlic, peeled
Salt and pepper to taste
Brown oxtails in soup pot in batches until browned. Add remaining ingredients, except carrots, to the pot with the oxtails. Simmer soup an hour, then add the carrots. Cook until meat is tender, about 2-3 hours longer. Remove meat and carrots from soup and strain stock. Return to kettle and skim off as much fat as you can. Adjust seasoning. Serve soup with cooked noodles and pieces of the carrots. You can eat the meat right off the bones, or remove some and dice it up to place in the soup. Makes 5-6 qts. Stock can be frozen and recipe can be halved.
Note: If you are using water, I would use Better Than Bouillon or another paste-type soup base to add extra flavor.
I got my Oxtails at Kocian Meats here in Cleveland. They were so well trimmed, I had very little fat in the stock. Thanks, Joe.
New Day Cleveland – Breakfast

Here is my most recent appearance on New Day Cleveland. Making breakfast foods.
Working with David Moss is always a joy. The whole crew makes me feel welcome.
https://fox8.com/on-air/new-day-cleveland/an-easy-and-unique-twist-on-breakfast/
Spelt and Walnut Biscotti

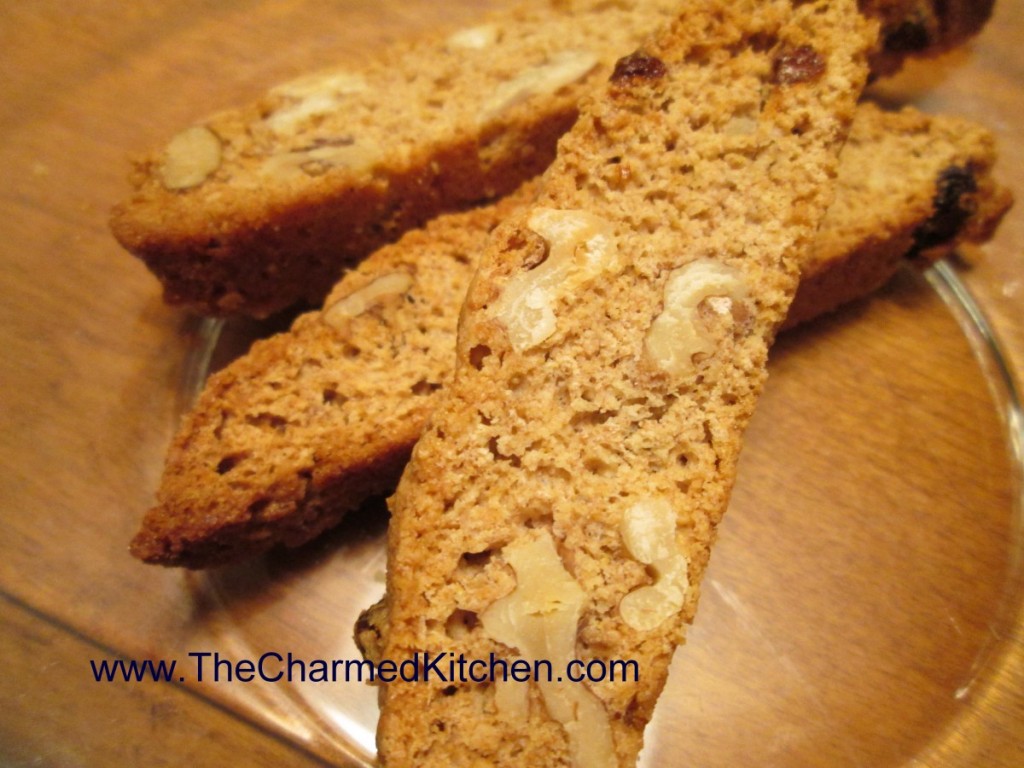
Biscotti are so easy to make. I don’t know why more people don’t bake their own. They are always nice to have with coffee, tea or a cold glass of milk. These aren’t too sweet, so biscotti make a nice breakfast. They also stay crisp for a long time, if stored in an air tight container.
Biscotti are twice baked. First in a loaf shape, then they are sliced and baked again. Most recipes will tell you to bake the slices half way, then turn them over to finish baking. A little time saving trick- just place a cooling rack on the baking sheet, then place the sliced biscotti on the rack. That way, they get crisp on both sides at once and there is no need to turn them.
These biscotti are made with spelt flour. Spelt is an ancient grain that is very closely related to wheat. It does contain gluten, so not an option for people with wheat allergies or Celiac, but a nice way to add a whole grain to your menu if you do eat wheat. Unlike whole wheat flour, which tends to be heavy in baking, spelt has a lighter texture and acts more like white flour. I used it to make these biscotti and they are crisp, light and very tasty.
Spelt Biscotti – with Walnuts
1 ¼ c. spelt flour*
⅓ c. sugar
1 t. baking powder
¼ t. salt
½ c. walnuts
¼ c. golden raisins- I often use dried cranberries or other dried fruit -optional
2 eggs
1 t. vanilla
Combine dry ingredients with nuts and raisins in medium mixing bowl. In small bowl combine eggs and vanilla and add to dry ingredients. Stir together to make a slightly sticky dough. With oiled hands shape into loaf (2”x11”) on oiled sheet. Bake at 350-degrees for 20 minutes. Remove from oven. Slice the loaf thin using a serrated knife and place slices on a rack on a baking sheet then return to oven, reduce heat to 300-degrees bake 25 minutes. Remove from oven and allow to cool. Store in an airtight container to retain crunch. Makes about 16.
* If you can’t find spelt flour you can use 3/4 c. all purpose flour and 1/2 c. whole wheat flour instead or substitute the entire amount of flour with whole wheat pastry flour.
Rich Crescent Rolls


These soft rolls are a perfect addition to any dinner. They are rich, buttery and very tender. Homemade rolls and bread just always taste better than store bought. They are totally worth the time it takes to make them.
Another perk is the way your house smells when they are baking.
These should not be confused with croissants. Croissants are made over a period of time with the dough and butter being folded, rolled and chilled a number of times to create flaky layers.
These are a soft, slightly sweet yeast dough, shaped into crescent shapes. Of course, you can make them in different shapes, if you like. I just like the way the little crescents look.
They are brushed with melted butter before being rolled up into the crescents. I also like to brush them with melted butter when they come out of the oven.
These are great served warm, with butter. I admit to loving to dip them in gravy, too.
So here is the recipe.
Rich Crescent Rolls
¾ c. milk
½ c. each butter and sugar
1 t. salt
2 packages active dry yeast
½ c. warm water
4-5 c. flour
2 eggs
Extra melted butter for brushing on the rolls
Heat together milk and butter until warm. Stir in sugar and salt. Dissolve yeast in warm water and add to milk mixture with 2 cups of flour. Beat 3 minutes. Beat in eggs. Stir in flour until soft dough forms. Knead on floured surface until dough is smooth and elastic. Place in oiled bowl and cover. Let rise until doubled. Turn dough onto lightly floured surface and knead a few strokes. Divide into fourths and roll each into a circle. Divide circle into 8 pieces (in wedges like a pie) and brush with melted butter. Starting at wide end roll up loosely and place on greased baking sheet with point tucked under. Allow 2-3 inches between rolls and curve slightly into an arc, if desired. Cover with a towel and allow to rise in a warm place for an hour, or until nearly doubled. Bake in a preheated 375-degree oven for 12-15 minutes. Brush with melted butter, if you like. Serve warm. Makes 32.
Beet “Pink” Soup


Since I had a beautiful bunch of beets, I decided to make this soup. On cooler days, I heat it up. On hot days, I serve it chilled. That is one of the nice things about this recipe. This soup is good, what ever temperature you serve it.
It is also a pretty soup. The color is so beautiful. A friend came over and I offered her a bowl. When I set it down in front of her she said, “Wow, this is really pink soup.” I just called it pink soup after that.
People seem to have strong opinions about beets. They either love them or hate them. I love them and I enjoy them in soups, salads, relishes, casseroles and more. The earthy flavor really appeals to me and the color is a delightful bonus. I added some extra veggies for more flavor and sour cream for a tart, creamy flavor and texture element. The result was a very tasty dish that is also sort of striking to look at.
Beet Pink Soup
6 or 7 small beets – or 3 large beets
2 T. olive oil
1 large onion, chopped
2 carrots, peeled and chopped
1 rib celery, chopped
3 medium potatoes, peeled and chopped
6 cups stock- I used chicken but vegetable stock or beef stock would also work
2 t. dill weed
salt and pepper to taste
1 c. sour cream or Greek yogurt- or a little more if you like
Cut beets off of their stems- leaving about 2 inches attached- this will reduce bleeding and retain more color in the beets. Place beets in a pot of water deep enough to cover them and cook until the beets are just getting tender, about 20 minutes – longer for larger beets. Remove and place in cold water. Once the beets are cool enough to handle trim off the stems and slip off the skins. Cut the beets into chunks and set aside. In soup pot, heat the oil and cook the onion until tender. Add the carrots and beets and cook a few minutes longer. Add the rest of the vegetables, stock, dill and simmer, covered, until vegetables are very tender. This will take at least 30 minutes- but cooking longer is better- around an hour. Puree the soup. To add the sour cream place sour cream in a bowl and add a ladle full of the hot soup to the sour cream, whisking until smooth. Add another ladle or two of the soup and whisk again. Return sour cream mixture to the soup. By warming the sour cream gently you prevent it curdling. Adjust seasonings and serve right away, or refrigerate and serve cold. Serves 6-8. Freezes well.
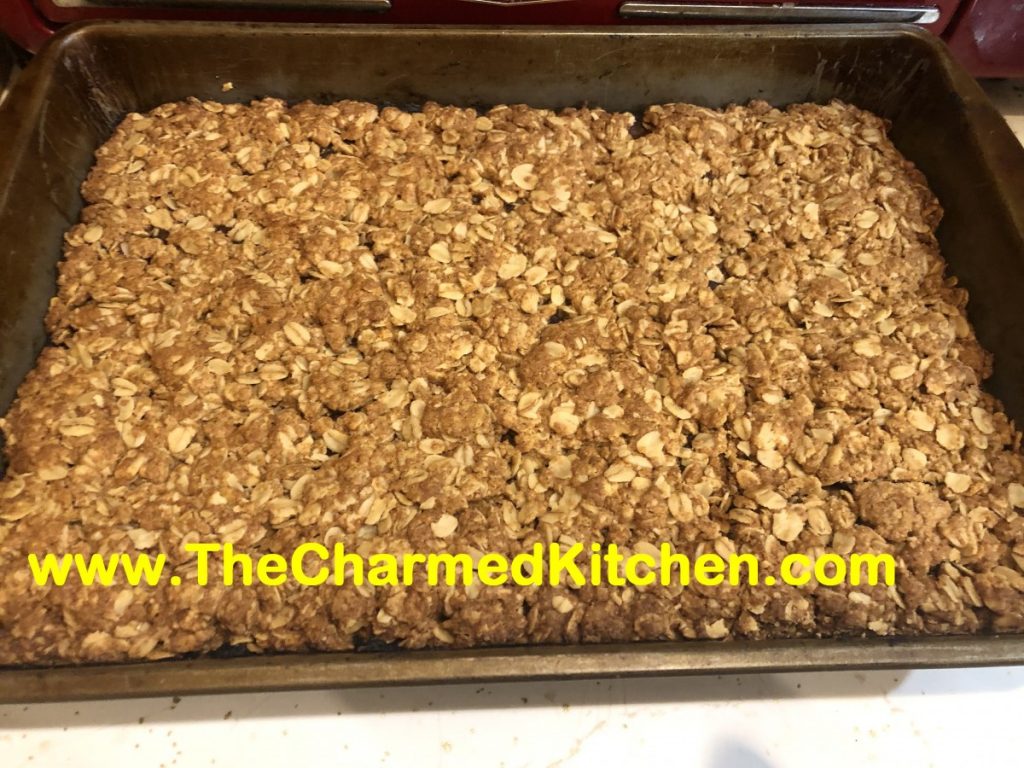
Oatmeal Date Bars

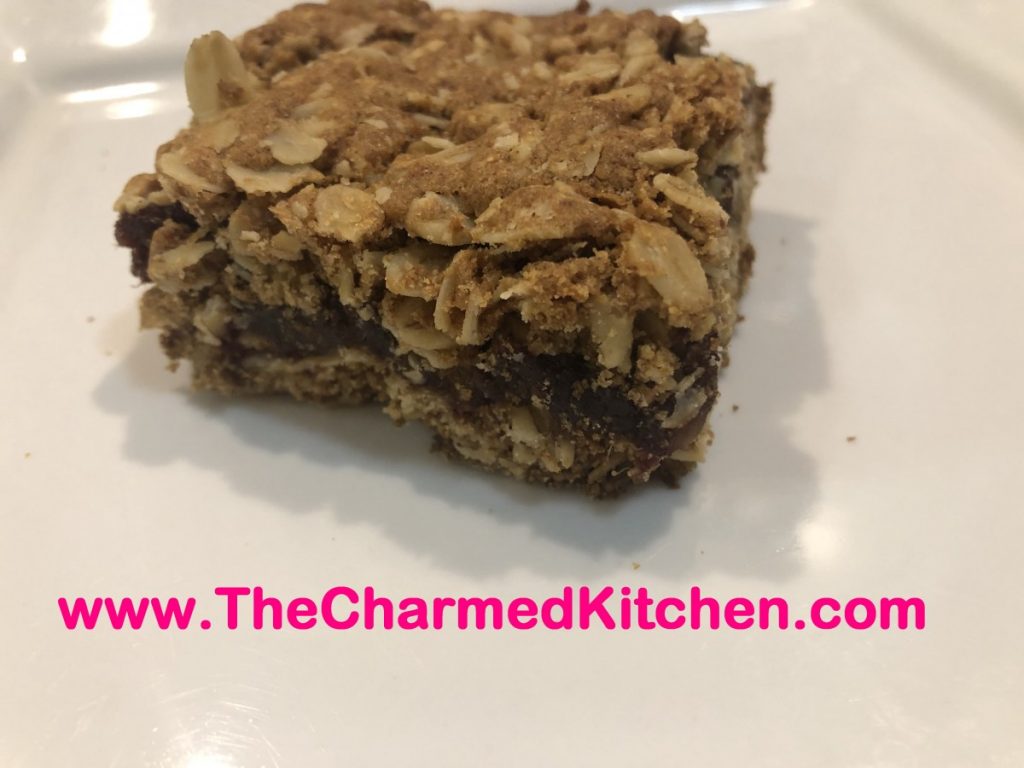
I wouldn’t go so far as to call these granola bars, but they are pretty similar. The dough is made from oats, flour, nuts, brown sugar and butter. There is also the option of making a vegan version with applesauce and olive oil in place of the butter. Both variations are good. Between the dough you add a layer of dates, although you can use any dried fruit you like or happen to have on hand. I have made these with fig jam, raisins and dried cranberries. Once cooked and cooled, you cut them into squares. They keep for days, but can also be frozen. Great for road trips, picnics, boxed lunches, breakfast or just snacking.
Oatmeal Date Bars
4 c. rolled oats
2 c. flour (you can use whole wheat pastry flour, or spelt flour)
½ c. brown sugar or ¼ c. honey
1 c. pecans, chopped
1 t. baking soda
1 t. salt
1 ½ c. butter, melted or 1 c. applesauce and ½ c. olive oil
2 t. vanilla
½ c. water
2 c. pitted dates, chopped- or 2 c. any dried fruit
Zest of 1 lemon
1 t. cinnamon
Non-stick cooking spray
Heat oven to 350. Spray a 9×13-inch pan, set aside. Combine oats, flour, sugar, nuts, soda, salt. Pour in butter and vanilla, stir until well mixed and set aside. Heat together water with dates, zest and cinnamon and bring to a boil. Simmer two minutes and remove from heat to cool a little. Press half of the oatmeal mixture in bottom of prepared pan. Spread the date mixture over the oatmeal mix and then top with the remaining oat mix. Press down firmly. Bake until golden on the top, 35-45 minutes. Cut once cool. Makes 24 bars.
Spiced Pumpkin Scones


These scones are easy to make and are not only great for breakfast and snacks- they make a fun base for shortcakes. The spice mixture gives them a rich, warm flavor.
The dough is slightly sticky and you form the scones by dropping balls of dough onto the baking sheet using an ice cream scoop. You could just use a couple of large spoons, too. Because the dough is not rolled out and cut, it makes for a more tender scone. They are a little rustic looking, with some lumps and bumps, but they taste wonderful and their texture is soft and tender on the inside with a nice crispness on the outside.
Once baked, they are drizzled with a vanilla glaze and then a cinnamon glaze.
Spiced Pumpkin Scones
4 c. all purpose flour
1/2 c. sugar
1 T. baking powder
1 t. each salt, cinnamon, allspice, nutmeg and ginger
1/2 t. cloves
1 1/2 sticks cold butter
1 c. cooked pumpkin or winter squash
3 oz. milk
2 eggs
Vanilla glaze
2 c. powdered sugar
1 t. vanilla
4-6 T. milk
Cinnamon Glaze
2 c. powdered sugar
2 t. cinnamon
4 T. milk
Preheat oven to 400. Lightly grease 2 baking sheets or line them with parchment paper. Set aside. Combine flour with sugar, baking powder and spices and stir to blend. Cut in butter until the mixture looks like coarse crumbs. Combine pumpkin or squash with the milk and eggs and stir into the flour mixture. Stir until well mixed. Dough should be just a little sticky. Use an ice cream scoop to scoop dough onto the prepared baking sheets- leaving a couple of inches between them. Hint: If you spray a little non-stick spray on the cookie scoop first the dough will pop out easier. Bake for 15 minutes or until scones are browned on the bottom and just getting golden on the top. If you want to put both baking sheets in the oven at the same time- switch them half way through the baking time and allow a few extra minutes. Remove scones to cooling rack. Meanwhile make both glazes by combining ingredients and stirring until smooth. Drizzle with the vanilla glaze while still warm and allow scones to cool and glaze to harden before drizzling with the cinnamon glaze. Makes about 20-30 depending on the size of the scoop you use.

Sarah’s Overnight French Toast


On a visit to Michigan I got to do one of my favorite things- spend time with my family. My niece Sarah is always so much fun to be around and the visits are always too short. She is a great hostess and I enjoy her cooking almost as much as I enjoy seeing her. For breakfast on the morning I was leaving, Sarah made this great baked French toast dish that we topped with warm blueberry syrup. It was so flavorful, not too sweet, and a special dish to serve for company. This is a great dish for when you are pressed for time. You assemble it the night before and then just bake it when needed. She said it was really easy to make and promised me the recipe. She also included the recipe for the warm blueberry syrup she served with it. So here is Sarah’s recipe. I loved it and I think you will, too.
Sarah’s Overnight French Toast Bake
10 cups cubed white bread (Sarah used Texas Toast)
8oz. cream cheese
8 large eggs
2/3 c. half and half
1½ c. milk
½ tsp. vanilla
Cream all together, except the bread. Put bread in 9×13 pan. Pour egg mixture over cubed bread. Cover and put in fridge overnight. Let stand at room temp for 1/2 an hour, put in 375 oven for 50 minutes. My lazy version ……take out of fridge, put in cold oven, turn oven on, set timer for one hour, go back to bed while breakfast cooks.
Blueberry Syrup
1 pint blueberries
1/2c sugar
2 -3 tbs corn starch
dash of lemon Juice
pinch of salt
Combine, cook, stirring often, until boiling.
Homemade Granola


One of the advantages of making stuff from scratch, is that you get to control what goes in it. This is really true for granola. The boxed stuff in the store is often full of way too much sugar for my taste. The base for granola is toasted oats, but after that you can get creative. I use plenty of nuts and seeds, sometimes coconut, and finish it off with an assortment of dried fruits. You can use what ever nuts, seeds and dried fruits you have around.
I prefer my granola less sweet than most commercial brands. By making my own, I get to control what, and how much, sweeteners to add. For my granola, I use honey to sweeten it. You can more or less, to suit your taste.
I know granola is most often thought of as a breakfast food, but it makes a great snack, and sprinkled on yogurt it can also be a tasty choice for lunch. Great to take along when hiking or going to the park. I actually like to sprinkle granola on ice cream, too.
Homemade Granola
3 c. rolled oats
1/4 -1/2 c. each of any of the following to equal 1-2 c. total
Sesame seeds, sunflower seeds, chia seeds, wheat germ, peanuts, pecans, almonds, hazel nuts, pumpkin seeds, walnuts, coconut… you get the idea. Don’t forget to chop up any big pieces.
1 t. cinnamon
1 t. orange peel
1/2 t. nutmeg
pinch of salt, optional
1/4 c. oil
1/4 c. honey- or add a little more if you like a sweeter granola
2 t. vanilla
Dried fruit to equal 1 -1 1/2 cups. Some choices could include: raisins, dried cranberries, cherries, pineapple, dates, figs, apricots, bananas, strawberries, blueberries etc. Cut up larger pieces.
In large bowl combine oats with seeds and nuts and toss well with seasonings. Heat together oil, honey and vanilla and pour over oat mixture, tossing to coat evenly. Spread on a cookie sheet and bake in a 300 degree oven for 30 minutes. Halfway through the baking time stir mixture so the edges won’t burn. Remove from oven and return to large bowl. Toss with the dried fruit and allow to cool before storing in an airtight container in a cool, dry place. Use in 1 month or store in freezer or fridge to keep longer. Makes 5-7 cups.
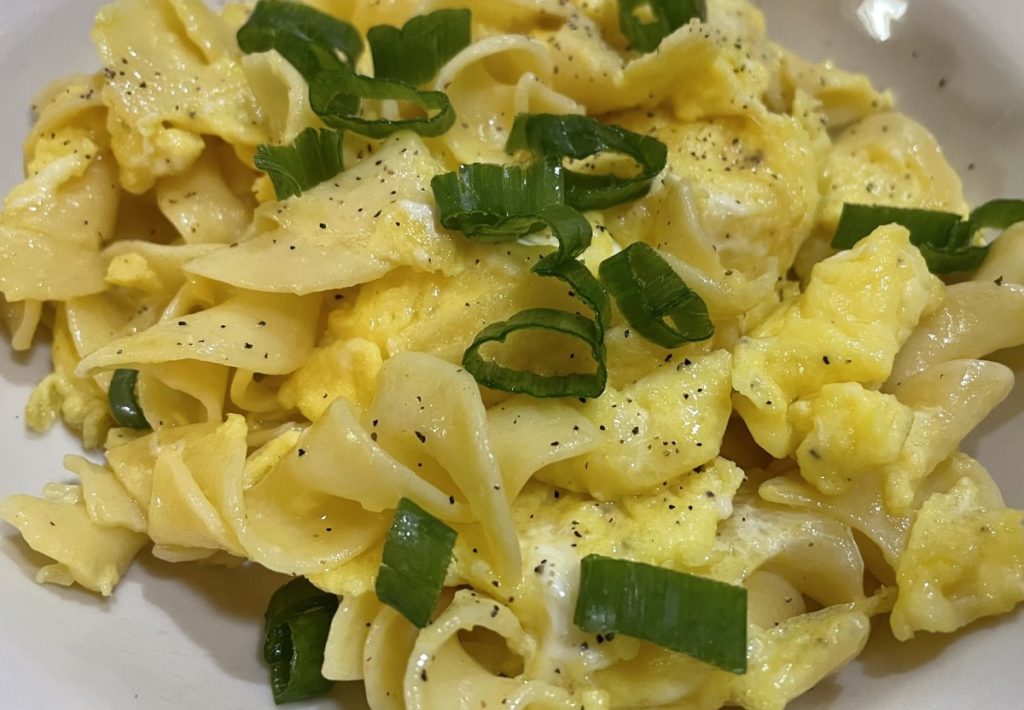
Noodles and Eggs


This is a very nostalgic dish for me. My mom made it for us when we were kids. My Busha, her mother made it, too. he recipe is pretty simple. Cooked egg noodles are heated in butter then beaten eggs are added and cooked with the noodles. Salt and pepper finish the dish. You can add extras for fun, like diced ham, cooked, crumbled bacon of a handful of cheese. I often top with chives or green onions.
My guess is the recipe came about when my grandmother was low on eggs and had breakfast to make. You can get by with an egg per person. My mom always said an egg per person and one for the pan.
I just love it, no matter how many eggs I have on hand. You can use almost any kind of cooked noodle. I have used farfalle, shell pasta and spaghetti.
So here is the family recipe you might want to try sometime.
Noodles and Eggs
1 T. butter or oil
8 oz. cooked noodles- any pasta you like is fine
8 eggs
Salt and pepper to taste
Heat butter in large skillet and add noodles, cooking until heated through. Beat eggs in bowl and add to hot noodle mixture, stirring until eggs are cooked and dish no longer looks wet. Season to taste and serve. Serves 6-8.
Variations: Add diced cooked ham, bacon or Canadian bacon with the noodles. Other options add 1 c. chopped tomato or chopped up cooked veggies. You can add 1-2 c. shredded cheese just after you add the eggs. Sometimes I top with fresh chives, green onions or herbs.