Mom’s Macaroni Salad

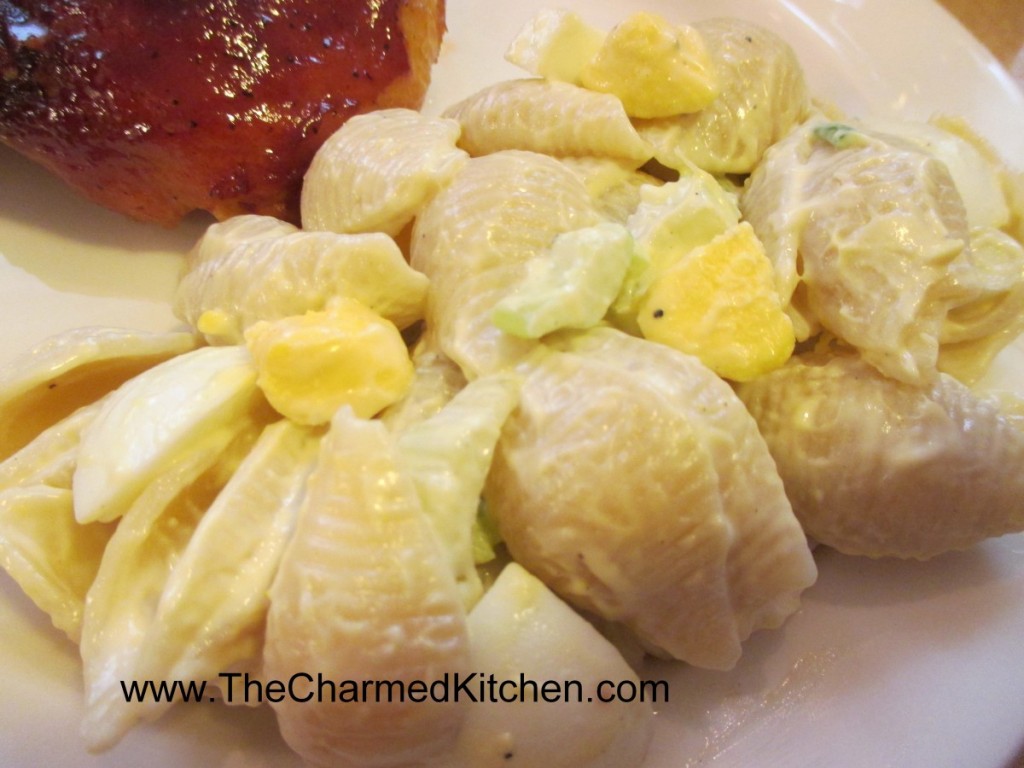
I’ve been in a nostalgic mood this week. Remembering, fondly, the picnics and cookouts from my childhood. For summer cookouts, we always had this salad. Long enough ago that it was called macaroni salad, not pasta salad. I loved it then, and I love it now.
I won’t say I don’t make other pasta salads. I do. I make all sorts of combinations, but this is the salad that brings me home.
Mom used mostly mayo, with a little salad dressing like Spin Blend. She felt it gave the salad just a little more zing. I use straight mayo, but that part of the recipe is flexible.
She added quite a few hard cooked eggs and I think they add a richness to the dish. My dad would cut up the celery and green onions for her. Mom liked the veggies cut into a fairly small dice in this dish, and Dad had great knife skills. I love the image of them cooking together.
So here it is- a family recipe wrapped up nicely with some memories, too.
Mom’s Macaroni Salad
1 lb. uncooked pasta, shells are preferred
Salt and pepper
Mayonnaise, about 11/2 cups
3-4 ribs celery, sliced thin
4-5 green onions, trimmed and sliced thin
8-12 hard-cooked eggs, cooled and peeled
Cook pasta according to package directions, but do not overcook. Rinse with cold water and drain well. Place drained pasta in a large bowl and sprinkle with salt and pepper to taste. Add mayo and vegetables and stir until well mixed. You may want to add more dressing to suit your taste. Chop eggs and stir into salad. Adjust seasonings if needed and chill before serving. Serves 8-10.
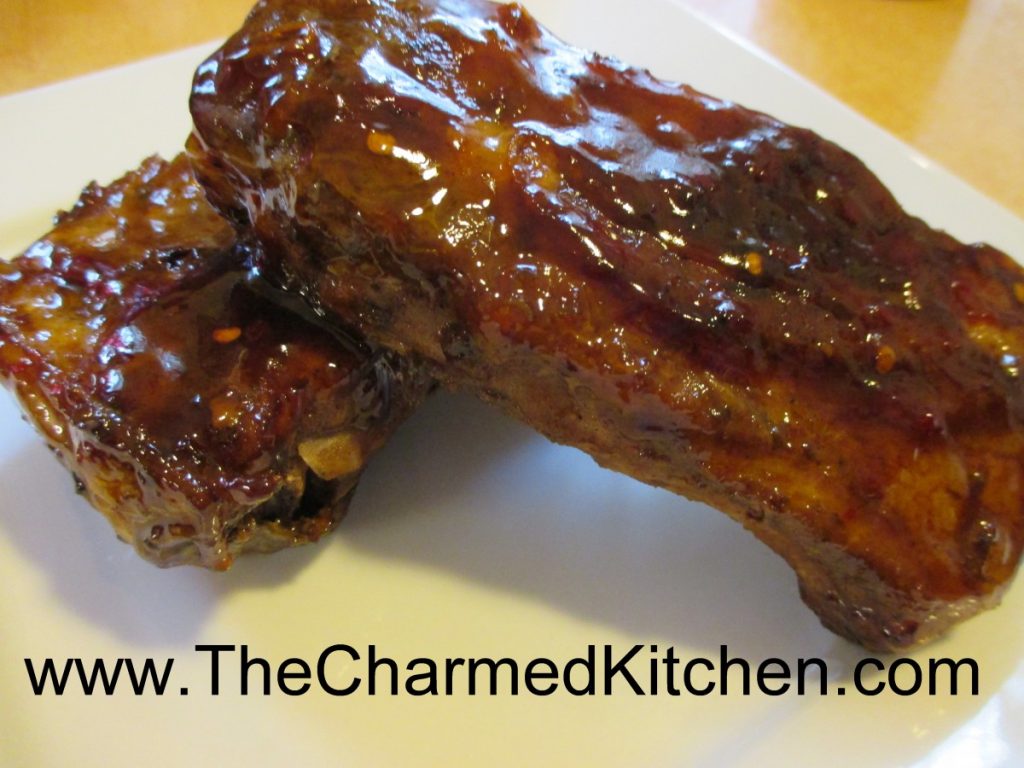
Sous Vide Ribs

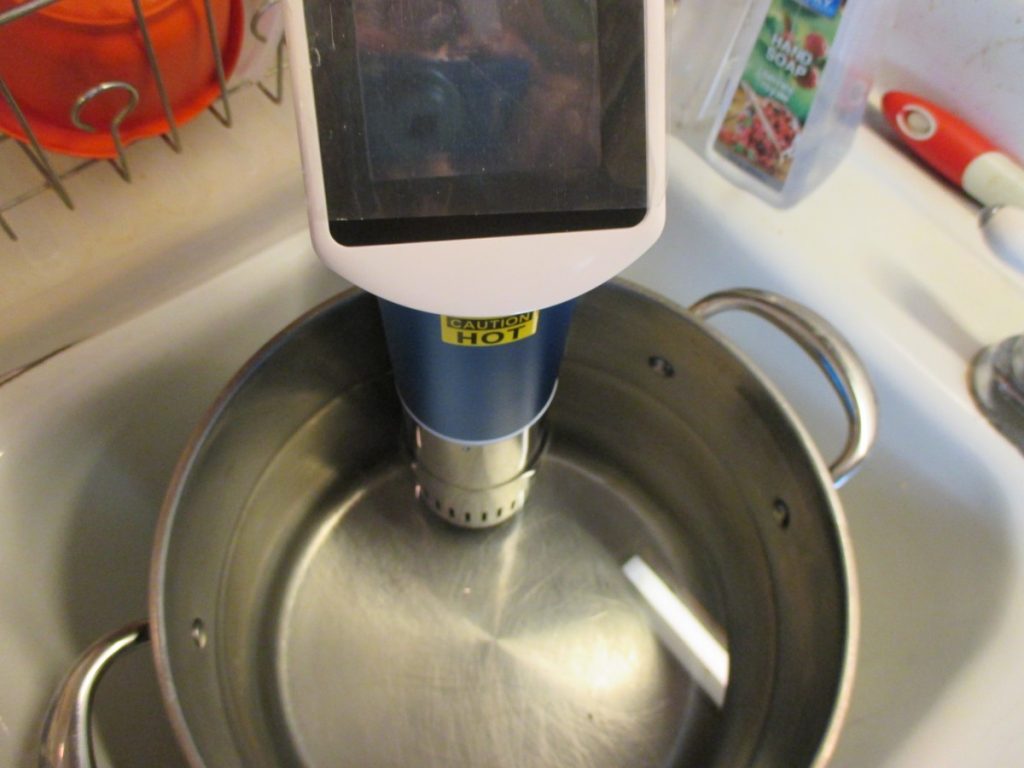
I have this fun kitchen machine called an immersion circulator, also known as a sous vide immersion circulator. They are used to cook food at very exact temperatures. It is a kitchen tool that is becoming more popular, but still unknown to a lot of people. They can be expensive, although prices seem to be coming down as more models hit the market. The one I have costs around $200, but you can find them for a lot less these days.
So why would you want to use/invest in one and how exactly is the food cooked?
Sous vide involves cooking your food in a bag, submerged in water. I know that doesn’t initially sound all that appealing, but it is pretty cool and has some advantages.
Have you ever fretted about overcooking a really expensive cut of meat? Or do you have trouble with the ends getting too done before the middle is cooked?
In an immersion circulator, you set the temperature that the water will be. If you like medium rare beef, you would set the temp at around 135 degrees F (57 Celsius). That means the water would maintain a temp of 135 degrees. When you put the meat in the circulator it can’t overcook. It will only get to a max of 135 degrees, or whatever temperature you like. The meat can’t overcook, even if you leave it in for several hours. It also will be cooked the same from one end the the other. This gives you the opportunity to cook less expensive cuts of meats for long periods, making them tender, but still rare. The leg of lamb we had for Easter was wonderful. When a guest was delayed, I didn’t have to worry about it getting overdone, either.
The sous vide machine is attached to a pot that is filled with water. Once you set it to the temperature you want, you place the bag with the meat in it, in the water. Set the timer and let the circulator do its job. You can also buy machines that are self contained. Check water levels once in awhile, but they don’t go down very much, even after long cooks.
One disadvantage is that the meat will not get that nice sear on the outside that comes from more traditional methods of cooking. To remedy that, you remove the meat from the bag, once it has cooked, and brown it then. I like to use a smoking hot skillet for this. You brown the meat over high heat, turning it until it looks the way you want it to look. This actually worked great for the ribs. You could also place the meat under the boiler for a few minutes or even on a hot grill. You can also sear rthe meat first, then put it in the bag and sous vide.
Another slight disadvantage, is not smelling the meat cook. Because everything is sealed up in bags, there are no yummy aromas in the house. At least, not until you open the bags to brown the meat. I have confused guests, who arrived for dinner, but smelled nothing cooking.
It is a nice way to cook in hot weather. Sous vide does not nearly generate the heat that an oven would.
Cooking the Ribs
So for my spare ribs, I wanted them to be very tender, but not mushy. I set the pork to cook at 145 degrees Fahrenheit or 60 degrees Celsius. That is the minimum safe temperature for pork. You can cook it at a slightly higher temperature- but not lower. I seasoned the meat with salt and my Ethiopian seasoning. I used a freezer Ziploc bag. I made sure I got as much air out of the bag as I could, and made sure it was sealed. I then double bagged the ribs, to be safe. Using a vacuum sealer or pump will help remove more air. Nice, but not a must.
I cooked my ribs for 12 hours the first time I made them. I have cooked them for as long as 24 hours. There is a lot of leeway for how long you have to sous vide meat. Tougher cuts should be cooked longer, to make them more tender. The 12 hour ribs were very tender, but the 24 hour ribs were better. Once the time was up, I took the ribs out, heated up my skillet, and browned the ribs on both sides. This is when you can add sauce, if you like. I added a sweet and sour sauce to this batch. They were tender and very juicy.
Unlike poaching, the meat is never in contact with the water, so all the flavor stays in the meat. Because you have such precise control, you don’t end up with overcooked meat, either.
There are videos all over the internet that discuss and share sous vide cooking as well as groups on Facebook. I am still learning and don’t consider myself an expert. I just wanted to try cooking my ribs this way. I was very happy with the result. I can’t say whether an immersion circulator is a good investment for you or not. I will say that I love mine and am using it several times a week.
Picnic Mini Quiches

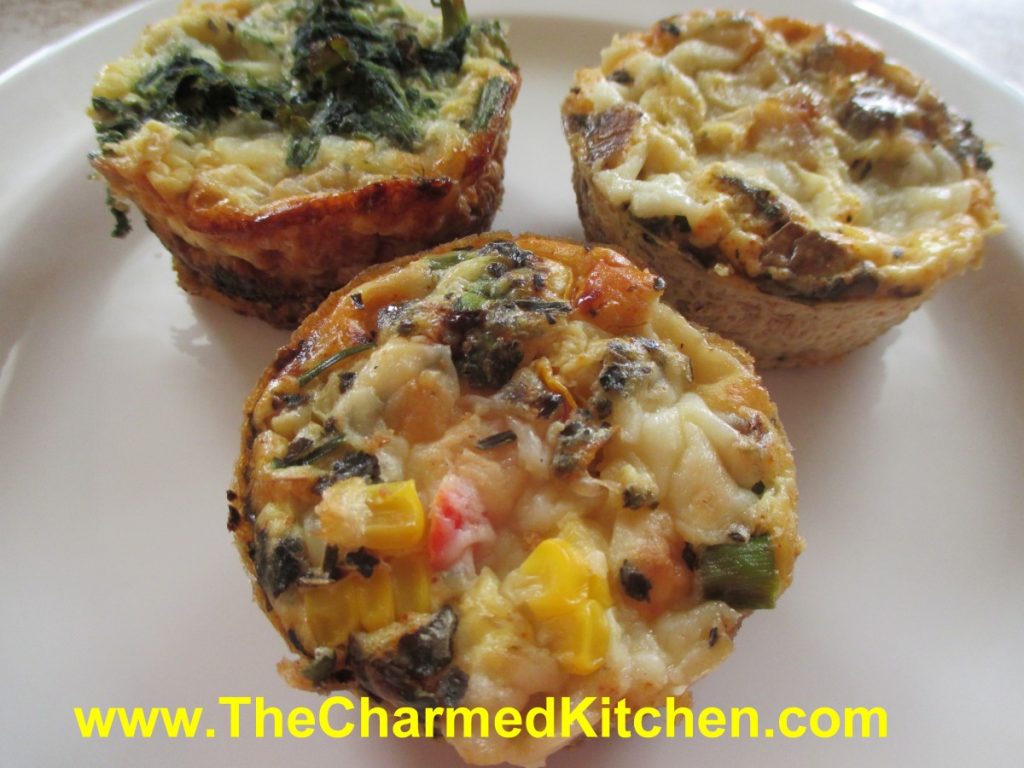
These tiny quiches pack a lot of flavor. They are also a great take along for picnics and cook outs. Since you can eat them hot or cold, they make a nice food for road trips, too.
The quiche recipe is made up of three parts- the crust, the filling and the custard. They are baked in muffins tins and each recipe makes a dozen. I have two crust recipes- including a gluten free crust that is made from rice and zucchini. There are three filling choices, but you can get creative and make a number of different variations. The custard is pretty straightforward- half and half, eggs and seasonings. I make a couple of batches at a time and then freeze some for later.
Picnic Quiches
Crust Options:
Rice Zucchini Crust (Gluten free)
1½ c. shredded zucchini
1¼ c. cooked rice (white or brown)
1 egg
¼ c. Parmesan cheese
Crouton Crust
3½ c. garlic-cheese croutons, about 5 oz., ground
1/3 c. melted butter
Fillings:
Mushroom and Onion
1 medium onion, chopped
Oil
8 oz. mushrooms, cleaned and chopped
3-4 oz. cheddar cheese, shredded or cubed fine
In skillet cook onion in oil until lightly browned. Add mushroom and cook until mushrooms are golden. Cool and combine with cheese before using.
Spinach and Bacon
12 oz. bacon, cooked and crumbled
10 oz. package of frozen spinach, thawed and squeezed dry
4 oz. Swiss cheese, shredded
Combine all ingredients. Set aside until ready to use.
Confetti
1 ear corn, cooked and kernel cut off the cob- about ½ cup
½ c. mined fresh sweet pepper
¼ c. chopped green onion
4 oz. shredded cheese- I like a sharp cheddar in this filling
Custard:
1c. half and half
3 eggs
½ t. each basil and salt
1/8 t. each garlic powder, pepper and paprika
Directions
Grease 12 muffin cups (3 inch). Prepare crust of your choice by mixing crust ingredients together. Pat 2 tablespoons of the crust mixture into each muffin cup. Bake in a 350 degree oven for 10-12 minutes. Cool before filling. While baking and cooling crusts, prepare filling of your choice and make the custard.
Spoon 2 tablespoons of filling over each cooled crust. Spoon about 3-4 tablespoons of the custard over the filling. Bake in a 375 degree oven for 15-20 minutes. Cool on wire racks, chill completely before packing for your picnic.
New Day Cleveland – Rainbow Salad

Thanks to David Moss and the rest of the crew at New Day Cleveland for another fun time. Here is my latest appearance.
https://fox8.com/video/new-day-cleveland-the-charmed-kitchen/8679585/
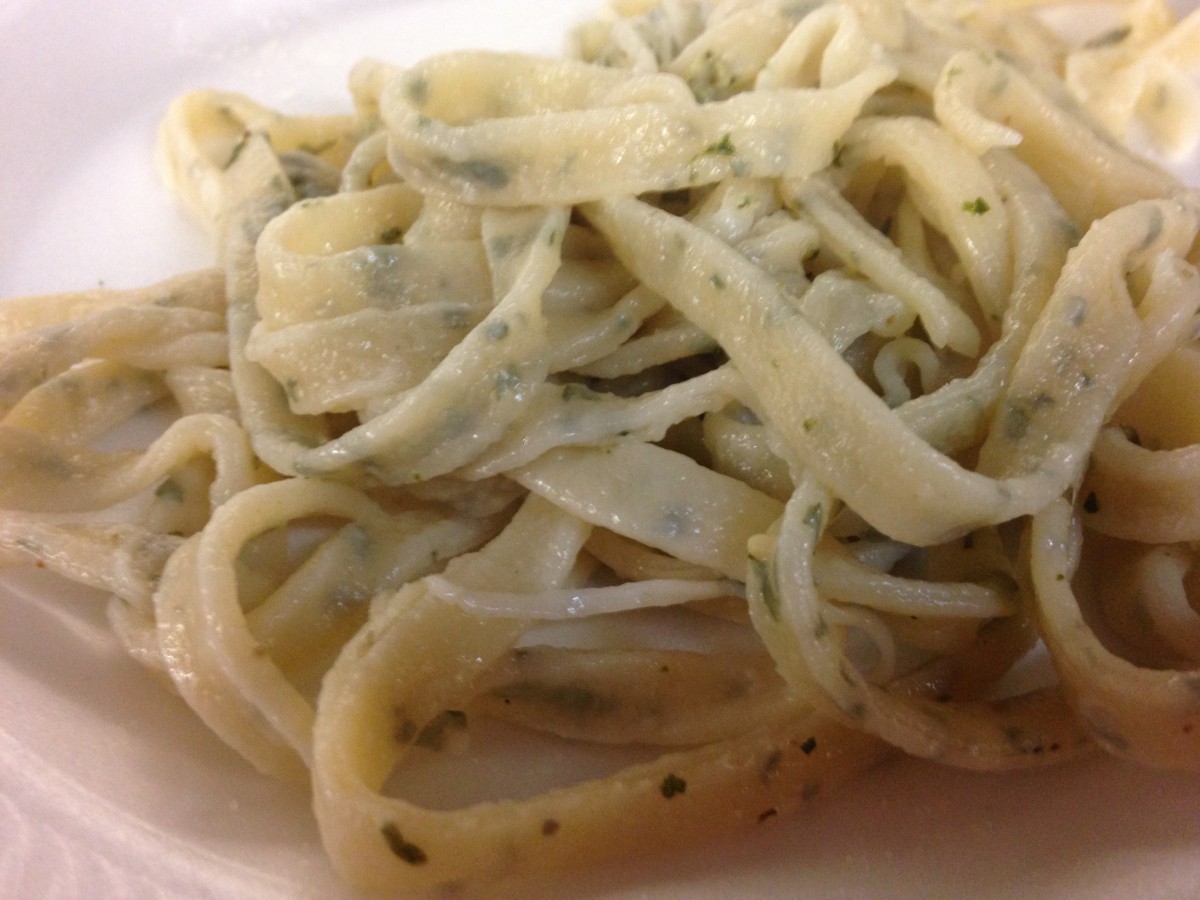
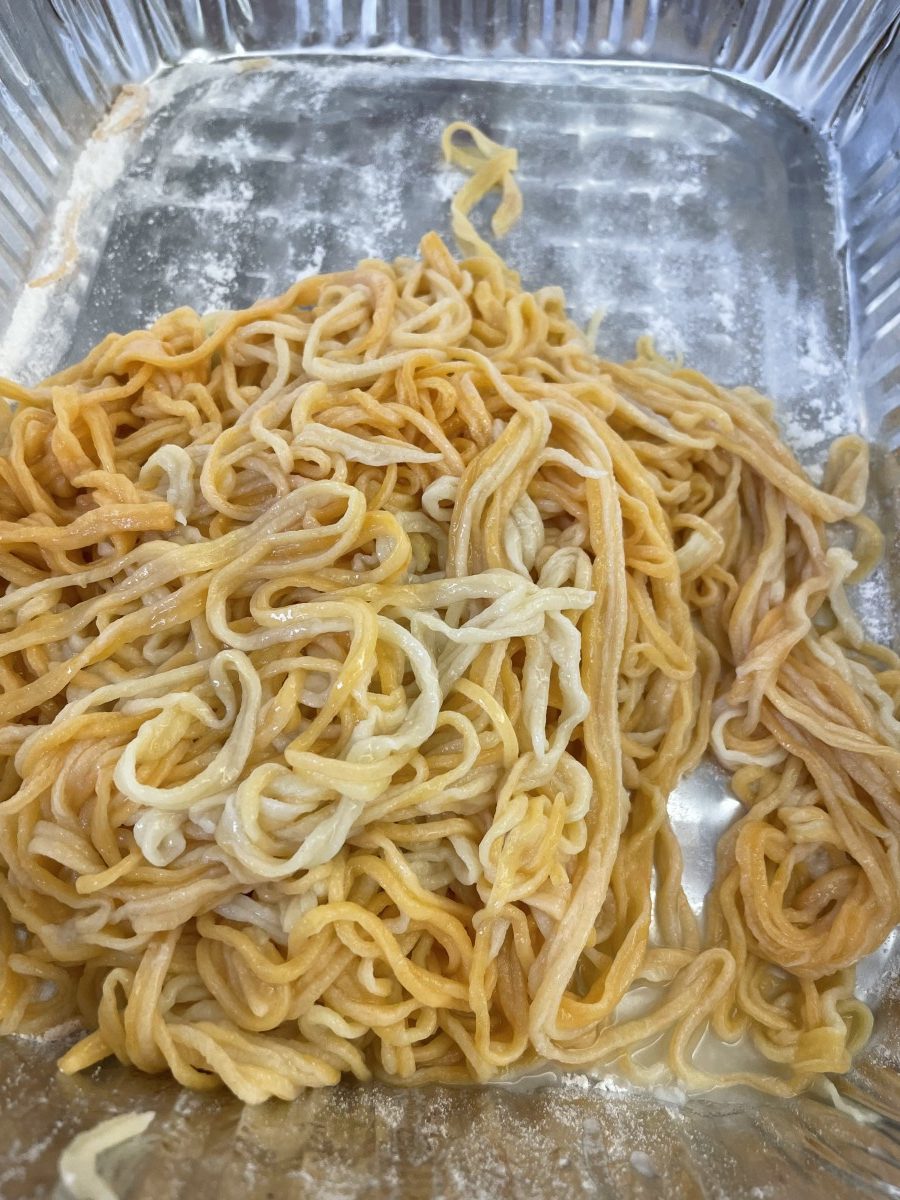
Homemade Pasta

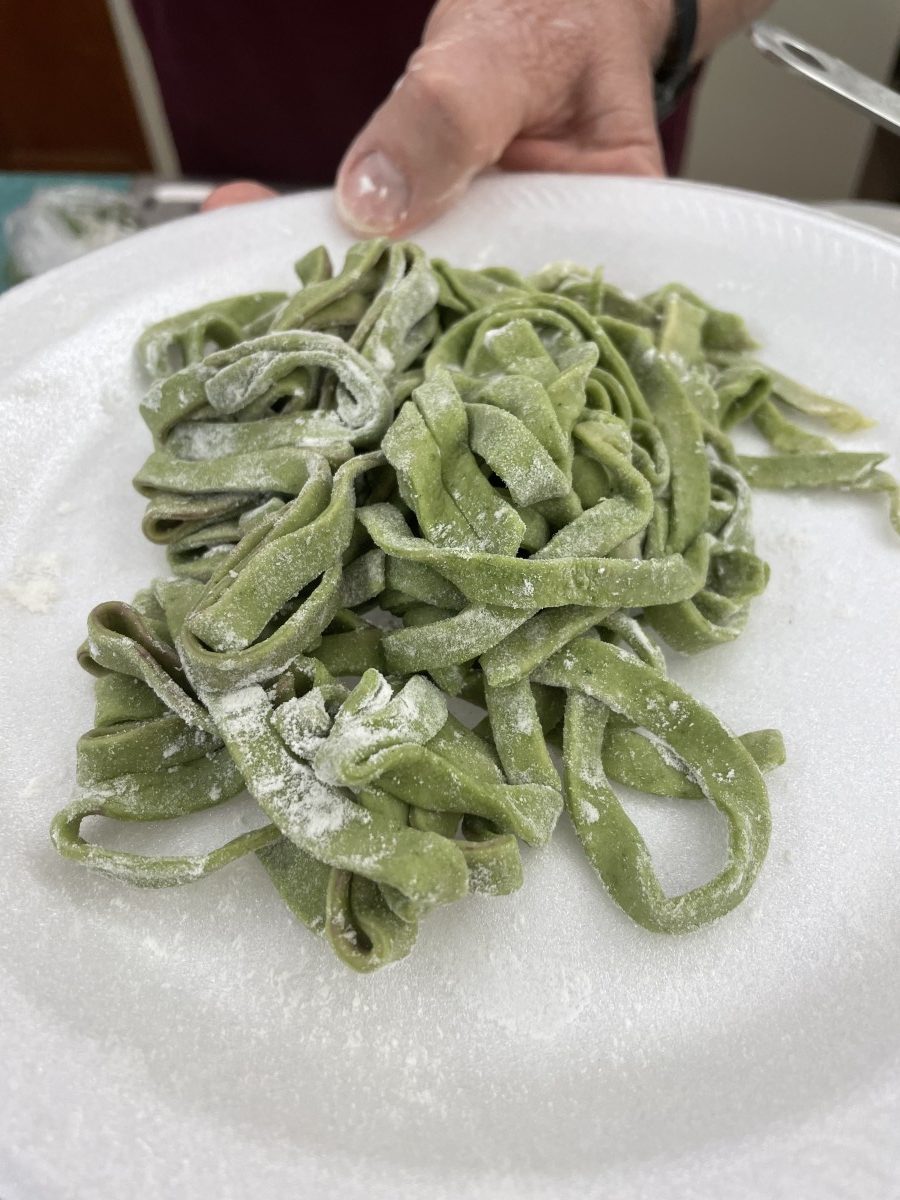
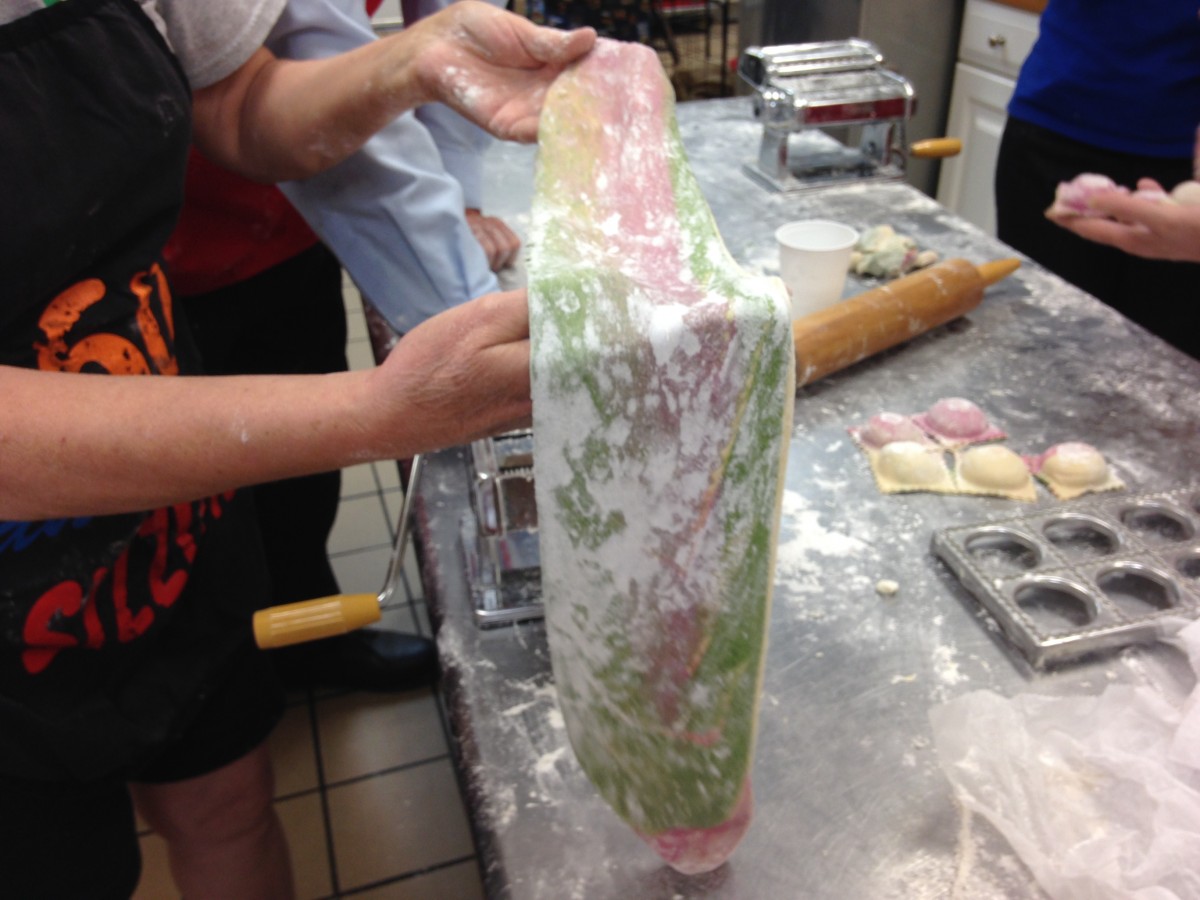
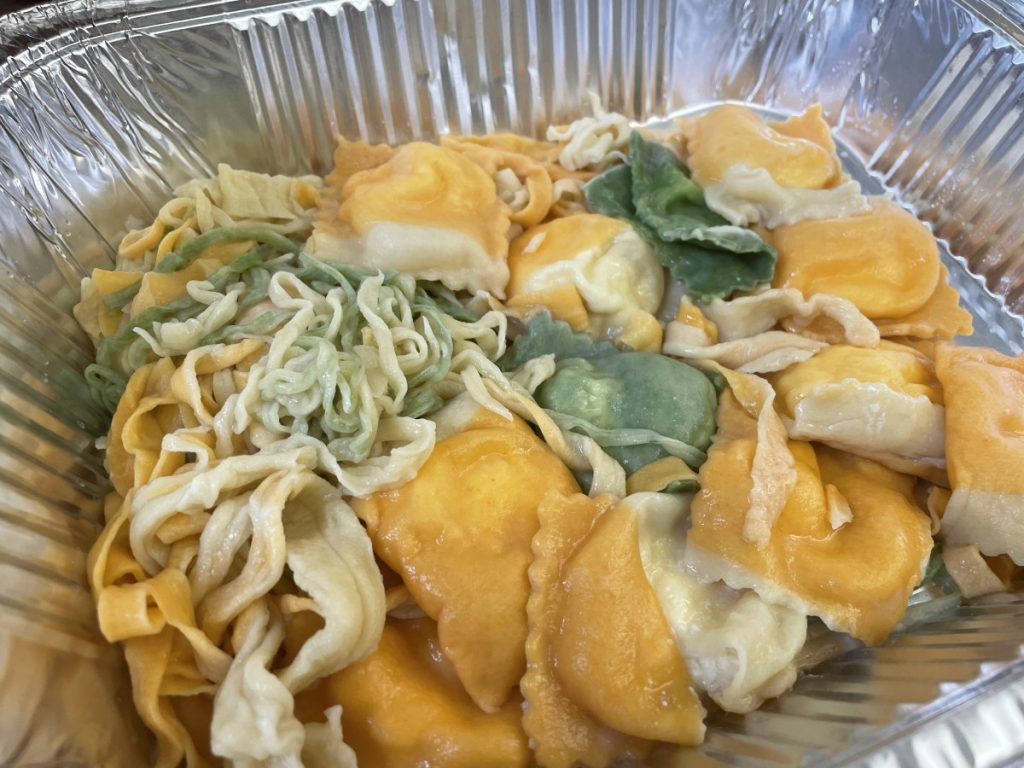
Homemade pasta is so much fun to make and the flavor is worth the extra effort. I taught a pasta making class last night. Everyone had a great time. We made several different veggie based pastas, including spinach, carrot and beet. The recipe is pretty simple. Cooked veggies and flour.
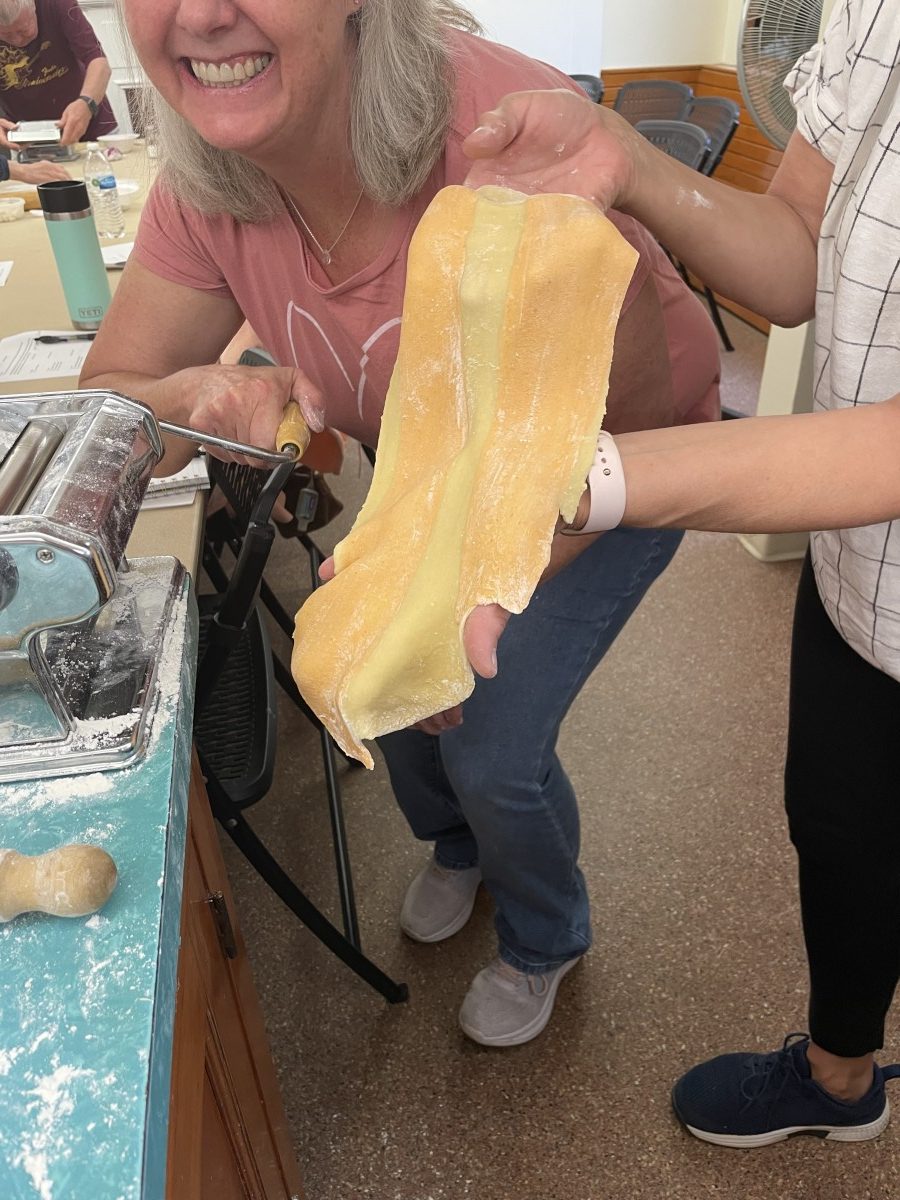
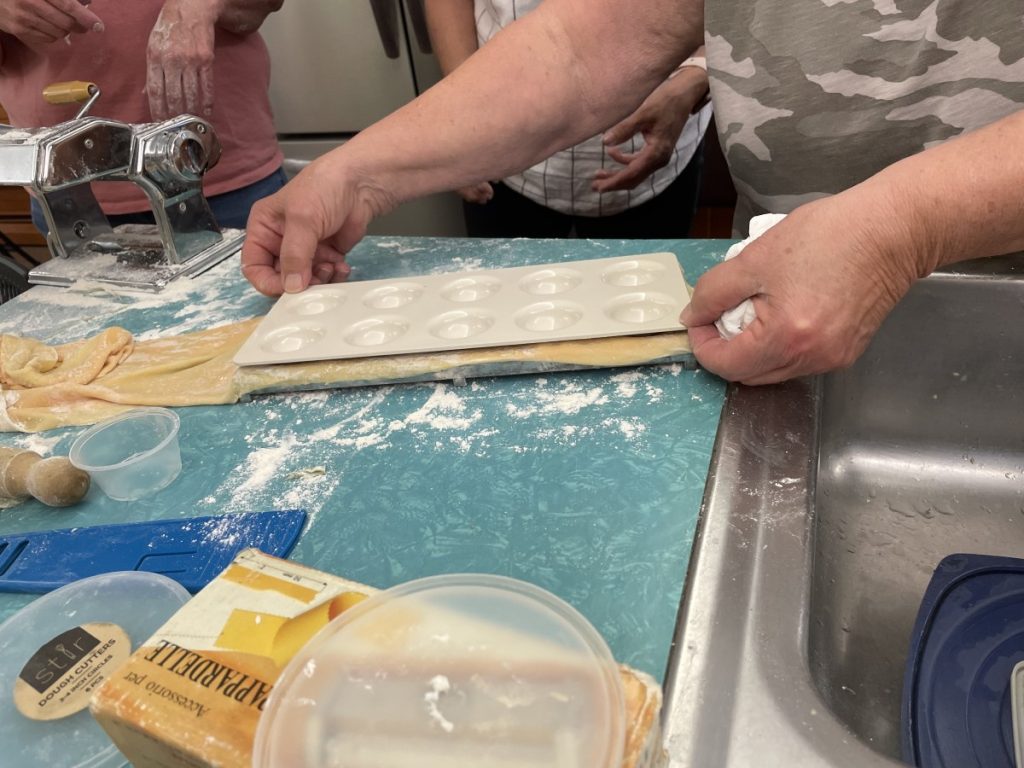
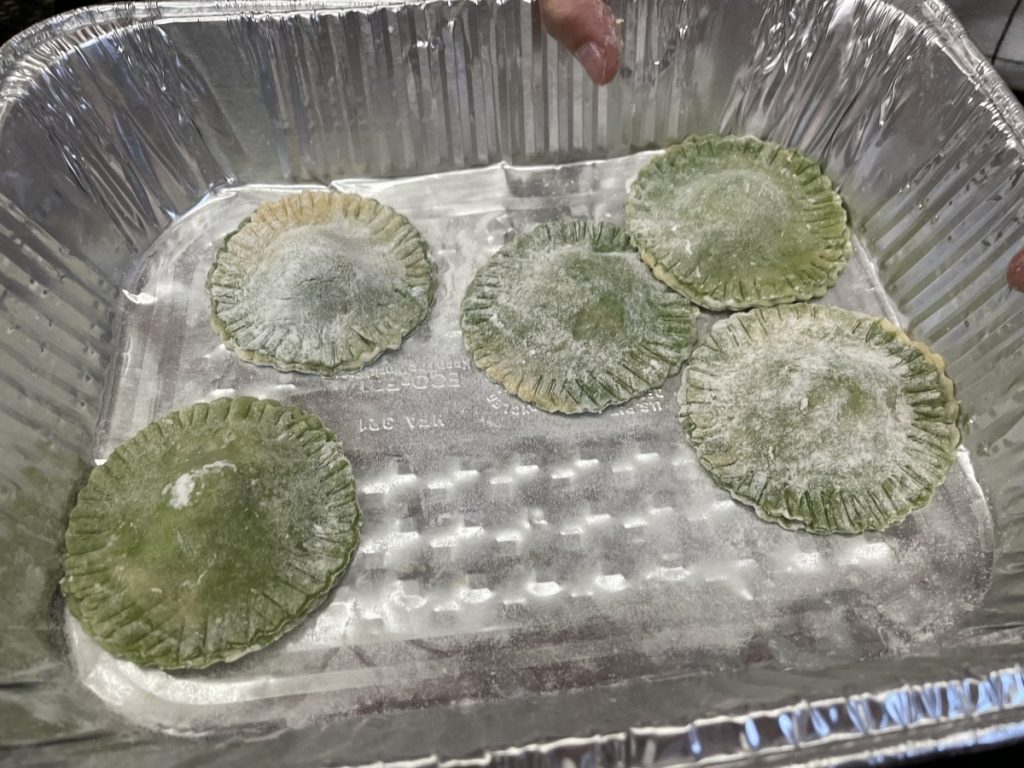
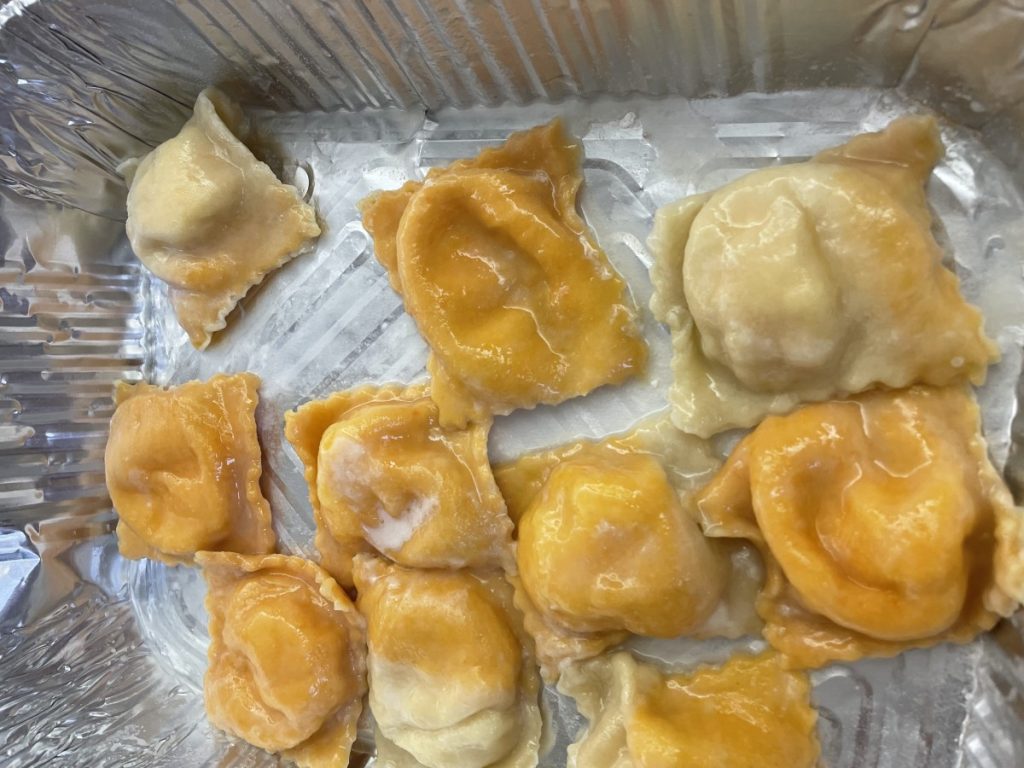
We combined the ingredients in a food processor, then let the dough rest before rolling. Once you are ready to roll out your pasta, the shape is up to you. You can hand roll the pasta, and cut into noodles. We used pasta makers to roll the dough, and then a cutting attachment for the angel hair pasta and linguine. Some dough was also used to make cheese stuffed ravioli, or combined with other pasta dough for more of a rainbow pasta.
We also had some egg based pasta dough.
Directions for mixing the dough is all the same- combine ingredients in a food processor and mix until dough forms into a ball. Allow to rest, covered, for 20 minutes, before rolling.
To cook fresh pasta, noodles are cooked in boiling, salted water for 1-2 minutes. Ravioli are cooked in boiling water for 3-5 minutes.
Mixed veggie pasta, ready to be cut

Spinach angel hair
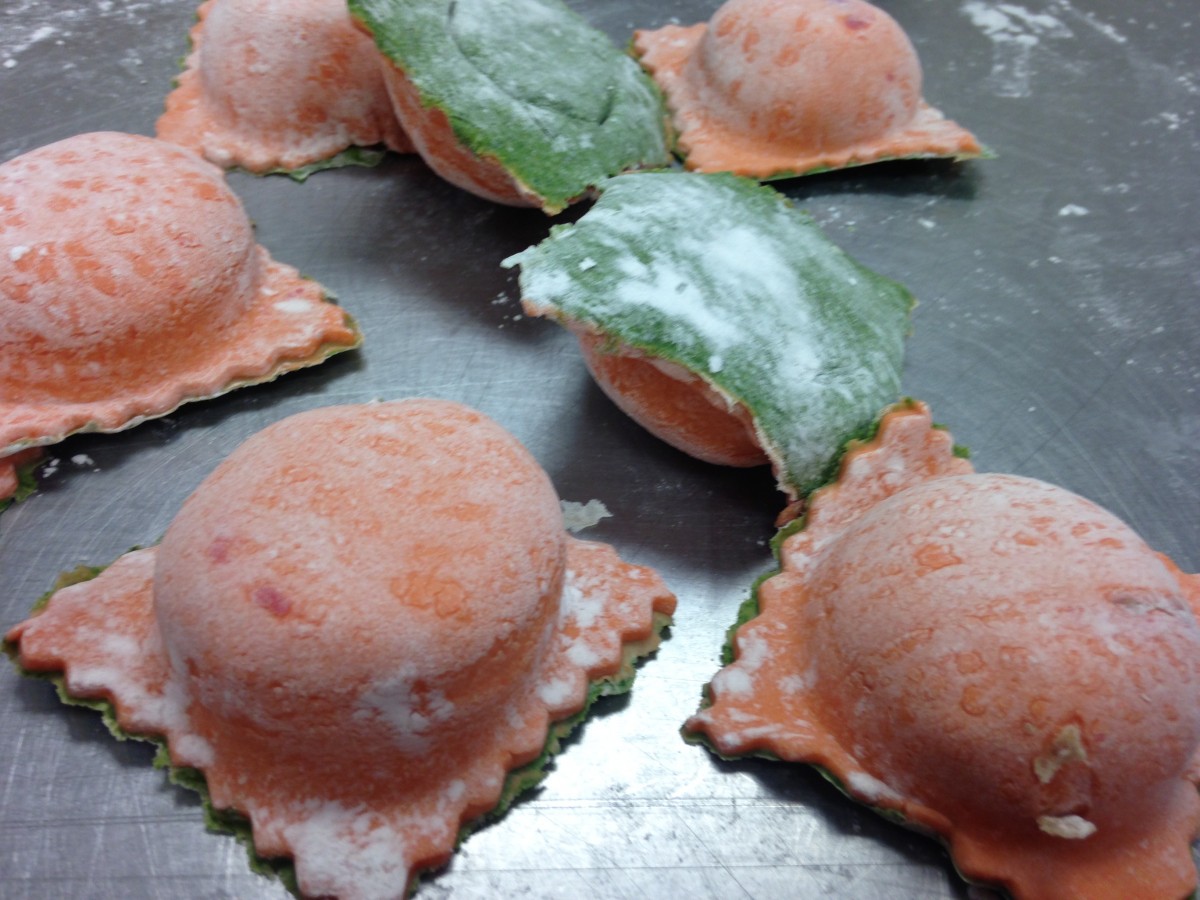
Carrot and Spinach Ravioli
Parsley Linguine
Carrot Pasta
1 c. flour
1/3 c. cooked carrots
1-2 T. water, if needed
Beet Pasta
1 c. flour
1/3 c. cooked beets
1-2 T. water, if needed
Spinach Pasta
2 c. flour
1 10 oz. package frozen spinach, thawed, drained, reserving some of the liquid
Mix this dough as for other pastas, but don’t be too quick to add reserved liquid. While processing, you’ll get water out of the spinach. May require more kneading and rolling than other pasta dough. Be patient, it’s worth the work.
Parsley Pasta
1 c. flour
3 t. chopped fresh parsley
1 egg
1 T. oil, (optional)
2-4 T. water, if needed
Basic Pasta Dough
1 c. flour
1 egg
1 T. olive oil
1 T. water, if needed
Four Cheese Ravioli Filling
3 c. shredded mozzarella cheese
15 oz. whole milk ricotta cheese
8 oz. cream cheese
5 oz. shredded Parmesan cheese
Combine all ingredients and mix well. Chill until ready to use. This will fill dozens and dozens of ravioli. Extra filling can be frozen and used another time.
More pictures from last night


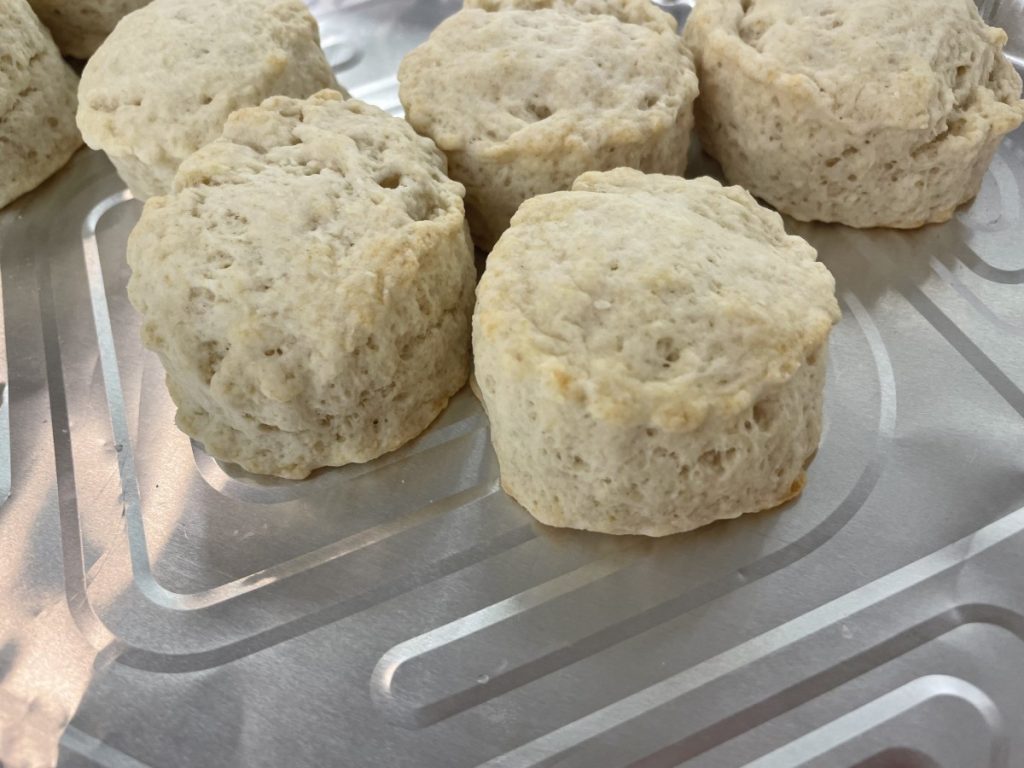
Cream Scones

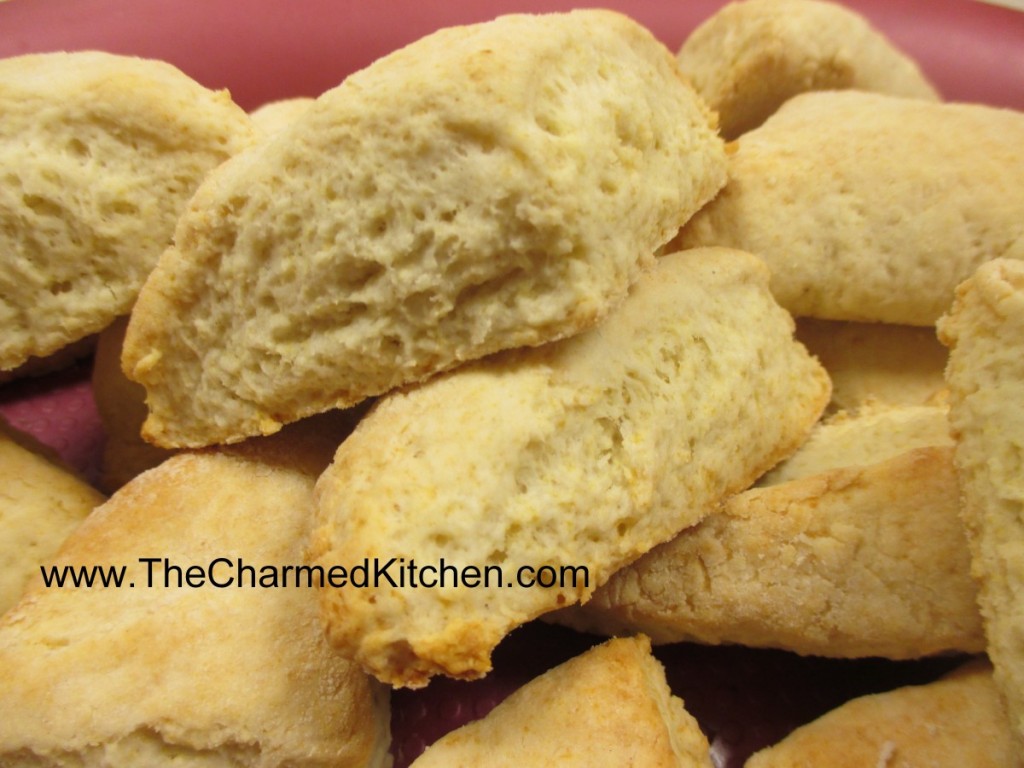
I must admit that for me, the difference between a scone and a biscuit is sometimes hard to see. Both use the same ingredients, for the most part. They can be rolled and cut out the same way, too. I often say that scones are like biscuits, but with more stuff in them. Scones are often sweeter, too.
This recipe is a tough call for me. I was given the recipe by a friend a long time ago. She called them Cream Scones. I could easily see calling them Cream Biscuits, instead. Whatever you call them, these little gems are tender, flaky and super easy to make. You can make variations with all sorts add ins. I recently made some with mini chocolate chips and orange zest. They also are great for shortcakes!!
Cream Scones
2 c. flour
1 T. sugar
½ t. salt
1 T. baking powder
1 c. heavy cream
Preheat oven to 425 degrees. Sift together dry ingredients and gradually add cream to form soft dough. Knead lightly on a floured board until dough sticks together. Roll to ½ – ¾ –inch thickness and cut with 2-inch biscuit cutter. Re-roll scraps and continue cutting, handling dough as little as possible.* Place on baking sheet and bake 10-12 minutes or until golden. Makes 8-10.
* Instead of rolling them out and cutting into rounds, I pressed the dough into an 8-inch square. I cut the square into 4 smaller squares. I then cut and “x” across each of the four squares, making 4 triangles (16 in all). Bake as directed above.
Here is the cut out version made in class last week
Mushroom Pastries/Empanadas

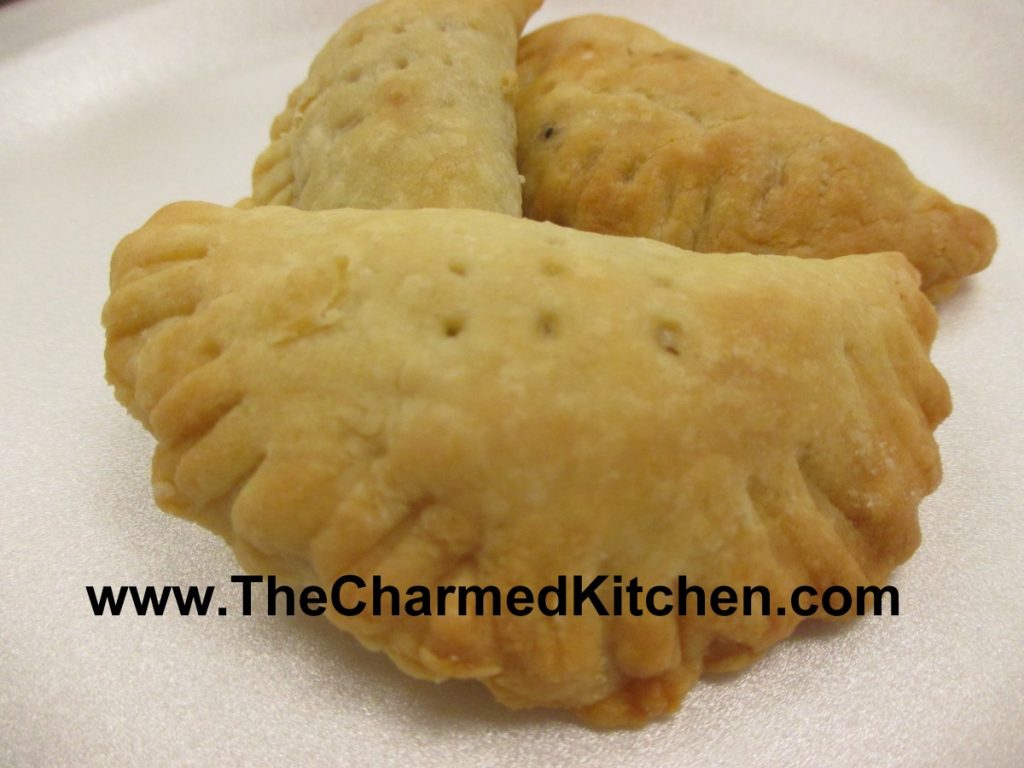
I made a batch of these the other night. I always called them mushroom pastries, but thought empanadas might be a better name for them. They are very tasty, whatever you call them. The filling is a combination of mushrooms with onions, thyme and sour cream. The pastry is a tender, flaky dough.
They are a fun food to take with you. Portable enough for picnics!!
They make great appetizers or can be served as a meal, maybe with a salad. Fun for parties, brunch or lunch!
Mushroom Pastries/Empanadas
1 (8 ounce) package cream cheese
1 cup butter
2 cups all-purpose flour
2 tablespoons butter
3/4 pound fresh mushrooms, finely chopped
1/2 medium onion, chopped
1/8 teaspoon dried thyme
1/4 teaspoon salt
1/2 teaspoon ground black pepper
1 1/2 teaspoons all-purpose flour
1/2 cup sour cream
In a medium bowl, mix together the cream cheese and 1 cup of butter until well blended. Mix in the flour until fully incorporated. Pat into a ball, and refrigerate while you make the filling. Melt 2 tablespoons of butter in a large skillet. Add the mushrooms and onion. Season with thyme, salt and pepper. Cook and stir until tender, about 5 minutes. Sprinkle the flour over everything so it won’t get lumpy, then reduce the heat to low, and stir in the sour cream. Heat just until thickened, then remove from the heat. Cool filling. Preheat the oven to 350 degrees F. On a lightly floured surface, roll the dough out to about 1/4 inch thickness. Cut into 3 inch rounds. Place a small amount of the mushroom mixture on one side of each circle, then fold the dough over and press to seal. Prick the tops with a fork to vent steam, and place the pastries on a baking sheet. (They can also be frozen at this time until needed.) Bake for 15 minutes in the preheated oven, or until golden brown. If baking frozen turnovers, it may take an additional 5 minutes.
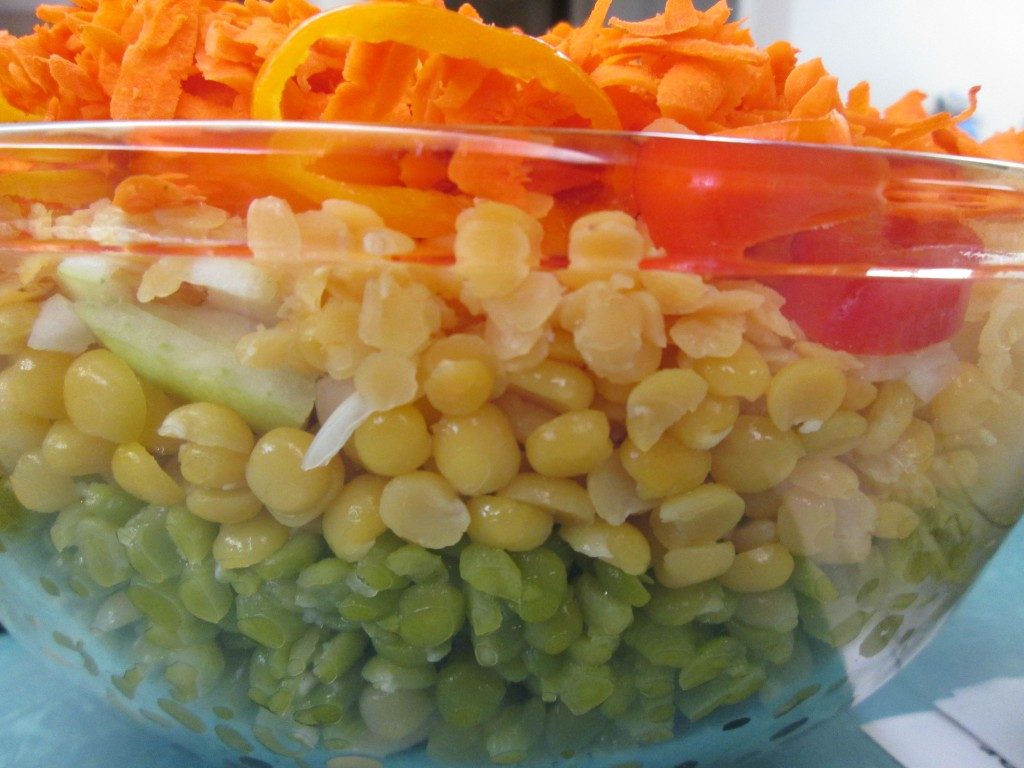
Rainbow Salad

When you hear green or yellow split peas- do you think of soup? You probably do. But when cooked until just tender, split peas make a great salad ingredient. I often just add some cooked split peas to a tossed salad. They add flavor, protein and a nice texture to salads. An added bonus is that split peas can be cooked from dry to tender in about 20 minutes. That makes them a great choice when time is tight.
This is one of my favorite salads using both green and yellow split peas. Fresh and colorful, it is a big hit with vegetarian and non-vegetarian friends. If some of you are looking for new meatless meals ideas, this one is a winner.
The salad uses both green and yellow split peas, along with black beans, butter beans, red lentils and assorted veggies. It is a great combination of colors and textures. It does make a lot, but you can easily cut the recipe in half.
The dish was inspired by my nephew Danny’s love of sand art when he was a kid. The ingredients are layered in the bowl for a pretty presentation. It is also an homage to the layered salads I remember from my youth. I like this one a whole lot more.
Rainbow Salad
1 c. each green split peas, yellow split peas and red lentils
1 can black beans, rinsed and drained
1 can butter beans, rinsed and drained
1 c. diced sweet onion
1 c. diced sweet pepper
1 c. grated carrot
Cook split peas and lentils separately just until tender. Split peas, both green and yellow will take 20 minutes. Red lentils will take about 8-10 minutes. Drain and rinse each under cold water when done and set aside until ready to use, or you can cook them a day ahead and keep chilled. Each will yield about 2 1/2 c. cooked.
In large glass bowl, place the following ingredients in this order.
Black beans, butter beans, green split peas. yellow split peas. onion, red lentils. carrots and peppers. Pour over dressing and chill several hours or overnight. Serve on a bed of greens. You can also leave the salad plain and serve dressing on the side.
Dressing *
1/2 c. oil
1/2 c. vinegar, I like apple cider vinegar or red wine vinegar
1 (14 oz.) can diced tomatoes, undrained
2-3 T. sugar
1/2 c. parsley or cilantro
1 t. each chili powder, cumin and salt
dash hot sauce
Combine in a blender or food processor until smooth.
*Note: Any fresh or bottled dressing you like can be used. Balsamic works very well. I often serve it with homemade Italian dressing.
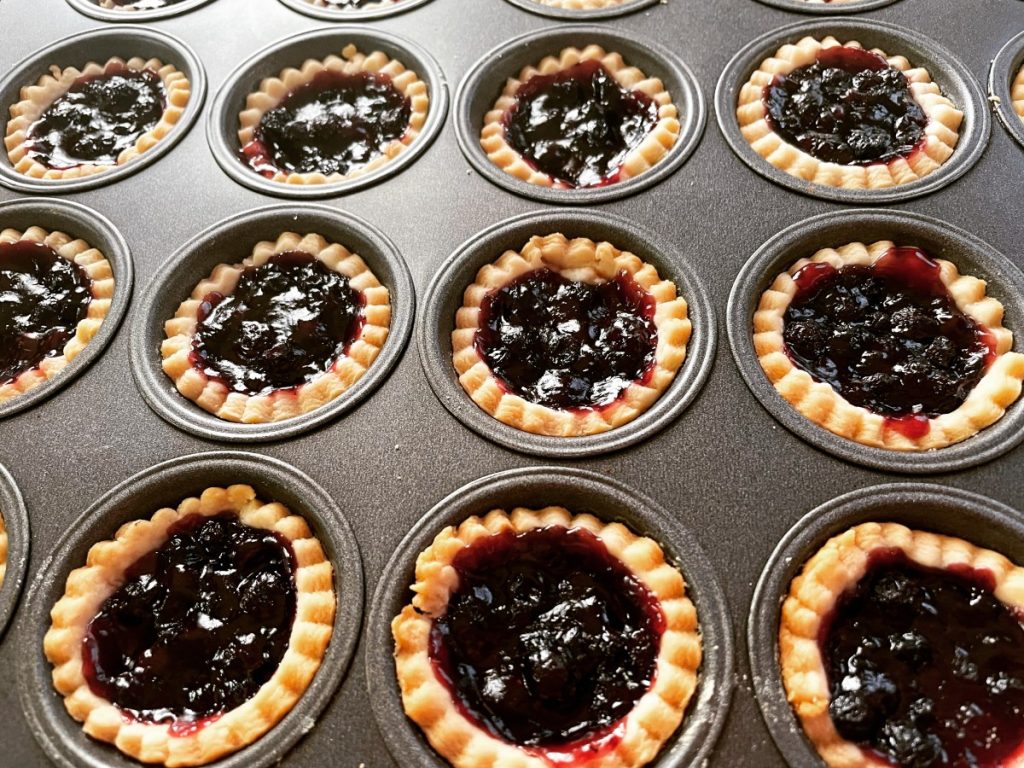
Mini Picnic Fruit Tarts

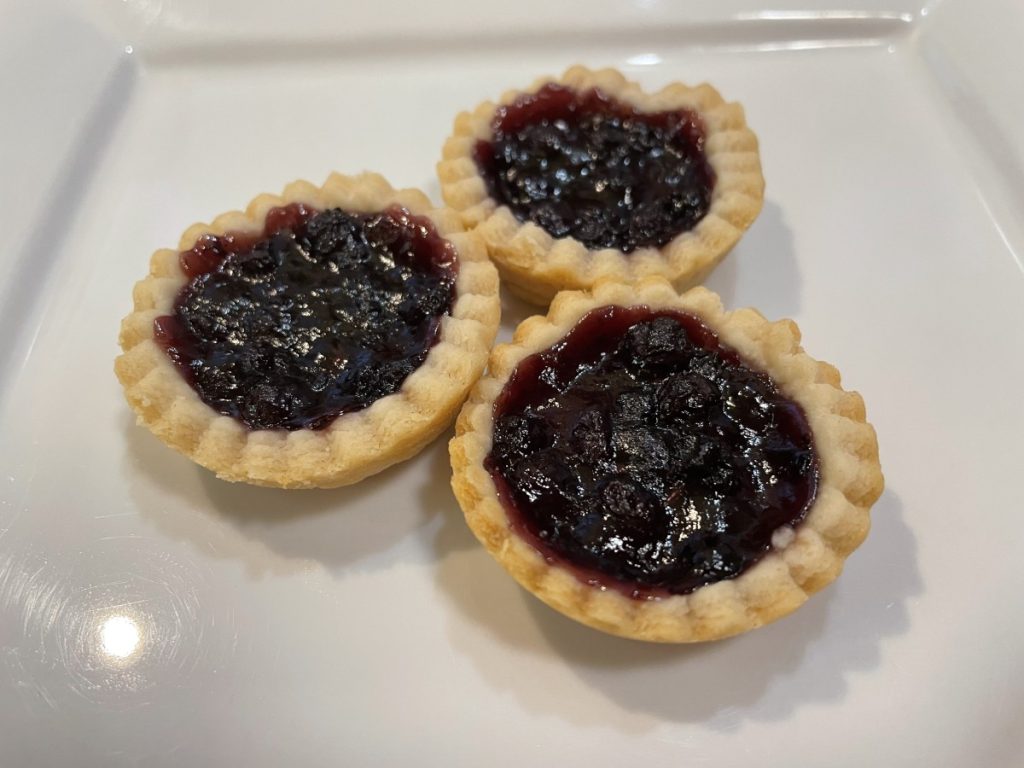
These little tarts are a perfect dessert any time or place. They are a wonderful dessert for picnics. They pack and travel well and make use of seasonal fruit. I used blueberries this time, but cherry or peach pie filling would also work. You can also fill them with jams. I have a nice supply of cherries in the freezer and i think cherry tarts might be next.
I used coconut oil in the crust recipe instead of butter. The crust worked out fine, although it is very crumbly. The texture after baking is amazingly tender, but I found the dough a little harder to handle than when made with butter. It’s a nice choice if you need a vegan dessert.
I used a jar of homemade blueberry pie filling made with wild Maine blueberries. You can use store bought, but I include the recipe at the bottom of the post. The recipe makes 4 cups of filling- you can use all the dough and all the filling and have 48 tarts. I didn’t need that many.
I made 24 and used a little over half of the dough recipe. Had I rolled them out a little thinner, half a recipe would be enough. I had a little blueberry filling left over, too.
Blueberry Mini Picnic Tarts
dough for 1 pie crust
About 2 cups blueberry pie filling, room temp or chilled
Flaky Pie Crust
2 c. flour
1 t. salt
3/4 c. coconut oil, chilled – you could use butter, lard or shortening
1 T. cider vinegar
4-5 T. cold water
Combine flour and salt in food processor and add coconut oil. Pulse until mixture resembles coarse crumbs. Toss in vinegar and water, 1 tablespoon at a time, pulsing as you add, until dough just holds together. Remove from processor and press dough together to form a ball. Chill at least 30 minutes before using. Makes enough for 2 pie crusts or up to 48 tarts.
Blueberry Pie Filling
3 1/2 c. blueberries, fresh or frozen
3/4 c. sugar, or to taste
1/4 c. cornstarch
1 c. water
1 T. lemon juice
In saucepan, bring blueberries and sugar to a boil, stirring often. Combine cornstarch with water and lemon juice and add to the blueberry mixture. Return to the boil and cook until thickened and bubbly. Makes 4 cups. You will not need the whole batch for the tarts.
To make the tarts: Preheat oven to 400 degrees. Roll out the dough to 1/8 inch thickness on lightly floured board. Cut out with 2-inch round cutter and place dough circles in mini muffin tins or mini tart pans. Re-roll scraps and keep cutting out until you have 24 circles. Save the rest of the dough for another use. It can be frozen. Place a rounded teaspoon of filling in each tart. I used fairly shallow pans, you can add more filling if your pans are deeper. Bake for 10 minutes, then turn down the oven to 350 and bake about 15 minutes longer, or until edges of the tarts are golden brown. Cool a little before you remove from the pans. Makes 24.
Mom’s Breaded Chicken

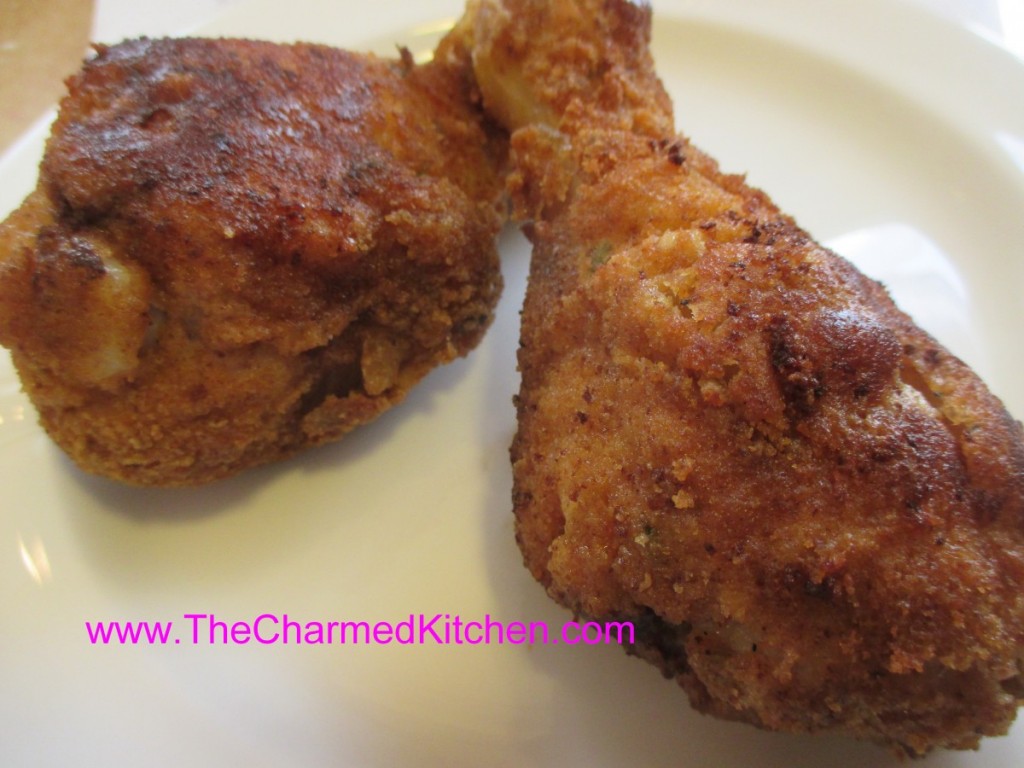
With picnic season here, I thought I would share this recipe again. It always brings back great memories of childhood picnics/cookouts with my family. I love this recipe and I hope you do, too.
I looked forward to the big family picnics we had when I was a kid. My Dad and I would go early in the morning to pick out our favorite location, and get tables arranged. Then he would start a fire in the grill and make us bacon and eggs in the cast iron skillet.
Everyone started arriving soon after that. Well, not everyone. My Mom, and one of my aunts, would always come a little later. That is because they were finishing up the breaded chicken that was always a part of these picnics. She wanted it to be served nice and warm.
It would have been breaded the day before. My mom felt that when you breaded the chicken ahead of time, it seemed to help the breading to stick better. I do it the same way today.
This isn’t fried chicken. The breaded chicken is lightly browned in a skillet, then finished off in the oven. It is crispy on the outside and nice and juicy inside. It is also a lovely memory for me of time spent with family. Here are the directions for how she made it.
Mom’s Breaded Chicken
Chicken pieces, I often use a whole bird, cut into pieces, or just thighs and drumsticks.
salt and pepper to taste
flour
Parsley
Paprika
Garlic powder
eggs
Milk
Bread crumbs
oil
Pat chicken pieces dry. Season with salt and pepper. In a bag, combine flour- about ½ c. per 8 pieces of chicken should be about right. Season flour with a little salt and pepper. In bowl combine milk and eggs with the rest of the seasonings, including more salt and pepper. I use 1 egg with enough milk to make a thin batter for every 4-5 pieces of chicken. Keep in mind that the size of the pieces matters. Wings will need less batter than legs or breasts. Place bread crumbs in a shallow dish or in a plastic bag. Place a few pieces of chicken in bag with the flour and shake to coat, dipping off the excess. Then dip chicken pieces (1-2 at a time) in egg mixture, turning to moisten completely. Then place chicken in crumbs and turn or shake to coat evenly. Repeat with remaining chicken until all of it is breaded.
At this time you can cover and refrigerate the chicken for several hours or overnight if desired. You can also go ahead and cook it right away. Mom suggests you bread the chicken the night before so it will stick better, but hey, you’re an adult, do what you want.
To cook the chicken, heat ½- inch of oil in a heavy skillet and preheat the oven to 400 degrees. Foil a roasting pan and then place a rack inside. Once the oil is hot, brown the chicken pieces several at a time, turning to brown evenly. Place the browned chicken on the rack in the baking dish and continue to brown remaining chicken. Place chicken in oven and bake until chicken is cooked and juices run clear when chicken is poked. Cooking time will vary depending on the size of the pieces, how much you browned them and how many you are cramming in one pan. Baking time will be about 45 minutes. Check a large piece of chicken, near the middle of the pan to be sure.
This is a real summer favorite and the baking on the rack helps fat to drip off, giving you fried chicken flavor with fewer calories. This chicken can be served hot, warm or cold.


