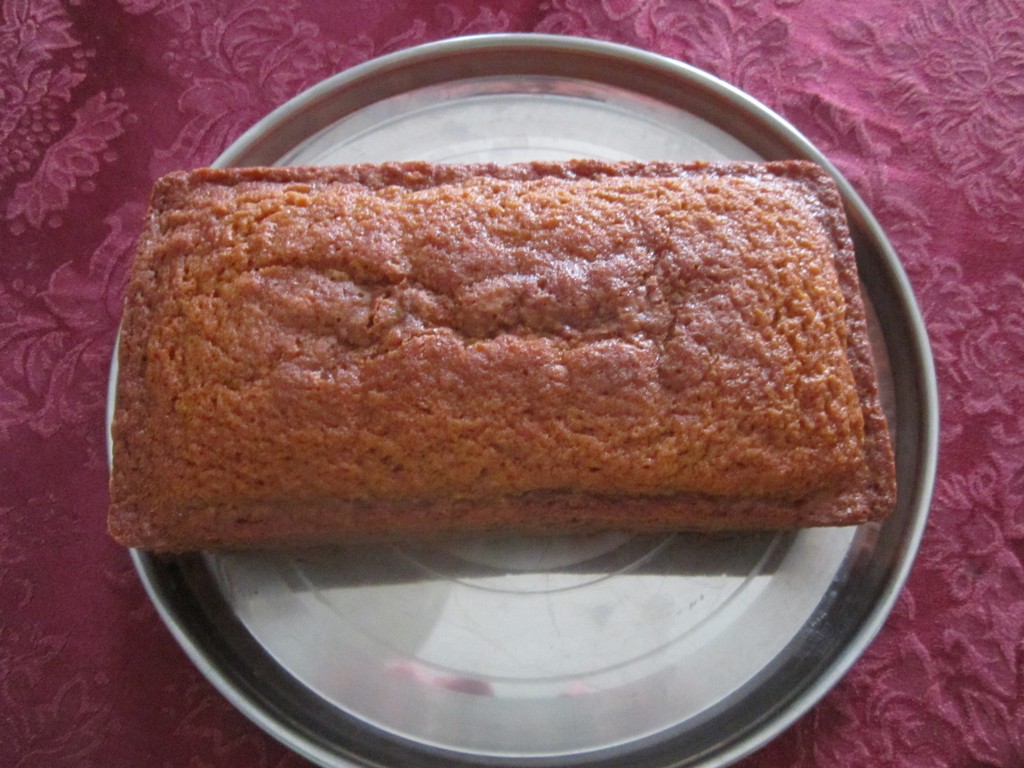
Beet Dumplings


I had beets that I wanted to use in something different. So I made these dumplings with cooked beets. The color came out so vibrant. We had them with dinner last night.
The flavor of the beet is somewhat muted in this little dumpling. These would be a nice side dish for all sorts of dishes. They would also be a fun addition to soup.
I do a very rustic version- just shape into rolls and slice dough off into 1/2 -inch thick pieces and boil them up. These could be made ahead and frozen, too. I considered calling them gnocchi, as they contain potatoes, too. They did remind me of gnocchi a bit, but they were a little denser. Call then what ever you like. They are fun and easy to make, too. My friend suggested maybe putting them through the spaetzle maker next time for a smaller version. I might just do that. So here is the recipe. Enjoy!!
Beet Dumplings
2 small russet potatoes, 11-12 oz. total, peeled, diced into 1/2-inch cubes
2 medium/small beets, roasted, skin on, cooled
1 egg
1/4 c. whipping cream or half and half – you could probably use milk, too. 1 1/4 t. salt
¼ t. dill weed
1 1/2 c. (about) flour
Steam potatoes over boiling water until tender, about 12 minutes. Place in bowl and mash or put potatoes through a ricer. Place in bowl and cool about 10 minutes. Remove skins from cooled beets and dice. Place beets in a food processor or blender. Add the cream and process until smooth. Combine beet mixture with potatoes, egg, salt and dill and mix well. Stir in flour and combine until slightly sticky dough forms. Add more flour a tablespoon at a time if the mixture is too moist. Turn dough onto lightly floured work surface and divide into 6 equal portions. Roll out 1 piece into a rope about 20-inches long by 3/4 inch. Cut dough into 3/4 -inch pieces and arrange finished dumplings in a single layer on a floured baking sheet and repeat the process with the remaining dough. Boil the dumplings in well-salted boiling water, about 1/3 at a time. Boil for 4-5 minutes. They will come to the surface and be tender. Check after 4 minutes. Serve with butter or with your favorite sauce or in a soup. Serves 6.
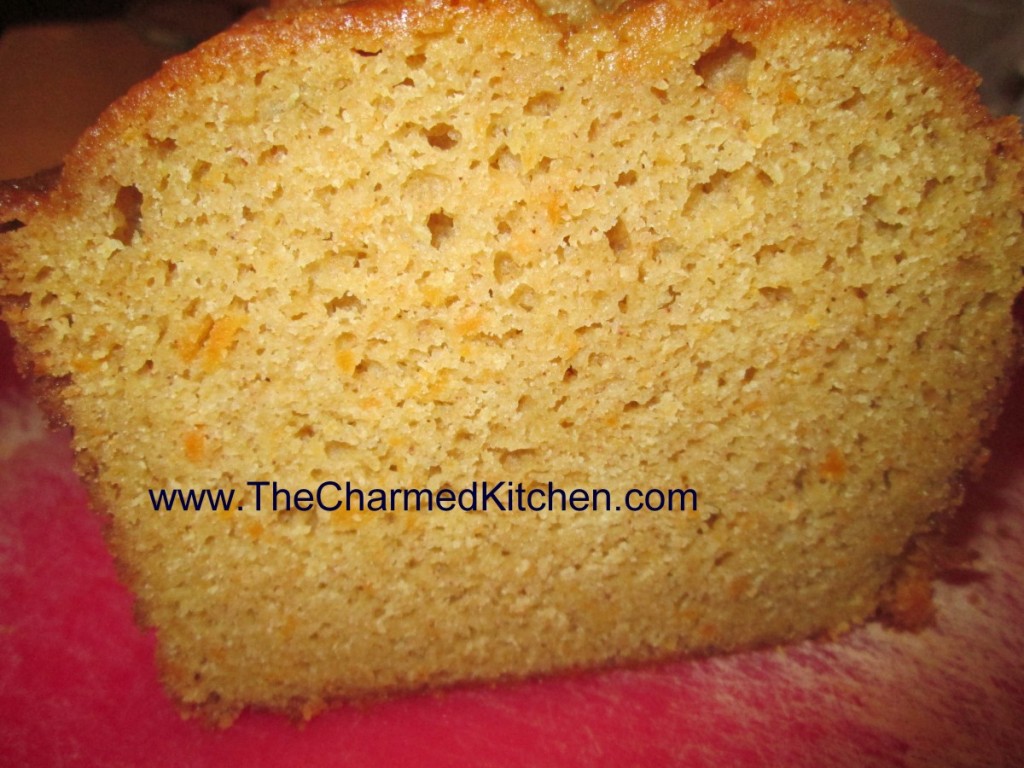
Sweet Potato Tea Cake

If the only way you enjoy sweet potatoes is as a side at the holidays, or in pie, it is time to expand your thinking about them. In this recipe, the mashed sweet potatoes add both sweetness and moistness to the finished cake. Great plain, or with a dollop of whipped cream and some fresh berries. It goes well with tea, or coffee.
This cake makes a lovely dessert or a nice addition to a brunch menu. Also, a nice way to use up leftover mashed sweet potatoes, if you find yourself with leftovers.
I mentioned this recipe to a friend and she was very interested. I will be seeing her next week and think I will make this for our dinner together.
Sweet Potato Tea Cake
1 1/2 c. cake flour*
1/2 t. each baking soda, salt, cinnamon and nutmeg
1/2 c. unsalted butter, room temperature
1/2 c. sour cream, room temperature
1 1/3 c. sugar
3 eggs, room temperature
1/2 c. mashed sweet potato
1 t. vanilla
Preheat oven to 300 degrees. Lightly oil an 8×4-inch loaf pan. Mix flour with next 4 ingredients and set aside. In large mixing bowl beat together butter and sour cream. Beat in sugar and then beat in eggs 1 at a time, beating well after each addition. Stir in mashed sweet potato and vanilla. Stir in dry ingredients and pour batter into prepared pan. Bake until tester comes out clean, about 1 hour and 15 minutes. Cool in pan 30 minutes before loosening cake sides from pan and removing. After cake has cooled wrap in foil and store at room temperature. Serves 8.
Note: You can add a powdered sugar drizzle or sprinkle with powdered sugar before serving.
* If you don’t have cake flour you can make your own. Simply measure out a cup of all purpose flour and remove 2 tablespoons of the flour. That is now the same as a cup of cake flour OR remove the 2 tablespoons of flour and replace them with 2 tablespoons of cornstarch and sift together to combine. I do the flour/cornstarch mix and keep a batch on hand for when I need it in baking. For a larger batch you can combine 3 1/2 cups of all purpose flour and 1/2 cup of cornstarch. Sift together and store until needed.
Rich and Chewy Brownies

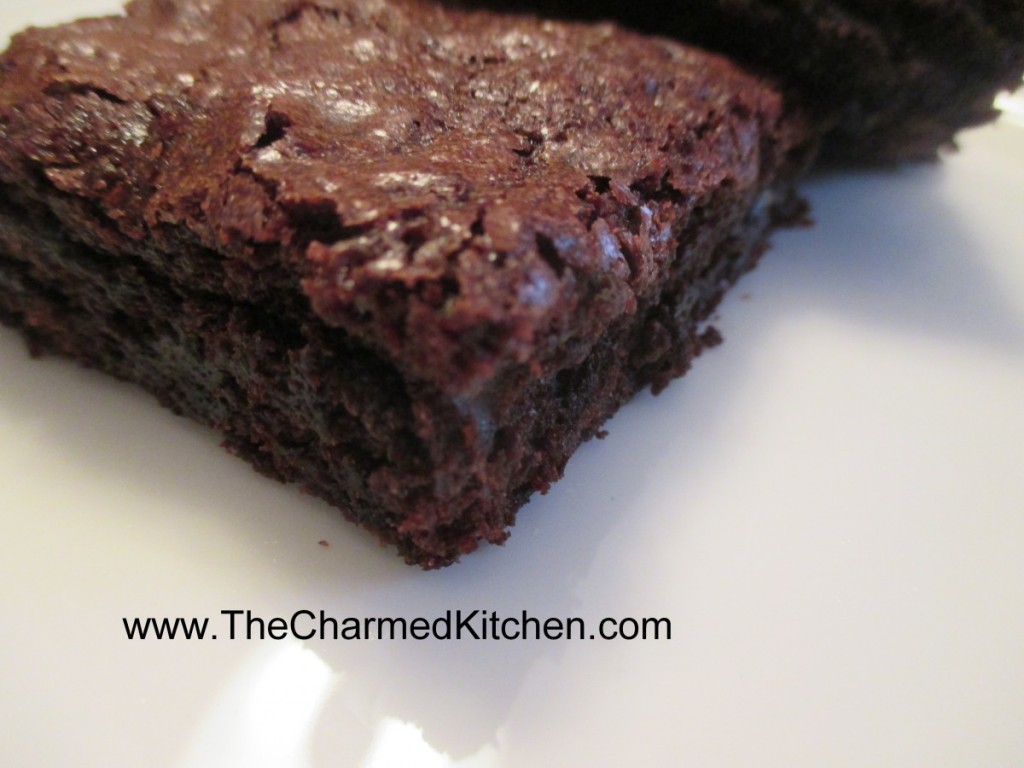
Brownies have been around for almost 100 years. The story about the creation of brownies, is that they were an accident. A woman was making a chocolate cake. She couldn’t find her recipe, so she made the cake as best she could from memory. The cake didn’t rise- and brownies were invented.
What a happy accident that was for the rest of us.
There are a lot of versions of brownies around. Some are more like a chocolate cake, just a little denser. Others are moist, and so dense they are almost fudge like.
I have a lot of brownie recipes. This is one of my favorites. If you make them, you will understand why. They are soft, rich and a little chewy. They can be served plain, dusted with powdered sugar, or frosted. There is a lovely chocolate buttercream recipe below the brownie recipe.
Rich and Chewy Brownies
3 sticks butter, melted and cooled
3 c. sugar
1 T. vanilla
6 large eggs
1½ c. flour
1 c. cocoa
1 t. baking powder
1 t. cinnamon
1 c. chocolate chips
Heat oven to 350 degrees and grease a 13×9 inch pan. Beat together butter, sugar and vanilla. Whisk in eggs one at a time. Combine dry ingredients and stir into batter. Stir in chocolate chips and spread batter in prepared pan. Bake 40-45 minutes, or until brownies pull away from sides of pan. Cool brownies completely in pan, on a rack and cover with foil. Let stand 6 hours before serving. Makes 24.
To serve, you can leave them plain, dust with powdered sugar, or frost. Here is a great frosting recipe for these brownies.
Easy Chocolate Butter Cream
6 T. butter, softened
1/3 – 3/4 c. cocoa, depending on how dark you want your frosting.
2 2/3 c. powdered sugar
1/3 c. milk
1 t. vanilla
Cream butter. Combine cocoa and sugar. Beat cocoa mixture in alternately with the milk until frosting is spreading consistency. Beat in vanilla. You may need an additional tablespoon of milk. Makes about 2 cups.
Martha’s Beets


I had picked up some beets from a produce market the other day. I have made this dish many times and it seemed like a good time to make it again. It is so tasty and easy to make. You just have to give the flavors time to develop.
This is a recipe that my friend Martha, made for us one chilly autumn afternoon, many years ago. The amounts are random for a reason. Just use what you have- more or less – and let the flavors blend together gently. That is what Martha did.
Full of earthiness and great fresh flavors it is always a favorite of mine. I always think of her, with great affection, when I make it. Miss you, my beloved friend.
Martha’s Beets
Oil
2 Onions, chopped
Potatoes, cut in big chunks, peeled, if desired, about 2 lbs.
1 bunch beets, with greens*
Chicken or vegetable stock, 2-4 cups, using as needed
Parsley
Salt and pepper
Cook beets in boiling water for 20 minutes. Cool and slip off skins. Cut up beets into chunks. In large pot, cook onions in oil until tender. Add potatoes and prepared beets with just enough stock to keep them from sticking. Cover and cook over medium-low heat until vegetables are tender. Meanwhile, chop up the beet greens. Add them to the pot and stir in. Cover and continue cooking until greens are tender. Toss in fresh parsley and cook 5 minutes longer.
* If you can’t find beets with greens, or if you like more greens, you can also add red Swiss chard in place of the beet greens.
Kale Fried Rice

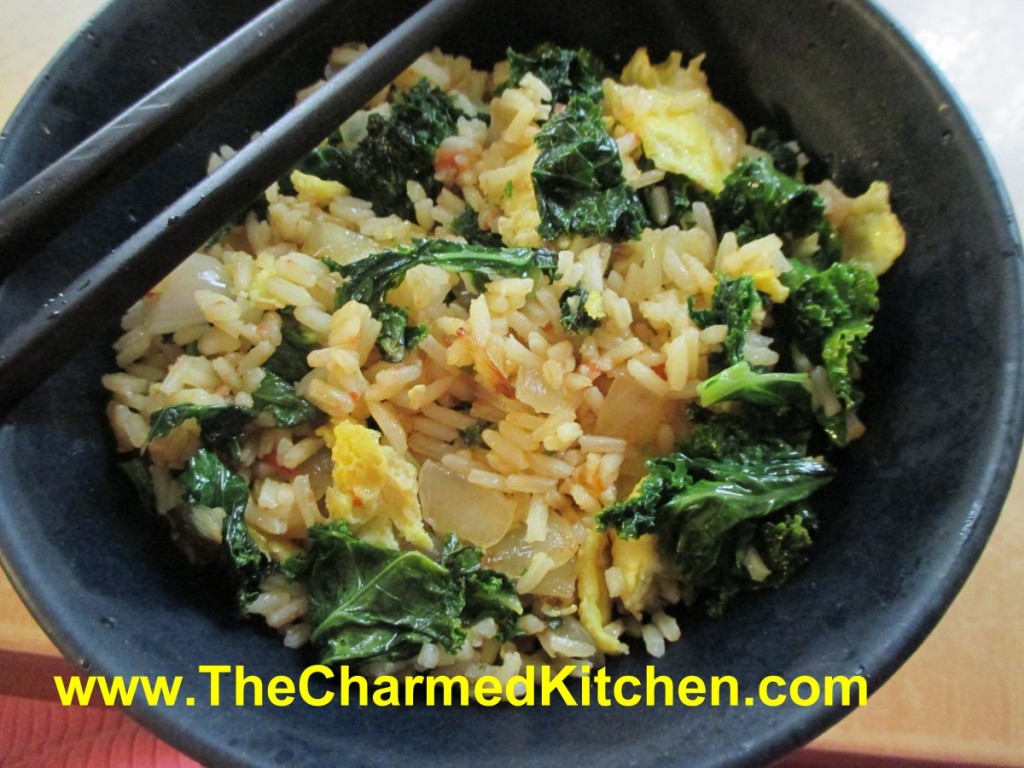
Among the planters I am growing this summer, are big pots of kale and other greens. I was watering my garden, when I decided I wanted some fresh greens for lunch.
The French Sorrel tempted me for a moment, but the kale won, in the end. I made fried rice, adding the kale and some scrambled egg. It was simple, but very satisfying.
You could make it this way, or add other greens. That’s the thing about fried rice, it is so versatile. All sorts of veggies and proteins can be tossed into fried rice.
One important thing to keep in mind: You only want to use cold rice in fried rice. The rice is even better if it is a little dry. I will lay my rice out on a baking sheet to dry it out when cooling it down, if it is on the wet side. I often make fried rice when I have leftover rice in the fridge.
Kale Fried Rice
2 T. oil
1 egg, beaten
1 onion, sliced
4 c. chopped kale
3 c. cooked white or brown rice
1 c. diced cooked chicken– you could use shrimp, pork, etc., optional
Chopped green onions
Dash of hot sauce
Soy sauce
Heat 1 tablespoon of oil and cook the egg- making it a sort of flat pancake. Cool and cut into strips. Set aside. Heat remaining oil in pan and cook onion until tender. Add kale and cook until wilted and tender. Add rice and chicken or other protein, if adding, and cook until heated through. Add onions, season and serve. Serves 4.
Extra Crispy Bacon Every Time


Have you heard about using flour to make your bacon extra crispy? I saw this method for cooking posted a few places and I decided I had to try it. The posts said that bacon would be extra crispy if you sprinkled it with flour before baking. The theory is that the flour holds on to a little of the fat and that makes the bacon crisper than if you didn’t use the flour.
The bacon is baked, not fried. That is fine with me because I normally bake my bacon. I wasn’t sure how much flour to use, so I did three batches in all. One with no flour, the way I normally cook my bacon. The second batch had what could be called a dusting of flour. The third batch I used a heavier hand when adding flour to the bacon.
The results: I found the bacon with flour was crisper than the non-floured bacon. Huh. Go figure. I did think the light coating was the best. When I dusted the one batch with a heavier amount of flour I could still see it after baking and it felt uncooked to me. When the batch with a lighter dusting of flour was done I really could not see flour. So here are the directions. If you try it, let me know what you think.
Floured Dusted Bacon
1 lb. bacon
2-3 T. flour
Preheat oven to 350 degrees. On a rimmed baking sheet, arrange bacon slices so they don’t overlap. They can touch, as they will shrink quite a bit when cooked. You might have to use a second baking sheet if the bacon in thin sliced, because there are more slices. Lightly dust the bacon with flour. I put the flour in a fine strainer and tapped it over the bacon. Place the bacon in the oven and cook until crisp. This can vary due to the thickness of the bacon. Start checking after 10 minutes for thin sliced bacon. Thick sliced bacon takes at least 15-20 minutes. I never turned the bacon over. I don’t turn it when I bake it without flour. When it looked crisp and golden around the edges I took it out and turned it over. It was darker on the down side, so I removed it from the pan and placed it on paper towels to drain. The result, very crisp bacon. You can drain and save the bacon grease on the pan.

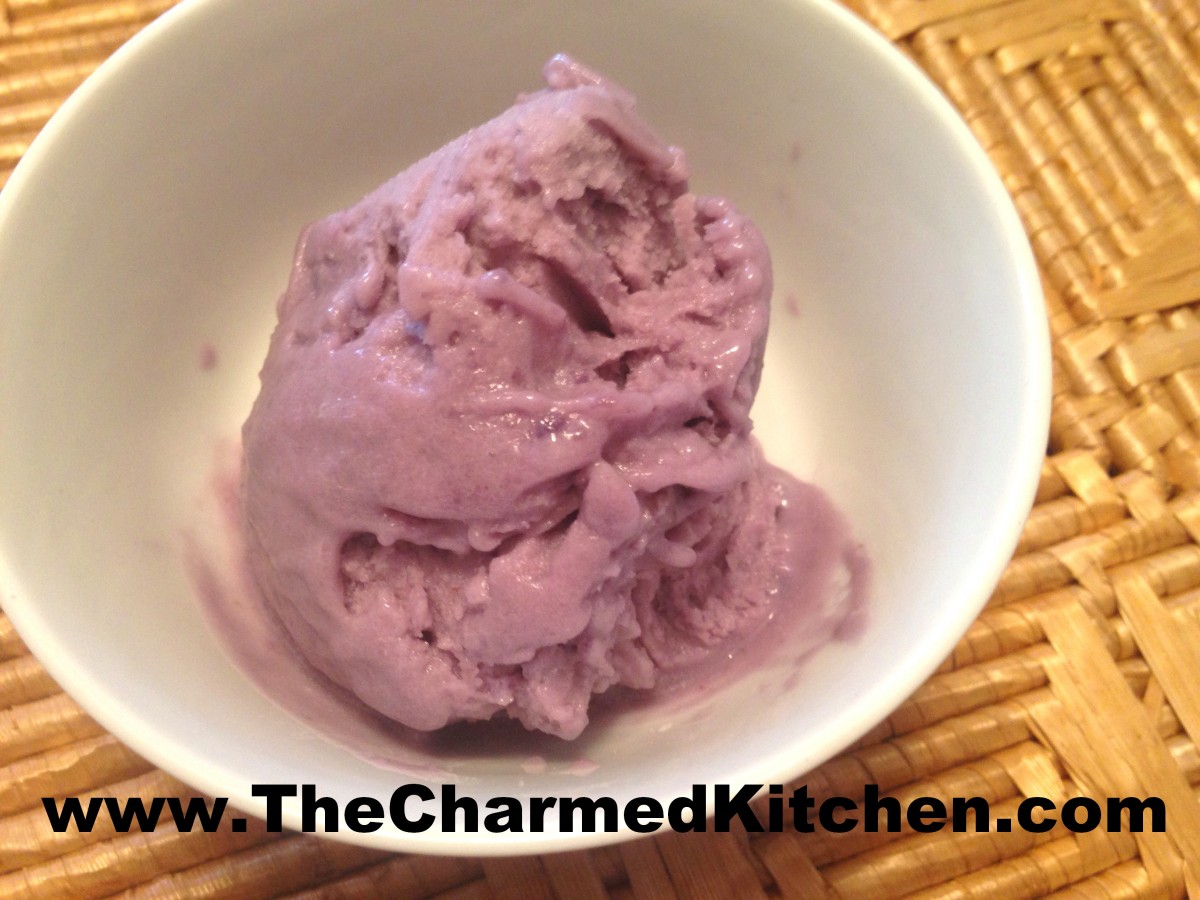
Purple Sweet Potato Gelato


This might be one of the oddest frozen desserts I have ever made. It is also one of the tastiest.
I started with a purple sweet potato. I peeled and steamed until it was tender. Once the potato cooled down, I pureed it with a can of coconut milk. I then sweetened the mixture and added some vanilla. I chilled, then froze it in my ice cream maker.
The texture was so smooth and the flavor was wonderful. The pretty purple color was an added bonus.
The sweet potato itself doesn’t look like anything special, until you cut it open. The outside is a pale, whitish color, the inside is bright purple. You could easily over look these at the produce market. Once cooked, they taste pretty much like other sweet potatoes. I find them at my local Asian grocery store.
The texture was so smooth and the flavor was wonderful. The pretty purple color was an added bonus.
I used one pretty good sized sweet potato. Thinking just under a pound. Here is the recipe.
Purple Sweet Potato Gelato
1 large purple sweet potato, peeled, cooked and cooled down
1 can ( about 13 oz.) coconut milk
3/4 c. sugar- or to taste
2 t. vanilla
In blender or food processor, combine sweet potato and coconut milk. Process until mixture is very smooth. Sweeten to taste with sugar and add the vanilla. Chill mixture, then process in an ice cream machine. If you don’t have an ice cream machine- freeze mixture. Then remove from freezer and let it soften a few minutes. Process in a food processor until smooth and creamy. Makes about 1 quart.
Chocolate Beet Cake

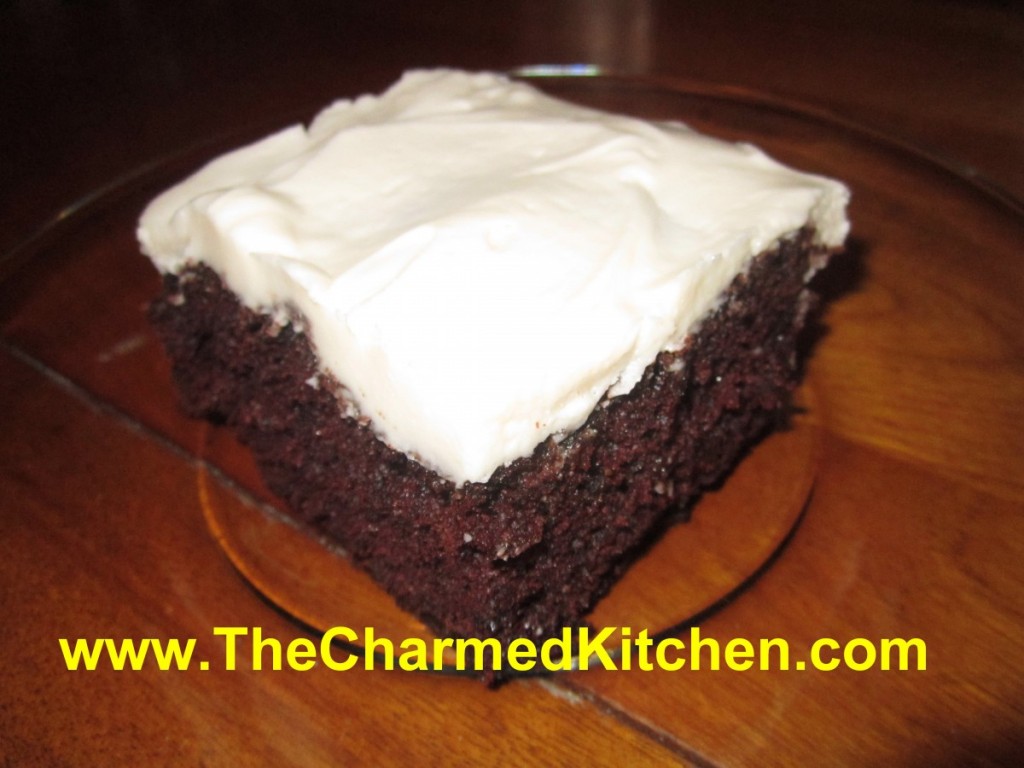
When I say beet cake, a lot of people give me a funny look. First, there are the beet haters, and you know who you are. The people who just don’t like the taste of beets. I get that, beets are an acquired taste.
Then there are the people who like beets, but could never picture them in a cake. I bake cakes with carrots in them, zucchini and even parsnips. Adding beets to a cake is not so far off. The beets add a subtle red color to the cake, but they also add moistness. The end result is a cake that is full of flavor and has a wonderful, moist texture. This is easily the most requested cake that I bake. Rumor has it that the first red velvet cake was tinted red with beet juice, not artificial red coloring.
Truth is, I don’t really taste the beets in the cake much at all. I taste the chocolate. So here is the chocolate beet cake recipe. I hope you enjoy it.
Chocolate Beet Cake
2 cups all-purpose flour
1½ teaspoons soda
1/2 teaspoon salt
1 1/2 cups sugar
1/2 cup cocoa powder
3 large eggs, beaten
1 cup plus 2 tablespoons oil
1½ cups grated cooked beets
2 teaspoons vanilla
Powdered sugar, optional, or cream cheese frosting- recipe below
Preheat oven to 350°. Combine flour, soda, salt, sugar and cocoa in a bowl; set aside. In a mixing bowl, combine the eggs and oil. Beat in vanilla and continue beating until well blended. Slowly beat in dry ingredients until well mixed; stir in beets. Pour into a greased and floured 9×13-inch baking pan. Bake at 350° for 25 to 35 minutes, or until cake bounces back when touched lightly with finger. Cool in pan on a rack. Frost cooled cake, or dust with powdered sugar.
Frosting recipe:
8 oz. Cream cheese, softened
3/4 c. powdered sugar- or more to taste
1 stick butter, room temperature
Beat all together until fluffy. Frost cake and refrigerate until ready to eat.
Plum Glazed Wings

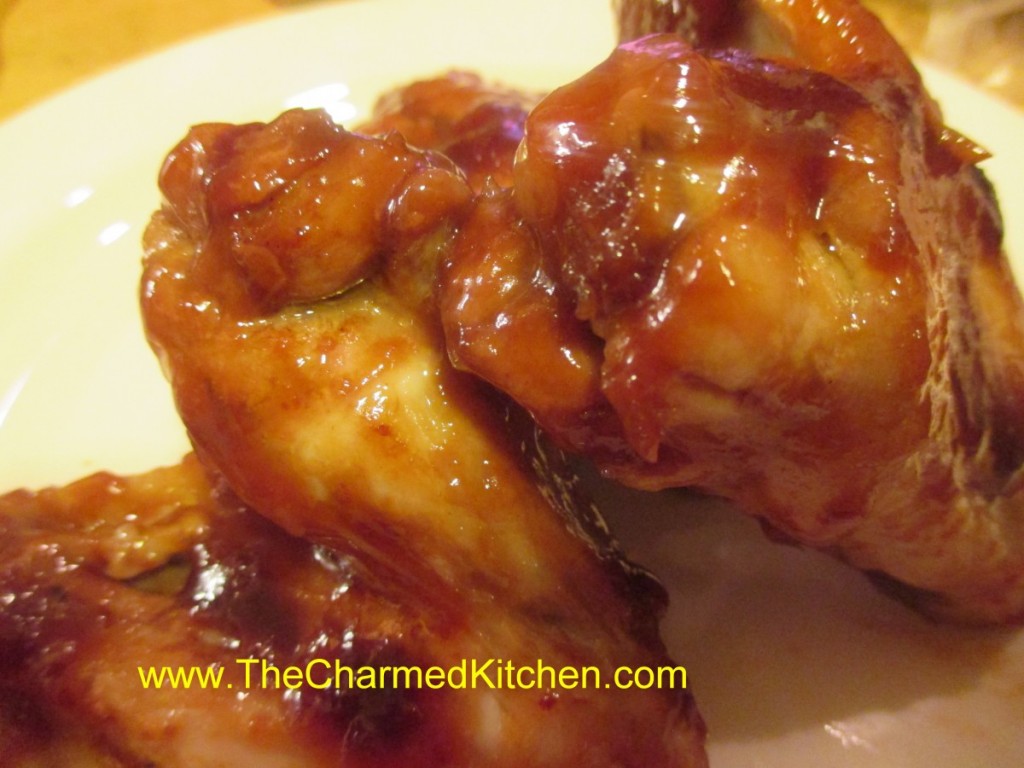
I love when local fruit is in season. I found myself with lovely red plums and I decided to use some of them to make a sauce for chicken wings. The sauce came out really nice. I started with onions, garlic and plum puree. I added more ingredients as I went until I felt the sauce had the flavor I was going for. This sauce/glaze would be great on pork or duck, too.
I pan fried my wings, but they could be grilled and basted with the sauce instead, air fried, or baked in the oven.
Plum Sauce/Glaze
2 T. oil, butter or bacon fat
1 medium onion, minced
2-3 cloves garlic, minced
1 c. plum puree made from about 1 lb. of plums
¼ c. cider vinegar
2 T. honey
1 T. hot sauce
1 t. fresh grated ginger
Salt to taste
I started by peeling the plums. You could leave the skins on, if you like. I think next time I might leave the skins on. I put the plums in boiling water for a minute and then in cold water. The skins came right off. I removed the pits and pureed the plums- I ended up with a cup of fresh plum puree. Saute onion in a little oil- you could use butter or even bacon fat. Add garlic once the onions are tender. After that, add the plum puree and the rest of the ingredients. Let it cook for about 10 minutes to thicken and give it a taste. I decided to smooth the sauce out in the blender but it would be fine to leave it chunky. Makes about 11/2 cups.
To cook the wings I just pan-fried them. I had just over a pound of wings. I cooked them in a skillet, covered for about 20 minutes, turning a couple of times. I poured the sauce over them and turned the heat down to medium. I let them cook, covered, another 10 or 15 minutes. Once I was sure the wings were cooked through, I uncovered them and let the sauce cook down and thicken a little. It created a nice glaze on the wings. Easy and very tasty. I could also see baking or grilling the wings and just tossing them in the sauce at the end.
I ended up pureeing more plums and tossed them in the freezer so I can make this sauce again when the weather is chilly and no fresh plums are around.
Sage Advice


Sage deserves better. It is a wonderful herb, but I think it doesn’t get used enough. Like rosemary, sage has strong flavor, and can overpower a dish if used too liberally. The secret is to use a light hand with sage. Dried sage has a more concentrated flavor than fresh. If you haven’t cooked with sage lately, maybe you should.
Traditionally used in poultry stuffing, sage is wonderful with meats, stews, and soups. It can also be used with shellfish and other seafood. Sage pairs nicely with cheese, and in dips, in poultry seasoning, sausages, and with any wild game, especially venison. I love to add sage to winter squash soup and pumpkin dishes, too.
A fun addition to any plate is fried sage leaves. Just drop a few leaves in a pan with a small amount of hot oil. They crisp right up.
Sage is also one of the easiest herbs you can grow. It is a hardy perennial that thrives in a sunny location, although it will tolerate some shade. Deer seem to leave it alone, too. The reward is fresh sage leaves all season long. You can freeze or dry sage leaves for use year round. This time of year I am looking to preserve sage to use during the winter months.
So here are some recipes for using sage. Enjoy!!

Scotch Eggs
1 1/4 lbs. bulk country style or herb sausage
1 t. sage
1/2 t. thyme
1/4 t. cayenne pepper
4 hard cooked eggs, peeled
1/2 c. flour
2 raw eggs, beaten
1-c. fresh bread crumbs
vegetable oil for deep frying
Combine sausage and flavorings and mix well. Divide into 4 equal portions and flatten. Place an egg on each flattened sausage piece and press sausage to completely cover each egg. Dredge eggs in the flour, and then dip in the eggs. Roll in the breadcrumbs and fry in 2 1/2 inches of oil (heated to 350 degrees until well browned. This will take about 10 minutes. Drain. Keep warm until served. Makes 4.
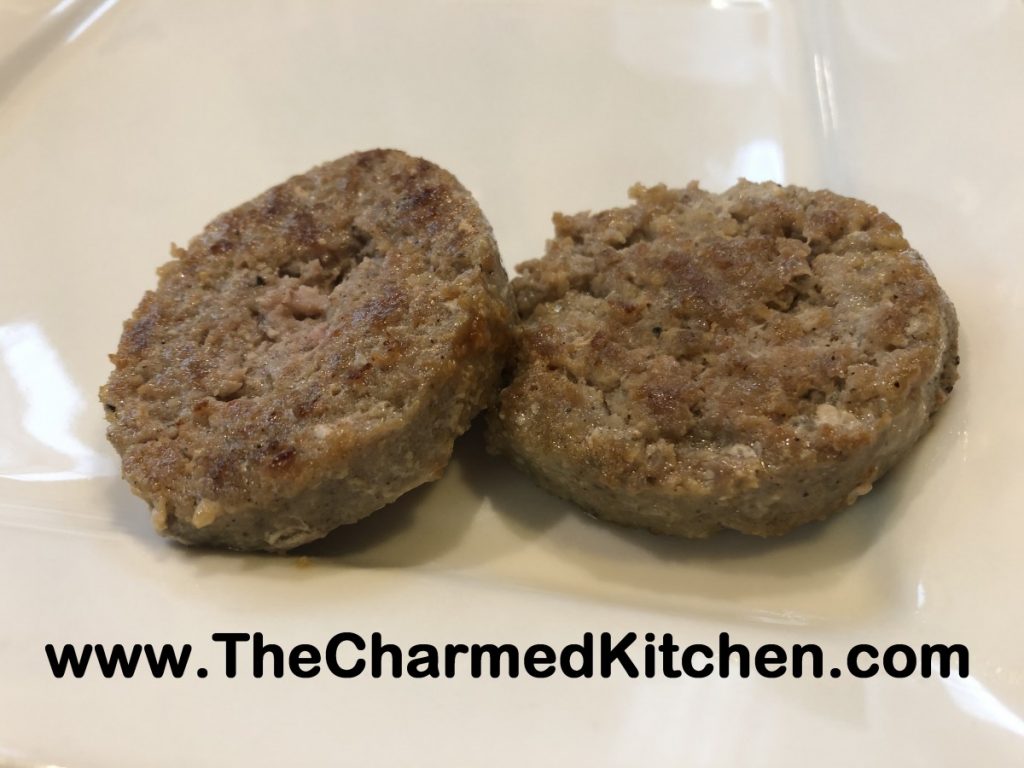
Breakfast Sausage
2½ lbs. ground pork or turkey (leave on a little fat)
1 T. dried sage
2 t. salt
2 t. pepper
1 t. dried marjoram
½ t. dried thyme
¼ t. allspice
¼ t. nutmeg
¼ t. dry mustard
⅛ t. cloves
pinch of cayenne pepper
⅓ c. warm water
Mix herbs and spices with water and let stand 10 minutes. Add the water and spice mixture to the meat and blend thoroughly. Form into patties, and chill or cook immediately. Patties can be fried or baked. This sausage can also be frozen for later use. Makes almost 3 pounds.
Dressing/Stuffing
1 c. sliced mushrooms
¾ c. diced celery
3 T. minced onions
2 T. chopped parsley
4 T. butter
4-5 c. bread cubes
salt and pepper to taste
¼ – ½ c. turkey or chicken broth if making dressing
Sauté vegetables in butter until tender. Add bread and seasonings and toss to coat. Stuff into turkey just before cooking or add broth and place in covered casserole, cooking for 45 minutes to an hour at 350 degrees. When making stuffing allow ¾ c. per pound of turkey. You may want to stuff the bird and still make extra dressing for the next day. When making dressing be sure to cover the pan well to keep the dressing from drying out.
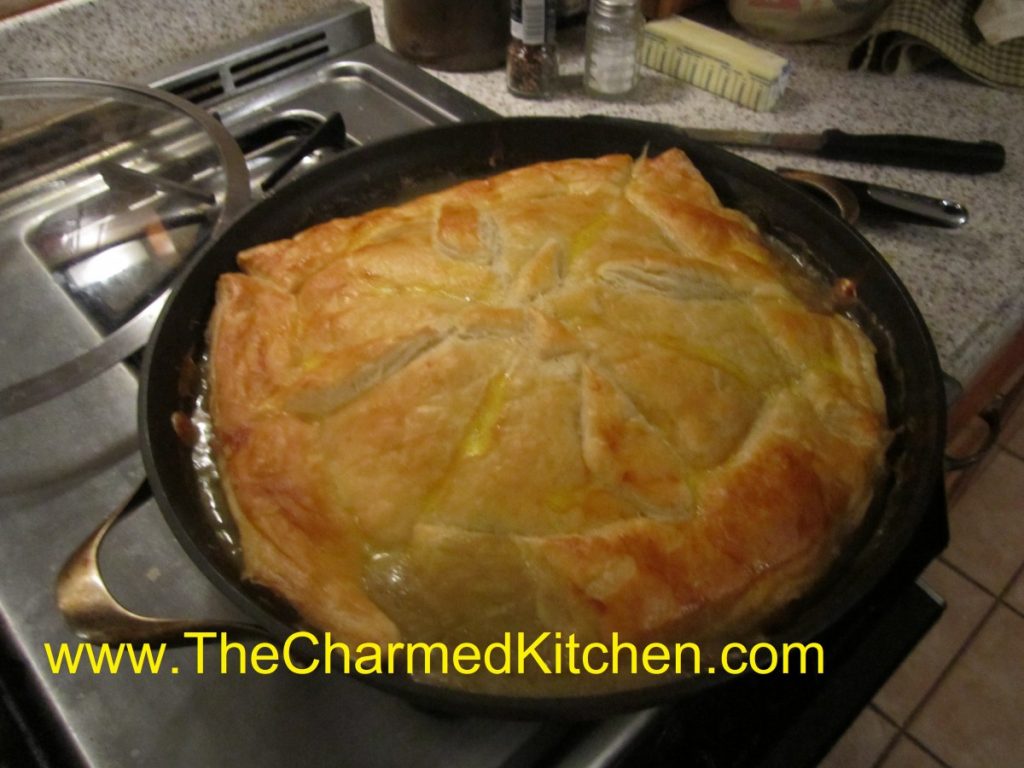
Amy’s Skillet Chicken Pot Pie
¼ c. olive oil
2 T. butter
1 sweet onion, chopped
4 parsnips, peeled and sliced
4 cloves garlic, minced
1 tablespoon chopped fresh sage
1 small bunch kale, center ribs and stems removed, leaves chopped
Kosher salt
freshly ground pepper
¼ cup all-purpose flour
3 cups low-sodium chicken broth
2 T. sherry
½ small butternut squash, peeled, cut into 1/2-inch pieces (about 1½ cups)
½ of a roasted chicken- meat removed from bones, torn onto bite sized pieces – about 1½ cups of meat
1 sheet frozen puff pastry, thawed
1 large egg
Place a rack in upper third of oven; preheat to 425°. Heat oil in a deep 12-inch cast-iron or other heavy ovenproof skillet over medium-high heat. Add onions; cook, stirring occasionally, until beginning to brown, about 4 minutes. Reduce heat to medium-low. Add parsnips, garlic and sage to skillet and cook, stirring occasionally, until garlic begins to brown, about 2 minutes. Add kale and season with salt and pepper. Cook, tossing often, until wilted, about 4 minutes. Sprinkle flour over. Cook, stirring constantly, for 4 minutes. Stir in broth, 1/2-cupful at a time, then add squash. Bring to a boil, reduce heat, and simmer until squash is just softened and broth is thickened, 8-10 minutes. Add chicken to skillet, stir, and season with salt and pepper. Unfold pastry and smooth any creases; place over skillet, allowing corners to hang over sides. Whisk egg and 1 teaspoon water in a small bowl. Brush pastry with egg wash; cut four 1-inch slits in top to vent. Bake pot pie until pastry is beginning to brown, 15-20 minutes. Reduce oven temperature to 375° and bake until pastry is deep golden brown and crisp, 15-20 minutes longer. Let cool for 10 minutes before serving.
Spiced Yellow Split Pea Soup
1 lb. yellow split peas, rinsed
8 c. stock or water
2 c. chopped onion
2 carrots, peeled and sliced
3 potatoes, peeled and cubed
½ lb. sliced green beans
1 T. parsley
2-3 t. hot pepper sauce
1 t. chopped fresh sage- or ½ t. dried sage
1 t. dried thyme
1 t. ginger
1 t. cumin
1 t. turmeric
½ t. white pepper
2 cups diced ham
Salt to taste
Note: you can use 1 teaspoon liquid smoke if omitting meat.
Combine peas, water or stock and simmer, covered, about an hour, stirring occasionally. Add remaining ingredients, except salt, and cook, covered, over low heat for about 60 minutes. Add salt to taste. Freezes well. Serves 6-8.
Poultry Seasoning
¼ c. dried parsley
3 T. dried marjoram
3 T. dried rosemary
3 T. dried thyme
2 T. dried savory
1 T. celery seed
1 T. dried sage
2 t. dried oregano
2 t. dried basil
1 t. ground allspice
1 t. fresh ground pepper
Combine all ingredients in a blender. Store in a cool, dry place to maintain freshness.
Sage Rolls
¾ c. milk
½ c. sugar
1/3 c. butter
1 t. salt
2 packages active dry yeast
½ c. warm water
4½.-5 c. bread flour
½ c. chopped green onion or chives
1 T. dried sage
2 eggs, lightly beaten
Heat milk to almost simmering, being careful not to bum. Stir in sugar, butter, and salt. Cool milk to lukewarm. Dissolve yeast in warm water. Set aside. Place 2 cups of flour in a large bowl. Add the milk mixture, and beat together. Stir in yeast mixture, sage, and eggs. Beat with an electric mixer for 4 minutes. Gradually stir in enough of the flour to make a soft dough that leaves the sides of the bowl. Tum dough onto a floured surface and knead until the dough is smooth and elastic, about 8 – 10 minutes. Place the dough in oiled bowl, turning to grease the top. Cover, and allow dough to rise until doubled in bulk, about 45- 55 minutes. Punch dough down, tum onto a floured surface, and cover with the bowl. Allow the dough to rest 15 minutes. Divide dough into 24 – 32 pieces, depending on the size you like. Shape dinner rolls as desired. I like to roll pieces into 6 inch ropes, and then tie them into a loose knot. Place the rolls onto greased baking sheets, allowing them room to grow. Cover, and let rise until doubled in bulk, about 45 minutes. Bake rolls in a 350 degree oven until golden brown, 15- 18 minutes.


