A Trio of Potato Salads

If you are looking for a side dish for Labor Day, why not bring a potato salad? Everybody loves potato salad. I love potato salad.
Actually, I love potatoes pretty much any way they are prepared. With so many cookouts and picnics, you can never have enough potato salad recipes, right? I am sharing three of my favorite potato salad recipes. The first one is really simple, enhanced with fresh thyme leaves. Thyme pairs well with the potatoes. The second one uses some of my fresh basil in a pesto sauce that is tossed with the potatoes. Who says pesto is just for pasta? The third salad is the way I remember my Mom making potato salad. She never wrote down her recipe, but I think I got it right.
Just in Thyme Potato Salad
With my herb garden growing like crazy right now I thought this was the perfect dish to make. This salad can be served warm or cold and goes well with so many dishes. I find when I have leftovers, I’ll even brown it in a skillet and serve it like hash browns with eggs for breakfast.
2 lbs. boiling potatoes, cut into bite sized pieces*
½ c. olive oil
¼ c. red wine vinegar
1 T. fresh lemon juice
2 t. fresh thyme leaves
Salt and pepper to taste
Cook potatoes until tender. Drain and toss with the rest of the ingredients and serve right away or chill to serve later. Serves 6-8.
* You can really use any potato you like. I often bake the potatoes whole and then peel and cut up. Cook them any way you prefer.
Pesto Potato Salad
This salad always makes me think of a warm summer day. I think it’s because of the basil. During the summer, my driveway is lined with pots of basil. I cook with it almost every day. Pesto can be used in a lot of different dishes beyond pasta. Here I’ve paired it up with potatoes. The combination works great together. I always freeze extra basil so I can enjoy it year round.
2 lbs. Boiling potatoes, cut into bite sized pieces
1 c. basil leaves
3 T. pine nuts
3 T. olive oil
2 garlic cloves, minced
1/3 c. Parmesan cheese
Salt to taste
Cook potatoes until tender. Cool. In blender combine remaining ingredients, except 1 tablespoon of the pine nuts. Pour blended mixture over potatoes and sprinkle with the reserved nuts. Chill. Serves 6-8.
Mom’s Mustard Potato Salad
When I was a kid I did not like the taste of mustard- except in this recipe. It adds such a wonderful flavor.
4 lbs. potatoes- I used Klondike Rose and I did not peel them
4 hard cooked eggs, peeled and chopped
1 sweet pepper, seeded and chopped, optional
1 c. mayo- maybe a little less
1/4 c. prepared mustard- I like a grainy brown mustard
salt and pepper to taste
dash of hot sauce
Bake whole potatoes until tender and allow to cool. Cube potatoes into large bowl and combine with remaining ingredients. Chill until ready to serve. Serves 8.

Pesto Potato Salad

Mustard Potato Salad
Cornbread Salad

This one might seem a little odd, at first. A salad, made from cornbread? There is an Italian bread salad, Panzanella. Why not a cornbread salad? It is rich and tasty. It is also a great way to use up cornbread or muffins that are a couple of days old. Waste not, want not.
I made this salad in a class recently and it was really well received. I think people were surprised they liked it. So if you are looking for something “new” to take to your next cookout, you might want to give a cornbread salad a try.
Cornbread Salad
4 c. crumbled cornbread or corn muffins
1 c. shredded mild cheese
1 sweet red pepper seeded and diced
1 c. diced celery
½ c. diced green onion
4 hard-cooked eggs, peeled and chopped
¼ c. chopped parsley
1-1 ½ c. mayonnaise, sometimes I use potato salad dressing or even slaw dressing
2 c. diced fresh tomatoes
1 c. toasted pecans
paprika for sprinkling on the top, optional
Place cornbread and next 6 ingredients in a medium bowl. Stir in dressing until desired moistness is achieved. Chill and stir in tomato and nut just before serving. Sprinkle with paprika if you like. Serves 6.
Note: You can add whole kernel corn, if you like.

Peach Cheesecake Squares

I love peaches and I love cheesecake. Never thought to combine them before. Wow, what a great dessert!! With peaches in season, it seemed like the perfect time to make it.
This recipe was inspired by a post I saw about a place that makes peach cheesecakes. I decided to make a less traditional cheesecake. I used a 9×13 baking dish instead of a springform pan. I also ended up making the cheesecake in layers. Let me explain.
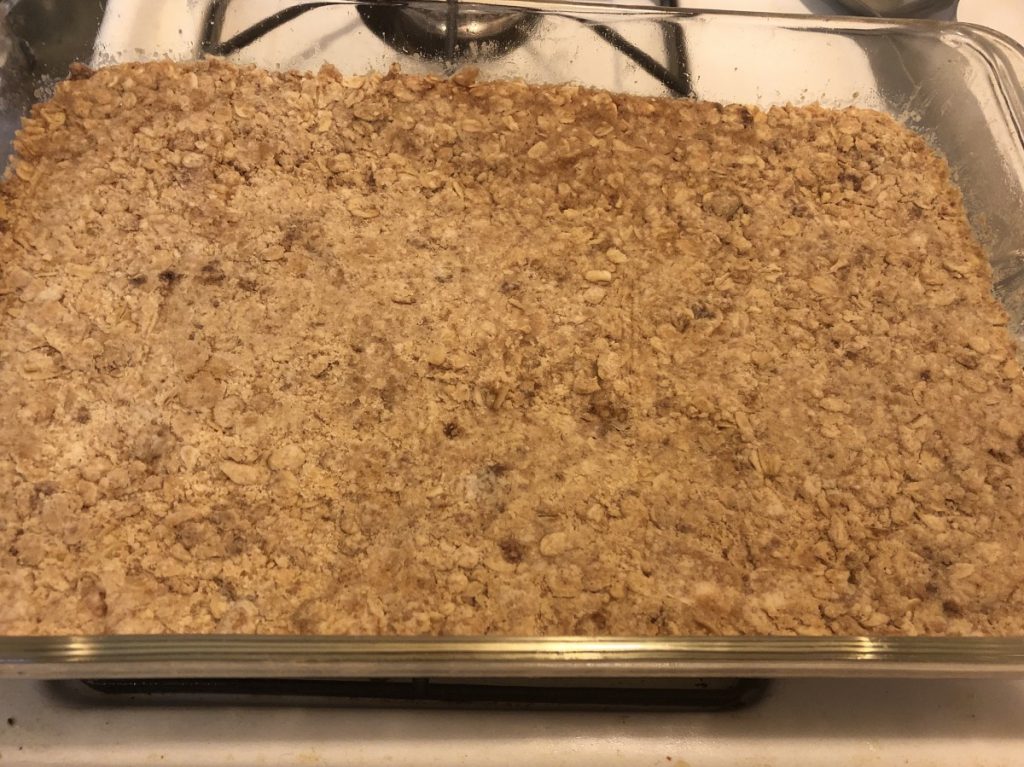
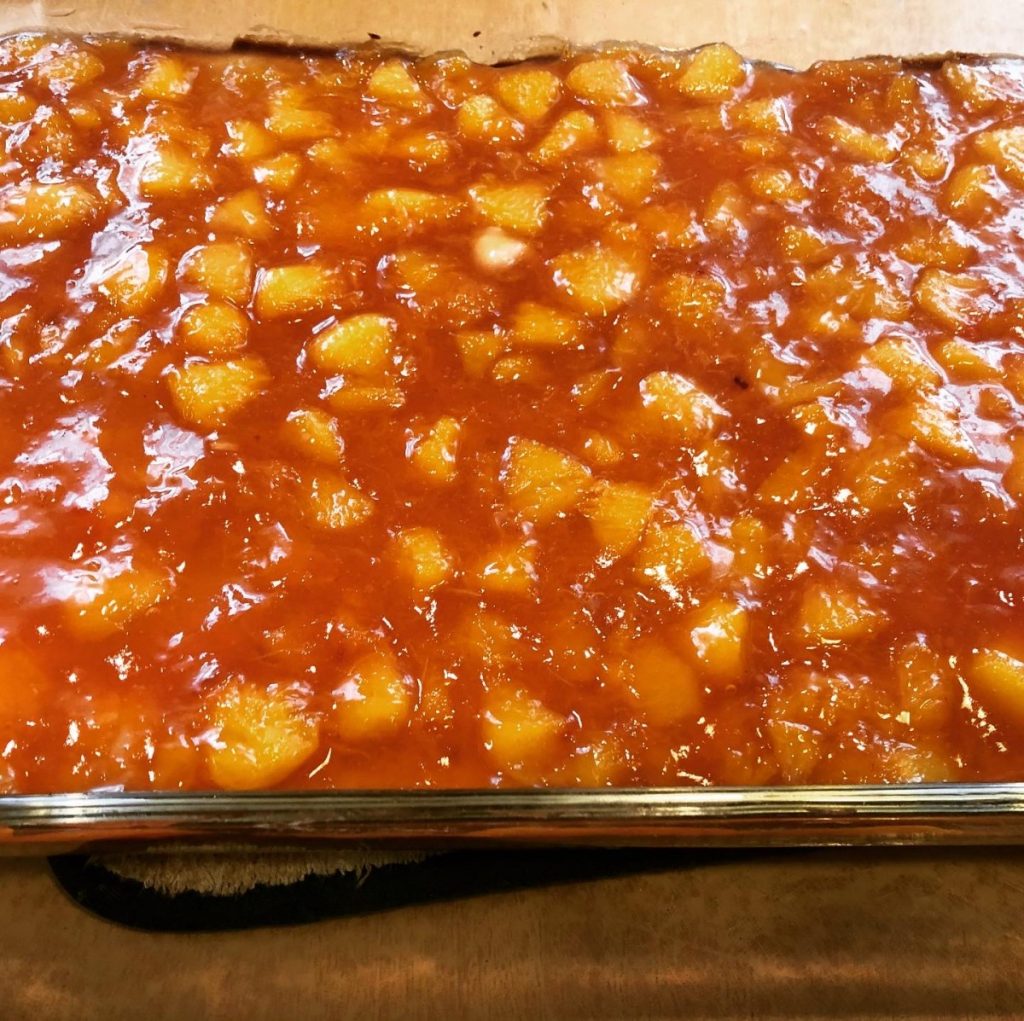
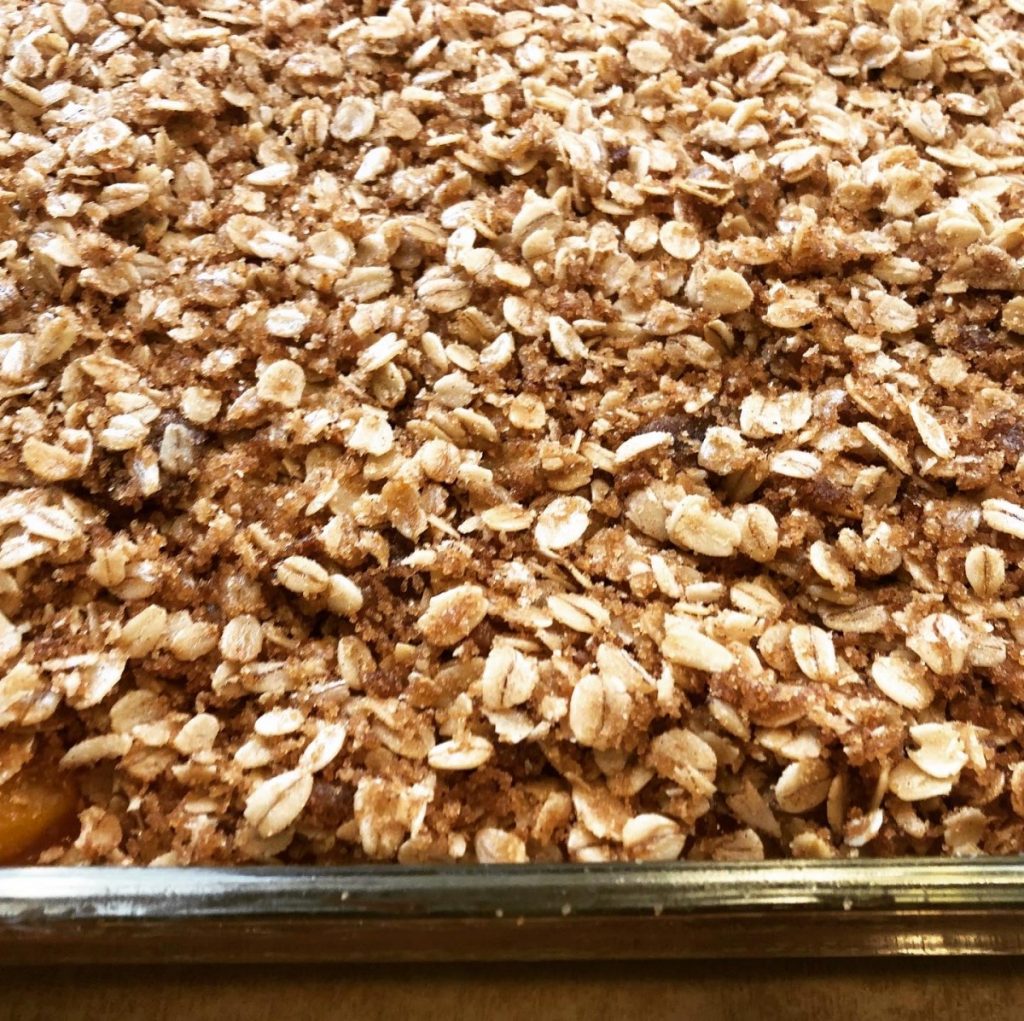
I baked the crust a little, then added the cheesecake layer to bake. I was trying to figure out the best way to add the peaches. I decided to put them on after the cheesecake was baked, so I cooked them while the crust and cheesecake layers were baking. The crumb topping was an afterthought. I wanted some texture and just put that together at the end.
The result was a really good dessert. Enough peaches. Light and rich at the same time. I will most definitely make it again.
So here is the recipe. Enjoy!!!
Peach Cheesecake Squares
Crust
¾ c. butter
1/3 c. brown sugar
1¼ c. flour
1 c. oatmeal, old-fashioned or quick cooking
2 t. cinnamon
¼ t. salt
Cheesecake Layer
2 (8oz.) packages cream cheese, softened
¾ c. sugar
2 T. flour
2 eggs
2 T. vanilla
2 t. cinnamon
Peach Layer
5-6 peaches, peeled, pitted and chopped, about 5 cups prepared fruit
2/3 c. sugar, or a little less
2 T. lemon juice
1 t. cinnamon
4 T. cold water
2 T. cornstarch
Crumble Topping
1½ c. rolled oats
½ c. butter
¼ c. brown sugar
3 T. flour
2 t. cinnamon
Heat oven to 350-degrees. Grease a 9×13-inch baking pan. Beat together butter and brown sugar, then stir in the rest of crust ingredients. Mixture will be crumbly. Press into bottom of prepared pan and bake 20 minutes. While crust is baking, prepare cheesecake layer. Beat cream cheese sugar and flour until fluffy. Beat in eggs one at a time. Stir in vanilla and cinnamon. Pour over crust and bake for 25 minutes, or until set. While filling is baking, prep peaches. Combine peaches with sugar, lemon juice and cinnamon in medium saucepan. Cook over medium heat until peaches are softened. Stir off and on to keep mixture from sticking. Combine cold water and cornstarch. Stir until smooth and pour into peach mixture. Mixture will thicken up. Stir until mixture returns to a simmer. Remove from heat and set aside. Prepare crumble topping. Mix all ingredients with your fingers until well blended. Place on a baking sheet and place in 350 degree oven for 15 minutes. You can do this while the cheesecake is baking, to save time. Let the cheesecake cool a few minutes. Then spoon over the peaches. Spread evenly and let it cool for 30 minutes. Spread the crumble mixture over the peaches. Cool then chill. Store covered in fridge. Serves 12. Can be frozen.
Peach Chef Salad

When you think about cooking with peaches, don’t limit yourself to desserts and jam. Peaches can pair well with savory dishes, too. I often use peaches for glazes and sauces for meats.
In this dish, I paired peaches with traditional chef salad ingredients. I tossed the peaches in a homemade honey French dressing, then spooned them over the salad. The result was wonderful- and a great lunch or dinner option for hot weather.
You can top the salad with cheese, meats or both. I like to add some nuts, too. I topped the salad with sharp cheddar cheese and bacon. I really liked the combination of the sweet fruit with the smoky bacon. Use what you like- and what you have on hand.
A chef salad is a great way to use up leftover grilled chicken or that open package of cheese. Add extra veggies, too, if you like. It also makes a wonderful meal when you don’t want to cook. Lovely, cool meal for a hot day.
Peach Chef Salad
Honey French Dressing:
1/3 c. honey
1/4 c. white wine vinegar or cider vinegar
1 t. paprika
1 t. dry mustard
1/4 t. salt
1/2 c. olive oil
3 cups chopped peaches
Salad:
6 c. torn salad greens
12 oz. cooked chicken, turkey, ham etc, cut into strips
1 c. cubed cheese
1/2 c. cashews, optional
To make the dressing, in blender, combine first five ingredients and start running machine on high. Add oil in a slow stream until mixture becomes thickened. Pour into bowl and stir in peaches and chill, several hours if you can. When ready to serve arrange greens on one large platter or on smaller salad plates. Arrange meat and cheese on platter or plates. Spoon over the peach/dressing mixture, add cashews, then serve. Serves 4-6.
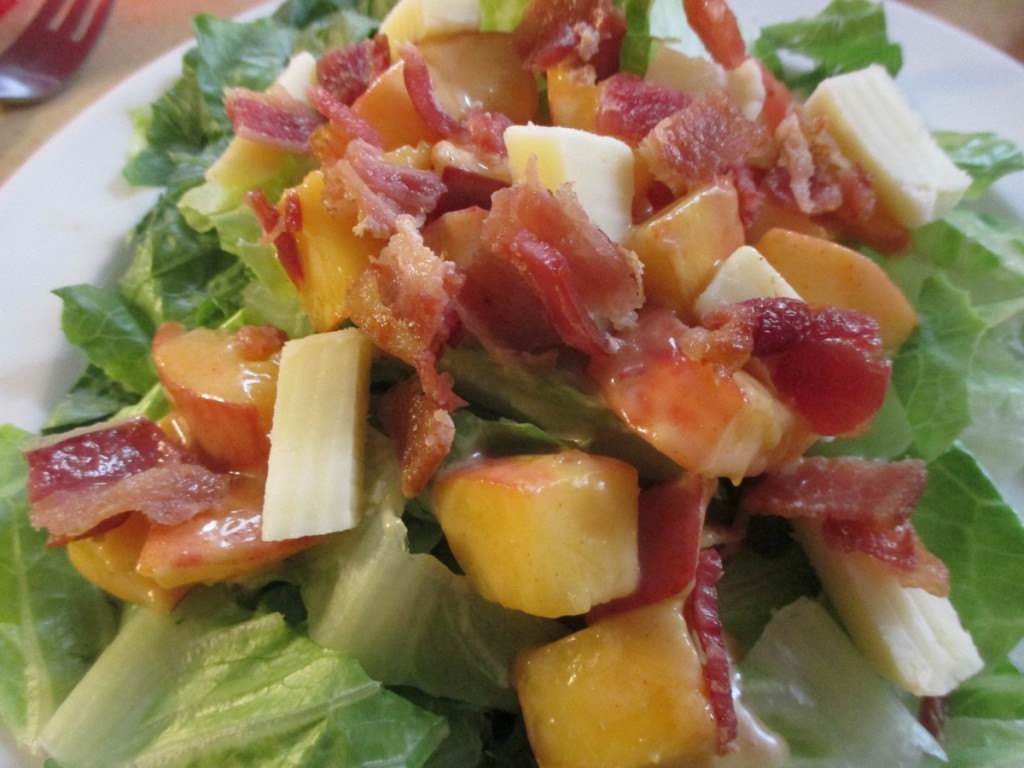
Salad topped with bacon and cheese
Barbecue Pinto Beans
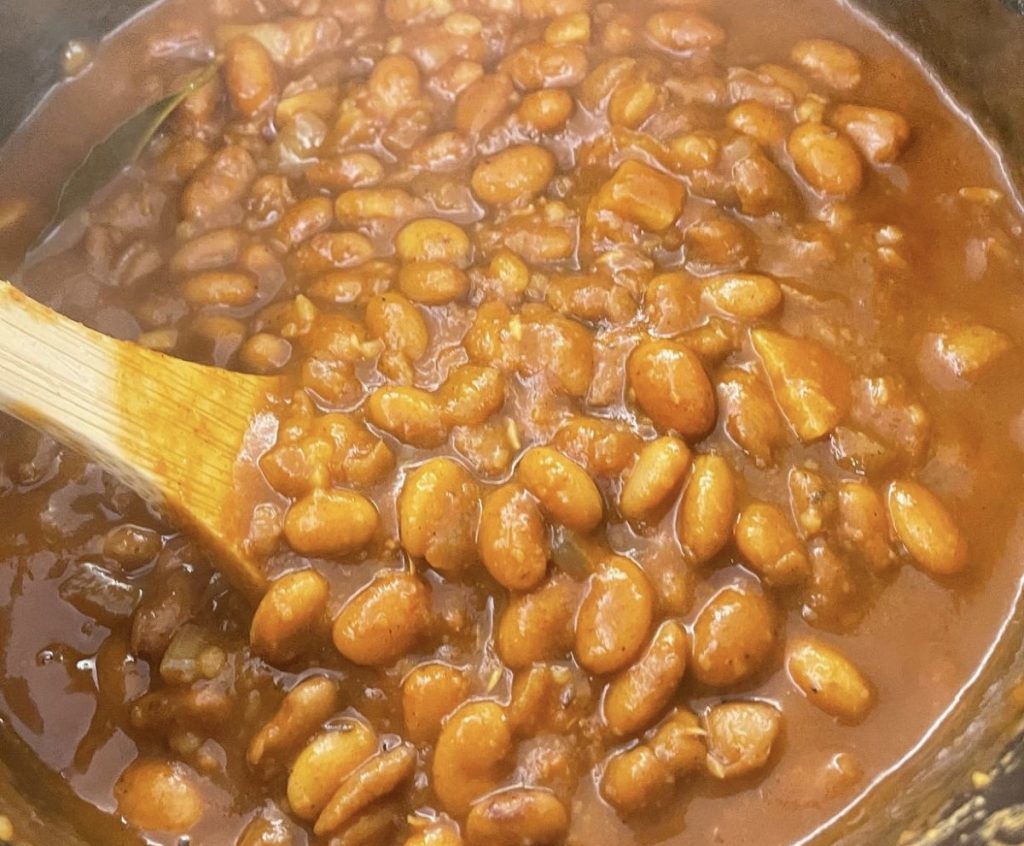
We made this recipe in class the other night. Everyone liked it. With the Labor Day weekend fast approaching, it would make a great side dish for your holiday meal. It really is simple. Once the pinto beans are cooked and tender, you add the rest of the ingredients and let them simmer together until the flavors blend. You could use a slow cooker, if you like.
This recipe doesn’t call for any meat. You could certainly add some bacon, if you like. So here is the recipe. Enjoy!!
Barbecued Pinto Beans
1 lb. dried pinto beans
1 onion, chopped
5 cloves minced garlic
1 bay leaf
3/4 c. ketchup
1/3 c. packed brown sugar
1/4 c. spicy mustard
2 T. chili powder
2 T. Worcestershire sauce
1 T. paprika
2 t. hot pepper sauce
1 1/2 t. dried thyme
Rinse beans and place in a large pot. Cover with cold water and bring to a boil. Boil 5 minutes and remove from heat. Allow to stand 1 hour. Drain and return beans to pot. Cover with fresh cold salted water and bring to a simmer. Cook, covered, until beans are tender, about 1 hour. Drain and return to pot with remaining ingredients adding a cup of water. Bring mixture to a simmer and cook over low heat, covered 30 minutes or longer or until mixture is thickened and flavors have blended. Add more water if needed. Season with salt to taste. Serves 6-8.
Note: After the beans are tender you can throw the whole dish into a slow cooker and let it simmer for 1- 2 hours.
Mom’s Cornbread

I have made a lot of versions of cornbread in my life, but this one might just be my favorite. Perhaps because it is my Mother’s recipe.
Her secret? She put a layer of shredded cheese between layers of batter. She also added cream style corn to some of the batter.
You end up with a cornbread that is full of flavor. It is also very tender and crumbly, but not dry. I bake mine in a cake pan, but there is no reason you could not bake this recipe in cast iron, if you prefer.
We made a version of it in class the other night. I have included that version, too. It uses boxed corn muffin mix, which is easier. Both versions work well. It was a big hit in class.
Mom’s Cornbread
1 c. cornmeal
1 c. flour
2 T. sugar, optional
4 t. baking powder
¾ t. salt
2 eggs
1 c. half and half
¼ c. oil- or melted butter or bacon fat
4 oz. pepper Jack cheese, shredded
1 c. cream style corn
Grease a 9-inch square pan and set aside. Preheat oven to 425 degrees. Combine dry ingredients in medium bowl, and set aside. In small bowl, combine eggs, half and half and oil and beat until smooth. Stir egg mixture into dry ingredients, stirring until combined. Don’t over-mix. Pour half of the batter into prepared pan. Sprinkle shredded cheese over the batter in the pan. Combine remaining batter with the cream style corn. Pour this mixture over the cheese in the pan. Bake 20-25 minutes. Serves 8-9.
Tennessee-Style Cornbread
2 boxes corn muffin mix (8.5oz. each)
1 c. shredded Monterey Jack cheese
1 c. creamed corn
Prepare one of the boxes according to package directions and spread batter over the bottom of a greased pan (9×9 inches) Sprinkle with the cheese. Prepare second box according to package directions and stir in corn. Spread over cheese and bake in a preheated oven (following package recommendations for 30-35 minutes. Makes 8 servings.
Fried Green Tomatoes

Tomato season is all about those firm, ripe, juicy tomatoes. For me, tomato season is also about fried green tomatoes.
Green tomatoes have a very different flavor than ripe tomatoes. It is like tomatoes and lemons had a baby. There is a distinct citrus-like tartness in green tomatoes. We fried some up in class last night. Everyone enjoyed them.
Green tomatoes are pretty hard, compared to ripe tomatoes, which makes them great for frying. They soften, but don’t fall apart when fried.
There are a number of variations on exactly how to fry your tomatoes. I do a traditional breaded method, flour, egg wash and cracker crumbs. Then I pan-fry them.
I like using cracker crumbs, but you could use bread crumbs instead. I have friends that love to use cornmeal instead.
So here is my recipe. I hope you give it a try.
Fried Green Tomatoes
1 c. flour, or 1/2 c. flour and 1/2 c. cornmeal
1 t. salt
1 t. pepper
5 green tomatoes, sliced 1/2-inch thick
1-2 c. cracker crumbs, saltines preferred
2 eggs, beaten
butter or oil for pan frying
Place flour and seasonings in small bowl. Place crumbs in second bowl and eggs in a third bowl. Dip tomato slices in eggs then in flour. Dip slice in egg again and then in crumbs. Fry slices in hot oil until golden and tender in the middle, turning to cook evenly. Drain and serve warm. Serves 4-6.
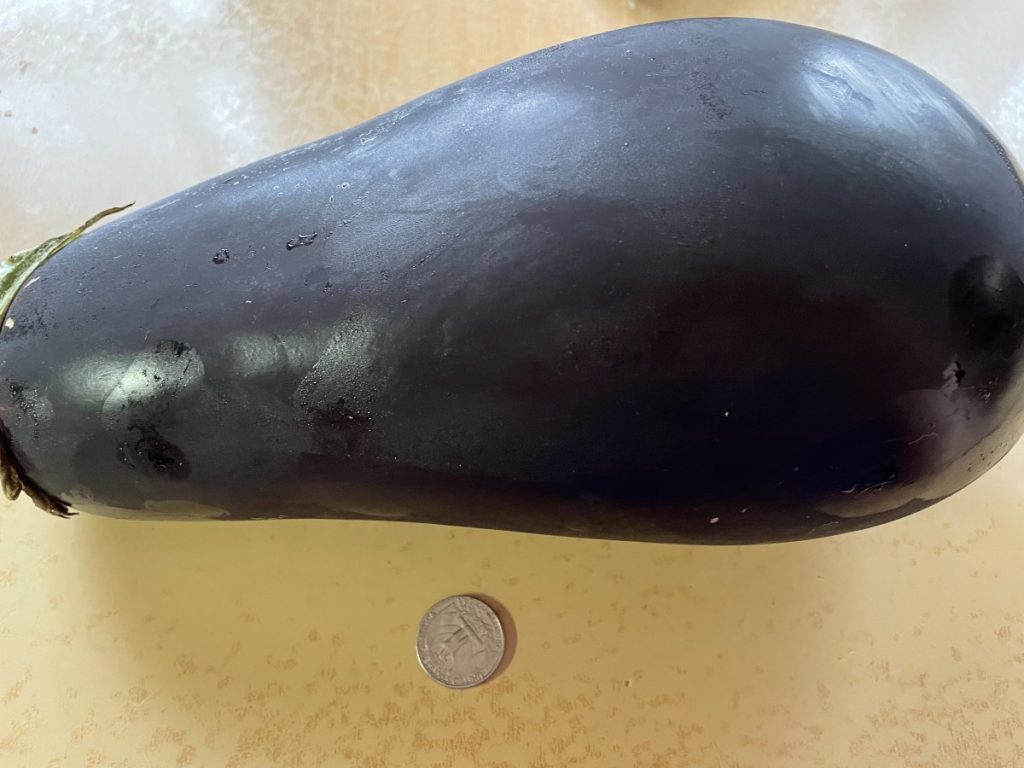
Baked Eggplant
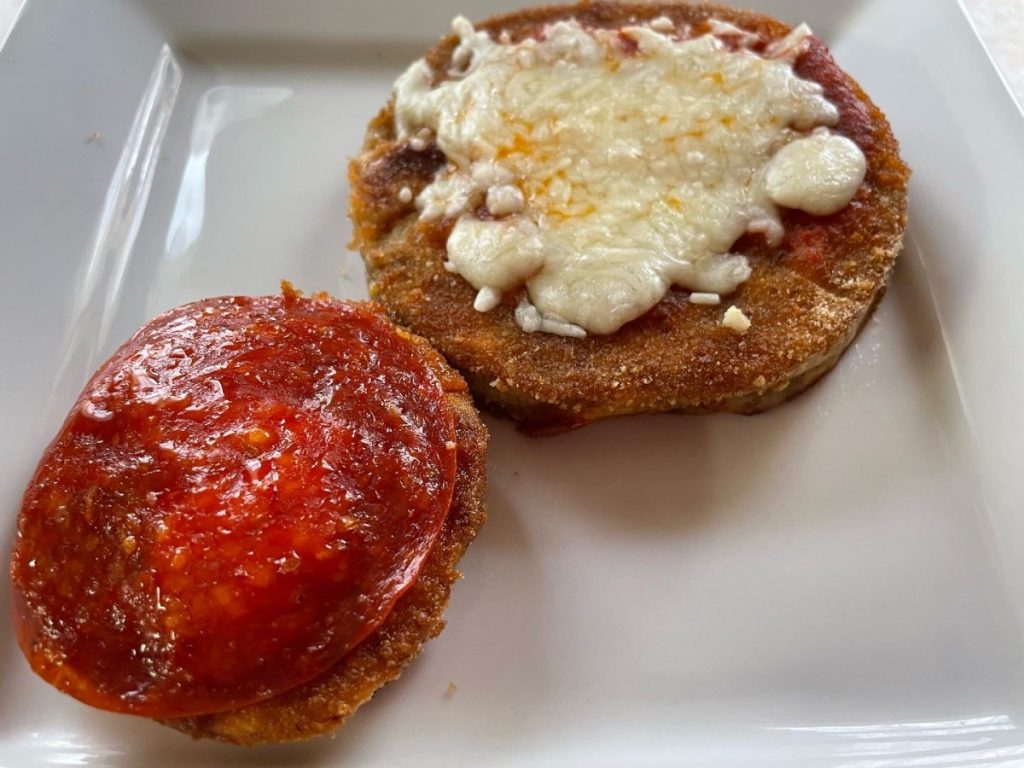
I love eggplant prepared in a lot of different ways. I must say, this preparation is one of my favorites. I think it is because it reminds me of my parents. My mother used to bread and bake eggplant this way. My dad loved it- and he was not a big eggplant fan. I guess pretty much anything tastes better when breaded. She would top the eggplant with some cheese and sometimes with some marinara sauce.
I had picked up an enormous eggplant at a local produce market. I decided to bake it. I cut the eggplant in slices, but you could also cut them in strips and serve like French fries, if you prefer.
One of the problems with eggplant is about how much oil it will absorb when cooking. If you fry these slices in a skillet- they will soak up the oil like a sponge. I prefer to bake the eggplant, with a drizzle of oil. They come out crispy, but not greasy.
They make a nice side dish or even main dish. I topped mine with marinara sauce and mozzarella cheese. Mozzarella was what my mom used. I often use Parmesan cheese or a Pecorino Romano.
Baked Eggplant
1 large eggplant or 2 medium
flour- about 1/2 cup
salt and pepper
2 eggs
1/4 c. water
1 T. Tuscan seasoning* recipe follows or use another blend of Italian herbs
1 t. garlic powder
about 1 cup of bread crumbs
1/2 c. oil
1/2 – 1c. marinara sauce
1 c. shredded mozzarella cheese
pepperoni, optional
Peel and slice eggplant. Place flour in bag and season with salt and pepper generously. Prepare egg wash by mixing the eggs with the water, pepper, a little more salt, Tuscan seasoning and garlic powder. Place in a shallow bowl. Place bread crumbs in another shallow bowl. Preheat oven to 375 degrees. One slice at a time, place in bag with flour and shake to coat , dip eggplant in egg wash, then in the bread crumbs, turning to coat evenly. Place on a baking sheet. Repeat with remaining eggplant. Drizzle with the oil and bake for about 25 minutes. Turn slices after 15 minutes and continue baking until eggplant slices are golden brown and tender. Spread some marinara on top, sprinkle with cheese and return to oven for 5 minutes longer. Serve as is, or with extra marinara sauce. Serves 3-4.
*Tuscan Seasoning
½ c. dried basil
½ c. dried oregano
½ c. dried marjoram
3 T. dried minced onion
2 T. dried minced garlic
2 T. dried rosemary
2 T. dried parsley
1 t. crushed red pepper

Dehydrating Vegetables

Do you ever buy a bag of potatoes, only to toss half of them away because they got mushy? Maybe your onions starting sprouting well before you could go through the whole bag? I hate when that happens. An easy solution could be to dehydrate them.
I have dehydrating on my mind this week. I found myself with some extra produce and I didn’t want it to go to waste. Dehydrating is an easy way to save it. It is a great way to preserve some of those wonderful tomatoes, too.
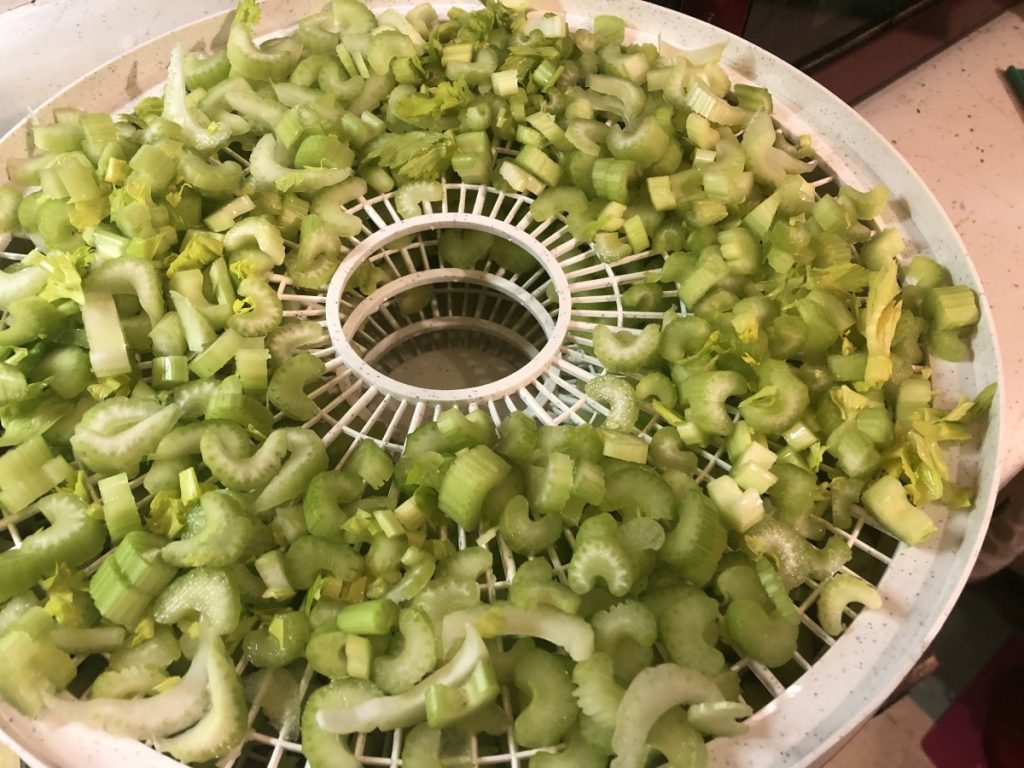
I started by dehydrating 2 large stalks of celery. I just washed them well, chopped them up, and placed them on the dehydrator trays. They filled my dehydrator, but once dried, I had little more than a cup. In case you were wondering- an entire bunch of celery is a stalk- one individual piece of celery is called a rib. I can use my celery in soups, sauces and stews. I can also powder it up and use it in salad dressings, marinades, rubs, and dips.
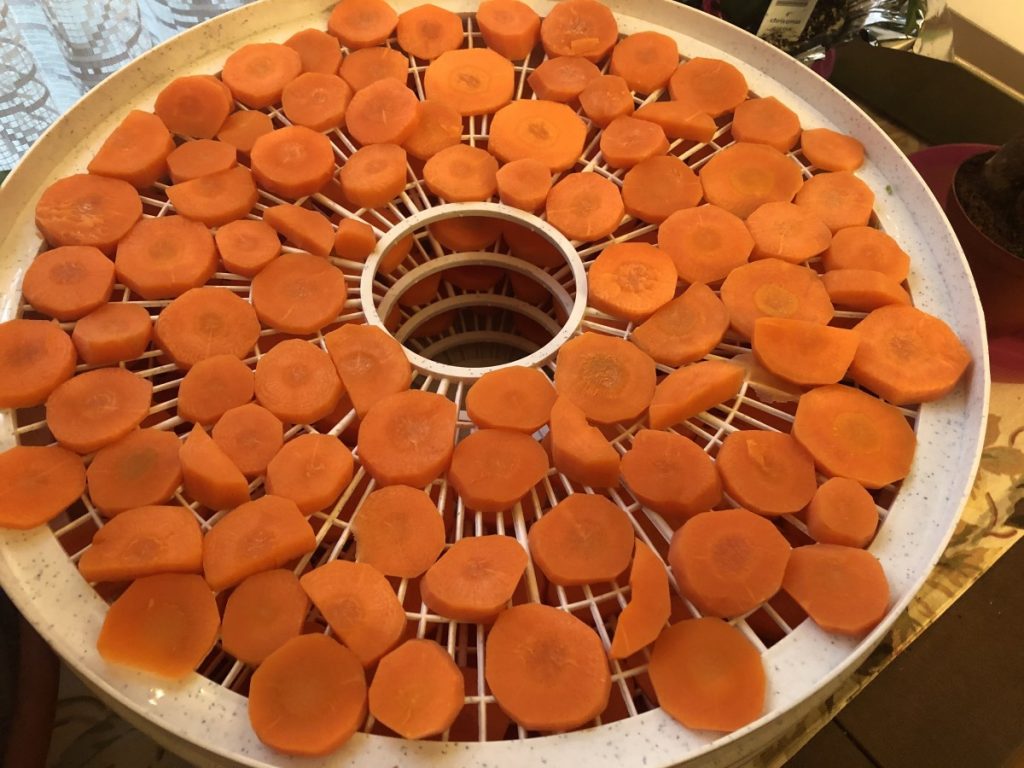
After dehydrating celery, I decided to dry some carrots. Unlike the celery, carrots need to be blanched before dehydrating. That helps the carrots to hold their color better and gives you a better finished product. I peeled and sliced the carrots. Then I steamed them for about 6 minutes. Once cool enough to handle, I placed the carrots in the dehydrator. Left them in over night and woke up to crispy carrot slices. These can also be added to soups, when making stock, stews, etc.
I preserve a lot of food by dehydrating it. Once you get over the initial investment in a dehydrator, the cost to dry food and to store dried food is pretty minimal. I got a very nice dehydrator for $30. Not a big investment at all.
Dried fruits are probably the most common home-dried foods. Apples, grapes, pineapple, strawberries and cherries are among my favorites. Because the dried vegetables are so useful and versatile, I enjoy them as much as dried fruits. I think you will, too.
Drying Vegetables
Most vegetables should be dried at the lower range if you have an adjustable thermometer on your dehydrator-around 125-degrees. Important to know with vegetables, is that some of them need to be blanched first. Blanching is just steaming or boiling the vegetables for a few minutes, before drying. Blanching kills certain enzymes, prevents browning and assures a better end product.
Vegetables that need blanching include green beans, cabbage, carrots, potatoes, greens, winter squash, corn and beets; this is not a complete list, but a good start.
Vegetables that do not require blanching include onions, celery, mushrooms, peppers, tomatoes, spinach, zucchini, cucumbers, garlic and also herbs.
Broccoli and cauliflower do not dehydrate well.
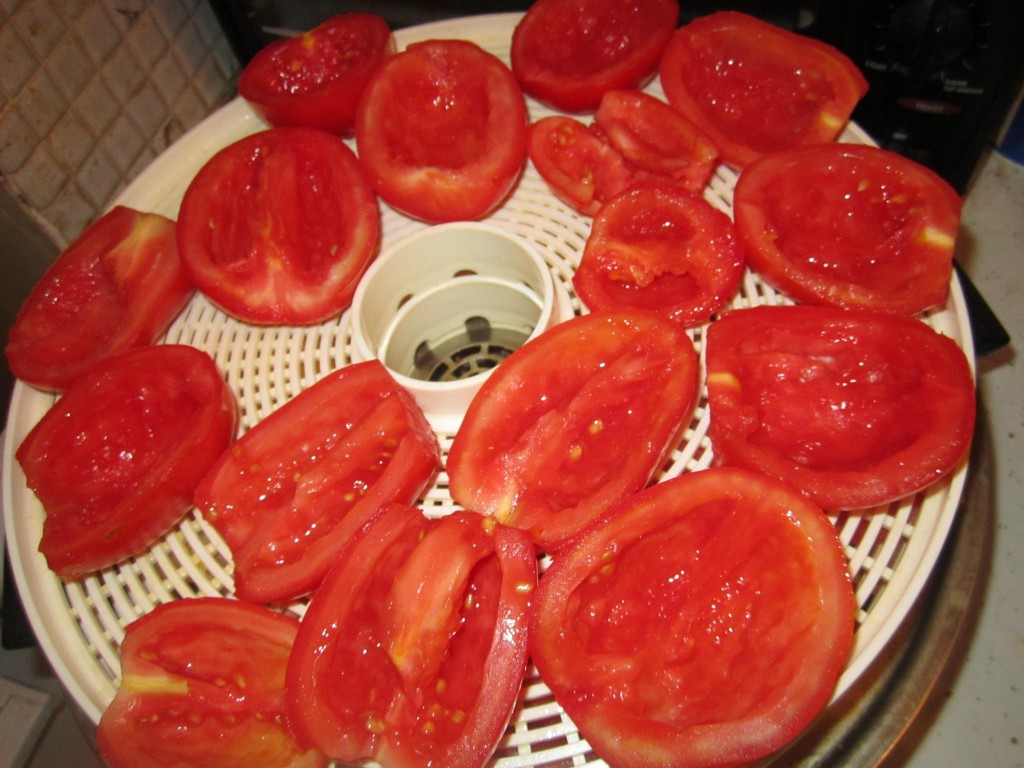
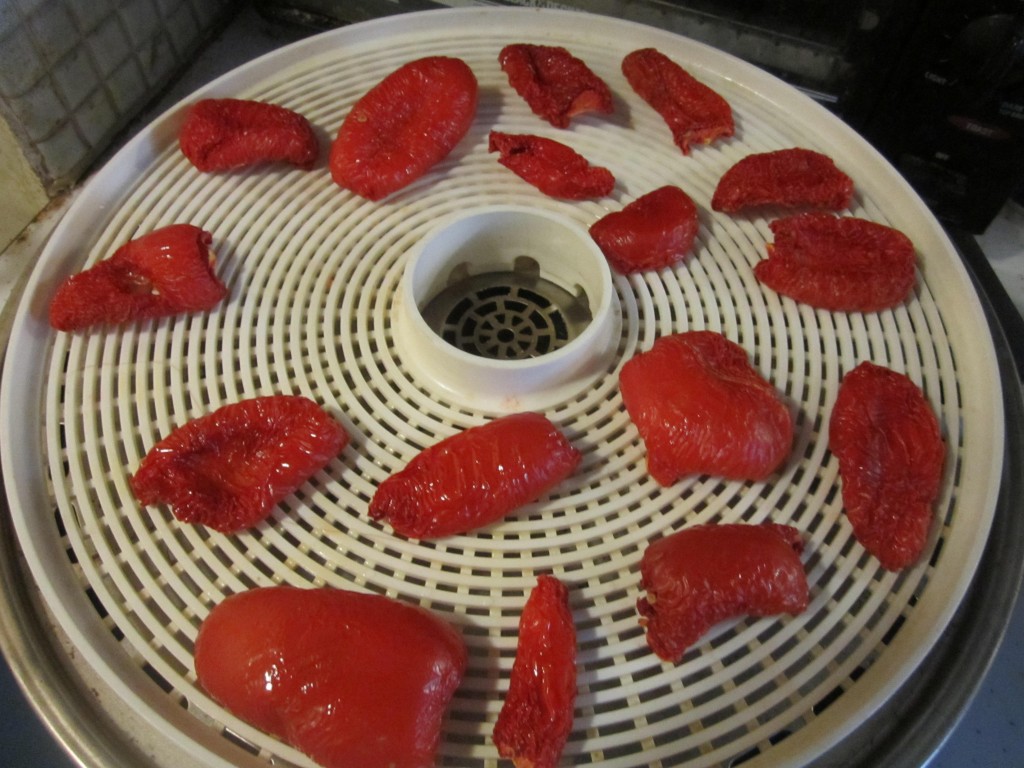
Tomatoes are probably the best vegetable to dry for the home gardener and cook. They are so easy to make and so tasty. Just cut plum tomatoes in half and scoop out the seeds. Lightly spray the trays with non-stick spray or rub with a little oil, and place the tomatoes cut side up for the first 12 hours. Turn them over after that until they are dried. I like them pretty crispy, so I dry them thoroughly. Still, just to be safe, I keep them in the freezer to keep their color and flavor longer. After a year tomatoes will darken if stored at room temperature. Larger tomatoes can also be dried. Just cut them in slices and squeeze out the seeds. Cherry tomatoes are just cut in half and squeezed to get out the seeds. With small cherry tomatoes I just make a cut large enough to get out the seeds and leave them whole.
How do you use them?
Veggie chips-zucchini and cucumber slices can be used instead of chips in dip.
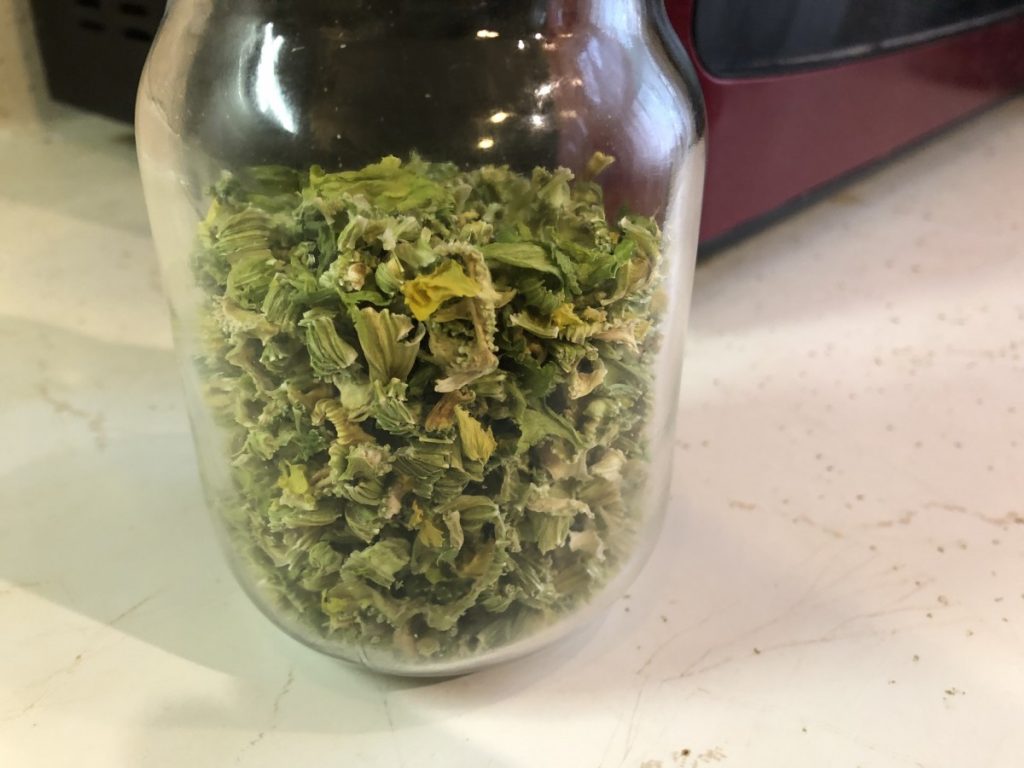
Powders- Tomatoes, celery, onion, pumpkin and garlic can all be powdered and used to flavor soups, stews sauces, cheeses, dips and more. I add powdered veggies to pasta dough. Mushroom powder is one of my favorite ingredients.
Reconstituted as fresh- potatoes in casseroles are wonderful. Corn, onions, celery, and carrots all re-hydrate exceptionally well.
Dips- Peppers, onion and celery all add great flavor.
To thicken sauces- Shredded zucchini, peppers, onions, mushrooms, celery and tomatoes all work well this way. If you want a lower carb or gluten free alternative to thicken a sauce, dehydrated veggies, especially in powder form, work great.
Soups and Stews- almost any dried vegetable is used this way. Easy to just let them simmer together until tender and all their flavors will enrich your stock
Chowders- Corn and potatoes are great in these dishes
Dried vegetables are best stored in a cool, dry place- I often freeze or refrigerate them for best shelf life. They can also be vacuum sealed to retain freshness. Just be sure that your veggies are dry enough. Moisture leaves you open to the risk of mold and spoilage. An old test is to hit a piece of dried veggie with a hammer. It should shatter. Doesn’t really work with my dried tomatoes, but that is part of the reason I store my dried tomatoes in the freezer or fridge.
Vegetables in photo: Starting left with bright green and going clockwise: Celery, potatoes, red peppers, mushrooms, carrots, cucumbers, onions and tomatoes. In the center- mixed sweet peppers.


Spicy Pickled Beets
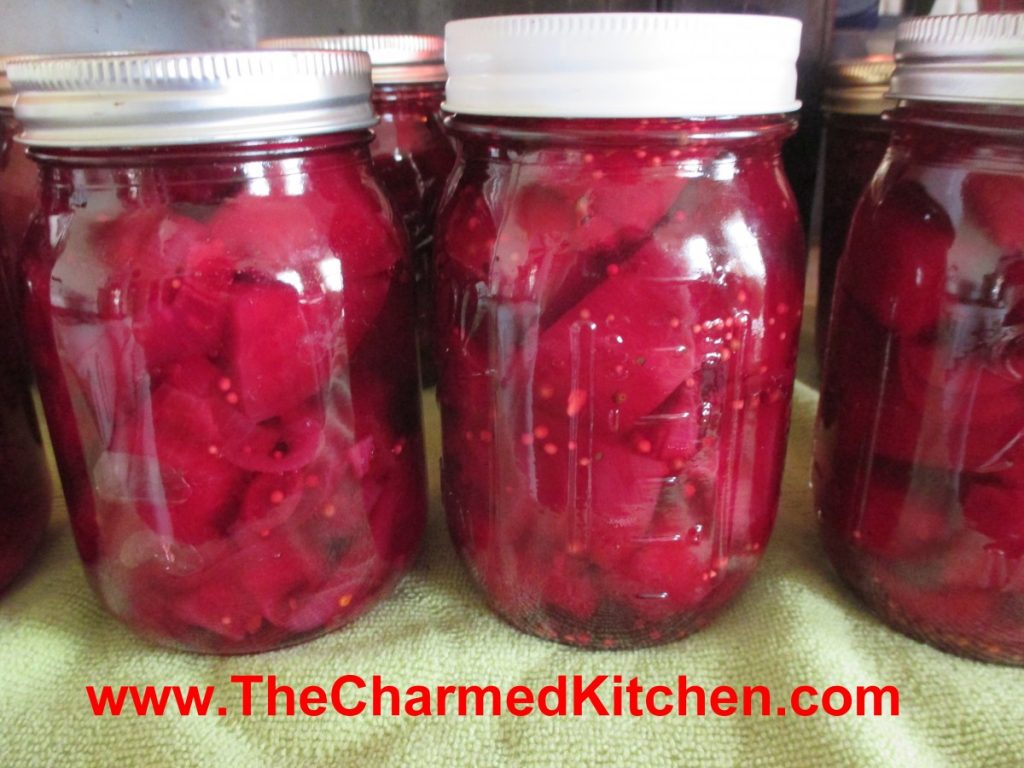
Beets are just one of those foods. People seem to love them, or hate them. I am a beet lover. I enjoy them in all sorts of dishes. The nice thing about making a batch of pickled beets is being able to open up a jar whenever you want.
This recipe is a pretty classic way to preserve beets. The brine is a sweet and sour mixture with pickling spice, salt and red pepper flakes for added flavor and heat. You could play around with the seasonings a little. Maybe adding more heat or less, depending on your preference. Keep in mind that spices tend to intensify in flavor when canned.
Pickled beets are great served as a side dish with all sorts of foods. I like them served with cheeses, crackers and other pickled foods as an appetizer. I also like to add them to salads. If you don’t want to can them- you can store them in the fridge for up to a couple of months.
Spicy Pickled Beets
4 lbs. beets, smaller sizes preferred
3 c. thin sliced onions
2 c. sugar
2 T. Pickling spice
1 T. canning salt
2 t. red pepper flakes
2½ c. cider vinegar- 5% acidity
1½ c. water
Wash and trim beets, leaving a couple inches of stem attached. Cook in boiling water until tender. Cool beets down so you can handle them. Peel beets and cut into 1½- 2-inch diameter pieces, if beets are large. Leave whole if beets are small. Set aside. Combine the rest of the ingredients in a pot and bring to a boil. Reduce to simmer and simmer 5 more minutes. Add beets and cook a few minutes, until beets are warmed through. Ladle hot beets into clean pint jars, leaving ½ inch headspace. Ladle in hot liquid, leaving ½-inch headspace. Remove air bubbles, wipe off rim, screw on lid to finger-tip tightness. Repeat with remaining beets and liquid. You should fill about 5 pint jars. Process in a boiling water bath for 30 minutes. Turn off the heat and leave jars in water bath 5 minutes before removing to counter to cool. Yield: 5 pints.


