Growing and Cooking with Dill

On appearance alone, dill is a welcome addition to any garden. It is a feathery, delicate looking plant that can reach a height of 3′ or more. It is an annual, so it has to be replanted every year. The good news is that dill is easy to grow. A lot of friends have told me that their dill reseeds itself and comes back every year.
When dill gets tall, it should be given some support to keep it from falling over in high winds. If you plant your dill in a clump, rather than in rows, you can put a few stakes around the plants, and run twine around it for support. I use tomato cages. I put them around the dill plants when they are small, so they grow up in the cages.
Dill does not transplant well, and seed should be sown where it is to grow or in peat pots, so you can transplant them without disturbing the roots too much. Dill is tolerant of cold, and can be planted fairly early in the spring. The only problem with planting dill early is that the plants are past their prime when the cucumbers are coming into season. I plant small amounts of dill every couple of weeks from Spring into Summer, so I know I will have dill when I need it.
Dill grows best in full sun and well-drained soil. While both the leaves and seeds are edible, some types of dill go to seed rather quickly, making the leaves less tasty. A cultivar of dill called Dukat, does not grow as tall as most types, and delays flowering by several weeks over other cultivars. For more leaves and a longer growing season, Fernleaf dill is another nice cultivar to plant. It is more compact, so less support is needed. Its bushy growth habit produces lots of fresh dill leaves.
Dill seed heads are used in pickle making. The mature seeds are used in salad dressings and potato salads. The dill leaves, also called dill weed are used in carrot, potato, and other vegetable dishes. Dill is a must if you are growing cucumbers for homemade pickles.
If your dill heads mature before you need them, all is not lost. Just freeze them to use later. Dill leaves freeze great, too. You can place dill in freezer containers or freezer bags and freeze. I chop up the leaves a little to save space. To freeze dill seed heads, I just place in plastic freezer bags, squeeze out as much air as possible, seal, and pop in the freezer.
My Mom loved dill. She made wonderful crock pickles and used them in cucumber salads. She would also add dill to carrot dishes and potatoes. I have included some of her favorite dill recipes, and a few of mine. Enjoy!!

Couscous Salad with Shrimp and Dill
½ c. olive oil
¼ c. fresh lemon juice
1 clove minced garlic
1 t. celery seed
2 c. couscous, about 10 oz.
2 ¼ c. boiling water or vegetable broth
1 lb. peeled cooked shrimp
1 c. diced sweet red pepper
½ c. chopped green onions
2 T. fresh dill weed or 2 t. dried
Whisk first 4 ingredients together for dressing. Place couscous in heat proof bowl and pour over the boiling water. Let stand until water is absorbed, about 10 minutes. Fluff with a fork and add remaining ingredients, stirring to mix well. Pour over dressing and toss to coat. Chill at least 30 minutes or up to 2 hours. 6 Servings.
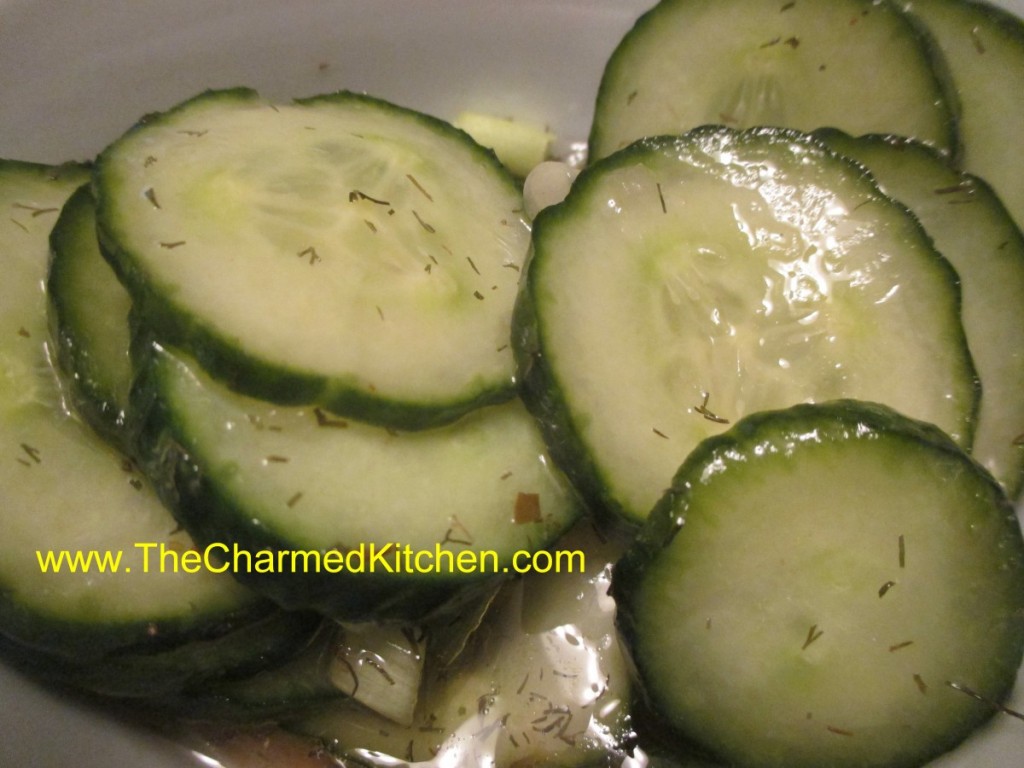
Dill Cucumber Salad
2 English cucumbers, sliced thin
2/3 c. cider vinegar
1/3 c. oil
2 T. sugar
2 t. salt
1 t. dill weed- I used dried- use about 1 tablespoon if using fresh
1 t. parsley
Fresh ground pepper and hot sauce to taste
Place cucumbers in a bowl and set aside. Combine remaining ingredients in another bowl and mix well. Pour over the cucumbers and mix together. Chill salad several hours before serving. Serves 6.
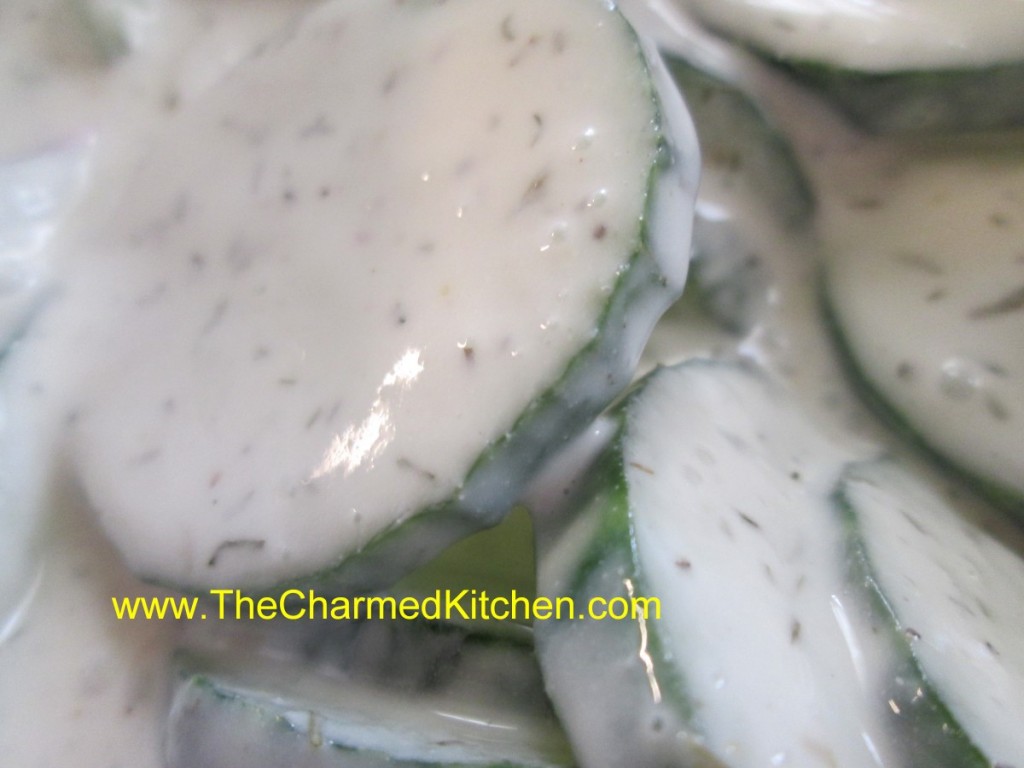
Mom’s Cucumbers and Sour Cream
2-3 medium cukes, sliced
1 c. sour cream or strained yogurt
¼ c. sugar
¼ c. vinegar
2 green onions, chopped
1 –2 T. chopped fresh dill or 1-2 t. dried
Combine all ingredients and chill at least 10 minutes. Serves 4-6.
Easy Dill Pickles
30-40 pickling cucumbers, 5 inches long, scrubbed and ends trimmed off
¾ c. sugar
¾ c. canning or pickling salt (non-iodized)
1 quart vinegar
1 quart water
7 fresh dill heads
3 T. pickling spice
7 garlic cloves, peeled, optional
Mix together the sugar, salt, vinegar, water and pickling spices and bring to a boil. Cook 10 minutes. Place a dill head in the bottom of seven clean, hot pint jars. Add the garlic, if using. Meanwhile cut trimmed and washed cucumbers into halves or quarters lengthwise and pack upright into the jars. Trim the length, if needed to fit no higher than to the shoulder of the jar. Pour over the hot brine leaving ½ -inch of headspace. Wipe rims and screw on lids. Place in a simmering water bath and bring to a boil. Process for 10 minutes. Remove and cool. Makes 7 pints.
Dilly Green Beans
4 lbs. table‑perfect whole green beans
1 3/4 t. crushed dried hot red pepper
3 1/2 t. dried dill seed or seven fresh dill heads
7 cloves of fresh garlic, peeled
5 c. vinegar
5 c. water
1/2 c. less 1 T. pickling salt
Wash beans thoroughly. Remove stems and tips, and cut them as much as possible in uniform lengths to allow them to stand upright in canning jar, coming to the shoulder of the jar. have jars clean and very hot, and lids and sealers ready in scalding water. In each jar place one dill head or 1/2 t. dill seed, add one garlic clove, and 1/4 t. crushed hot red pepper. Pack beans upright in jars, leaving 1 inch of head room. Heat together the water, vinegar and salt. When the mixture boils, pour it over the beans, filling each jar to 1/2 inch from the top. Run a plastic knife down and around to remove trapped air. Adjust lids, and process in a boiling water bath for 10 minutes, start timing after the water in the canner returns to a boil. Remove jars. …Wait at least 2 weeks for these beans to develop their flavor. Yield: 7 pints
Aunt Tillie’s Crock Pickles
1 gallon water (use spring or distilled if your water is hard)
1 c. vinegar
1/2 c. canning salt
1 T. pickling spice
garlic and fresh dill
fresh pickling cucumbers, washed and ends trimmed
Boil together the water, vinegar, salt and pickling spice. Cool completely. In large, straight sided crock, stainless steel or food safe plastic container alternate layers of cukes with dill and garlic according to your taste. You can also eliminate garlic if you choose.
Pour over brine to completely cover cucumbers and dill. Place plate or lid on container and weigh down to keep “pickles” submerged. Allow fermentation to take place in a reasonably cool place like a basement, but do not refrigerate. Every couple of days you should skim any scum or foam that forms on the surface. When no scum forms any more, fermentation is complete. The process can take weeks. You can also add more cucumbers as you harvest them, but try to stick the newer ones on the bottom. Pickles can then be placed in sterile jars, covered with fresh brine, sealed and refrigerated. They will keep several months this way. You can also cover with fresh, hot brine, seal and place in a boiling water bath and process at a simmer for 15 minutes to store outside of the fridge.
Green Tomato Dill Pickles- Kosher style
Green tomatoes
Stalk celery
Sweet green peppers
Garlic
2 quarts water
1 quart vinegar
1 cup salt
2-3 T. fresh dill, I sometimes add a little more
Use small firm green tomatoes. Pack into sterilized canning jars. Add to each quart jar a bud of garlic, 1 stalk of celery, and 1 green pepper cut into fourths. Make a brine of the water, vinegar, and the salt. Boil with the dill for 5 minutes. Pour the hot brine over the pickles to within 1/2 inch of the top of the jar. Put on cap, screw band firmly tight. Process in a boiling water bath for 15 minutes. These pickles will be ready for use in 4 6 weeks. Yield: About 6 quarts.
Dilled Cucumber Soup – Serve Chilled
2 cucumbers, peeled and seeded
2 c. yogurt, or sour cream
salt to taste
cayenne pepper to taste
¼ – ½ c. fresh snipped dill
1 T. fresh chopped parsley or cilantro
1½ c. milk
2 ribs celery, diced
1 sweet red pepper, seeded and diced
lemon wedges and dill sprigs for garnish
Finely chop one of the cucumbers and place in a bowl. Coarsely chop the second cucumber and place in a food processor. Add yogurt and seasonings and blend until smooth. Add the pureed mixture to the cucumber in the bowl and add remaining ingredients, except the lemon wedges and dill sprigs. Chill soup, covered, for several hours or overnight. To serve ladle into chilled bowls and garnish, if desired with lemon and dill. Serves 4.
Dill Gravy
1 T. oil
2 T. flour
1/2-1 c. fresh chopped dill
2 T. vinegar
1 t. sugar
salt and pepper to taste
about 1/2 c. water
In small skillet heat oil and brown the flour. Stir in all ingredients until dill wilts. Start adding the water, over medium high heat, stirring constantly. Add the water slowly, allowing the gravy to come to the boil and thicken as you go. You may need a little more or less water according to you taste. You can use stock in place of water if you prefer. Serve with meat and potatoes. Makes 1/2 c.
Dill Marinade
1/4 c. white wine
juice of half a lemon or lime
1/3 c. olive oil
2 T. balsamic vinegar
2 T. chopped fresh dill
2 T. Dijon- style mustard
salt and pepper to taste
Combine all ingredients in a blender until smooth. Use with chicken, swordfish, tuna or shark steaks.
Beet and Carrot Salad
1 large or 2 medium beets
2 large carrots
4 T. olive oil
4 T. cider vinegar
2 T. honey, or to taste
1 T. fresh dill weed or about 1 t. dried
Dash of hot sauce
Salt and pepper to taste
Peel beets and shred or grate them using a hand grater or food processor. Place in a mixing bowl and set aside. Peel and shred the carrots and add to the beets. Combine remaining ingredients and pour over the beet mixture. Stir to coat and chill until ready to serve. Makes about 3 cups.
Zucchini and Cheese Tartlets
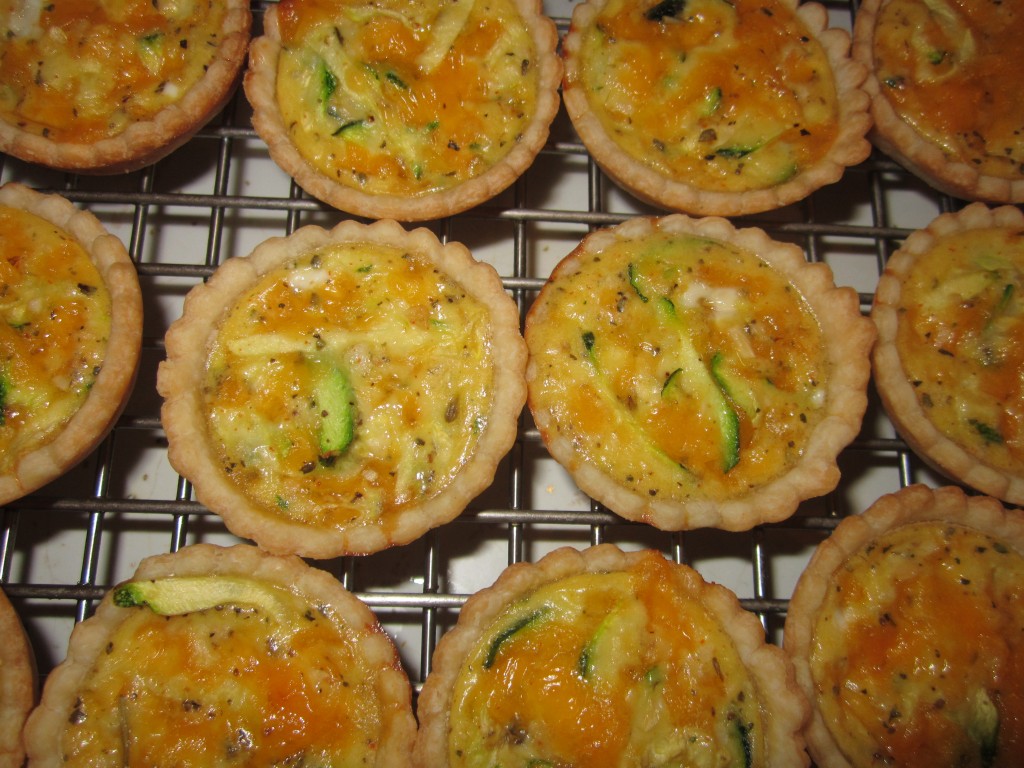
Since zucchini are so prolific there never seem to be enough recipes for them. I like this one as an appetizer. You can bake up a big batch, bake and then freeze some for whenever you need them.
Zucchini and Cheese Tartlets
1 recipe of pie crust dough, enough for 2 pies, home made or store bought
1 medium zucchini shredded, about 1 1/2 cups
1 T. flour
1 c. shredded cheese- any kind you like. I like cheddar.
2 eggs, beaten
1/2 c. minced onion
1 t. Italian seasoning
salt and pepper to taste
hot pepper sauce to taste
Preheat oven to 375 degrees. Roll out dough to 1/8-inch thick. Use a 2 1/2-inch biscuit cutter to cut out circles of dough. Place dough circles in mini muffin pans. Press them in gently being careful not to tear them. Repeat with remaining dough and re-roll scraps. You’ll end up with about 3 dozen in all. If you don’t have enough pans, keep the extra dough circles under a towel or plastic wrap so they don’t dry out until you are ready to use them. In mixing bowl combine zucchini and toss in the flour. Add remaining ingredients and mix well. Adjust seasonings to your taste. Place a rounded teaspoonful of zucchini mixture into each of the tartlet shells in the prepared pans. Don’t over fill. Bake for 12-15 minutes or until golden brown on top. They will puff up while baking but flatten when cooling. Can be served hot, warm or at room temperature. Makes about 3 dozen.
Can be frozen. To reheat take straight from the freezer and place on a baking sheet. Bake in a preheated 325 degree oven and bake for about 20 minutes, but check after 15 minutes.
Cherry “Danish”

We made these little pastries in cooking camp yesterday. The kids enjoyed making them and eating them. If you are a baker, you might balk at calling these Danish. They are not the traditional Danish we are used to. They are tasty, though, and easy to make. I call them pastries, although that seems a little vague. They are more like little biscuits, filled with fruit.
Mom always called them Danish. My Mom used to make a batch whenever she had unexpected guests. They are ready in no time. I used cherry pie filling in these, but you can use other fruit fillings or even make cheese Danish.
They are made with baking mix- like Jiffy Mix. I make my own mix and the recipe follows. You can prep them in the time it takes to preheat the oven. They bake for just a few minutes, so a batch made in no time at all.
Easy “Danish”
2 c. biscuit mix, like Bisquick or Jiffy Mix- I make my own.
2 T. sugar
1/2 c. butter
2/3 c. milk
Assorted preserves or pie fillings or even sweetened cream cheese or ricotta for cheese “Danish” I prefer pie filling over preserves because preserves melt a lot and tend to spill out during baking.
1/2 c. confectioner’s sugar
milk
Combine biscuit mix and sugar. Cut in butter. Stir in milk. Drop rounded tablespoonfuls on lightly greased baking sheet. Indent middle using spoon. Leave 2-3 inches in between, as they grow. Spoon preserves, or pie filling, into indents. Bake in 400 degree oven for 10-15 minutes or until lightly browned. Combine confectioner’s sugar with enough milk to make a runny glaze. Drizzle over cooled Danish. Makes 12.
Homemade Biscuit Mix
8 c. flour
1 c. powdered milk
1 c. powdered buttermilk
¼ c. baking powder
1 T. salt
1½ c. shortening- I like to use coconut oil- you can also use butter, but mixture needs to be kept in the fridge if you use butter. I keep mine in the fridge in hot weather if I use coconut oil.
In large bowl combine dry ingredients and mix well. Cut in shortening until mixture resembles coarse crumbs. Store in a tightly-closed container and use it in 2-4 months. Makes 10 cups.


Cherry Liqueur

I make a lot of homemade liqueurs, but cherry is one of my favorites. I enjoy just sipping it, or adding it to other cocktails or mixing it with soda water.
It is easy, and the reward is having this lovely liqueur to enjoy even when cherries aren’t in season. I added a couple of vanilla beans to mine, but you can leave them out, if you prefer. You could also add 1-2 tablespoons of vanilla extract.
If you like a less sweet liqueur, you can add less sugar. You could also use sour cherries instead.
Cherry Liqueur
2 c. granulated sugar
4 c. vodka or brandy
1 lb. large, washed, stemmed and pitted sweet cherries
2 (6-7 inch) vanilla beans, broken into several pieces
Place sugar and vodka or brandy in a large jar- I used a half gallon canning jar. Stir until sugar is mostly dissolved. Add cherries and vanilla and cover jar. Do not stir. Place in a cool, dark place for 3 months, without stirring or shaking. Strain and filter. Divine! Makes 4-6 cups.
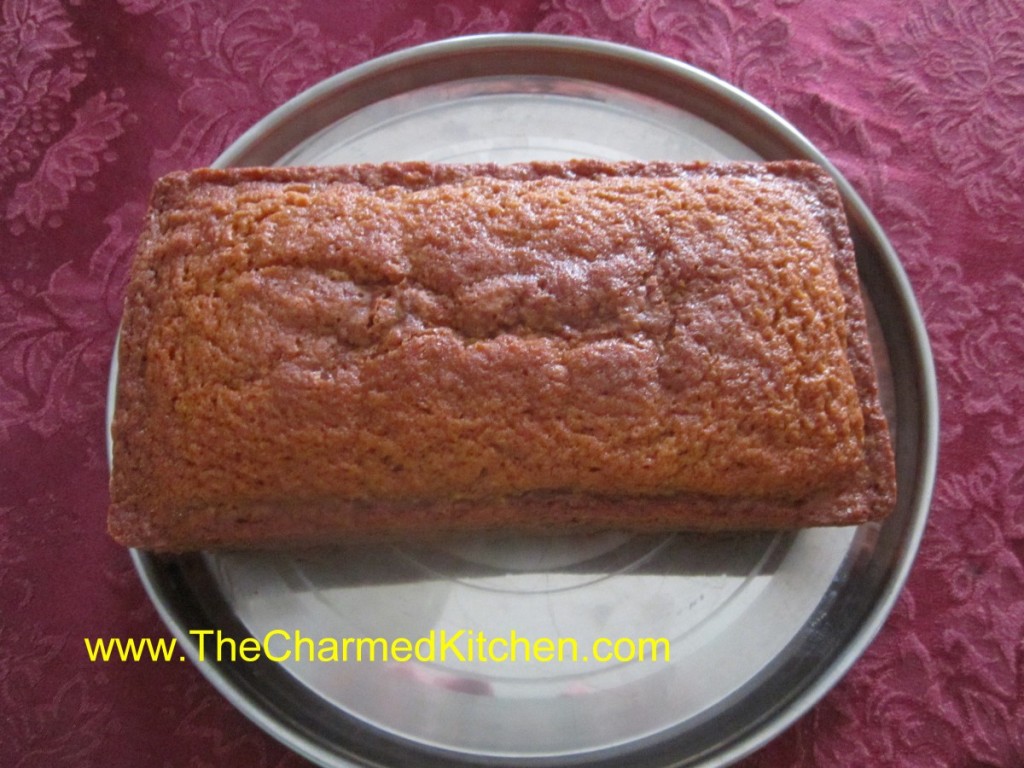
Giant Zucchini Bread
Let me be clear. The bread is normal size- the zucchini are giant. Even the most diligent of gardeners will have a few zucchini get away from them.
Zucchini seem to go from too small to gigantic in the blink of an eye. A friend just brought me a really big zucchini. I knew it would make nice zucchini bread.
This time of year I get a lot of questions about overgrown zucchini. People seem to think there is nothing you can do with them. That’s not true. Even older squash can be eaten in all sorts of ways.
You can determine if the skin is too tough to eat by trying to pierce it with a fingernail. If you can easily poke the skin- it is tender enough to eat. If it isn’t, just peel before using.
Cut the zucchini in half lengthwise and look at the seed cavity. If the middle looks spongy, hollow or if the seeds are developing scoop out the middle and discard. The remaining zucchini can be cubed or sliced and added to stews, soups, stir fries and all sorts of dishes.
One of my favorite things to make with the bigger zucchini, is zucchini bread. I shred up a whole zucchini and portion it out in amounts I will need for my bread. I freeze what I won’t be using that day. It is really nice in the dead of winter to be able to make zucchini bread. Here is the recipe I use. It is a favorite and makes 2 loaves, which is a bonus.
Zucchini Bread
3 c. flour
3 eggs
2 c. sugar, I use less
2 c. shredded zucchini
1 c. oil
1 c. chopped nuts or raisins, optional
½ c. sour cream or Greek yogurt
1 t. each vanilla, cinnamon, salt and baking soda
Preheat oven to 350 degrees and grease 2 (9×5 inch) loaf pans. Set aside. Place flour in large bowl. Beat eggs and add with remaining ingredients to flour, mixing well and scraping bowl. Pour batter into prepared pans and bake 50-60 minutes, or until browned and toothpick in center emerges clean. Cool in pans on wire rack. Freezes well. Makes 2 .
Cheesy Cherry-Blueberry Coffeecake
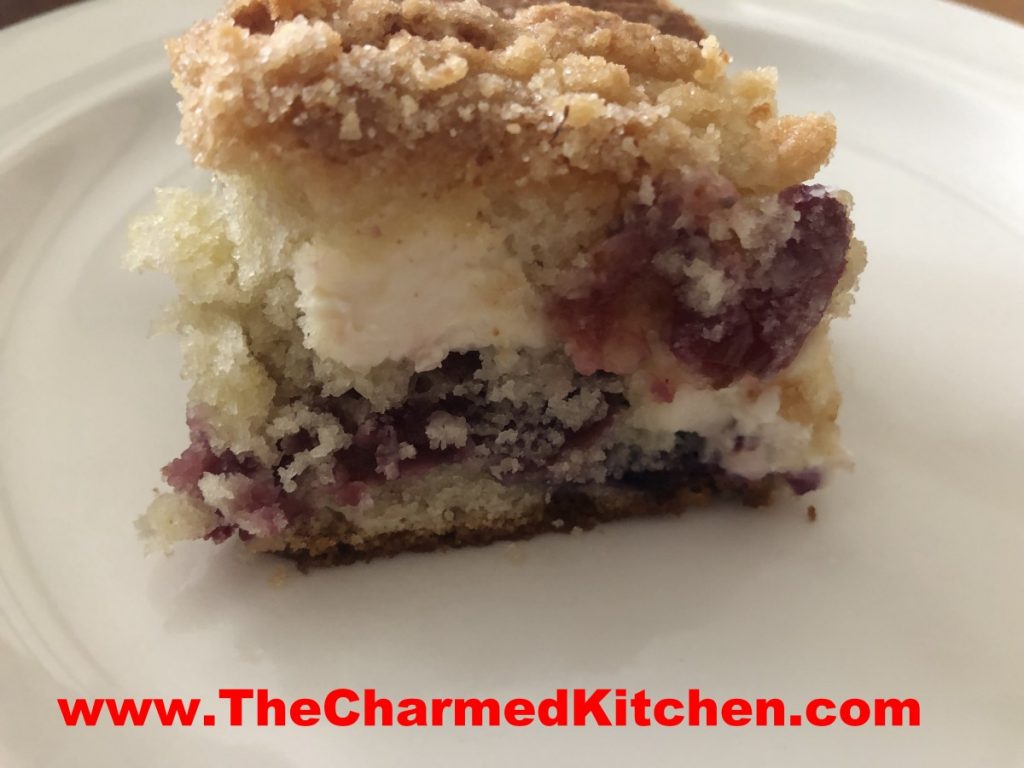
If you need a really special dessert for your next party or cookout, consider making this cheesy cherry-blueberry coffee cake. It is one of my favorite coffee cake recipes ever. The cake is not too sweet, and the combination of cream cheese, with the fruit reminds me of a cherry-blueberry blintz.
The streusal topping adds a nice little crunch.
It is fine served all on its own. You can also serve it with ice cream or whipped cream. You can also top with more blueberries and cherries.
While I think of this cake as a wonderful dessert, it can be served as a breakfast or brunch dish.
As if this weren’t enough- this cake freezes great. Who are we kidding? There won’t be any leftovers – but you could freeze them, if you had some.
So here is the recipe. Enjoy!!
Cheesy Cherry-Blueberry Coffee Cake
1 1/4 c. sugar
1/2 c. butter
2 eggs
2 1/4 c. flour
1 T. baking powder
1 t. salt
1 c. milk
1 c. fresh or frozen blueberries
1 c. pitted and coarsely chopped cherries
8 oz. cream cheese, cubed
1 t. grated lemon peel
Topping:
1/4 c. sugar
1/4 c. flour
1 t. grated lemon peel
2 T. butter
Preheat oven to 375. Grease and flour a 13×9 inch baking dish. Cream together sugar and butter until fluffy. Beat in eggs. Combine 2 cups of the flour with baking powder and salt and beat into batter alternately with the milk. Toss fruit with the remaining flour and fold into the batter along with the cheese and lemon rind. Pour batter into prepared pan. Combine sugar, flour and lemon peel for topping and cut in butter to resemble coarse crumbs. Sprinkle over batter and bake for about 45 minutes. Use toothpick to test for doneness. Serves 12.

Zucchini Brownies- Gluten Free
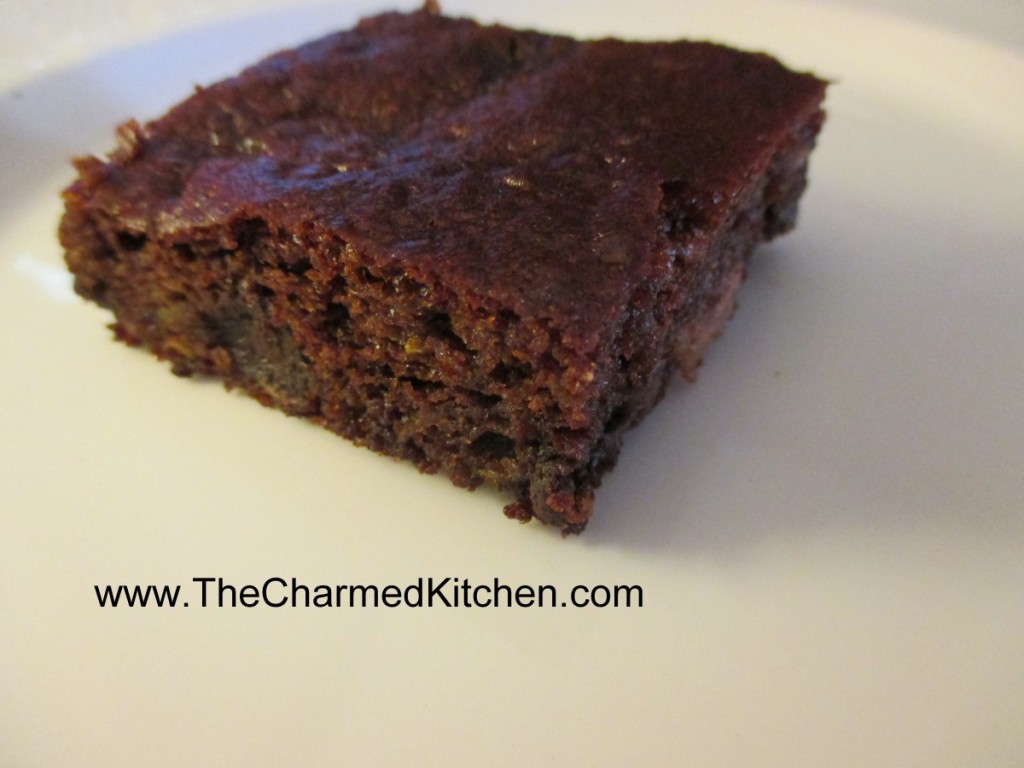
These brownies are everything you want in a brownie. Sweet, moist and very tender. The fact they are also flour and gluten-free is a nice bonus for those who can’t have gluten.
You might think, when you read the ingredients, that I left something out. I didn’t. They baked up beautifully and had a wonderful texture. I think the next time I make them, I might also add some chopped nuts.
Gluten-Free Zucchini Brownies
1½ c. shredded zucchini
1 c. almond butter- but you could use peanut butter instead
1 c. chocolate chips
1/3 c. honey – but you can use 1/2 cup if you want a sweeter brownie
¼ c. unsweetened cocoa powder
1 egg
1 t. vanilla
1 t. baking soda
1 t. cinnamon
½ t. allspice
Preheat oven to 350 degrees. Grease a 9×9 inch pan, set aside. Combine all ingredients in a medium bowl and stir until well blended. Pour batter into pan and spread evenly. Bake 25-30 minutes, or until toothpick inserted comes out clean. Cool before cutting. Makes 16.
Soft Butter Cookies

If you are looking for a truly tender cookie, this may be it. These cookies are so delicate, they just melt in your mouth!!
The secret ingredient might surprise you. It is oil. Yes, I know I said butter cookies – they also contain butter. But the combination of oil and butter makes them soft and delicate, even days after baking.
They also contain both granulated and powdered sugar. Not your typical cookie recipe, for sure. This just may be my “go to” butter cookie recipe from now on.
You don’t have to chill the dough and they roll very easily, without sticking to your fingers. You could chill the dough, but let it warm up a little before rolling. The dough can also be made ahead and frozen- I tested it.
We made these in cooking camp today. It was a great cookie for kids to make. Easy to handle. They dipped the tops of the raw cookies in nonpareils,, sprinkles or colored sugars, then baked them. You could leave them plain, then roll in powder sugar, once baked and cooled, or drizzle with melted chocolate.
Soft Butter Cookies
1 c. butter
1 c. oil, I used avocado oil
1 c. sugar
1 c. powdered sugar
2 eggs
1 T. vanilla
1 t. baking soda
1 t. cream of tartar
½ t. salt
4 ½ c. flour
In mixing bowl, beat together butter, oil, sugars and vanilla. Once well blended, beat in eggs. Stir in the baking soda, cream of tartar and salt, then add the flour, mixing until well combined. Heat oven to 350 degrees. Roll dough into one inch balls and press tops of cookies in sprinkles or colored sugar, if desired. Place one inch apart on ungreased baking sheets. Bake for 12 minutes, or until light golden on bottom. Leave cookies on baking sheets 3 minutes before placing on cooling rack. Makes about 6 dozen cookies.
Favorite Tomato Salads
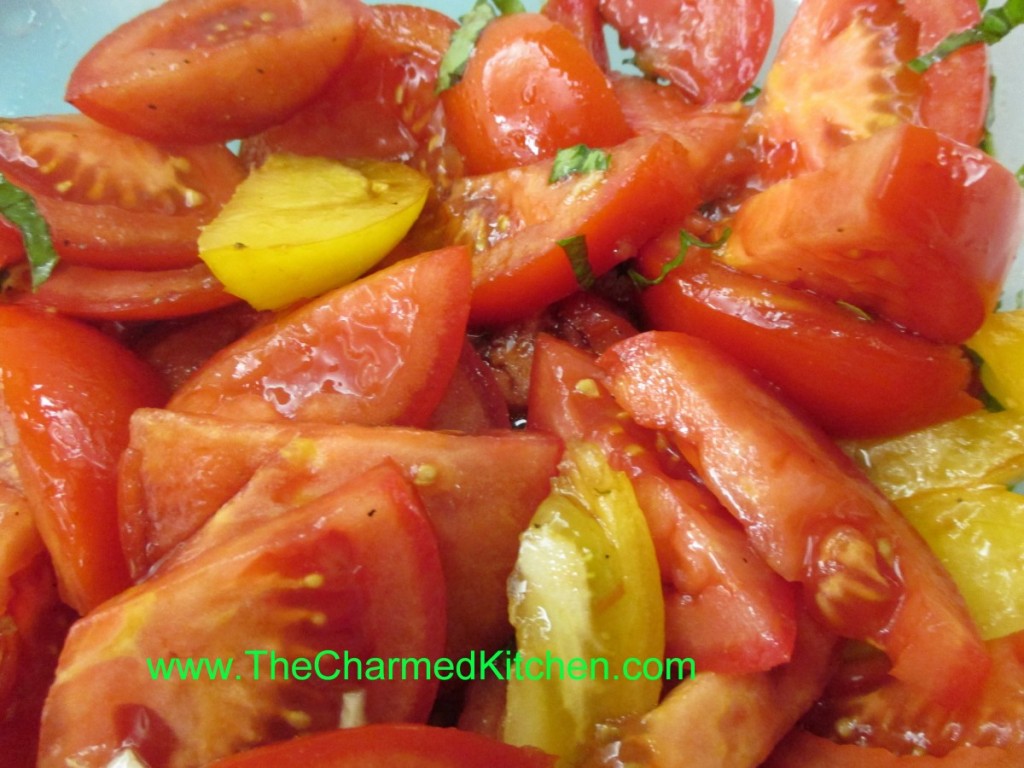
Tomato season is too short around here. I can never get enough of what my mom called “real tomatoes”. The first few tomatoes never made it in the house. Warm from the sun, they were too tempting. We would pick them right off the plant and eat them. Deer have made it pretty impossible for me to grow tomatoes right now. Luckily, local farm markets have many beautiful tomatoes.
I am enjoying eating fresh tomatoes right now. Later in the season, I will purchase enough tomatoes to can and dehydrate to enjoy once the season is over.
I thought I would share a few of my favorite tomato salad recipes with you.
They are pretty simple. I think that is how it should be. When you have something as close to perfection as a ripe tomato, little more is needed.
Marinated Tomato Salad
3 large tomatoes, cut in wedges, or 2 pints cherry tomatoes, halved
1 T. olive oil
1 clove garlic, minced
2-3 basil leaves, cut into thin strips
2 T. balsamic vinegar
salt and pepper to taste
Combine ingredients and serve at room temperature. Serves 4-6.
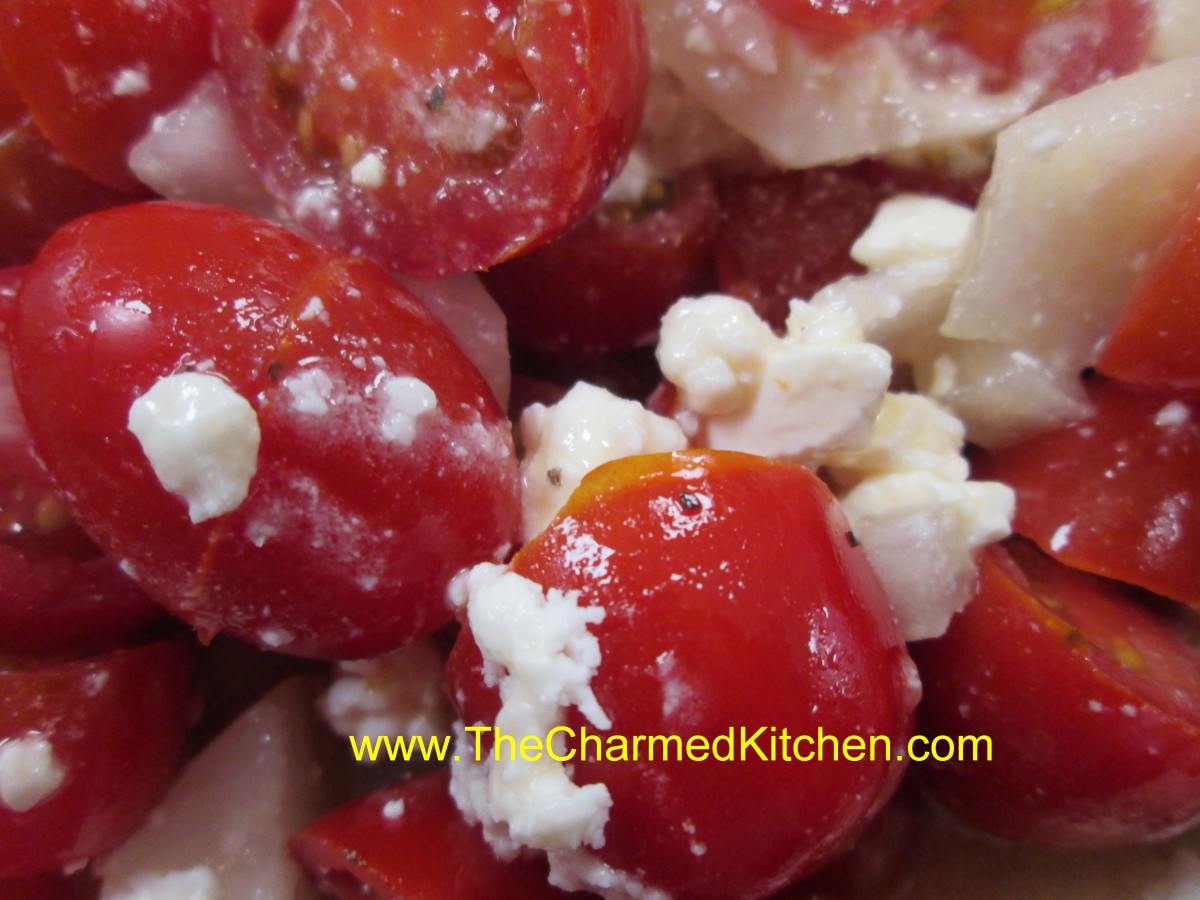
Tomato and Feta Salad
3 tablespoons crumbled feta cheese
12 cherry tomatoes, thinly sliced
1/2 sweet onion, diced
1 tablespoon olive oil -I used a lemon infused olive oil
1 tablespoon lemon juice
Salt and pepper to taste
In a bowl, mix the feta cheese, cherry tomatoes, onion, olive oil, and lemon juice. Add salt and pepper to taste. Serve immediately. Serves 2.
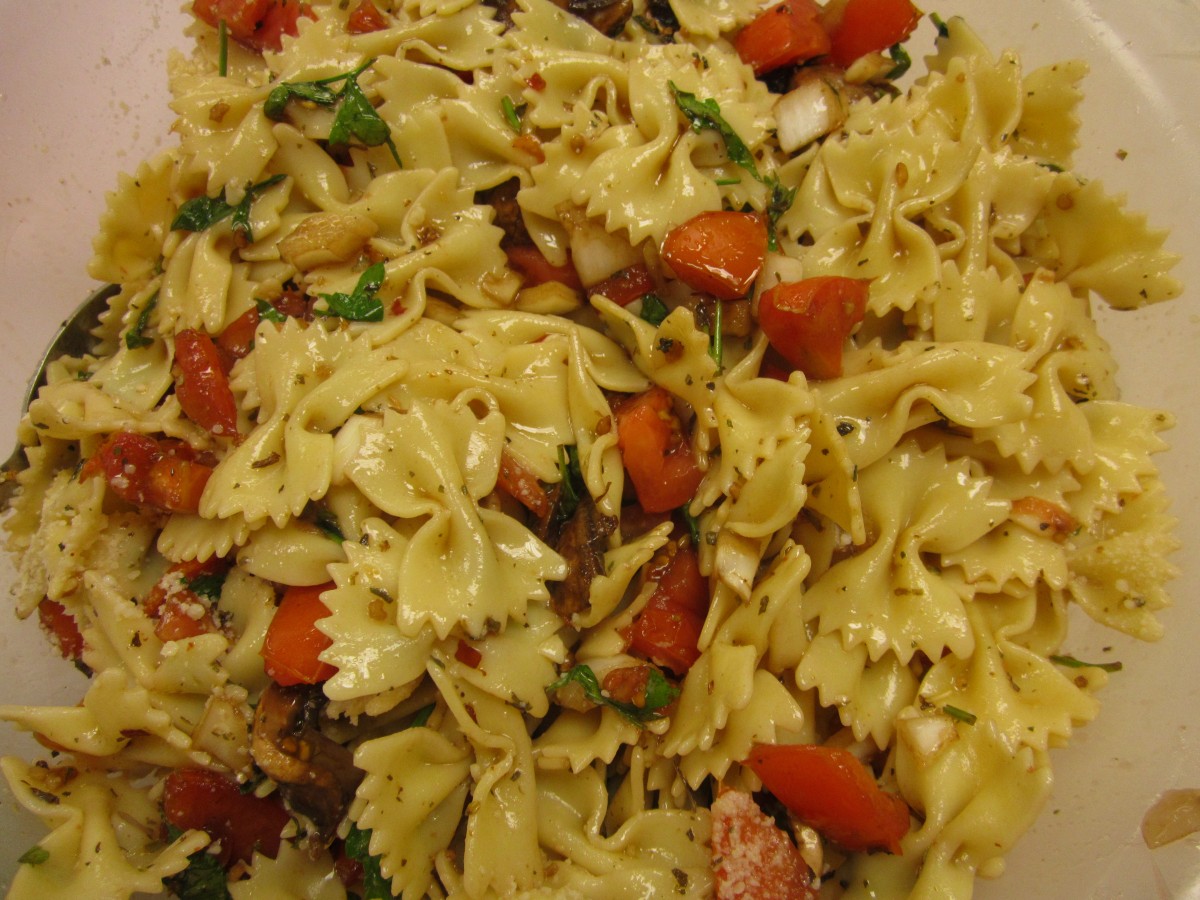
Warm Pasta Salad
1 lb. Plum tomatoes, chopped
1 medium sweet onion, chopped
4 oz. Fresh mushrooms, sliced
2 cloves garlic, minced
¼ c. fresh parsley, chopped
1 T. dried basil or 1/4 c. chopped fresh basil
1 T. capers, optional
1 t. dried oregano
½ c. olive oil
¼ c. red wine vinegar
3 T. balsamic vinegar
Dash of hot red pepper flakes
Salt to taste
1 lb. Uncooked pasta
Combine all ingredients, except pasta and chill overnight. Cook pasta, drain and toss with tomato mixture. Mixture should be served right away . Serves 6.
BLT Salad
6-8 slices bacon
2 slices rye bread
2 slices Swiss cheese
5 c. torn up lettuce or mixed greens
3 T. olive oil
2 T. apple cider vinegar
1 T. balsamic vinegar
Salt and fresh ground pepper
2-3 tomatoes, diced
Cook bacon until crisp. Remove from pan, drain and crumble. Remove most of the bacon grease from the pan. Make a sandwich with the rye bread and the Swiss cheese. Toast in the skillet over medium heat until golden brown and cheese is melted. Set aside. Place lettuce in bowl and toss with the oil to coat the leaves. Toss with the vinegars and season with salt and pepper to taste. Add the tomatoes and the bacon and toss. Cut the sandwich into cubes and place on the top of the salad. Serves 2.
Note: you can make two sandwiches if you want more bread and cheese in the salad.
Tomato Feta Salad
Warm Pasta Salad

BLT Salad
Creamy Zucchini Soup- Hot or Cold

You can never have enough recipes for zucchini. If you have ever planted zucchini, you know what I mean.
This is a recipe I’ve had for ages, but had not made in a while. I forgot how much I liked it. As an added bonus, it can be served hot or cold.
I leave the skins on my zucchini, I like the way the little green flecks look in the soup, but you can peel, if you prefer. You can also use a combo of green and yellow summer squash.
Here is the recipe.
Creamy Zucchini Soup
1 medium onion, chopped
2 T. butter
4-6 medium zucchini, sliced
1 large potato, peeled and diced
1 T. chopped parsley
½ t. each basil, marjoram and thyme
1 t. hot sauce, or to taste
salt and pepper to taste
6 c. chicken or veggie broth
1 c. milk or half and half- I prefer the half and half
In Dutch oven cook onions in butter until tender. Add vegetables and seasonings and cook until hot. Add broth, heat to a simmer and cook 15 minutes. Puree mixture in blender in batches and return to pot. Add milk and heat through. Adjust seasonings. Serve hot or cold. I topped mine with some fresh chopped parsley and a little hot sauce. Serves 6-8.


