Bacon-Wrapped Water Chestnuts
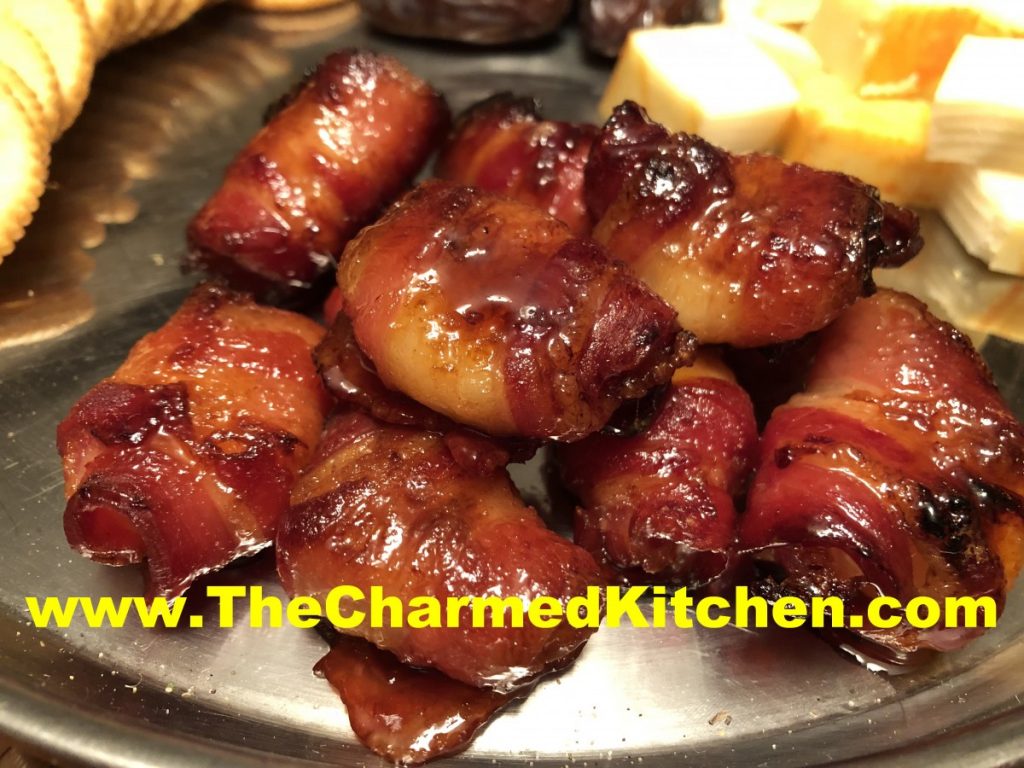
Bacon-wrapped water chestnuts are always a big hit when I make them. People can’t seem to get enough of them. The combination of salty and sweet, with the smokiness of the bacon, a little heat, and the crunch of the water chestnuts is a flavor explosion.
When I make them for parties, everyone loves them. OK, not my vegetarian friends, but everyone else does. There are never any leftovers.
What is it about the smell of bacon cooking? Maybe for you, like me, it is a childhood memory. We never had bacon for breakfast during the week. Not even every weekend. But on some magical Sunday mornings, I would wake up and smell bacon cooking. No one slept in on those mornings. Mom or dad would be frying the bacon in the cast iron skillet. If we had pancakes or waffles, I would dip my bacon in the syrup on my plate.
This recipe combines some of those flavors. You can assemble them ahead of time, then just cook when you are ready. You can also cook them a day or two ahead, then reheat before serving. I have even been known to freeze them. They are easy to make, too.
So here is the recipe that I use. You can adapt it to suit your taste. Perhaps make them spicier? I hope you try them for a party soon.
Bacon-Wrapped Water Chestnuts
20 slices bacon, cut in half
40 water chestnuts, whole
Hot sauce
Maple syrup
Brown sugar
Roll ½ a slice of bacon around water chestnut and place rolls in a baking dish. Make sure the edge of the bacon is on the bottom, so it stays in place. It will save you from having to put a toothpick in each one. Cook in a 400-degree oven for 20 minutes or until rolls are well-browned. Remove from pan and drain on paper towels. Return rolls to baking dish. Drizzle with maple syrup and sprinkle with brown sugar and hot sauce. Return to oven and bake until caramelized, about 10 minutes. Makes 40.
Cheesy Butternut Squash Bake
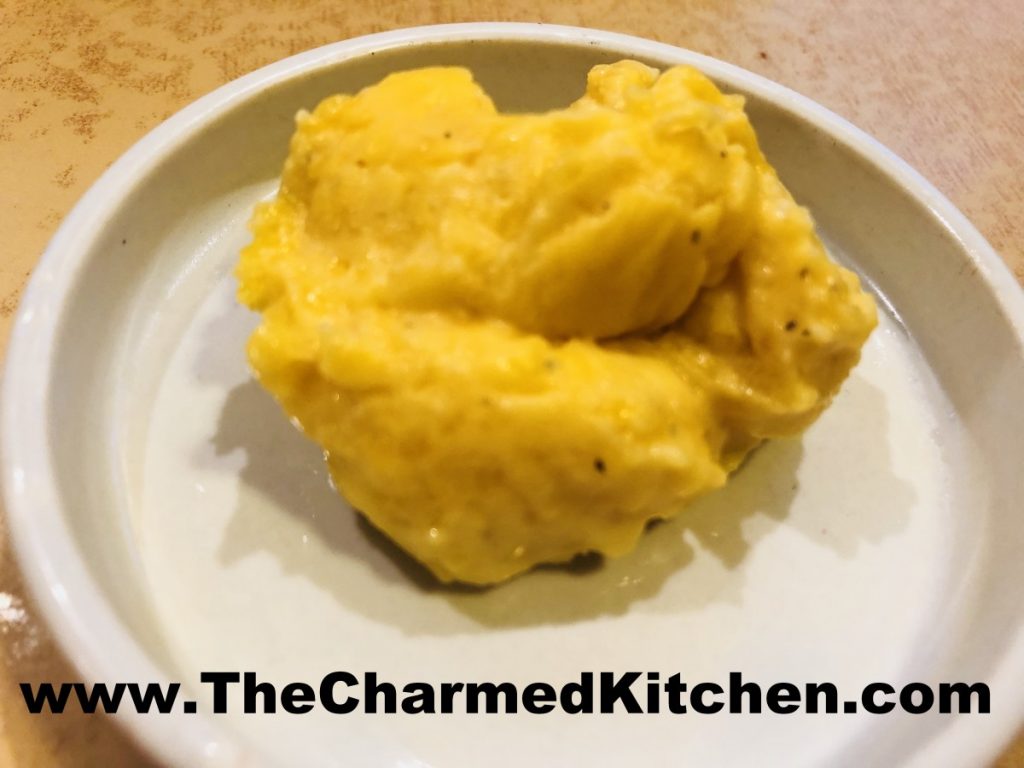
This recipe turned out to be a wonderful way to prepare squash. It tasted so good. I had some leftover squash in the fridge. I wasn’t sure if I wanted to go savory or sweet. I mashed up the squash, then rummaged in my fridge. I had some sharp white cheddar cheese and shredded it up, adding it to the squash. I also had an open carton of whipping cream- so I added some, too. I was worried it would be too runny, so in went a little cornstarch. Then I added a generous amount of salt and fresh ground pepper.
I put the mixture in a baking dish and popped it in the oven. I took it out when it was all bubbly and hot. In hindsight, I could have given it a few more minutes to brown a little on the top.
Sometimes the hardest part about cooking is coming up with a name for a new dish. I wasn’t quite sure what to call this one. I thought about calling it a mash or maybe a casserole. I ended up with the innocuous name bake. Well, whatever you call it, I think you will love it as much as I did.
Feel free to play around with the cheese you use. Anything that melts will work. You can also use different winter squashes or pumpkin, too.
So here is the recipe.
Cheesy Butternut Squash Bake
4 c. cubed butternut squash
8 oz. shredded cheese- I used a sharp cheddar
½ c. heavy whipping cream- or half and half
2 T. cornstarch
Salt and pepper to taste
Cook the cubed squash until tender. You can steam, boil or roast. If boiling, be sure to drain well. Place cooked squash in a bowl and mash. It is ok if there are still some small lumps. Add remaining ingredients and combine well. Place in a baking dish and bake in a 350-degree oven for 30 minutes, or until mixture is bubbly. Serves 4-6.
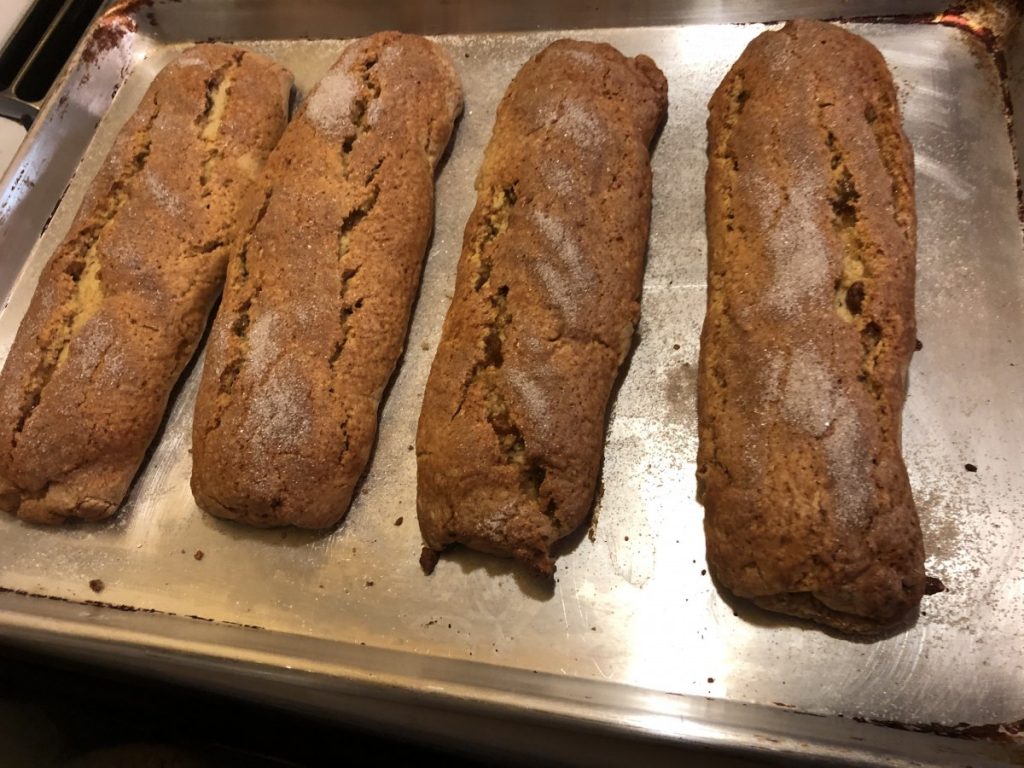
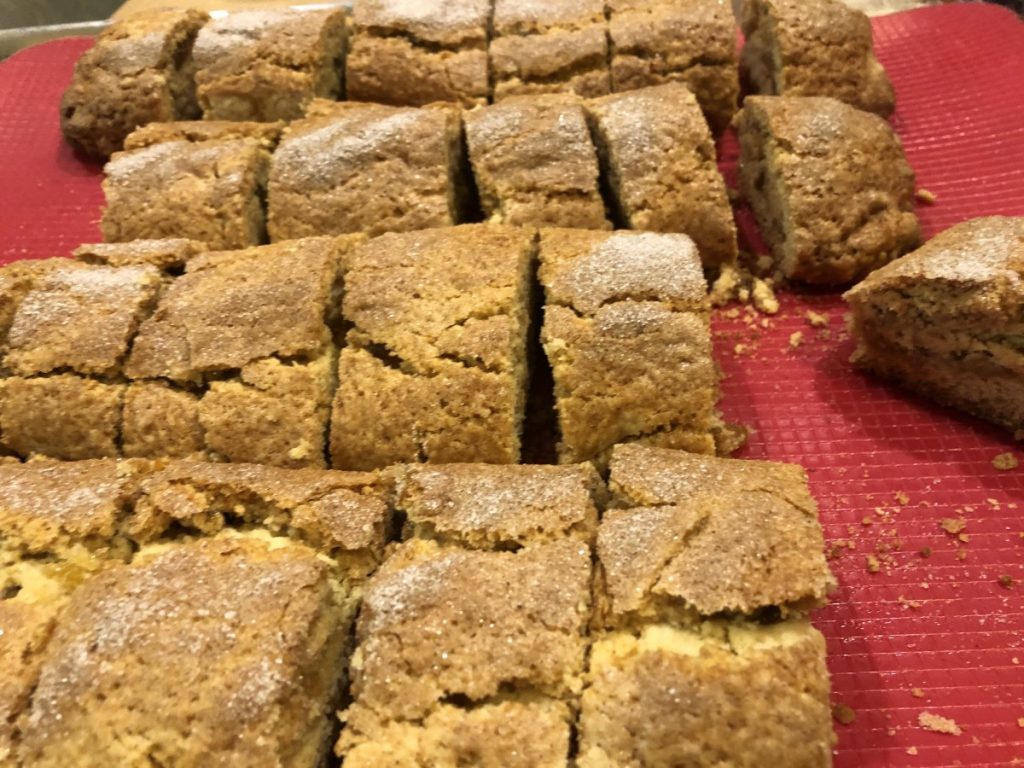
Russian Tea Biscuits
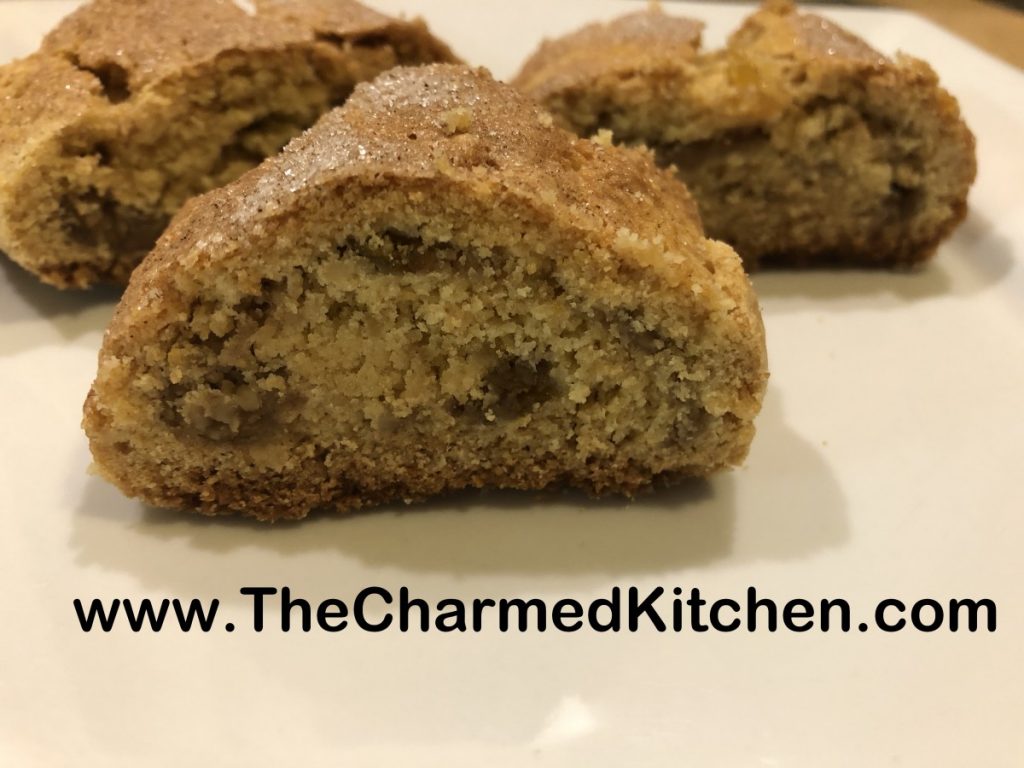
Russian tea biscuits are like a kind of cookie. A magical cookie, filled with jam and raisins and nuts. The are crispy, tender and rich. They also are not all that sweet, which appeals to me. You can serve them as a dessert, but also serve them with breakfast or brunch. And of course, with your tea or coffee.
I can remember the first time I ever had a Russian tea biscuit. It was at the Cedar-Lee theater. I guess you could say I got my love for foreign films and Russian pastry at the same place. I found a recipe in my mother’s recipe collection. I tried them and they were pretty close to the ones at the Cedar-Lee. I did tweak that recipe a bit.
My only regret was not having raspberry jam. That is my favorite. The swirl of red in the biscuits is very pretty. I used what I had- peach- and am happy with them. Not as colorful, but very tasty, all the same.
Here is the recipe. I think you might want to try these with that next cup of tea.
Russian Tea Biscuits
3½ c. flour
½ c. sugar
1 t. baking powder
1 t. baking soda
¼ t. salt
1 c. butter, softened
2 eggs, separated
½ c. orange juice
1 1/3 c. preserves, (strawberry, raspberry, plum or apricot are favorites)
1 c. chopped walnuts
1 c. raisins, dark or golden
1 t. cinnamon
3 T. sugar
Combine dry ingredients in a mixing bowl and cut in butter until mixture is the size of peas. Stir in egg yolks and orange juice. Knead until dough is well blended. Divide dough into 4 equal pieces. Roll out a piece of dough 1/4 -inch thick into an 8×10-inch rectangle. Spread with 1/3 c. of the preserves and sprinkle with 1/4 c. each of the raisins and nuts. Roll up jelly roll fashion and set, seam side down, on ungreased baking sheet. Repeat with remaining dough. Beat egg whites until foamy and brush on dough. Combine cinnamon and sugar and sprinkle on dough. Bake in a 350-degee oven for 25-35 minutes, or until golden. Use a toothpick to test for doneness. They can be golden, but a little under baked in the middle. Slice while warm into 6 pieces for each roll. Makes 24.
Chicken Pot Pie Soup

I have to thank my friend, Vicky Singleton, for the inspiration of this recipe. She asked if I had ever made chicken pot pie soup. I hadn’t. I told her I hadn’t ever heard of it. She explained to me what it was.
So what exactly is Chicken Pot Pie Soup? Imagine the ingredients of a pot pie, only in a soup. Then imagine using baked pie crust like croutons on the soup. A classic casserole, presented in soup form.
You want this soup to be creamy, like a pot pie filling. How “thickened” is really up to you. I didn’t want my soup to be as thick as a pot pie, but I wanted it thickened, so I played around with the amount of flour I added to it. Half a cup of flour worked perfectly for me, but you can add 1/4 cup more flour if you want a thicker soup.
The vegetable selection has some wiggle room, too. I think green beans would be a nice addition, I just didn’t have any. That is the fun part of making your own version. I think I might add mushrooms to the next batch.
I could see making this soup with leftover turkey after Thanksgiving.
I made my own pie crust, but feel free to use store bought. The recipe for the crust is at the bottom of this post. I used cookie cutters, but you could cut the crust out free-hand into little squares or triangles.
So here is the version of Chicken Pot Pie Soup I came up with. I hope you’ll give it a try. You can thank Vicky.
Chicken Pot Pie Soup
Dough for 2 pie crusts – recipe follows
3 T. oil or butter
1 large onion, chopped
3 medium carrots, peeled and sliced thin
1 c. sliced celery
3 medium potatoes, peeled and cubed
1 c. fresh or frozen corn
3 c. cooked chicken, diced
8 c. chicken stock
1 c. peas, fresh or frozen
½ c. flour
¼ c. fresh chopped parsley- or 1 T. dried
Salt and pepper to taste
The pie dough makes the croutons for the top of the soup. You can use homemade pie crust or store bought. Roll out the crust to about 1/8-inch thick and cut out in pretty shapes to top your soup. Re roll scraps and place all the cut out dough pieces on an ungreased baking sheet. It will take two sheets for all the dough. Bake in a 350 degree until golden, about 7-10 minutes. Remove to a cooling rack.
In a soup pot, heat up the butter or oil and add the onions, cooking until onions are tender. Add the carrots, celery, potatoes, corn and 7 cups of the stock. Set the remaining cup of stock aside for now. Bring to a boil, reduce to a simmer and cook, covered, until the vegetables are tender. Place the reserved stock in a jar with a tight fitting lid. Add the flour, close jar tightly and shake until the mixture is smooth. Add the flour/stock mixture to the soup along with the peas and parsley. Bring to a simmer and cook, covered 5 minutes- or a little longer. Adjust seasonings.
Ladle soup into individual bowls and top with some the pie crust croutons. Serves 6-8.
Flaky Pie Crust
2 c. flour
1 t. salt
3/4 c. butter, chilled – you could also use chilled coconut oil, lard or shortening
1 T. cider vinegar
4-5 T. cold water
Combine flour and salt and cut in butter. Toss in vinegar and water, 1 tablespoon at a time, until dough holds together. Use a fork to toss the ingredients together and as soon as the mixture holds together stop adding water. Makes 2. Chill well before using.

Halloween Candy Mini Cheesecakes

I am posting this as a public service to those of you with leftover Halloween candy.
Sometimes you end up with leftover Halloween candy. You could just eat the candy- or you can transform it into a dessert.
The idea I came up with was mini cheesecakes. I’ve made them before, so I used my recipe, and just folded in crushed candy bars. Once the cheesecakes cool they deflate a little, so I also added some crushed candy bars to the top to make them look nice.
Only change from the original recipe was a slight decrease in sugar, to compensate for the extra sweetness of the candy. I went down to 1/3 cup of sugar. I think 1/4 cup would also have been enough.
I am sure a lot of different candy bars would work. I used a small food processor to really crush up the candy bars. I made 2 batches, one with cookies and cream candy bars and the other with Kit Kat bars.
Since the candy will keep, you could use the candy in a Thanksgiving dessert. Of course, the candy might not last until Thanksgiving.
Halloween Candy Mini Cheesecakes
12 vanilla wafers
2 (8 oz.) cream cheese, softened
1/3 c. sugar
2 t. vanilla
2 eggs
2/3 c. crushed candy bars plus 1/4 c. crushed candy bar, for topping
Line 12 muffin tins with paper liners. Place 1 wafer in each. Beat together remaining ingredients (except candy) for 1 minute with an electric mixer. Fold in candy. Divide this mixture in the muffin tins, filling each 3/4 full. Bake 25 minutes at 325 degrees. Cool and decorate with extra crushed candy. Makes 12. These can be frozen.
Pumpkin Ice Cream
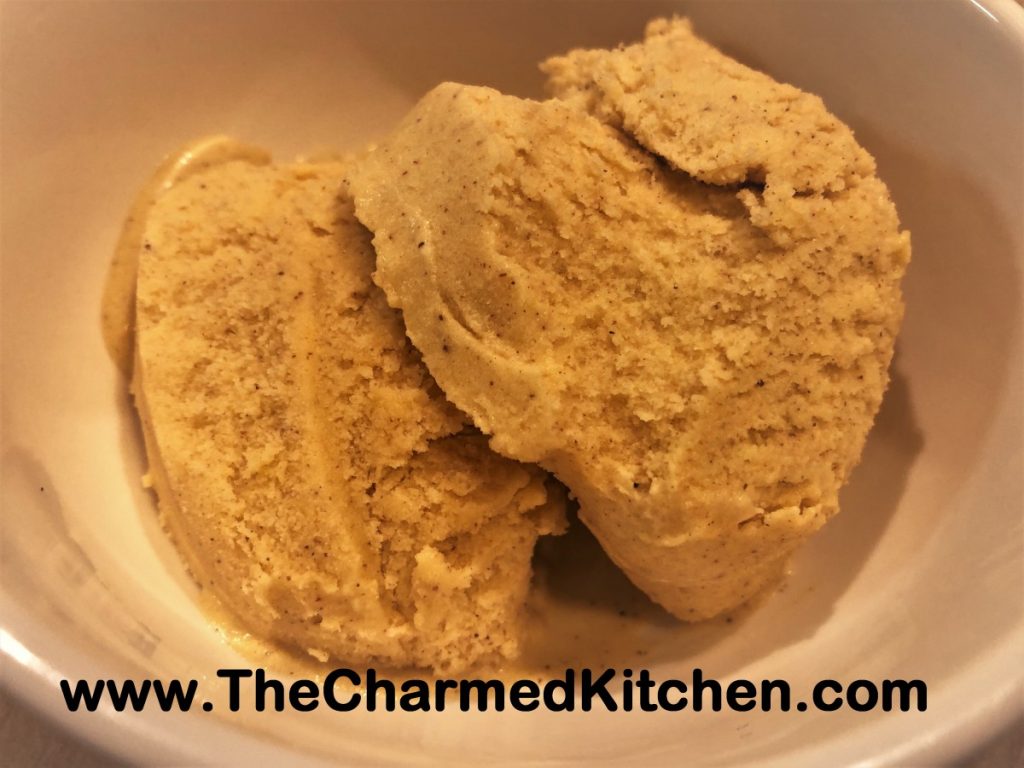
Pumpkin ice cream is such a nice addition to many fall desserts. I made a batch to serve with apple cake and butterscotch sauce for a birthday dinner. It is also a nice way to use up some of your Halloween pumpkins.
It has been a while since I made pumpkin ice cream. I think colder Fall weather makes me think less about ice cream desserts. Still, I don’t think it is ever too cold for ice cream.
This is a pretty simple recipe. I did not use eggs/custard as the base. You just mix the ingredients and freeze. Easier if you have an ice cream maker, but doable without.
Pumpkin Ice Cream
2 c. whipping cream
2 c. pumpkin puree or winter squash
1 c. sugar, or to taste
1 T. molasses
2 t. cinnamon
1 t. vanilla
1/4 t. salt
Combine all ingredients and stir until well mixed and sugar is dissolved. Place in an ice cream maker following the manufacturer’s directions. My machine can’t take the whole recipe at once so I froze it in 2 batches and kept the rest of the pumpkin mixture chilled until ready to use. Place finished ice cream in the freezer until ready to serve.
Note: If you don’t have an ice cream maker you can place the mixture in a shallow pan and freeze until solid. remove from freezer and allow to that a little- about 10 minutes then break up and place in a mixing bowl. Whip with a mixer until smooth and return to the freezer. Repeat process once more to end up with creamy ice cream.
“Pumpkin” Cheese Dip
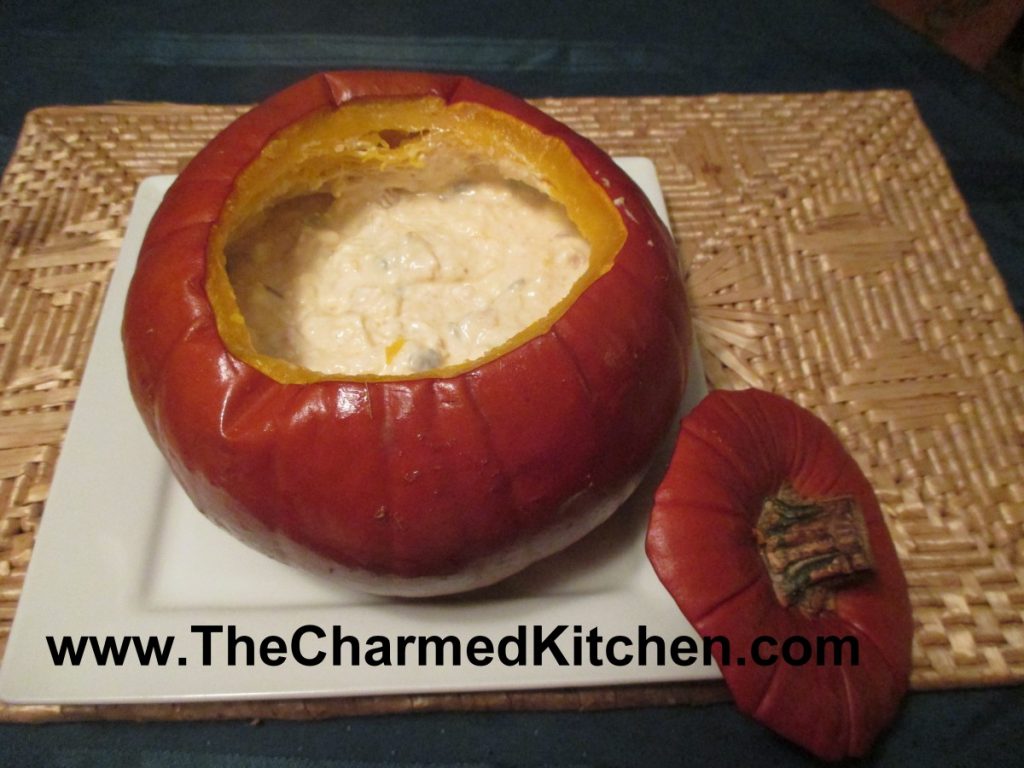
This is a pretty way to serve dips this time of year. The dip bakes inside the pumpkin- and the pumpkin bakes, too. Fun for Halloween, Thanksgiving, or just movie night with the family.
It really is simple and could be filled with any number of combinations of cheesy goodness. I have included the recipe I used in the picture. I also included my recipe for Spinach and Artichoke Dip, to give you another option.
You just get a pie pumpkin, about 2-3 lbs. Cut off the top to make a lid and scoop out the seeds, like you would if you were making a Jack-o-Lantern. Wipe off the outside and then just fill it up with the dip mixture. Put the lid back on, bake for an hour, and you are good to go. The fun part is scraping some of the cooked pumpkin in with the cheese dip. More detailed directions follow.
So here is the recipe for making the cheesy filled pumpkin. I think it is simple enough to serve anytime, not just on a holiday. Enjoy!!
“Pumpkin” Cheese Dip
Directions: Preheat oven to 350 degrees. Cut off top of pumpkin. Cut in at an angle, so top will fit like a lid and not fall in. Set top aside. Scoop out seeds and clean out any stringy bits*. Set pumpkin on a baking sheet. Combine cheese filling of your choice and place inside the pumpkin. Place the top of the pumpkin back on the pumpkin, and place in oven. Bake for 1 hour. Remove pumpkin and place on heat proof dish. I used a glass pie plate. Remove lid. Serve with crusty bread or crackers.
Smoky Cheese Dip
8 oz. cream cheese, cubed
4 oz. extra sharp cheddar cheese, shredded
8 oz. bacon, cooked and crumbled
½ c. sour cream
¼ c. mayo
¼ c. chopped parsley
½ t. each cumin and smoked paprika
Pinch of nutmeg
½ c. hulled pumpkin seeds
In medium bowl, stir together all ingredients, except the seeds. Place this mixture in the pumpkin when ready to bake. Don’t add the pumpkin seeds until right before serving. Stir them in a little, if you like.
Another nice choice…….
Spinach and Artichoke Dip
1 (12-14 oz.) can artichoke hearts, drained and coarsely chopped
10 oz. package frozen spinach, thawed and squeezed dry
8 oz. cream cheese, cubed
4 oz. shredded cheddar cheese
½ c. diced onion
¼ c. Italian dressing
Dash of hot sauce
In medium bowl, combine dip ingredients, stirring to combine. Place in pumpkin when ready to bake.
* You can rinse off the seeds, lightly salt them and toast them, if you like. Then serve with the pumpkin dip. If you aren’t interested in eating them- please put them outside for the birds to eat.
Pear Crumb Cake
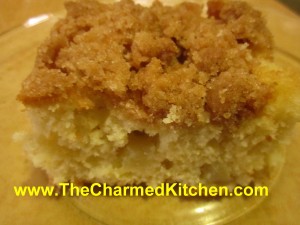
I remember my Mom making crumb cake when I was a kid. I loved it. It was one of my favorite cakes. The tender cake, and crunchy topping seemed the perfect combination to me. Even today, I would rather have a crumb topping on a cake than frosting.
This recipe hits all the right notes. Sweet with pear chunks throughout, and the crunchy topping that I love. This is a great dessert for any occasion. I serve it just the way it is, but you could also top with ice cream or whipped cream. If you prefer, you can also make the cake with a mix of pears and apples – just have 2 cups of chopped fruit, in total.
Pear Crumb Cake
For cake batter:
2 c. flour
2 t. baking powder
½ t. salt
½ stick (¼ cup) butter, softened
¾ c. sugar
1 egg
½ c. milk
2 c. peeled, cored and chopped pears
For topping:
½ c. sugar
¼ c. flour
½ t. cinnamon
½ stick (¼ c. butter, chilled and cut into bits)
Combine dry ingredients and set aside. In mixing bowl with electric mixer, beat butter and sugar until light and fluffy. Beat in egg and milk. Add flour mixture gradually until just mixed in. Fold in fruit. Grease and flour an 8 or 9-inch pan and add prepared batter. Combine topping ingredients until they resemble coarse crumbs. Sprinkle over batter in pan and bake in a preheated 375-degree oven and bake for 35-45 minutes. Use toothpick to test.
Note: I used a 9-inch square pan and it worked fine.
Spooky Goo Drink
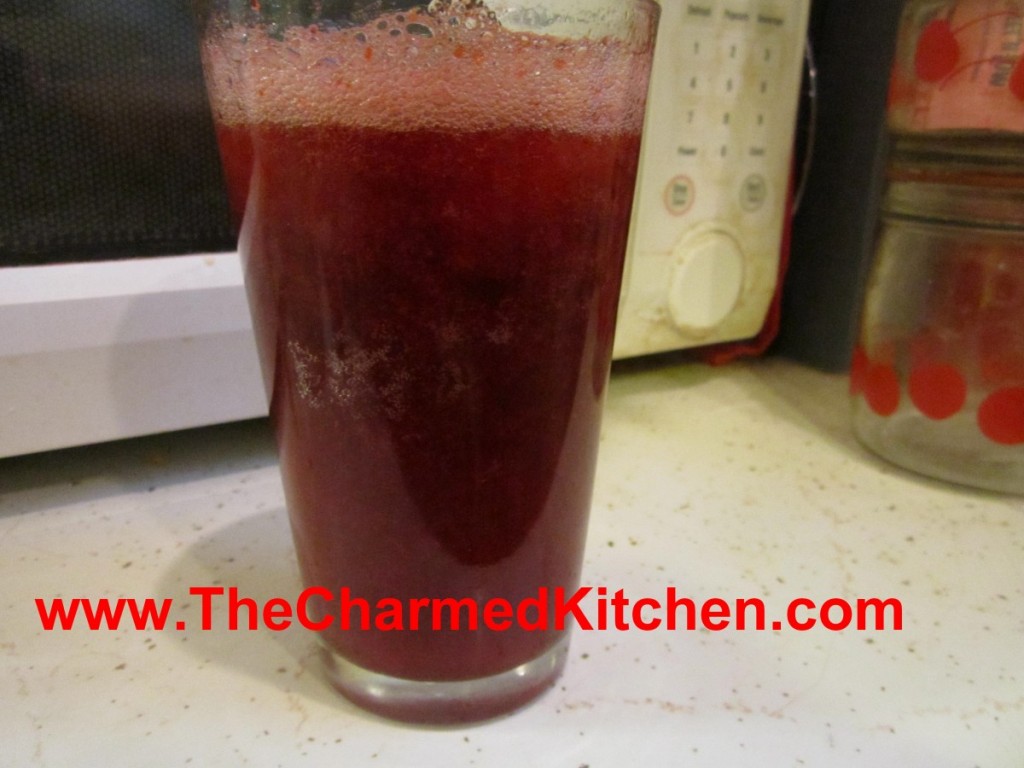
If you want a fun beverage to serve for Halloween, try this Spooky Goo Drink. It’s easy to make and will give guests a start. It’s fun for kids and adults.
The secret is Jell-o. Make whatever flavor Jell-o you like. Once it is firm, mash it with a fork into small pieces.
Place some of the mashed up Jell-o in a glass and add ice and whatever beverage you like. I used cherry Jell-o with sour cherry soda. The Jell-o is invisible that way.
When your guests take a drink, they get little gobs of Jell-o in every sip. You can also play with color combinations for fun. Grape Jell-o with orange soda looks like little black globs in the drink. Kids love it.
You can make it with Jell-o shots, for the grown-ups. Or add the mashed up Jell-o to adult beverages. You can also add the Jell-o to a punch bowl or pitcher of drinks.

Mash Jell-o with a fork

Add some Jell-o to the glass before adding ice and soda
Pumpkin Fritters
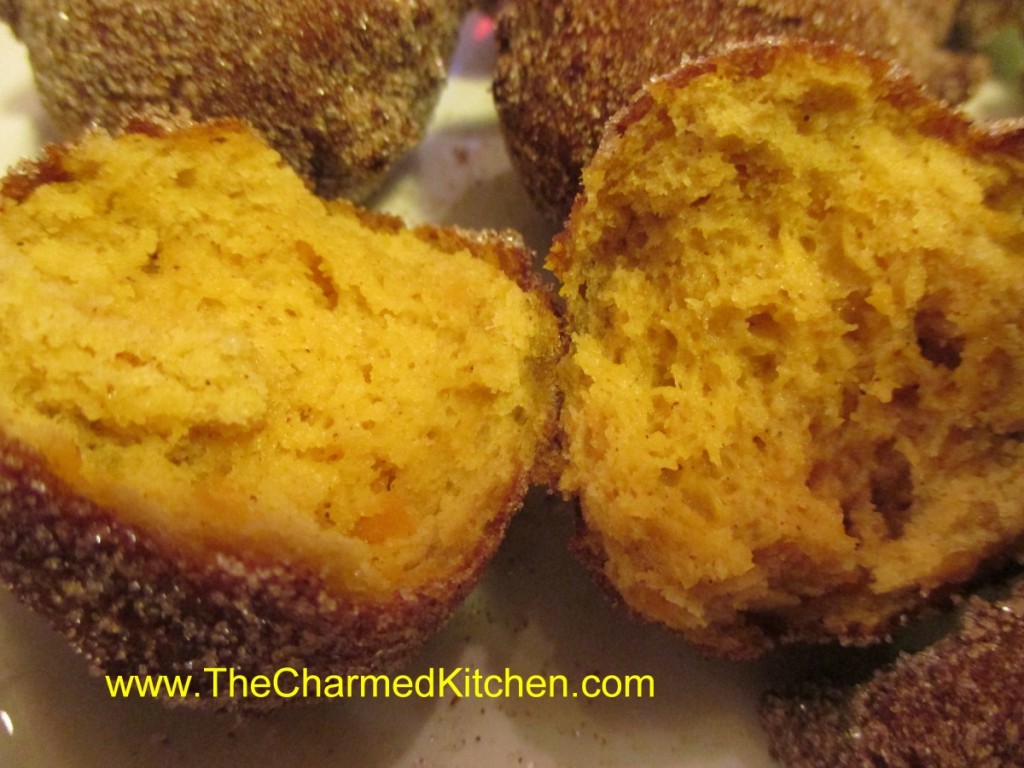
These tasty fritters would be a fun dessert for Halloween. This is also a great recipe when you have a little cooked pumpkin or winter squash to use up. The recipe only uses a cup of cooked pumpkin or winter squash.
It is a pretty simple recipe. I started with cooked pumpkin puree. I added eggs, flour, baking powder and a few other ingredients, then fried them up in oil, and ended up with a really good fritter. Crispy on the outside, soft and tender on the inside. I drained them on paper towels and then rolled them in cinnamon sugar while still warm. You could also dip them in a powdered sugar glaze. I think I might make a maple glaze for the next batch.
Pumpkin Fritters
1 c. cooked, mashed pumpkin or winter squash
2 eggs
2 T. brown sugar
2 t. baking powder
1 t. cinnamon
1/2 t. baking soda
1/2 t. nutmeg
1/2 t. salt
1 1/2 c. flour
oil for frying
cinnamon sugar for rolling- powdered sugar would work, too
In mixing bowl combine all ingredients, except the flour and beat until smooth. Stir in flour. Batter will be thick. Heat oil to 350 degrees.* There should be enough oil in the pan top be at least 1 inch deep- or deeper. To save oil I used a smallish pan and cooked 3-4 fritters at a time. Drop dough by rounded teaspoonfuls into hot oil and cook, turning once until golden brown on both sides. This will take about 3 minutes. Drain on paper towels then roll in cinnamon sugar while warm. Makes 24-30. Best served warm.
* Fun way to know when your oil has hit 350 degrees. Place an un-popped popcorn kernel in the oil. Popcorn pops at 350 degrees.


