Peach Ice Cream-Custard Style
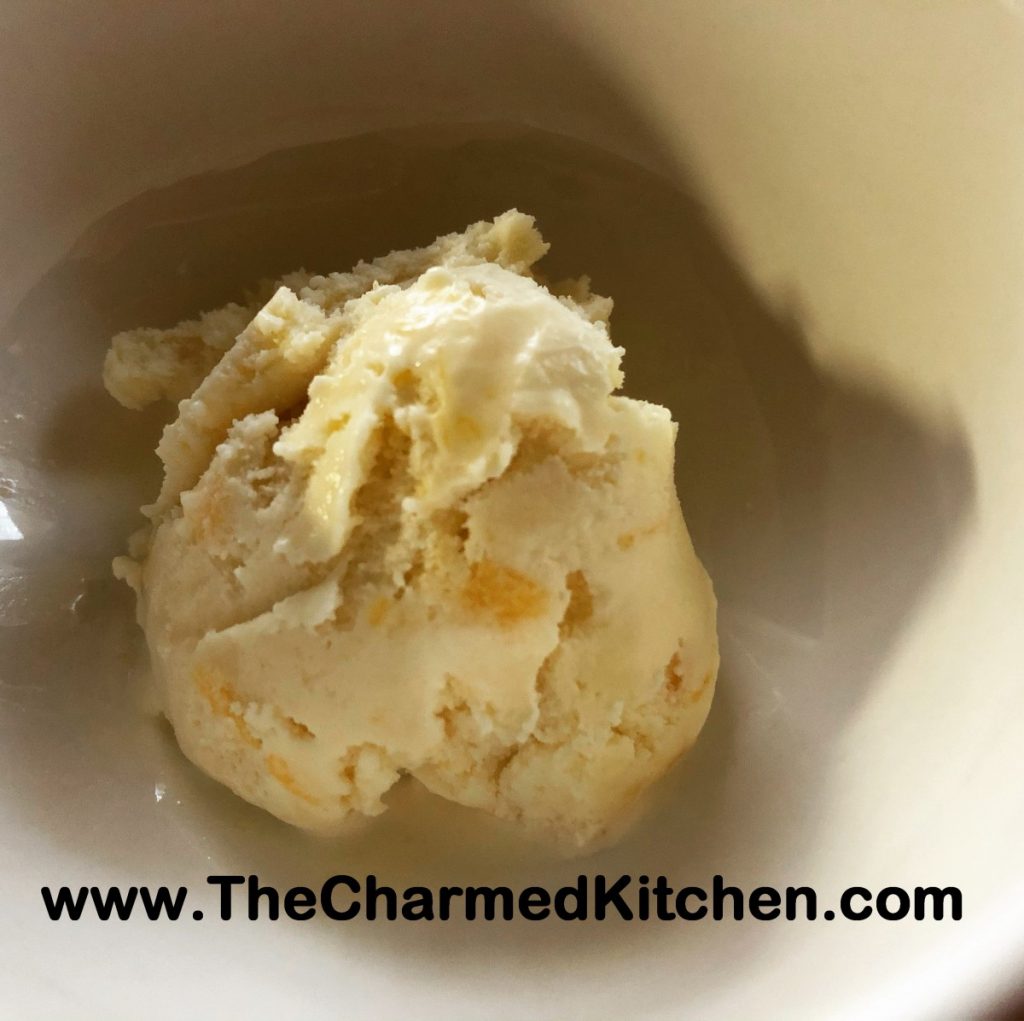
If there is a favorite summer treat for me- it is ice cream. I love to go to the local ice cream shop for a sundae or cone, and I love to make my own ice cream. When I found myself with a few extra peaches, I knew I wanted to use some of them to make ice cream. Peach ice cream is one of my absolute favorite flavors.
I have made peach ice cream before. I have posted the recipe before. This one is different because I made a custard base for my ice cream this time. A custard base just means that egg yolks, or eggs, are incorporated into the base of the ice cream. The base is heated up, so the eggs get cooked. In the other recipe, there are no eggs.
The custard base gives you a creamier end product. I wouldn’t say you have to make a custard based ice cream for it to be good. They are just different. The custard base is a bit more work, but still not a difficult recipe at all.
This peach ice cream came out so good. Really creamy. I had perfectly ripe peaches. They were a little small, so I used 5 of them in this batch of ice cream. I used a vegetable peeler to remove the skins. I think that the skins get tough once cooked. Leave them on, if you prefer. I cut them off the pits, being sure to save all the juices, too. Then I just diced the peaches up pretty small.
If I just dumped the raw peaches into the ice cream base and froze it, they would end up as hard peachy cubes. By cooking the peaches first, they stay softer in the ice cream. This is true of any fruit ice cream. Using fruit that had been frozen, then thawed, will also work. I added a little vanilla, too. Not enough to overpower the peaches, but to add another layer of flavor.
So here is the recipe. Enjoy!!
Peach Ice Cream- Custard Style
4-5 peaches- mine were small- I used 5
1½ c. half and half
1 c. heavy whipping cream
3 egg yolks
1 c. sugar or to taste
1 t. vanilla
Peel the peaches. Cut the peaches to remove the pits. Discard pits. Dice up the peaches over a bowl to catch all the juices. In medium saucepan, place the peaches with the peach juice, half and half and cream. Over medium low heat, bring up to a simmer. Stir every few minutes, to prevent scorching. Let the mixture cook a few minutes, to soften the peaches. In a small bowl, beat together the egg yolks, sugar and vanilla. Add ½ cup of the hot cream mixture to the eggs, whisking in well. Add another ½ cup of the cream mixture, whisking again. Add one last ½ cup of the hot cream and again, whisk until smooth. Pour the egg mixture into the saucepan with the cream and while whisking, simmer until mixture starts to thicken and will coat the back of a spoon. This will take about 5 minutes. Don’t use too high a heat, or you will scramble your eggs. Mixture should reach 160 degrees to be sure eggs are cooked. Remove from heat. Pour mixture into a bowl. Allow ice cream base to cool down, then chill in fridge. Chilled mixture can be frozen in an ice cream maker once cold- in a few hours- or even the next day. Once mixture has been frozen in ice cream maker, place in a container and freeze until ready to serve. Makes about 5-6 cups of ice cream.
Strawberry Sorbet
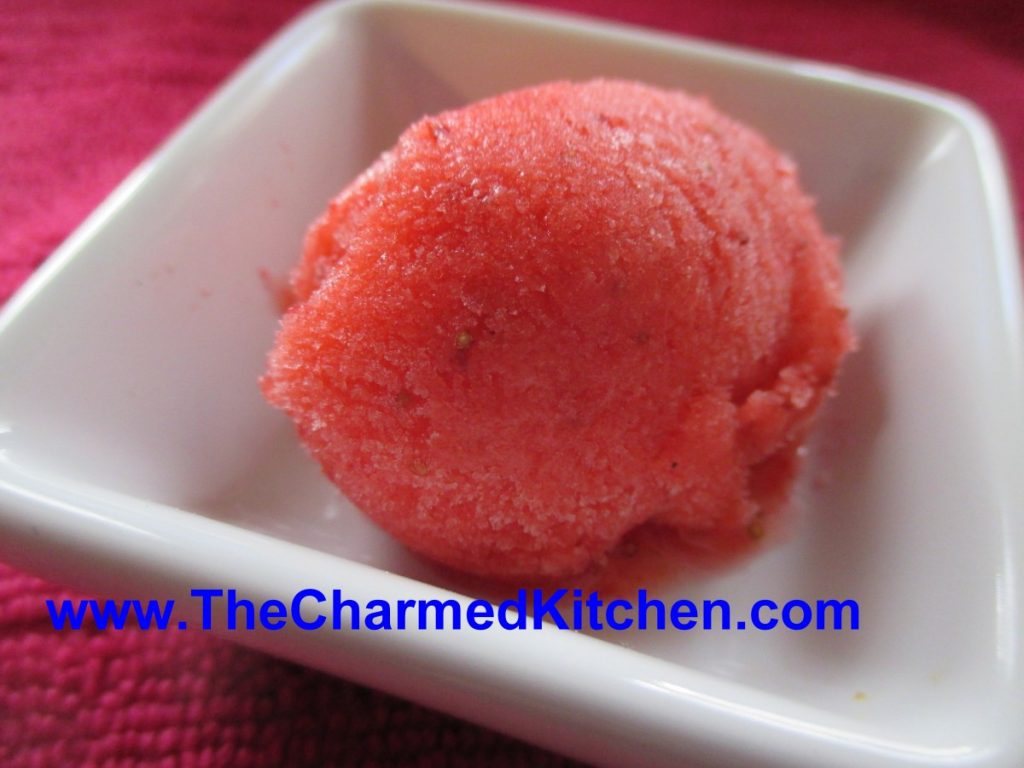
If you are looking for a versatile dessert, sorbets are a great option. Almost any fruit can be used, and you can sweeten, or not, to suit your own taste. If you start with frozen fruit, you can blend up your sorbet and serve it right away. Even better, if you can process and freeze it a couple of times.
You can play around with adding other flavors. I sometimes add fresh herbs, like mint or lavender. Extracts can be added, too.
Sorbets can be served on their own, with cake, or drizzled with chocolate sauce. I sometimes add a scoop of sorbet to a glass of lemonade or ice tea on a hot day. So refreshing. Sorbet can be a fun topper in cocktails, too. I sometimes combine a couple of fruits in one sorbet.
You can make the sorbet in an ice cream machine, if you have one, but you don’t need to. I don’t. It really is simple. As an added bonus, once your sorbet is made, you have it on hand whenever you need a dessert. The secret is to blend the sorbet a couple of times after it is frozen, if you can. Each time, the sorbet gets smoother and creamier. I use my food processor.
So here is the recipe for my strawberry sorbet. You can substitute any number of different fruits.
Strawberry Sorbet
1 1/2 lbs strawberries, fresh or frozen
1/2 c. sugar, or to taste – you could also sweeten with honey, if you prefer, or use no sweetener
1 T. lime or lemon juice
Wash and stem berries. Place in food processor with juice and blend until smooth. Sweeten to taste, stirring until sugar is dissolved. Place in a container with a lid and freeze. Once frozen, remove strawberry mix from freezer and sit it on the counter to soften a little bit. This is really the important part. You don’t want it to thaw, but you do want it soft just enough to break into chunks. Place chunks in food processor and blend it again. It will actually start to look a little creamy and lighter in color. You can serve it right away- or put it back in the freezer to serve later. At this point the sorbet is ready- but you can repeat the soften/process step once more, if you like, for even creamier sorbet. Makes 3-4 cups.
Peachy Chef Salad
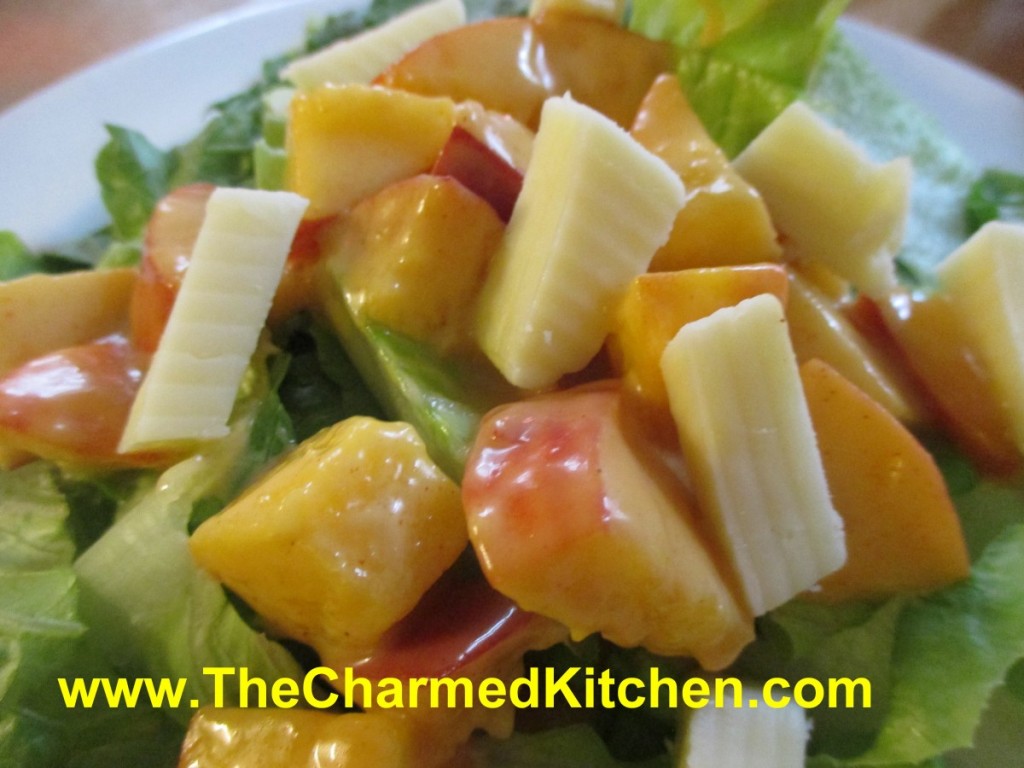
When you think about cooking with peaches, don’t limit yourself to desserts and jam. Peaches can pair well with savory dishes, too. I often use peaches for glazes and sauces for meats.
In this dish, I paired peaches with traditional chef salad ingredients. I tossed the peaches in a homemade honey French dressing, then spooned them over the salad. The result was wonderful- and a great lunch or dinner option for hot weather.
You can top the salad with cheese, meats or both. I like to add some nuts, too. I topped the salad with sharp cheddar cheese and bacon. I really liked the combination of the sweet fruit with the smoky bacon. Use what you like- and what you have on hand.
A chef salad is a great way to use up that leftover grilled chicken or that open package of cheese. Add extra veggies, too, if you like. It also makes a wonderful meal when you don’t want to cook. Lovely, cool meal for a hot day.
Peachy Chef Salad
Honey French Dressing:
1/3 c. honey
1/4 c. white wine vinegar or cider vinegar
1 t. paprika
1 t. dry mustard
1/4 t. salt
1/2 c. olive oil
3 cups chopped peaches
Salad:
6 c. torn salad greens
12 oz. cooked chicken, turkey, ham etc, cut into strips
1 c. cubed cheese
1/2 c. cashews, optional
To make the dressing, in blender, combine first five ingredients and start running machine on high. Add oil in a slow stream until mixture becomes thickened. Pour into bowl and stir in peaches and chill, several hours if you can. When ready to serve arrange greens on one large platter or on smaller salad plates. Arrange meat and cheese on platter or plates. Spoon over the peach/dressing mixture, add cashews, then serve. Serves 4-6.
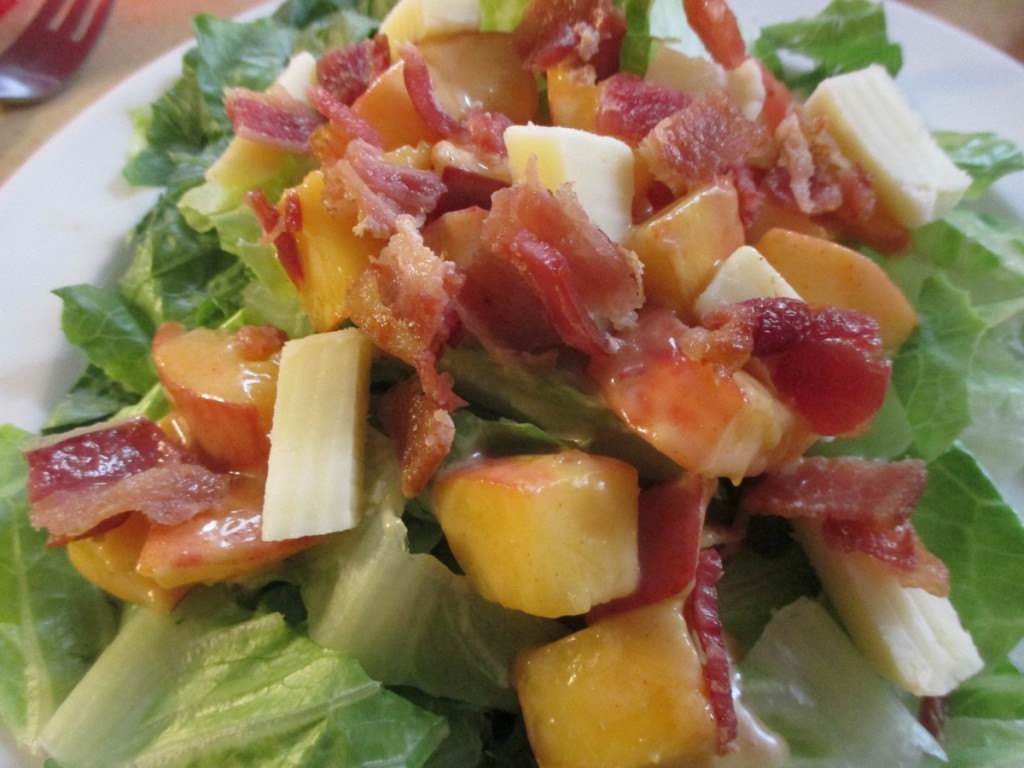
Salad topped with bacon and cheese
Giant Strawberry Shortcake
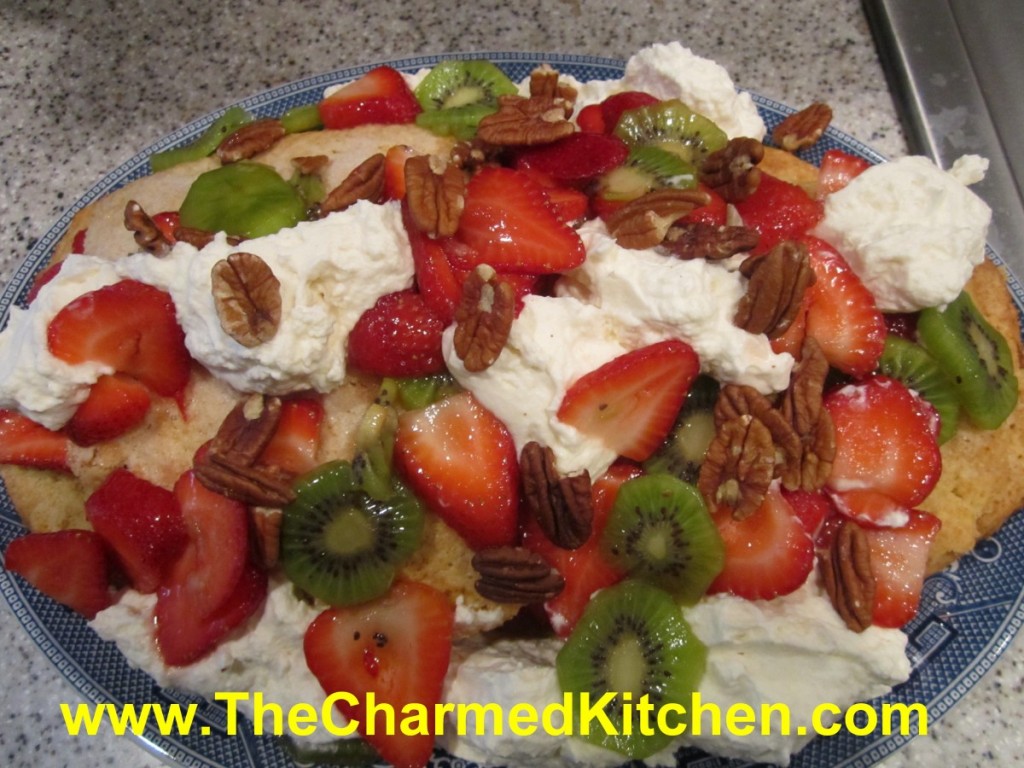
A couple of weeks ago, I posted a recipe for mini strawberry shortcakes. Now, we go to the other extreme. One giant shortcake.
Seriously, it is a fun way to make shortcake. You could make one for any special occasion or party.
This is a great dessert for a party, picnic or barbecue. Instead of making a bunch of individual shortcakes, make one really big one. It makes quite an impression.
When ready to serve it, just cut into slices, like cake or pie. I often serve this shortcake with ice cream on the side. Feel free to switch up which fruits you use. I used kiwi fruit with the strawberries, but you can add different fruits. Peaches would go well with the strawberries or blueberries. Just have fun and use fruit combinations you like. For the 4th of July, you could use a combination of strawberries, raspberries and blueberries.
Giant Strawberry Shortcake
1 egg
3/4 c. milk
1/2 t. lemon juice
2 c. flour
1/4 c. brown sugar
1 T. baking powder
1/2 stick cold butter plus 1 T. softened
1/2 c. plus 1 T. sugar
1 qt. strawberries, sliced thin
2 kiwi fruit, peeled and sliced thin
1/4 c. chopped nuts, toasted
whipped cream, optional
In small bowl combine egg, milk and lemon juice and set aside. In larger bowl combine the flour, brown sugar and baking powder. Cut in cold butter to resemble coarse crumbs. Add egg mixture and stir until mixture forms into a soft dough. Knead dough gently on a lightly floured surface about 10 times. On greased baking sheet pat dough into a 15×6-inch oval. Sprinkle dough with the 1 tablespoon of sugar and dot with the softened butter. Bake in a preheated 400 degree oven for 20-25 minutes, or until lightly golden. Place on wire rack to cool. Toss the berries with the remaining 1/2 cup of sugar. Allow to stand 30 minutes. Split the shortcake lengthwise and remove the top. Spoon over the half the berries and replace top of shortcake. Combine the kiwi with the remaining berries.Spoon over the remaining fruit and sprinkle with the nuts. Dot with whipped cream, if desired. Cut in wedges to serve. Serves 8.
Note: you can bake shortcake day ahead and prep the fruit day ahead, keeping it chilled and just assemble when ready to serve.
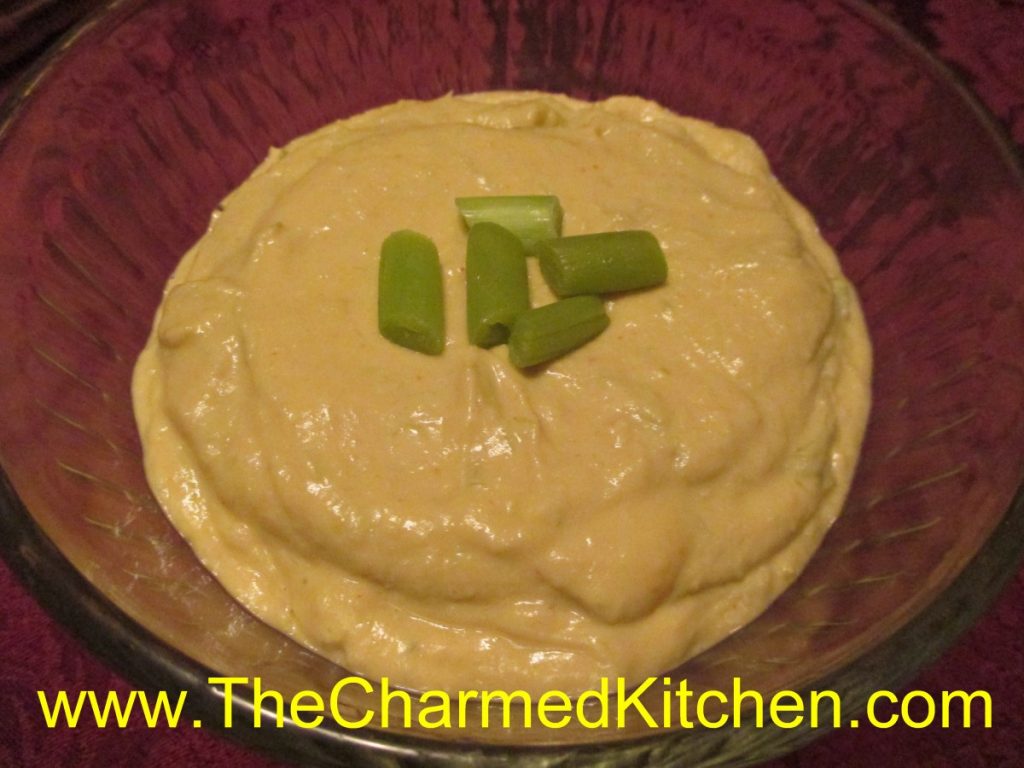
Garlic Scapes Hummus
Around here, garlic scapes are in season and being eaten a lot. I find myself cooking with them in everything I can. Everyone seems to be talking about scapes and looking for new ways to use them. There is even a word for it – scorpacciata.
Scorpacciata is an Italian word that means consuming large amounts of a particular local ingredient while it’s in season.
Scapes, if you didn’t know, are the tops of hard-neck variety garlic. They are cut off this time to year- to help the plants produce larger heads. They curl as they grow. You should be able to find them at your local farm market. They can be eaten raw or cooked. They can be a little woody when raw.
This time, I steamed the scapes, and added them to my hummus. The end result was really good. The scapes replaced the garlic cloves, adding their own personality to the dish. I switched the dish up a little more, by using avocado oil, instead of the traditional olive oil.
So here is one more recipe to use those lovely, seasonal garlic scapes.
Garlic Scapes Hummus
1 can garbanzo beans, drained- I used a one pint jar of home canned
½ c. chopped garlic scapes- 1 or 2 garlic scapes- steamed 5 minutes and chopped
¼ c. olive oil or avocado oil
2 T. lemon juice – about 1 lemon
2 T. tahini (sesame seed paste)
salt and hot pepper sauce to taste
Combine all ingredients in a blender or food processor until smooth. Adjust seasonings. Chill. Serve with pita bread, crackers or fresh vegetables. Also nice spread in a pita bread with sliced tomatoes, cucumbers and lettuce. Freezes well.
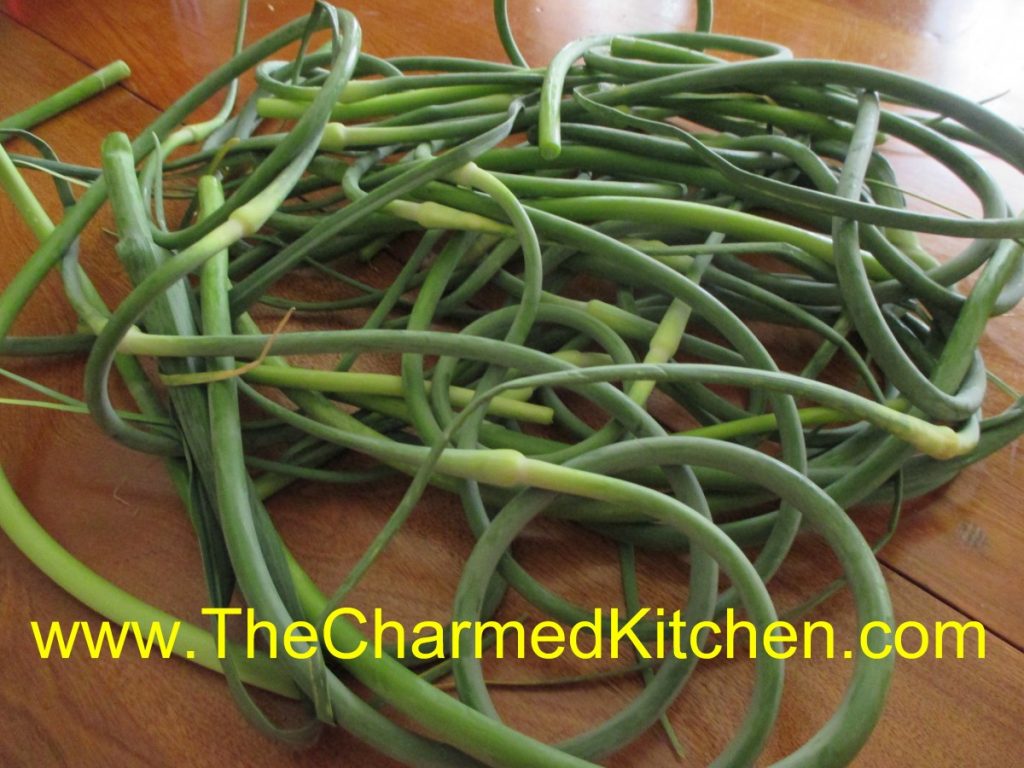
Cooking with Garlic Scapes
If you have never had garlic scapes, you don’t know what you are missing. Garlic scapes are the green shoots removed from hard-neck varieties of garlic. By removing the shoots, the bulbs will get bigger. So farmers and gardeners remove them. Garlic scapes curl as they grow, and are good served raw, or barely cooked. They are showing up at farm markets around here right now.
When cooked, the flavor mellows a lot. I love to steam garlic scapes for about 5 minutes, then just eat like fresh green beans, with butter and salt. I steamed a bunch of scapes the other day- then chopped them up and added to potato salad. So tasty!!
They have a rich, garlic flavor that is all the sweeter because of the short time they are around. Enjoy them when you can- they will be gone soon.
I sometimes use scapes in place of basil, in my pesto recipe, or combine them with parsley in a garlic scapes-parsley pesto. You can also combine the garlic scapes with cottage cheese in the blender- add a little lemon juice and hot sauce for a tasty dip. Here are some more recipes for cooking with garlic scapes.

Garlic Scapes Potato Salad
4-5 garlic scapes
2 lbs. red skinned potatoes*
½ cup minced sweet pepper
½ c. olive oil
½ c. apple cider vinegar
2 T. sugar
2 T. chopped parsley
2 t. fresh dill weed
Salt and pepper to taste
Hot sauce to taste
Steam the scapes for 5 minutes. Cool a little, and cut into ¾ -inch slices. You should end up with about 1½ of sliced scapes when done. Place in a medium bowl. Cook potatoes until tender. I baked mine in a microwave until tender and then cut into cubes. Baking them is also a nice way to cook the potatoes. You can also opt to cut into cubes first and boil the potatoes. Whatever method to cook the potatoes is fine with me. Take the potatoes, while still warm, and place in the bowl with the scapes. Mix the rest of the ingredients together in a small bowl and stir until sugar dissolves. Pour over warm potato mix, tossing to coat evenly. Adjust seasonings. Chill and serve. Serves 6-8.
* You can really use any potato you like.
Garlic Scape Pesto Sauce
1 c. chopped scapes – you can also use half scapes, half parsley
1/4 c. olive oil
3-4 cloves garlic
Salt to taste
1/2 c. pine nuts, sunflower seeds, pecans or walnuts
1 c. fresh grated Parmesan cheese
Combine all ingredients, except the cheese, in a blender and mix until smooth. Stir in the cheese and toss over hot, cooked pasta or use as a sauce on meat and poultry. Sauce will keep a few days in the fridge and makes about 1 1/2 cups, enough for 1 lb. of cooked pasta.
Lebanese Garlic Sauce
1/2 c. chopped garlic scapes
1 cup lemon juice
1 teaspoon salt
3 cups olive oil
In the container of a blender, combine the garlic scapes, lemon juice and salt. Blend at medium speed until smooth. Continue blending while pouring olive oil into the blender in a thin stream. The mixture should become thick and white almost like mayo. Store refrigerated in a glass container. Nice on hot pasta, cooked rice or grains or brushed on meats while cooking. It also is a great salad dressing.
Garlic Scapes with Broccoli
1 c. chopped garlic scapes
1 1/2 teaspoons salt
1 bunch broccoli, cut into florets, steamed 5 minutes, cooled
1/3 cup olive oil
1/4 cup red wine vinegar
1 tablespoon Dijon mustard
1/2 cup grated Parmesan cheese, or to taste
Place garlic scapes in a food processor with the salt and blend into a paste. Add olive oil, vinegar, and mustard. Pulse until smooth. Place garlic scapes mixture in a bowl and add the broccoli. Stir to coat. Chill for 3 hours to marinate, stirring occasionally. Sprinkle with Parmesan cheese before serving. Tastes even better the next day!!!
Strawberry Vanilla Jam
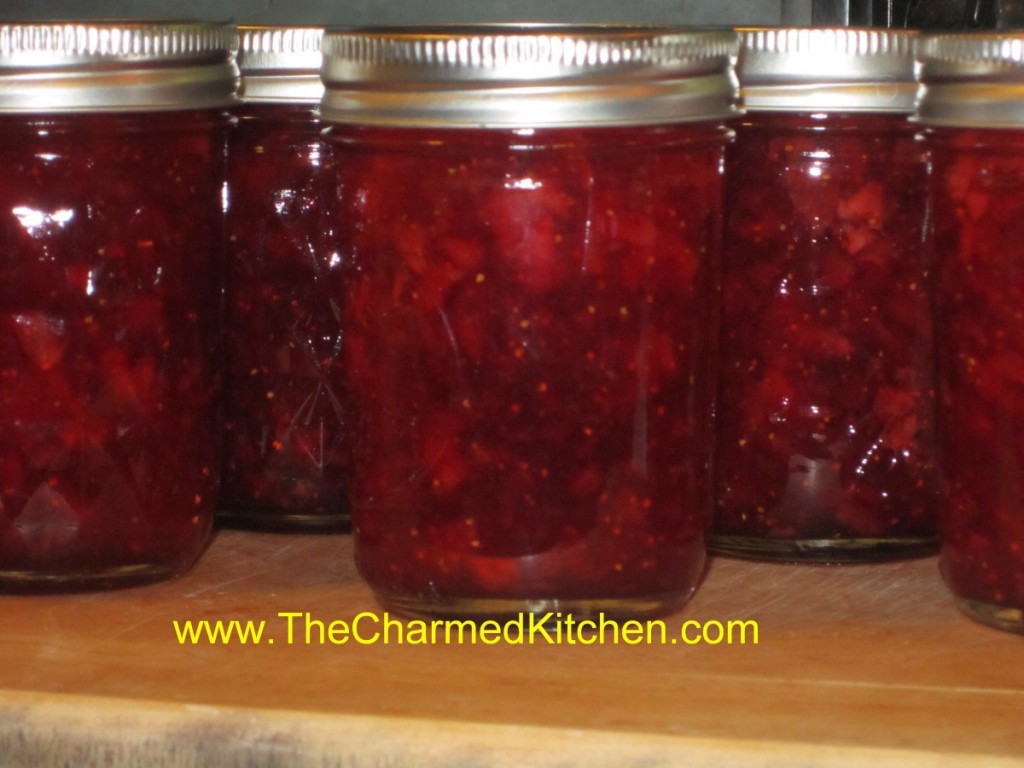
Once you taste homemade jam, you will understand why it is worth the effort to make your own. Homemade jams, preserves and jellies are a great way to save seasonal fruits to enjoy all year. They also make nice gifts.
One of my favorite homemade jams is strawberry. I like the addition of a little vanilla to my strawberry jam. I think it adds an additional layer of flavor, without covering up the natural beauty of the berries. Of course, you can omit the vanilla, if you prefer.
I try to make enough to last all year, but I end up running out quickly. This jam is great on toast, but also a nice addition to several desserts I make.
With local berries in season now, it is a perfect time to make a batch, or two.
In grocery stores, berries are often sold in one pound packages, not in quarts. A quart of strawberries should weigh 1 1/4 pounds. That should help you figure out how many berries you will need.
Here is the recipe.
Strawberry-Vanilla Jam
2 qts. strawberries, stemmed, washed and crushed
2 T. pure vanilla
1 package dry pectin
1/4 c. lemon juice
7 cups sugar
Combine berries, vanilla, pectin and lemon juice in large saucepan and bring to a boil over medium heat, stirring often. Add sugar and turn heat up to high. Stir often until mixture comes to a boil. Boil hard one minute stirring constantly. Ladle hot jam in to jars leaving 1/4 inch headspace. Wipe rims and screw on lids comfortably tight. Place in boiling water bath and process 10 minutes. Remove to cooling rack, towel or wooden surface to cool. Makes 8-9 half pints.
Strawberry Cheesy Chocolate Pie
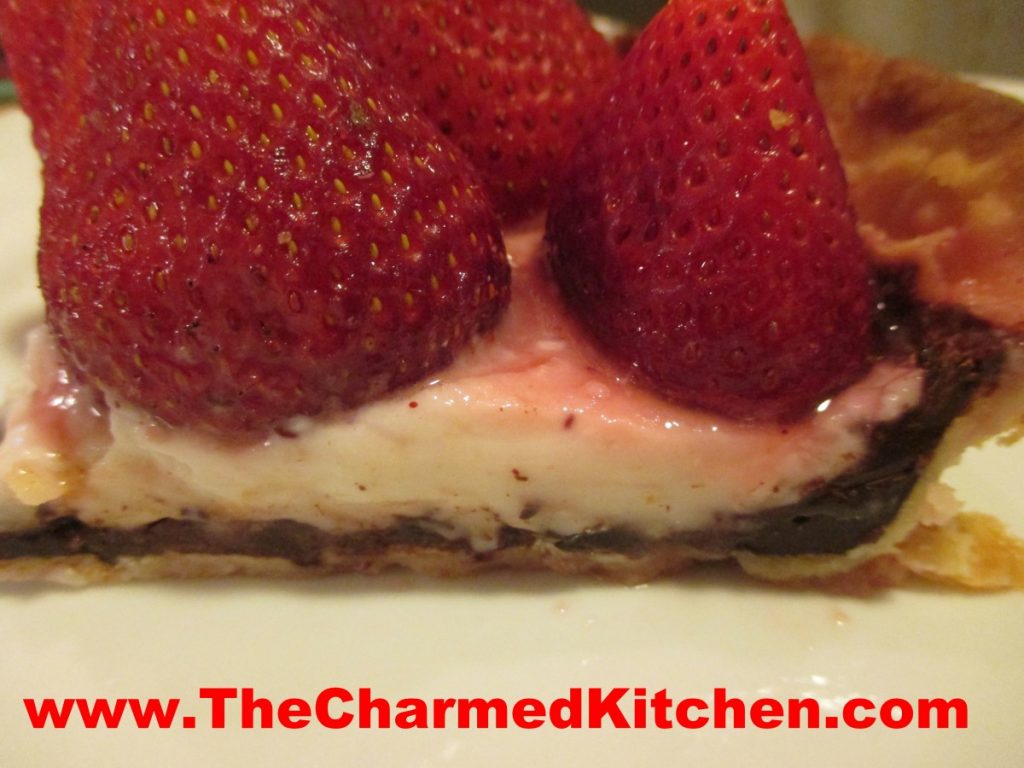
This pie has it all. Fresh strawberries, glazed and sitting on a flaky crust. But it doesn’t stop there. The crust is topped with chocolate and a layer of sweetened cream cheese. The chocolate and cheese are under the berries. They provide a wonderful surprise when eating the pie. Like a strawberry cheesecake, with chocolate!!!
The chocolate is such a natural match for the strawberries. The cream cheese gives a little “cheesecake” feel. In the end, the combination works perfectly together.
During strawberry season, I enjoy so many different dishes made with fresh berries. Fresh strawberry pie is always going to be a favorite. I try to make different versions and this one was definitely a version I will make again.
Strawberry Cheesy Chocolate Pie
1 (9-inch) pie crust * recipe follows
1 c. chocolate chips
1 T. butter
1 qt. strawberries (1¼ lbs.), hulled
1 c. sugar
2 T. cornstarch
¼ c. water
1 T. butter
8 oz. cream cheese, softened
½ c. powdered sugar
Whipped cream, optional
Using a pie pan, roll out your crust and fit it into the pan- trim off any excess. Pre-bake your crust. To do this: The prepared pie crust should be pricked all over with a fork. Cover the surface with foil and then pie weights. I use dry beans for my pie weights. Pre-heat oven to 400-degrees. Bake crust for 15-20 minutes. Check to be sure it doesn’t get too brown. Remove weights and foil. Melt chocolate chips and butter together, stirring until smooth. Pour over crust and use a spatula to spread into a thin layer on the bottom and, if you like, up the sides of the crust. Set aside and allow crust to cool and chocolate to set up. Select about 25-30 berries to be placed in pie crust, large side down, and set aside. You might need fewer berries, if they are really big. Puree or crush remaining berries. Place in a saucepan with the sugar and bring to a boil. Combine cornstarch with water and stir until smooth. Add to the strawberry mixture and cook, stirring constantly until mixture thickens and gets clear. Simmer about 5 minutes. Remove from heat and stir in butter. Set aside. Place cream cheese in a bowl and beat in the powdered sugar. Spread cheese over the chocolate layer. Arrange the reserved berries on the cheese layer, pointy side up. Put the largest berry in the middle and arrange the rest around it decoratively. Spoon the puree over the berries and allow the pie to cool down a little before putting in the fridge. Serve with whipped cream, if desired.
Note: other berries can also be used including raspberries, blackberries and blueberries, or a combination. This recipe can also be used as a filling for tarts and tartlets.
Half and Half Dough*
This is a great crust for liquid fillings like custard type pies and fresh fruit pies.
¼ c. butter, room temp
½ c. shortening, room temp- you can use lard instead, or chilled coconut oil
¼ c. sugar
½ t. salt
2½ c. pastry or all purpose flour
1/8 t. baking powder
¼ c. milk
1 t. lemon juice
Cream together the first 4 ingredients until smooth. Mix together the flour and baking powder. Set aside. Combine milk with the juice and set aside. Stir ½ c. of the flour into butter mixture. Stir until smooth. Add a little of the milk, stirring until smooth. Add remaining ingredients alternately until finished. Dough will firm up once chilled. Chill at least 4 hours before using. Makes 2 crusts. You only need half the dough for the strawberry pie.
Rhubarb Sauce

It is rhubarb season around here. Rhubarb is turning up at local farm markets and even in some grocery stores.
Like a lot of people, when I think of rhubarb, I first think of dessert, like pie or cobbler. But rhubarb’s tangy, tart flavor, lends itself to lots of savory uses.
I had some rhubarb and could not decide what to do with it. I chopped it up, and cooked it in a little water until tender. I ended up with 2 cups of cooked rhubarb.
I used this as the base for the sauce. I added the other ingredients, cooked it down until it was thick, and ended up with about 2 cups of sauce. It had a nice balance of sweet, tart and heat.
I used some of it as a glaze for chicken I was cooking. I froze the rest. The sauce would be good on other meats or even on grilled veggies.
Rhubarb Glazed Chicken
8 chicken thighs or 1 whole chicken, cut up
1 cup rhubarb sauce (recipe follows)
salt and pepper to taste
Place chicken pieces in roasting pan, season to taste and bake in a preheated 375 degree oven for 30 minutes. Remove from oven and drain any fat out of the pan. Pour over the rhubarb sauce and return chicken to oven for an additional 35 minutes. Baste the chicken with some of the sauce in the pan and return to oven for 15 minutes more. Serves 4.
Rhubarb Sauce
2 c. cooked rhubarb
1 c. apple cider vinegar
1/4 c. brown sugar
2 T. honey
2 T. dried minced onion
1 T. hot sauce
1 T. paprika
2 t. minced garlic
1 t. Worcestershire sauce
1 t. cumin
1 t. cinnamon
salt to taste
Place all ingredients in a saucepan and cook over medium heat until thickened. Stir more often as mixture thickens. Cook until sauce has reduced to about 2 cups. Use as a glaze on meats and vegetables. It was great on chicken but would also go well on pork or duck. I could also imagine it on portobello mushrooms. It would make a nice dipping sauce, too. Note: I liked the tang of it but you could make it a little sweeter to suit your own taste. Makes 2 cups. Will keep a few weeks in the fridge or can be frozen.
Sweet Corn Ice Cream
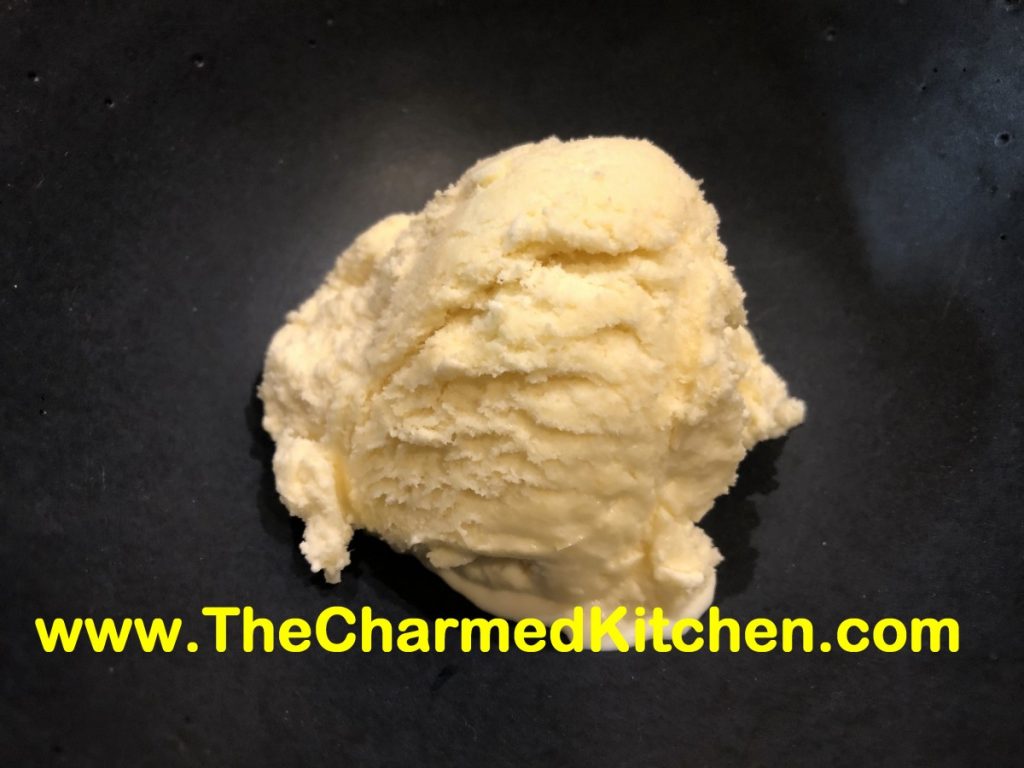
This is one of those times when you just need to trust me. Ice cream flavored with sweet corn might sound odd to you, but it is really quite tasty. The corn flavor actually works very well when added to traditional ice cream ingredients like cream, sugar and eggs.
What a fun dessert to make for your next summer barbecue. You can even let people taste it to see if they can guess the secret ingredient!
I had heard of ice cream being made with corn before, but only tasted it recently. A cousin of mine made some and I was lucky enough to try it. It was really good. Corn ice cream is popular in Mexico, at least that is what I read.
I decided to make some of my own. It was perfect timing. I had some cream and half and half that needed to be used soon. I also had 2 ears of corn in the fridge. You can just cut the corn from the cob and add it to the recipe. That will leave you with kernels of corn in the finished ice cream. Nothing wrong with that. I pureed the corn mixture, because I wanted a smoother finished ice cream. Either is fine, based on your preference. I used 2 ears of corn- that was all I had. I could see adding another ear of corn for a more corny flavor.
Sweet Corn Ice Cream
2 ears sweet corn
1½ c. half and half
1 c. heavy whipping cream
¾ c. sugar- or a little more or less, to taste
4 egg yolks
1 t. vanilla
Scrape the corn kernels off the cobs and place in a medium saucepan. Add the half and half and the cream and bring to a simmer. You can leave the kernels as is, or puree the mixture at this point. I wanted a smoother ice cream, so I used my immersion blender to puree the corn in the pot. In a medium bowl, beat together the egg yolks, sugar and vanilla. Add ½ cup of the hot cream mixture to the eggs, whisking in well. Add another ½ cup of the cream mixture, whisking again. Add one last ½ cup of the hot cream and again, whisk until smooth. Pour the egg mixture into the saucepan with the cream and while whisking, simmer until mixture starts to thicken and will coat the back of a spoon. This will take about 5 minutes. Don’t use too high a heat, or you will scramble your eggs. Mixture should reach 160 degrees to be sure eggs are cooked. Remove from heat and pour mixture into a bowl. Allow ice cream base to cool down, then chill in fridge. Chilled mixture can be frozen in an ice cream maker once cold- in a few hours- or even the next day. Once mixture has been frozen in ice cream maker, place in a container and freeze until ready to serve. Makes about 5-6 cups of ice cream.


