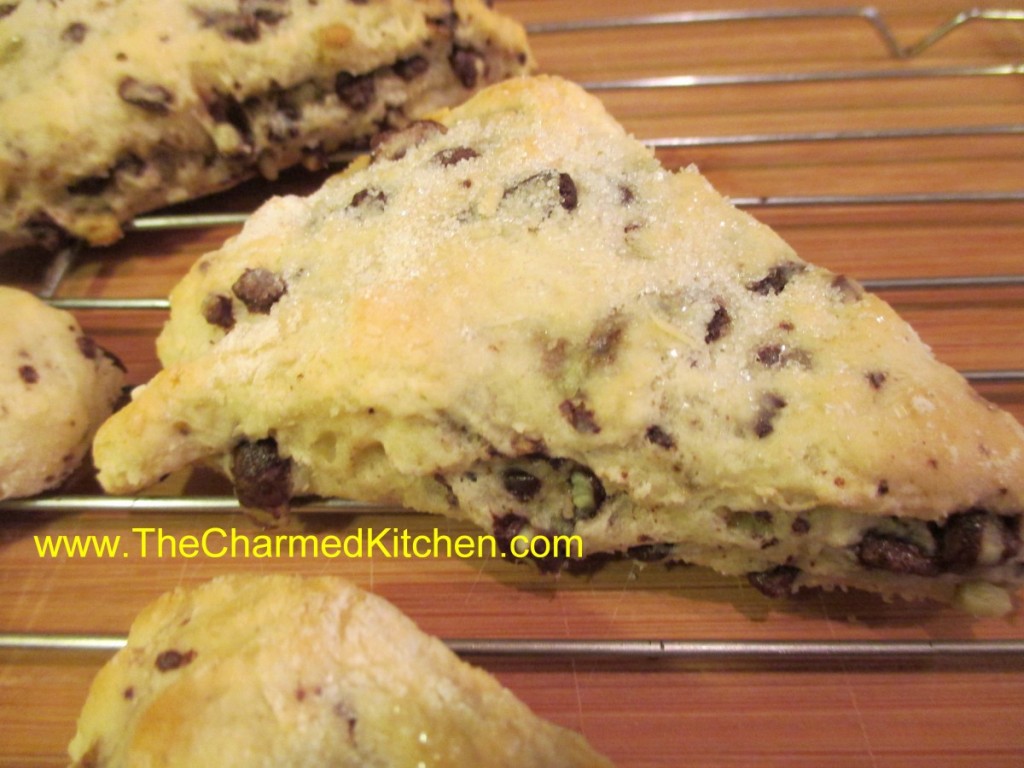
Orange and Cream Scones

These are wonderful scones. They are just what a good scone should be, tender and crumbly, without being dry. The orange flavor comes from the orange zest used in the recipe. It is subtle, but there.
I love scones because you can have them for breakfast or with a cup of coffee or tea. You can also use them as the base for a shortcake dessert by splitting them, adding sweetened fruit and whipped cream.
I was in the mood for scones, but wanted to try something new. I had come across this recipe in an old file of mine. I had ripped it out of a magazine a long time ago. They looked promising, so I decided to make them. I made few changes from the original recipe. I was very happy with how they came out. I think you will be, too. I enjoyed one this morning with some homemade clementine marmalade.
Orange and Cream Scones
2 c. flour
¼ c. sugar
1-2 T. orange zest, I used 1 tablespoon, but could have used more
2 t. baking powder
½ t. salt
10 T. unsalted cold butter, cut into ½ -inch cubes
1 egg
½ c. cold half and half
1 t. vanilla
Extra flour
2 T. half and half or orange juice to brush the scones
Extra sugar for sprinkling on top- 3-4 tablespoons
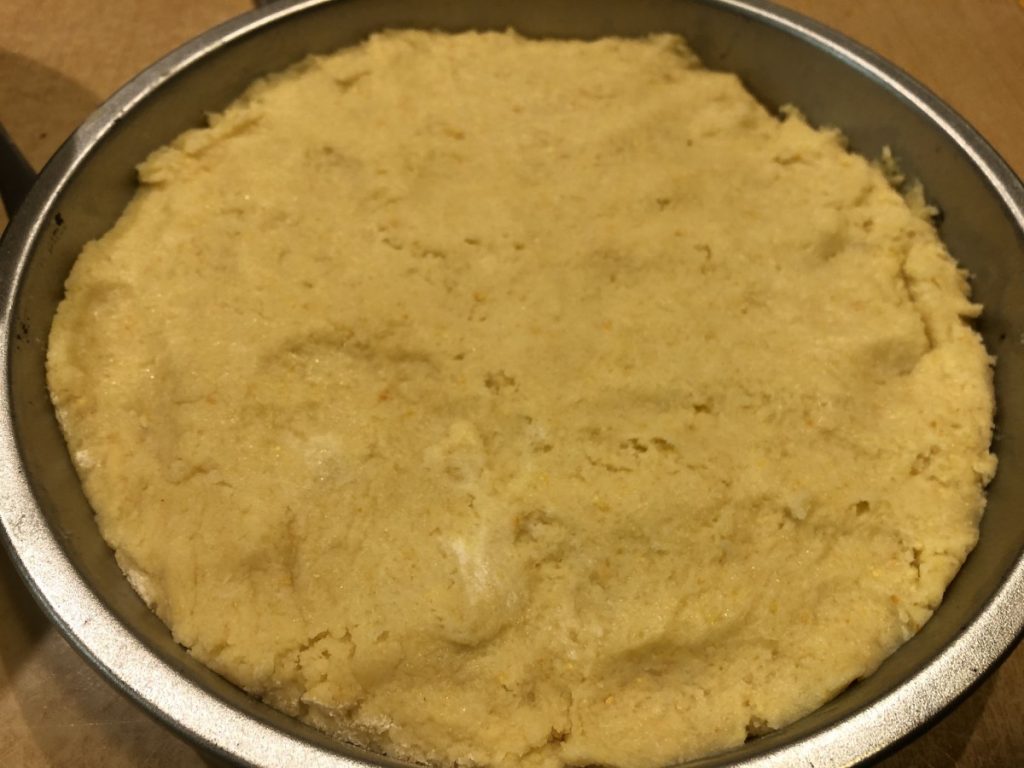
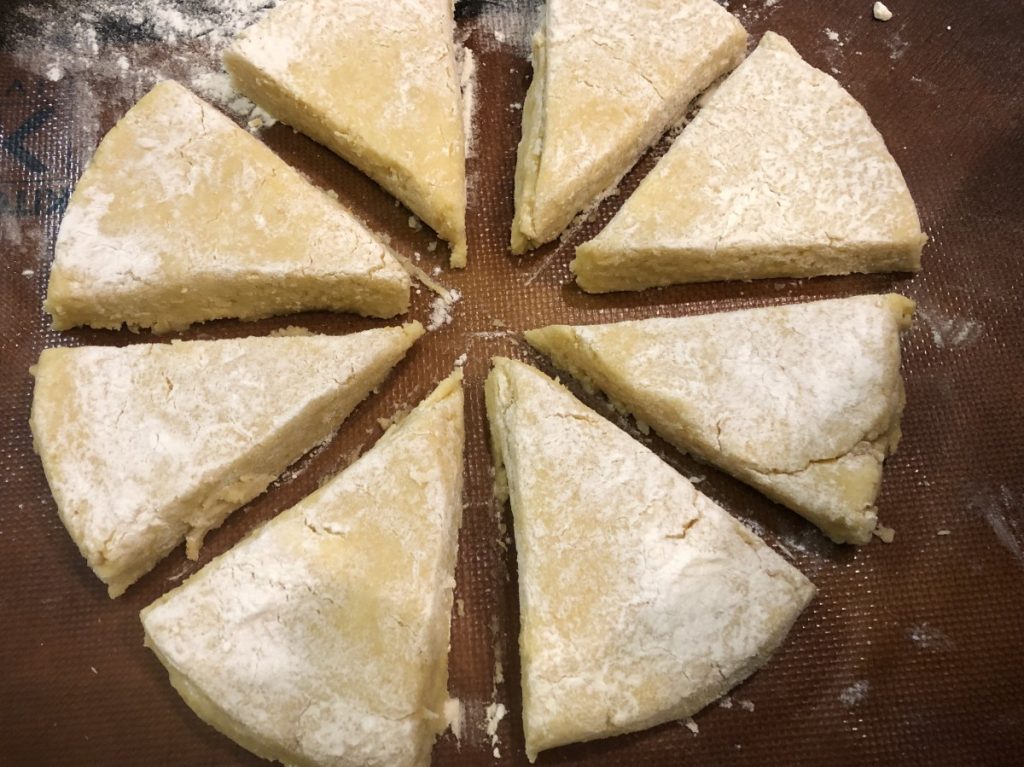
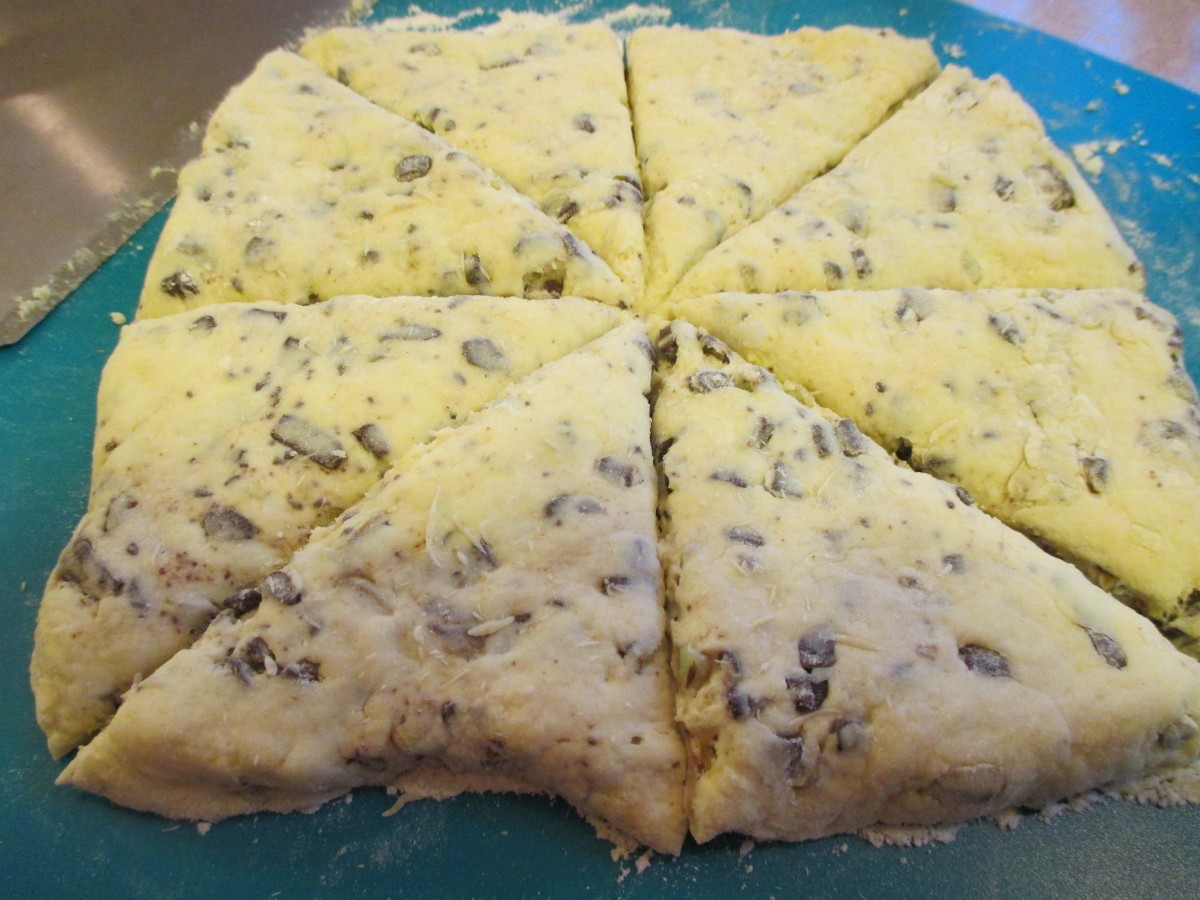
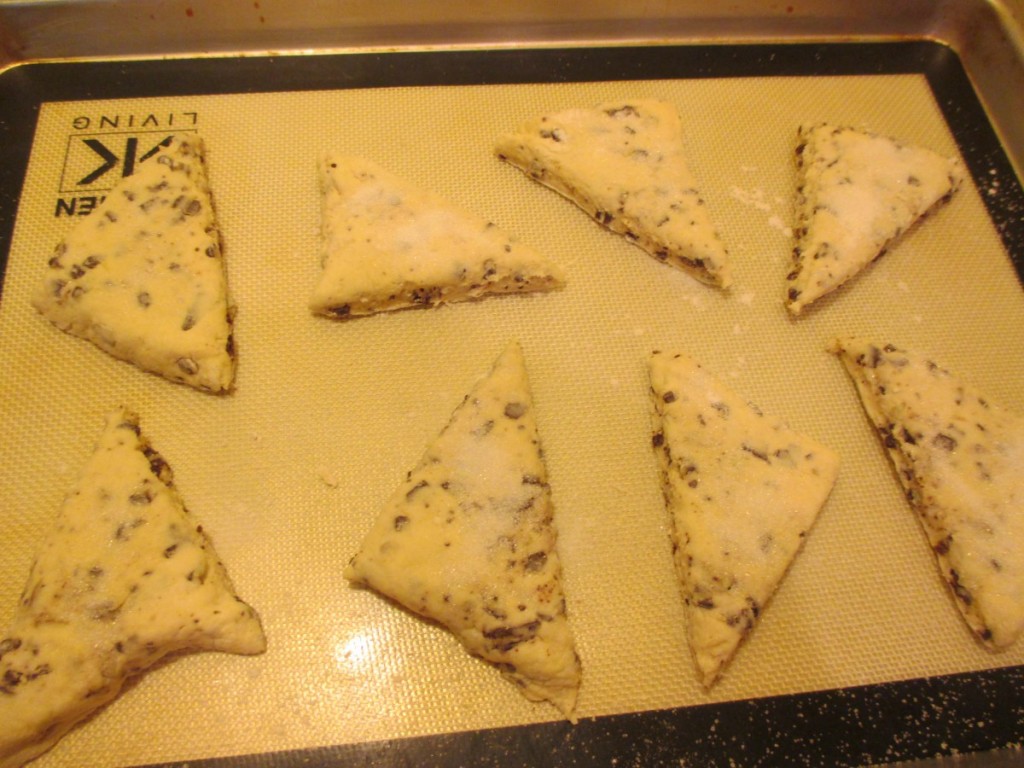
Preheat oven to 375. Line a large baking sheet with parchment paper or use a silicone liner. Set aside. In a large bowl mix together the dry ingredients. Using your fingers, rub the butter into the flour mixture until it looks like coarse crumbs. You can also use a pastry blender, but what fun is that? In a small bowl, beat together the egg, half and half and vanilla. Pour into flour mixture and stir until mixture starts to hold together. I am going to save you from messing up your counter with this next part. Get an 8-inch round cake pan and sprinkle flour in the bottom of it. Don’t be stingy, be sure there is a layer over the whole pan. One or two tablespoons should do it. Go back to your dough and sort of knead it in the bowl. That is why I said to use a large bowl. You don’t really need to knead it on your counter. Use a wooden spoon, rubber spatula or your hands to get the dough to form into a ball. Make sure you get all the dry bits from the bottom of the bowl. This isn’t a yeast dough. The idea is to get it to stick together with as little actual kneading as possible. Trust me, this is how you end up with super tender scones. As soon as the dough will hold together, and form into a ball, use a rubber scraper to get it into the floured cake pan. Press the dough evenly into the pan. Now a fun trick. You want to turn to the pan over so the dough ends up on the prepared baking sheet. You don’t want to do this slowly or the dough might plop out too soon. You also want to dough to come out. In one motion turn the cake pan over quickly onto the baking sheet. You want to actually slam it firmly on the baking sheet. Then lift up the cake pan. If all has gone according to plan, you’ll have a perfect 8-inch circle of dough on the baking sheet. I could have told you to just place the dough on the baking sheet and form it into an 8-inch circle, but I prefer the cake pan method. You get nice, even edges. There will be some flour on the dough. Leave it there for now. Using a bench scraper, or a long knife, cut the dough in half, then in half again, like cutting a pie. The dough is pretty moist, so the extra flour on top should make them easier to cut. Repeat two more times so you end up with 8 wedges. Pull them apart a little, so they can expand when they bake. I used a metal spatula to do this. If there is still extra flour on top and it is bothering you, you can brush it off. Using a pastry brush, brush a little half and half or orange juice over the scones. Then sprinkle the tops with the extra sugar. Bake for 25 minutes, or until golden brown. Makes 8. Great plain or served with jam.
Black Forest Mini Cheesecakes
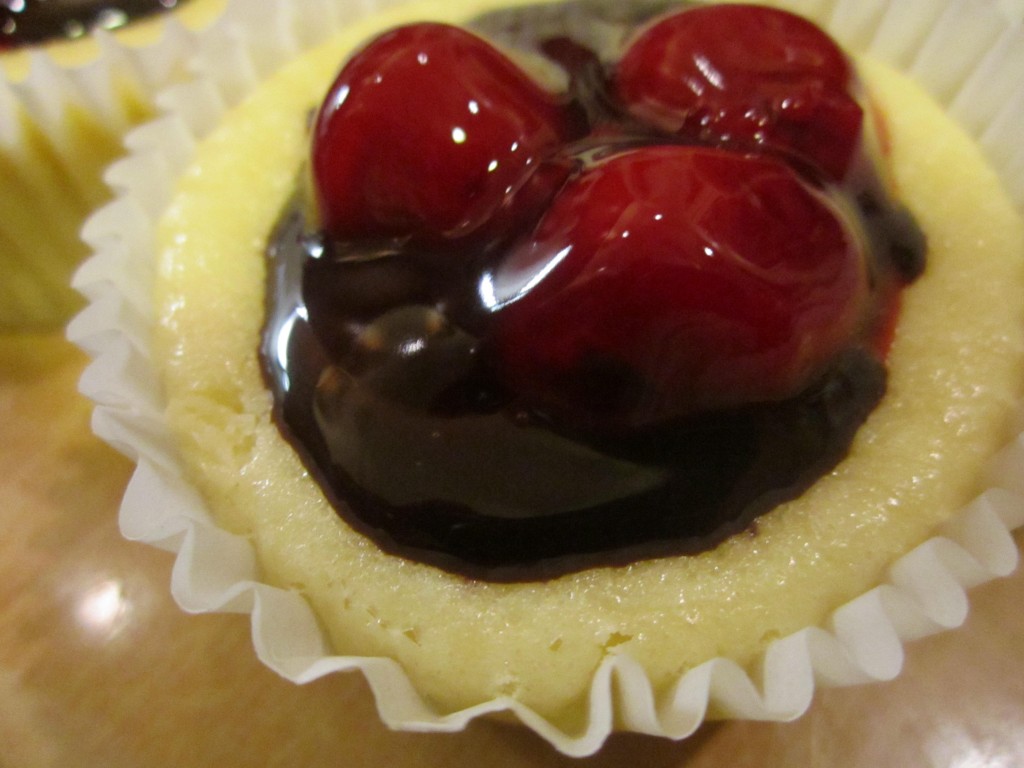
I love when things just fall into place. I had some cherry pie filling left over from making Danish. I wanted to use it up. I also needed a dessert for dinner with a friend. These little cheesecakes worked out as the perfect dessert for us.
To start with, it’s cheesecake, which is always a good thing. It is also a really quick recipe, and simple to make. Finally, the recipe just makes 6 little cheesecakes. Perfect for when you don’t need a whole cheesecake. Nothing stopping you from doubling, or tripling the recipe, if you need a few more. I used cherry pie filling (homemade), but you could top these with almost any pie filling or fresh fruit you liked, or even eat them plain.
Black Forest Mini Cheesecakes
6 vanilla wafers
8 oz. cream cheese, softened
1/3 c. sugar
1 t. vanilla
1 egg
chocolate syrup or sauce
cherry pie filling
Preheat oven to 350 degrees. Place paper liners in 6 muffin tins and place a vanilla wafer in each one. Set aside. In medium mixing bowl beat together cream cheese, sugar and vanilla until smooth. Beat in egg until just mixed. Spoon batter into prepared muffin tins. Bake for 15- 20 minutes. Cheesecakes will puff up and then deflates a little when cooled. Once cooled top each cheesecake with a little chocolate syrup and a spoonful of cherry pie filling. Chill. Makes 6. Serves 2-3.
Lemon Cheesecake Squares
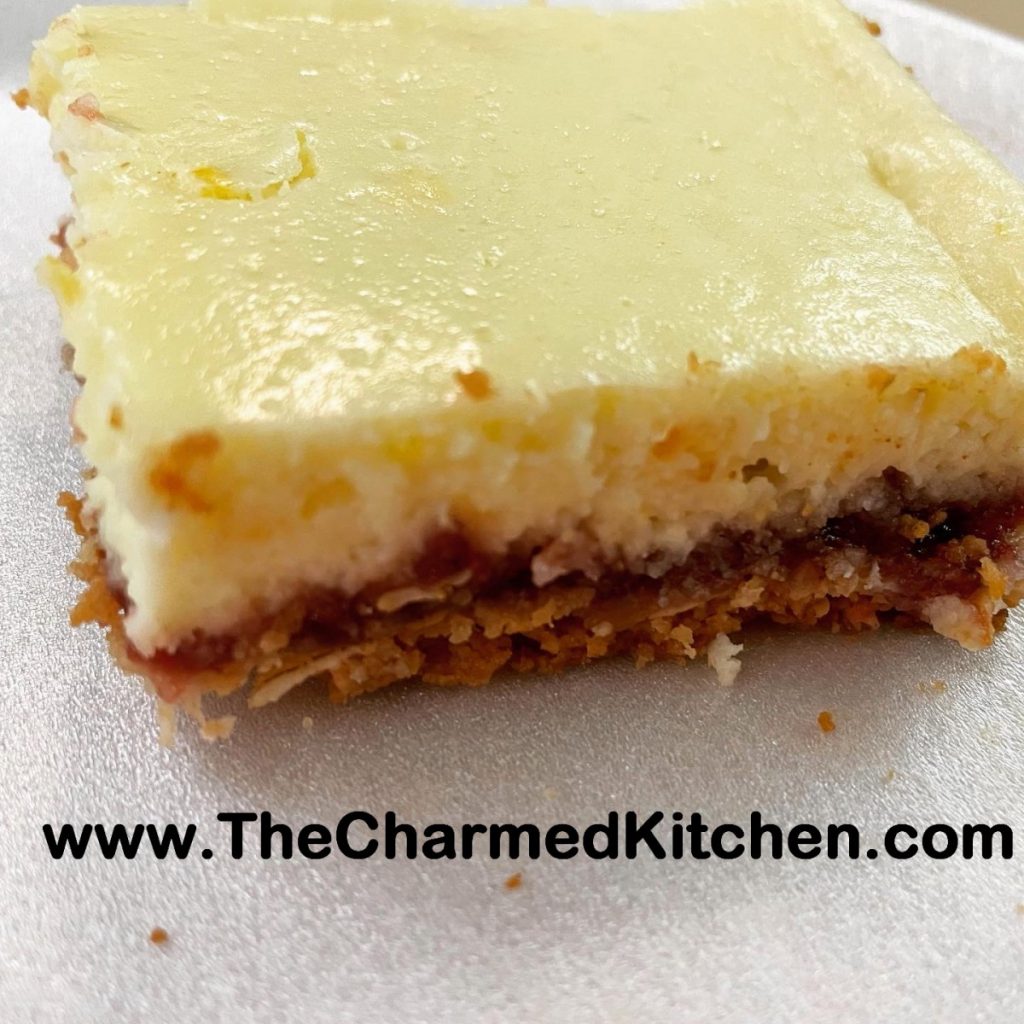
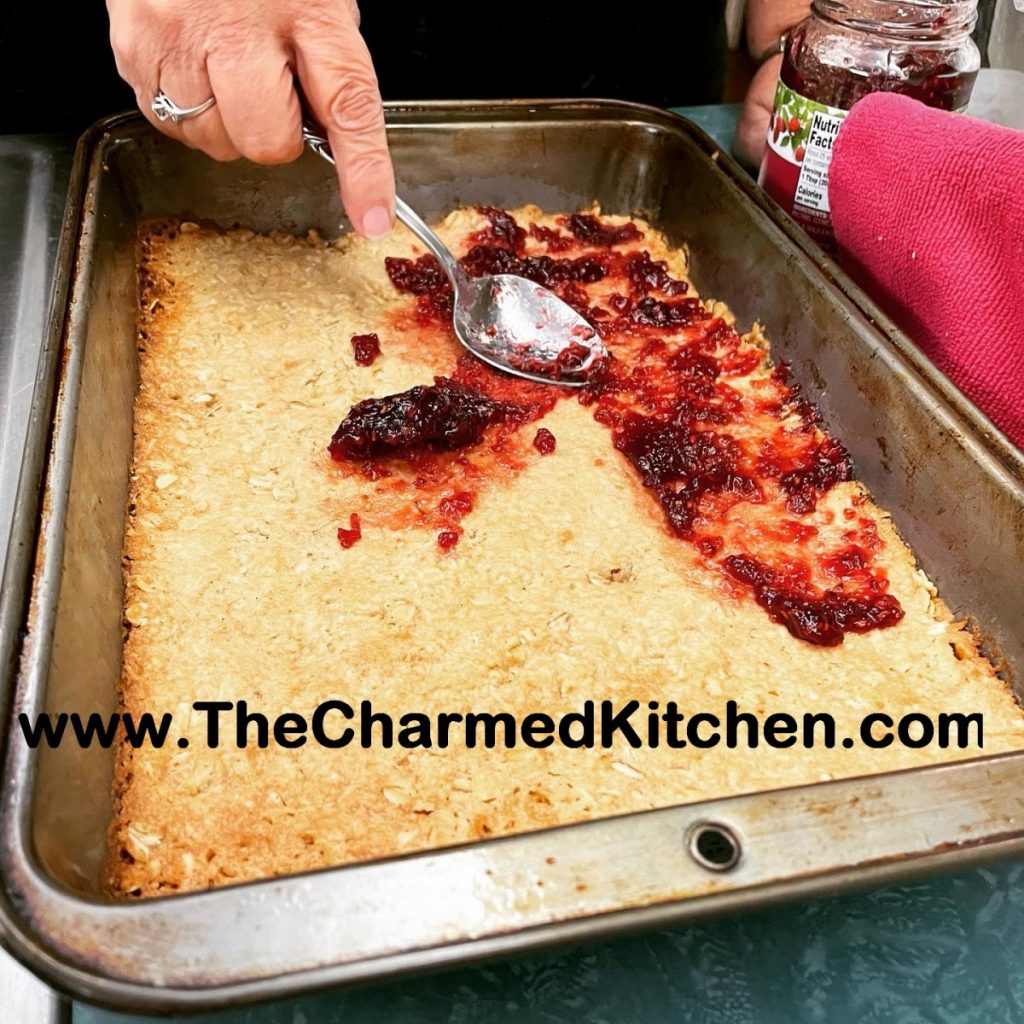
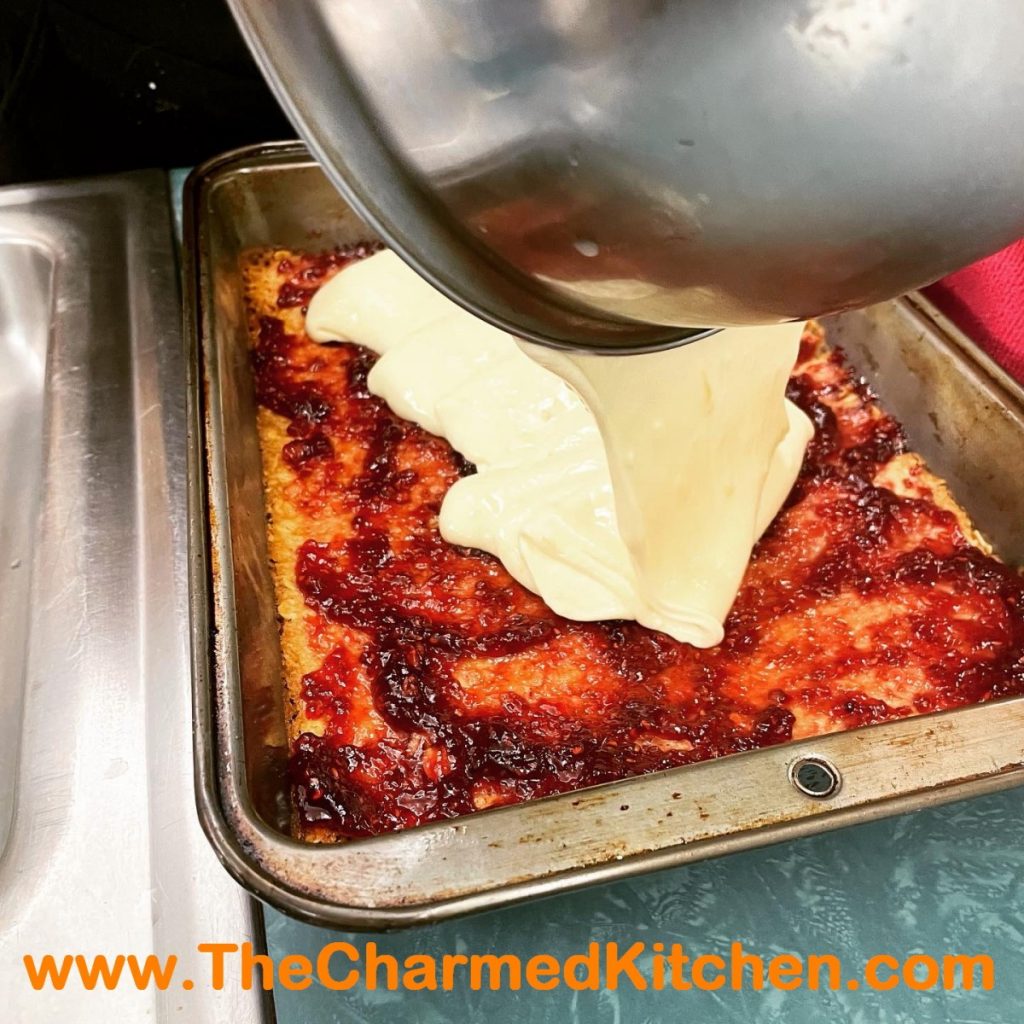
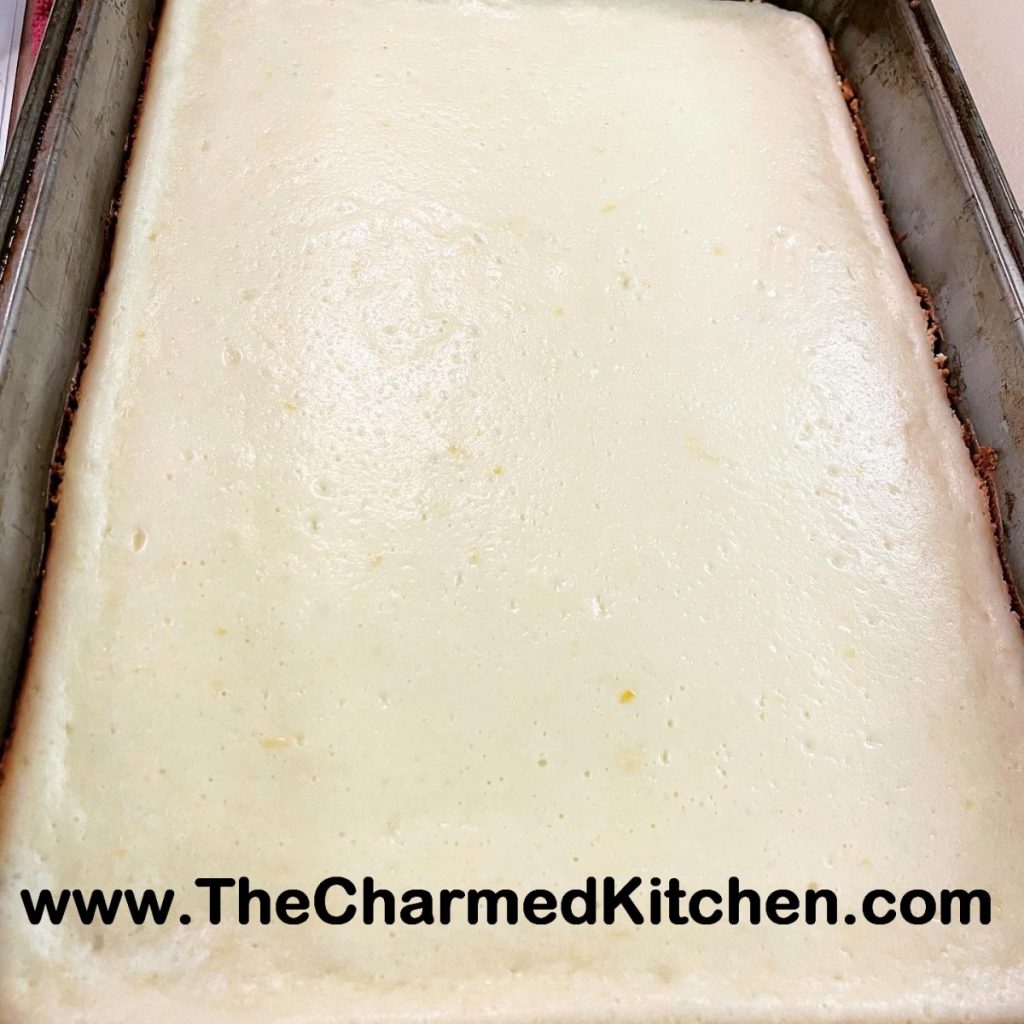
We made these cheesecake squares in cooking class last night. It had been awhile since I had them. I forgot just how good they are. Between the crust and lemon cheesecake topping there is a layer of raspberry jam. They are just so good. As an added bonus, they are also very easy to make.
This is a slightly non-traditional cheesecake. For starters, the crust is oatmeal-based not graham cracker. This cheesecake is also not baked in a spring form pan, but in a 9×13 inch pan.
Like other cheesecakes, they can be frozen.
So here is the recipe. Enjoy!!
Lemon Cheesecake Squares
Crust
¾ c. butter
1/3 c. brown sugar
1¼ c. flour
1 c. oatmeal, old-fashioned or quick cooking
¼ t. salt
Filling
½ c. raspberry jam
2 (8oz.) packages cream cheese, softened
¾ c. sugar
2 T. flour
2 eggs
3 T. lemon juice
2 t. grated lemon peel
Heat oven to 350-degrees. Grease a 9×13-inch baking pan. Beat together butter and brown sugar then stir in rest of crust ingredients. Press into bottom of prepared pan and bake 20 minutes. Remove from oven. Crust should be golden around the edges. Spread jam over hot crust. As the jam warms it get easier to spread. Beat cream cheese sugar and flour until fluffy. Beat in eggs one at a time. Stir in juice and peel. Pour over jam and bake for 25 minutes, or until set. Cool then chill. Store covered in fridge. Makes 24 squares.
Mixed Fruit Crumble
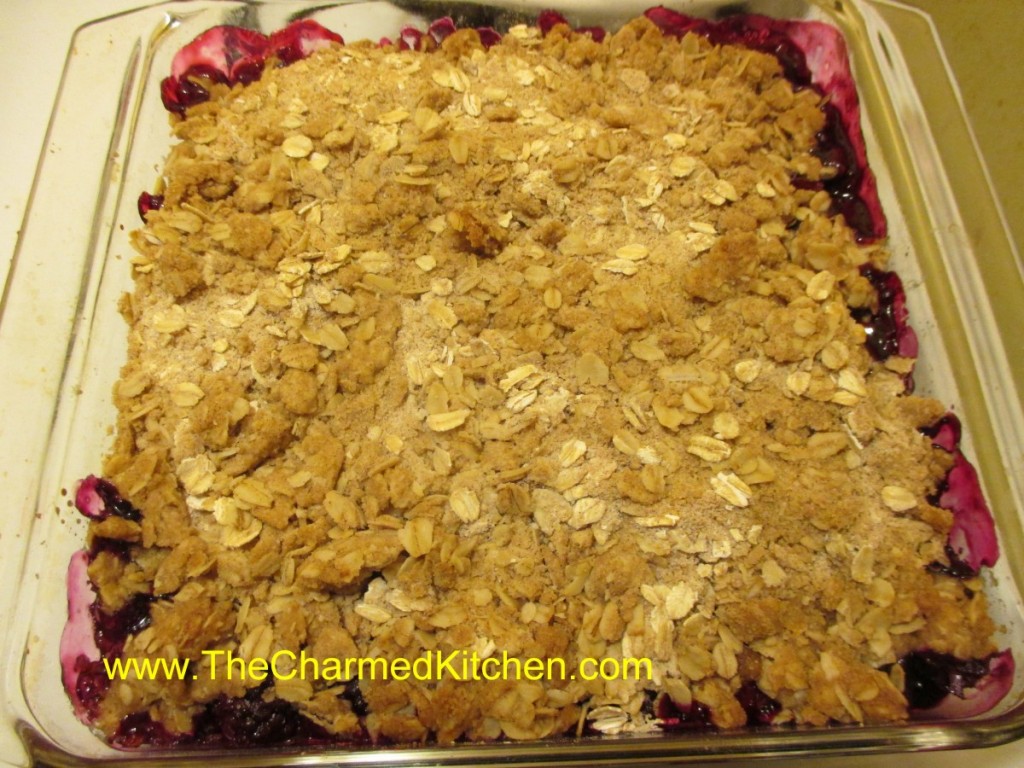
I was looking to empty my freezer out a little. I find it also helps me to be more creative. I was looking to make a fruit-based dessert. Something to suit the warmer temps this week. I decided the first three fruits I found were the ones I would use. Turned out to be blackberries, blueberries and red grapes. Pretty nice mix. I thawed out the fruit and tossed them with some sugar, a little cornstarch and a squeeze of lemon juice. I had about 7 or 8 cups of fruit, but I knew they would cook down. I put them in a 9-inch glass baking dish and made the topping next.
Baked it until the top was golden and the fruit was all bubbly. It was a big hit and if I hadn’t admitted that it was just a matter of what I found first I think my guest would have though I’d planned it from the beginning. Fresh fruit would have also worked.
Mixed Fruit Crumble
The filling
7-8 cups mixed fruit- I used blueberries, blackberries and red grapes -thawed if frozen
1/2 c. brown sugar
3 T. cornstarch
2 T. lemon juice
The topping
2 c. rolled oats
1 c. flour
1/3 c. brown sugar
2 t. cinnamon
1 t. nutmeg
1 stick butter
Combine the fruit with the other filling ingredients and place in a baking dish. I used a 9×9 inch glass baking dish but use whatever casserole you like. Place all the topping ingredients, except the butter, in a mixing bowl and stir to combine. Cut in butter to resemble coarse crumbs. Mixture will be crumbly. Sprinkle over the fruit mixture and bake in a preheated 350 degree oven for 35-40 minutes, or until topping is golden and fruit is bubbly. Serves 6.
Chocolate Mint Scones
I was going to just make a simple biscuit, but looked around at what I had, and came up with these minty chocolate scones. I used baking mix- like Bisquick- but I use a home made mix. I also had some sour cream so used that in the dough. The chocolate mint part came from a bag of Andes chocolate chips. These are just like the Andes candies, but in chip form. I have used them to make cookies before and had just enough left in the bag for the scones. The scones are very tender and flaky.
These would pair up nicely with berries and whipped cream to make shortcakes. Just let them cool completely before trying to slice for shortcakes.
Chocolate Mint Scones
1 c. baking mix- like Jiffy Mix or Bisquick- I used homemade
1/2 c. sour cream
1 egg
1/2 c. Andes chocolate mint chips
sugar for sprinkling
In small bowl place the baking mix. In another bowl mix together the sour cream and egg. Mix into the baking mix, along with the chips and stir until mixture turns into a soft dough. On lightly floured surface press the dough into an 8-inch square. Cut in half- then cut across in half again- you’ll have 4 squares. Cut diagonally across each square to form 8 triangles. Place triangles of dough onto ungreased baking sheet and sprinkle with a little sugar. Bake in a preheated 400 degree oven for 12-15 minutes, or until golden brown on top. Don’t over bake. Cool on wire rack. Makes 8.


Mom’s Duck Fat Bread

There is a reason my mother’s sweet bread recipe has such an odd name. My Mom used to make this wonderful sweet bread. Made it for every family occasion. The recipe uses butter.
She was a very frugal person. One day, she decided to render the skin from a duck she was using in soup. She would never just toss it. Too wasteful. Once it was cooled, the duck fat looked like butter.
She was making her sweet bread and substituted the duck fat for the butter in the recipe. When my brother-in-law, Bob, tasted it he declared it was the best batch yet. My Mom told him what the secret ingredient was, and from that day on, we always called it duck fat bread, even when it was made with butter.
Recently, my niece Sarah has made the bread. My nephew Bobby also made the bread with his daughter, Elia. It makes me happy to see the family traditions continued onto the next generation. Elia loved it so much, Bobby suggested we rename it Elia Bread!!! I am Ok with that.
The bread really is exceptional, with a texture that is soft and a little chewy at the same time. I thought I would share my family story with all of you. Happy Mother’s Day!!
Here is the recipe- wonderful even when made with plain old butter.
Mom’s Butter Coffeecake Braids aka Duck Fat Bread
4 1/2 c. flour
2 T. sugar
1 t. salt
½ c. butter or 1/2 c. cooled, rendered duck fat
1 packet yeast
¼ c. warm water
2 t. sugar
1 c. evaporated milk
2 eggs, beaten
Combine flour with sugar and salt. Cut in butter or duck fat and set aside. Dissolve 2 teaspoons sugar in warm water. Dissolve yeast in warm water mixture and set aside. Allow to become bubbly, about 5 minutes. Combine milk with eggs. Stir in yeast mixture and add to flour mixture stirring well. Knead dough in bowl until smooth, about 10 minutes. Place on lightly floured surface and knead until smooth. Cover and let rise until doubled, about 1½ hours. Divide dough in half and then each half into thirds. Roll dough into ropes and braid three ropes together. Repeat with remaining 3 ropes. Place braids in 9×5 inch greased bread pans and cover with a towel. Place in a warm, draft-free place and allow to rise until doubled, about 1½ hours. Bake in a preheated 350 degree oven for 25 minutes. If you like glaze loaves while warm with a mix of powdered sugar, a little milk, butter, and vanilla. Toasted almonds or walnuts can be added, if desired. Makes 2 loaves.
Note: You can also refrigerate the dough after kneading it if you would prefer. Just place dough in an oiled bowl, cover with plastic wrap and chill overnight. Roll and shape dough into braids when cold from the fridge. Rise, covered, until doubled in bulk, about 2-3 hours. Bake as directed.
Note: You can also place loaves on a greased baking sheet for a longer, flatter bread rather than in loaf pan.
Note: This is the same dough my parents used to make jelly doughnuts.
Tara’s Brunch Enchiladas

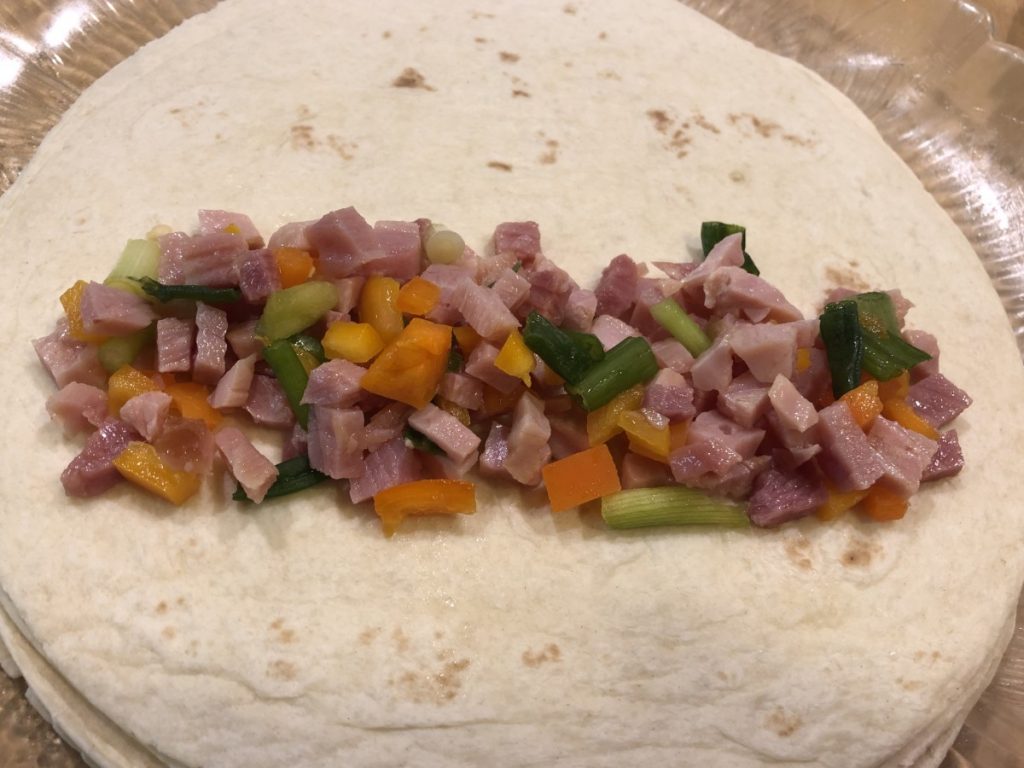
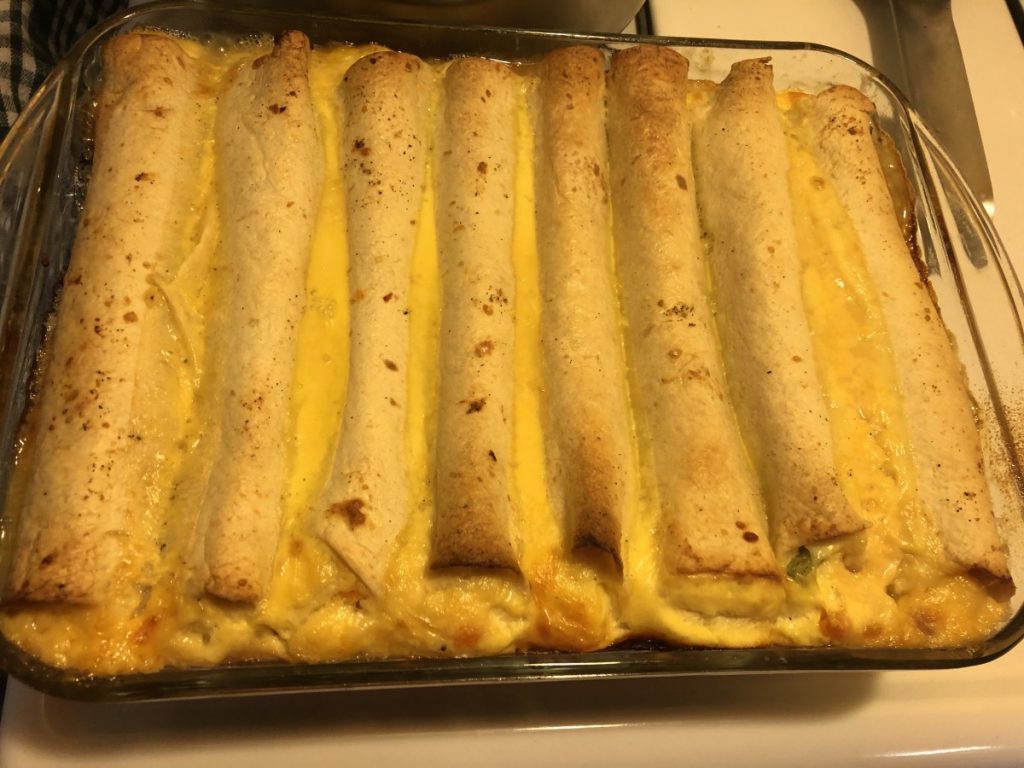
These are not traditional enchiladas, and I am OK with that. Made with a ham and cheese filling, then topped with an egg-based custard, they are a wonderful addition to any brunch menu. They would be fine served for breakfast or lunch, too. The prep in all done the day before, so you just have to pop them in the oven when ready to bake and serve. Nice for Mother’s day.
The recipe can be easily tweaked, to work with other ingredients. Maybe a corned beef and Swiss cheese version or chicken with broccoli. You could also go vegetarian with a combination of beans and veggies. You can cut the recipe in half, or freeze leftovers. I love a versatile recipe.
I started calling them Tara’s Enchiladas for my friend Tara, who needed a recipe for a Mother’s day brunch a few years ago. She made them and really loved them.
So here is the recipe. Hope you give it a try.
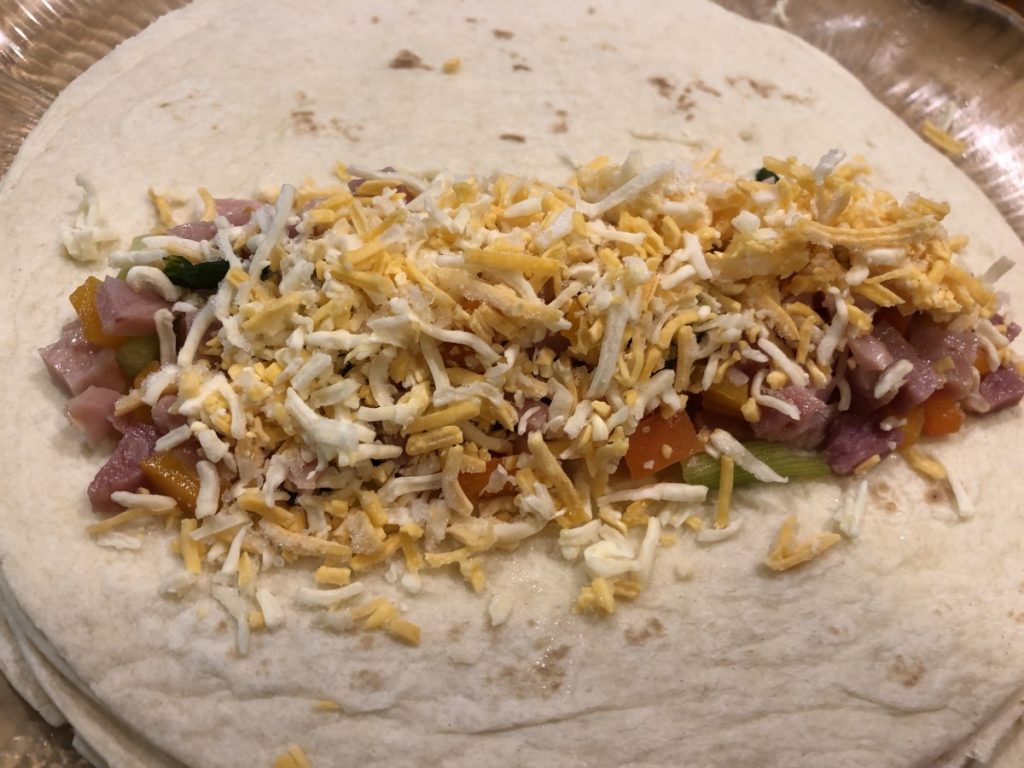
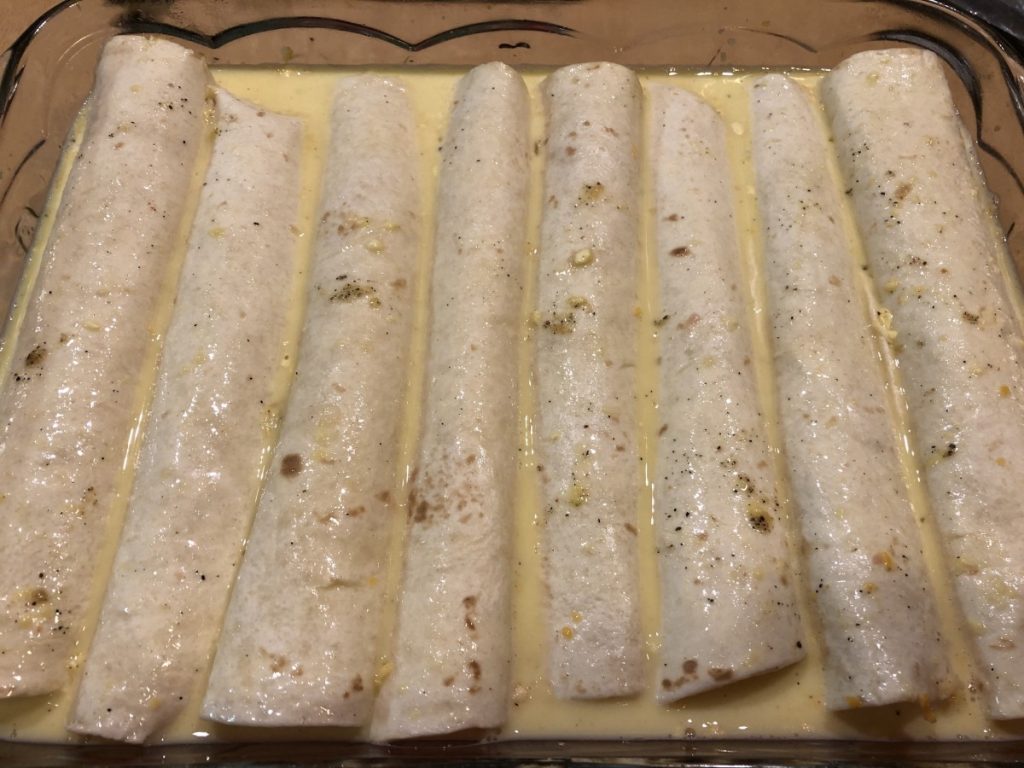
Tara’s Brunch Enchiladas
12 oz. fully cooked ham, chopped fine or ground
½ c. sliced green onions
½ c. chopped sweet pepper
2½ c. shredded cheddar cheese
8 (8-inch) flour tortillas
4 beaten eggs
2 c. half and half or milk
1 T. flour
salt, pepper, and garlic powder to taste- ham is salty- so go light on salt
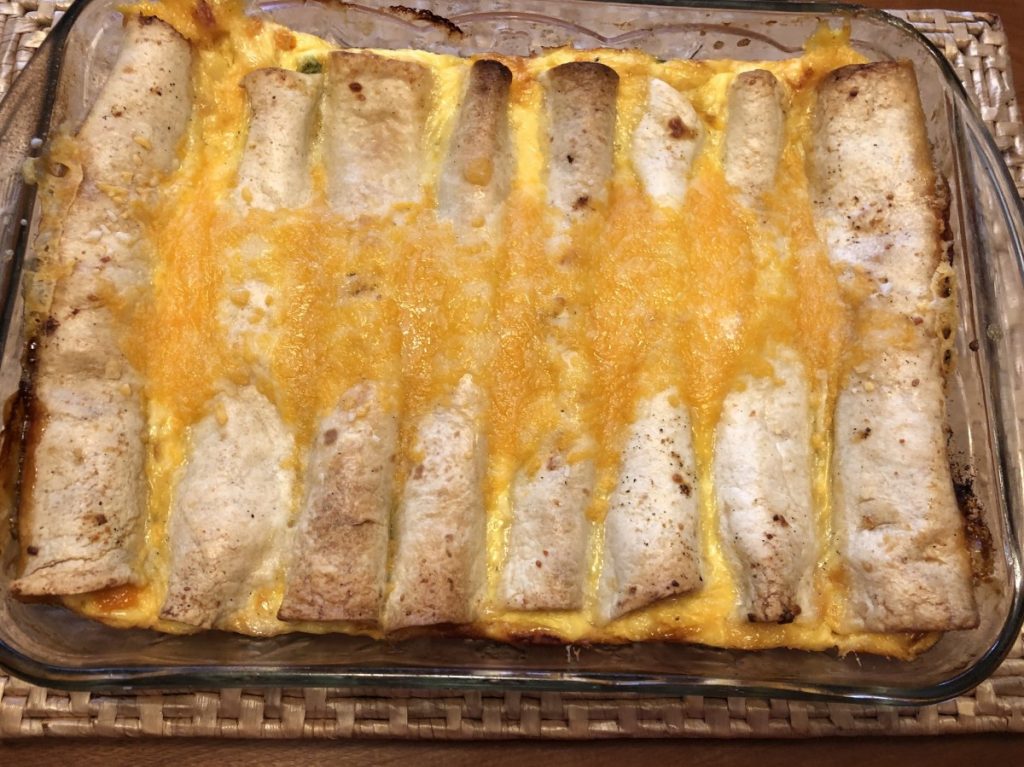
In bowl, combine ham with vegetables. Place 1/3 c. of ham mixture and 3 tablespoons of cheese in each tortilla and roll up. Place tortillas, seam side down, in greased 9×13-inch pan. Combine remaining ingredients and mix well. Pour over tortillas. Refrigerate several hours or overnight. Uncover and bake in a 350-degree oven for 45-50 minutes or until set. To check for “doneness”, insert a knife off center. Knife should come out clean. Sprinkle with remaining cheese and return to oven for 3-5 minutes to melt cheese. Serves 8.
Note: Let enchiladas sit a few minutes before serving to make cutting easier. I cut them down the middle, then into squares to serve.
Sarah’s Overnight French Toast
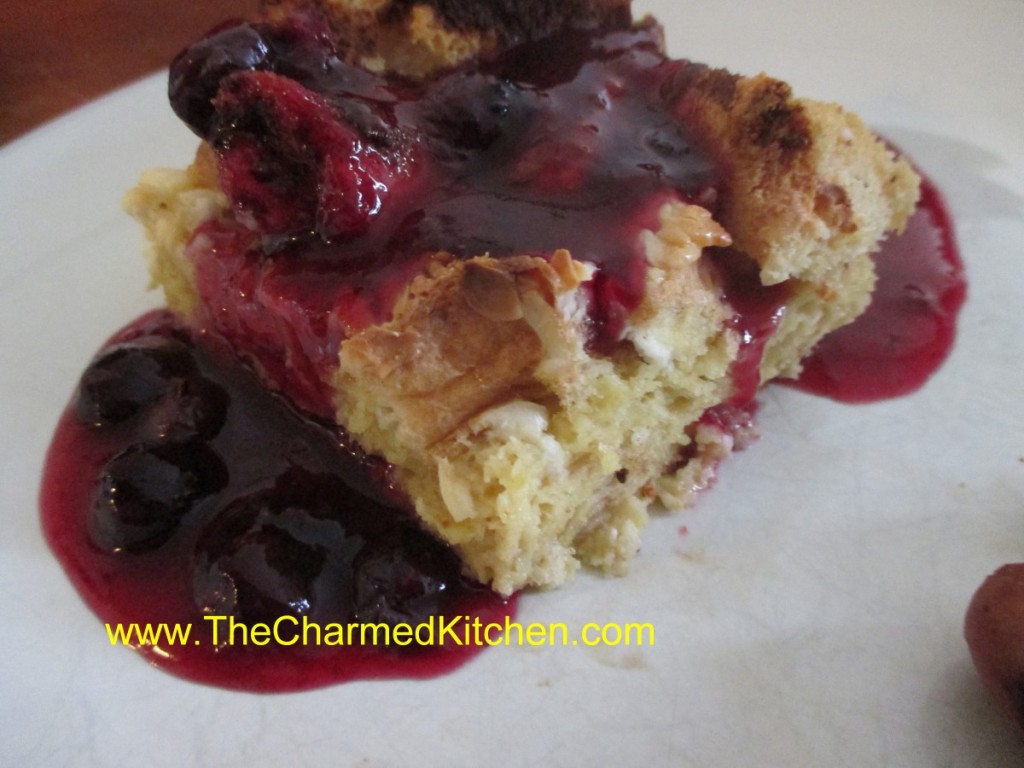
If you want to make a special breakfast for Mom on Sunday, you might want to make baked French Toast.
On a visit to Michigan my niece made this for breakfast and she shared her recipe with me. For breakfast on the morning I was leaving, Sarah made this baked French toast dish that we topped with warm blueberry syrup. It was so flavorful, not too sweet, and a special dish to serve for Mom.
This is a great dish for when you are pressed for time. You assemble it the night before and then just bake it when needed. She said it was really easy to make and promised me the recipe. She also included the recipe for the warm blueberry syrup she served with it. So here is Sarah’s recipe. I loved it and I think you will, too.
Sarah’s Overnight French Toast Bake
10 cups cubed white bread (Sarah used Texas Toast)
8oz. cream cheese
8 large eggs
2/3 c. half and half
1½ c. milk
½ tsp. vanilla
Cream all together, except the bread. Put bread in 9×13 pan. Pour egg mixture over cubed bread. Cover and put in fridge overnight. Let stand at room temp for 1/2 an hour, put in 375 oven for 50 minutes. My lazy version ……take out of fridge, put in cold oven, turn oven on, set timer for one hour, go back to bed while breakfast cooks.
Blueberry Syrup
1 pint blueberries
1/2c sugar
2 -3 tbs corn starch
dash of lemon Juice
pinch of salt
Combine, cook, stirring often, until boiling.
Coffee Waffles

Yes, you read that right. Coffee waffles. Waffles with coffee already inside them. They are quite wonderful actually. Great for breakfast, which is obvious, I suppose. These waffles also make a fun base for desserts. I am serving them with honey ice cream as a dessert. This is a nice recipe to make for Mom on Mother’s Day.
I wanted to add coffee flavor to waffles, but I knew even strong coffee would water down the batter too much. The only solution was to use either instant coffee or espresso powder. I knew I could get enough coffee flavor into them, without affecting the batter in a negative way.
It worked!! Plenty of coffee flavor and a nice, crispy waffle. I was thinking it might be fun to add cinnamon to the next batch. I got 10 rectangular waffles out of the recipe. Froze most of them for later.
You can serve them topped with butter, syrup, whipped cream or powdered sugar.
So here is the recipe. Hope you give them a try.
Coffee Waffles
1¾ c. flour
¼ c. brown sugar
1½ t. baking powder
½ t. salt
1½ c. half and half or milk
1 egg, beaten
1/3 c. oil
1 T. instant coffee or espresso powder
1 T. vanilla
Non-stick spray or oil for coating the waffle iron
In medium mixing bowl, mix dry ingredients together and set aside. In a separate bowl, combine the half and half with the remaining ingredients. The dry coffee granules will not dissolve right away. You can let the wet ingredients sit a few minutes and whisk again, if you like. While they are just sitting there, you can heat up the waffle iron. Coat the waffle iron with a non-stick cooking spray or brush with a little oil. Add the wet ingredients to the dry ingredients and stir until mixed together. Don’t get crazy over mixing. That will give you tough waffles, and nobody wants that. Just stir until you don’t see any dry bits in the mix. I like to use a rubber scraper to get to the bottom of the bowl. Ladle some batter into the waffle iron and cook until golden brown. When the steam stops coming out of the waffle iron, or lessens a lot, it is usually good indicator that your waffles are done. Yield depends on the size of your waffle iron. I got 10 waffles, about 4×5 inches.
Note: The instant coffee breaks down more when mixed with the dry ingredients. Espresso powder will dissolve quickly, but if you use instant coffee like I did, expect a few “flecks” of coffee in the batter. I kind of liked the way it looked.
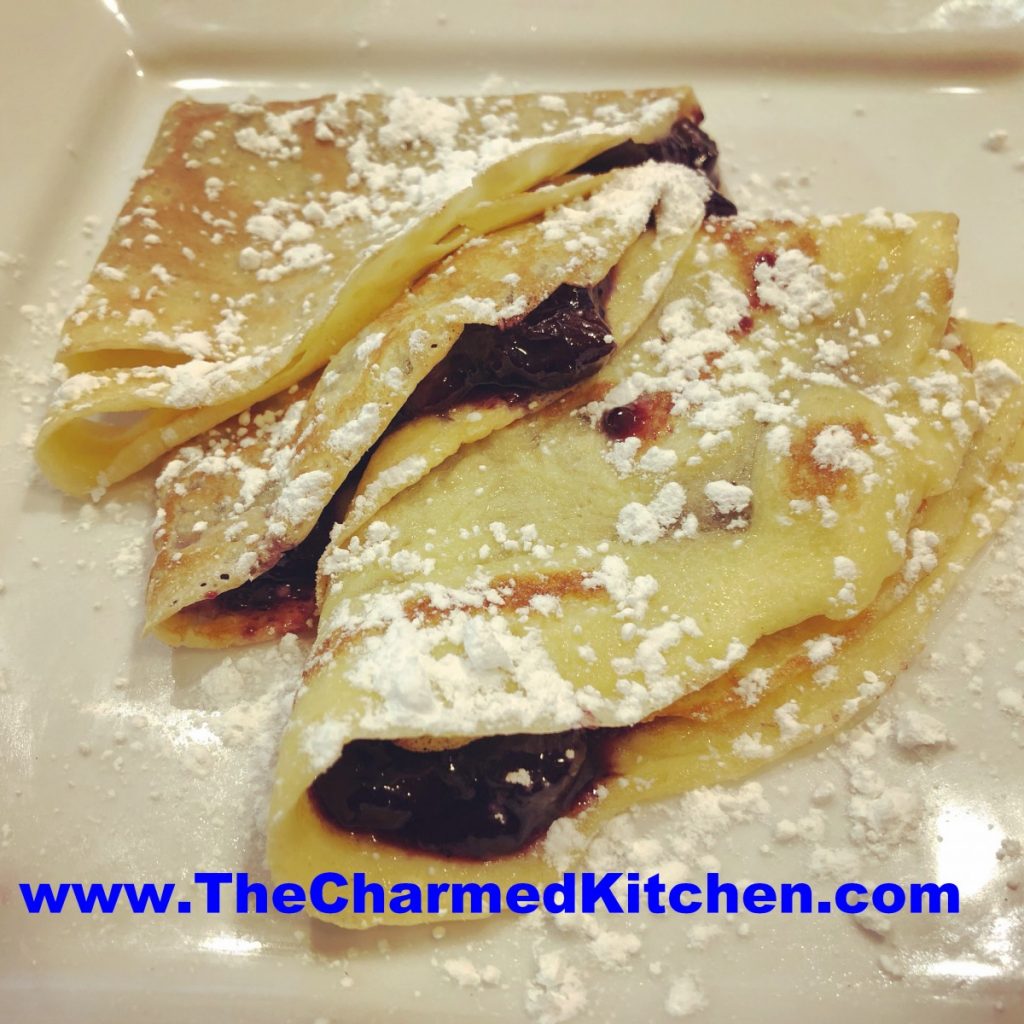
Mom’s Crepes
I should make crepes more often. Crepes are so versatile. They taste great, too. Crepes are one of those foods that everyone seems to love, but very few love to make them. I hear that all the time. There is some sort of irrational fear of crepe-making that I hope to dispel.
Crepes aren’t hard to make. Once you make a couple, you fall into a sort of rhythm. I do. I use a tiny sauce ladle to portion out the batter. In it goes. I tilt the pan to get an even, thin coating over the bottom of the pan. It just takes a couple of minutes for the crepe to brown lightly. A flip of the spatula, another minute or two- done. Then on to the next.
I always think about my Mother when I make crepes. I loved watching her make them. One after the other- all perfect. She said the first crepe never worked. She said there is a crepe “tradition” that the first crepe of the day always looks like an amoeba. So if this happens to you- just keep going. They get easier to make, I promise. You get into a sweet spot where the pan is the right temp, you are putting the right amount of batter in. Once this happens, you’ll have a stack of perfect crepes in no time at all.
I made a classic recipe- the same recipe my mom used. I have other recipes for crepes, but this one is a sentimental favorite.
These crepes can be filled with either sweet or savory ingredients. I made a blueberry filling for some of the crepes, then froze the rest to use as pancakes for moo shu duck. You can just smear the crepes with you favorite jam or jelly, fold and enjoy.
So here is the recipe for both the crepes and the blueberry filling.
Mom’s Crepes
3/4 c. flour
1/8 t. salt
3 eggs, beaten
2 T. melted butter
3/4 c. milk, approximately
Butter or oil for pan
Beat together flour, salt and eggs until smooth. Stir in melted butter and then stir in milk until batter consistency is that of cream. Let stand for 30 minutes before using, or can be refrigerated, covered, overnight. Beat again, just before using.
Heat 6 or 7 inch skillet. Brush with butter or oil and pour in about 2 tablespoons of batter, tipping pan to cover bottom of pan completely with batter. Cook until edges start to brown, turn over and cook until lightly browned (about 2 minutes per side.) Remove to a plate and repeat with remaining batter.
Crepes can be made day ahead. They can also be frozen. To freeze, layer crepes between sheets of waxed paper and wrap in plastic wrap of place in a freezer container or freezer bag. Freeze. Makes 12.
Crepes can be filled ahead or guests can fill their own. Fillings can be served warm or cold. These crepes can be filled with either sweet or savory fillings.
To make the blueberry crepes: Lay a crepe on work surface. Spoon about 2 tablespoons of the blueberry compote onto one half of the crepe. Fold in half, then fold again to create a fan shape. You can also spread the filling all over and roll up the crepe instead. Serve dusted with powdered sugar, if you like. You can also serve with whipped cream or ice cream.
Blueberry Compote
2 pints fresh or frozen blueberries
Zest of 2 oranges
Juice of two oranges
¼ c. honey
Pinch of salt
Place all ingredients in a medium saucepan and cook, over medium heat, until berries soften. Continue cooking, over medium low heat, until most of the liquid has cooked off and mixture thickens. Stir from time to time, to prevent sticking. Watch more closely as mixture cooks down. If you like a sweeter product, you can add a little sugar. Set aside until ready to use. Can be spooned into crepes warm or at room temp. Makes about 2 cups.