Smoky Squash Soup
Smoky Squash Soup
I had this Hubbard squash……It was a really big squash, but it had a nick, and needed to be cooked up soon, before it spoiled. I took a large cleaver to it and was able to get it open.
When they call winter squash hard squashes, they had to have Hubbard squash in mind. My sister, Cindy, tosses her Hubbards off her deck to break them open. I hacked at it and was able to get reasonable sized chunks. I scraped out the seeds and placed the pieces in a large baking pan. I added a little water, covered the pan with foil, and baked it until the pieces were fork tender. It took about an hour. Once the pieces were cool enough to handle, I scooped out the flesh, and ran it through my food mill. I ended up with a gallon of cooked squash.
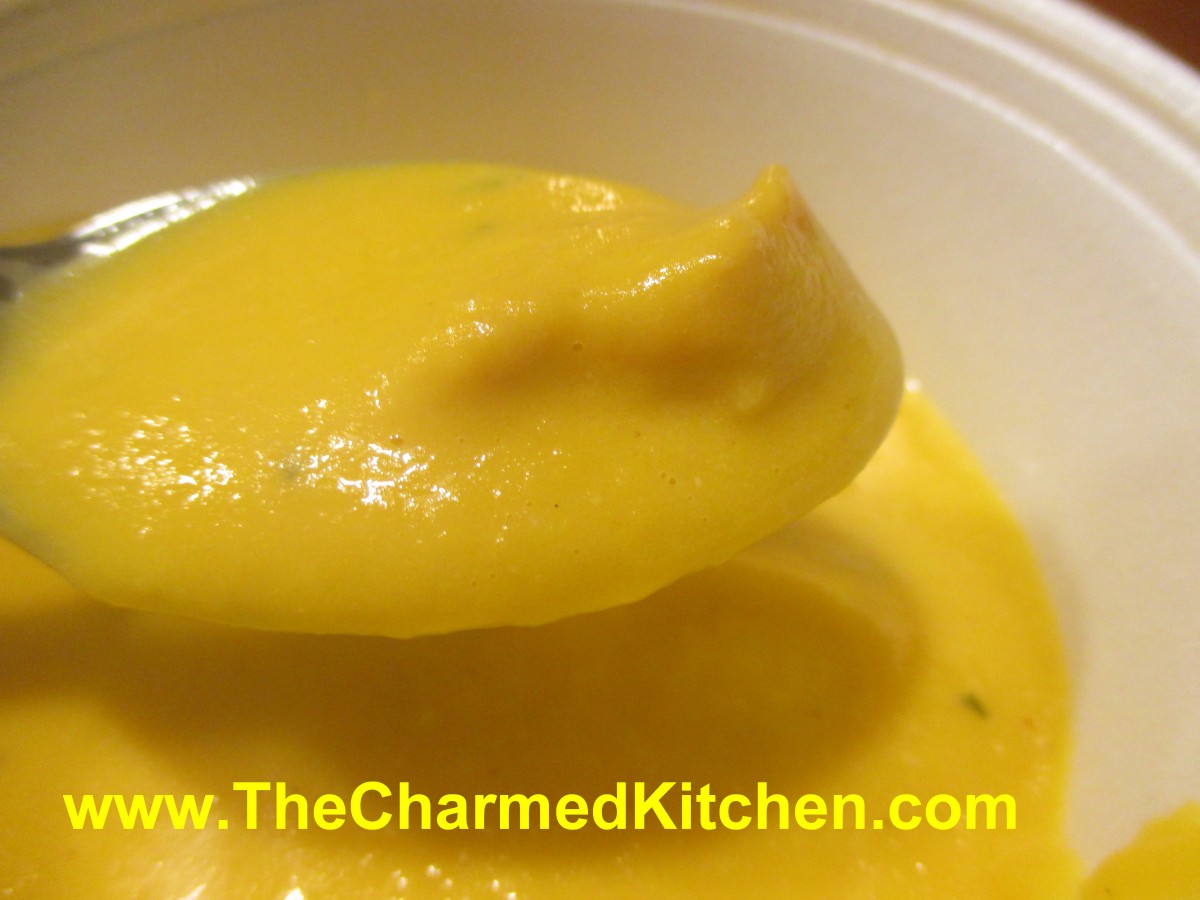
I will freeze some of it, but I made this soup to share with friends this weekend. The soup actually had a lot more than just squash in it. A mix of veggies, simmered with smoky ham, then pureed and finished with half and half, the soup was creamy and full of flavor. It turned out just great. It made a big batch, but it freezes well so you can have some whenever you want. I think my friends are going to really enjoy it.
Smoky Squash Soup
2 qts. water or chicken or veggie stock
2 lbs. uncooked smoked turkey on the bone, or a ham bone with lots of meat
2 onions, peeled and halved
3-4 large carrots, peeled and chunked
1 cauliflower, cut into flowerets
2-3 ribs celery, sliced
1-2 sweet red peppers, seeded and cut up
1 can (about 14.5 oz.), tomatoes – I used a pint of home canned tomatoes
4 c. cooked winter squash- or you could use pumpkin
2 c. half and half
2 T. Italian Seasoning ( I like Tuscan seasoning, recipe follows)
Salt and pepper to taste, plus a healthy dash of hot sauce
Place all ingredients, except seasonings, in a large pot and bring to a boil. Cover and simmer until vegetables are very tender and meat is cooked and tender, at least 1½ hours and up to 3 hours. Remove meat to cool and add half and half and herbs. Use an immersion blender to puree the vegetables. It does not have to be completely smooth, but it should be close. Adjust seasonings if needed. If you like, cut the meat off the bones and return meat to the chowder. I used a ham bone- so I had the smokey flavor, but not a lot of meat. I think the soup is just fine without it. Serves 10+.
Note: I make it in even larger batches because this soup freezes well. You can add other vegetables like corn, potatoes, green beans or whatever else you have around. I often add cabbage and zucchini. If you want thicker chowder add a potato or two to the recipe. You can also add smoked sausage, if you like. Just remove the sausage, puree the chowder, slice sausage and return to the pot. I also use leftover chicken or turkey and just add a little liquid smoke for another way to get the smoky flavor. This is also a good way to use up a ham bone or leftover ham or turkey ham.
Tuscan Seasoning
½ c. dried basil
½ c. dried oregano
½ c. dried marjoram
3 T. dried minced onion
2 T. dried minced garlic
2 T. dried rosemary
2 T. dried parsley
1 t. crushed red pepper
Use this blend in tomato sauce or other Italian dishes. Also, you can add to vinegar and oil with a little salt, if desired, to make a quick salad dressing.
Maple-Glazed Apple Bacon Fritters

Maple-Glazed Apple and Bacon Fritters
This time of year, with apples in season, it is fun to use them in all sorts of recipes. I’ve made an assortment of both sweet and savory dishes with them. This is one of my favorites. What could be better than combining apples with bacon in a sweet treat? The sweetness of the apples pairs so well with the smoky/saltiness of the bacon.
Fritters aren’t difficult to make. They really don’t take that long to make, either. I prefer to make them close to when I am serving them- so my guests can enjoy them warm.
They make a wonderful dessert, or a fun addition to a breakfast or brunch menu. I dipped them in the maple glaze, which also went well with the apples and bacon.
I must warn you, they are addictive.
Apple and Bacon Fritters
2 c. flour
2 T. sugar
2 T. baking powder
1/2 t. salt
1 c. milk
2 eggs, beaten
2 T. melted butter
1 c. diced apples
1 c. cooked, crumbled bacon
oil for frying- I used coconut oil
Combine dry ingredients and set aside. Mix together milk with the eggs and butter. Stir in dry ingredients until just moistened and add the apples and bacon. Heat oil to 375. If using gluten free flour, heat oil to 350. Drop dough by tablespoonfuls into the hot oil and fry until golden brown. Don’t do more than 4-5 at a time. It will take about 4 minutes in total but you need to turn them to brown evenly so 2 minutes per side. Drain on paper towels. Dip in maple glaze (recipe follows) while warm. Makes about 32.
Maple Glaze
1 c. Powdered sugar
1/2 c. maple syrup
a little water if mixture gets too thick
Combine all ingredients and set aside until ready to use.
Winter Squash Ravioli Soup

Squash Ravioli Soup
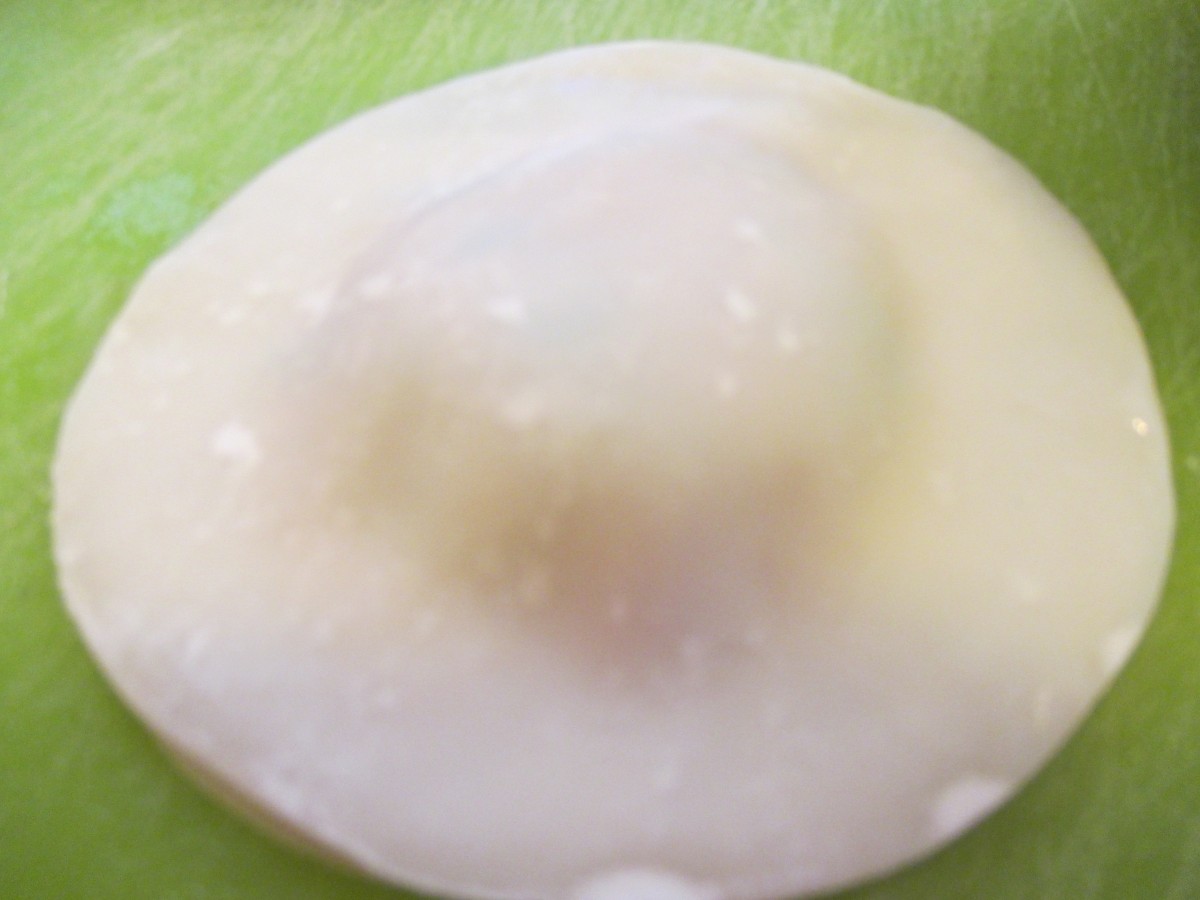
After cooking up a Hubbard squash, I was looking for a way to use some of it in a soup. It is chilly here and I was in the mood for soup, but I wasn’t in the mood for a pureed soup. I found inspiration in my freezer. I was putting some of the squash in the freezer, when I noticed a package of won ton wrappers. I decided to use the squash as a filling for ravioli, then just put the ravioli in the soup. I played with the spices and added some butter to the filling, too. It needed that extra bit of fat for flavor. It worked well. I just cooked the ravioli right in the soup, but you could also enjoy them without soup at all. You can just cook the ravioli in water. Once they are tender, drain and top with the sauce of your choice. I like brown butter with a little sage, but even a red sauce would be nice with the ravioli. Here is the recipe- for both the ravioli and the soup. Almost any winter squash or pumpkin could work in the filling, too.
Squash Ravioli Soup
Ravioli:
24 round won ton/dumpling wrappers
Filling:
1 cup cooked winter squash or pumpkin
2 T. softened butter
1 T. chopped parsley
1 t. paprika
1 t. nutmeg
½ t. garlic powder
Salt and pepper to taste
Pinch of cayenne
Soup:
2 T. oil or butter
2 onions, peeled and sliced
6 c. stock- chicken or veggie
3-4 carrots, peeled and sliced
2-3 c. thinly sliced collard greens
Salt and pepper
Dash of hot sauce
Fresh chopped parsley
Combine ravioli filling. Adjust seasonings. Place a rounded tablespoonful of filling on one of the wrappers. Dampen edges with water and place another wrapper on top. Seal, pressing out as much air as possible. Continue with remaining filling and wrappers- you should have 12 raviolis in all. Set aside while making the soup.
Heat oil or butter in a pot and add the onions. Cook until onions are tender. Add stock and bring to a boil. Add carrots and collards and cook until veggies are tender. Add seasonings and bring soup to a boil. Add the raviolis and let the soup simmer gently until they are cooked- about 4 minutes. Stir a little to keep them from sticking, but gently. They get a lot bigger and are sort of delicate. Transfer gently with a large spoon to soup bowls and ladle over the soup. Serves 4- 6.

Classic Apple Cake
Classic Apple Cake
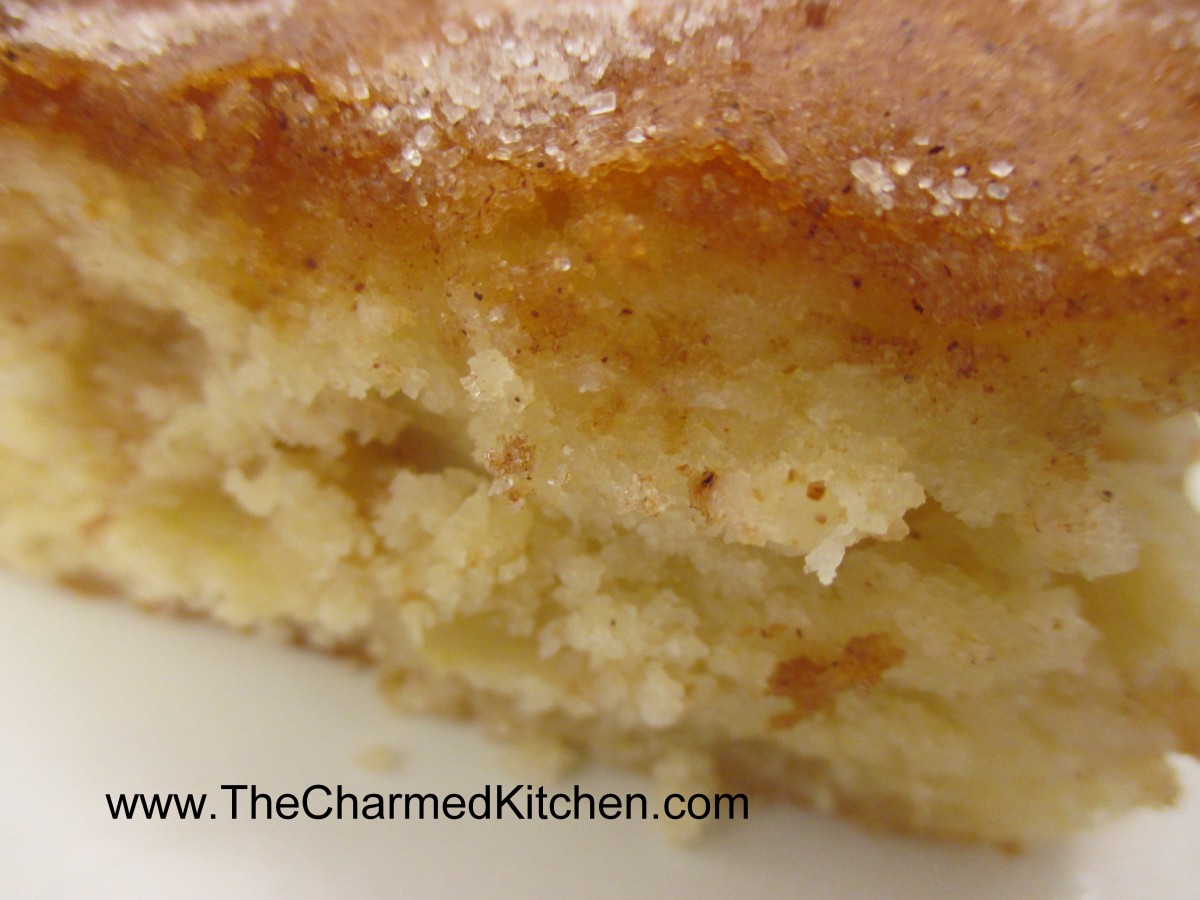
I have posted this cake recipe in the past. It truly is my favorite apple cake ever. I had a request for this recipe yesterday, so here it is. I’ve had this recipe since I was a kid. My Aunt Josie gave it to my mom. Not sure where she got it but it has been a family favorite since we first made it. It’s a simple recipe that comes out moist and flavorful. I normally bake it in a 13×9- inch pan but it can also be baked in a Bundt pan. While the recipe calls for cinnamon sugar- I sometimes add a little fresh ground nutmeg, too. Pretty much any apple works in this recipe- except maybe Red Delicious. Perfect for dessert or even served with brunch. Who am I kidding? I would eat this cake for breakfast.
Note: The batter is really thick. Don’t think you’ve done something wrong.
Classic Apple Cake
1 c. oil
4 eggs
1 t. vanilla
1/3 c. orange or lemon juice
Combine above ingredients and set aside.
Mix together the following dry ingredients. Make a well and stir in egg mixture to make a stiff batter.
3 c. flour
2 c. sugar
3 t. baking powder
¼ t. salt
Mix ½ c. sugar and 2 t. cinnamon and set aside
Peel, core and slice 4 medium apples.
Grease a 9×13 inch pan or a Bundt pan. Preheat oven to 350-degrees. Place ½ of batter in prepared pan. Arrange apple slices on batter and sprinkle on ½ of the cinnamon mixture. Pour on remaining batter and sprinkle with remaining sugar mixture.
Bake 1-1 ½ hours. One hour for 13×9-inch pan and 1 1/2 hours for Bundt. I find that sometimes it takes less than an hour- check at 50 minutes.
Caramel Pumpkin Scones
Caramel Pumpkin Scone
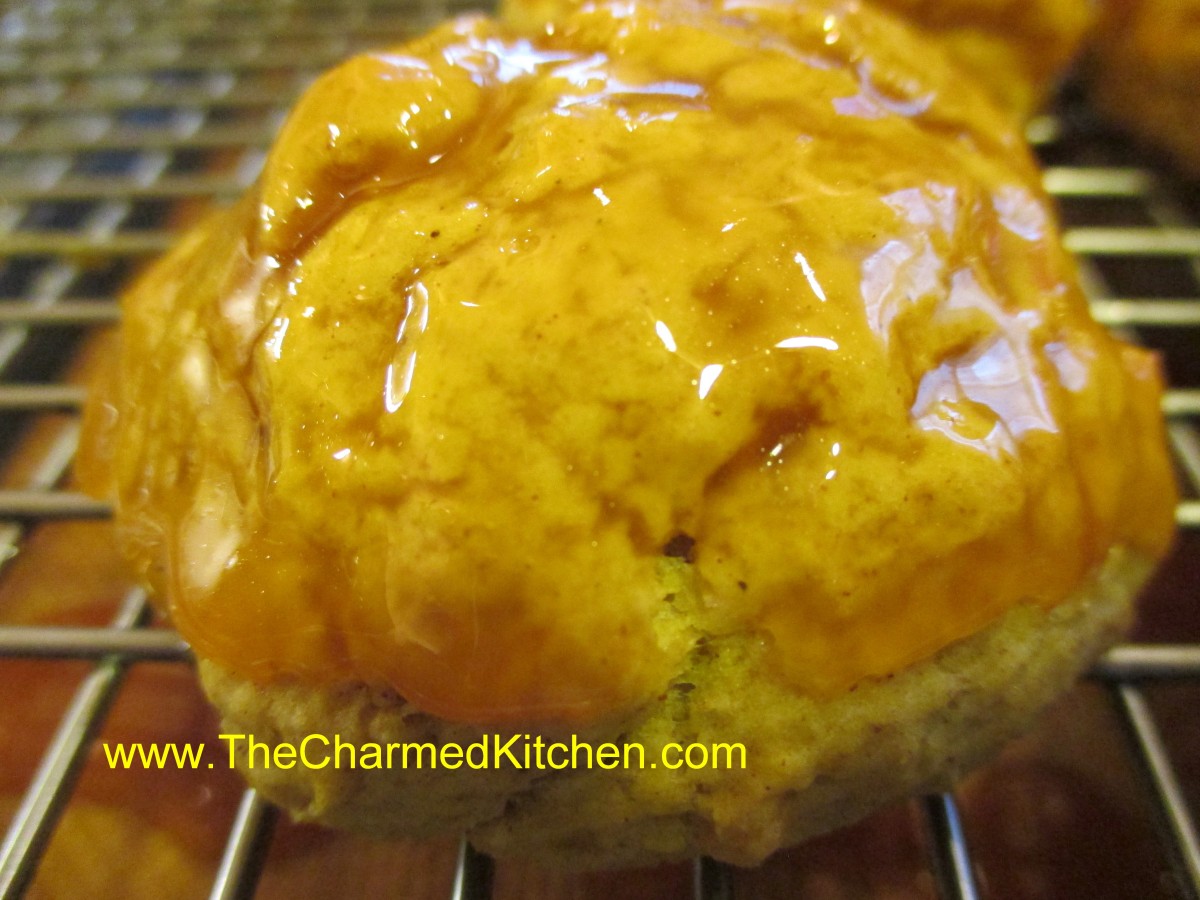
I love the flavor of these scones, but also their sort of rustic appearance. The soft dough is dropped by spoonfuls onto baking sheets. I use an ice cream scoop to do this. They rise up into tender, slightly sweet scones, with cracks over the surface. I have made these before and normally top them with a powdered sugar glaze. For some reason, I wanted something a little different for the topping. I decided to make a vanilla flavored caramel instead. It worked out well and I will do this again. These make a great breakfast or brunch dish or a nice base for a shortcake dessert.
Here is the recipe.
Caramel Pumpkin Scones
4 c. all purpose flour
1/2 c. sugar
1 T. baking powder
1 t. each salt, cinnamon, allspice, nutmeg and ginger
1/2 t. cloves
1 1/2 sticks cold butter
1 c. cooked pumpkin or winter squash
3 oz. milk
2 eggs
Caramel:
2/3 c. sugar
3 T. butter
2 t. vanilla
Preheat oven to 400. Lightly grease 2 baking sheets or line them with parchment paper. Set aside. Combine flour with sugar, baking powder and spices and stir to blend. Cut in butter until the mixture looks like coarse crumbs. Combine pumpkin or squash with the milk and eggs and stir into the flour mixture. Stir until well mixed. Dough should be just a little sticky. Use an ice cream scoop to scoop dough onto the prepared baking sheets- leaving a couple of inches between them. Hint: If you spray a little non-stick spray on the cookie scoop first the dough will pop out easier. Bake for 15 minutes or until scones are browned on the bottom and just getting golden on the top. If you want to put both baking sheets in the oven at the same time- switch them half way through the baking time and allow a few extra minutes. Remove scones to cooling rack.
Meanwhile make caramel by placing the sugar in a small saucepan and cooking over medium heat until sugar has melted and turned a golden color. Remove from the heat and stir in butter and vanilla. Mixture will bubble a lot. Keep stirring until smooth. Mixture is really hot. You can hold the scones and dip the tops in the warm caramel mixture or use a spoon to drizzle the caramel over the top. If you are dipping the scones transfer the caramel into another container- the saucepan will be hot and make it tricky to dip them without getting burned. I used a shallow metal bowl and it worked great. Caramel will be very shiny and sticky but will cool down and become less shiny and sticky. Makes about 20-30 depending on the size of the scoop you use.
Autumn Cabbage with Apples
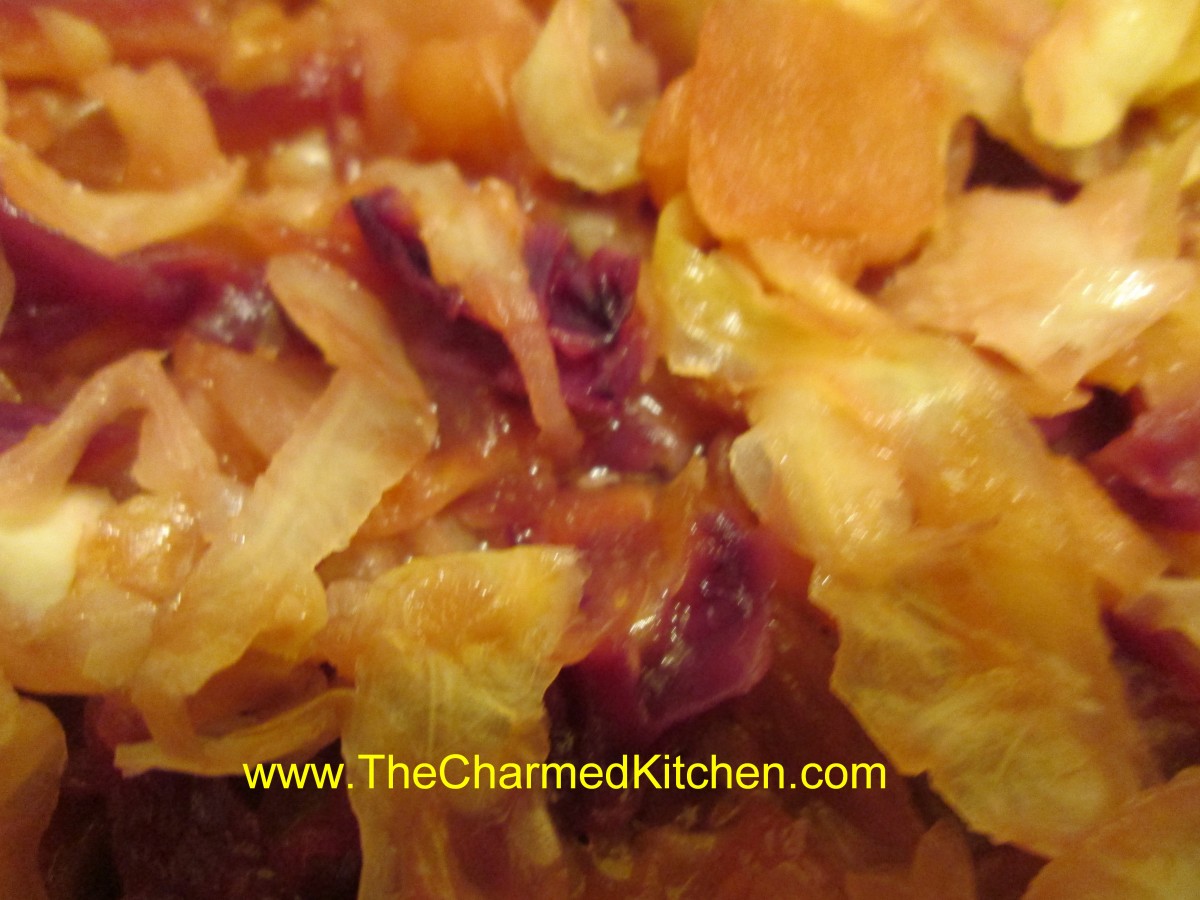
Autumn Cabbage with Apples
I think cabbage is underrated. It is such a versatile vegetable. Cabbage is good in both hot and cold dishes, it isn’t expensive, and cabbage is good for you. I was looking for a side dish for a duck dinner the other night and I decided to start with cabbage. Since I had a pretty good sized head of green cabbage and just a small piece of red cabbage, I mixed the two together. I added cider vinegar, sugar and seasonings. Then I added apples to round out the dish. It had a sweet and sour flavor that went well with the duck. I’d also serve this as a side dish with ham, pork or even a lamb roast. It would go well with any of them. You could use any color cabbage for this dish- or combine colors, as I did. Perfect for a Fall dinner.
Autumn Cabbage with Apples
2-3 T. oil
2-3 onions, sliced thin
8 c. chopped cabbage, any color
1 c. stock- chicken or vegetable stock
1/2 c. apple cider vinegar
1/4 c. sugar
1 t. celery seeds
3 apples, peeled , cored and diced
salt and hot pepper sauce to taste
Heat oil in skillet and cook onion until tender and a little wilted. Add cabbage, stock, vinegar, sugar and celery seeds and cook until cabbage is tender. Most of the liquid will evaporate. Add the apples and cook until apples are just heated through. Season with salt and hot sauce and serve. Serves 5-6.
Pink Applesauce
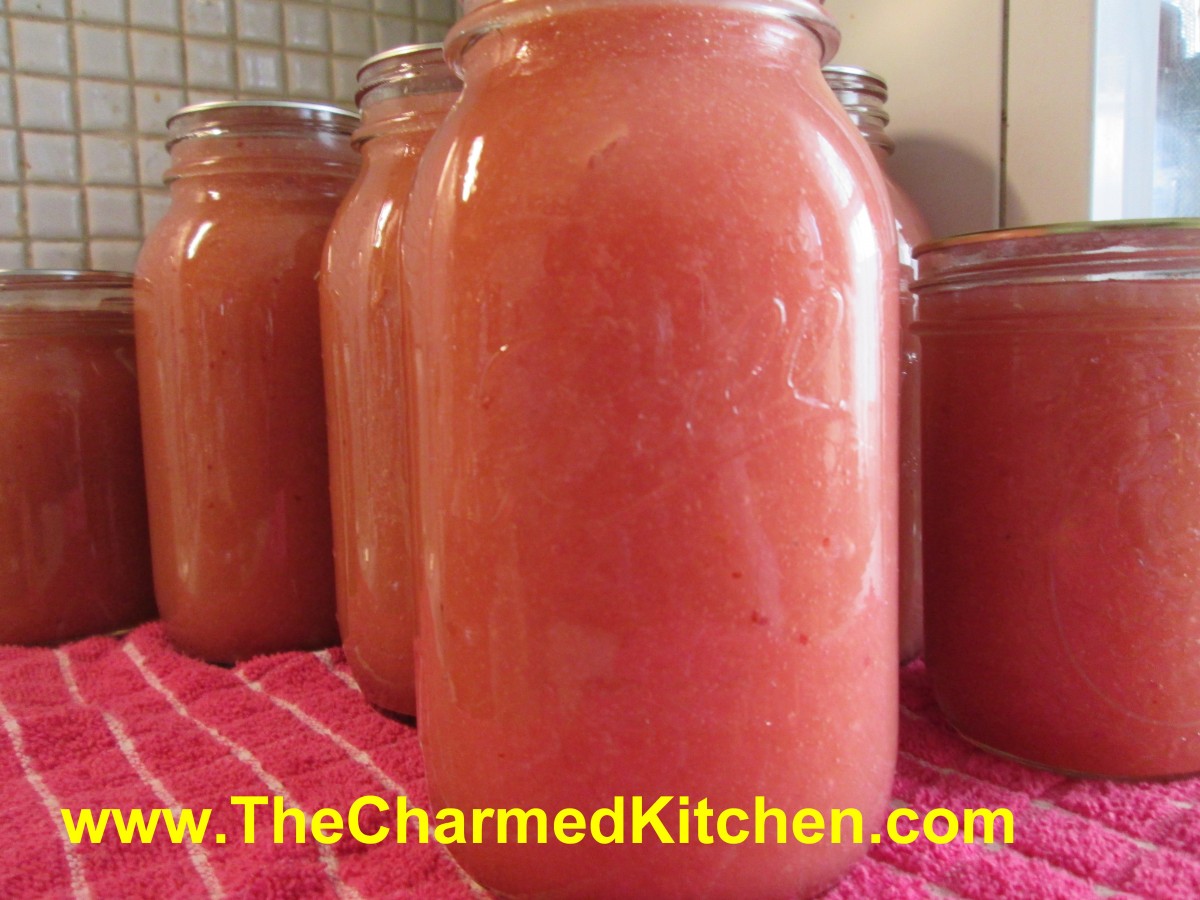
Pink Applesauce
Inspired by some of my canning friends, who add all sorts of other fruits to their applesauce, I decided to mix things up a little by making applesauce with cranberries. It came out a pretty shade of pink. The cranberries also added nice tartness to the mix. Doing it over, I would add another bag of cranberries, perhaps. The nice thing about applesauce, is you can make any amount, depending on how many apples you happen to have. You can also freeze the mixture if you don’t want to can it.
Pink Applesauce
60 medium apples, I used mostly Melrose and some Jonathans
12 oz. cranberries
water
1 c. lemon juice
sugar to taste
Peel and core apples. Put in water with some ascorbic acid, citric acid or lemon juice to prevent discoloration. Place apples in a pot with enough water to prevent sticking and add the cranberries and lemon juice. Cook over medium high heat until soft. I wanted smooth applesauce, so I ran the cooked apple mixture through a food mill on the medium blade. Return apple mixture to pan and bring to a boil. Sweeten with sugar, if you like, or leave unsweetened. Have water bath full of boiling water and have hot, clean canning jars and lids and rings ready. Ladle hot applesauce into hot jars, leaving 1/2 inch of headspace. Wipe rims and apply lids. Process in a boiling water bath for 20 minutes for pints or quarts. Turn off heat and let jars stand in water bath 5 minutes before removing. Set in a draft free area to cool down. Yield: 8 quarts 0r 16 pints.
Apple Pie Blintzes

Apple Pie Blintzes
Since I posted the recipe for making your own apple pie filling yesterday, I thought I’d share a fun way to use it- other than in a pie. I made blintzes with the pie filling. I used flour tortillas for the crepes.
I soaked the tortillas in milk – actually I soaked them in almond milk because that is what I had- but you could use regular milk if you prefer. By soaking the tortillas in milk, they soften up and can be used like a crepe. Soak them for at least 10 minutes, or up to 30 minutes. I placed the tortillas in a shallow baking pan and made sure to drizzle each one with almond milk as I added them to the pan.
For the filling, I used some of my homemade apple pie filling. If you have fresh apples, you can just peel and slice the apples, then cook them in a little water and sugar until softened. You can make them as sweet as you like. You made need less sugar if the apples are extra sweet. Add some cinnamon and nutmeg, too. If they are too watery- combine a little cornstarch with cold water and drizzle the mixture in until the apples thicken up. Don’t add too quickly or you might them too thick and gummy.
To assemble the blintzes, place a softened tortilla on your work surface and spoon a little apple filling in the middle. You can do this with hot filling, or even make the filling ahead of time and use it cold. Don’t over fill them or you won’t be able to fold them up. I used 8-inch tortillas and used about 1/4 cup of filling for each one. Fold the sides in until they almost meet in the middle and them roll the tortilla up to cover the filling. Place seam side down until ready to fry them.
Heat butter in a skillet, and brown the blintzes over medium heat until lightly toasted on both sides. They will be crispy on the outside, but tender in the middle. Put on a serving plate, sprinkle with powdered sugar and serve while warm. These are fine just as they are, but feel free to add ice cream or whipped cream, too.
My guests really liked them and said they did not realize they were made from tortillas. I have made these before and use different fruit fillings. I’ve even made a cheese filled version a few times. It seems I usually have a package of tortillas, so it is a go-to dessert for me in a pinch.
Canned Apple Pie Filling
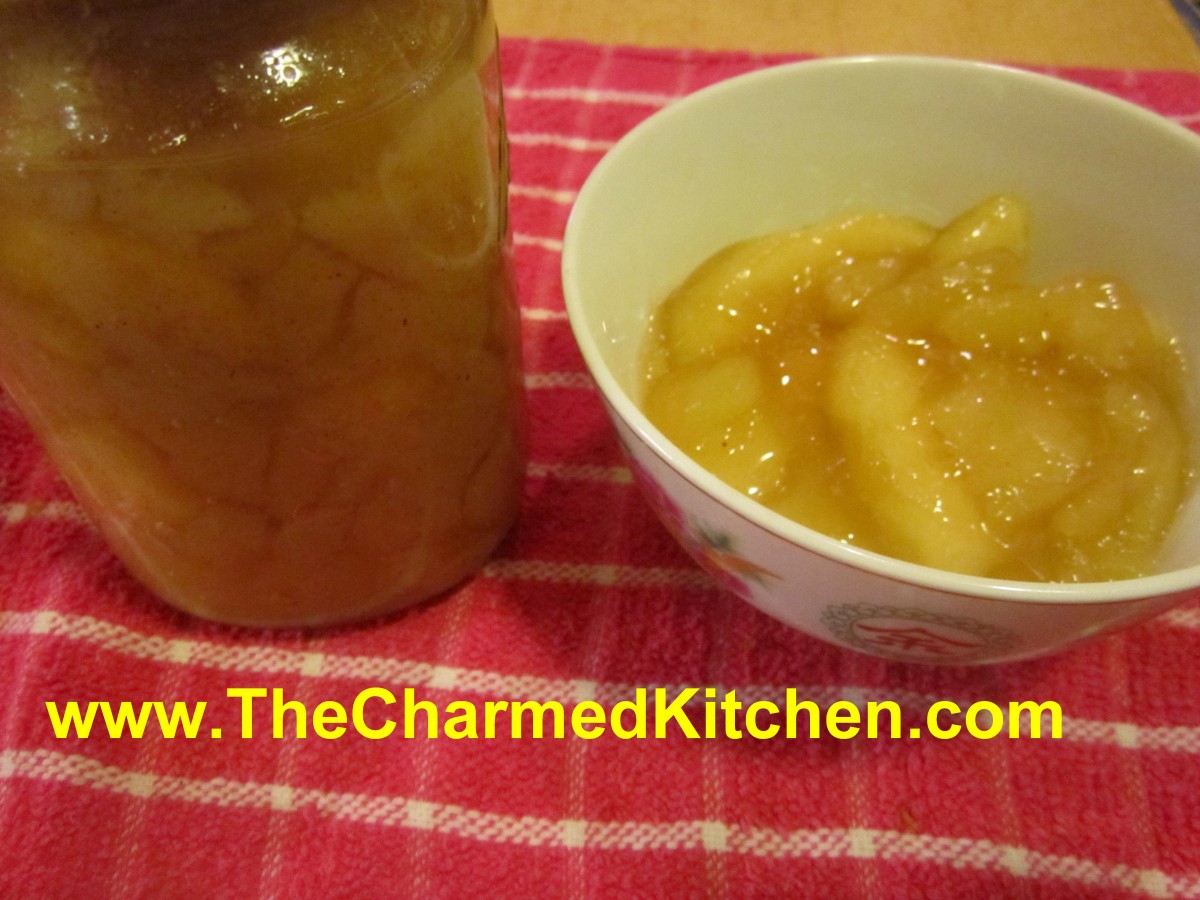
Apple Pie Filling
While I think the best pie is made with fresh apples, I also like making and canning my own apple pie filling. It is a handy way for me to enjoy local apples throughout the year. It is also a whole lot better than any commercial pie filling I have tried. Loaded with plenty of big chunks of apples and seasoned with cinnamon and nutmeg- I think it the next best thing to fresh apples for baking.
I use my canned filling to make pies, but I also use it for kolachy, blintzes, cakes and more.
The hard part, for some, is getting a hold of Clear Gel. It is a special type of cornstarch. I buy mine on line, but you can find it in stores where the Amish shop. Clear Gel stays thick, even if it is reheated. Regular cornstarch will not.
Here is the recipe I use. You can tweak the seasonings to suit your own taste, but keep in mind that spices sometimes get stronger when canned, so don’t go too crazy!!
Apple Pie Filling
6 qts. apples, sliced and blanched
5 1/2 c. sugar
1 1/2 c. Clear Gel- modified cornstarch available on line and in Amish stores
1 T. cinnamon
1 t. nutmeg
2 1/2 c. cold water
5 c. apple juice
3/4 c. lemon juice
If apples lack tartness use an additional 1/4 cup of lemon juice. Wash, peel and core apples and cut into 1/2 thick slices. Place in water treated with either lemon juice, citric acid or ascorbic acid to prevent darkening. Remove from solution and drain well. Blanch in boiling water- 2 quarts at a time- for 1 minute. As you finish each batch place in a bowl and cover to keep warm. In large pot combine sugar, Clear Gel, cinnamon, nutmeg, water and apple juice. Stir over medium heat until mixture begins to bubble and thicken. Add lemon juice and boil 1 minute. Add drained apples and stir gently to combine. Ladle into hot, clean jars leaving 1 1/2 inches of headspace. Remove air bubbles. Wipe rims and adjust lids. Process in a boiling water bath- pints or quarts for 25 minutes. After the time is up, turn off canner and let jars sit in water bath for 5 minutes before removing. This will reduce the chance of siphoning. Makes 7 quarts or 14 pints.
For only 1 quart
3 1/2 c.apples
3/4 plus 2 T. sugar
1/4 c. Clear Gel
1/2 t. cinnamon
1/8 t. nutmeg
1/2 c. cold water
3/4 c. apple juice
2 T. lemon juice
Rustic Apple Galette
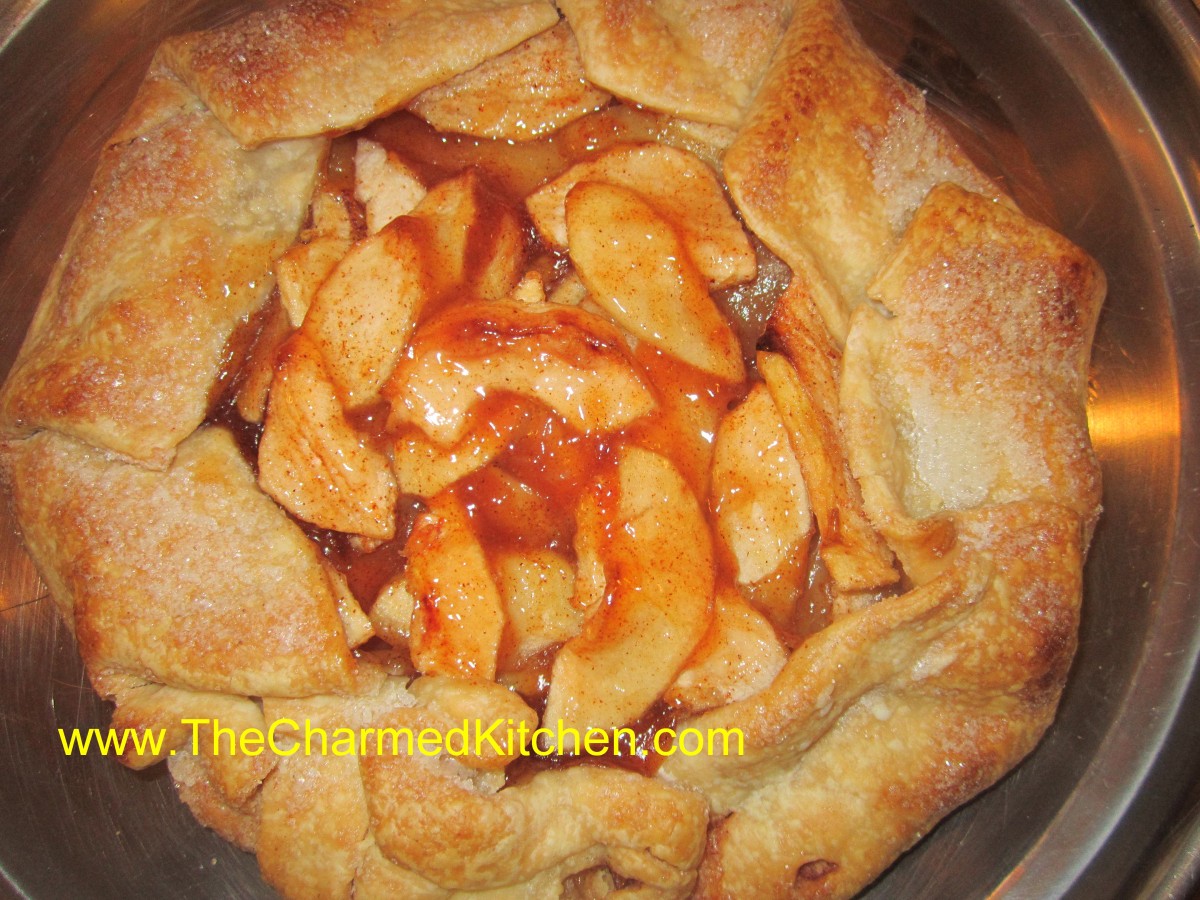
Apple Galette
If you like apple pie, you should like apple galette. I actually find a galette easier to make than pie. You don’t have to try to roll out your dough to fit into the pie pan. Instead, you roll out your pastry dough, fill the middle with apples, and fold the edges over. You can make it with other fruits, as well. With a galette, you don’t have to worry about rolling out a perfect circle of dough, either. That takes a lot of pressure off, if rolling a perfect circle of dough is not your best talent. I must confess to liking its rustic charm. I make my own crust, but you can used purchased crusts, if you prefer. You can serve your galette with ice cream, whipped cream or dusted with powdered sugar.
Apple Galette
Flaky Pie Crust
2 c. flour
1 t. salt
3/4 c. butter, chilled
1 T. cider vinegar
4-5 T. cold water
Combine flour and salt and cut in butter. Toss in vinegar and water 1 tablespoon at a time until dough holds together. Use a fork to toss the ingredients together and as soon as the mixture holds together stop adding water. Makes 2. Chill well before using.
Filling:
5-6 medium apples- I used Jonathan, Gala and Macintosh
2/3 c. sugar- plus extra for sprinkling
3 T. cornstarch
1 T. cinnamon
1 T. Lemon juice, plus extra for treating the apples
1 t. nutmeg
1 t. vanilla
1/2 t. salt
Prepare dough. Roll half the dough into a 10-inch circle- repeat with remaining dough. Keep covered with plastic wrap until ready to use. Peel and core apples and slice thin. Place apples in water with lemon juice added to prevent browning. Drain apple slices well and place in a bowl. Toss with the sugar, cornstarch, lemon juice and seasonings. Place one of the crusts on a baking sheet. Pile half of the prepared apples on the center of the crust. You should have about a 2-inch circle of dough around the edges that is uncovered. Fold edges of the crust up over the apples pressing lightly to hold in place. Sprinkle with a little extra sugar. Repeat with the remaining crust and apples. You will have a little liquid in the bowl from the apple mixture- save that for now. Place the galettes in a preheated 425 degree oven and bake for 15 minutes. Turn down heat to 350 and bake for another 40 minutes or until crust is golden brown. While galettes are baking take the liquid left from the apples and cook in a small saucepan until thickened- it will take a minute or two. This will be used to glaze the galettes. When galettes come out of the oven brush the apples with the thickened glaze. Cool on wire rack. Makes 2.


