Soft Butter Cookies

If you are looking for a truly tender cookie, this may be it. These cookies are so delicate, they just melt in your mouth!!
The secret ingredient might surprise you. It is oil. Yes, I know I said butter cookies – they also contain butter. But the combination of oil and butter makes them soft and delicate, even days after baking.
They also contain both granulated and powdered sugar. Not your typical cookie recipe, for sure. This just may be my “go to” butter cookie recipe from now on.
You don’t have to chill the dough and they roll very easily, without sticking to your fingers. You could chill the dough, but let it warm up a little before rolling. The dough can also be made ahead and frozen- I tested it.
In camp the kidspressed the tops in colored sugars, nonpareils or sprinkles before baking. You can also bake them plain, then dip in melted chocolate and sprinkles or nuts after baking,
Soft Butter Cookies
1 c. butter
1 c. oil, I used avocado oil
1 c. sugar
1 c. powdered sugar
2 eggs
1 T. vanilla
1 t. baking soda
1 t. cream of tartar
½ t. salt
4 ½ c. flour id f dough is too soft, you might need to add a little more flour.
In mixing bowl, beat together butter, oil, sugars and vanilla. Once well blended, beat in eggs. Stir in the baking soda, cream of tartar and salt, then add the flour, mixing until well combined. Heat oven to 350 degrees. Roll dough into one inch balls and press tops of cookies in sprinkles or colored sugar, if desired. Place one inch apart on ungreased baking sheets. Bake for 12 minutes, or until light golden on bottom. Leave cookies on baking sheets 3 minutes before placing on cooling rack. Makes about 6 dozen cookies.
Sweet Cherry Vanilla Jam
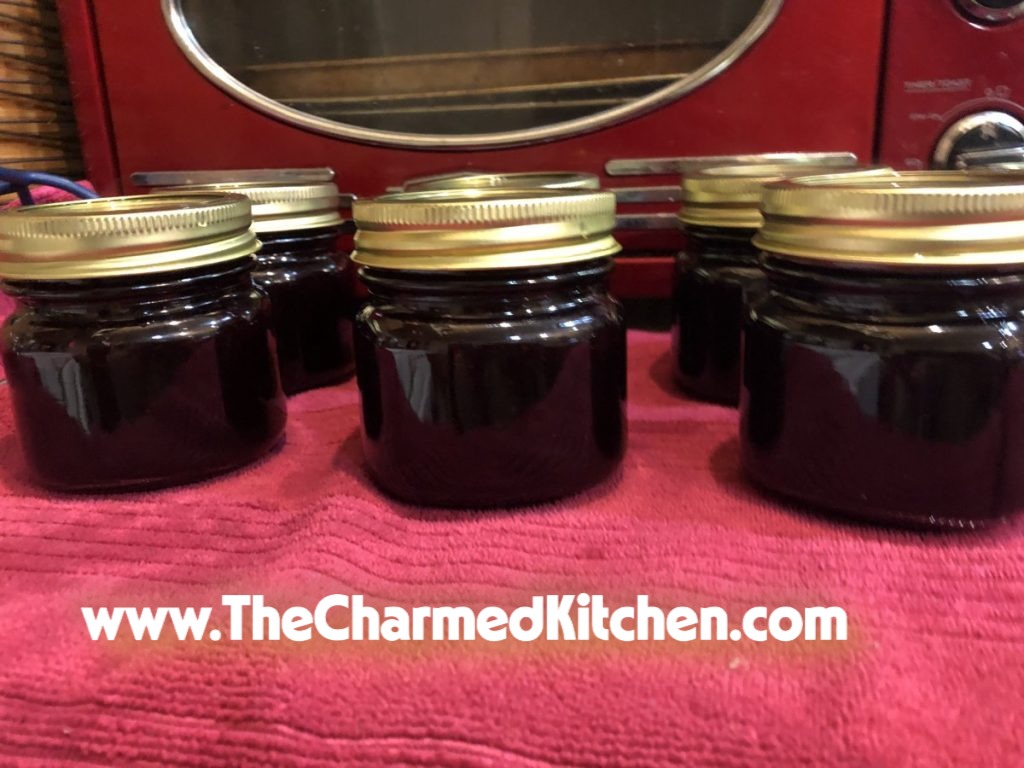
I look forward to cherry season every year. I love eating fresh cherries, but I also like to preserve them, to enjoy year round. One of my favorite things to make is cherry jam.
This must be a great year for cherries. They seem bigger than usual, and very sweet.
While I normally make jam from sour cherries, I knew the sweet ones would work. Besides the cherries, sugar and pectin, this jam also contains lemon juice and vanilla. Those extra ingredients give the jam a more complex flavor and a little bit of a tang.
This may be one of my favorite jams ever!!! I was worried it would be too sweet, but it isn’t. The flavor of the cherries comes through as well at the flavor of the vanilla and cinnamon. Thinking I made need to buy more cherries and make another batch….
Here is the recipe. Enjoy.
Sweet Cherry Vanilla Jam
4 c. chopped pitted sweet cherries, about 2 lbs.
6 T. powdered pectin
6 T. lemon juice
2 T. pure vanilla extract
4½ c. sugar
Wash jelly jars and lids and keep warm until ready to use. Place a large pot of water, with a rack, on to boil for the water bath. In large saucepan combine cherries with pectin, lemon juice and vanilla. Bring to a rolling boil, stirring often. Add the sugar and bring mixture back to a rolling boil, stirring often. Once the mixture gets to a full, rolling boil, cook for one minute longer, stirring constantly. Remove jam from heat and skim off any foam. Ladle hot jam into hot jars, filling to about 1/4 inch from the top. Wipe off rim and screw on the lids. Repeat with remaining jam. Process in a hot water bath for 10 minutes. Turn off heat and let jar sit in canner 5 minutes before removing. Remove from water bath and allow jars to cool. Yield: about 6 half pint jars of jam.
Adapted from The Ball Blue Book
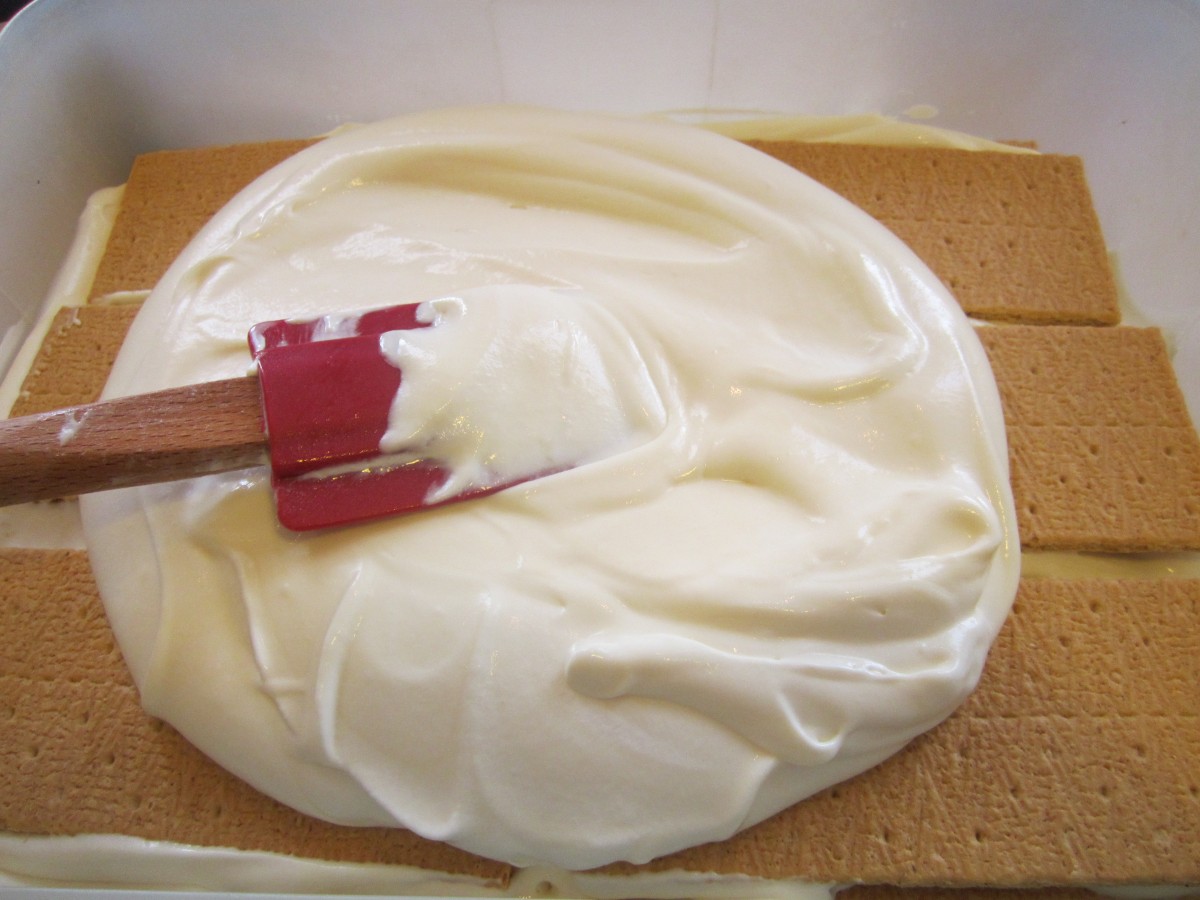
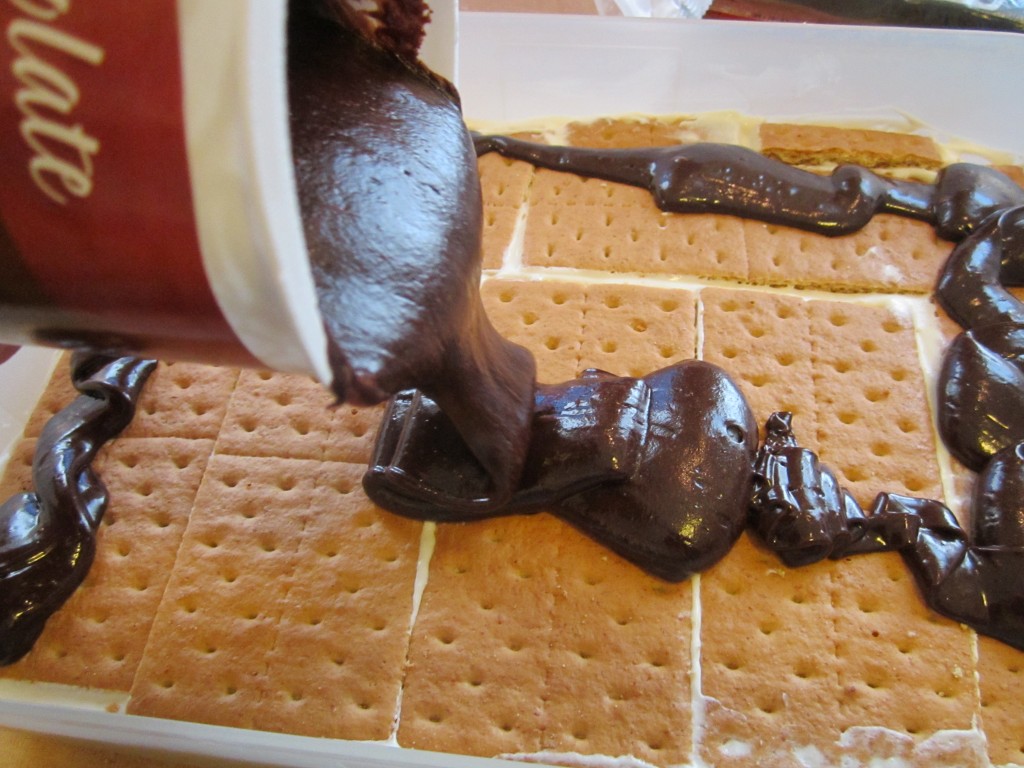
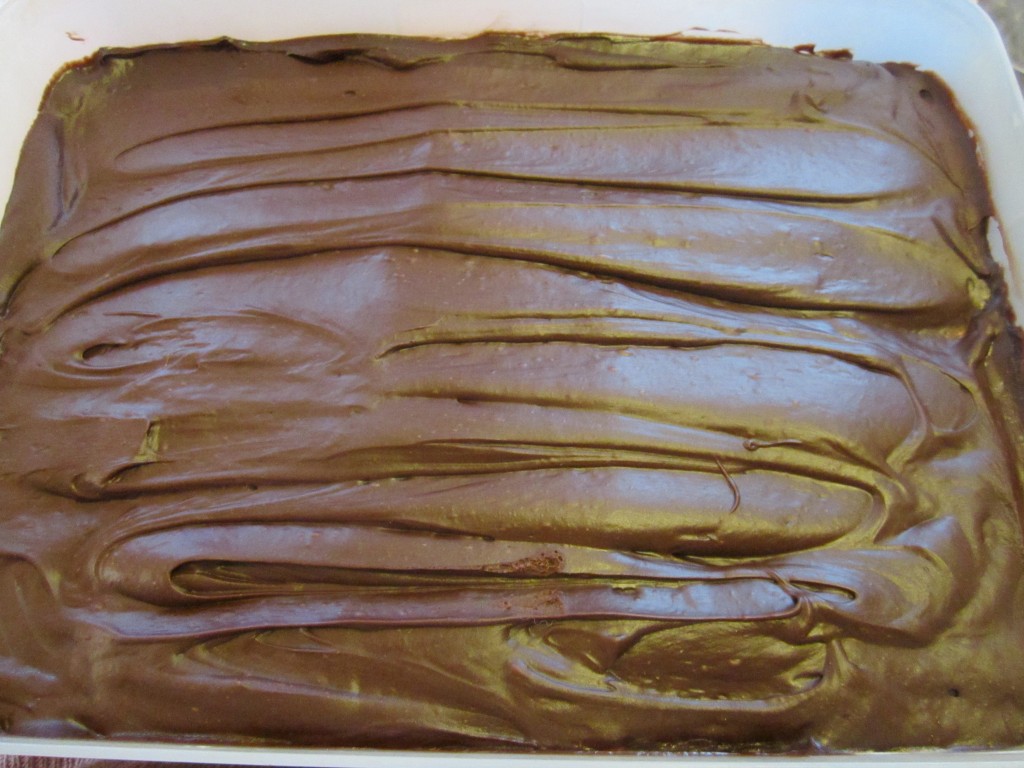
No Bake Chocolate Eclair Cake

This recipe has been around a long time. It’s very tasty and deceptively simple to make. For starters there is no baking involved. Nice when it is hot and you just don’t feel like turning on the oven.
The dessert itself is layers of graham crackers and a pudding and cream mixture with chocolate frosting to finish it off. You do need to assemble it a day ahead, so there is some planning needed, but no cooking. As the mixture sits, the crackers soften. When you serve the cake it cuts beautifully. The cake is supposed to remind you of an eclair, thus it’s name.
The original recipe calls for frozen whipped topping – like Cool Whip. You can easily substitute real whipping cream. That is what I do.
No-Bake Chocolate Eclair Cake
4 c. vanilla pudding
1 small container non-dairy whipped topping, thawed or 1 cup whipping cream, whipped
1 box graham crackers
1 can chocolate frosting or 1- 2 c. homemade chocolate frosting
Combine pudding and whipped topping or whipped cream and set aside. In 9×13 inch cake pan place 1 layer of graham crackers. Try to cover the whole bottom of the pan with the crackers, breaking them to fill in gaps, ff needed. Spoon half of the pudding mixture over the crackers and spread out evenly. Place another layer of graham crackers over the pudding mixture and then spoon on the remaining pudding mixture, smoothing evenly. Place last layer of crackers on top. Warm frosting slightly and pour over the top. Spread out evenly. Cover and refrigerate overnight. Serves 10-12.

Raspberry Crumb Cake
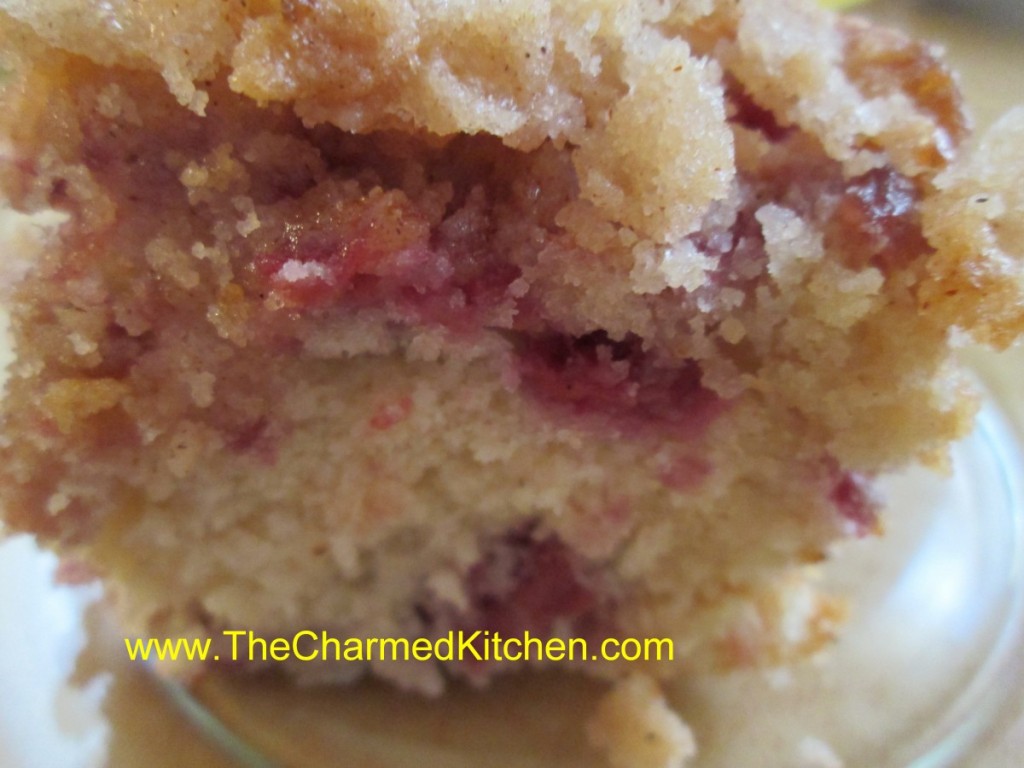
I picked up some beautiful local raspberries the other day. I love just eating them fresh, but I also wanted to do something more with them. I decided to bake this crumb cake.
The cake is delicate and not too sweet. The crumb topping really makes it special. It stands on its own, but is also good served with a drizzle of melted chocolate, some extra berries, or a scoop of ice cream. This cake always makes me think of the raspberries I grew up with.
When I was a kid, we had a patch of raspberries in the back of the yard. It was always a special treat to go out on a summer day and harvest raspberries, warm from the sun. We did lose berries to birds and squirrels and it became my Father’s mission to save as many berries as he could. When we got a new dog, my Dad was sure berry theft would go down. Oddly, we seemed to be getting even fewer berries. One day, my Mom caught the dog eating raspberries right off the plants. Mystery solved.
Today I grow black raspberries and golden raspberries. Enjoying some every day, but still competing with birds and squirrels.
I have made this cake with frozen berries, too. Either works, but I give the cake a few extra minutes to bake when I use frozen berries.
Raspberry Crumb Cake
For cake batter:
2 c. flour
2 t. baking powder
½ t. salt
½ stick (¼ cup) butter, softened
¾ c. sugar
1 egg
½ c. sour cream
2 t. vanilla
2 cups raspberries – I like fresh but frozen work
For topping:
½ c. sugar
¼ c. flour
½ t. cinnamon
½ stick (¼ c. butter, chilled and cut into bits)
Combine dry ingredients and set aside. In mixing bowl with electric mixer, beat butter and sugar until light and fluffy. Beat in egg, sour cream and vanilla. Add flour mixture gradually until just mixed in. Fold in raspberries. Grease and flour an 8 or 9-inch pan and add prepared batter. Combine topping ingredients until they resemble coarse crumbs. Sprinkle over batter in pan and bake in a preheated 375-degree oven and bake for 35-45 minutes. Use toothpick to test.
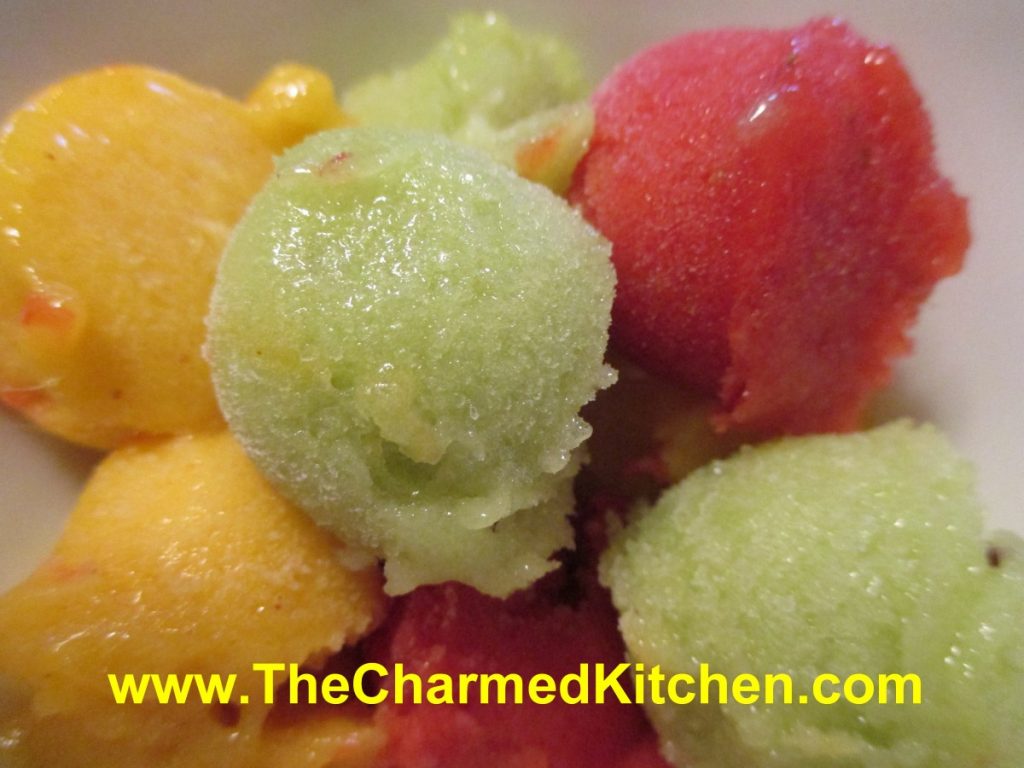
“Melon Ball” Sorbets
I remember making melon balls for fruit salad, when I was a kid. My mom showed me how. It always seemed like a special occasion when we made them. I had to learn how to use the melon “baller” to get pieces that were all perfect little rounds.
I will admit, I haven’t made melon balls in a long time, but I still like the way they look.
I used melon balls at the inspiration for this dish. Funny thing is- there isn’t any melon in the dish. I made three different sorbets- strawberry, mango and kiwi. Each one is meant to resemble a different melon- watermelon, cantaloupe and honeydew. You can, of course, make sorbet from melons. I just didn’t happen to do that. I used a cookie scoop to make the balls, then returned them to the freezer until ready to serve.
They can be served alone and make a light, wonderful dessert. You can add a scoop of ice cream or whipped cream, if you like. They can also be served with cakes or cookies. You can even add some to a glass of lemonade or a summer cocktail, just for fun.
This dessert is easy to make and a nice alternative to ice cream. Don’t get me wrong, I love ice cream, but sometimes I want something lighter. Nice for those who are lactose intolerant, too. Once made, you can have them on hand for dessert anytime.
Strawberry Vanilla Sorbet
2 c. fresh or frozen strawberries (allow frozen berries to thaw a little first)
1/4 c. sugar, or to taste
3 T. fresh lemon juice
1 t. vanilla
Place ingredients in food processor and process until smooth. Place in shallow pan and freeze. If you are using frozen berries re-freezing will take only about 1 hour. Up to 30 minutes before serving remove sorbet from freezer and allow to soften enough to break into chunks. Place in processor and blend again until very smooth. Return to freezer until needed.
Mango Honey Ginger Sorbet
2-3 large, ripe mangoes, seed and peeled
1/4 c. honey, or to taste
2-3 t. fresh grated ginger
Place ingredients in food processor and process until smooth. Place in shallow pan and freeze. Up to 30 minutes before serving remove sorbet from freezer and allow to soften enough to break into chunks. Place in processor and blend again until very smooth. Return to freezer until needed. For an even smoother sorbet, you can blend it another time.
Kiwi Lime Sorbet
6 kiwi, peeled
juice of 1 lime
1/4 c. sugar, or to taste
Place ingredients in food processor and process until smooth. Place in shallow pan and freeze. Up to 30 minutes before serving remove sorbet from freezer and allow to soften enough to break into chunks. Place in processor and blend again until very smooth. Return to freezer until needed.
To serve the sorbets, use a cookie scoop to make the “melon” balls. I made them as I was serving them, but you can also make the balls and return them to the freezer until ready to serve. They look better if made ahead and returned to the freezer to harden up a little. Then when you want to serve them, just grab them out of the freezer.
Mini Blueberry Crumb Cakes
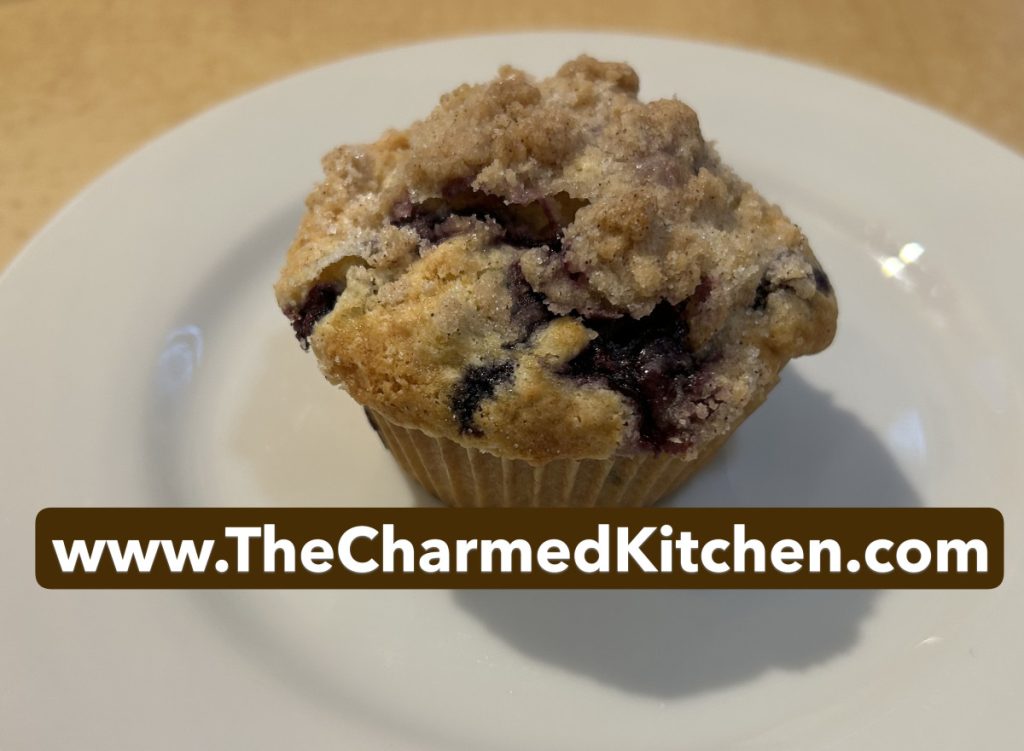
These cakes are small but pack a lot of flavor. I wanted a summery dessert for a recent dinner with friends. These blueberry crumb cakes were just the thing. I adapted my blueberry crumb cake recipe by baking it in muffin tins instead of in one larger pan. I wasn’t quite sure how many it would make. The original recipe bakes in a 9×9 inch pan. I knew 24 would be too many, but 12 seemed too few. I ended up with 13, but they were still too full. Fifteen was much better. Bake time was shorter. I could see baking these in small square pans. I had standard muffin tins, so that is what I used.
They have a wonderful crunchy topping you expect in a good crumb cake. They can be served as is, or perhaps with whipped cream or ice cream. They also travel well, so you can take them to your next cookout or picnic. Maybe even on a road trip. Just don’t let your kids eat them in the car!!!
Here is the recipe. Hope you give these a try.
Mini Blueberry Crumb Cakes
For cake batter:
2 c. flour
2 t. baking powder
½ t. salt
½ stick (¼ cup) butter, softened
¾ c. sugar
1 egg
½ c. milk 1 T. vanilla
1 pint blueberries, fresh or frozen
For topping:
½ c. sugar
¼ c. flour
½ t. cinnamon
½ stick (¼ c. butter, chilled and cut into bits)
Preheat oven to 375. Live 15 muffin tins with paper liners and set aside. Combine dry ingredients and set aside. In mixing bowl with electric mixer, beat butter and sugar until light and fluffy. Beat in egg, milk and vanilla. Add flour mixture gradually until just mixed in. Fold in blueberries. Batter with be thick. Divide the batter among the 15 muffin tins. Combine topping ingredients until they resemble coarse crumbs. Sprinkle over batter in pans and bake for 20-25 minutes. Use toothpick to test. Makes 15.
Lemon and Sour Cream Cupcakes
I love the lemon flavor in these cupcakes. They are rich, without being too heavy.
Lemon zest in both the batter and the frosting, really makes them special. Cupcakes are such a nice, easy dessert. If you try these, I am sure you will be pleased, as will your family and friends. These could be a nice dessert for Fathers’ Day.
It makes a big batch, so you can freeze some for later.
Even though I normally frost these, you can also just combine powdered sugar with a little lemon zest and dust them with it, instead of the frosting.
Lemon and Sour Cream Cupcakes
1 cup butter, softened
2 cups sugar
3 eggs
2 teaspoons grated lemon peel
1 teaspoon vanilla extract
3½ cups all-purpose flour
1 teaspoon baking soda
½ teaspoon each baking powder and salt
2 cups sour cream
Frosting:
9 tablespoons butter, softened
6 ¾ cups confectioners’ sugar
6 tablespoons lemon juice
1 T. vanilla extract
¾ teaspoon grated lemon peel
3 tablespoon milk
In a mixing bowl, cream butter and sugar. Beat in eggs, one at a time. Add lemon peel and vanilla; mix well. Combine dry ingredients; add to creamed mixture alternately with sour cream (batter will be thick). Fill 30 greased or paper-lined muffin cups with 1/4 cup of batter. Bake at 350 degrees for 25-30 minutes or until a toothpick inserted near the center comes out clean. Cool for 10 minutes; remove to wire racks to cool completely. For frosting, cream butter and sugar in a small mixing bowl. Add lemon juice, vanilla, lemon peel and milk; beat until smooth. Frost cupcakes. Makes 30.
Strawberry Ice Cream Cake Roll
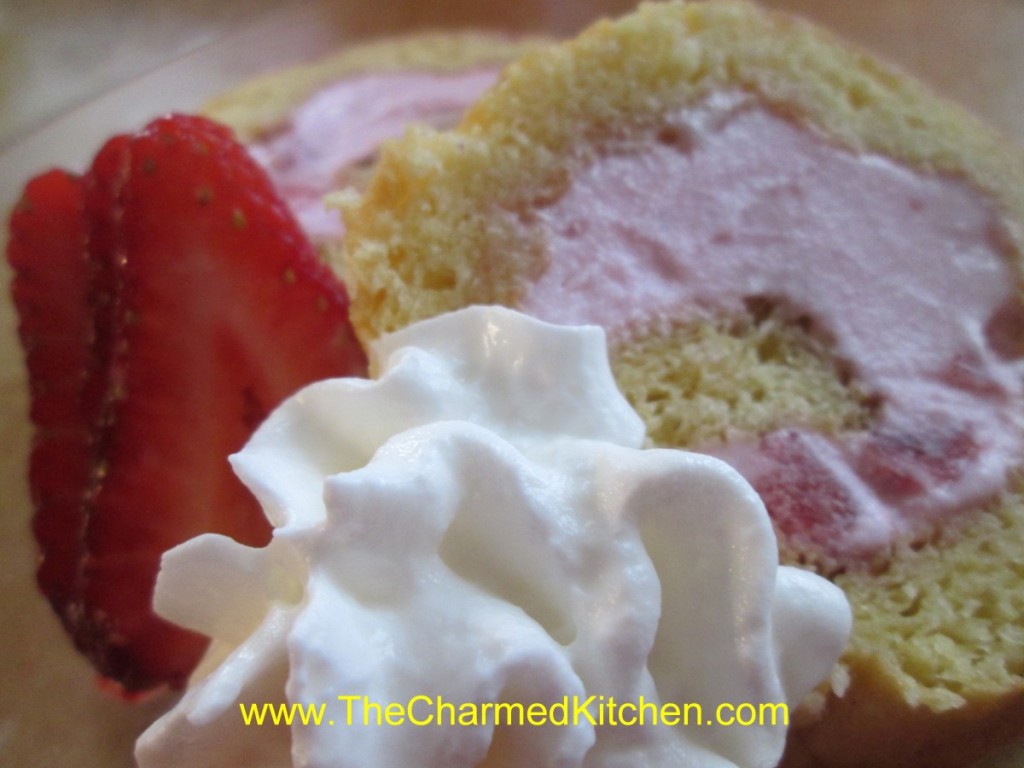
This is the perfect summer dessert. Fresh berries, a light, citrus-scented cake and ice cream. What more could you want?
When you say cake roll, I think a lot of people first think of a pumpkin roll or perhaps a Buche de Noel (yule log). There are so many more desserts you can make with them. Cake rolls can be made in many flavors and they can be filled with custard, frosting, fruit, ice cream and more.
For this sponge cake roll, I used homemade strawberry ice cream to fill it, recipe follows. You could use store bought ice cream, if you prefer.
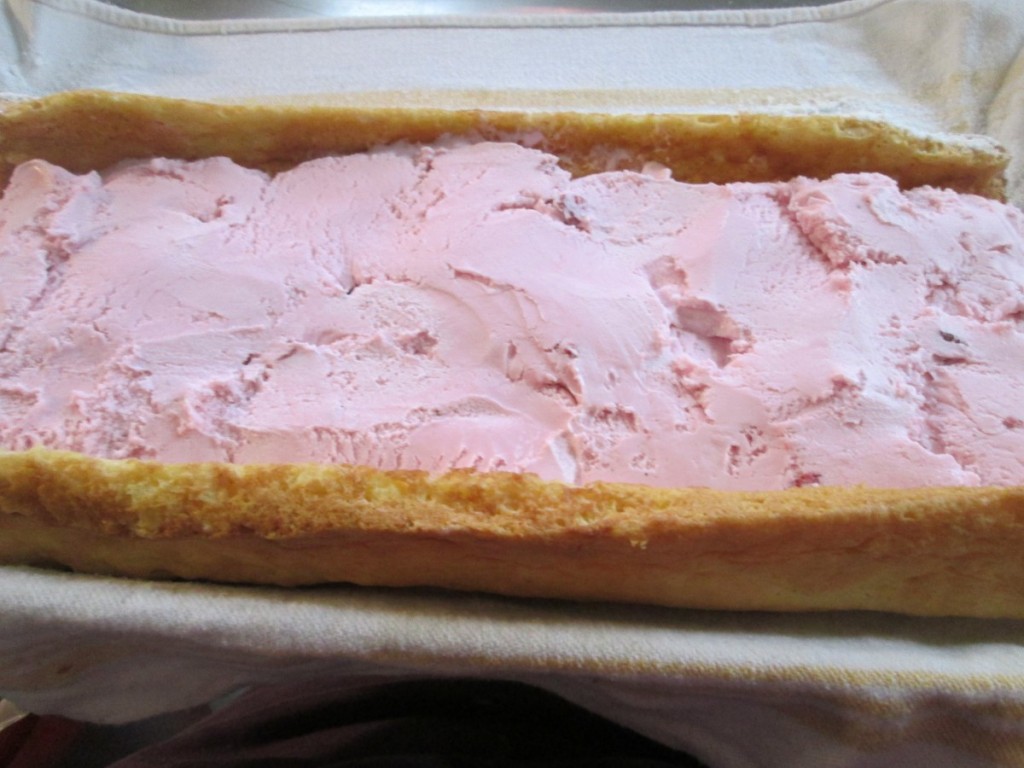
Start with the sponge cake roll recipe below, and use whatever flavor ice cream you like. You’ll need about a quart of ice cream- or a little more.
Once finished, you just wrap it up and pop the cake in the freezer until needed. Great to have on hand for summer parties and cook outs. Perhaps a nice dessert for Father’s Day? You can decorate with fresh berries when serving. Blueberries would make this a fun red, white and blue dessert for Memorial Day or the 4th of July.
Sponge Cake Roll
This sponge cake roll can be filled with whipped cream or ice cream, or use your favorite filling.
5 eggs, separated
2/3 cup granulated sugar
1 teaspoon lemon juice
1/2 teaspoon finely grated lemon zest
2/3 cup cake flour*
1/4 teaspoon salt
1 teaspoon baking soda
3 tablespoons melted butter
Beat egg yolks until thicken and lemon colored; gradually add 1/3 cup of the granulated sugar, the lemon juice and the lemon zest. Beat egg whites until almost stiff then gradually beat in the remaining 1/3 cup sugar. Beat until stiff peaks form. Fold yolk mixture into whites. Sift dry ingredients into a separate container; add to egg mixture, folding in carefully. Fold in melted butter. Pour batter into waxed paper-lined 10x15x1-inch jelly roll pan. Bake at 375° for 12 minutes. Sprinkle with confectioners’ sugar. Turn onto a clean kitchen towel which has been generously dusted with confectioners’ sugar. Trim edges, if necessary; roll cake up, towel and all, while still warm. Let cool completely. Unroll and fill with whipped cream or ice cream then re-roll cake. The trick is to let the ice cream soften up a few minutes before spreading it on the cake. But don’t wait too long. Rather than trying to let the ice cream get soft enough to spread I used a spatula to sort of cut slices of ice cream and place them on the cake. Store ice cream cake roll in freezer until ready to slice and serve.
*If you don’t have cake flour you can make your own. Measure out a cup of all purpose flour, remove 2 tablespoons of flour and replace them with 2 tablespoons of cornstarch. For larger amounts place 7 cups of flour in a bowl and combine with 1 cup of cornstarch. Mix well or even sift together. Store in an airtight container.
Strawberry Ice Cream
2 c. chopped strawberries
1 c. sugar
1 T. vanilla
2 c. cream or half and half or a combination. You can also use some milk or even almond or rice milk.
Additional sugar to taste
Place strawberries, vanilla and sugar in saucepan and bring to a simmer, stirring occasionally. Remove from heat and chill. Combine chilled berry mixture with cream. Add additional sugar if you like. Remember that once it is frozen the ice cream will not taste as sweet so make this mixture a little sweeter than you want the final product to be. How much sugar you add varies with personal taste, and how sweet the berries are. Place in an ice cream maker and process according to manufacturer’s directions. Once finished put in an air- tight container and place in freezer. Makes about 1 quart.
Strawberry Ice Cream
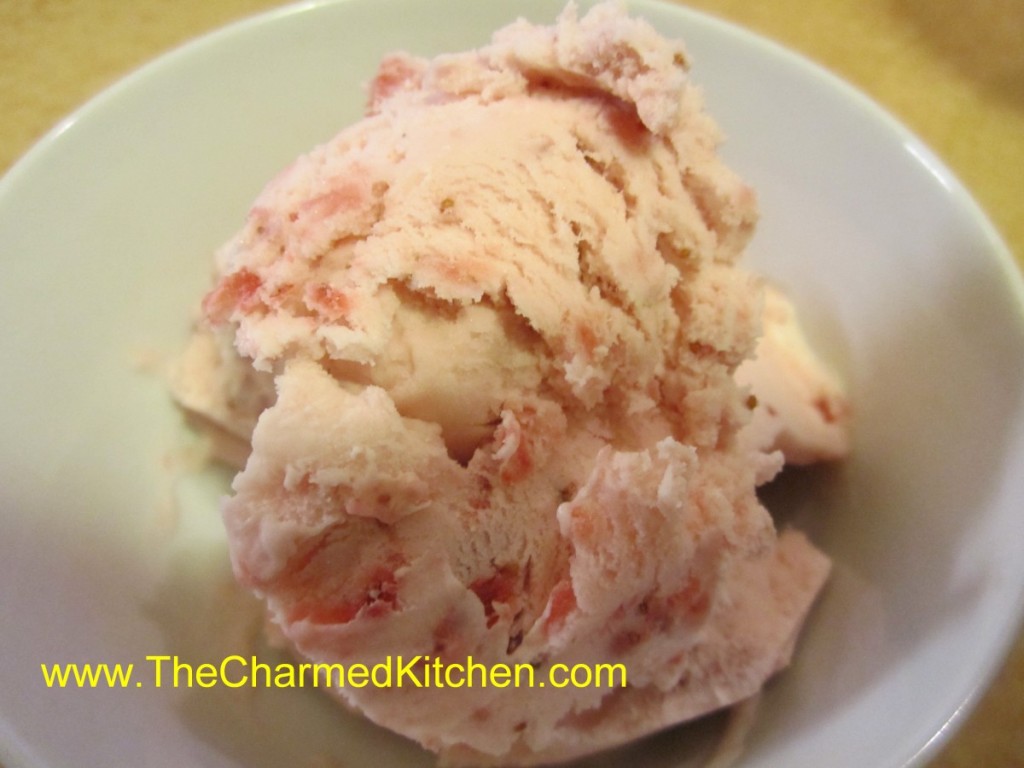
It is strawberry season around here, and I am loving it. Since the weather is warming up, I decided to make ice cream with some of the berries. Homemade ice cream is easy to make. When you make your own, you can adjust flavorings and sweetness level, too.
Studded with plenty of berries, this ice cream will put anything store-bought to shame. Feel free to add blueberries or raspberries, too. Sometimes I add other flavors, like lavender or mint.
Strawberry Ice Cream
2 c. chopped strawberries
1 c. sugar
1 T. vanilla
2 c. cream or half and half or a combination. You can also use some milk or even almond or rice milk.
Additional sugar to taste
Place strawberries, vanilla and sugar in saucepan and bring to a simmer, stirring occasionally. Remove from heat and chill. Combine chilled berry mixture with cream. Add additional sugar if you like. Remember that once it is frozen, the ice cream will not taste as sweet, so make this mixture a little sweeter than you want the final product to be. How much sugar you add varies with personal taste and how sweet the berries are. Place in an ice cream maker and process according to manufacturer’s directions. Once finished put in an air- tight container and place in freezer. Makes about 1 quart.
Homemade Strawberry Liqueur

This strawberry liqueur is like summer in a bottle. I make a lot of different liqueurs and strawberry is one of my absolute favorites. It is wonderful for sipping or over ice. It is also a fun addition to any number of cocktails. A friend adds it to ice cream with extra berries and blends it up for an adult strawberry milkshake.
With strawberries in season, this is the time of year to enjoy them. I want to preserve some for later, too. I will be making strawberry jam and I will freeze some.
Another way to preserve strawberries, is by making a liqueur with them. It is pretty simple. Just combine berries with vodka and a small amount of powdered sugar. I use half gallon canning jars for this, but you could use any food safe container with a tight fitting lid.
Let the mixture steep long enough for the berries to infuse the alcohol with their flavor. You can sweeten it later on, or even leave it unsweetened, if you prefer. I like to sip the liqueur as is, or serve on the rocks with a splash of club soda.
Strawberry Liqueur
3 cups fresh or frozen strawberries, sliced
3 T. powdered sugar
3 c. vodka
1 c. simple syrup*
Sprinkle powdered sugar over berries and let dissolve. Pour over vodka and let steep 2 weeks. Crush berries and strain then filter through cheesecloth or coffee filters. Add sugar syrup and mature 1 week. Makes 5 cups.
*Simple syrup is made from 1 cup of sugar and ½ cup of water. Bring to a boil, then cool. You will have 1 cup of syrup. You can sweeten your liqueur with honey, if you prefer. Watch when you substitute honey for sugar, as it is sweeter and stronger flavored. Better to use orange or clover honey. Add to suit your taste.


