Growing Sprouts
Sprouts for harvesting
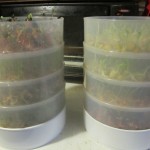
I was given a couple of sprouters last week and decided to try them out. I had always used jars before. The problem with the jars was that I have limited counter space so I only started one or two seeds at a time. These devices allowed me to sprout up to 8 kinds of seeds at one time. It’s pretty simple. You just place seeds in the sprouter and stack them up. There is a reservoir to catch the water. Then just pour 2 cups of water into it. You can drain the water right after it stops dripping or before you add more. Repeat the watering process once or twice a day. So far the results have been very good. No signs of mold- which has happened with the jars in the past- and I have an abundant supply of sprouts to harvest. Now the hardest thing I have to do Is decide how I am going to use them all.
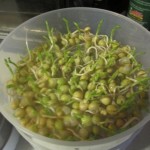
Pea Sprouts
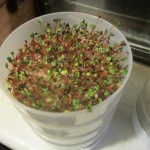
Spicy Radish Sprouts
Candied Orange Peels
Freshly made candies orange peel
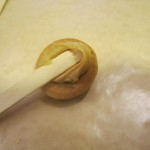
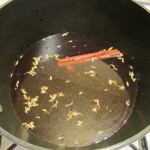
It’s January and citrus season is here. One way to get the most from your citrus is to find a use for the peels. I’ve seen hollowed out orange halves used as votive candle holders and orange peels steeped in vinegar to make a handy all-purpose household cleaner. You can eat the peels, too. Candied orange peels are a favorite treat of a good friend of mine. Try to make them for her at least once a year. Since you are eating the peels it is best to use organic citrus.
Candied Orange Peel
2 large oranges ( you can also use 1 grapefruit or 3 lemons)
or 1 lb. of ginger root*
¾ c. water
¾ c. sugar, plus extra for rolling
3 T. light corn syrup, optional
Remove peel from fruit using a sharp knife. Try to get the peel off in 4 pieces. Cut the peel into ¼-inch wide strips. Place peel in a pot with cold water and bring to a boil. Boil 1 minute, drain and rinse under cold water. Repeat process 2 more times. Return to pan with fresh water and boil 15 minutes. Drain and pat dry. Bring ¾ c. water and ¾ c. sugar to boil in sauce pan with the corn syrup. Boil 2-3 minutes and then add the peel. Simmer, stirring occasionally until all but a spoonful of the syrup is left. This should take about 10 minutes. On a wax-paper lined baking sheet sprinkle 1 cup of sugar and arrange the peels on top of the sugar. Toss the peels around until cooled adding more sugar if needed. Place peels on a drying rack for 24 hours before storing. Once dried you can also dip one end of the peels in dark chocolate. Makes ½ pound.
* If making the candied ginger root peel and cut into 1/4- inch slices. Then cut the slices into 1/4-inch thick strips
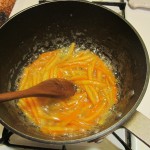
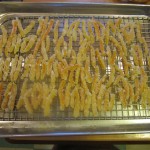
Boiling the orange peels in the syrup
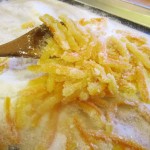
Rolling in sugar
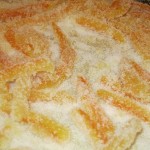
All coated- ready to be set on a tray to dry
Food Not Lawns Seed Swap
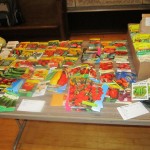
Seeds galore!!
These are just some of the seeds available today at the Cleveland Food Not Lawns Seed Swap. The event was held at Grace Lutheran Church in Cleveland Heights and hosted/organized by my dear friend, Mari Keating. If you are interested in attending more events like this please contact Mari Keating at beanpie55@att.net. She is a great resource for information on Permaculture, water barrels and so much more. There will be a February seed starting workshop where more seeds will be available. There was also a freecycle table and an assortment of goodies. Fun day, worthwhile event and some amazing people.
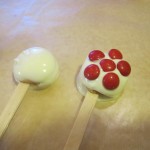
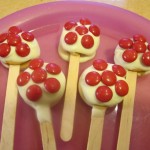
Cookie “Pops”
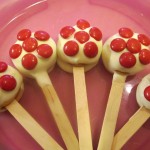
Cookie “Pops”
These are a fun and easy dessert to make with kids. Great when you don’t have the time to bake, either. I used white “chocolate” discs, but you can use real chocolate, too. All you need are vanilla wafers, peanut butter or frosting to stick the cookies together, Popsicle sticks, some sort of chocolate you can melt and candies to decorate. After that it’s pretty easy. Dip the end of a stick into the peanut butter. Press 2 cookies together on the end of the stick. Press firmly. Melt the chocolate- I used a glass bowl in the microwave,but be careful not to burn the chocolate. Dip the cookies into the melted chocolate until covered. Allow excess to drip off. Place cookies on wax paper. Decorate your “pops” to look like flowers- I used M&M’s. Allow them to dry/cool then you can just peel them off the wax paper.
You can get M&M’s in so many colors, the “chocolate” discs, too, that color combinations are pretty limitless. You can make them for different holidays or in school colors. Nice to make in hot weather, too since there is no baking. If there are nut allergies to consider you can also use frosting to stick the cookies together.
Peanut butter used to affix cookies

Press together firmly
Dipping the cookie
Setting up on wax paper until firm
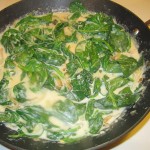
Easy Chicken Florentine
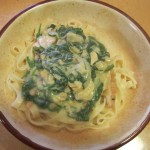
Easy Chicken Florentine
I was asked last week about using leftovers. Someone suggested I do a class on using them up. As I went to make dinner tonight I saw some leftover cooked chicken and an open container of half and half so I decided to share with you what I did. Since the chicken was already cooked the cook time was really short. While cooking the pasta I prepped and cooked the rest of the dish- about 15-20 minutes in total.
Easy Chicken Florentine
1 onion, sliced
oil
3T. flour
1/2 c. half and half or milk
3/4-1 c. chicken stock
6 oz. fresh spinach- about 6 cups
6 oz. cooked chicken, sliced
salt and pepper to taste
hot pepper sauce
hot cooked pasta
While pasta is cooking saute onion in oil in skillet until lightly browned. Toss flour into onion mixture and stir to coat. Add half and half or milk and stock and cook, stirring until mixture comes to a boil. Turn down to a simmer and cook 1 minute longer. Add spinach and cook until spinach is just wilted. Add chicken and heat through, stirring occasionally. Season to taste. Drain pasta and place on serving dish or individual plates. Spoon over the spinach mixture and serve. Makes 2-3 servings.
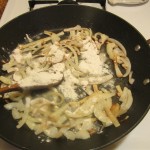
Adding flour to onions
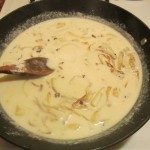
Cooking the sauce

Adding the chicken
Groundhog Day Cookies
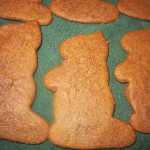
Groundhog Cookies
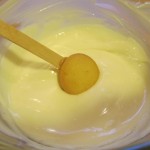
Well it’s just around the corner. I like to celebrate this holiday by making up a batch of groundhog cookies. Not made from groundhogs, mind you, but shaped like them. The recipe comes from my dear friend, Cindy Kotula, whose late husband Mike was from Punxsutawney, P.A. She also gave me a groundhog shaped cookie cutter. Even if you don’t have one of those- I’d be surprised if you did- you can still make these wonderful ginger-snap cookies. Cookie cutters are available at some baking supply stores and online. They come out a lovely groundhog brown and are positively yummy. We enjoyed them today with lunch.
Spicy Groundhog Cookies
2 c. flour
2 t. cinnamon
1t. each ground ginger, ground cloves, ground allspice and baking powder
1/2 t. each baking soda and salt
1/2 c. butter, softened
1 c. sugar
1/2 c. molasses
1 egg yolk
Sift dry ingredients together and set aside. Beat sugar and butter until smooth and stir in molasses and egg yolk. Stir in dry ingredients and chill dough at least an hour. Preheat oven to 350 degrees. Roll out dough 1/8-inch thick on lightly sugared surface. Cut out with cookie cutter and place cookies on greased baking sheet. Bake 8-10 minutes. Cool slightly before removing from baking sheet. Makes 12-15 large groundhogs or 3-4 dozen small ones.
Note: I have the small groundhog cookie cutter- you can borrow it if you promise to return it promptly.
Happy Groundhog Day!
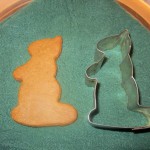
Cookie and the cutter
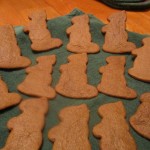
A tray full of groundhogs
ElderberryTea

Elderberry Spice Tea
Needing something to warm me up today so I decided to make some elderberry tea. Should really call it an Elderberry Spice Tea. I started with a couple of cups in water in a saucepan then added 1/2 cup of elderberry syrup, a cinnamon stick, some pieces of nutmeg, cloves, fennel seeds and a dash of cardamom. Let it come to a simmer and cooked it over low heat for 5 minutes. Strained it and ready to go. Super yummy and supposed to help fight off germs!!!! All medicine should taste this good . 🙂 You can sweeten it with additional honey- but it really does not need it. Feel free to swap up the spices. You could also add citrus peel, red pepper flakes, rose hips, turmeric, vanilla, allspice- well, you get the idea.
Simmering tea
Melting Snowman Cupcakes
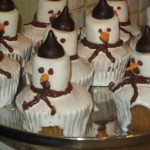
Melting Snowmen Cupcakes
I am going to dinner with friends tonight and offered to bring dessert. With storms looming in the near future I decided to make something with a winter theme. I ended up making Melting Snowmen Cupcakes- or Global Warming Cupcakes- you decide. They were pretty easy to make. I just baked some vanilla cupcakes- you can make whatever kind you like. I had 2 containers of marshmallow cream a friend had given me so I used them for the frosting. You could just as easily use vanilla frosting- store bought or homemade. I set a marshmallow on the top and decorated them with frosting for eyes, scarves and carrot “noses” . Since I had some kisses I used them for hats.
Melting Snowman Cupcakes
24 prepared cupcakes
2 jars marshmallow cream- or 2c. white frosting
24 marshmallows
1/2 c. chocolate frosting- for eyes, mouths and scarves
small amount of orange frosting for carrot noses
24 kisses candies
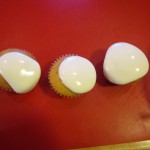
If using the marshmallow cream, place in microwave-safe dish and warm up in the microwave for a minute or so- stir until smooth. Dollop cupcakes with a small amount of the cream and allow it to melt over the cakes. Place a marshmallow on top of each cupcake to form the snowman’s head- I used toothpicks to affix the marshmallows until the marshmallow cream set up. If you are using frosting,just frost the cupcakes allowing a little frosting to drip over the sides. Use a small writing tip with a decorating tube to make eyes and mouths with chocolate frosting. I used the same frosting for the scarves, but you can tint white frosting any color you like for the scarves. Use a small writing tip to make the orange carrot noses. If you have used toothpicks to affix the marshmallows- remove them. Affix the kisses to the heads of the snowmen with a little frosting- any kind you have extra of. Makes 24.
Marshmallow cream spreading over the cupcakes
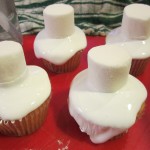
Marshmallows are placed on top
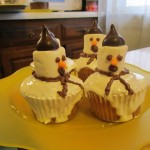
A trio of snowmen
Winter Greens
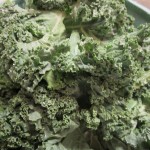
Fresh Kale
Its the time of year when we look to enjoy more comfort foods. Soups, stews, chowders. Many of the “winter” greens are perfect for these dishes. Often greens like kale, collards and chard are well suited for the longer cooking dishes of winter. I love kale but I must admit I get into a rut with it this time of year. I make a big pot of soup and end up adding handfuls of washed and chopped kale during the last 15 minutes of cooking. Very tasty, but I want more. I decided to share some of my favorite winter green recipes with you over the course of the next few weeks. I would love to hear from you. If you have a favorite recipe for greens that you would like to share- I would be delighted to post it.
Kale and Bean Stew
1½ lb. kale leaves, center ribs removed
3 T. oil
1 c. chopped carrots
1 c. chopped celery
1 c. chopped onions
2 garlic cloves, minced
1 c. dry white wine
2 (15 oz.) cans beans, rinsed and drained- I like butter beans
4-5 cups Vegetable or chicken stock
1 t. dried savory or thyme
1 bay leaf
1 T. white balsamic vinegar
2 T. fresh chopped herbs
Blanch kale in boiling water for 1 minute. Rinse under cold water. Drain and squeeze out excess water. Chop kale leaves coarsely. Heat oil in pot over medium heat. Cook vegetables and garlic until tender but not browned. Add wine and simmer until liquid is reduced by half. Add 4 cups of the broth, beans, savory and bay leaf and simmer over medium-low heat for 20 minutes. Add kale and simmer 5 minutes more. Add more stock if stew is too thick. Add vinegar, fresh herbs and salt and pepper to taste. Serves 6.
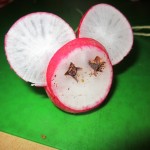
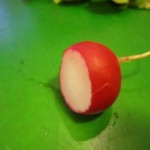
Radish Mice

radish “mice”
You know its time for me to go back to work when I have time to play with my food. I made some radish “mice” today. They are easy to make and kids love them. Just make sure someone who is old enough to handle a knife does the slicing part of this activity. It is not a job for younger kids. They can, however, do all the assemble parts. You can add cloves for eyes if you like.
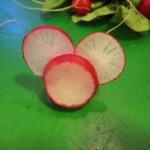
Radish Mice
Radishes
Cloves
Choose radishes with the longest root pieces to be your mice. The roots will be the tails. Set them aside cut thin slices from the extra radishes. These will be the ears. You will need 2 per mouse. In the mouse radishes cut a small slice off one side so the “mouse” will lie on its side. Cut a slit in the top of the radish near the non-root side. Slip in the thin slices to form the ears. Add cloves for eyes and nose. Use these to decorate salad plates and party trays but don’t give them to little children because they could choke on small pieces.
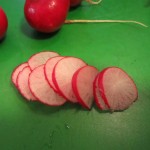
slices for “ears”
waiting for ears
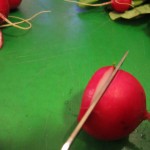
Making a slot for the “ears”
Ready for “eyes”


