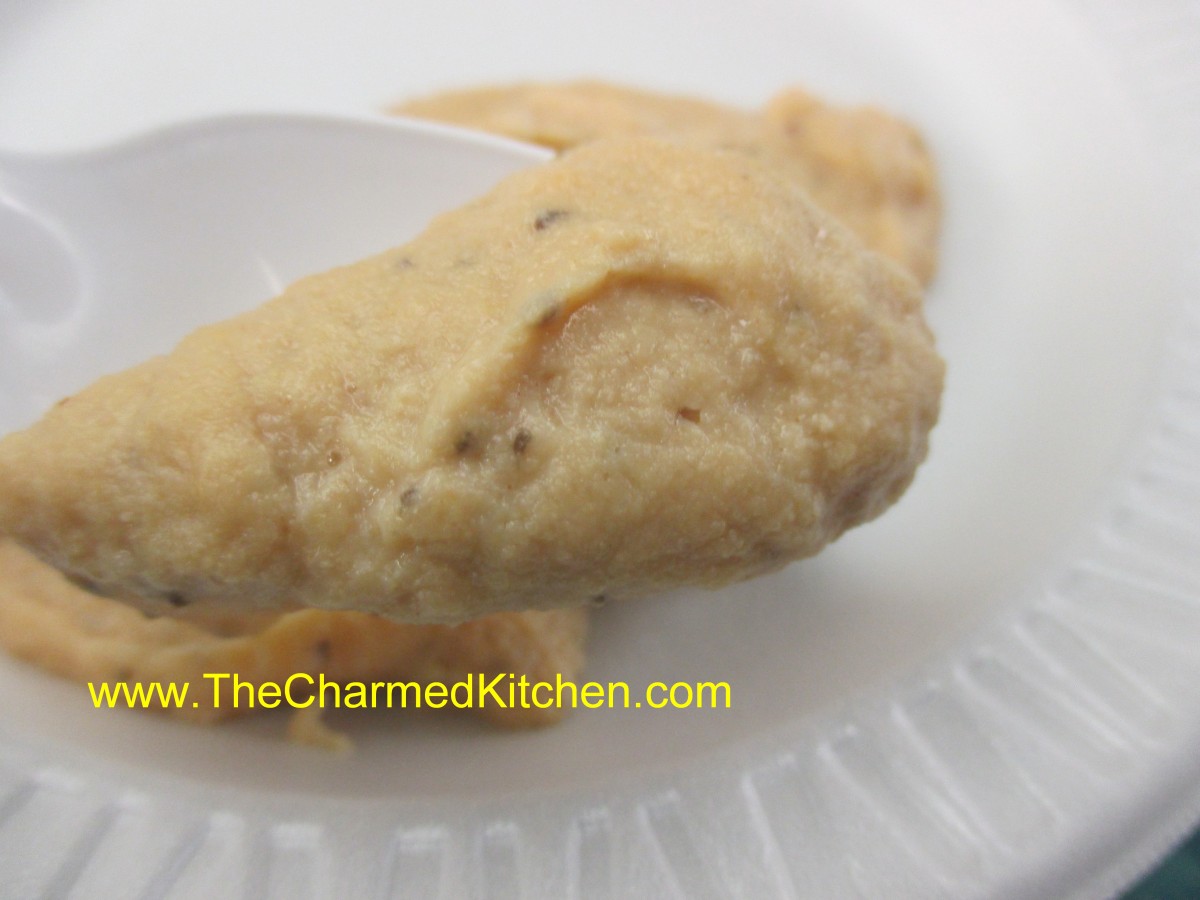
Coffee Waffles


One more idea for something to make for Mom on Mother’s Day. Yes, you read that right. Coffee waffles. Waffles with coffee already inside them. They are quite wonderful actually. Great for breakfast, which is obvious, I suppose. These waffles also make a fun base for desserts. I am serving them with honey ice cream as a dessert.
I wanted to add coffee flavor to waffles, but I knew even strong coffee would water down the batter too much. The only solution was to use either instant coffee or espresso powder. I knew I could get enough coffee flavor into them, without affecting the batter in a negative way.
It worked!! Plenty of coffee flavor and a nice, crispy waffle. I was thinking it might be fun to add cinnamon to the next batch. I got 10 rectangular waffles out of the recipe. Froze most of them for later.
You can serve them topped with butter, syrup, whipped cream or powdered sugar.
So here is the recipe. Hope you give them a try.
Coffee Waffles
1¾ c. flour
¼ c. brown sugar
1½ t. baking powder
½ t. salt
1½ c. half and half or milk
1 egg, beaten
1/3 c. oil
1 T. instant coffee or espresso powder
1 T. vanilla
Non-stick spray or oil for coating the waffle iron
In medium mixing bowl, mix dry ingredients together and set aside. In a separate bowl, combine the half and half with the remaining ingredients. The dry coffee granules will not dissolve right away. You can let the wet ingredients sit a few minutes and whisk again, if you like. While they are just sitting there, you can heat up the waffle iron. Coat the waffle iron with a non-stick cooking spray or brush with a little oil. Add the wet ingredients to the dry ingredients and stir until mixed together. Don’t get crazy over mixing. That will give you tough waffles, and nobody wants that. Just stir until you don’t see any dry bits in the mix. I like to use a rubber scraper to get to the bottom of the bowl. Ladle some batter into the waffle iron and cook until golden brown. When the steam stops coming out of the waffle iron, or lessens a lot, it is usually good indicator that your waffles are done. Yield depends on the size of your waffle iron. I got 10 waffles, about 4×5 inches.
Note: The instant coffee breaks down more when mixed with the dry ingredients. Espresso powder will dissolve quickly, but if you use instant coffee like I did, expect a few “flecks” of coffee in the batter. I kind of liked the way it looked.
Homemade Food Gifts for Mom

Homemade gifts are always special. For Mother’s Day, I think homemade is even more appreciated. I’ve assembled some of my favorite food gift recipes. While some will require adult hands, there are a few kid- friendly options, too. Some are sweet, others savory or even spicy. For all the moms out there- Happy Mother’s Day.
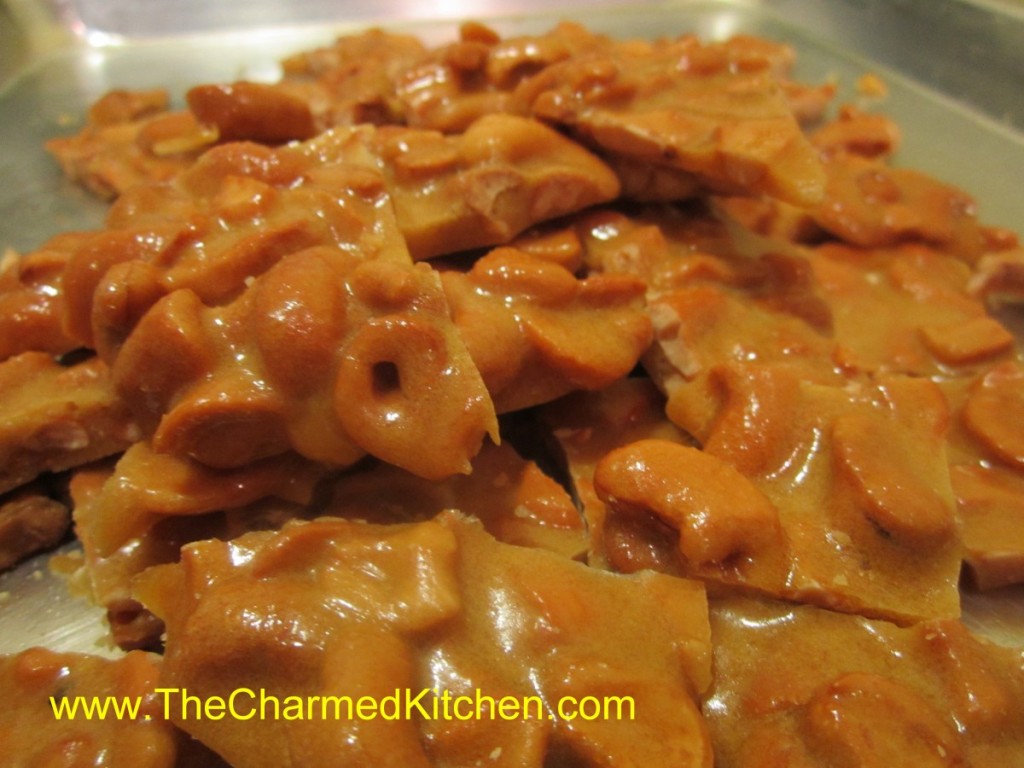
We will start with this cashew brittle recipe. Brittle was a special favorite of my own mother. I always think of her when I make it. This recipe is a breeze. Cooked in the microwave, this recipe is ready before you know it. You can, of course, use different nuts.
Homemade Cashew Brittle
2 c. cashews*
1 c. sugar
1/2 c. corn syrup
1/8 t. salt
1 t. butter
1 t. vanilla
1 t. baking soda
Butter or oil a large baking sheet and set aside. In a 3-4 quart glass bowl combine the nuts, sugar, corn syrup and salt. Microwave on high for 3 minutes. Remove from microwave, stir well and return to microwave. Cook 3 more minutes in microwave. Remove and stir in butter and vanilla, stirring until butter has melted. Return to microwave and cook for 2 more minutes. Remove from microwave and stir in baking soda. Stir until well blended and pour mixture onto prepared baking sheet. Spread out quickly, then allow to cool. Once cool, break into pieces. Store in a cool, dry place. I normally store it in a tin or plastic container with a tight-fitting lid.
* I used salted cashews but feel free to experiment with other nuts
Note: Use high power setting on microwave.
Truffles
1/3 c. Whipping cream
6 T. butter, cut into small pieces
2 c. chocolate chips- or 12 oz. dark chocolate, grated or chopped coarsely
Unsweetened cocoa
Heat cream to boiling in small saucepan. Stir in butter and cook until melted. Remove from heat and stir in chocolate until melted. Place in shallow bowl and chill until firm, at least a couple of hours. Roll mixture into 1-inch balls and roll in cocoa. Sometimes the mixture is quite firm and hard to roll into perfectly smooth balls. You can roll them out as smooth as you can, roll in cocoa and then roll again to smooth out. You might want to give them another roll in the cocoa after that. Makes about 30.
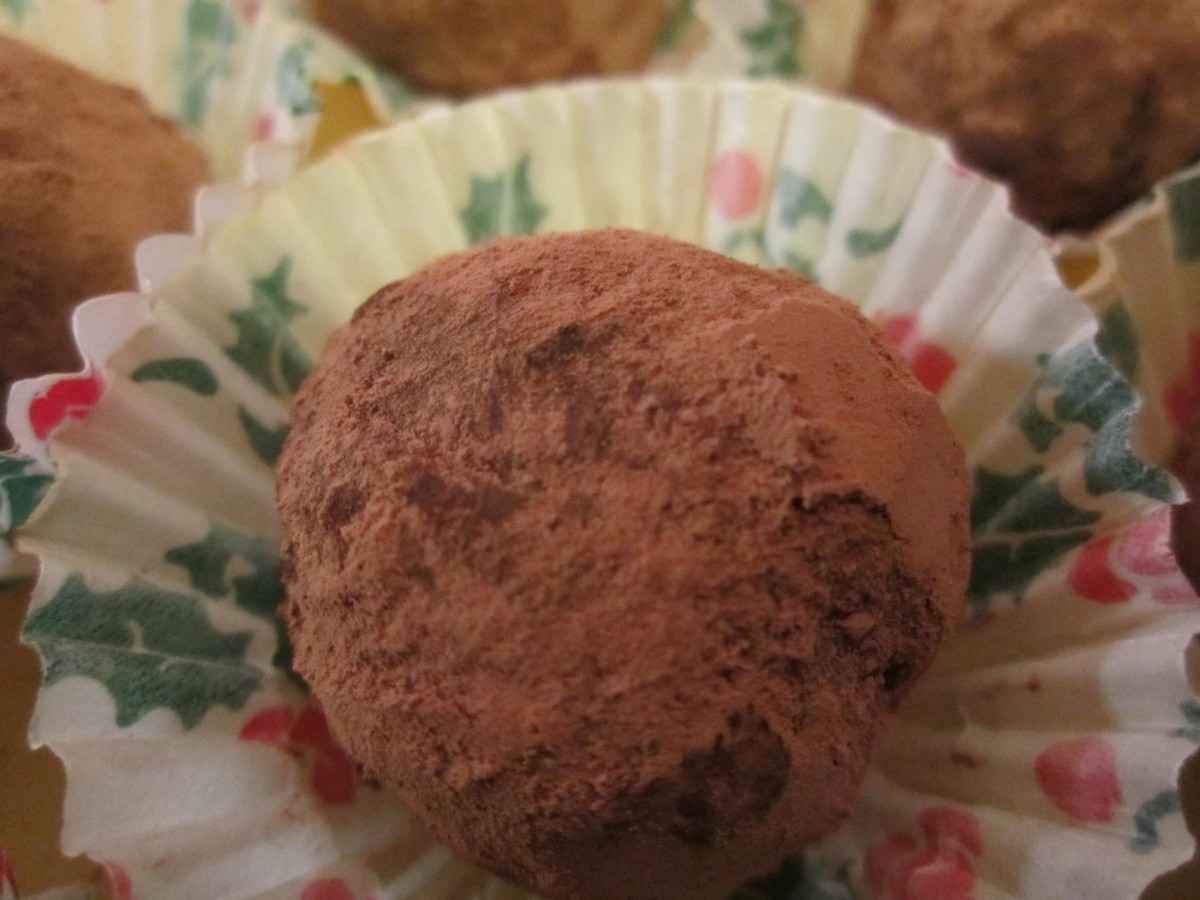
Chocolate Truffles

Minty Cocoa Hearts
Sugared Nuts
Homemade Bavarian Mustard
Minty Cocoa Hearts
If you are looking for a simple chocolate treat- that requires no cooking – try Minty Cocoa Hearts. This easy to make candy is made with just a few ingredients. The “dough” is mixed and rolled out. Then you just cut them out into little hearts. They taste great and they are also a nice project for kids. There is no special equipment needed other than a tiny heart-shaped cookie cutter. So if time is short and you really want to make something homemade this Mother’s Day- these could be the answer.
9 c. powdered sugar
1 c. cocoa
1/2 c. butter, softened
1/2 c. water
2 t. peppermint extract
In large bowl combine ingredients until well blended. You can add more water, if needed, 1 teaspoon at a time. Divide mixture into 2 pieces and shape in balls. Place each between sheets of wax paper and roll out to 1/4 -inch thickness. Cut out with tiny cutters and place on foil-lined tray. Chill several hours, then wrap up in colored foil or place in tiny candy bags. Makes 80 (1-inch) candies.
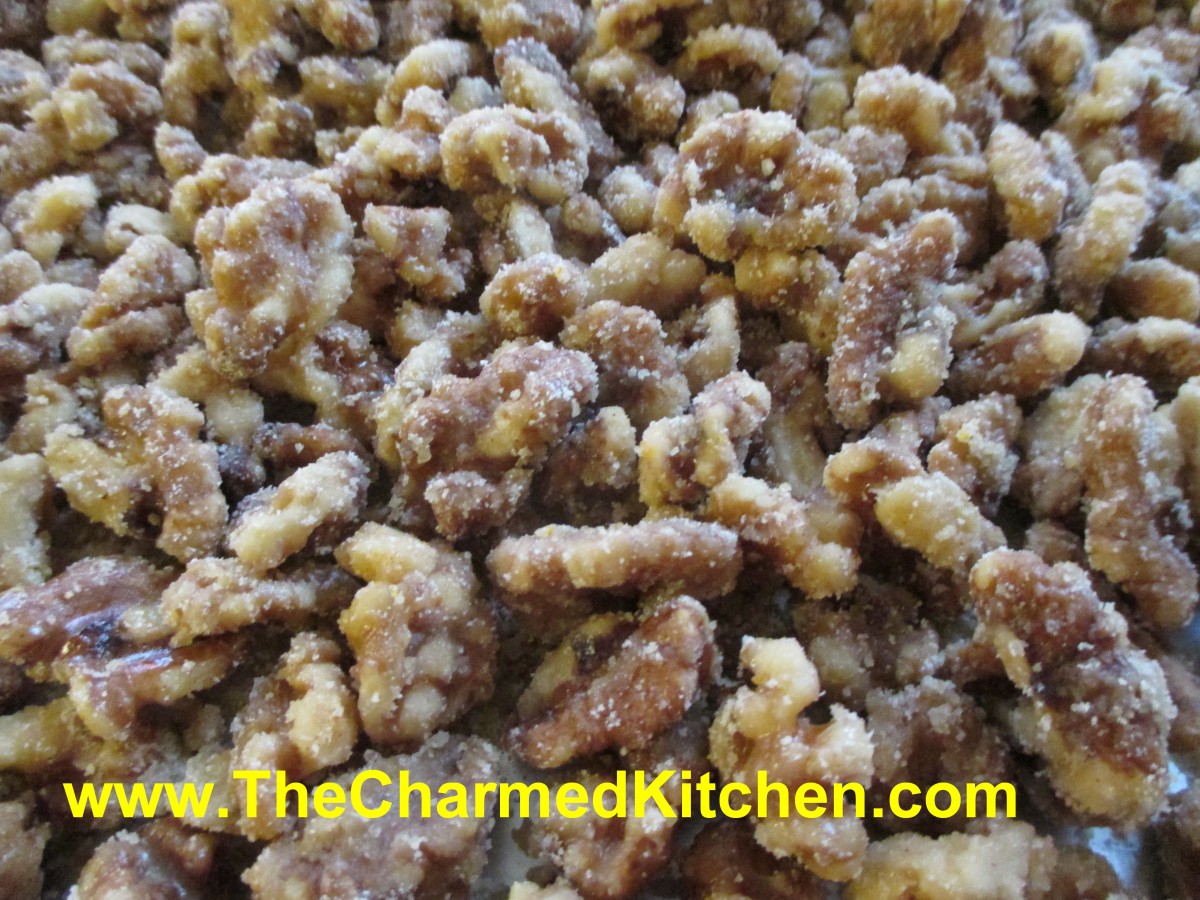
Sugared Nuts
Many years ago, my sister Cindy gave me the recipe for making these nuts. I make at least a few batches every year, and they are always a big hit. I will admit to tweaking the recipe a little over time, but the basics are still the same. Nuts are placed in a heavy skillet with sugar, water and seasonings. The mixture is then brought to a boil and cooked until most of the liquid cooks off. This takes about 10 minutes, give or take. You dump the nuts onto a cookie sheet, and start stirring immediately. If you don’t stir them, they will stick together. This is where the magic happens. The nuts look wet when you pour them out and start stirring, but in a few minutes, they cool and dry, and the sugar crystallizes on the nuts. Once cooled, the nuts are crunchy and sweet and very tasty. You can use them as a snack, or in all sorts of recipes. This is a really fast confection to make, and is a nice gift, too.
4-5 c. nuts, I like walnuts or pecans
2 c. sugar
1 c. water
1 t. cinnamon
1 t. orange peel
1 t. salt, optional
Place all ingredients in heavy skillet and cook over medium heat, stirring often, until all the water disappears. Whatever liquid in the pan will be clinging to the nuts and syrupy. Dump nuts onto a large cookie sheet and break apart with a wooden spoon to prevent clumping. As nuts cool, stir once or twice to remove any remaining clumps, and to cool faster. Nuts will lose their glossy appearance and attain a sugary crust. If it looks like nut soup, you didn’t cook them long enough, and you must return all to the skillet and cook longer. As the nuts start to get drier during cooking, you can turn down the heat a little to prevent burning. Once you’ve made a few batches, though, you will get good at judging when to stop cooking. You can also make a spicy version by adding a teaspoon of cayenne pepper along with the other ingredients. Store in cool, dry place to keep nuts fresh longer.
Horseradish Mustard
1 c. dry mustard
3/4 c. white wine vinegar
1/3 c. dry white wine or dry sherry
1/4 c. brown sugar
1/4 c. granulated sugar
1 T. dried minced onion
2 t. caraway seeds
1 1/2 t. salt
1/4 t. coarse ground mustard
2 eggs, slightly beaten
1 T. prepared horseradish
Combine all ingredients, except eggs and horseradish in top of double boiler and let stand at room temperature for 2 hours. Whisk in eggs and cook over simmering water until mixture has thickened and eggs are cooked, about 10 minutes. Remove from heat and stir in horseradish. Pour into sterilized jar, cool and cover. Store in fridge for up to 3 months. Makes 2 cups.
Bavarian Mustard
3/4 c. beer
2/3 c. dry mustard
2 T. sugar
2 T. cider vinegar
2 t. salt
1-t. celery seeds
1/2 t. fresh grated ginger or 1/4 t. dry
1 egg, beaten
Combine all but the egg in the top of a double boiler and let stand 2 hours at room temperature. Stir in egg and cook over simmering water. stirring constantly until mixture thickens and egg is cooked, about 10 minutes. Pour into sterilized jars and cool before covering. Store in fridge for up to 2 months. Makes 2 cups.
Spicy Mustard
1 c. dry mustard
2/3 c. dry white wine
1/2 c. vinegar, flavored with herbs or garlic
1/2 c. sugar
2 t. salt
1 t. basil
1 t. chili powder
1 t. dried minced garlic
1 t. oregano
1/2 t. cracked pepper
2 eggs, slightly beaten
Mix all ingredients, except eggs, in top of double boiler and let stand 2 hours at room temperature. Add eggs and cook over simmering water, stirring constantly until mixture thickens and eggs are cooked, about 10 minutes. Pour into sterilized jars and cool down before covering and refrigerating. Keeps in fridge for up to 2-3 months. Makes 2 cups.
French Herb Mustard
1/4 c. dry mustard
1/4 c. white wine vinegar
1/4 c. white wine or dry sherry
1/4 c. brown sugar
1/2 t. salt
1/2 t. tarragon
1/4 t. dill seed
1/4 t. celery seed
1/4 t. ground cloves
3 egg yolks or 1 whole egg
Combine all ingredients, except eggs, in top of double boiler and let stand at room temperature 2 hours. Whisk in eggs and cook over simmering water, stirring constantly, until mustard thickens and eggs are cooked, about 5 minutes. Store in crock or jar in fridge for up to 1 month. Makes 1 cup, recipe can be doubled.
Cookie Pops
These are a fun and easy gift to make with kids. I used white “chocolate” discs, but you can use real chocolate, too. Kids can make Mom an edible “bouquet”.
All you need are vanilla wafers, peanut butter or frosting to stick the cookies together, Popsicle sticks, some sort of chocolate you can melt and candies to decorate. After that it’s pretty easy. Dip the end of a stick into the peanut butter. Press 2 cookies together on the end of the stick. Press firmly. Melt the chocolate- I used a glass bowl in the microwave,but be careful not to burn the chocolate. Dip the cookies into the melted chocolate until covered. Allow excess to drip off. Place cookies on wax paper. Decorate your “pops” to look like flowers- I used M&M’s. Allow them to dry/cool then you can just peel them off the wax paper.
You can get M&M’s in so many colors, the “chocolate” discs, too, that color combinations are pretty limitless. If there are nut allergies to consider use frosting to stick the cookies together.

Cookie Pops
Hot Fudge Sauce
If Mom is a chocolate lover, this sauce makes a great gift. Don’t forget the ice cream!
1 c. unsweetened cocoa powder
¾ c. sugar
½ c. brown sugar
1/8 t. salt
1-c. heavy or whipping cream
½ c. butter, cut into pieces
1 t. vanilla extract
In saucepan , stir together dry ingredients then stir in cream and butter. Heat to boiling and boil 1 minute. Remove from heat, cool 5 minutes and stir in vanilla. Store leftovers in fridge. Rewarm before using. Makes 2 ½ cups.
Spinach and Mushroom Quesadillas

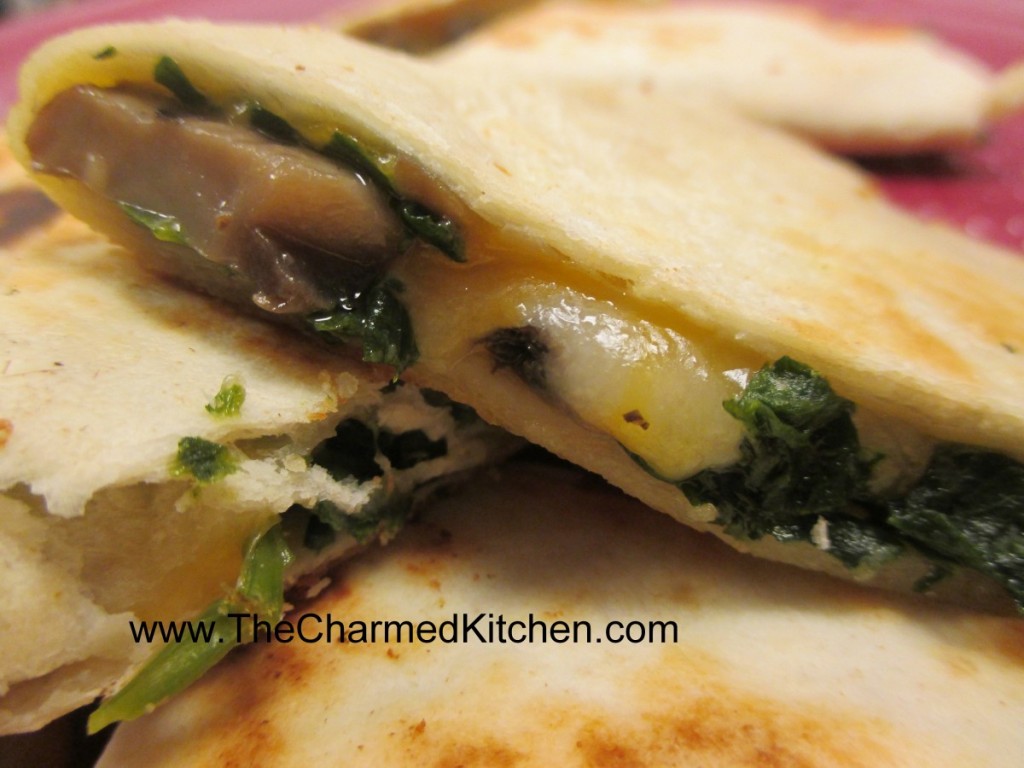
Quesadillas are a fun and easy appetizer for any party. They also are great for lunch, brunch or dinner. You can fill them with all sorts of fillings. I used frozen spinach, which had been thawed, but fresh spinach could also be used. I also used a combination of Portobello mushrooms and shitakes.
The spinach and mushrooms worked really nicely together. The ones in the picture have Swiss cheese in them. But you can use any number for different cheeses. I have made them with cheddar cheese and once with smoked Gouda. These were cooked in a skillet, but you could also bake them in the oven, or brush with oil and cook them on the grill. You can serve them as is- or maybe top with some salsa or sour cream.
Mushroom and Spinach Quesadillas
1 (10 ounce) package fresh or frozen spinach, thawed and squeezed dry.
2 cups shredded cheese, I like cheddar or Swiss, but use what you like
2-3 tablespoons butter- you can use oil instead
2 cloves garlic, sliced
2 Portobello mushroom caps, sliced
Salt and pepper to taste
Hot sauce to taste
4 (10 inch) flour tortillas
1 tablespoon oil
Saute spinach in a little butter until wilted. Cool and chop. Set aside. Melt the remaining butter in a skillet over medium heat. Stir in garlic and mushrooms, and cook about 5 minutes. Mix in spinach, and continue cooking 5 minutes. Add seasonings to suit your taste. Place a quarter of the mixture on one side of each tortilla. Top with a quarter of cheese. Fold tortillas in half over the filling. Heat oil in a separate skillet over medium heat. Place quesadillas in the skillet, and cook 3 minutes on each side, until golden brown. Cut each quesadilla into 4 wedges to serve.
Homemade Tortillas


With Cinco de Mayo coming up, I thought it was time to re-post the recipes for homemade tortillas.
If you never made tortillas because you thought they were too hard to make, I hope I can change your mind. Tortillas are pretty easy to make. They only have a few ingredients- although you can get creative and add more stuff. The dough is simple enough. Once made, you just roll it out into circles. Heck, you only need to roll them into something resembling a circle. They will taste the same, even if they aren’t perfectly round.
Cooking involves a hot skillet and 30 seconds per side. The flavor and texture are so much fresher than most of what you can buy. Certainly fresher than what is at the local grocery store.
While it is easier if you have a tortilla press, I roll mine out by hand all the time. You could also use a pasta machine for rolling- although that will limit their width.
There is a little fat in most recipes- traditionally lard- but you have wiggle room here, too. I used coconut oil and was very happy with the taste and texture. So here are three recipes for tortillas- corn, wheat and whole wheat.
Corn Tortillas
1 3/4 cups masa harina ( corn flour) it is finer than cornmeal and will give you a nicer end product
1 1/8 cups hot water
In a medium bowl, mix together masa harina and hot water until thoroughly combined. Turn dough onto a clean surface and knead until pliable and smooth. If dough is too sticky, add more masa harina; if it begins to dry out, sprinkle with water. Cover dough tightly with plastic wrap and allow to stand for 30 minutes.
Preheat a cast iron skillet or griddle to medium-high. Divide dough into 15 equal-size balls. Using a tortilla press, a rolling pin, or your hands, press each ball of dough flat between two sheets of plastic wrap. Immediately place tortilla in preheated pan and allow to cook for approximately 30 seconds, or until browned
and slightly puffy. Turn tortilla over to brown on second side for approximately 30 seconds more, then transfer to a plate. Repeat process with each ball of dough. Keep tortillas covered with a towel to stay warm and moist until ready to serve.
Note: I often add a little salt to the dough. It is optional, but it does add a nice flavor. 1 teaspoon per batch seems about right.
Whole Wheat Flour Tortillas
1 cup all-purpose flour
4 cups whole wheat bread flour
1/2 cup fat, you could use lard, shortening or coconut oil – something solid at room temp- not oil
2 tablespoons salt
1 1/2 cups boiling water
flour for rolling
In a large bowl, stir together 1- cup all-purpose flour, whole wheat flour and salt. Rub in the fat by hand until the mixture is the texture of oatmeal. Make a well in the center, and pour in the boiling water. Mix with a fork until all of the water is evenly incorporated. Sprinkle with a bit of additional flour, and knead until the dough does not stick to your fingers. The dough should be smooth. Make balls the size of golf balls, about 2 oz. each. Place them on a tray, and cover with a cloth. Let stand for at least 1 hour, or up to 8 hours. Heat a griddle or large frying pan over high heat. On a lightly floured surface, roll out a tortilla to preferred thinness. Fry one at a time. Place on the griddle for 10 seconds, as soon as you see a bubble on the top, flip the tortilla over. Let it cook for about 30 seconds, then flip and cook the other side for another 30 seconds. Roll out the next tortilla while you wait for that one to cook. Tortillas can be refrigerated or frozen. Makes 18.
Flour Tortillas
2 c. flour
1/4 c. fat, you could use lard, shortening or coconut oil – any fat solid at room temp- not oil
1 t. salt
2/3 c. warm water
Combine flour and fat by cutting in to resemble coarse crumbs. Dissolve salt in water and stir into flour mixture. Form into a ball and knead on a lightly floured surface 2-3 minutes or until it is smooth. Divide dough into 12 equal pieces and wrap each in plastic wrap. Allow dough to rest 30 – 60 minutes. On lightly floured surface roll out a piece of dough into a 7-inch circle. Cook dough on griddle or in a skillet over medium high heat until puffy and golden on both sides, 1-2 minutes. Wrap in a kitchen towel and repeat process with remaining dough, stacking and wrapping as you go. Makes 12.
Coffee Cake Muffins

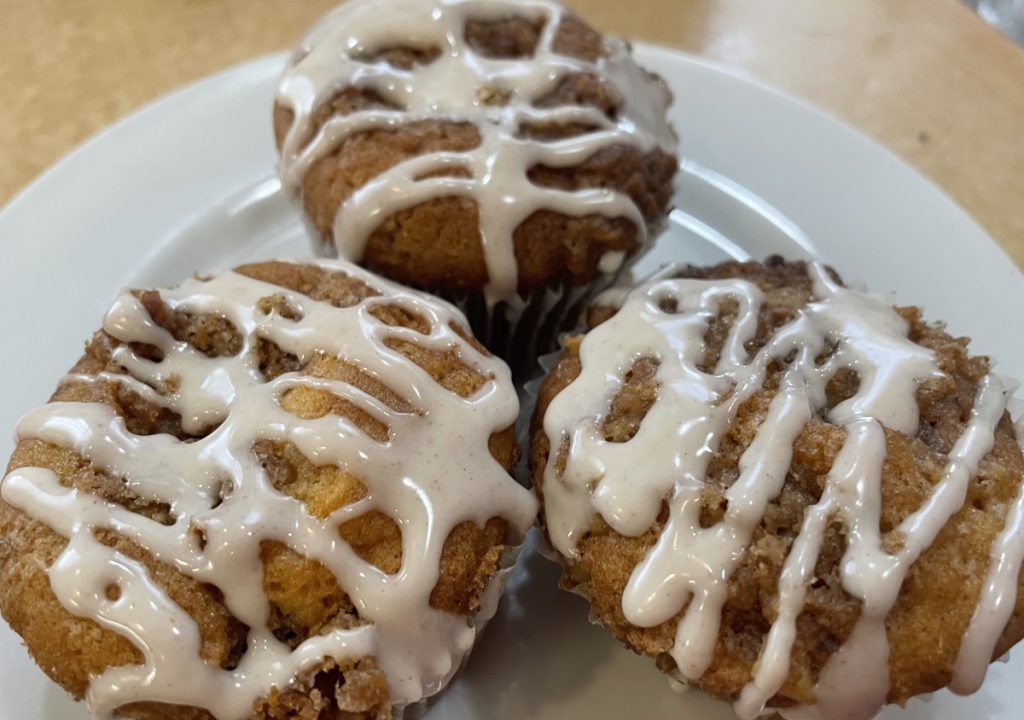
These came about when I was playing around with an old family recipe. The original recipe was for a coffee cake that my Busha taught me to make when I was about 12. I wanted to make something more portable, so the muffins seemed like a logical option. The recipe was changed a bit from the original, but I was very happy with the end result. I added a drizzle at the end which worked well. So here is the recipe.
Coffee Cake Muffins
Topping
½ c. light brown sugar
3 T. butter, softened
2 t. cinnamon
½ – ¾ c. chopped nuts
Batter
3/4 c. sugar
1/2 c. butter, softened
1½ t. vanilla
3 eggs, room temperature
1 c. sour cream
2 c. flour
1 t. baking powder
1 t. baking soda
Drizzle
1½ c. powdered sugar
1/2 t. cinnamon
1 T. milk
1 T. lemon juice
Preheat oven to 350 degrees. Line 24 cupcake tins with paper or foil liners. Set aside. Mix first 4 ingredients together and set aside. Beat together sugar and butter until fluffy. Add vanilla and beat well. Beat in eggs, one at a time. Stir in sour cream. Combine dry ingredients and add to egg mixture. Stir until just combined. Divide batter in the cupcake pans. They will be half full, or a bit under. Top with the topping, crumbling to spread evenly. Bake for 15-18 minutes, or until toothpick inserted comes out clean. Once cooled down, combine drizzle ingredients and pour over the muffins. Makes 24.
Rich and Chewy Brownies

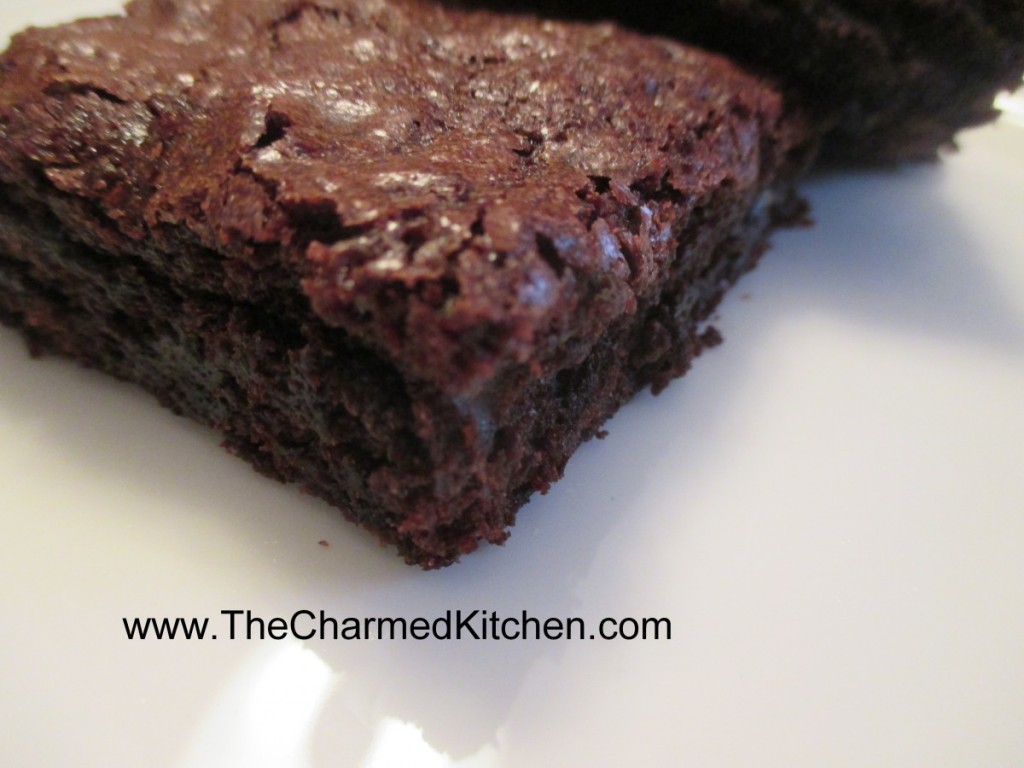
Brownies have been around for almost 100 years. The story about the creation of brownies, is that they were an accident. A woman was making a chocolate cake. She couldn’t find her recipe, so she made the cake as best she could from memory. The cake didn’t rise- and brownies were invented.
What a happy accident that was for the rest of us.
There are a lot of versions of brownies around. Some are more like a chocolate cake, just a little denser. Others are moist, and so dense they are almost fudge like.
I have a lot of brownie recipes. This is one of my favorites. If you make them, you will understand why. They are soft, rich and a little chewy. They can be served plain, dusted with powdered sugar, or frosted. There is a lovely chocolate buttercream recipe below the brownie recipe.
Rich and Chewy Brownies
3 sticks butter, melted and cooled
3 c. sugar
1 T. vanilla
6 large eggs
1½ c. flour
1 c. cocoa
1 t. baking powder
1 t. cinnamon
1 c. chocolate chips
Heat oven to 350 degrees and grease a 13×9 inch pan. Beat together butter, sugar and vanilla. Whisk in eggs one at a time. Combine dry ingredients and stir into batter. Stir in chocolate chips and spread batter in prepared pan. Bake 40-45 minutes, or until brownies pull away from sides of pan. Cool brownies completely in pan, on a rack and cover with foil. Let stand 6 hours before serving. Makes 24.
To serve, you can leave them plain, dust with powdered sugar, or frost. Here is a great frosting recipe for these brownies.
Easy Chocolate Butter Cream
6 T. butter, softened
1/3 – 3/4 c. cocoa, depending on how dark you want your frosting.
2 2/3 c. powdered sugar
1/3 c. milk
1 t. vanilla
Cream butter. Combine cocoa and sugar. Beat cocoa mixture in alternately with the milk until frosting is spreading consistency. Beat in vanilla. You may need an additional tablespoon of milk. Makes about 2 cups.
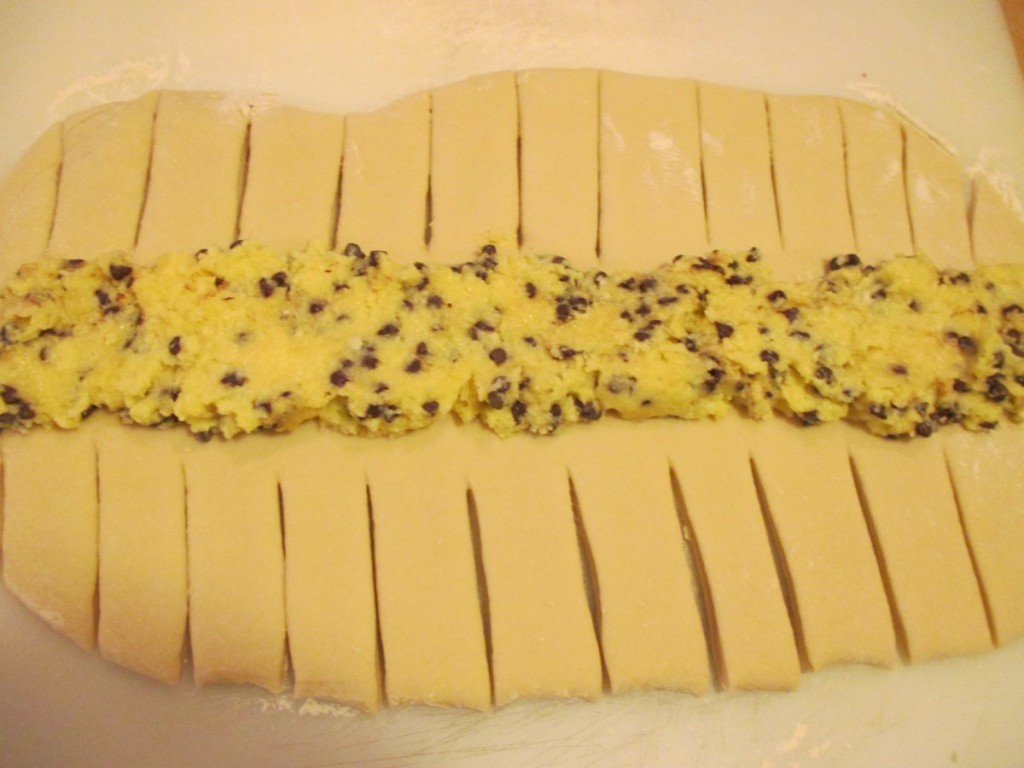
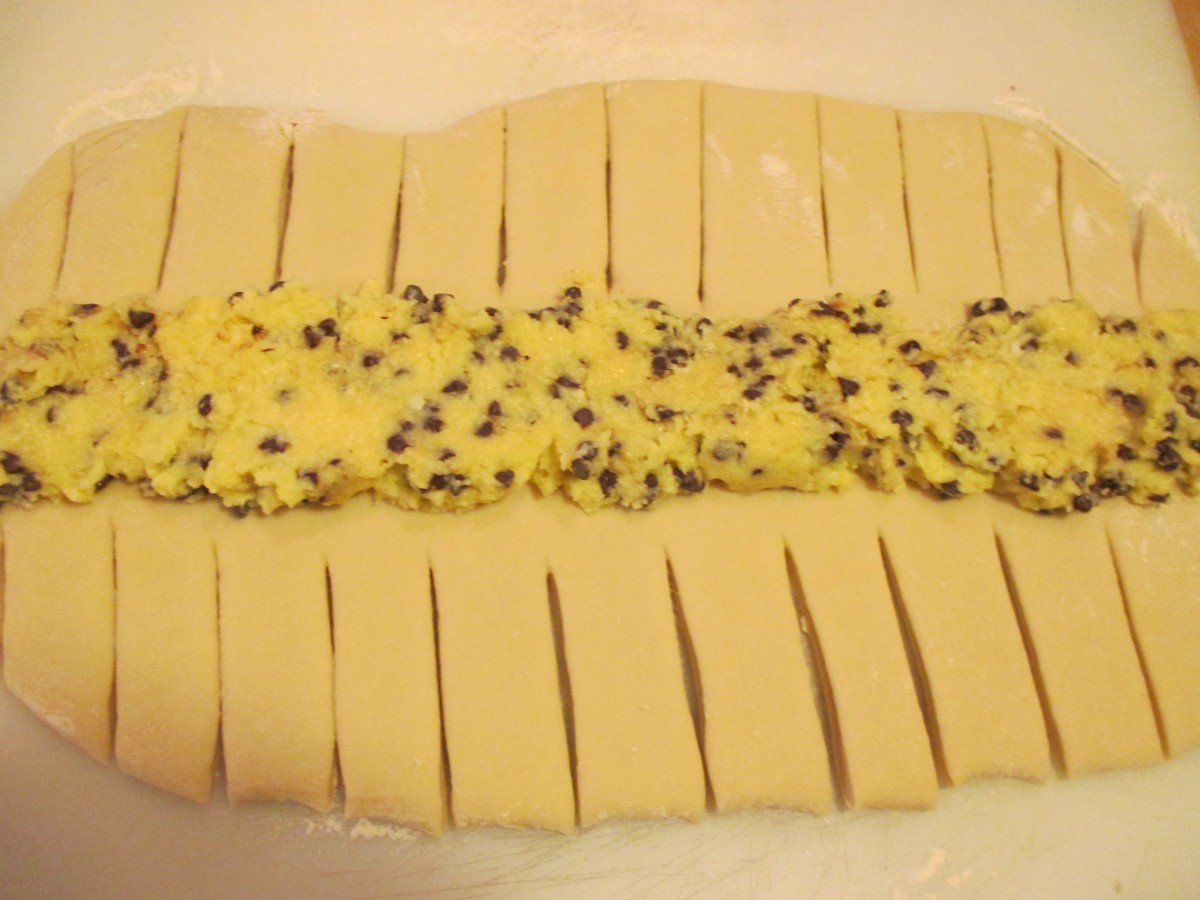
Cheesy Sweet Bread


For some reason, I had real trouble naming this recipe. It’s a sweet bread, with a cream cheese and chocolate chip filling. The filling reminded me of cheese cake, cheese Danish and cannoli, all rolled into one.
Whatever you call it- it is really good. This would be a great brunch or breakfast dish for a Sunday morning. You could also serve it for dessert.
It can be baked a head of time, and it even freezes well. It is sweet, but not too sweet. When I mixed up the filling ingredients, it was kind of runny. I decided to precook the filling, which worked out great.
I used a powder sugar glaze for the top, then added sliced almonds. I could see adding a drizzle of melted chocolate, too. Well, maybe the next time.
Cream Cheese Sweet Bread
3 ¼ c. flour
¾ c. sugar
2 t. cinnamon
1 t. salt
1 package quick-rising yeast
1 c. hot water
1 T. oil
Filling
1 (8 oz.) package cream cheese, softened
½ c. sugar
2 eggs
2 t. vanilla
1 c. mini chocolate chips, optional
Topping
2 c. powdered sugar
Milk, water or lemon juice
Toasted sliced almonds*
Set aside 1 cup of the flour. Combine remaining flour with the other dry ingredients in a medium bowl. Stir in water and oil and gradually stir in enough flour to make a soft dough. Turn onto lightly floured surface and knead until dough is smooth and elastic, about 5 minutes. Cover and allow dough to double, about 30 minutes. Meanwhile, combine cream cheese with sugar and beat until smooth. Add eggs and vanilla and mix well. Mixture will be soupy. Place cream cheese mixture in a microwave safe bowl and cook, in microwave, on high, for 3-4 minutes, or until cheese mixture firms up. Let it cool down 10 minutes and then stir it. Stir in chips, if using. Roll dough into a rectangle about 16 x 8. Spread cheese filling down center middle of dough. Cut one-inch wide strips of dough from filling to edge on both sides. It will sort of look like fringe. Alternating sides, fold strips up and over the filling at an angle. Carefully lift loaf onto greased baking sheet and place at an angle. Cover with a towel and set in a warm place to double in bulk, about 30 minutes. Bake in a preheated 375-degree for 20-25 minutes or until golden brown. Remove from oven and place bread on a rack to cool. Make the topping by combining powdered sugar with just enough liquid so you can drizzle it over the bread. Once the bread is cooled down, drizzle with the glaze. Sprinkle with the sliced almonds. Refrigerate leftovers.
If you use regular yeast, use warm, rather than hot water. Also, it will take a little longer for dough to rise.
*To toast the almonds, just place them in a skillet, over medium heat, and cook until lightly browned. Stir or toss often and watch closely so they don’t burn.

Duck Fat Bread


There is a reason my mother’s sweet bread recipe has such an odd name. My Mom used to make this wonderful sweet bread. Made it for every family occasion. The recipe uses butter.
She was a very frugal person. One day, she decided to render the skin from a duck she was using in soup. She would never just toss it. Too wasteful. Once it was cooled, the duck fat looked like butter.
She was making her sweet bread and substituted the duck fat for the butter in the recipe. When my brother-in-law, Bob, tasted it he declared it was the best batch yet. My Mom told him what the secret ingredient was, and from that day on, we always called it duck fat bread, even when it was made with butter.
Recently, my niece Sarah has made the bread. My nephew Bobby also made the bread with his daughter, Elia. It makes me happy to see the family traditions continued onto the next generation. Elia loved it so much, Bobby suggested we rename it Elia Bread!!! I am Ok with that.
The bread really is exceptional, with a texture that is soft and a little chewy at the same time. With Mother’s Day approaching, I thought I would share my family story with all of you. Happy Mother’s Day!!
Here is the recipe- wonderful even when made with plain old butter.
Mom’s Butter Coffeecake Braids aka Duck Fat Bread
4 1/2 c. flour
2 T. sugar
1 t. salt
½ c. butter or 1/2 c. cooled rendered duck fat
1 packet yeast
¼ c. warm water
2 t. sugar
1 c. evaporated milk
2 eggs, beaten
Combine flour with sugar and salt. Cut in butter or duck fat and set aside. Dissolve 2 teaspoons sugar in warm water. Dissolve yeast in warm water mixture and set aside. Allow to become bubbly, about 5 minutes. Combine milk with eggs. Stir in yeast mixture and add to flour mixture stirring well. Knead dough in bowl until smooth, about 10 minutes. Place on lightly floured surface and knead until smooth. Cover and let rise until doubled, about 1½ hours. Divide dough in half and then each half into thirds. Roll dough into ropes and braid three ropes together. Repeat with remaining 3 ropes. Place braids in 9×5 inch greased bread pans and cover with a towel. Place in a warm, draft-free place and allow to rise until doubled, about 1½ hours. Bake in a preheated 350 degree oven for 25 minutes. If you like glaze loaves while warm with a mix of powdered sugar, a little milk, butter, and vanilla. Toasted almonds or walnuts can be added, if desired. Makes 2 loaves.
Note: You can also refrigerate the dough after kneading it if you would prefer. Just place dough in an oiled bowl, cover with plastic wrap and chill overnight. Roll and shape dough into braids when cold from the fridge. Rise, covered, until doubled in bulk, about 2-3 hours. Bake as directed.
Note: You can also place loaves on a greased baking sheet for a longer, flatter bread rather than in loaf pan.
Note: This is the same dough my parents used to make jelly doughnuts.
Fish and Vegetable Soup


When you think of homemade soup, I am guessing you don’t think of fish. Perhaps a clam chowder, but not fish. Maybe you should. This soup is really quite wonderful. It is full of great flavors and it cooks up in no time. It is both light and satisfying. It sort of reminded me of a Manhattan style chowder, but with fish instead of clams.
You can use any mild fish you happen to like. I have used salmon, catfish, cod, tilapia and flounder in the past, and liked the way all of them tasted in the soup. You can also use a mix of more than one fish.
The recipe calls for canned tomatoes, but fresh tomatoes would work. I have used bottled salsa a few times. It added a nice little bit of extra flavor. You would add a pound of diced fresh tomatoes, if using fresh.
So here is the recipe. Hope you give it a try.
Fish and Vegetable Soup
1 medium carrot, sliced
2 ribs celery, diced
2 medium potatoes, peeled and sliced
1 large leek, white part only, cleaned and chopped
5 c. chicken, vegetable or fish stock
1 (14 oz.) can of stewed tomatoes, I used a pint of home canned tomatoes
Salt, pepper and cayenne pepper to taste to taste
1 1/2 lb. firm white fish cut into 1/2 inch cubes
1/4 c. flour
2 t. paprika
2 T. oil 1/4 c. fresh parsley
In broth cook the carrot, celery and leeks 10 minutes. Add tomatoes and potatoes and simmer, covered, for 15 minutes longer. Season to taste. Meanwhile mix the flour and paprika together and dredge the fish in it. Heat oil in a skillet over medium high heat and cook the fish until lightly browned on both sides. Drain on paper towels. Before serving add fish pieces and parsley to the soup and simmer 5 minutes. Serve with crusty bread. Serves 6.

Lemon Poppy Seed Scones

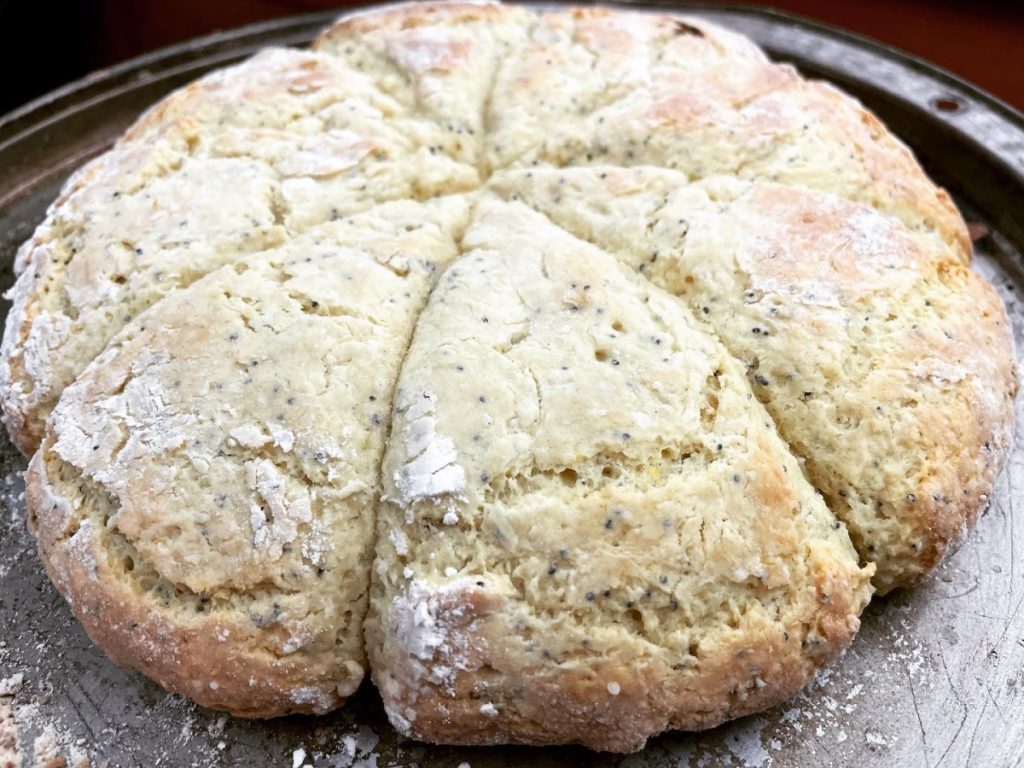
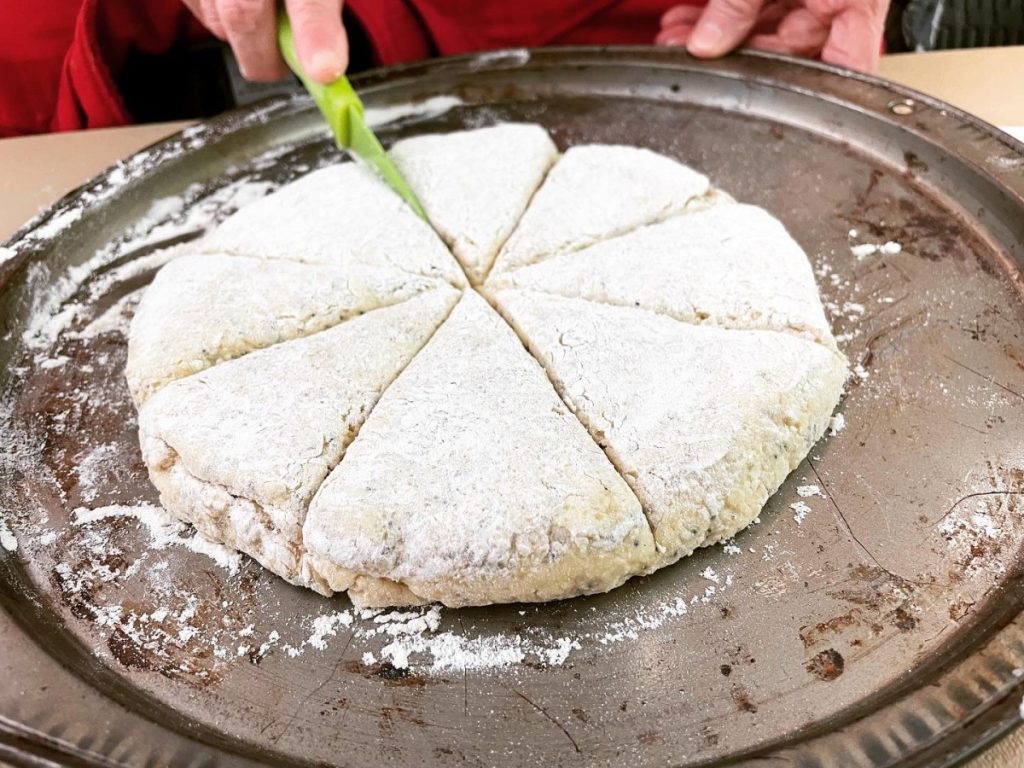
This recipe is a variation on a classic scone recipe that I bake often. The addition of poppy seeds and lemon add a nice flavor and texture to the scones. They rose beautifully and were crisp on the outside and tender in the middle. The secret to a good scone is not to over mix the dough. Handle the dough as little as possible once the dough comes together.
Lemon Poppy Seed Scones
2 c. flour
2 T. sugar
1 T. poppy seeds
2 t. baking powder
1 t. baking soda
½ -1 t. Lemon zest
½ t. salt
¼ c. butter, cut up
2/3 c. buttermilk
1 egg
Topping
2 T. sugar
1 T. lemon juice
Mix together sugar and lemon juice and brush on hot scones.
Preheat oven to 425 degrees and lightly grease a baking sheet or line with silicone baking mat. Combine dry ingredients in medium bowl and cut in butter to resemble coarse crumbs. Beat together milk and egg and add to flour mixture, stirring with fork until just coming together. Turn onto floured surface and knead 5-6 strokes or until ball of dough holds together. Transfer dough to prepared sheet and with floured hands, press dough into an eight-inch circle. To get a perfect circle, dust an 8-inch round cake pan with flour. Press dough into the pan, then quickly turn the pan over onto the prepared baking sheet. Remove cake pan. With a sharp, floured knife cut dough into 8 wedges. Bake 14-16 minutes. Makes 8.
Dough can also be patted out on work surface and cut into circles or pressed into a square and cut into smaller squares.