Pear Sweet and Sour Sauce


I love sweet and sour sauce. I have made many versions over the years and have used different fruits in them. I decided to try to make sweet and sour sauce with a ripe pear. It worked out wonderfully. Even better than I expected, actually. The sweetness of the pear was a great addition to the sauce. It came out a rich, mahogany color and is full of flavor. I will make a double batch the next time. I have already enjoyed it with egg rolls. Thinking of making sweet and sour chicken next.
I try to be as exact in measuring as I can. I had a pretty big Bartlett pear, but use 2 small pears, if that is what you have. Any pear will work in this recipe- just be sure it is ripe. As the sauce cooks the pear pretty much falls apart and disappears into the sauce. I also used Sriracha sauce, which is hot, but not as hot as some other hot sauces. Depending on the brand you are using, you might want to add less. Then again, heat is a matter of personal preference. Spice it up according to your own taste. That is one of the perks of making it yourself.
When I make a sweet and sour sauce- I use Clear Gel, instead of traditional corn starch. It is modified cornstarch (non-waxy) and when you reheat the sauce, it will stay thick. Regular cornstarch will often thin out when reheated. Clear Gel is used in pie fillings and a lot of frozen foods and condiments. Often listed on the label as modified food starch. It looks just like regular cornstarch. I buy mine online or when I am in stores in Amish communities.
So here is the recipe for a sweet and sour sauce I will surely make again. Planning on making some to freeze, too.
Pear Sweet and Sour Sauce
1 large pear, (about 8 oz.) peeled and diced fine
½ c. cider vinegar
½ c. sugar
3 T. soy sauce
1 T. minced garlic
1 T. Sriracha sauce- or other hot sauce- add to suit your taste
2 t. grated ginger
3 T. water
2 T. cornstarch or Clear Gel*
2 t. sesame oil
In medium saucepan, combine all ingredients, except the water, cornstarch and sesame oil . Simmer mixture, covered about 5-7 minutes, or until pear becomes tender. Stir occasionally. Combine cornstarch with water and stir until smooth. Pour slowly into simmering pear sauce, stirring to prevent sticking. Sauce with thicken. Stir in sesame oil. Makes about 2 cups. Keeps in fridge for weeks.
* If you use a type of cornstarch called Clear Gel, you can reheat the sauce without it becoming runny. Clear Gel, also called modified food starch, or modified cornstarch, is available online and at some specialty food stores. I find it in Amish communities.
Classic Pear Cobbler

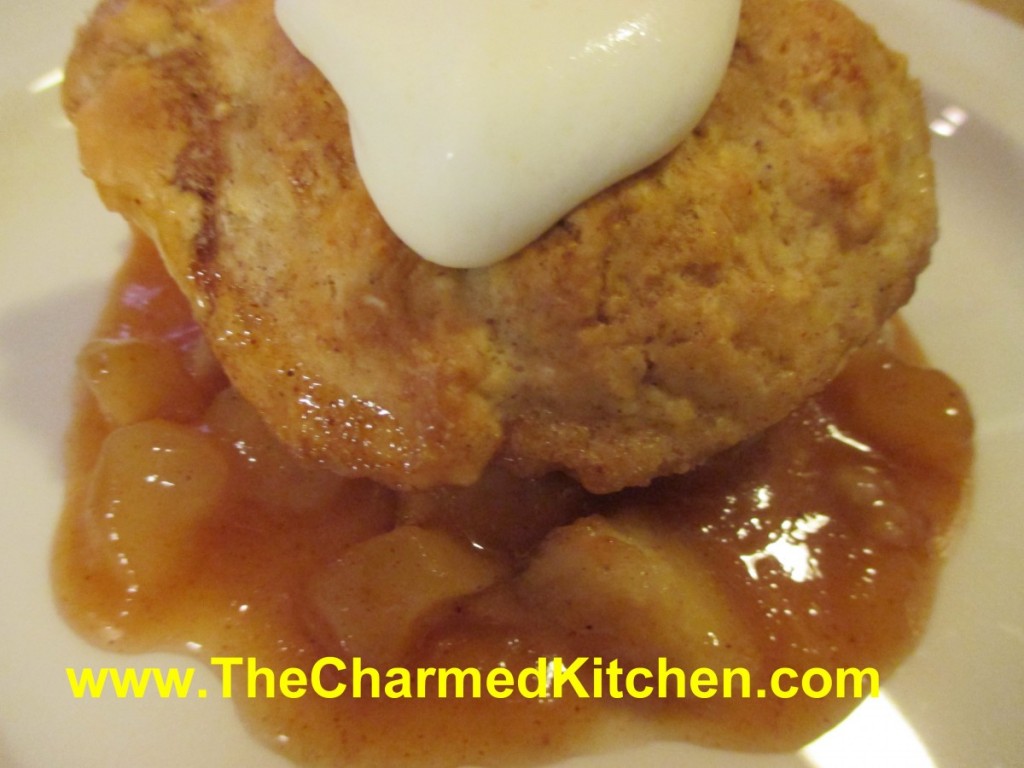
Cobbler is one of my favorite desserts for this time of year. I really enjoy making this pear cobbler for family and friends. Like apples, pears always remind me of Fall.
While cobblers can be made with any number of different fruits, I love using pears. It is one of the simplest desserts you can make from scratch, and one of my favorites, for sure.
In the time it takes to preheat the oven, you can have it ready to bake. This recipe calls for baking mix, like Bisquick or Jiffy Mix. I make my own- recipes follows- but use what you like. The cobbler is fine served plain, or with a dollop of whipped cream or ice cream. It can also be served cold, but I like to serve it warm.
If you prefer, you can also make the cobbler with a combination of pears and apples.
Pear Cobbler
4 c. peeled and sliced pears
½ c. sugar
1 T. plus 2/3 c. baking mix (Like Bisquick or Jiffy Mix or even homemade)- recipe follows
1-2 t. cinnamon
2 T. packed brown sugar
¼ c. butter
2 T. milk
In 1-quart shallow casserole, combine fruit, sugar, 1 tablespoon of the biscuit mix and cinnamon. In medium bowl combine remaining biscuit mix with sugar. Cut in butter to resemble coarse crumbs. Stir in milk to make a soft dough. Drop by spoonfuls over fruit mixture. Bake in a preheated 400-degree oven for 30 minutes, or until toothpick inserted into dough comes out clean. Let stand 5 minutes. Serves 4-6.
Baking/ Biscuit Mix
8 cups sifted, all-purpose flour
1 c. powdered milk
1 c. powdered buttermilk
¼ c. baking powder
1 T. salt
2 c. shortening*
Sift dry ingredients together 3 times. Cut in shortening to resemble cornmeal. Keep in an airtight container. Store in a cool dry place and use within six months.
*You can use butter or coconut oil in place of the shortening. Just store in the fridge, if you do. I use coconut oil.
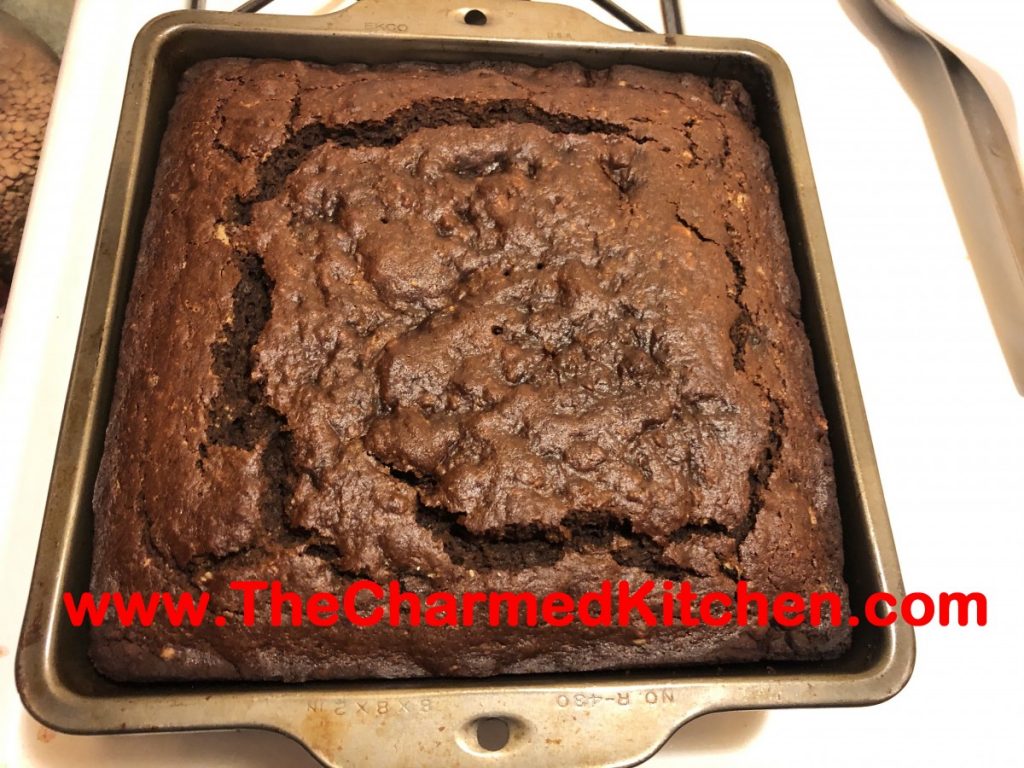
Molasses Applesauce Cake

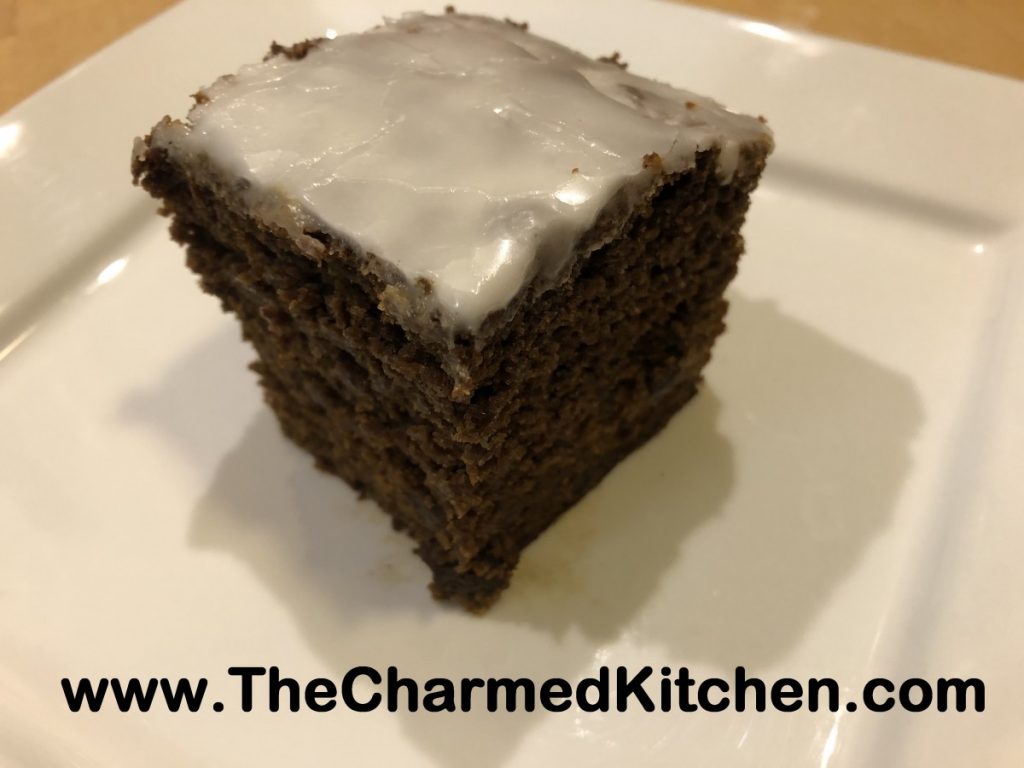
I can remember the first time I made a molasses cake. I was about 17. The recipe was in one of my Mom’s “women’s magazines”. I loved the earthy flavor that the molasses gave the cake.
I also remembered that the cake had applesauce in it. I canned a lot of applesauce last fall and have been looking for recipes using applesauce.
I found the original recipe last night and decided to make the cake. I did change a few ingredients around. The recipe I originally used had shortening in it. I swapped it out for butter. I also added more spices.
It is every bit as wonderful as before. Moist, not too sweet, with just a kiss of spices. So, if you have a jar of molasses and some applesauce, give this cake a try.
Molasses Applesauce Cake
2¼ c. flour
1 t. baking soda
1 t. cinnamon
1 t. salt
½ t. nutmeg
Pinch of cloves
4 oz. butter, softened, 1 stick
1 c. applesauce
1 c. molasses
1 egg
¾ c. raisins, plumped in warm water, then drained well, optional
Glaze:
1½ c. powdered sugar
2 T. lemon juice
Preheat oven to 350. Grease an 8-inch square baking dish. Set aside. In mixing bowl combine dry ingredients and stir to blend. Cut in butter to resemble coarse crumbs. Add remaining ingredients to flour mixture and stir until blended. Pour batter into prepared pan. Spread out evenly. Bake for 40-45 minutes, or until toothpick inserted into cake comes out clean. Cool cake then top with glaze. To make glaze, combine powdered sugar and lemon juice in small bowl, stirring until smooth. Pour over the cake. Serves 8.
Pear Coffee Cake

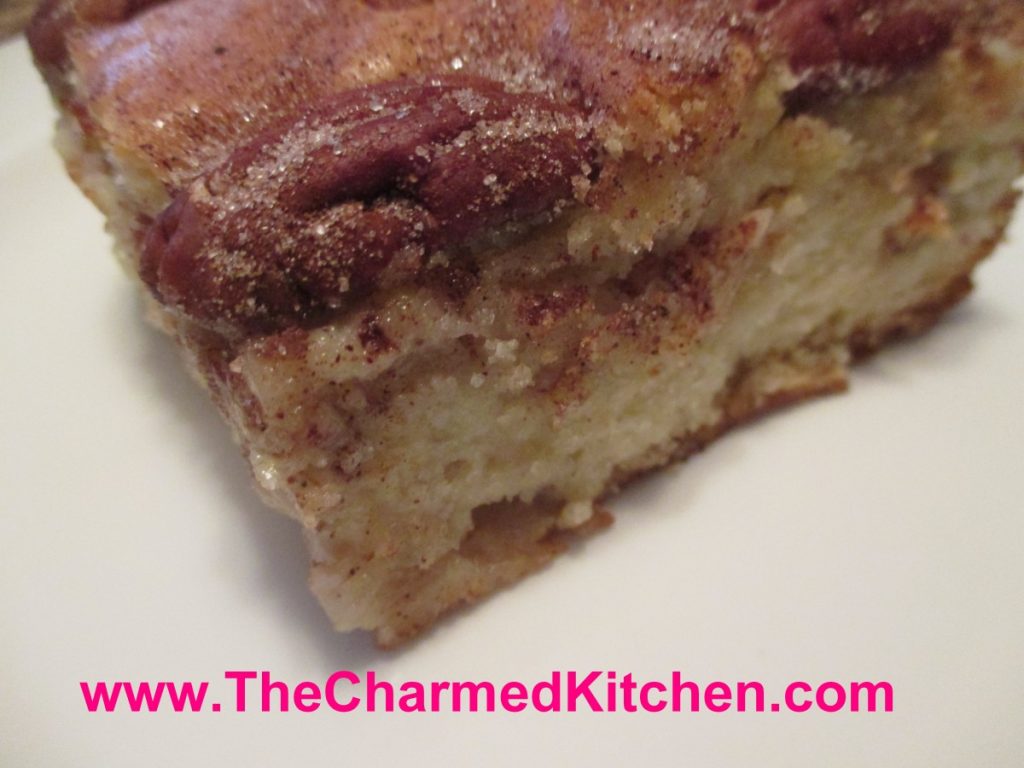
This may be one of my favorite pear desserts. I combined ripe pears with pecans and cinnamon sugar to create this moist and flavorful cake. I had Bartlett pears, but use whatever pears you have on hand. They should be ripe, but still firm. In the recipe directions I say to have the pears peeled and sliced, and ready to go in the cake. I actually made the batter first, then prepped the fruit. Mostly because I was distracted and forgot. It worked out just fine. The upside was that the pears did not have a chance to discolor, and I didn’t have to put them in lemon water until ready to use.
The cake is wonderful served all on its own, but I also enjoy topping it with a scoop of ice cream or whipped cream.
Pear Coffee Cake
1 c. oil- I like to use olive oil or avocado oil
4 eggs
1 t. vanilla
1/3 c. orange or lemon juice
3 c. flour
2 c. sugar
3 t. baking powder
¼ t. salt
3-4 pears, peeled, cored and sliced
½ c. sugar
1 T. cinnamon
¾ c. toasted pecan halves or pieces, optional
Grease a 9×13 inch pan. Preheat oven to 350-degrees. Combine oil with eggs, vanilla and juice until well blended. In a separate bowl, mix dry ingredients and add to egg mixture. Beat together until batter is smooth. Batter will be thick. Combine the ½ cup sugar with the cinnamon. Set aside. Place ½ of batter in prepared pan. Arrange pear slices on batter and sprinkle on ½ of the cinnamon mixture. Pour on remaining batter and top with the pecans, if using. Sprinkle with remaining sugar mixture. Bake 50- 60 minutes or until toothpick inserted in cake comes out clean. Cool before slicing. Serves 10-12.
Aunt Josie’s Coconut Cake Squares aka “Snowballs”

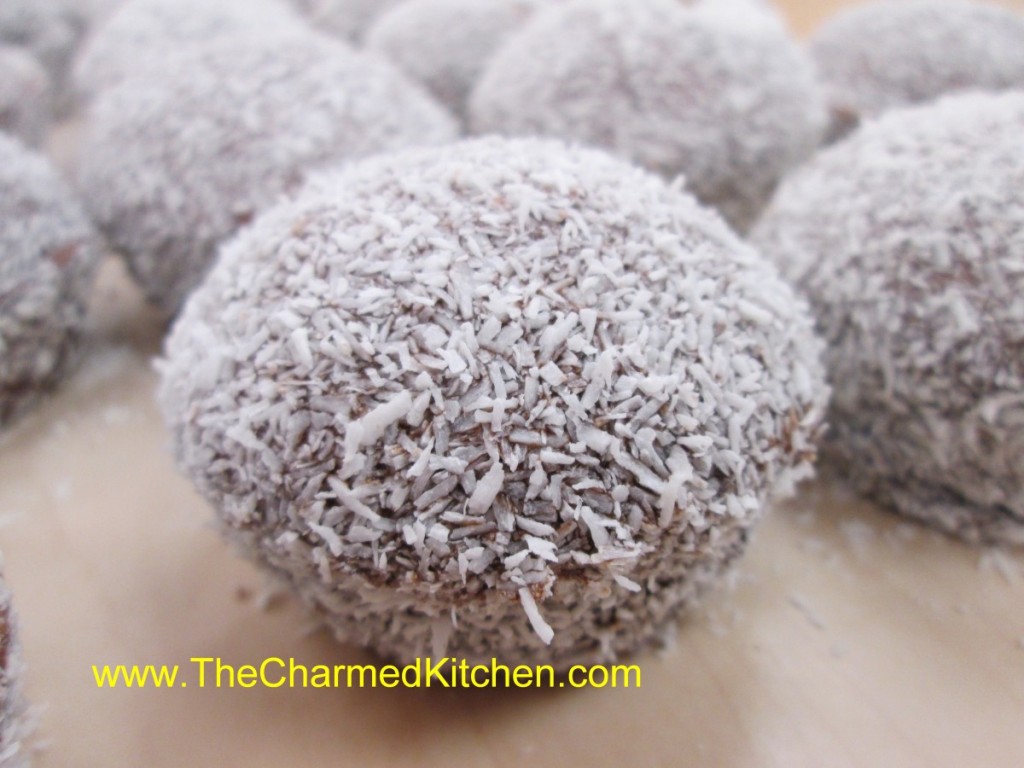
I have wonderful memories of my Aunt Josie making these for every family gathering. Aunt Josie cut the cake into squares. They were all perfectly even. I asked her how she did that. She told me that she used her cooling racks to get the lines even. She would set the cooling racks on her cake and use the wires as guides. So clever.
I never could seem to get them even, so I bake my cake in cupcake tins and call then snowballs. Whatever the shape, these little cakes are a favorite treat in my family. I made them for a recent family clambake and everyone enjoyed them. I even made a batch of gluten free ones for my cousin, Sue, who has celiac. For the gluten free ones, I just bought a gluten free cake mix.
In bakeries, you’ll find them in squares or rectangles. She shared her recipe with me a long time ago, and I am sharing it with you.
You can bake the batter in mini muffin pans or standard muffin pans. It just depends on what size you want your snowballs to be. After the cupcakes are baked, freeze them. The frozen cakes are dipped in a chocolate sauce and then rolled in desiccated coconut.
Desiccated coconut is dried and unsweetened. It looks like coarse, white bread crumbs. You can find it in stores that carry baking supplies and at Asian markets. It is the same kind of coconut used to make coconut shrimp.
Here is the recipe for making the “snowballs”. The recipe for the cupcakes is listed below, as well. I just doubled my classic white cupcake recipe, but you could use a box mix, if you prefer.
Aunt Josie’s Coconut Cake Squares aka “Snowballs”
1 white cake, prepared and frozen solid* or cupcakes
Chocolate Sauce
1 c. unsweetened cocoa
1 1/4 c. sugar
2 c. water
1 t. vanilla
1 c. desiccated coconut (available at cake supply stores and some health food stores)
Cut frozen cake into small squares, or cake can be baked in regular or mini cupcake tins. Keep cake frozen until ready to use. Meanwhile, make the chocolate dipping sauce. Combine remaining ingredients, except coconut, in a medium saucepan. Bring to a boil then simmer 5 minutes. Remove from heat and cool completely.
Using toothpicks or fondue forks, dip frozen cake in sauce let drain a few seconds, then roll in the coconut. Can be enjoyed right away or frozen again for later use.
*If you make the cake in muffin tins you’ll get 24 cupcakes or about 60 mini cupcakes.
Classic White Cupcakes
1 cup sugar
1/2 cup butter
2 eggs
2 teaspoons vanilla extract
1 1/2 cups all-purpose flour
1 3/4 teaspoons baking powder
1/2 cup milk
Preheat oven to 350 degrees. Line a muffin pan with 12paper liners. In a medium bowl, cream together the sugar and butter. Beat in the eggs, one at a time, then stir in the vanilla. Combine flour and baking powder, add to the creamed mixture and mix well. Finally stir in the milk until batter is smooth. Pour or spoon batter into the prepared pan. Bake 20 to 25 minutes. Cupcakes are done when they springs back to the touch. Makes 12.
Classic Eggs Benedict


If you are looking for a special breakfast or brunch recipe, Eggs Benedict would be a top choice for me.
Eggs Benedict are English muffins, split and toasted, topped with some lightly browned slices of ham, or more traditionally, Canadian bacon. That is topped with poached eggs and then the Hollandaise sauce. There are a lot of variations. You can add wilted spinach, bacon, crab or even lobster, if you really want to splurge. I have a vegetarian friend who subs out the meat with some asparagus or cauliflower. Whatever makes you happy, works for me.
Here are the directions for making a classic Eggs Benedict.
Eggs Benedict
English Muffins allow one per serving
Eggs – for poaching – you’ll need 2 for each serving
Ham or Canadian bacon
Hollandaise Sauce- recipes follow
Get all your ingredients ready. You’ll need a skillet with water boiling in it to poach the eggs. Add a couple of teaspoons of vinegar- it helps hold the eggs together better. Slice the ham, if needed, and brown it in a skillet. Keep warm until needed. I put the split English muffins in the toaster oven, so I could start toasting them when I started poaching the eggs. Next, make the Hollandaise sauce. I have included two ways to make your Hollandaise. One version is made in the microwave, the other with a traditional double boiler. Both come out great. For traditional Hollandaise you’ll need either a double boiler, or a pot with simmering water for this, so get it ready with hot water. For the microwave, just a glass bowl and a whisk. Recipes and directions for both versions follow.
Microwave Hollandaise
1 stick butter ( 1/2 cup)
3 egg yolks
1/2 T. lemon juice
pinch of salt
fresh ground pepper, optional
In microwave safe bowl, soften butter. This will take 10-15 seconds. Don’t melt the butter, just soften it. Watch carefully. It may take less time if the butter is already room temperature, longer if butter is cold. I often make a double batch, so allow a few more seconds for larger quantities. Whisk together the egg yolks and lemon juice. Whisk the yolk mixture into the softened butter. Let stand on the counter a minute or two. Place in microwave and cook on high heat for 15 seconds. Be careful- only 15 seconds at a time. Whisk the mixture and return to the microwave, cooking 15 seconds. Repeat this process until sauce is thickened, smooth and shiny. It should take 3-4 of these 15 second cooking sessions, but ovens vary. It takes a little longer if you double the batch. Don’t worry if the sauce doesn’t look smooth the first time you whisk all the ingredients together. It gets smoother upon further cooking/whisking. Season with salt and pepper to your own taste. Enjoy with Eggs Benedict or as a sauce for steamed veggies.
Classic Hollandaise Sauce
4 egg yolks
1 T. lemon juice
½ cup butter, melted
Salt and cayenne to taste- just a pinch of each will do.
Since I used a bowl over a pot with simmering water, I put the egg yolks in a stainless steel bowl with the lemon juice and whisked until kind of frothy. If you are using a double boiler- do that in the pot from the double boiler. Once the mixture looked thick, I placed the bowl over the pot of simmering water and whisked it for a couple of minutes to warm the eggs. The simmering water in the pot should not be deep enough to touch the bottom of the bowl. While whisking, slowly drizzle in the melted butter. Keep whisking so the mixture stays smooth. If you don’t, the eggs scramble and get all lumpy. Once all the butter is in, cook about a minute longer- or until sauce is thick and smooth. Remove from the heat, season to taste, and keep warm until ready to use. Don’t wait too long. Hollandaise is best used pretty soon after you make it. If it gets too thick, add a little warm water to thin it out.
To poach the eggs, place eggs, gently, in the simmering water- the stuff in the skillet that you added vinegar to. Some people like to have the water swirling when they do this by stirring it just before adding the eggs. I just put the eggs in gently, and it seems to work just fine. Use a slotted spoon to sort of fold the whites up over the eggs. Poach for about 3½ minutes. Whites should be set, but yolks will be runny. Remove from the pan with a slotted spoon and place on a folded towel to get off some of the water.
To assemble the eggs Benedict, place toasted English muffins halves on a plate. Top with a slice, or two, of the ham. Then gently add a poached egg on top of the ham. Spoon over the Hollandaise and serve. A little more work than most egg dishes, but worth the effort.
Zucchini and Corn Saute

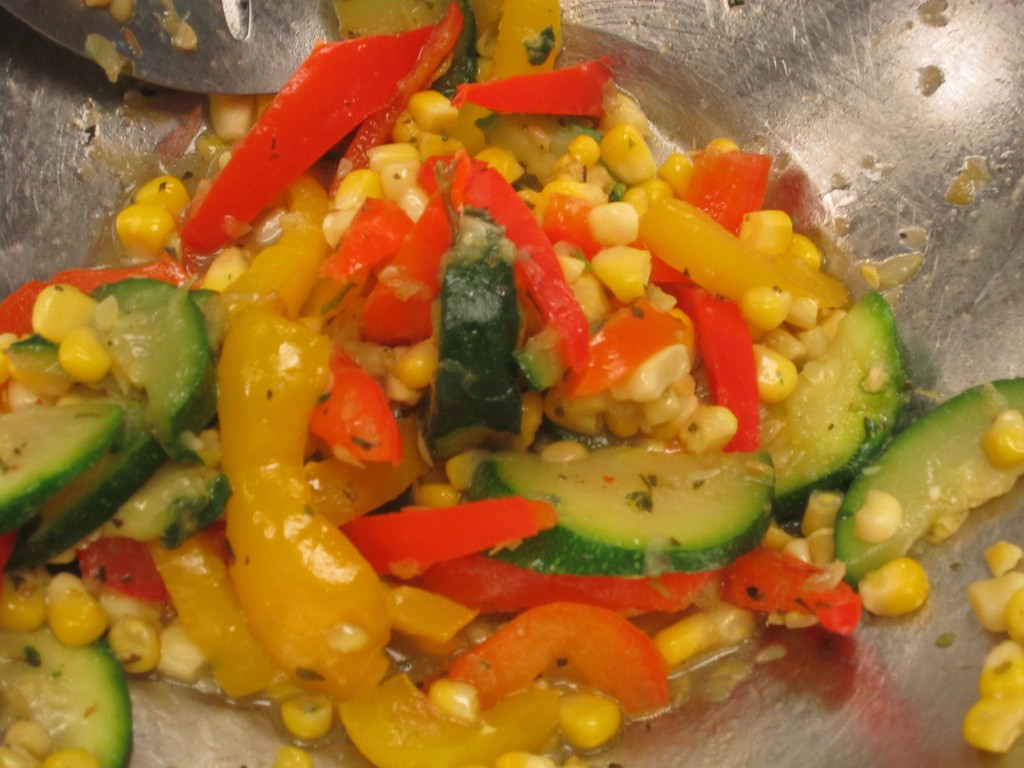
For those of you looking for another way to use some of those zucchini this dish is really fun and easy. The flavors of the zucchini, corn and peppers work really well together and makes a tasty side dish in just a few minutes. I served mine in pita bread. I sometimes add a little cheese, too.
Quick Zucchini and Corn Sauté
2 sweet peppers, seeded and cut into strips
2 medium zucchini, sliced
Oil
2 c. corn kernels cut from cobs, about 3 ears
2-3 cloves garlic, minced
1 t. salt
2 t. Italian seasoning
In oil, cook peppers and zucchini until crisp tender, about 5 minutes. Add remaining ingredients and cook 4 more minutes, or until heated through. Serves 6-8.
Linguine with Clam Sauce


This classic is one of my favorite pasta recipes. I like to keep it pretty simple. Clams, half and half, garlic, parsley and linguine. Sometimes I add a little white wine or sherry to the sauce.
I have been craving it for a few days and decided to make it for dinner yesterday. As an added bonus, it is a dish that can be prepared in no time at all.
I like the pasta to absorb flavor from the clam sauce so I cook the pasta barely to al dente. Then I add it to the clam sauce and let them cook together a few minutes. The sauce almost disappears, but the flavor of the pasta is wonderful!!
I use frozen clam meat (thawed), instead of canned clams, when I have them. I get them at my local Asian grocery store. If I do use canned clams, I drain the liquid and save it to use later in clam chowder. I just pop the liquid in the freezer.
Linguine with Clam Sauce
1 T. oil or butter
2 cloves garlic, minced- you can add more garlic
2 cans, 10 oz. each, whole clams, drained*
½ c. white wine or dry sherry, optional
1 c. finely chopped parsley
1 c. half and half or milk
1 T. lemon juice
Salt and Pepper to taste
1 lb. linguine
Heat oil in skillet and sauté garlic until tender. Add clams, wine or sherry, if using, and parsley and cook over medium heat 5 minutes. Add half and half, lemon juice, salt and pepper and simmer 5 more minutes. Sauce should start to reduce a little. Meanwhile prepare linguine al dente. Drain pasta and transfer to the skillet. Toss with the sauce and simmer together a few minutes. Pasta will absorb some of the liquid. Adjust seasonings. Transfer to serving bowl. Makes 6 servings.
* Rather than using canned clams, I have been using frozen, cooked clams that I get at the Asian grocery store. A one-pound bag gives me a lot of clam meat for the sauce. Thaw and drain before using in this recipe.
For linguine with a red clam sauce just substitute 1-2 cups of your favorite spaghetti sauce for the milk and lemon juice. Serve with fresh grated Parmesan cheese.
Homemade Plum Jam

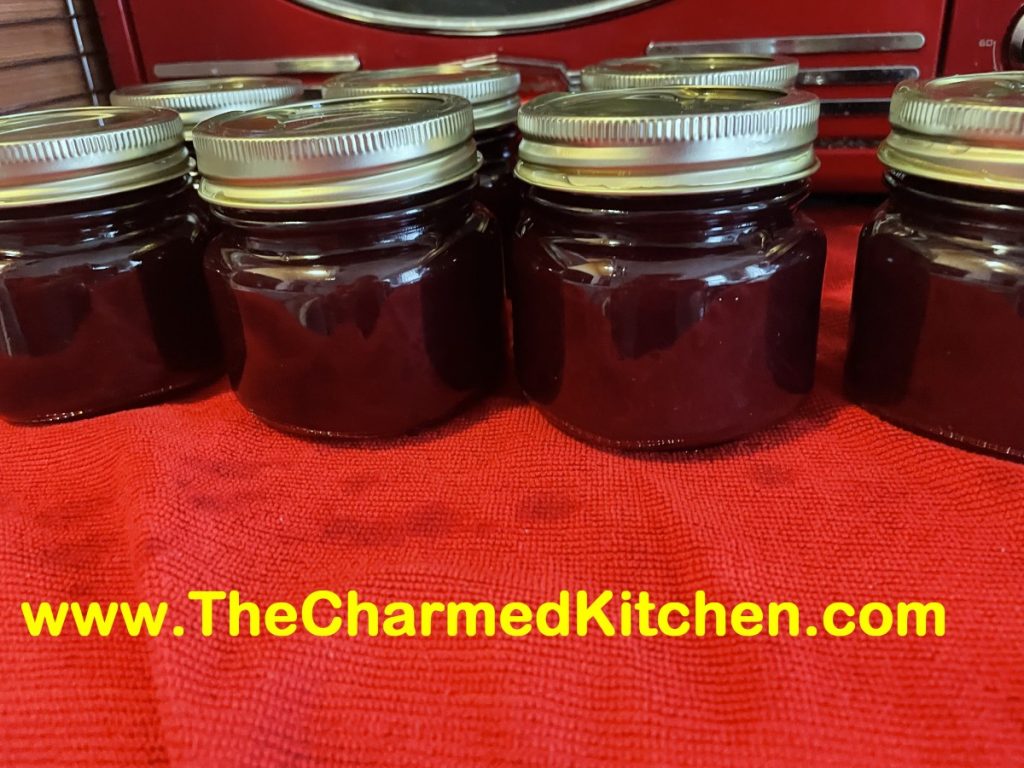
This is one of the easiest jams you can make. You don’t need pectin and it cooks pretty quickly into sweet, thick jammy goodness. I prefer a softer set, so I stopped cooking mine a little sooner than you might prefer. I like a jam that spreads easily, even after it has been opened and stored in the fridge. I love this jam.
I did a test with just a couple of plums. The flavor was great, but some of the pieces of the peel seemed too big. I could see them in the finished jam. To insure the skins got chopped up, I cooked my jam for awhile then used an immersion blender to smooth it out. This is just a cosmetic preference. You can just cook down chopped up plums and they will be fine.
So here is the recipe. I got it from the NCHFP website. The only changes I made was to up the processing time to 10 minutes, so I didn’t have to sterilize the jars. I also let the jam sit in the canner a few extra minutes to prevent siphoning.
Plum Jam
2 quarts chopped, pitted tart plums (about 4 pounds) – any plums will work
6 cups sugar
1½ cup water
¼ cup lemon juice
Combine all ingredients; bring slowly to boiling, stirring occasionally until sugar dissolves. Cook rapidly to, or almost to, the jellying point (which is 8°F above the boiling point of water, or 220°F at sea level). Stir constantly to prevent sticking or burning.
Pour hot jam into hot jars, leaving ¼ inch headspace. Wipe rims of jars with a dampened clean paper towel; adjust two-piece metal canning lids. Process in a boiling water bath canner for 10 minutes. Turn off the heat and allow jars to remain in canner 5 minutes before removing. Set jars on cooling rack or towel in a draft free place while they cool down. Check seals once jars are cool. Yield: About 8 half-pint jars.
Aunt Josie’s Clam Chowder


It is clambake season around here and it seemed like a great time to share this recipe. Aunt Josie’s clam chowder is a favorite of mine. I have loved it from the first time I had it. It is pretty easy to make and full of flavor. We have it at every family clambake.
You have the option of adding some stock or water at one point. I sometimes have seafood stock in the freezer, but a bottle of clam juice would work great, too.
So here is the recipe. I hope you enjoy it as much as I do.
Aunt Josie’s Clam Chowder
2 T. butter
1 onion, chopped
1 rib celery, chopped
2-3 small potatoes, cubed
1 c. water or stock
2 (10 oz.) cans clams, undrained*
1 T. butter
2 T. flour
2 c. milk – I use half and half
salt and pepper to taste
Sauté onions and celery in butter until tender, but not browned. Add potatoes and water or stock and cook, covered until potatoes are tender. Stir in clams and set aside. In another saucepan, combine butter and flour over low heat and stir in milk, stirring to make a white sauce. Cook mixture until it thickens and starts to bubble. Add it to the clam mixture and adjust seasonings. Bring to a gentle simmer. I added some parsley right before serving. Serves 4.
* You can also add clam meat and a little extra stock. I often buy frozen clam meat.
This post is dedicated, with love, to Aunt Josie.


