Smoky Brussels Sprout Salad

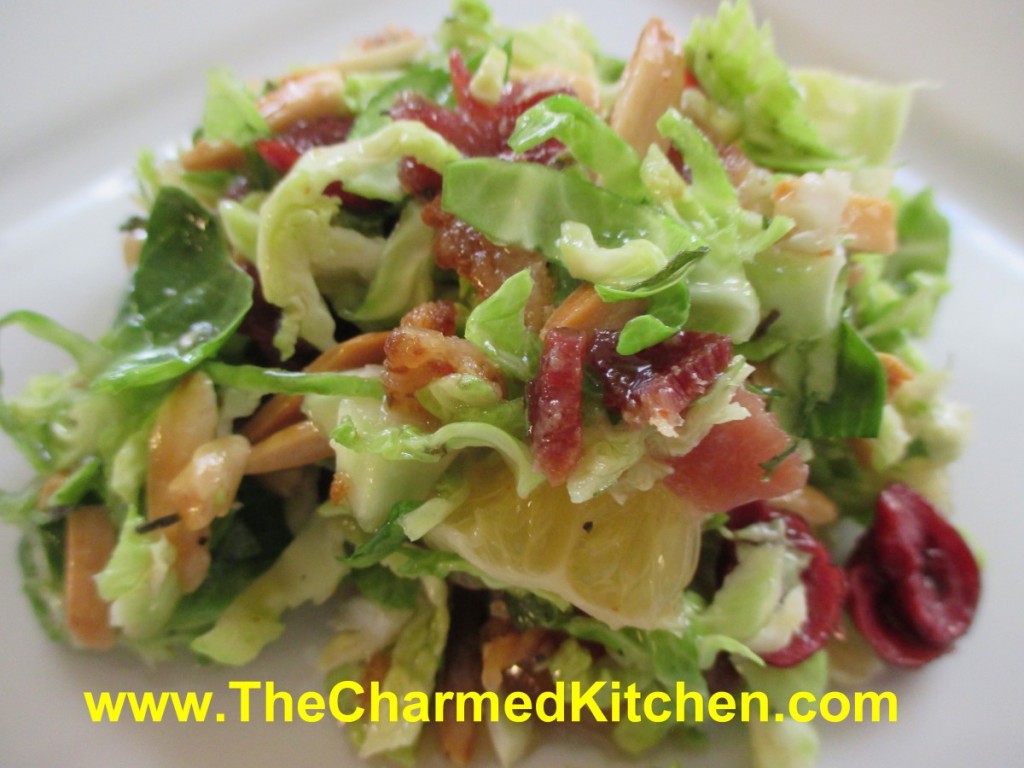
I know some people don’t like Brussels sprouts. I am not one of them. I have always loved them, even when I was a kid. I like them steamed with butter, roasted, pan fried and even raw. This salad is a great way to enjoy their crunchiness in raw form. The smoky flavor come from the bacon. The dressing, sweetened with maple syrup, really makes the dish.
The nice thing about this salad, is that it tastes good even the next day. The sprouts are like little cabbages. Unlike leaf lettuce, which wilts quickly once dressed, the sprouts soften some, but retain most of their crunch.
Smoky Brussels Sprouts Salad
8- 10 oz. Brussels sprouts
1 large orange, peeled and cubed
4 slices bacon, cooked and crumbled
¾ c. dried cranberries
½ c. toasted slivered almonds*
Dressing:
¼ c. olive oil
¼ c. apple cider vinegar
2 T. maple syrup
1 T. fresh chopped parsley- or 1 t. dried
2 t. hot sauce, or to taste
½ t. dried thyme
½ t. dried basil
Salt and pepper to taste
Trim bottoms off the sprouts, cut in half and slice thin. You should end up with about 4 cups of sliced sprouts. Place in large bowl with the remaining salad ingredients. Place dressing ingredients in a jar with a tight fitting lid and shake well to combine. Toss over Brussels sprout mixture.
Note: The salad ingredients can all be assembled a day ahead, then just dressed when ready to serve. This salad is also good the next day.
*To toast the almonds, place in a skillet over medium low heat and stir occasionally, until toasted. Be careful, once they start to brown, they can burn easily. In class last night, the ladies making the salad toasted the almonds in the bacon fat. They came out perfect!!!
Pecan Crusted Salmon

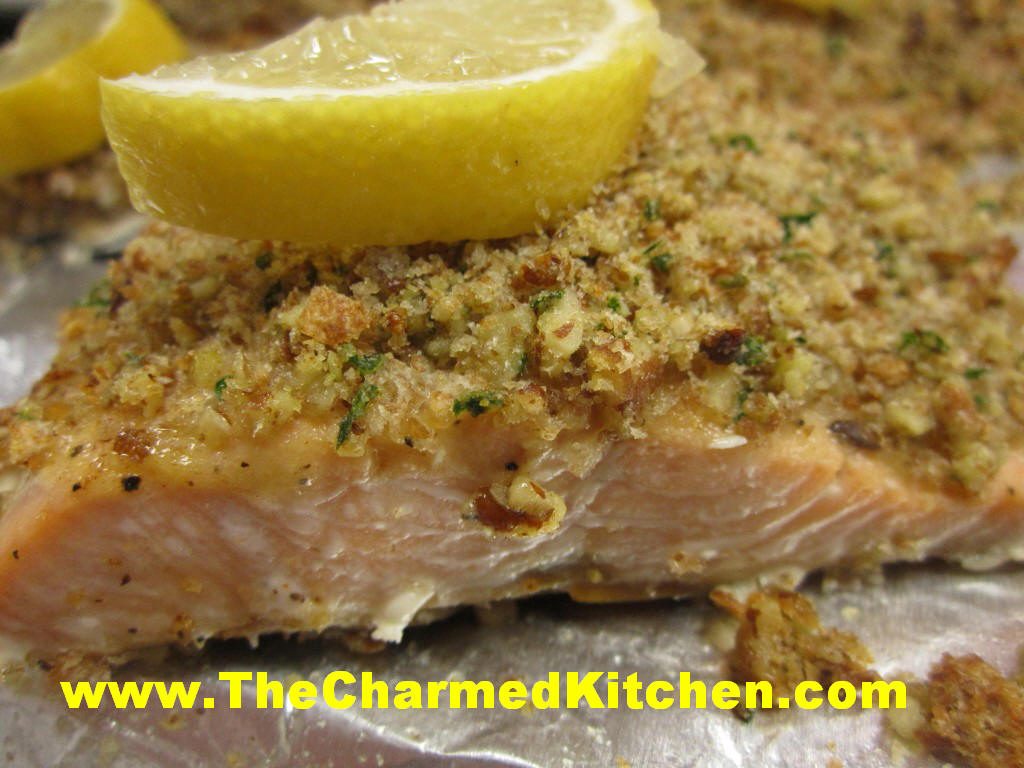
If you love salmon like I do, this is a fun way to prepare it. The crunch from the nuts adds a nice contrast to the texture of the fish. The flavors work well together, too. You don’t have to use pecans. I prefer them, but finely chopped walnuts, hazelnuts, almonds or even pumpkin seeds might be fun.
A combination of Dijon mustard, butter and honey helps the nuts to stick to the fish. There are a few fresh bread crumbs in there as well.
This dish is simple enough to prepare any night of the week, but special enough to make for company.
I used salmon fillets. You could use a whole side of salmon. You just have to increase the baking time to about 20-25 minutes and reduce the oven to 425 degrees. Depending on the size of the piece of salmon, it might take a few more minutes.
You could use other fish, but you need a sturdy fish that will stand up to the topping. I have made it with Steel Head Trout and it worked out beautifully.
Pecan Crusted Salmon
2 T. Dijon Mustard
2 T. melted butter
4 t. honey
1/4 c. fresh bread crumbs
1/4 c. finely chopped pecans or walnuts
2 t. chopped parsley
4 salmon fillets
Salt and pepper
Lemon wedges
Mix together mustard, butter and honey and set aside. Mix together bread crumbs, nuts and parsley and set aside. Season each fillet with salt and pepper. Place on lightly greased baking or broiling pan. Brush each fillet with mustard mixture. Divide crumb mixture among fillets, patting to hold. Bake in 450 degree oven for 10 minutes per inch thickness of fillets. Serve with lemon wedges. Serves 4.
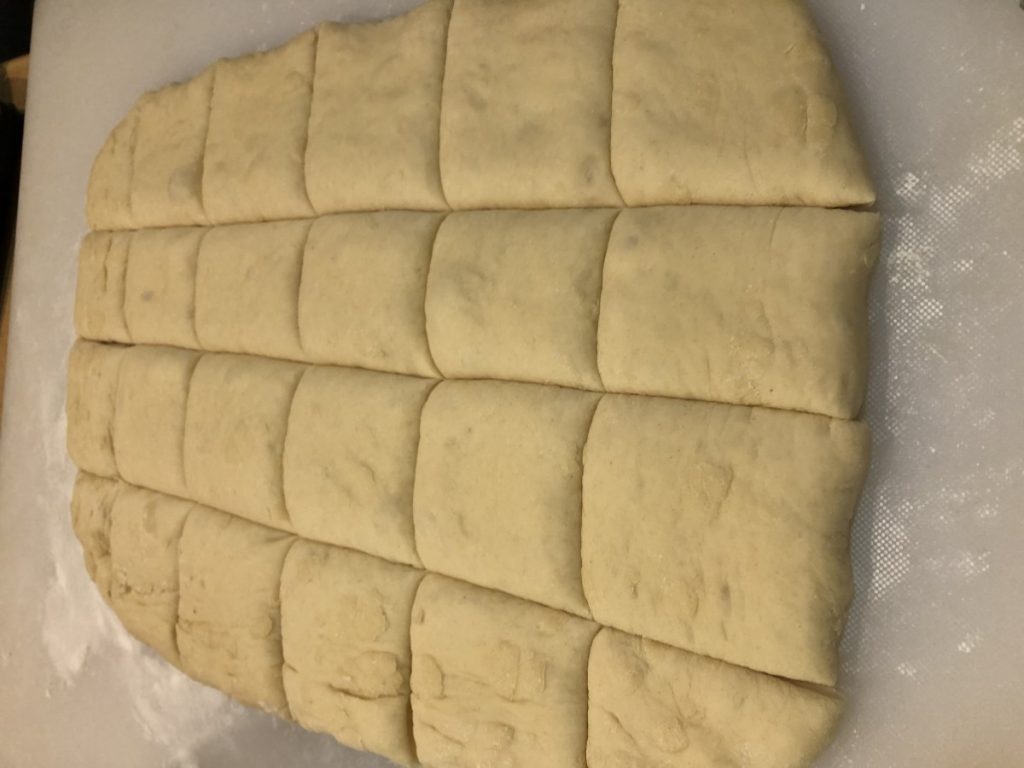
Beignets


Beignets are a fun addition to any Fat Tuesday/ Mardi Gras celebration. Beignets are the official fried dough of New Orleans. These squares of fried dough are often referred to as a fritter or doughnut.
Beignets can be made with a choux pastry- like the type of dough used for cream puffs. They can also be made from a yeast raised dough. I made mine with a yeast dough.
Once fried, beignets are drained on paper towels and then tossed in a bag with powdered sugar. They are served hot, or at least warm. The fresher the better.
They really aren’t that difficult to make. The dough is soft and pliable. Very easy to handle. When you roll the dough into a rectangle to cut into squares, do your best to get the corners squared off. But don’t get too concerned. I always end up with the four corners a little misshapen. They still taste good. I use a pizza cutter to cut the dough into squares.
Beignets
1 1/2 cups lukewarm water
1/2 cup granulated sugar
1 envelope active dry yeast
2 eggs, slightly beaten
1 1/4 teaspoons salt
1 cup evaporated milk
7 cups bread flour
1/4 cup shortening, softened butter or oil
Oil, for deep-frying
3 cups confectioners’ sugar
Mix water, sugar, and yeast in a large bowl and let sit for 10 minutes. In another bowl, beat the eggs, salt and evaporated milk together. Mix egg mixture to the yeast mixture. In a separate bowl, measure out the bread flour. Add 3 cups of the flour to the yeast mixture and stir to combine. Add the shortening and continue to stir while adding the remaining flour. Remove dough from the bowl, place onto a lightly floured surface and knead until smooth. Brush a large bowl with a little oil. Put dough into the bowl and cover with plastic wrap or a towel. Let rise in a warm place for at least 2 hours. Preheat oil in a deep-fryer to 350 degrees. Add the confectioners’ sugar to a paper or plastic bag and set aside. Roll the dough out to about 1/4-inch thickness and cut into 1-inch or 2- inch squares. Deep-fry, flipping constantly, until they become a golden color. After beignets are fried, drain them for a few seconds on paper towels, and then toss them into the bag of confectioners’ sugar. Hold bag closed and shake to coat evenly. Makes about 4 dozen, when cut in 2-inch squares, 8 dozen when cut in 1-inch squares.
Note: This recipe makes a lot. I cut the recipe in half when I don’t need so many. You can cut them a little smaller, if you prefer. They puff up a lot when fried.

Spicy Shrimp and Grits


A fun way to celebrate Mardi Gras is with shrimp and grits. Everybody seems to love them. As an added bonus, they are fast and easy to make. It’s all in the timing. Get your grits simmering on the stove, while you clean and season the shrimp. Once the grits are ready, keep them warm and quickly saute the shrimp. Then just serve them up.
Some folks like to add cheese to the grits. I didn’t this time, but feel free to add a cup or two of shredded cheese, if you like. Sharp cheddar or Parmesan are good choices. Add the cheese when you add the cream and butter.
I didn’t get specific on how much of the seasonings to add. I dusted the shrimp with the seasonings and tossed to get them all coated evenly. I was generous with all but the cayenne. I used about a 1/4 teaspoon of cayenne. They still had a nice kick, but I think I could have used a bit more. You can always serve them with hot sauce on the side, so guests who like spicier foods can add that to their shrimp.
Spicy Shrimp and Grits
1 c. grits, I used regular grits, not quick cooking
4 c. water
½ t. salt
3 T. butter
1/3 cup heavy cream
1 lb. large raw shrimp, shelled and deveined
Salt
Pepper
Cayenne pepper
Garlic powder
Paprika
2 T. oil
2 T. butter
In saucepan, bring water to a boil and add the grits and salt. Turn down to a simmer and cover the pan. Stir every few minutes. Cook until grits are tender and water is absorbed, about 20 minutes. While the grits are cooking, place shrimp in medium bowl and season to taste with the salt, pepper, cayenne, garlic powder and paprika. Toss shrimp to coat evenly and set aside. Once grits are done cooking, stir in the cream and butter. Adjust seasoning. Cover and remove from the heat. Heat oil and butter in skillet and cook shrimp over medium high heat, turning to cook on both sides until shrimp are cooked, about 5 minutes. They should get a nice, golden color. Larger shrimp will take longer, but be careful not to overcook them. To serve, spoon some grits on a plate or in a shallow bowl. Top with some shrimp and serve. Serves 4.
Creole Jambalaya

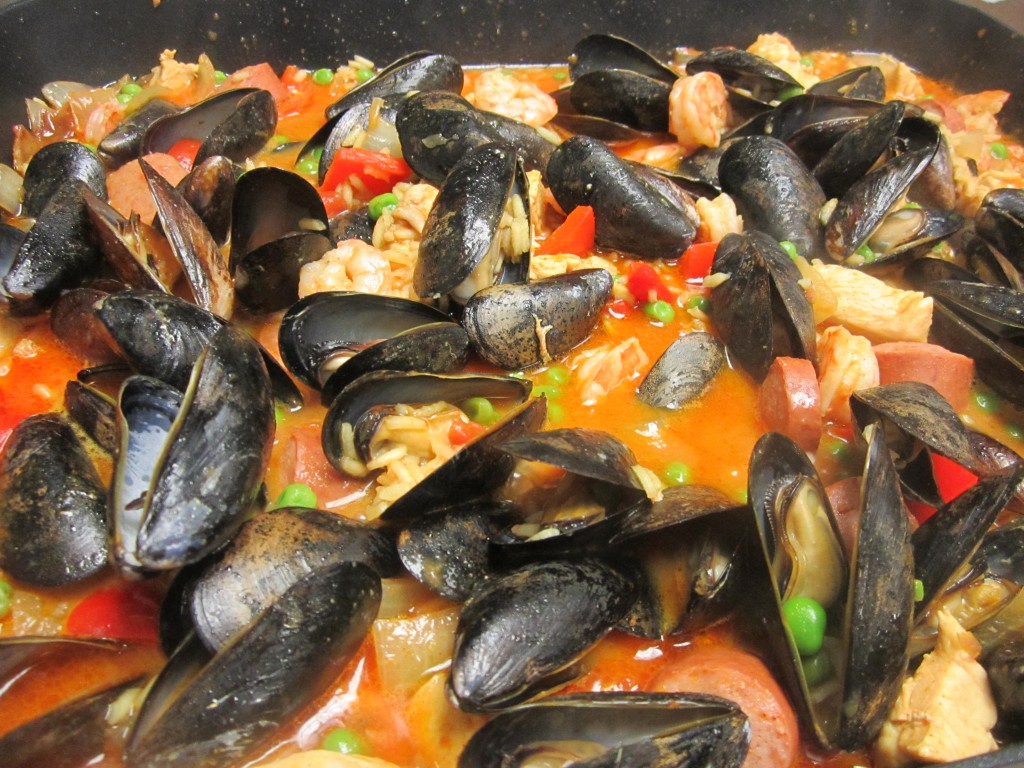
There are so many variations for Jambalaya. I don’t think I ever had a Jambalaya I didn’t like. This Creole dish varies a little with each person who makes it. The assortment of ingredients adds so many layers of flavor.
Traditionally, Jambalaya would include smoked sausage or ham, chicken, shellfish, rice, tomatoes and assorted veggies and seasonings.You can see why there are so many variations. For me, it just isn’t Jambalaya without mussels. Lots and lots of mussels.
It is definitely a great dish for a party. It is impossible to make a small batch of Jambalaya!!!
This recipe is a tweaked version I got from a boss of mine a long time ago. I must say, every time I make this for friends or family it gets rave reviews.
The heat level in this dish is really about personal preference and for the people who are going to be eating it. I like it a bit spicier, so I add more cayenne. If I am making it for friends who like their food less spicy, I use less. Of course, you can always serve it with hot sauce on the side, so people can spice it up a little more.
Creole Jambalaya
1 lb. smoked sausage, sliced into 1-inch pieces
1 c. chopped onions
1 c. chopped celery
2 garlic cloves, chopped
1/4 c. oil
2 c. cubed uncooked chicken
3 c. chicken stock
1 1/2 c. uncooked rice
1 (14.5 oz.) can tomatoes
2-3 t. paprika
Cayenne pepper to taste
Black pepper to taste
1/4 t. ground turmeric
1 lb. medium shrimp, peeled and de-veined, uncooked
1 1/2 c. shelled peas, fresh or frozen
1/2 c. chopped red pepper
1-2 lb. mussels, scrubbed
In Dutch oven cook sausage, onion, celery and garlic in oil until onion is tender. Add remaining ingredients, except shrimp, peas, sweet red peppers and mussels. Bring to a boil, turn down to simmer and cook 20 minutes. Stir in shrimp, and peppers, cover and cook 10 minutes. Stir in peas and stick in mussels. Cover and cook 5 more minutes. Discard any mussels which have not opened in 5 minutes. Serves 8.
Mardi Gras King Cake

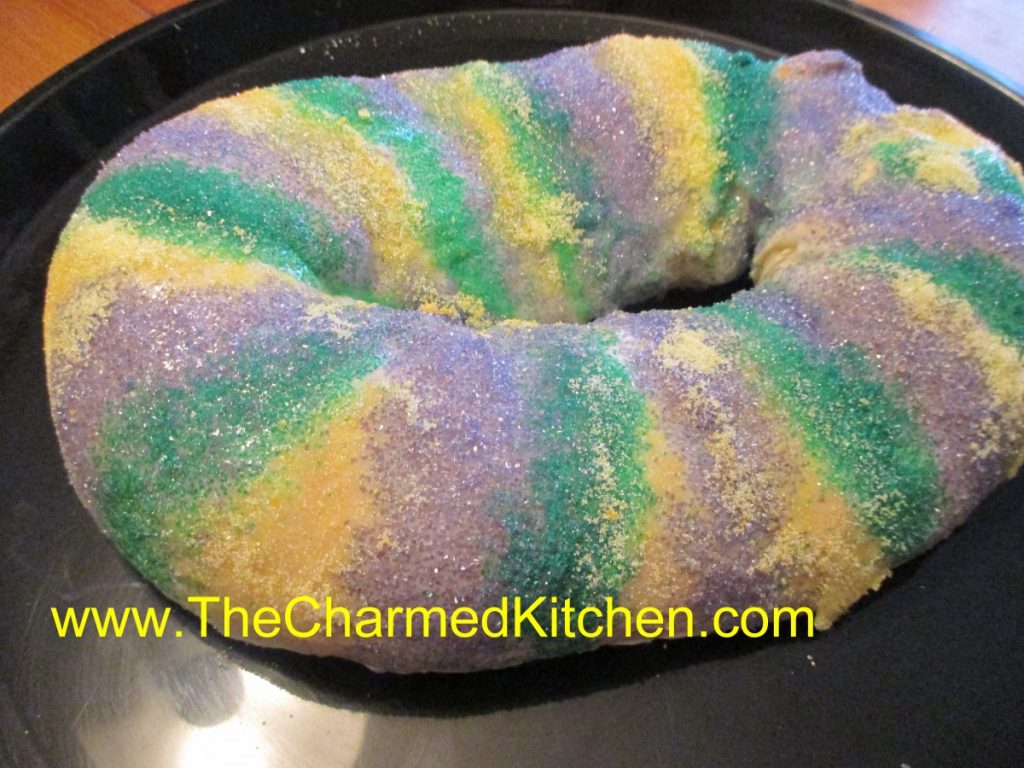
If you are planning a Mardi Gras party, you will want a King Cake. King Cakes are a long-standing tradition in New Orleans at Mardi Gras. A small plastic baby is often hidden in the cake, although you can use a bean or even a whole pecan or almond.
Tradition has it that the guest who finds the “surprise” in their piece of cake will host next year’s party. Be careful to warn guest so they don’t break a tooth or swallow the “prize”. You can also use a whole nut inside the cake and just set the baby on top of the cake when serving.
The “cake” is really a sweet cinnamon swirl bread. This recipes, with a whole pint of sour cream in the dough, is both rich and tender. The yeast dough is rolled out, spread with butter and cinnamon sugar, and rolled up. Then the dough is shaped into an oval shape.
After it is baked, the king cake is decorated with colorful frostings, sugars or both. Traditionally the colors used are yellow, green and purple, but, hey it’s your cake have fun with it.
If you want just the sugars, and no frosting, then brush the king cake with a beaten egg before baking and sprinkle with the sugar then. Otherwise, you’ll decorate the cake once baked and cooled.
King Cake
1/4 c. butter
16 oz. container sour cream
1/3 c. sugar
1 t. salt
2 packages active dry yeast
1 T. sugar
1/2 c. warm water
2 eggs
6 1/2 c. flour
1/2 c. white sugar
2 T. cinnamon
1/2 c. butter, softened
Colored sugars and frostings (recipes follow)
Heat together the first 4 ingredient to about 100 degrees. Dissolve yeast and sugar in warm water in large bowl and let stand 5 minutes. Add butter mixture, eggs and 2 cups of the flour. Beat 2 minutes at medium speed and gradually work in enough flour to form a soft dough. Knead until smooth and elastic, about ten minutes. Place dough in a greased bowl, turning to grease top and cover. Allow to rise in a warm place until doubled, about 1 hour. Stir together 1/2 c. sugar with cinnamon and set aside. Punch dough down and divide in half. Roll out one piece of dough into a 28×10-inch rectangle. Spread dough with half of the butter and sprinkle with half of the sugar mixture. Starting at long end roll up jelly roll fashion and pinch seam to seal. Shape dough into an oval shape and pinch ends together. Place seam side down on a greased baking sheet. Repeat with remaining piece of dough except remember to add the toy baby, nut or bean if you want the “surprise”. Cover and let rise about 20 minutes. Bake in a preheated 375-degree oven for 15-20 minutes, or until golden brown. Cool before decorating with tinted frostings and colored sugars. Makes 2, serving 24.
Frostings
3 c. powdered sugar
3 T. melted butter
3 t. milk
1/2 t. vanilla
Green, yellow, red and blue food coloring
Combine sugar and butter and add enough milk to make the glaze a drizzling consistency. Add vanilla and divide mixture in three small bowls. Tint one bowl yellow, one green and one purple, using both the red and blue food coloring. I often don’t bother to tint the frostings, but rely on the tinted sugars for color.
Tinted sugars
1 1/2 c. granulated sugar
Food coloring
Place 1/2 c. sugar in each of three small bags and add a couple of drops of food coloring to each. One use yellow, one green and one both the red and blue for purple. Shake the bags to distribute the color. You should only need a couple of drops of each.
Decorate the cake by making bands of the colored frostings and then sprinkling on the sugars.
Lemon Tea Cake

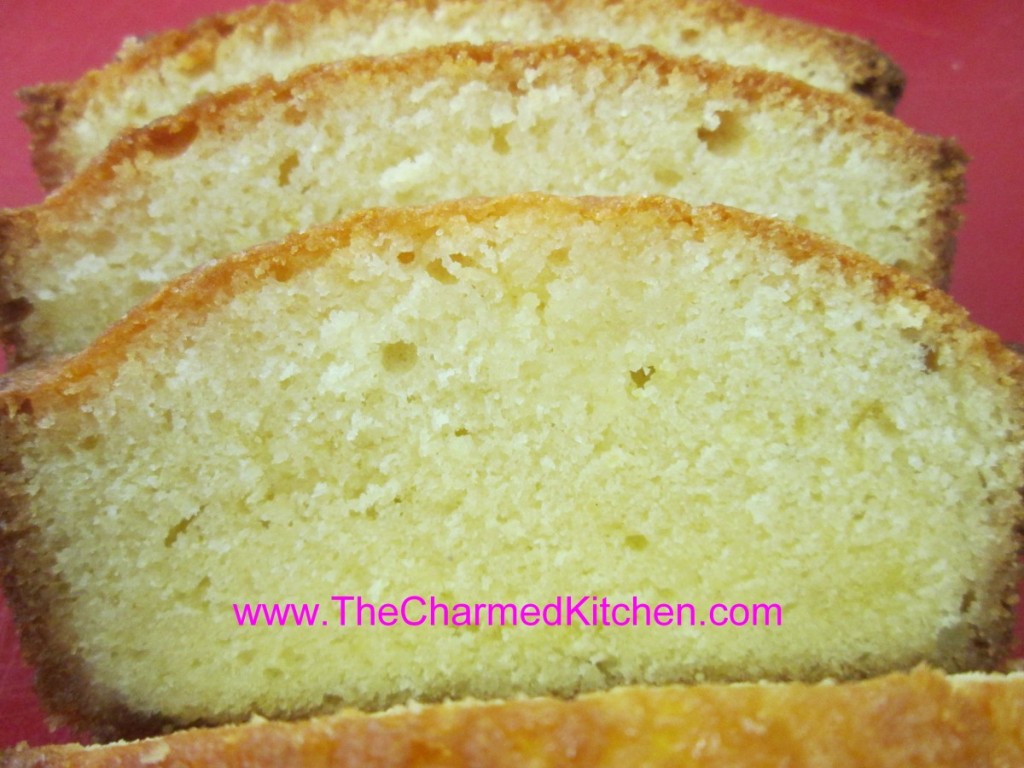
This is one of my favorite cakes of all time. It is a simple cake, enhanced with the flavor of lemon juice and lemon zest. Once out of the oven, you poke the hot cake with a large fork or a skewer, and pour a lemon syrup over it. The syrup gives the cake an extra lemony tang. It is a perfect addition to afternoon tea.
When my friend Courtney gave me some Meyer lemons she grew, I knew I wanted to do something special with them. I couldn’t think of anything better than this cake. Meyer lemons are a little sweeter than other lemons, but still tangy enough for this cake.
Great all on its own, this cake is also wonderful served with fresh berries and whipped cream for a Spring dessert. On a hot day, I have been known to top it with a scoop of ice cream.
Before you ask, the measurements are correct- only 3/4 cup of flour. No leaveners like baking powder or baking soda, either. The cake does not rise a whole bunch, but the texture is still very nice. The texture of the cake helps it to stand up to the lemon syrup.
Lemon Tea Cake
2 lemons
3 T. sugar for topping
½ c. butter, softened
¾ c. sugar
2 eggs, beaten
3/4 c. flour
6 T. milk or half and half
Preheat oven to 375 degrees. Grease an 8- inch loaf pan and line with wax or parchment paper. Grate the lemon rinds and set aside. Combine the juice of 1 of the lemons with the 3 tablespoons of sugar, stirring to dissolve sugar. Set aside.
Cream together the butter with the rest of the sugar and beat until fluffy. Beat in the eggs, a little at a time until well mixed. Stir in the flour and lemon peel and beat well. Add the milk and beat well. Pour batter into prepared pan and bake at least an hour. The cake should spring back when touched lightly. As soon as you remove the cake from the oven pierce it all over with a long-tined fork or a skewer. Pour over the reserved lemon juice mixture. Cool cake in pan before serving. Cake will be moist and tangy.
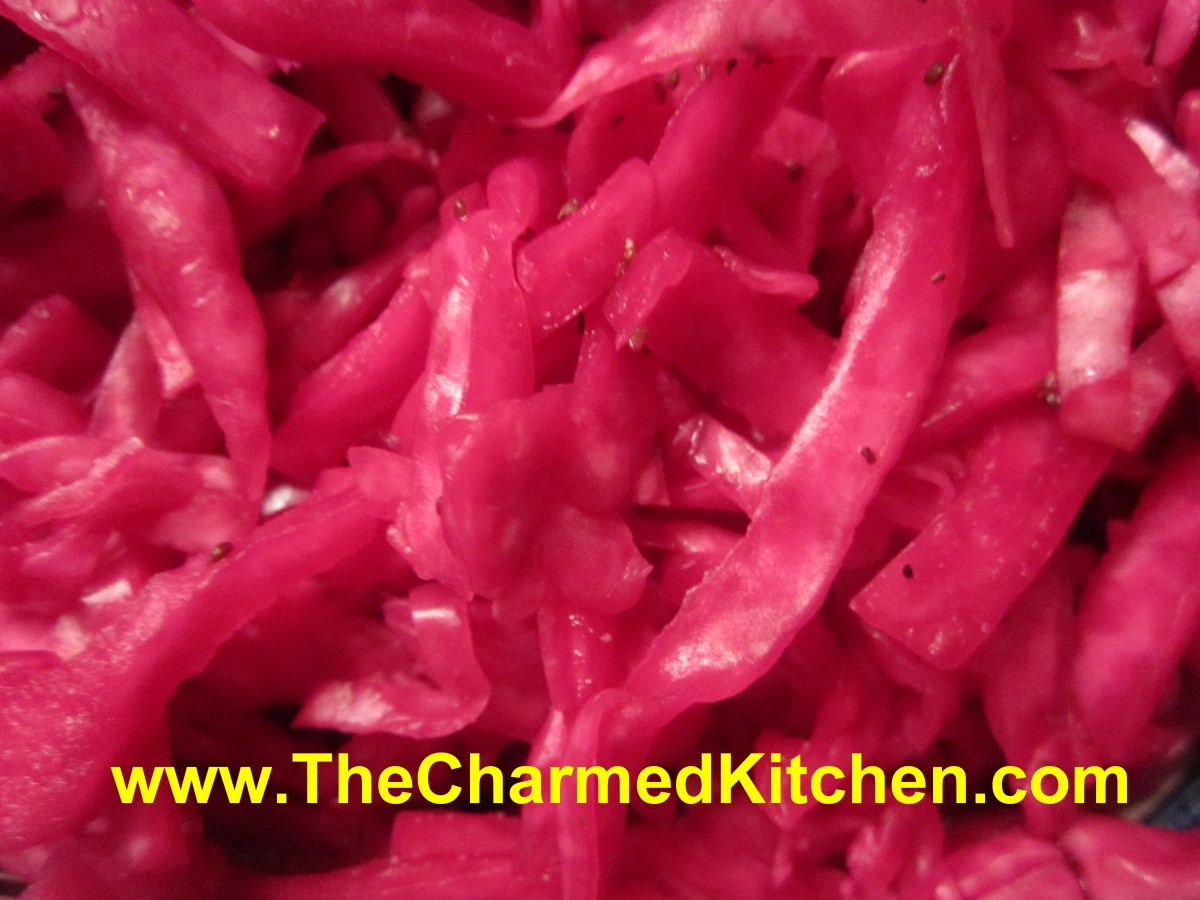
Red Cabbage Overnight Slaw


When I was growing up I had a neighbor, Ruth Stevens, who was like a grandmother to me. I adored her. She loved gardening and animals, and had a gentle quality about her, that I will never forget. I spent many happy days in her garden and learned so much from her. She gave me a version of this recipe. I was about 12 at the time. I still have her recipe, written in her slightly shaky handwriting. When I look through old recipes and come across it, I always think of her, and miss her even to this day.
I got some beautiful red cabbage and decided to make a salad to go with a recent dinner with friends. It is meant to be made a day ahead- even a few days ahead. You can make the salad with red or green cabbage or a combination. After a few days in the fridge, if you make the combination of red and green the green cabbage will pick up the color from the red cabbage and the whole thing will look red. Because of the acidity of the cider vinegar in the dressing the red cabbage not only maintains its color, I think it gets a little brighter. With the vinegar dressing the slaw will keep for at least a week in the fridge- it just gets more “pickled” over time.
Red Cabbage Overnight Slaw
inspired by Ruth Stevens
8 cups shredded red cabbage- about 1 medium head
1 c. cider vinegar
1/2 c. sugar, or to taste
1 T. celery seed
2 t. dried dill weed
salt and pepper to taste
Place cabbage in large bowl. In jar with a tight fitting lid place the rest of the ingredients and shake well until sugar is dissolved. Pour over the cabbage and stir to coat. Cover bowl and place in fridge overnight to let the flavors blend and the cabbage soften. Salad will wilt down quite a bit. Keeps in fridge for a le of week. Serves 6-8.
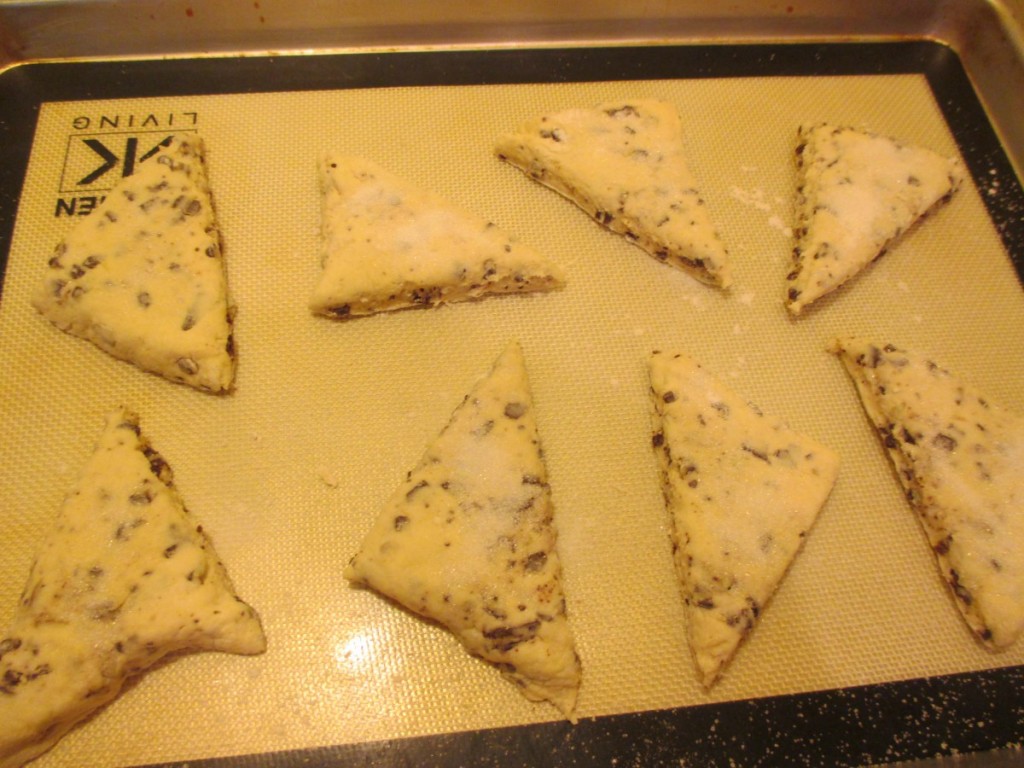
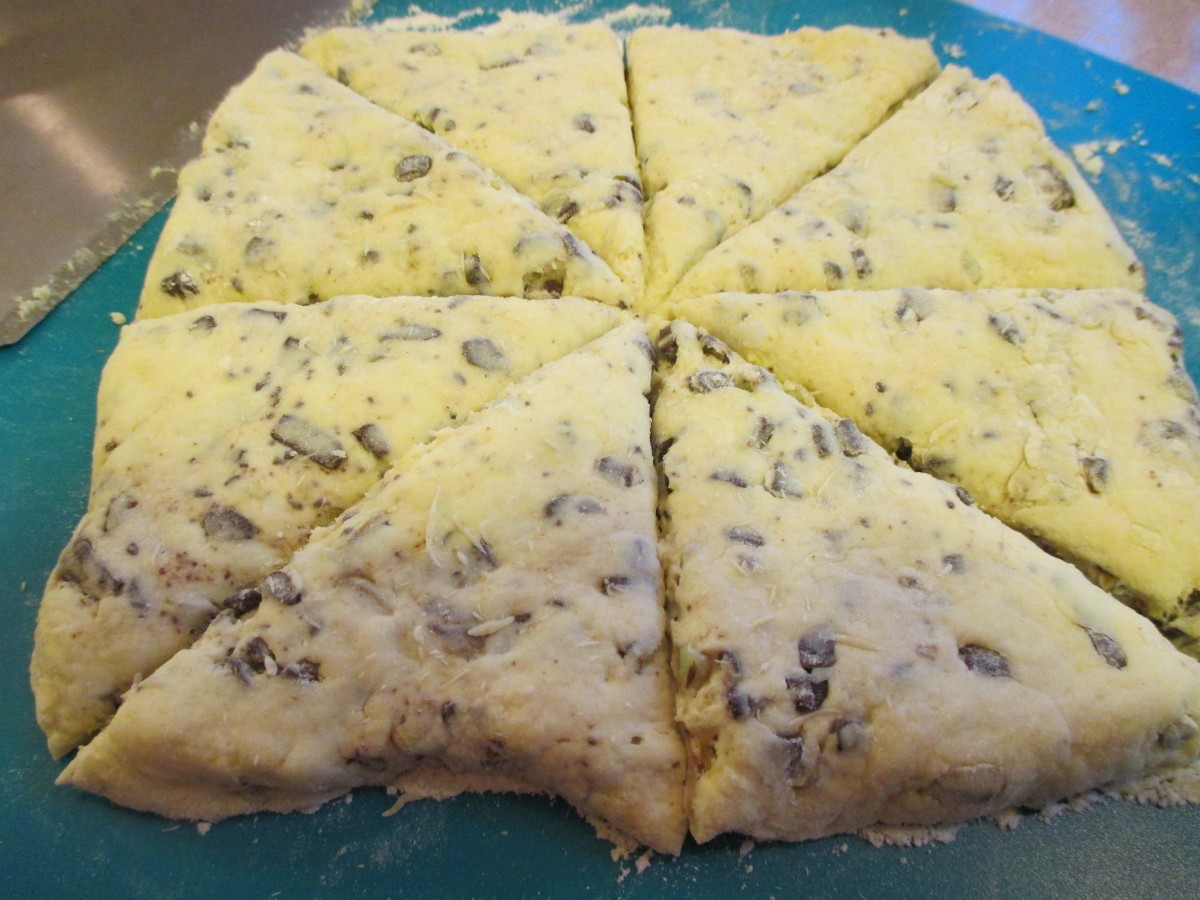
Chocolate Mint Scones

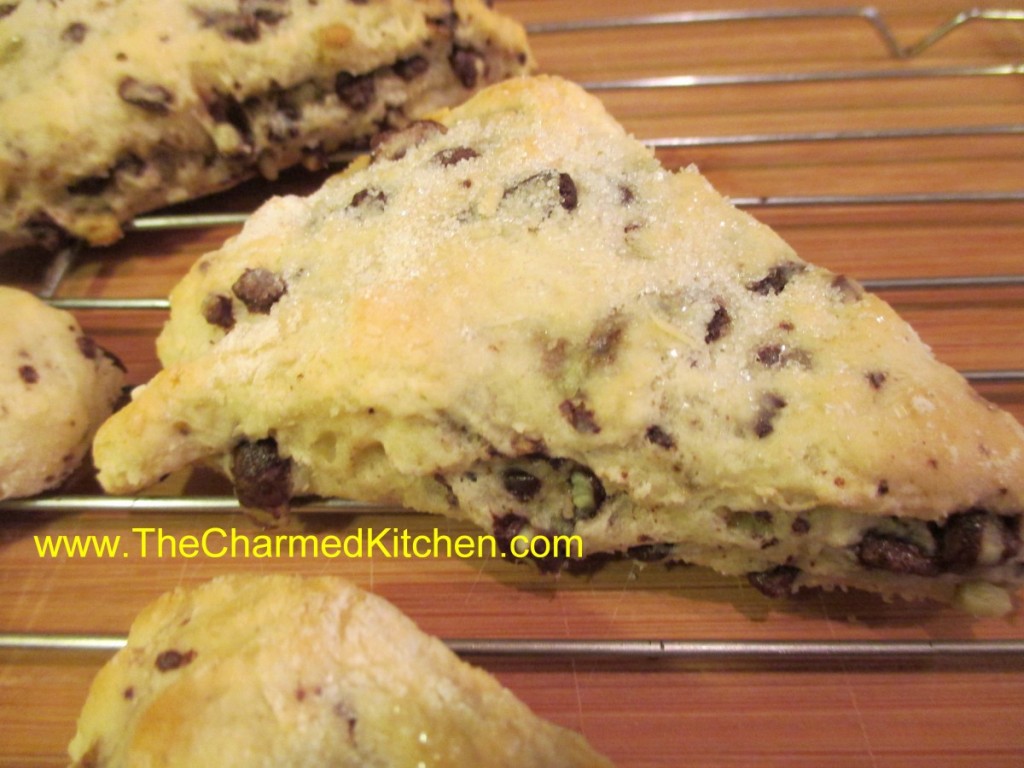
I guess I just have chocolate on my mind these days. I was going to just make a simple biscuit, but looked around at what I had, and came up with these minty chocolate scones. I used baking mix- like Bisquick- but I use a home made mix. I also had some sour cream so used that in the dough. The chocolate mint part came from a bag of Andes chocolate chips. These are just like the Andes candies, but in chip form. I have used them to make cookies before and had just enough left in the bag for the scones. The scones are very tender and flaky.
These would pair up nicely with berries and whipped cream to make shortcakes. Just let them cool completely before trying to slice for shortcakes.
Chocolate Mint Scones
1 c. baking mix- like Jiffy Mix or Bisquick- I used homemade
1/2 c. sour cream
1 egg
1/2 c. Andes chocolate mint chips
sugar for sprinkling
In small bowl place the baking mix. In another bowl mix together the sour cream and egg. Mix into the baking mix, along with the chips and stir until mixture turns into a soft dough. On lightly floured surface press the dough into an 8-inch square. Cut in half- then cut across in half again- you’ll have 4 squares. Cut diagonally across each square to form 8 triangles. Place triangles of dough onto ungreased baking sheet and sprinkle with a little sugar. Bake in a preheated 400 degree oven for 12-15 minutes, or until golden brown on top. Don’t over bake. Cool on wire rack. Makes 8.


Pickled Beets

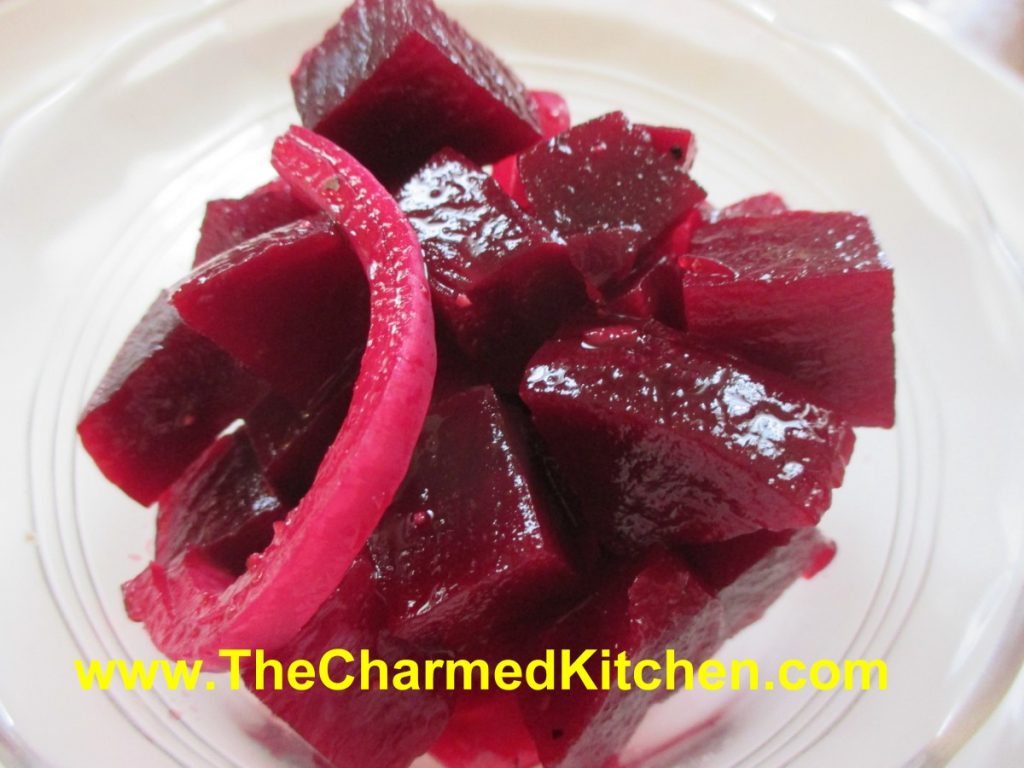
I love beets in all sorts of dishes. The bright color and earthy flavor appeal to me. They are so versatile. Beets are great in soups, salads and even desserts. One of my favorite ways to prepare beets is to pickle them.
Last week, I was lucky enough to get some really beautiful organic beets at a local produce market. I made beet soup and beet cake and enjoyed the greens steamed.
I had enough beets left to pickle some. This simple preparation makes them perfect to add to salads, or to enjoy on their own. They will keep in the fridge for weeks and weeks. I sometimes serve pickled beets with cheese and crackers as an appetizer.
I cooked my beets by just boiling them whole until tender, but you can also roast them. Once cooked, just let them cool a little and slip off the skins. Then just dice them up and add the dressing. They will taste better after a few days in the fridge. It gives the dressing a chance to get into the beets and onion and give them that pickled flavor. Feel free to add other seasonings. I had some fresh dill, so that is what I used.
Pickled Beets
2 lbs. beets, greens trimmed off, leaving 1 inch of the stem
1 red onion, peeled and sliced thin
1 c. cider vinegar
1/2 c. sugar- more or less to suit your taste*
2-3 cloves of garlic, minced
1 T. fresh dill snipped, or 1 t. dried
2 t. salt
1 t. fresh ground pepper
1/2 t. celery seed
dash of hot sauce
Cook beets whole until tender. I boiled my beets in a large pot of water for about 35 minutes- they were kind of big. You could roast them, if you prefer. Place in cold water for 5 minutes, then remove from the water and slip off the skins. They usually come off easily, but you might have to peel them. Dice into 1/2 -inch cubes and place in a bowl. Add the onion. Combine remaining ingredients and pour over the beets. Stir to combine, cover and place in fridge. These are ready to eat in a couple of days. Keep for weeks.
*You can also omit the sugar altogether- they will be very tart- but still tasty.


