Swedish Limpa Bread


There is nothing better than the smell of fresh baked bread. This Swedish rye bread is a favorite of mine. It has a soft texture and makes great sandwiches. It also makes the house smell wonderful as it bakes.
The flavor in enhanced by a combination of caraway seeds and a little orange zest. It even makes wonderful French toast. My brother-in-law always said it was just like the bread his Swedish mother made.
It is not like rye breads you might traditionally think of. Limpa is lighter in color and texture. It makes really great French toast, too.
I shape mine in two round loaves, but you can also bake this bread in loaf pans, if you prefer. If you want to use it for sandwiches, the loaf pans are probably a good idea. You can also shape the dough into dinner rolls, if you like. You will get 2-3 dozen rolls out of this recipe, depending on how big you make your rolls.
Swedish Limpa
6 ½ c. flour
2 c. rye flour
¼ c. brown sugar
2 t. salt
2-t. caraway seeds
2 t. grated orange peel
2 pkt. Active dry yeast
2 T. butter, softened
2 2/3 c. hot water (125-130 degrees)
Set aside 1-cup flour. Mix remaining flours and other dry ingredients in a large bowl. Add butter and water to flour mixture and stir to blend. Mix in enough additional flour to make a soft dough. Knead on a floured surface until smooth about 8-10 minutes. Place dough in oiled bowl turning to oil top. Cover and let rest in a draft free area until doubled, about 30 –40 minutes. Punch down. Divide dough in half and form into 2 balls. Place on greased baking sheet and cover until doubled in bulk, about 30 –40 minutes. Bake in a preheated 400-degree oven for 30 minutes or until bread sounds hollow when tapped lightly. Makes 2 loaves.
Note: you can also divide the dough and place in 2 (9×5-inch) greased loaf pans.
Hot and Sour Soup


Many years ago, my dear friend, Martha, got me to try Hot and Sour Soup. I have been in love with it ever since. I stock up on the ingredients when I am shopping at my local Asian grocery store. Since many of the ingredients are canned or dried, it is easy to keep them on hand. The soup itself does not take that long to make. You do need to soak the black mushrooms for a little while, but once they are ready, the soup comes together pretty quickly. The black mushrooms are available already sliced in thin strips. That is what I use. You can also find them dried whole. In that case, you would soak the mushrooms first, then slice them.
Feel free to play around with the additions. Sometimes I’ll add some shredded nappa cabbage. I have also made a vegetarian version by using vegetable stock and omitting the sliced meat. It was still a very tasty bowl of soup.
You get plenty of heat from the white pepper, but you can add some hot sauce, if you like it hotter.
Hot and Sour Soup
5 c. chicken broth- or vegetable broth
2 c. pork, sliced in thin strips or you can use chicken or omit
1 T. soy sauce
¾ c. dried sliced Chinese black mushrooms, soaked 30 minutes in water and drained
1 can straw mushrooms, drained
1 c. sliced bamboo shoots – I use the braised ones in a can- nice flavor
1 can sliced water chestnuts, drained
10 oz. tofu, cubed
½ -1 t. white pepper
¼ c. cider vinegar
4 T. cornstarch mixed with 1/4 c. water*
2 beaten eggs
Sesame oil
1 green onion, sliced thin, or chives
Combine broth with pork, soy sauce, mushrooms, bamboo shoots and water chestnuts in pot and simmer 10 minutes. Add tofu, pepper, vinegar and cornstarch mixture and bring to a boil. As soup thickens and clears pour egg in slowly. Remove from heat; stir in a little oil and onions and serve.
Serves 4.
Note: For extra heat you can add hot sauce to taste.
* I use a type of cornstarch called Clear Gel. It remains thick, even after reheating. You can find it in Amish stores and on line.
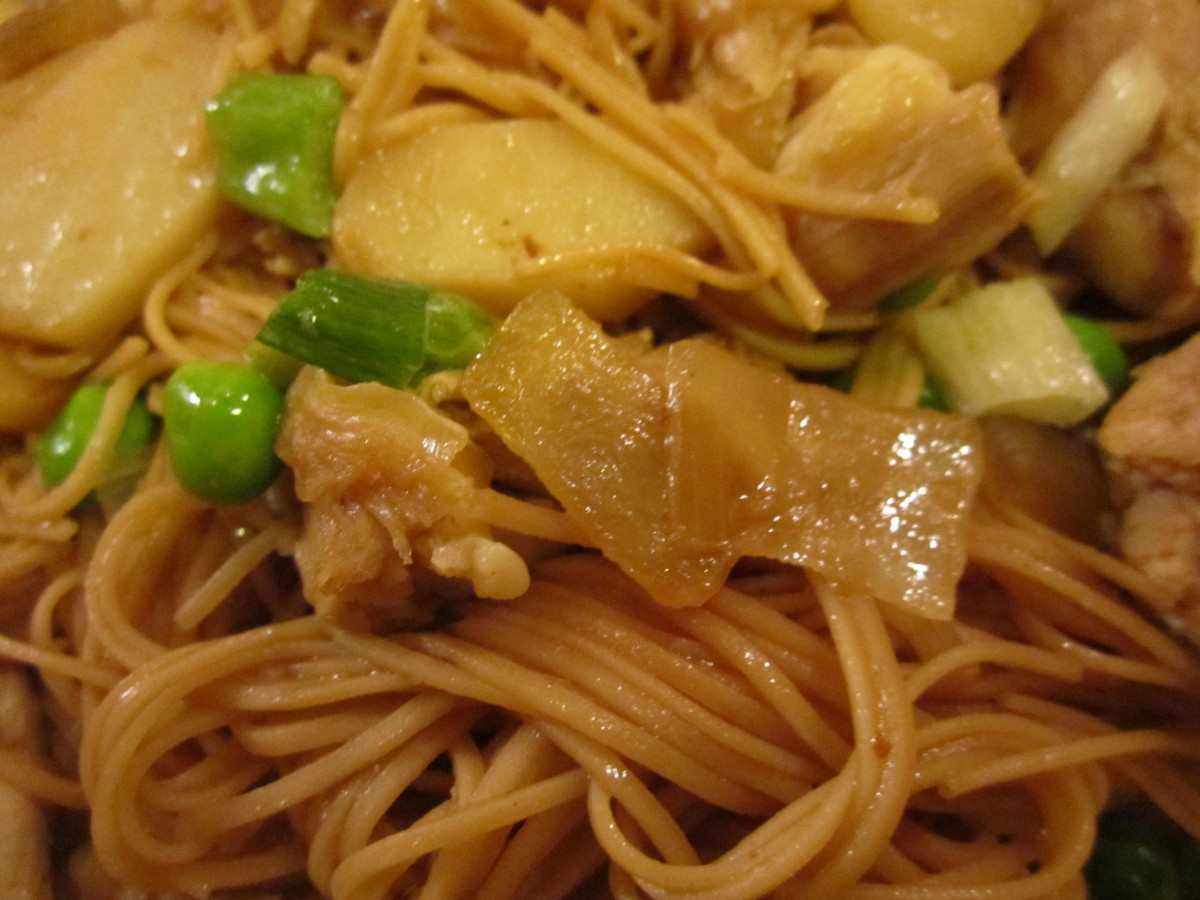
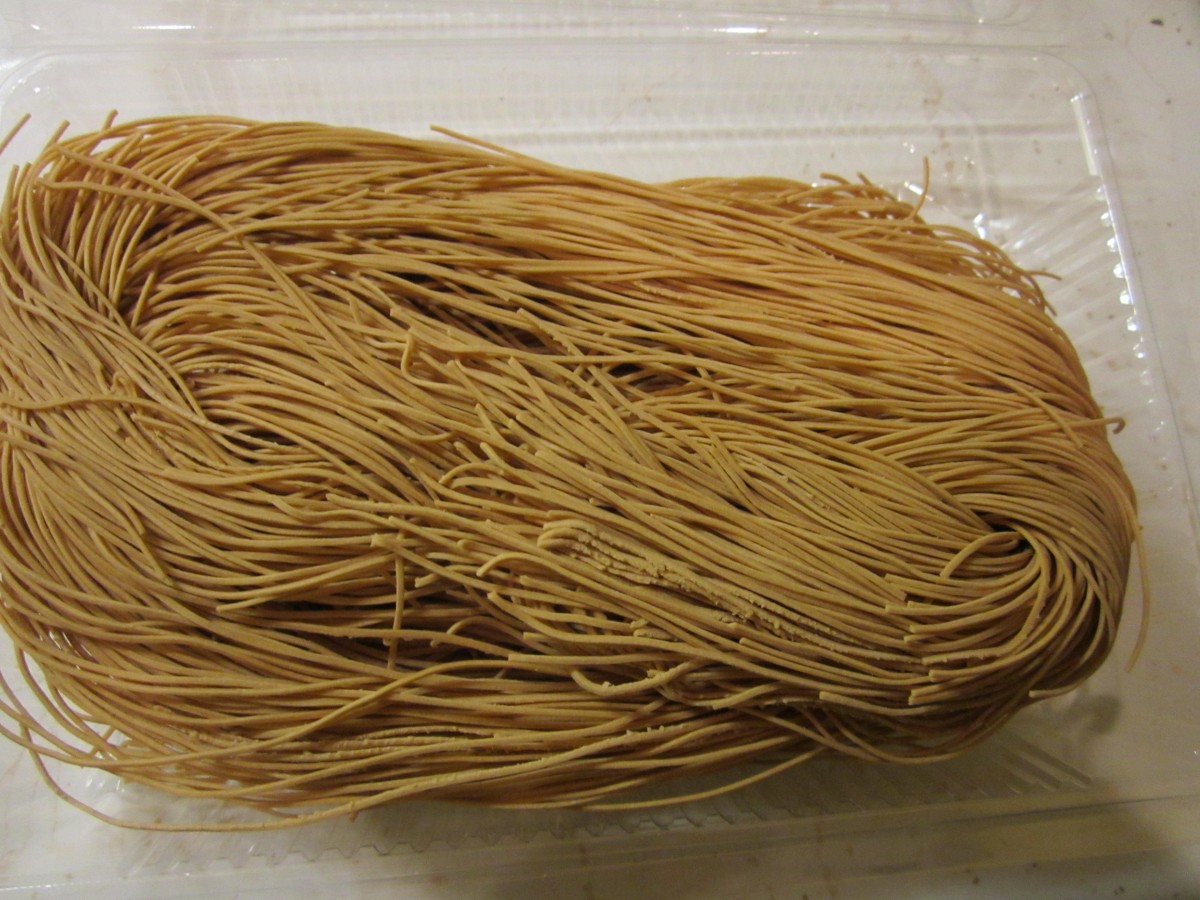
Chicken (or Pork) Lo Mein


Lo Mein is an easy dish to prepare and everyone seems to love it. I used cooked chicken in this one, but pork works great. too. The real trick is to not overcook the very fine pasta traditionally used in lo mein. Follow package directions, but cook a little under done. That way, when you mix all the hot ingredients together, the noodles get a chance to soak up all those flavors and not get mushy.
Chicken Lo Mein
1 onion, chopped
2 T. oil
1 can sliced water chestnuts, drained
1/2 c. green peas- you could also use green beans
2 c. diced cooked chicken- pork works too
8 oz. angel hair pasta -I use a very fine noodle I get at the Asian market
soy sauce to taste
Hoisen sauce or oyster sauce to taste- you could also use stir-fry sauce
sesame oil
chopped green onions
Heat water for pasta. Heat oil in skillet and cook onion until browned. Add water chestnuts and cook 1 minute longer. While onion is cooking, cook pasta. Add peas to onion mixture and stir to combine. Add the chicken and heat through. Drain pasta and toss into chicken mixture. Season with soy sauce and what ever Asian sauce you have on hand. Drizzle with sesame oil and top with green onions. Serves 4.

Sweet and Sour Pork


I have to admit to loving all things sweet and sour. It takes a bit of work- but it is worth the effort. I used a fresh pineapple, which I prefer, but canned pineapple could be used, too. You can buy sweet and sour sauce in most grocery stores, but I like my own better.
Make the sauce first, so you can just toss it over the pork and veggies when ready to serve.
The pork is cubed and marinated overnight in a mixture of soy sauce, cornstarch and an egg. The pork comes out very tender, when prepared this way. You could substitute cubed chicken, for the pork, if you prefer.
Sweet and Sour Pork
1-2 lbs. boneless pork
1 egg
1 t. cornstarch
2 t. soy sauce
Additional cornstarch for dredging
oil for frying
1 medium onion, chopped
1 sweet red or yellow pepper, seeded and chopped
2 cups peeled and cubed fresh pineapple, or 1 can pineapple in juice, drained, reserving juice for sauce
Sweet and Sour Sauce, recipe follows
Chopped green onions
Cut meat into cubes and place in bowl. Combine egg, 1-t. cornstarch and soy sauce and pour over the meat, stirring to coat. Allow marinating at least 1 hour in fridge, but best if done the day before, or early in the day.
When ready to cook, heat 1-2 inches of oil in a medium sauce pan to 350 degrees. Dredge the pork in corn starch to coat. Set aside. Heat 1T. oil in large skillet or wok. In wok, sauté onions on high until tender. While you are cooking the onions and other vegetables, start cooking the cubed pork in the sauce pan in the 1-2 inches of hot oil. It will take several batches to cook the pork. As the pork cooks- it will take about three minutes per batch- remove the pork from the pan and drain on paper towels. Continue to cook the pork in batches while finishing the veggies and pineapple in the wok. Add pepper to onion and sauté 3 minutes more. Add pineapple and cook until pineapple starts to brown a little. Add the cooked pork to the onion mixture. Then and some of the sweet and sour sauce and toss until coated. There is usually extra sauce for a later use. Serve over rice, and top with some green onions. Makes 4-6 servings.
Sweet and Sour Sauce- see note
1/2 c. apple cider vinegar
1/2 c. sugar
1/2 c. pineapple juice
3 T. ketchup
2 T. soy sauce
2 T. cornstarch
1 t. dried minced garlic
1-t. fresh grated ginger
Hot pepper flakes to taste
In saucepan combine all ingredients. Cook over medium heat, stirring as mixture gets hot, until sauce begins to bubble. It will also get much clearer. Boil gently 1 minute, stirring constantly before removing You may also want to use only some of the sauce and save the rest for another use.from heat. Makes 1 1/2 c. Keeps in the fridge for a couple of weeks.
Note: If you make the sweet and sour sauce ahead of time it will get runny when reheated if made with regular cornstarch. Either use modified cornstarch (Clear Gel ) or make sauce just before using.
Fried Brown Rice


This might not be what comes to mind when you think fried rice. I love fried rice from the local Chinese restaurant, but I like this recipe so much better.
For starters, it is made with brown rice, which I really prefer. It also has a lot more veggies in it than more traditional fried rice. The additional veggies add a lot of flavor and texture and also makes it a pretty dish. It also doesn’t use all that much oil for frying.
I make it often, swapping out veggies based on what I have, and what is in season.
Be sure to use cold rice. I always cook the rice the day before, or earlier in the day. It fries up better that way.
Fried Brown Rice with Vegetables
3 T. oil
1 c. thinly sliced carrots
1 onion, sliced thin
1 clove minced garlic
1 large sweet pepper, seeded and sliced thin
1 c. thin sliced zucchini
1 c. sliced mushrooms
1 T. water, optional
2 c. green beans, sliced or pea pods, washed and trimmed
1 c. cold cooked brown rice
4 T. soy sauce
chopped green onion, optional
Place wok over high heat. Add oil when wok is hot. Add carrots and stir-fry 1 minute. Add onion, garlic and pepper and stir-fry 1 minute more. Add zucchini, mushrooms and beans or peas, stir-frying until vegetables are tender crisp, about 2-3 minutes more, adding water if needed. If needed, add extra oil as well. Add rice and stir-fry until just heated through. Add soy sauce and top with onions if you like. Serves 6.
Wonton Soup


For me, Wonton soup always brings back memories of going out for Chinese food with my family, when I was a kid. The restaurant would serve it family style, and my mom or dad would ladle out everyone’s soup. It always looked and smelled wonderful. Tasted wonderful, too. Even more special, because we only had it when we out to dinner.
The one problem I find when trying to make this soup at home is finding wonton wrappers that are thick enough. The square ones I find at the neighborhood grocery store are OK, but thinner than the ones in Wonton Soup at a restaurant. At a local Asian grocery I have found round wrappers that are labelled for dumplings and are thicker. That is what I used. They worked out better. You can play around with fillings. I often add shrimp as both a filling, and to the soup itself.
Wonton Soup
1½ lb. chicken
1 head bok choy, or 4-5 baby bok choy
3 T. hoisen sauce
1 clove garlic, minced
24 won ton wrappers
2 qts. chicken stock
1 t. ginger
1 t. hot pepper sauce
Chopped green onions
Sesame oil
Bake the chicken until cooked. I used boneless chicken thighs, but even leftover roasted chicken would work. You can also used pork. Once cooled, I minced enough of the chicken to give me 1 cup of meat. The rest I cut into thin strips. I then took stems from the bok choy and minced enough of them to make 1 cup. Combine the minced chicken with minced bok choy, the hoisen and the garlic. This is the filling for your wontons. Slice more of the bok choy- using mainly the leaves, into thin shreds. This will go into the soup later, along with the strips of chicken. You should have at least a couple of cups of the shredded bok choy, but more is OK, too. To make the wontons place one on your work surface and spoon a rounded teaspoon of the filling into the middle of it. Moisten edge with water, fold in half and press to seal. I used round wrappers, but square wrappers are fine, too. Repeat with remaining wontons and fillings until done. Bring stock to a boil and add the ginger and hot sauce. Add the wontons to the simmering stock. Simmer gently for 3-4 minutes, stirring occasionally, then add the strips of chicken and the shredded bok choy greens. Cook about 5-6 minutes longer. Finish soup with chopped green onions and a drizzle of sesame oil. Serves 6-8.
Asian Pressed Duck


Pressed duck is a bit of work, but a very fun dish to serve. It is a really nice dish for special occasions, like Chinese New Year. To prepare pressed duck, cooked duck in de-boned, pressed into a pan and steamed. Then the duck is cut into squares and fried. The result is a real treat- crispy on the outside with tender duck meat in the middle.
The process does take two days. The duck is cooked, shredded and steamed on the first day. Then it is refrigerated overnight, before frying. That’s not really a bad thing. All the messy stuff is out of the way the day before. When you want to prep the duck, just slice and fry. I pan fried the duck squares, but you could deep fry it, if you prefer.
The dish came out quite well, but there is one thing I might change for the next time I make it. I used an 8×8 inch square pan. It was tricky to fit the pan in my stock pot for the steaming. Next time, I would a 9×5-inch loaf pan or two, which would make the steaming easier. My pan ended up a little tilted during the steaming process. Or, I could have used a bigger stock pot.
Except for the steaming issues, it was not a difficult dish to prepare. It was kind of fun. Another bonus is that I had a pot of duck stock, from cooking the duck. I strained it, cooled it down and removed the fat on top. The next day, I used to stock to cook my rice in. The rice was so flavorful.
So here is the recipe. I kept in the directions using square pans, but feel free to use a loaf pans instead.
Pressed Duck
1 (4-5 lb.) duck
Water to cover
2 green onions
1 ( 1-inch) piece ginger root
2 T. fennel seeds- or two star anise
2 T. dark soy sauce
1 t. hoisen sauce
1 t. salt
2-3 T. cornstarch
Oil for frying
Sweet and sour sauce- recipe follows
The day before you want to serve pressed duck, in soup pot, combine duck with just enough water to cover. Add green onions, fennel seeds, soy sauces and salt. Cover and simmer until duck in very tender, at least a couple of hours. Remove duck and allow to cool down. Remove skin and meat from the bones. Discard the bones. Shred the meat. You can add a little of the skin, if you like. I actually removed most of the skin from the duck before I cooked it. Then I rendered down the skin to have duck fat for cooking. In baking pan, sprinkle half the cornstarch to cover the bottom of the pans. Be generous with the cornstarch. If you use an 8×8-inch pan, you will need a little less cornstarch than if you use a 9×9-inch pan. Press the shredded duck meat firmly into the pan. Sprinkle with the rest of the cornstarch. Set up a pot to steam the duck mixture. I used a large stockpot with a steamer rack in it. Place the pan in the steamer, cover and steam for 30 minutes. Remove duck from steamer, cool and refrigerate overnight. The next day remove the duck from pan and cut into squares. Pat off extra moisture to reduce splattering. Heat oil to 350 degrees and fry duck pieces for about 5 minutes, or until crispy and golden on the outside. Drain and serve with sweet and sour sauce- or a dipping sauce you like. Serves 4.
Sweet and Sour Sauce
1/2 c. vinegar- I like apple cider vinegar or rice vinegar
1/2 c. sugar
1/2 c. pineapple juice
3 T. catsup
2 T. soy sauce
2 T. cornstarch
1 t. dried minced garlic
1-t. fresh grated ginger
Hot pepper flakes to taste
In saucepan combine all ingredients. Cook over medium heat, stirring as mixture gets hot, until sauce begins to bubble. It will also get much clearer. Boil gently 1 minute, stirring constantly before removing from heat. Makes 1 1/2 c. Keeps in the fridge for a couple of weeks.
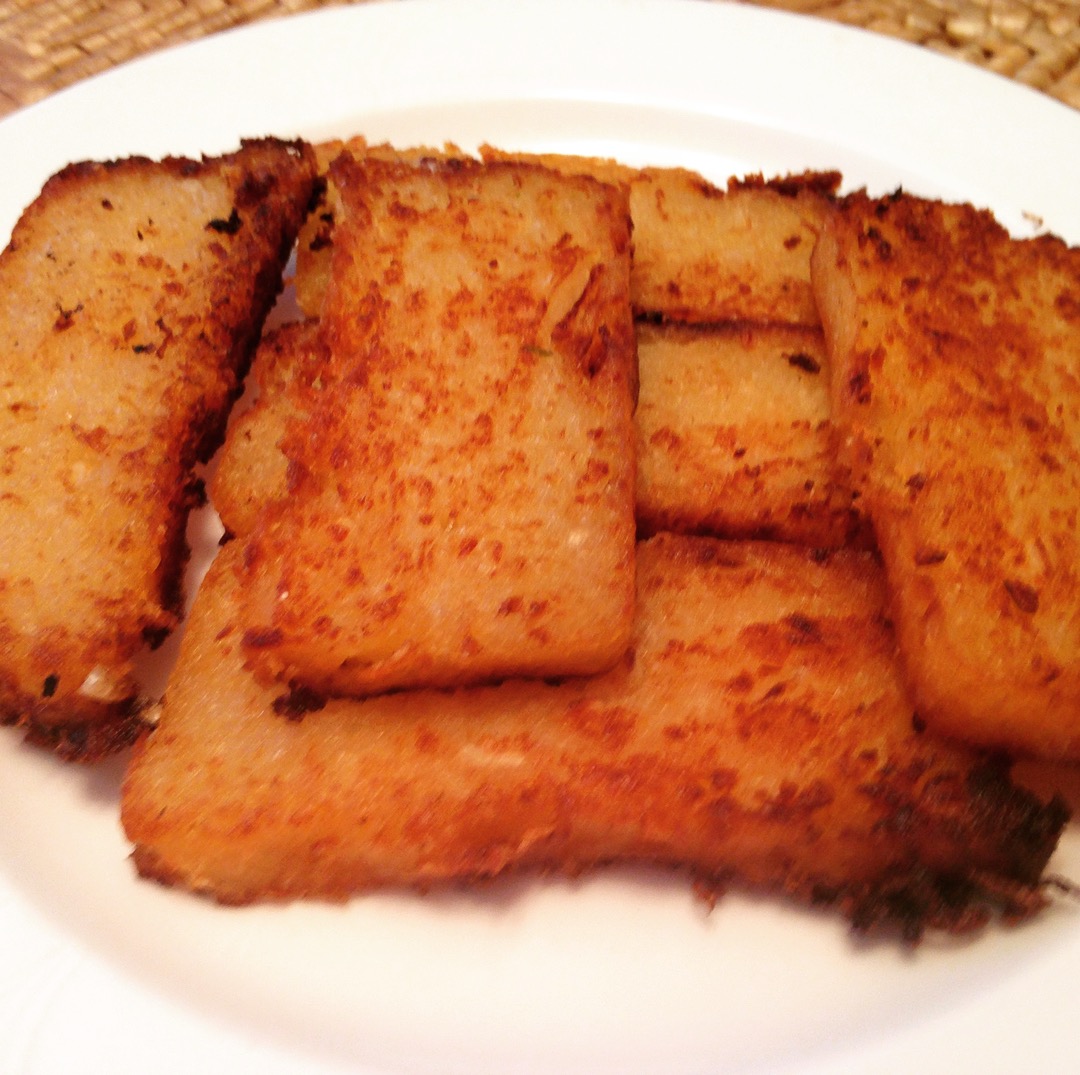
Asian Turnip Cakes


If you are planning a party for Chinese New Year, you might want to make turnip cakes.
I first had turnip cakes at a local Asian restaurant. I loved them, and was intrigued at how to make them. They were little squares, lightly crisped on the outside, smooth and creamy in the middle.
When I first heard turnip cake- I was thinking of the purple and white turnips I knew. That is not what these turnip cakes are made from.
It helped a lot when I realized the “turnip” cake was actually made from Daikon radish. Daikon radishes are also called Chinese turnips. They are really big, white radishes. They are available at Asian grocery stores and other grocery stores. Now that I knew the ingredient I needed, I had to find a recipe.
I searched the internet and found a lot of different variations for how to make them.
The first recipe I tried was more like a potato pancake. Shredded radish paired with eggs and bread crumbs. They were good, but not what I had at the restaurant. The turnip cake I had enjoyed was smooth and sort of starchy. Plus, it was a neat square shape.
I found several recipes that included the steaming step. This enabled the cakes to be set up with a starch, cooled and sliced before the final frying step. This was what I wanted!!
The most promising recipe included rice flour- but I was out of rice flour, so I improvised with cornstarch and a little wheat flour. It worked really well.
Many recipes included shrimp or Chinese sausage and sometimes green onions. I decided, this time, to make them vegetarian. That worked well, but you certainly could add meat or shrimp to yours.
I shredded the daikon pretty fine, but you could still discern the radish in the final dish. I liked that a lot. I did not grate them as some recipes suggested.
So here is my version of turnip cakes. They sound like a bit of work, but it really is worth the time. I also like that all the prep can be done a day or two ahead of time, then just slice and fry when you want them.
Turnip Cakes
1 large Daikon radish- about 1¼ lbs., give or take
1 c. water
½ c. minced onion
1 t. salt
½ t. white pepper
½ c. cornstarch
2 T. flour
Oil for frying
Oyster sauce for dipping, optional
Peel and shred radish. I used a fine shredding blade. Squeeze out some of the liquid from the radish. Place shredded radish in bowl with the water and onion and steam in microwave for 4-5 minutes- you can also place radish and onion in saucepan with water and simmer 4-5 minutes. Set aside to cool. Combine the radish mixture with the cornstarch, flour salt and pepper. Oil an 8×4-inch loaf pan. Place the radish mixture in the prepared pan and steam for 50 minutes.* I placed plastic wrap over the pan to prevent water from dripping into the pan. Remove pan from steamer and cool down for at least 30 minutes. . At this point you can finish preparing the turnip cakes- or place in fridge until ready to make them. When ready to fry the turnip cakes, remove from the pan and cut into slices- about ¾ -inch thick. Heat oil in a skillet over medium high heat. Cook cakes in oil on both sides until golden brown and crisp. Drain on paper towels. Serve with oyster sauce- or whatever dipping sauce you prefer. Makes about 10.
* To steam the mixture- I just used a large stock pot with a cooling rack in it. I brought about 2 inches of water to a boil, placed the pan on the rack and covered the pan. You could also steam in the oven with a roasting pan, with an inch of boiling water in it and covered with foil.

Slicing the turnip cakes before frying
Ready to serve
Extra Crispy Chicken Wings


I like a wing with very crispy skin. These wings are super crispy, even though they are baked in the oven, not fried. It may have to do with a rather unusual ingredient.
I got this recipe from a local television show and have made it a couple of times now. Thanks, David Moss, for this one. The wings are coated with a little salt and baking powder.
Yes, baking powder. I am not sure how it works, but the combination leaves you with wings that are super crisp on the outside and juicy inside. The only thing I changed from the original recipe, is that I use a little less salt.
These would be great served at a Super Bowl party.
Once the wings are done cooking, you can toss them in whatever sauce you like.
Extra Crispy Chicken Wings
3-4 lbs. chicken wings
2 T. baking powder
1 t. salt
Hot sauce and butter- or assorted dipping sauces
Cut wings into three pieces- discard tips, or use to make stock. Pat the wings dry. This step is important. The dry skin helps them to get crisp. Place baking powder and salt in a plastic bag and add the wing pieces, a few at a time, shaking to coat evenly. Continue until all the wings are coated. Place wings on a rack that is placed on a baking sheet. Bake wings in a preheated 250 degree oven for 30 minutes. Turn the heat up to 425 and continue cooking 45 minutes more. Remove wings from oven. You can melt butter, mix with some hot sauce and toss the wings in that mixture, or just serve the wings with your favorite sauce.
Cauliflower Flatbread

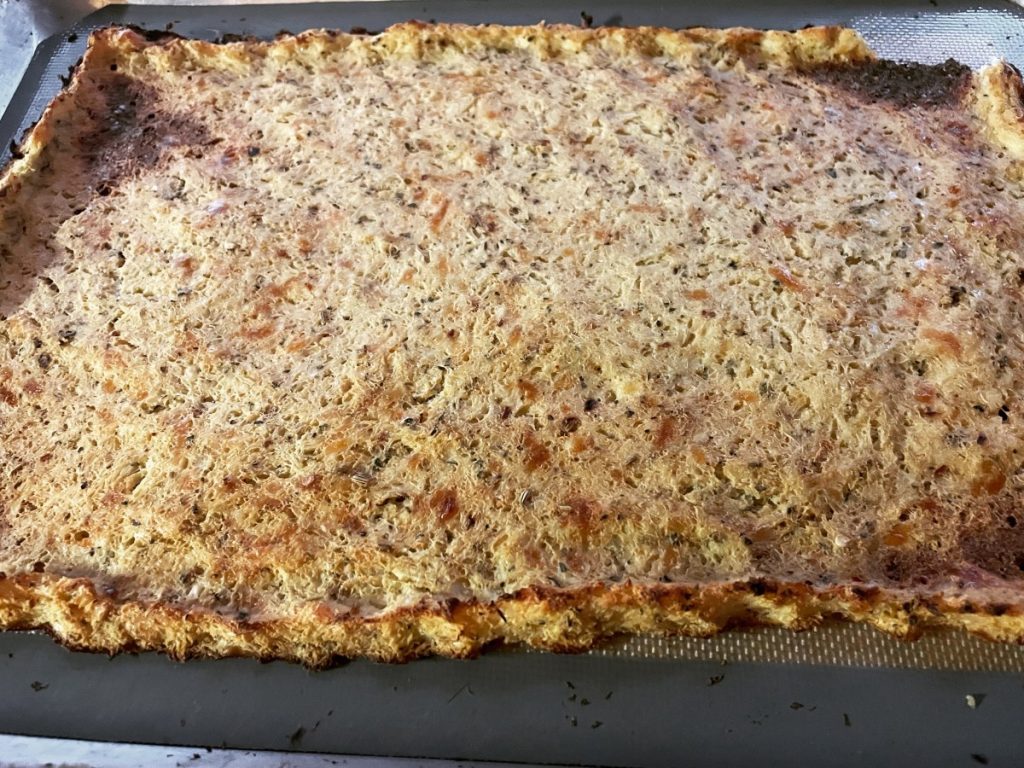
I have made this recipe before, but it had been awhile and I knew I wanted to make it again. I love cauliflower and eat it often. I had picked up a, huge cauliflower from a local produce market and I just wanted to do something different with it this time. It isn’t that hard to make. It is easier than making bread.
I was torn about what to call it. Often it is called a cauliflower pizza crust, but I think that gives you unrealistic expectations. It is after all, just a cauliflower. Somehow flatbread works better for me, but call it whatever makes you happy. In spite of not want ing to call it a pizza crust. I ended up treating it like a pizza.
The most time consuming part of this recipe is “ricing” the cauliflower. It involves cutting the cauliflower into flowerets and then chopping them in a food processor until the pieces are about the size of rice grains. Still, not that hard, just takes a few minutes. You can also buy cauliflowwer already chopped up, so you can even skip this step, if that helps.
After I made the crust, I cooked down a couple of jars of home canned tomatoes, sauteed onions, garlic and peppers and put it all together for the topping. Like a chunky pizza ssauce. added pizza seasoning to it, too. I spread it ocver the crust then topped with mozzarella and Parmesan cheeses. It was actuaslly very good and was eaten quickly by my guests.
So here is the recipe.
Cauliflower Flatbread Crust
2½ pounds cauliflower florets, riced
2 eggs, beaten
2 oz. cream cheese, softened
½ c. shredded mozzarella cheese
2 t. pizza seasoning- or seasoning of your choice
1 t. salt
To make the cauliflower “rice”, pulse batches of raw cauliflower florets in a food processor, until a rice-like texture is achieved. Fill a large pot with about an inch of water, and bring it to a boil. Add the “rice” and cover; let it cook for about 4-5 minutes. You can also steam the cauliflower or even bake it in the oven at 350 for 10-15 minutes. Just get the cauliflower cooked. Drain into a fine-mesh strainer. Once you’ve strained the cauliflower, let it cool down, then transfer it to a clean, thin dishtowel or several layers of cheesecloth. Wrap up the steamed “rice” in the dishtowel, twist it up, and squeeze all the excess moisture out! It’s amazing how much extra liquid will be released, which will leave you with a nice and dry crust.
In a large bowl, mix up your strained cauliflower, beaten eggs, cheeses, and spices. (Don’t be afraid to use your hands! You want it very well mixed.) It won’t be like any bread dough you’ve ever worked with, but don’t worry– it’ll hold together! Press the dough out onto a baking sheet lined with parchment paper or a silicone liner. (It’s important that it’s lined, or it will stick.) Keep the dough about ⅓” thick, and make the edges a little higher for a “crust” effect, if you like. Bake for 35-40 minutes. The crust should be firm, and golden brown when finished. Now’s the time to add all your favorites– sauce, cheese, and any other toppings you like. Return to the oven, and bake an additional 5-10 minutes, just until the cheese is hot and bubbly. Slice and serve immediately!
Note: I used the cream cheese because I had some leftover from another recipe and it made sense to use it up. I honestly think the recipe would be fine without it- maybe add a bit more mozzarella cheese. I also added a second egg, which I did not do the last time I made the “crust”. I think it helped the crust to hold together better.