Asian Pressed Duck

Pressed duck is a bit of work, but a very fun dish to serve. It is a really nice dish for special occasions, like Chinese New Year. To prepare pressed duck, cooked duck is de-boned, pressed into a pan and steamed. Then the duck is cut into squares and fried. The result is a real treat- crispy on the outside with tender duck meat in the middle.
The process does take two days. The duck is cooked, shredded and steamed on the first day. Then it is refrigerated overnight, before frying. That’s not really a bad thing. All the messy stuff is out of the way the day before. When you want to prep the duck, just slice and fry. I pan fried the duck squares, but you could deep fry it, if you prefer.
The dish came out quite well, but there is one thing I might change for the next time I make it. I used an 8×8 inch square pan. It was tricky to fit the pan in my stock pot for the steaming. Next time, I would a 9×5-inch loaf pan or two, which would make the steaming easier. My pan ended up a little tilted during the steaming process. Or, I could have used a bigger stock pot.
Except for the steaming issues, it was not a difficult dish to prepare. It was kind of fun. Another bonus is that I had a pot of duck stock, from cooking the duck. I strained it, cooled it down and removed the fat on top. The next day, I used to stock to cook my rice in. The rice was so flavorful.
So here is the recipe. I kept in the directions using square pans, but feel free to use a loaf pans instead.
Pressed Duck
1 (4-5 lb.) duck
Water to cover
2 green onions
1 ( 1-inch) piece ginger root
2 T. fennel seeds- or two star anise
2 T. dark soy sauce
1 t. hoisen sauce
1 t. salt
2-3 T. cornstarch
Oil for frying
Sweet and sour sauce- recipe follows
The day before you want to serve pressed duck, in soup pot, combine duck with just enough water to cover. Add green onions, fennel seeds, soy sauces and salt. Cover and simmer until duck in very tender, at least a couple of hours. Remove duck and allow to cool down. Remove skin and meat from the bones. Discard the bones. Shred the meat. You can add a little of the skin, if you like. I actually removed most of the skin from the duck before I cooked it. Then I rendered down the skin to have duck fat for cooking. In baking pan, sprinkle half the cornstarch to cover the bottom of the pans. Be generous with the cornstarch. If you use an 8×8-inch pan, you will need a little less cornstarch than if you use a 9×9-inch pan. Press the shredded duck meat firmly into the pan. Sprinkle with the rest of the cornstarch. Set up a pot to steam the duck mixture. I used a large stockpot with a steamer rack in it. Place the pan in the steamer, cover and steam for 30 minutes. Remove duck from steamer, cool and refrigerate overnight. The next day remove the duck from pan and cut into squares. Pat off extra moisture to reduce splattering. Heat oil to 350 degrees and fry duck pieces for about 5 minutes, or until crispy and golden on the outside. Drain and serve with sweet and sour sauce- or a dipping sauce you like. Serves 4.
Sweet and Sour Sauce
1/2 c. vinegar- I like apple cider vinegar or rice vinegar
1/2 c. sugar
1/2 c. pineapple juice
3 T. catsup
2 T. soy sauce
2 T. cornstarch
1 t. dried minced garlic
1-t. fresh grated ginger
Hot pepper flakes to taste
In saucepan combine all ingredients. Cook over medium heat, stirring as mixture gets hot, until sauce begins to bubble. It will also get much clearer. Boil gently 1 minute, stirring constantly before removing from heat. Makes 1 1/2 c. Keeps in the fridge for a couple of weeks.
Sweet and Sour Pork

I have to admit to loving all things sweet and sour. It takes a bit of work- but it is worth the effort. I used a fresh pineapple, which I prefer, but canned pineapple could be used, too. You can buy sweet and sour sauce in most grocery stores, but I like my own better.
Make the sauce first, so you can just toss it over the pork and veggies when ready to serve.
The pork is cubed and marinated overnight in a mixture of soy sauce, cornstarch and an egg. The pork comes out very tender, when prepared this way. You could substitute cubed chicken, for the pork, if you prefer.
Sweet and Sour Pork
1-2 lbs. boneless pork
1 egg
1 t. cornstarch
2 t. soy sauce
Additional cornstarch for dredging
oil for frying
1 medium onion, chopped
1 sweet red or yellow pepper, seeded and chopped
2 cups peeled and cubed fresh pineapple, or 1 can pineapple in juice, drained, reserving juice for sauce
Sweet and Sour Sauce, recipe follows
Chopped green onions
Cut meat into cubes and place in bowl. Combine egg, 1-t. cornstarch and soy sauce and pour over the meat, stirring to coat. Allow marinating at least 1 hour in fridge, but best if done the day before, or early in the day.
When ready to cook, heat 1-2 inches of oil in a medium sauce pan to 350 degrees. Dredge the pork in corn starch to coat. Set aside. Heat 1T. oil in large skillet or wok. In wok, sauté onions on high until tender. While you are cooking the onions and other vegetables, start cooking the cubed pork in the sauce pan in the 1-2 inches of hot oil. It will take several batches to cook the pork. As the pork cooks- it will take about three minutes per batch- remove the pork from the pan and drain on paper towels. Continue to cook the pork in batches while finishing the veggies and pineapple in the wok. Add pepper to onion and sauté 3 minutes more. Add pineapple and cook until pineapple starts to brown a little. Add the cooked pork to the onion mixture. Then and some of the sweet and sour sauce and toss until coated. There is usually extra sauce for a later use. Serve over rice, and top with some green onions. Makes 4-6 servings.
Sweet and Sour Sauce- see note
1/2 c. apple cider vinegar
1/2 c. sugar
1/2 c. pineapple juice
3 T. ketchup
2 T. soy sauce
2 T. cornstarch
1 t. dried minced garlic
1-t. fresh grated ginger
Hot pepper flakes to taste
In saucepan combine all ingredients. Cook over medium heat, stirring as mixture gets hot, until sauce begins to bubble. It will also get much clearer. Boil gently 1 minute, stirring constantly before removing You may also want to use only some of the sauce and save the rest for another use.from heat. Makes 1 1/2 c. Keeps in the fridge for a couple of weeks.
Note: If you make the sweet and sour sauce ahead of time it will get runny when reheated if made with regular cornstarch. Either use modified cornstarch (Clear Gel ) or make sauce just before using.
Pot Stickers
We went down to the Asian market recently. I always have so much fun there- and buy so much. Stocked up on won ton wrappers. OK, I had a class on cooking with wontons but I bought a LOT more wontons than we would need for class. I’ve been having fun playing around with them. I’ll be posting pictures and recipes. Some of these are recipes from class, some are new.
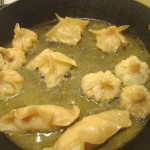
Pot Stickers are called that because when the steaming liquid evaporates and they start to brown on the bottom they tend to stick to the pot. Doing them in an un- seasoned pan that does not have a non-stick coating can result in the pot stickers leaving their bottoms behind them in the pan.
Feel free to play around with fillings. I could easily have left out the meat and added chopped, cooked mushrooms for a vegetarian version.
Traditional Pot Stickers
1/2 pound ground pork- I used ground chicken
1/2 medium head cabbage, finely chopped- I used Chinese cabbage, or nappa
1 green onion, finely chopped
2 slices fresh ginger root, finely chopped
2 water chestnuts, drained and finely chopped
1 teaspoon salt
1/2 teaspoon white sugar
1 teaspoon sesame oil
1 (14 ounce) package wonton wrappers
5 tablespoons vegetable oil
3/4 cup water- or stock
Dipping Sauce:
1 tablespoon chili oil
1 tablespoon soy sauce
1 teaspoon rice vinegar
Crumble pork into a large, deep skillet. Cook over medium high heat until evenly brown. Drain and set aside. In a medium bowl, mix together the pork, cabbage, green onion, ginger, water chestnuts, salt, sugar and sesame oil. Chill in the refrigerator 6 to 8 hours, or overnight. Place a tablespoon of the pork mixture into each of the wonton wrappers. Fold the wrappers, and seal the edges with a moistened fork. In a large, deep skillet, heat 3 tablespoons vegetable oil over medium high heat. Place the pot stickers into the oil seam sides up. Heat 30 seconds to a minute. Pour water into the skillet. Gently boil 7 to 8 minutes, until oil and water begins to sizzle, and then add remaining oil. When the bottoms begin to brown, remove pot stickers from heat. In a small serving bowl, mix together the chili oil, soy sauce, and vinegar, adjusting proportions to taste.
Won Ton Soup
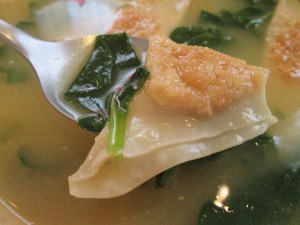
Still in the mood for Chinese food so I made a version of Won Ton Soup. I had some leftover won ton wrappers so I filled them with chicken. Simmered them in chicken stock and added spinach at the last minute. Not a traditional Won Ton Soup, but I had to work with what I had. It tasted good so that is what matters in the end.
Won Ton Soup
24 Won ton wrappers
1 c. cooked chicken
1/4 c. minced celery
1 t. soy sauce
1 t. sesame oil
4 c. chicken stock
4 c. fresh spinach
Combine chicken with the celery, soy sauce and sesame oil. Place 1 teaspoon of the chicken mixture in the center of a won ton wrapper. Moisten edges and fold in half to form a triangle. Press edges to seal. Repeat with remaining filling and wrappers. Heat stock and add the wrappers and spinach and cook until heat through and spinach is cooked, about 5 minutes. Serves 2-3.


