Asian Cabbage and Ramen Salad

Asian Cabbage and Ramen Salad
I’ve had this recipe for a long time and have made it many times. It had been quite a while since I last made it. Having found myself with a bunch of cabbage, I decided to make it for lunch with a friend. I must say, I forgot just how much I liked it. It is so simple to make. You just crumble up ramen noodles and place in a strainer. Pour over boiling water, let them drain and mix with the rest of the ingredients. The recipe calls for shredded cabbage, but you could use cole slaw mix. I admit I am not a big fan of the seasoning packet, which is called for in the dressing. You can just leave it out and add a little extra salt. That’s what I do.
Asian Cabbage Salad
1 (3 oz.) package ramen style noodles
4 c. shredded cabbage, you could use cole slaw mix 2 c. baby spinach or other greens
4 green onions, sliced
2 T. sesame seeds
3 T. vinegar
2 T. sugar
2 T. oil
1/2 t. ground white pepper
1/4 t. salt
1/2 c. slivered almonds
Crush noodles slightly, place in colander. Pour boiling water over the noodles to soften slightly. Drain well. In mixing bowl combine the noodles, cabbage, onions and sesame seeds. For dressing in screw top jar combine seasoning packet from noodles* with remaining ingredients, except almonds. Put on lid and shake well to combine. Toss dressing over noodle mixture and refrigerate, covered, several hours or overnight. Toss in almonds just before serving. Makes 6-8 side dishes.
* If you don’t want to use the seasoning packet, just add some extra salt to the dressing or even some soy sauce to taste.
Fresh Strawberry Crepes

Fresh Strawberry Crepe
I have very fond memories of watching my mother make crepes when I was a little girl. She would add the batter and tilt the pan to get the crepes smooth and thin. She made it look effortless. With a little practice they actually are. Crepes are easy to make and versatile, too. They can be served for breakfast, brunch or dessert and can be sweet or savory. These are a slightly sweetened crepe, perfect for a fruit filling. I used strawberries – you can use your imagination to fill them any way you like.
Strawberry Crepes
1 recipe dessert crepe batter- see below
2 lbs.fresh strawberries, washed, hulled and sliced
sugar to taste- start with 1/2 cup, then adjust to your taste
1 t. vanilla
1 t. grated orange peel
powdered sugar
whipped cream, optional
Make the crepe batter (recipe below) and cook the crepes. Toss the berries with the sugar, vanilla and orange peel. Place a crepe on your work surface and spoon berries down the middle. Fold up the sides of the crepe and move to serving dish. Repeat with remaining ingredients until you run out of something. I tend to put a lot of the berries in each crepe so I run out of berries and have left over crepes. How much fruit you put in each one is completely up to you and your taste. Dust filled crepes with powdered sugar and top with extra berries- if you have any left. You can also add some whipped cream on the top. I list it as optional- but I really think you’re going to want that whipped cream. Makes about 12 crepes, give or take.
Dessert Crepes
1 c. flour
4 eggs
1 1/2 c. milk
1 T. sugar
2-T. orange-flavored liqueur or orange juice concentrate
1/4 c. butter, melted and cooled
Mix all ingredients in blender (except butter) until smooth, scraping sides often. Add butter and blend well. Let stand for 30 minutes before using, or batter can be refrigerated, covered, over night. Beat again, just before using.Heat 6 or 7 inch skillet. Brush with butter or oil and pour in about 2 teaspoons of batter, tipping pan to cover bottom of pan completely with batter. Cook until edges start to brown, turn over and cook until lightly browned (about 2 minutes per side.)Crepes can be made day ahead or even frozen between sheets of waxed paper and frozen.Makes 20.
8 Recipes for Leftover Ham
Ham and Swiss Calzones
If you had a ham for Easter and find yourself with leftovers here are some recipes you might like. Ham is so versatile and can be used in all sorts of dishes. Added to soups, stir fry, breads and omelets it adds a wonderful smoky flavor to every dish.
Ham and Swiss Calzones
4 c. flour
2 c. rye flour
2 T. sugar
2 t. salt
2 packages quick-rising yeast
2⅓ c. hot water
2 T. oil
2 lb. thin sliced ham- more or less
1 lb. sliced Swiss cheese
Thousand island dressing- recipe follows
1 egg , beaten
Set aside 2 cups of the all-purpose flour. Combine remaining flour with the other dry ingredients in a medium bowl. Stir in water and oil and gradually stir in enough flour to make a soft dough. Turn onto lightly floured surface and knead until dough is smooth and elastic, about 5 minutes. Cover dough and let rest 20 minutes. Divide dough into 12 pieces and roll one piece into a 8 -inch circle. In the middle of the dough place 1 1/2 ounces of the Swiss cheese, a spoonful of the dressing and 2-3 ounces of the ham. Brush the edge of the dough with water. Fold over the dough in half and press the edges to seal. Brush the edge again with water and roll the edge over again. It will give you a prettier look and seal the calzone better. Repeat with remaining dough and fillings. Place calzones on greased baking sheets- or on a baking sheet with a silicone liner or parchment paper liner. You will end up with 12 calzones in all. Only put 4 on one baking sheet. Cover and let rest 15 minutes while preheating the oven to 400 degrees. Before placing calzones in the oven brush with beaten egg and make a few slashes with a knife to help steam to escape while baking. I put 2 baking sheets in the oven at the same time and switch them halfway through baking. Bake in a preheated 400-degree for 20-25 minutes or until golden brown. If baking 2 at once switch them after 10 minutes or so. Cool slightly before eating. Serve warm and refrigerate leftovers. Makes 12.
If you want to use regular yeast use warm, rather than hot water. Also, allow a little more time for the dough to rise the first time, about 40 minutes. Everything else will work the same.
Thousand Island Dressing
Combine equal parts of ketchup, mayo and sweet pickle relish. You likely need at least a cup for this recipe. I made extra so the sandwiches could be dipped in extra dressing, if desired.
Corn and Ham Saute
1 T. oil
1 small onion, diced
1 c. diced ham
4 c. corn- fresh or frozen
salt and fresh ground pepper to taste
In pan cook onion in oil until tender. Add the ham and cook a few minutes longer. Add corn and continue cooking until corn is heated through. Season to taste and serve. Serves 3-4.
Ham and Swiss Bread Florentine
3 ¼ c. flour
1 T. sugar
1 t. salt
1 package quick-rising yeast
1 c. hot water
1 T. oil
¼ c. Dijon mustard
6-8 oz. sliced ham
4 oz. sliced Swiss cheese
1 large bunch fresh spinach, rinsed and steamed a few minutes to wilt, drained well.
Set aside 1 cup of the flour. Combine remaining flour with the other dry ingredients in a medium bowl. Stir in water and oil and gradually stir in enough flour to make a soft dough. Turn onto lightly floured surface and knead until dough is smooth and elastic, about 5 minutes. Roll dough into a rectangle about 16 x 8. Spread mustard down center middle of dough. Top with meat slices, cheese and spinach. Cut one-inch wide strips of dough from filling to edge on both sides. It will sort of look like fringe. Alternating sides, fold strips up and over the filling at an angle. Carefully lift loaf onto greased baking sheet and place at an angle. Cover with a towel and place sheet on top of a roasting pan half-filled with simmering water for 15 minutes. Bake in a preheated 400-degree for 20-25 minutes or until golden brown. Cool slightly before slicing. Serve warm and refrigerate leftovers.
Note: The variations for this bread are almost endless. Some favorite combinations are Corned beef and Swiss with sauerkraut and thousand island dressing., roast beef and cheddar, chicken, broccoli and cheese, Spinach with ricotta or feta and onions, pizza, assorted fillings. You get the idea. Use your imagination and have fun. Just be careful not to overfill, or the bread will be hard to move, use fillings that aren’t too runny and always use cold fillings.
If you want to use regular yeast use warm, rather than hot water. Also, don’t let dough rise over boiling water. After kneading cover dough and let rise 45 minutes. Punch down and assemble as in original recipe. Cover with a towel and let rise until dough looks puffy, about 40 minutes. Bake as directed above. These breads can also be frozen.
Ham and Corn Chowder
I was looking for a quick soup for dinner the other night. Inspiration hit when I came across some corn in the freezer. I had blanched and frozen it during the summer at the peak of corn season. I had a little ham in the fridge I was wanting to use up and the pairing was a natural. I started by sauteing an onion in a little butter. Once the onion was tender I added a peeled and diced potato, the corn, the diced ham and about 2 or 3 cups of chicken stock. I covered the soup and let it simmer until the potato was tender, about 15 minutes. I then took 4 tablespoons of flour and put it in a jar. I added a cup of milk, put on the lid and shook it until the flour was well mixed in. I poured the flour mixture into the pot and brought the mixture up to a gentle boil. I stirred it as it thickened up. I cooked it for a few minutes and adjusted the seasonings adding salt, fresh ground pepper and a dash of hot sauce. I also added some chopped parsley. The end result was a wonderful chowder that took almost no time at all. Sometimes the best dishes come from just looking at what we already have. In this case some frozen veggies and a bit of leftover ham.
Ham and Veggie Stir Fry
2 T. oil
1 medium onion, sliced
1 medium carrot, peeled and sliced thinly
1 c. sliced cabbage
1 clove garlic, peeled and chopped
1 sweet red pepper, seeded and cut into thin strips
2 c. sliced bok choy
1 1/2 c. cubed cooked ham
2 green onions, trimmed and sliced
1/2 c. whole almonds
fresh grated ginger- or powdered, to taste
soy sauce to taste
dash of hot sauce
Heat oil in wok or skillet and cook onion and carrots for 3 minutes. Add cabbage add garlic and stir fry 2-3 minutes longer. Toss in the pepper and bok choy and cook 3 more minutes. Add ham, green onions and almonds along with seasonings and soy sauce and cook until ham is heated through. Serve over hot cooked rice or pasta. Serves 3-4.
Ham with Brussels Sprouts
I started by trimming the Brussels sprouts and cutting small ones in half. I quartered the larger ones. I heated a little butter in a skillet and added 3 cups of prepared Brussels sprouts. I cooked them until they were getting a little color on them. I think their flavor is enhanced by sauteing. I then added 1 1/2 cups of diced cooked ham and 1/2 cup of water. The water helps steam the sprouts so they are tender. I like Brussels sprouts tender. You can skip the water, if you like. The water evaporates quickly and as soon as the ham starts to brown a little the dish was pretty much done. I added a little freshly ground pepper- but it didn’t need salt. I also served it with fresh grated Romano cheese. You could serve it as is or toss in some cooked pasta with the ham. Simple and really good. You might even get a Brussels sprout hater to give this one a try.
Ham and Cheese Strata
12 slices bread, crusts removed if desired – I used rye
6 slices cheese – I used Swiss
1/4 c. diced green onions
1/2 c. chopped sweet pepper
2 c. diced cooked ham or turkey ham
3 eggs
2 c. milk
1 t. salt
1/8 t. pepper
Place six slices of bread on bottom of 2-quart oblong casserole. Top each slice of bread with a slice of cheese. Top cheese with the onions, peppers and ham. Top with remaining bread and cut each “sandwich” in half diagonally. Combine remaining ingredients and pour over sandwiches. Cover dish and let stand several hours or overnight in the fridge. Bake uncovered in a 350-degree oven for 40-45 minutes, or until puffed and set. Serves 6.
Swedish Yellow Split Pea Soup
1 lb. yellow split peas, rinsed
2 qts. Boiling water or stock
1 bay leaf
2. c. chopped onion 2 c. sliced carrots
1 tsp. dried marjoram
1/4 t. ginger
dash nutmeg
1/2 t. pepper
1 T. salt, or to taste
2 cups diced ham
Note: you can use 1 teaspoon liquid smoke if omitting meat.
Combine peas, boiling water or stock and bay leaf and simmer, covered, about an hour, stirring occasionally. Remove bay leaf. Add remaining ingredients, except diced meat and salt, and cook, covered, over low heat for about 30 minutes. Add meat and cook 1 hour more, stirring occasionally. Season to taste. Serve with a pumpernickel bread. Freezes well. Serves 6-8.
Easter Egg Pierogi
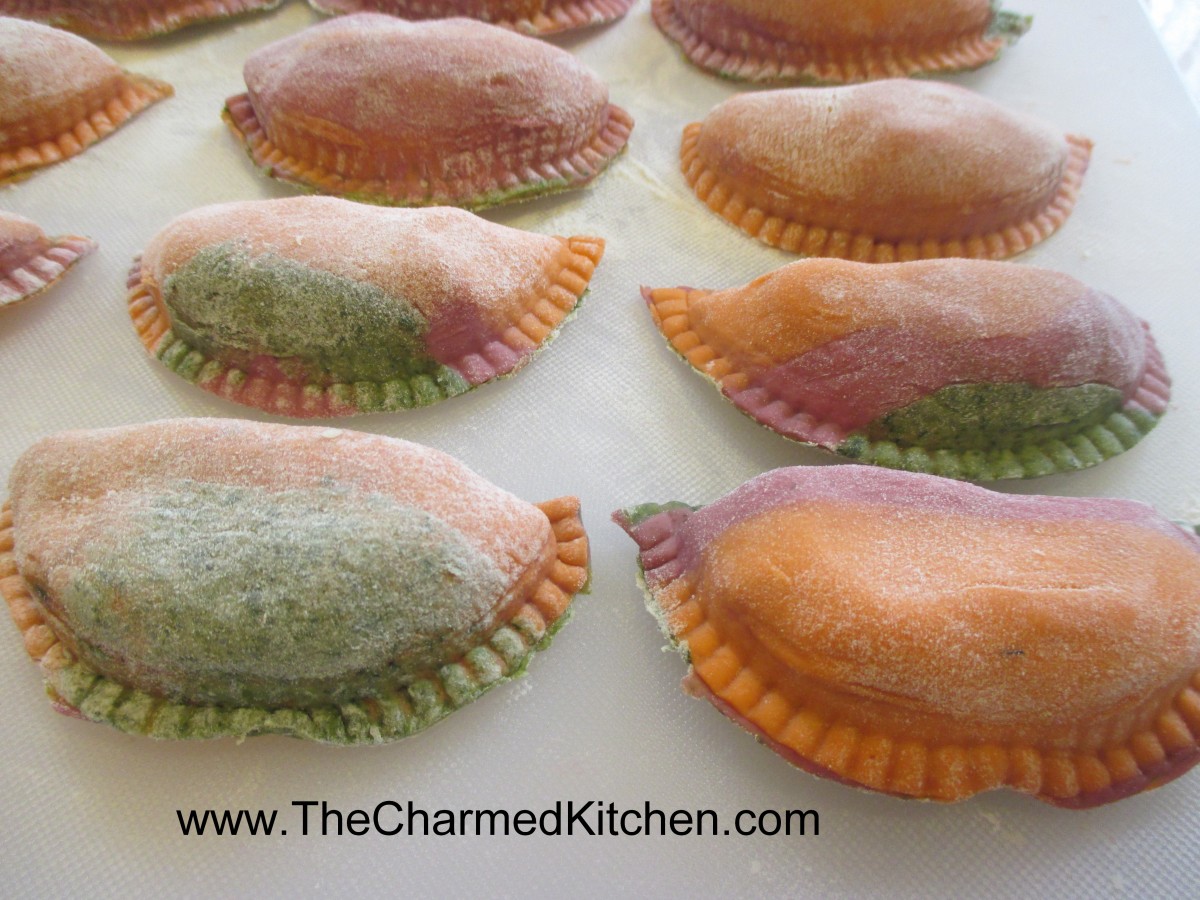
Easter Egg Pierogi
I already enjoy making pasta with veggie based dough. The colors are so pretty and I love the way they taste. I am planning a dinner today for some friends and I decided to make pierogi. It is a favorite of two of my guests. So, since it is Easter, I went a step further and used my veggie based doughs to make pierogi that are inspired by colorful Easter eggs. They came out so nice I will be making them again for sure. I used a potato and cheese filling, so that part is pretty traditional. Will serve them with sauteed onions. Here is the recipe for all.
Easter Egg Pierogi
All of the doughs were mixed using a food processor. If you want to mix them by hand- puree the veggies first. Once the doughs are made allow them to rest at least 30 minutes. Since veggie pasta dough tends to be a little softer than traditional pasta- I actually prefer to make them a day ahead and chill. Chilling the dough, even for an hour, will help.
When ready to roll out your dough, grab a hunk of each dough and press them together. If the the dough is a little sticky that will help. Then on a floured surface roll out to the desired thickness. I use a template to make my pierogis- but you can cut them out with any round cutter or even a glass or jar. Spoon filling of your choice on center of dough circle. Fold dough in half over filling and press edge with fork to seal. Wetting the edge of the dough will help the dough to stick. Don’t overfill or pierogis will split. Test a couple first to get the hang of it. Place a few at a time into salted boiling water and cook until they float. You can eat them as is, or brown cooked pierogi in butter in a skillet. Serve with grilled onions and/or sour cream. We would often make a larger batch and then freeze them, uncooked on wax paper-lined baking sheets. When frozen they would be transferred to a freezer bag or container. Place right from the freezer into boiling water when ready to use.
Carrot Pasta
1 c. flour
1/2 t. dried dill
1/3 c. carrot puree
1-2 T. water, if needed
Beet Pasta
1 c. flour
1/2 t. dill
1/3 c. beet puree
1-2 T. water, if needed
Spinach Pasta
2 c. flour
1 10 oz. package frozen spinach, cooked, drained, reserving some of the liquid
Mix this dough as for other pastas, but don’t be too quick to add reserved liquid. While kneading you’ll get water out of the spinach. May require more kneading and rolling than other pasta doughs. Be patient, it’s worth the work.
Pierogi Filling
1 lb. Potatoes, peeled and boiled
4 oz. cream cheese – normally I would use farmer’s cheese or cottage cheese, but cream cheese was what I had
1/2 c. shredded cheddar cheese
salt and pepper to taste
Mash potatoes with other ingredients and season to taste.
I usually add some chopped sweet onion to my filling, but one of my guests isn’t crazy about onions, so I am leaving them out.
Goldenrod
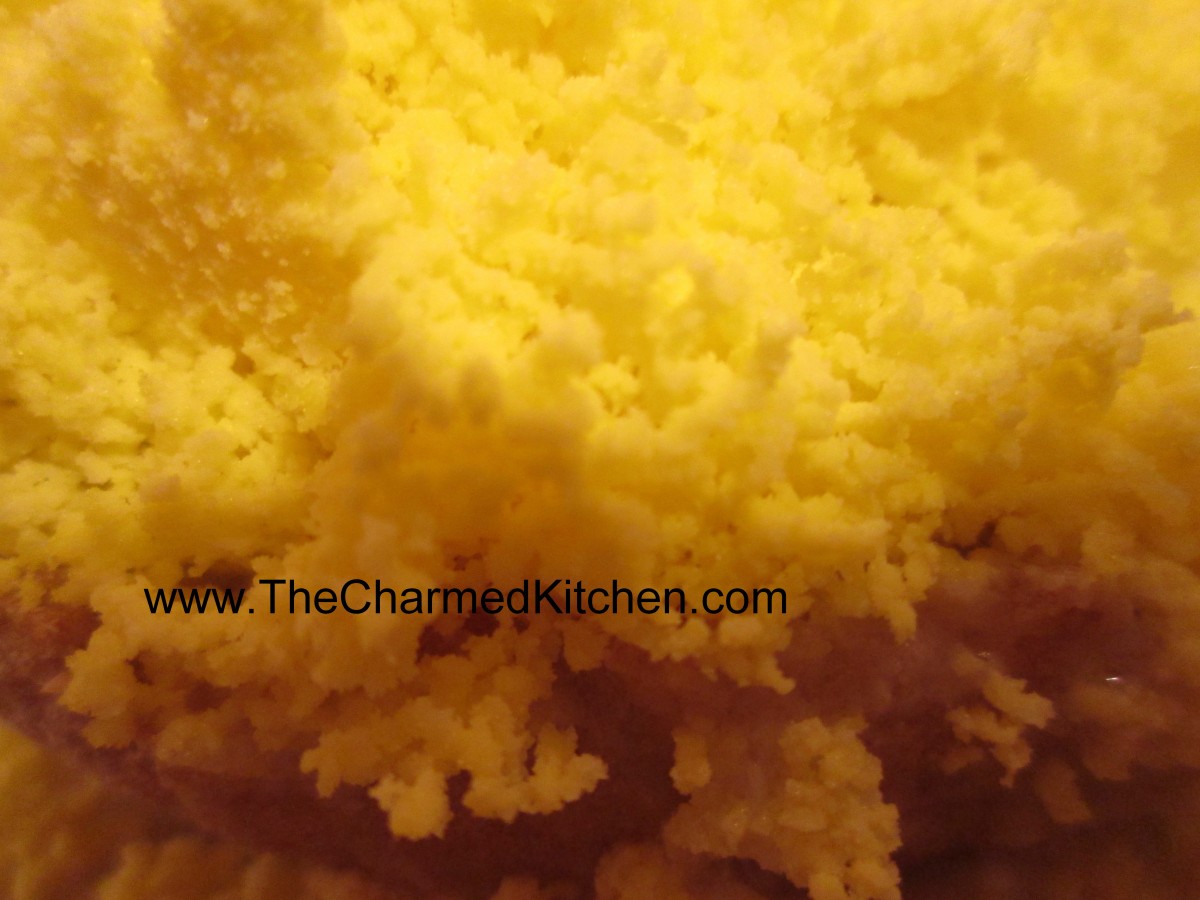
Goldenrod
If you are looking for a recipe using hard-cooked eggs you might want to make some Goldenrod. It’s a recipe my grandmother and mother used to make every year after Easter. Very tasty and a great way to use up extra eggs. You just make a white sauce and add the chopped up egg whites. Season with salt and pepper. When ready to serve pour the hot egg white mixture over toast and then put the egg yolks in a small strainer or sieve and press them through the strainer over the egg whites. The yolks turn into a powder and the end result looks quite pretty. I like it served over English muffins but you can serve it over toast, biscuits or bagels.
Goldenrod
4-6 hard cooked eggs
2 T. flour
2 T. butter
1-1 1/2 c. milk
salt and pepper to taste
2-4 slices bread, toasted
Peel eggs and separate whites from yolks. Chop egg whites and set aside. In saucepan cook flour and butter together until smooth. Stir in milk and cook until thickened and bubbly. Be careful not to burn the sauce. Season to taste and add reserved egg whites, heating through. Arrange toast on serving dishes and cover with the sauce. Place reserves egg yolks in a fine sieve and press through over sauce, dusting as evenly as possible. Serves 2-4.
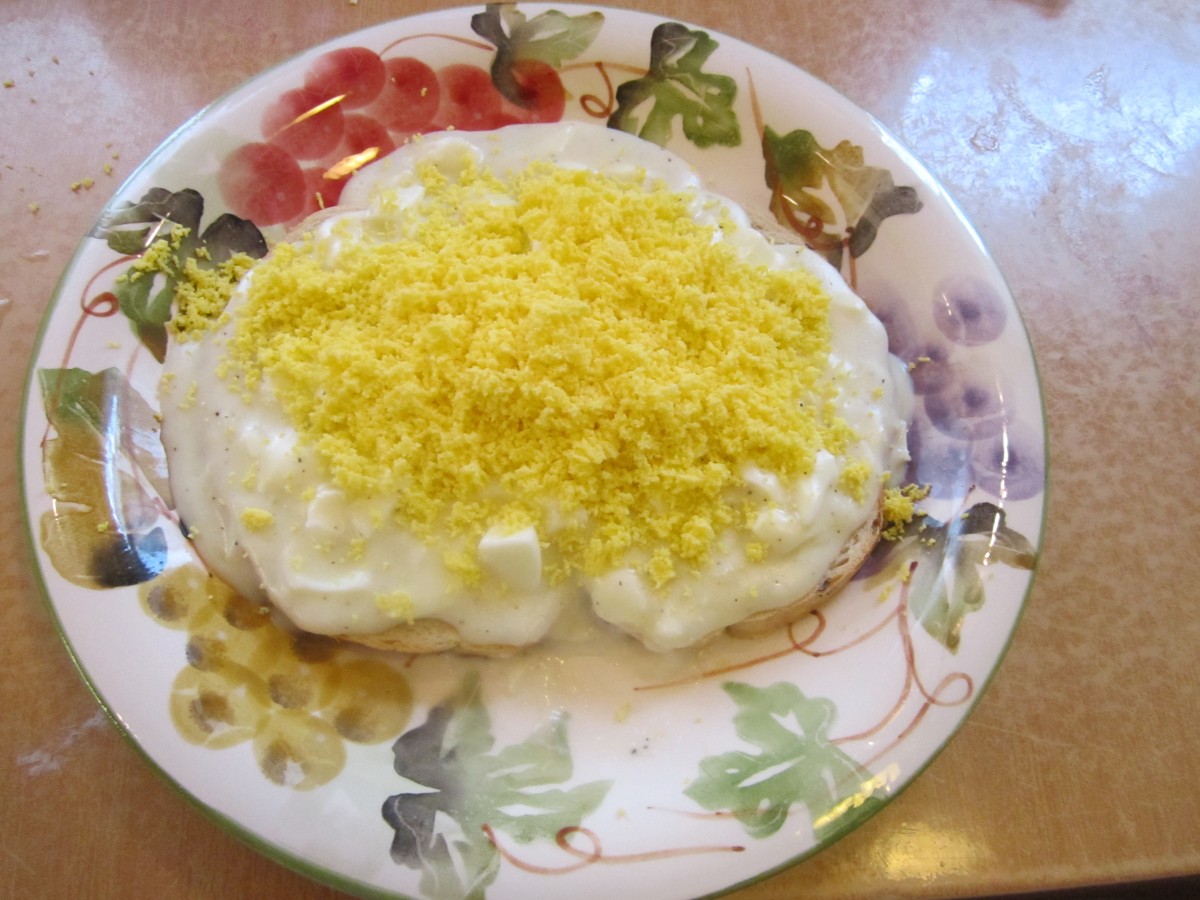
Ready to serve
Mixed Mushroom Quiche

Mixed Mushroom Quiche
I’ve been on a mushroom kick lately. Since I needed a meat-free meal for a friend I decided to use mushrooms to make quiche. I had a mix of fresh shitake, oyster and portobello mushrooms. Pretty much any fresh mushrooms would work, but I like to mix a few together. I made two since I had two crusts and plenty of mushrooms. You can freeze one, or just make half a recipe.
Mixed Mushroom Quiche
2 unbaked pie crusts – homemade preferred
2 T. oil
1 medium onion, diced
1 lb. fresh mushrooms, trimmed, washed and sliced or chopped
salt and pepper
8 oz. Swiss cheese, cubed or shredded
4 T. flour
2 c. milk or half and half
6 eggs, beaten
1/4 c. chopped fresh parsley
hot pepper sauce to taste
Roll out dough and place in 2 (9-inch) pie pans. Preheat oven to 375 degrees. Heat oil in skillet and cook onion until tender. Add mushrooms and cook over medium/low heat until mushrooms are tender. Season with salt and pepper. I don’t like to rush this part. I like the flavor of mushrooms when they cook kind of slow and long. Plus it gives the moisture in the mushrooms a chance to cook off. Place half of the cheese in each of the crusts. Add half the flour to each and toss to coat. Add the mushroom mixture, dividing it evenly between the crusts. In medium bowl combine the milk with the eggs, parsley, hot sauce and salt and pepper. Pour half of the egg mixture in each of the crusts. I place them on a baking sheet to catch drips. Place in the oven and bake at 375 for 30 minutes. Turn down to 300 and bake 25-30 minutes longer- or until center is set. Serve warm. Makes 2.
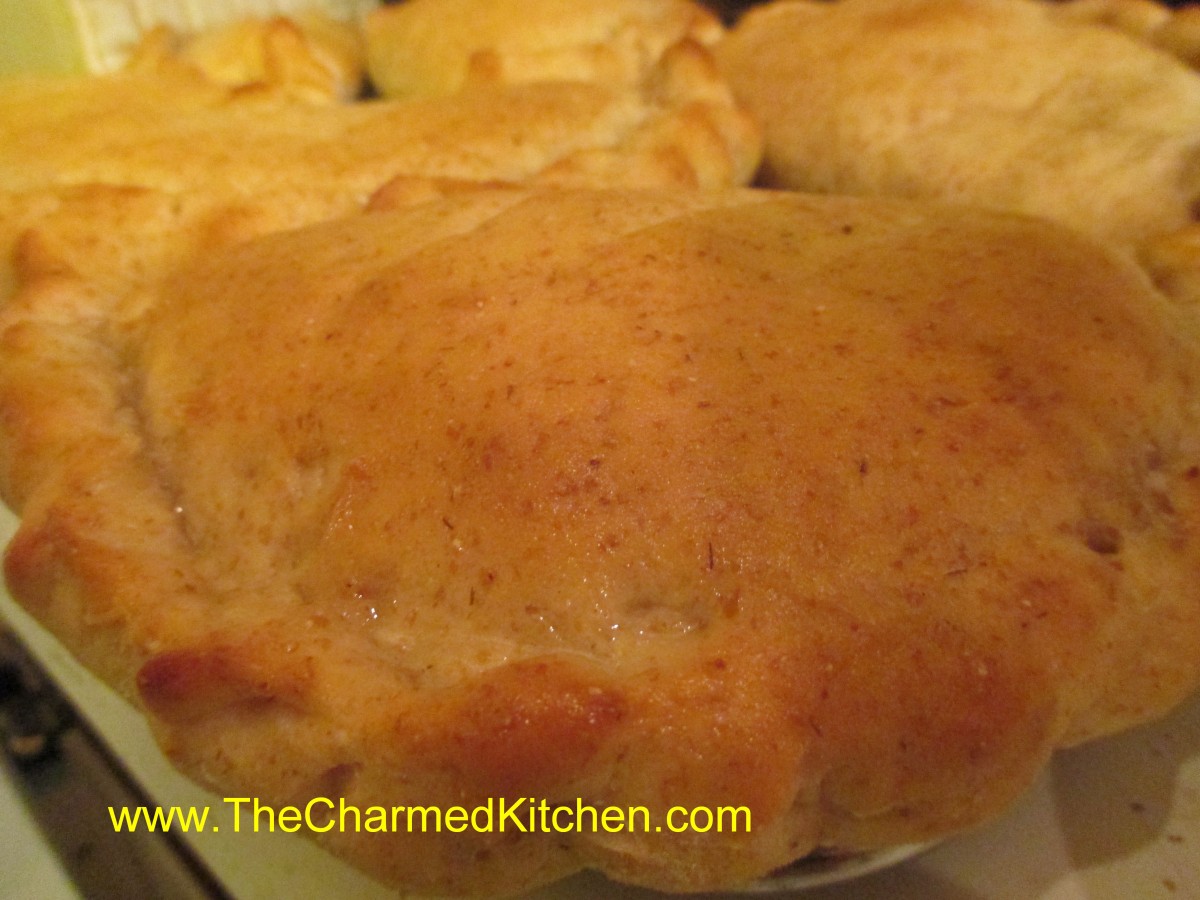
Hot Cross Bun Bread Pudding
 I had leftover Hot Cross buns last year and ended up making bread pudding with some of them. It was a really big hits with my friends. Since I just posted the recipe for the Hot Cross Buns, I thought I’d share this recipe again. I made a big batch, but the recipe could be cut in half. Thinking I might make Hot Cross Buns- just so I can make this dessert again!!
Hot Cross Buns Bread Pudding
12 c. torn up hot cross buns- I used 8 buns
2 c. half and half
1 c. milk – I used almond milk
1 c. sugar- or less if you are using frosted buns
5 eggs
1 T. vanilla
1 T. cinnamon
Frosting:
1 c. powdered sugar
4 t. milk
In large mixing bowl place the torn up buns. Mix remaining ingredients and pour over the buns. Stir to moisten evenly. Spoon mixture into a buttered 9×13-inch pan. Bake in a preheated 350 degree oven for 35-40 minutes or until bread pudding is set and a little golden on top. While the bread pudding is baking combine powdered sugar with milk to make a frosting thin enough to drizzle. Let bread pudding cool 10 minutes and drizzle with frosting. Serves 8-10.
Hot Cross Buns

Hot Cross Buns
These rich rolls are a traditional dish at Easter in my house. They can be served at breakfast, brunch or even as a dinner roll. Because the dough is rich, they are slow to rise, so if they aren’t jumping out of the pan after an hour or so, don’t worry. They do rise quite a bit in the oven. After they cool a bit- pipe on the icing in the crisscross pattern that gives these rolls their name.
Hot Cross Buns
2/3 c. sugar
1 t. salt
2 packages active dry yeast
About 5 cups bread flour
1 ½ c. milk
½ c. butter
2 eggs
1 c. raisins
Icing
¾ c. powdered sugar
1 T. milk
In bowl combine sugar, salt, yeast and about 1 ½ c. flour. Heat together milk and butter until very warm. Beat milk mixture into to flour mixture and beat 2 minutes with electric mixer. Beat in 1 egg and 1 cup flour and beat 2 more minutes until batter thickens. Stir in raisins and enough additional flour to make a soft dough. Turn dough onto a floured surface and knead until smooth, about 10 minutes. Place dough in greased bowl, turning to grease top, cover with a towel and allow to rise in a draft free place until doubled in bulk, about 1 hour.
Place dough on floured surface and divide into 15 equal pieces. Cover with towel and lest rest 15 minutes. Meanwhile grease a 9×13 inch pan. Form dough into smooth balls and place in prepared pan. Cover and let rise until doubled, about an hour. Preheat oven to 350 degrees. Beat remaining egg. Cut a cross in each bun and brush with the egg. Bake for 25 minutes or until buns are golden. Remove buns to wire rack to cool 15 minutes. Make frosting, place in decorating bag and pipe onto buns. Makes 15.
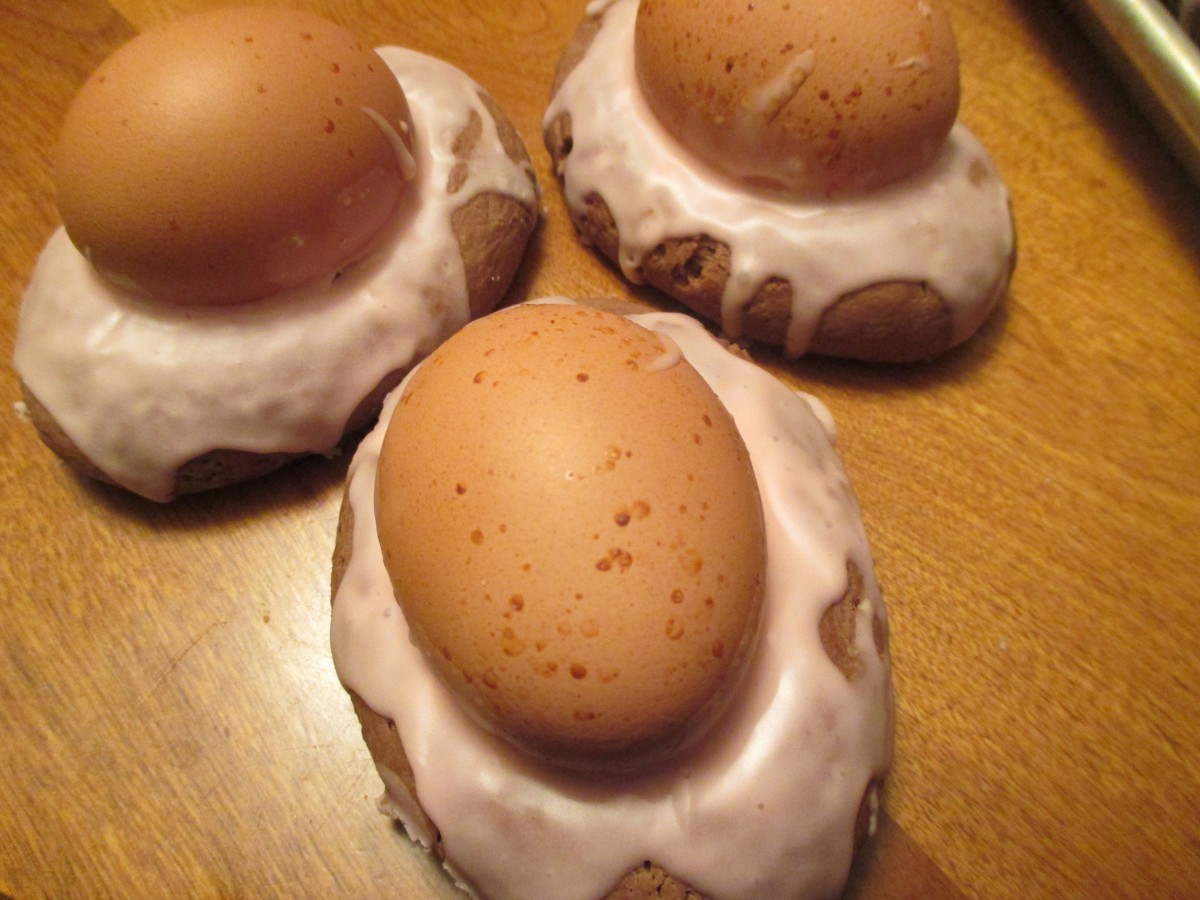
Chocolate Easter Egg Biscotti

Chocolate Easter Egg Biscotti
After a friend mentioned that she would love my Easter Egg Biscotti even better if they were chocolate, I decided to try to make her some. This is the end result. I used my original recipe and added cocoa powder. Worked out really nice, so I thought I’d share them with you.
Chocolate Easter Egg Biscotti
1 c. shortening – you can use butter- I do*
1 ½ c. sugar
4 eggs
5 t. baking powder
1 t. salt
2 t. vanilla
1 c. milk
6 c. flour
¾ c. cocoa powder
Hard cooked eggs, plain or dyed
Powdered sugar glaze- recipe follows
Preheat oven to 350 degrees. Cream together shortening and sugar. Beat in eggs. Add next 4 ingredients and blend until smooth. Mix flour with cocoa. Stir in flour mixture 2 cups at a time. Dough should be pliable. If dough is too sticky add a little more flour. Take a piece of dough about the size of a large egg and roll until smooth. Place on a greased baking sheet. Indent middle slightly and then place an egg in the center, pressing down slightly. It should look like a nest. Continue with remaining dough allowing about 2-3 inches in between as they grow. You can fit 6-8 on a large baking sheet. Bake 20 –25 minutes or until browned on the bottom. Cool on wire rack before drizzling with frosting. Makes 24-30. Store in the fridge.
* If using butter- chill dough before rolling.
Sugar glaze
2 c. powdered sugar
2-3 T. milk or orange juice
1 t. vanilla
Food coloring, if desired
Mix together until smooth and of drizzling consistency.

Chocolate and original biscotti waiting to be baked
Glazed and ready to enjoy
Oyster Mushroom Marsala
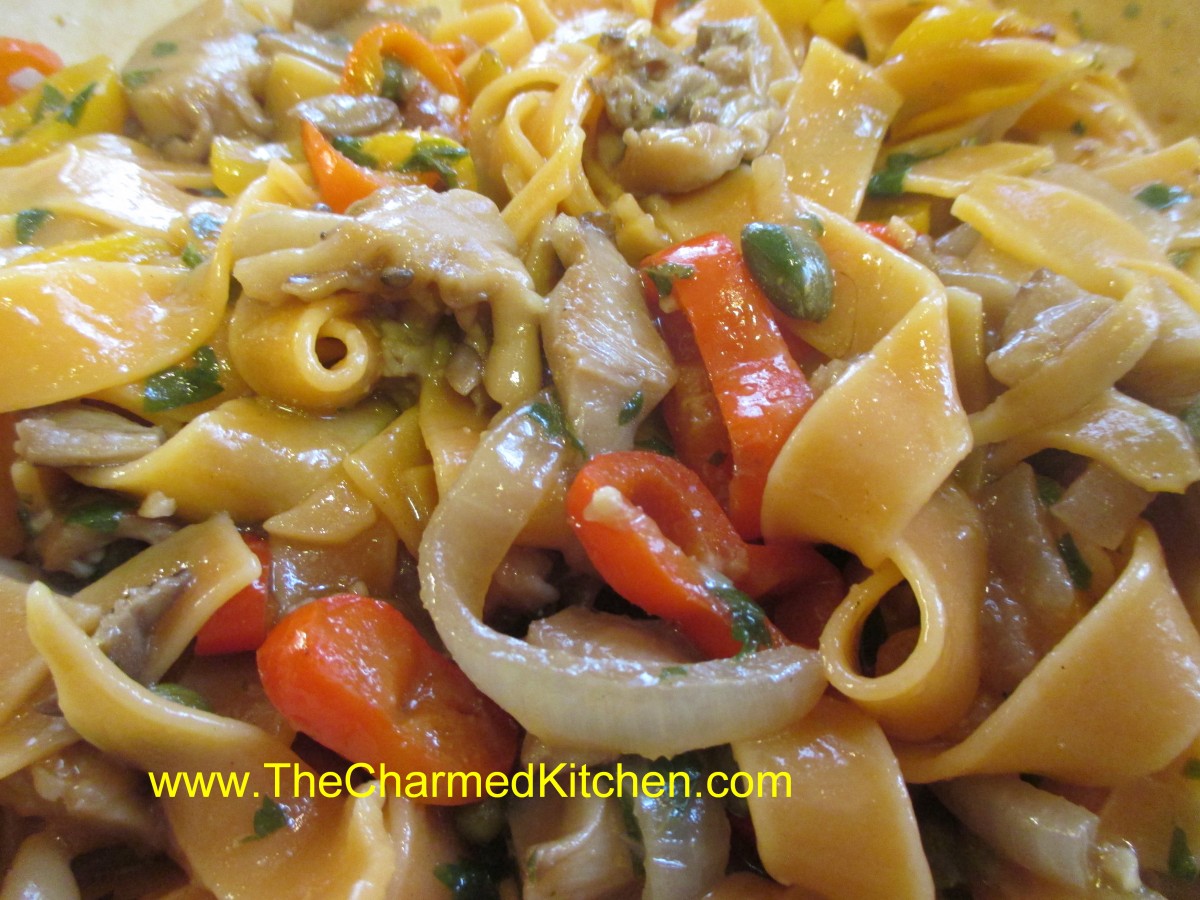
Oyster Mushroom Marsala
Sometimes the ingredients take you where you need to go. I had some oyster mushrooms I had gotten at a local farm market. I used some of them in an omelet a few days ago. I decided to use the rest of them in a pasta dish. The plan was for a red sauce, but as I started making the dish I tasted the mushrooms and decided to go in a another direction altogether. After the mushrooms were cooked with the onions and garlic they were so good already I didn’t want them in a red sauce at all. I am so pleased with what ended up happening. Here is the recipe.
Oyster Mushroom Marsala
2 T. oil – you could use some butter, too.
1 small onion, sliced
3 cloves minced garlic
4 oz. oyster mushrooms, washed and chopped coarsely
1 c. sliced sweet peppers – I had mini peppers so cut in rings
1 T. capers – maybe a little more
2 T. flour
1 c. stock- use what you like I used chicken, veggie or beef would be good, too
1/2 c. Marsala wine
1/2 c. chopped fresh parsely
salt and pepper to taste
hot pepper to taste
Hot cooked pasta- I used a tomato fettuccine – about 6 oz.
In skillet cook onion in oil until golden. Add garlic, mushrooms, peppers and capers and cook over medium heat until veggies are tender. Add the flour and toss to coat. Add stock, wine and parsley and bring to a simmer. Cook over medium-low heat for several minutes, or a bit longer. You want to cook it long enough to mellow out the flavor of the Marsala. Adjust seasonings and toss with hot pasta. Serves as is or add some Parmesan cheese. Serves 2-3.


