Brie “Truffles”
Brie Truffles
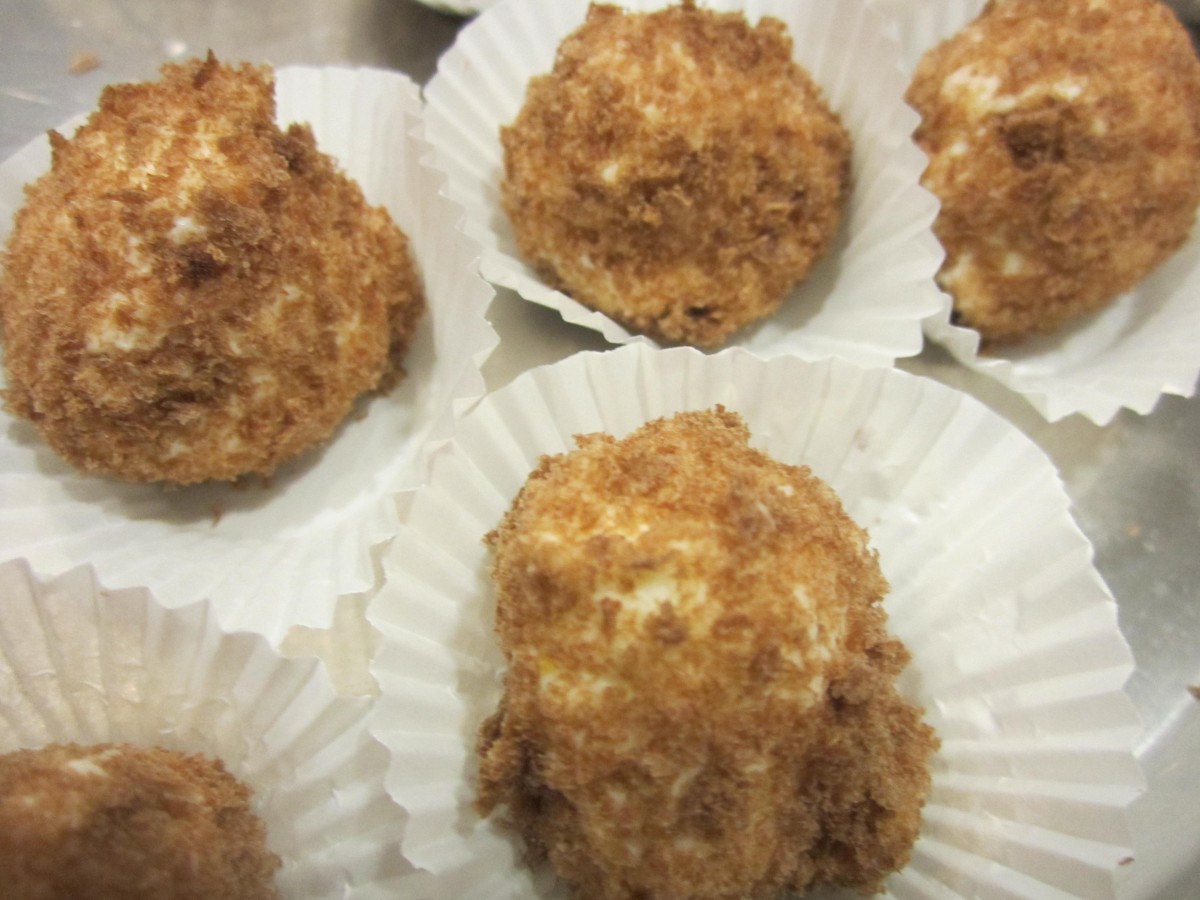
I love brie. There are several classic ways to serve it and I have done them all. This is a fun twist. Brie is combined with cream cheese and butter until smooth and then rolled in fresh pumpernickel bread crumbs and placed in little paper cups. The effect is that the cheese looks like little cocoa coated chocolate truffles. Rich and melt in your mouth these “truffles” are sure to be a hit at your next party. Thanks to Carol Thompson for hosting the party where I made these.
Brie Truffles
8 oz. brie, room temperature- I remove the rind from the brie for a smoother texture.
8 oz. cream cheese, softened
1 stick ( 4 0z.) butter, softened
2 c. fresh pumpernickel bread crumbs*
In food processor combine cheeses with butter until smooth. Chill mixture 30 minutes or longer. With a small cookie scoop or teaspoon form mixture into small balls. Place crumbs in a bowl and roll the balls of cheese in the crumbs to coat. Place in small paper cups and chill until ready to serve. Makes 3-4 dozen.
* To make the crumbs just place torn up pumpernickel bread in a food processor and run until bread turns into crumbs.
Bacon Wrapped Water Chestnuts
Bacon-Wrapped Water Chestnuts
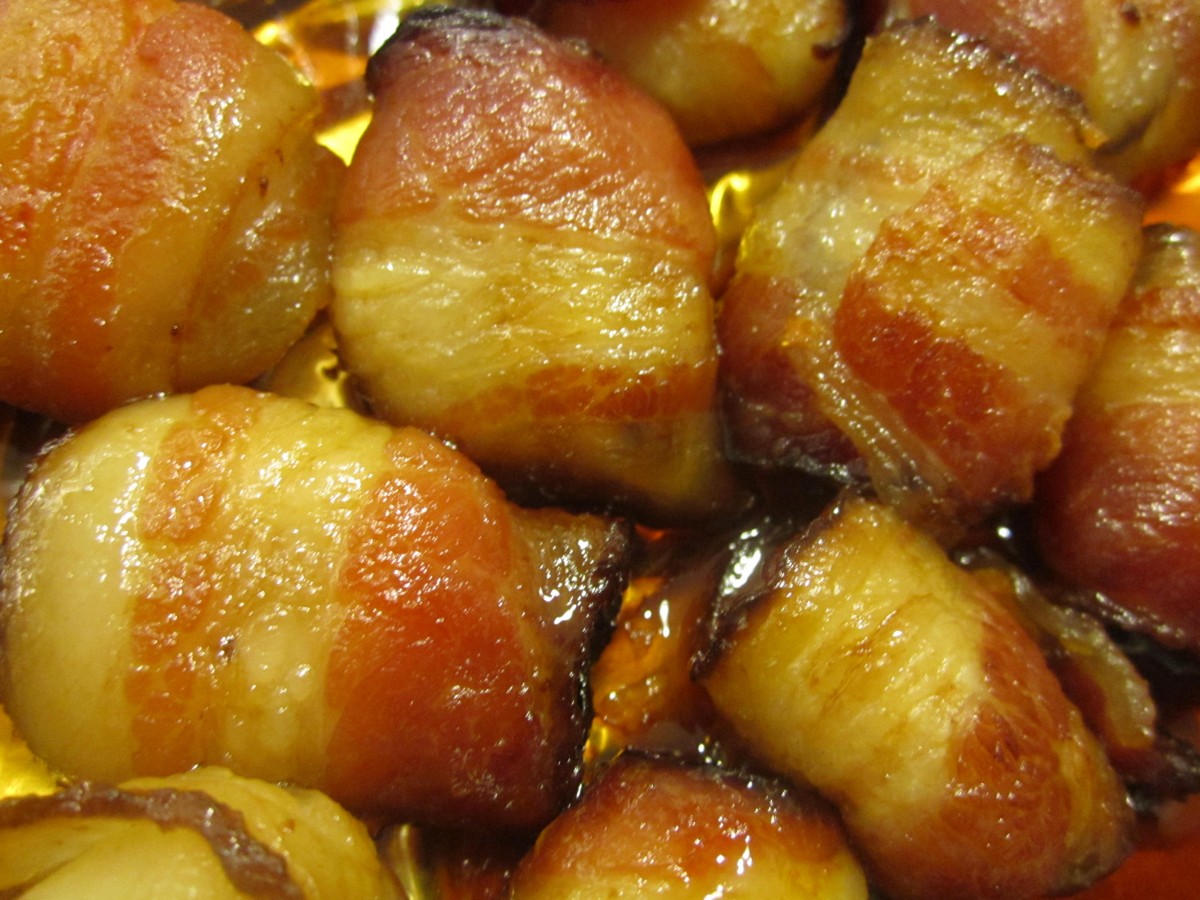
Had a great class last night with a wonderful group of ladies. Thanks to Carol Thompson for hosting the event. The class was on quick and easy appetizers. I got a special request to make water chestnuts wrapped in bacon. They were a hit last night. No surprises there. These are always a hit and easy to make. Just a suggestion- make more than you think you will need- the disappear quickly.
Bacon-Wrapped Water Chestnuts
20 slices bacon, cut in half
40 whole water chestnuts
hot sauce
brown sugar
Roll half of slice of bacon around a water chestnut and place in a baking pan, seam side down. Repeat with remaining bacon and water chestnuts. Cook in a 400 degree oven for 20-25 minutes or until bacon is well browned. Remove from oven and place bacon rolls on paper towels to drain. Drain off the fat in the pan. Return bacon roll ups to the pan- or you can place in a fresh baking pan, if you prefer. Sprinkle a little of the hot sauce on the bacon rolls and drizzle with maple syrup and some brown sugar. Return to oven and bake until caramelized- about 15 minutes- but watch so they don’t burn. Makes 40.
Note: You can make these ahead of time and just reheat when ready to serve. They can also be frozen.
Sausage with Veggies
Sausage with Veggies
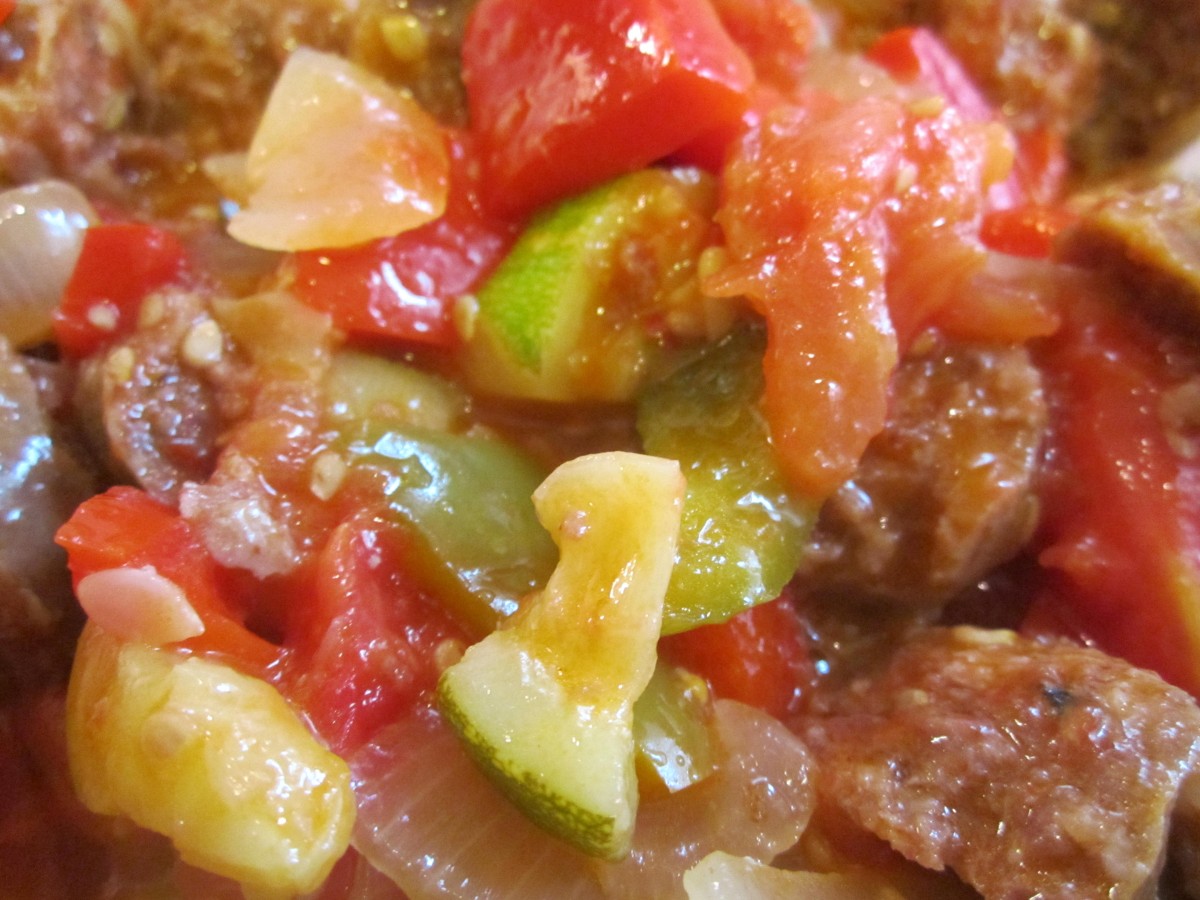
With all the great local produce I have these days cooking has been more fun than ever. I wanted to make a dinner using as many veggies as possible but I was short on time. I opted for a take on sausage with peppers. I had some cooked Italian sausage I wanted to use and turned leftovers into a great new dish. Layers of flavors and super easy.
Sausage with Veggies
oil
1 large onion, chopped
2 cloves garlic, peeled and sliced
1 medium summer squash, diced
2 sweet peppers, any color, seeded and chopped
4 c. peeled and chopped fresh tomatoes
2 c. sliced cooked sausage- I used Italian, but use what you like
Salt and pepper to taste
Hot pepper sauce to taste
Heat oil in skillet and add onion, cooking until tender. Add garlic and cook another couple of minutes. Add remaining vegetables and sausage and cook until veggies are tender. Adjust seasonings. Serve over rice or pasta. Serve 3-4.
Stuffed Pepper Soup

Stuffed Pepper Soup
I was given all the ingredients for stuffed peppers from Carl at Blue Pike Farm. He wanted me to can stuffed peppers for him. I ended up making him stuffed pepper soup instead. He can eat it the way it is or add rice to it later. I have to say that it tasted great and I canned quite a bit of it for him. Here is the recipe, if you want to make it, too.
Stuffed Pepper Soup
1 qt. chicken stock
6 c. chopped onions
8 c. seeded and chopped sweet peppers- about 14
8 lbs. fresh tomatoes, peeled and cut up
2 lbs. ground meat- cooked and drained well
3 cloves garlic, peeled and chopped
1/2 c. cider vinegar
non-iodized salt to taste
pepper to taste
cayenne pepper to taste
Combine first seven ingredients in a large pot and bring up to a boil. Turn heat down to a simmer and cook until vegetables are tender, about 20 minutes. Stir from time to time. Add remaining ingredients and cook 5 minutes longer. Ladle hot soup into clean, hot quart jars and fill leaving 1-inch head space. Use a plastic knife to remove and air bubbles. Wipe rims and screw on lids. Repeat with remaining soup. Place jars in a pressure canner and following the manufacturer’s instructions. Process quarts for 90 minutes at 10 pounds pressure, pints for 75 minutes. Yield: about 7 quarts.
Note: Soup could also be frozen instead.
Blueberry Pie
Blueberry Pie
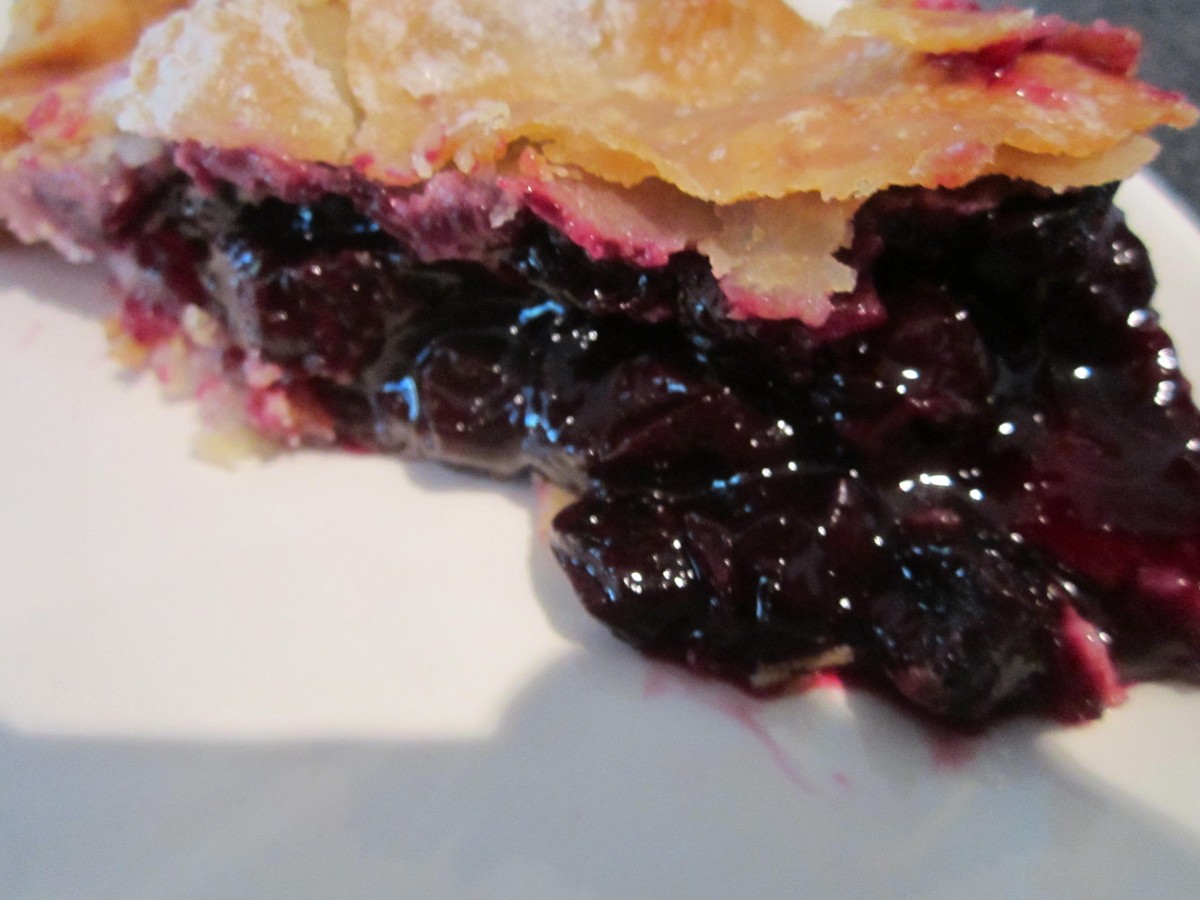
Had some friends in town over the weekend from the Netherlands. I wanted to make a dessert that was special and for me that was a blueberry pie. The pie was a big hit and I wanted to share the recipe with you. Andro and Tom- it was great to see you!!
Blueberry Pie
Pastry for 2 crust pie- recipe- The crust recipe I used is at the bottom of the page
2 ½ T. cornstarch
1 c. sugar
3 c. fresh or frozen blueberries
1 T. lemon juice
1 T. butter
1 T. sugar, for sprinkling
Roll out half of the crust and place in 8 or 9-inch pie pan. You can roll out the top crust ahead of time, or even cut into strips for a lattice top. Cover remaining crust to keep it from drying out. In medium bowl mix cornstarch and sugar. Toss in berries and then sprinkle in the lemon juice. Allow to stand 15 minutes. If berries were frozen be sure they are not clumped together. Spoon mixture into prepared crust and dot with the butter. Top with the second crust or place strips on in a lattice design. If using a whole crust cut in decorative slits for ventilation. I used a tiny heart-shaped cutter for my pie. Moisten then crimp edges and shape decoratively or use a fork to seal. Place pie in lower half of hot oven. Bake in a preheated 425-degree oven for 15 minutes. Reduce heat to 375 and bake an additional 40-50 minutes or until crust is brown and juices begin to bubble through the slits. Cool a little before serving.
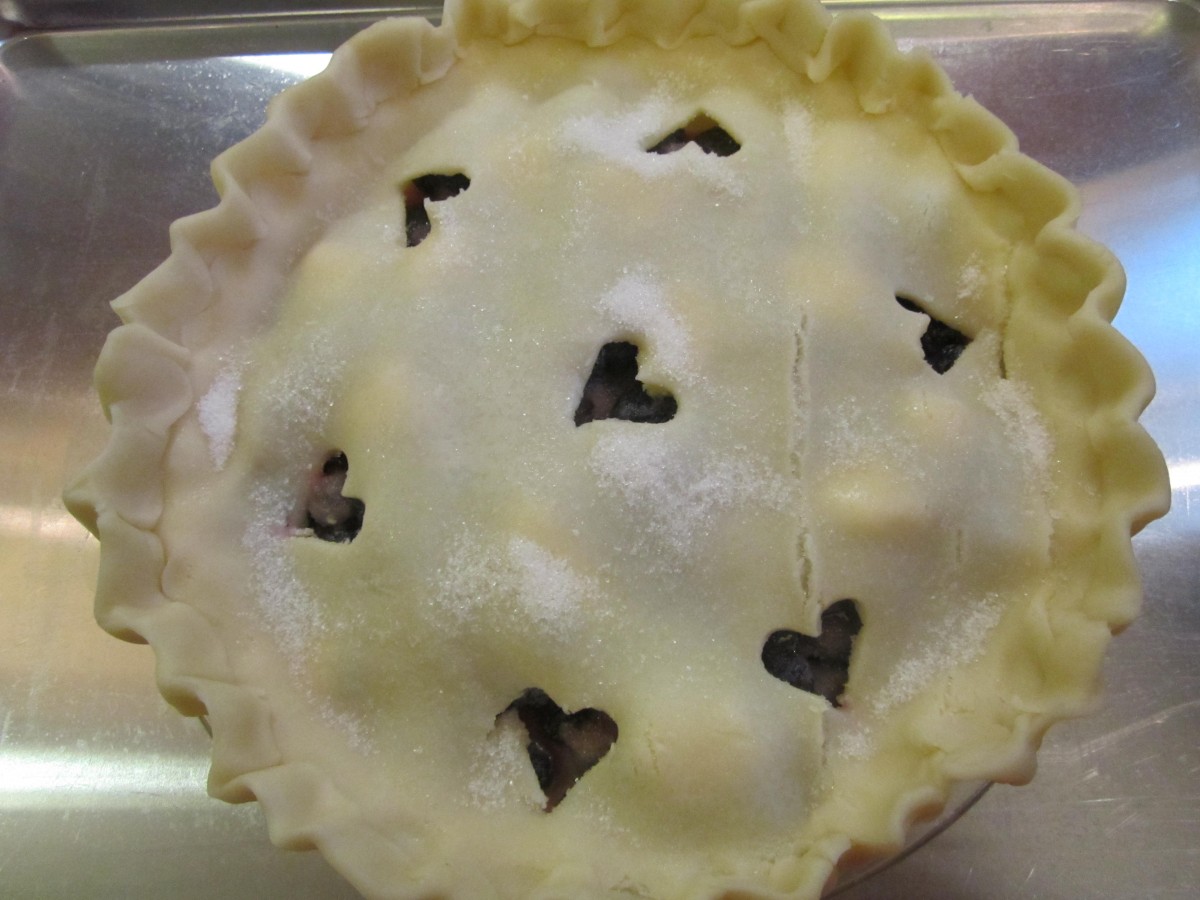
Ready for the oven
Flaky Pie Crust
2 c. flour
1 t. salt
3/4 c. shortening, chilled
1 T. cider vinegar
4-5 T. cold water
Combine flour and salt and cut in shortening. Toss in vinegar and water 1 tablespoon at a time until dough holds together. Use a fork to toss the ingredients together and as soon as the mixture holds together stop adding water. Makes 2. Chill well before using
Steak and Pepper Omelet
Steak and Pepper Omelet
I love to play around with different omelet fillings. Often I’ll use up whatever is around. With some red sweet peppers on hand and some leftover steak I got the idea for a steak and pepper omelet. It was wonderful.
Steak and Pepper Omelet
oil
1 small onion, sliced
1 small red pepper, seeded and sliced
1 c. cubed cooked steak
3-4 eggs
2 oz. cheese- cut in small pieces or shredded*
salt and pepper to taste
dash hot pepper sauce
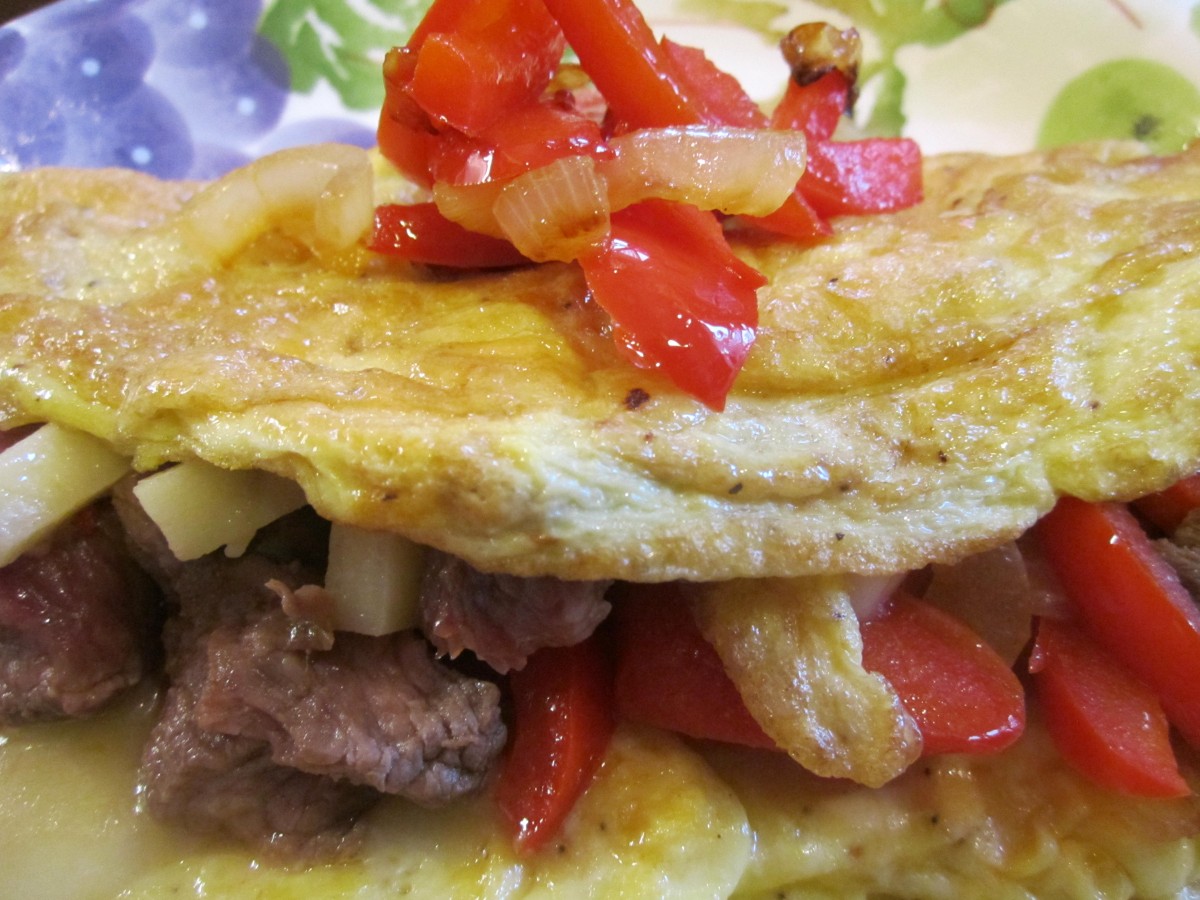
Heat oil in skillet and cook onion until golden. Add a little salt to the onions while they are cooking. Add pepper and cook until tender-crisp. Remove from pan and set aside. Heat same pan adding more oil, if needed. Beat eggs in a small bowl and season with salt and pepper and hot sauce to your taste. Pour eggs into hot skillet and swirl to coat bottom of skillet. Using a spatula lift eggs a little and tip pan to allow uncooked egg to get to surface of the pan. Once omelet is almost set place some of the pepper mixture on one half. Top with the steak and cheese. Using a spatula gently fold the empty half of the omelet over the fillings. Allow to cook one more minute and slide onto a serving plate. Top with the remaining pepper mixture. Serves 2.
* I used Pepper Jack cheese because that is what I happened to have. Use any cheese you like.

Ready to fold over
Wild Blackberry Jelly

Wild Blackberry Jelly
I was given some beautiful wild blackberries and they have been in the freezer just waiting for me. Thanks to both Janice and Amy McWilliam. Decided to use some of them to make blackberry jelly. It came out perfect. Sweet and tart and full of the flavor of summer.
Blackberry Jelly
3 quarts blackberries*
1/2 c. water
1 box powdered pectin
5 c. sugar
Place the berries in a pot and use a potato masher to crush the berries. Add the water and simmer until the berries are soft. Strain out the solids and then pour the juice through several layers of cheesecloth to clarify. You should end up with about 4-5 cups of juice. Place juice in a pot and add the pectin. Bring mixture to a boil stirring constantly. Add the sugar and return mixture to the boil, again stirring constantly. Boil for 1 minute. Remove from heat and skim off any foam. Ladle mixture into clean, hot jelly jars and fill to 1/4 inch from the top. Seal and repeat with remaining jelly. Place in a boiling water bath and process 10 minutes. Makes 6-7 half pints.
* Best if some of the berries are a little under ripe. Higher in natural pectin.
Note: I decided to take the solids and seeds and place them in a large jar and cover them with vodka so I can make liqueur later. We’ll see how that works out in a few weeks. I’ll sweeten that mixture later after filtering out the solids.
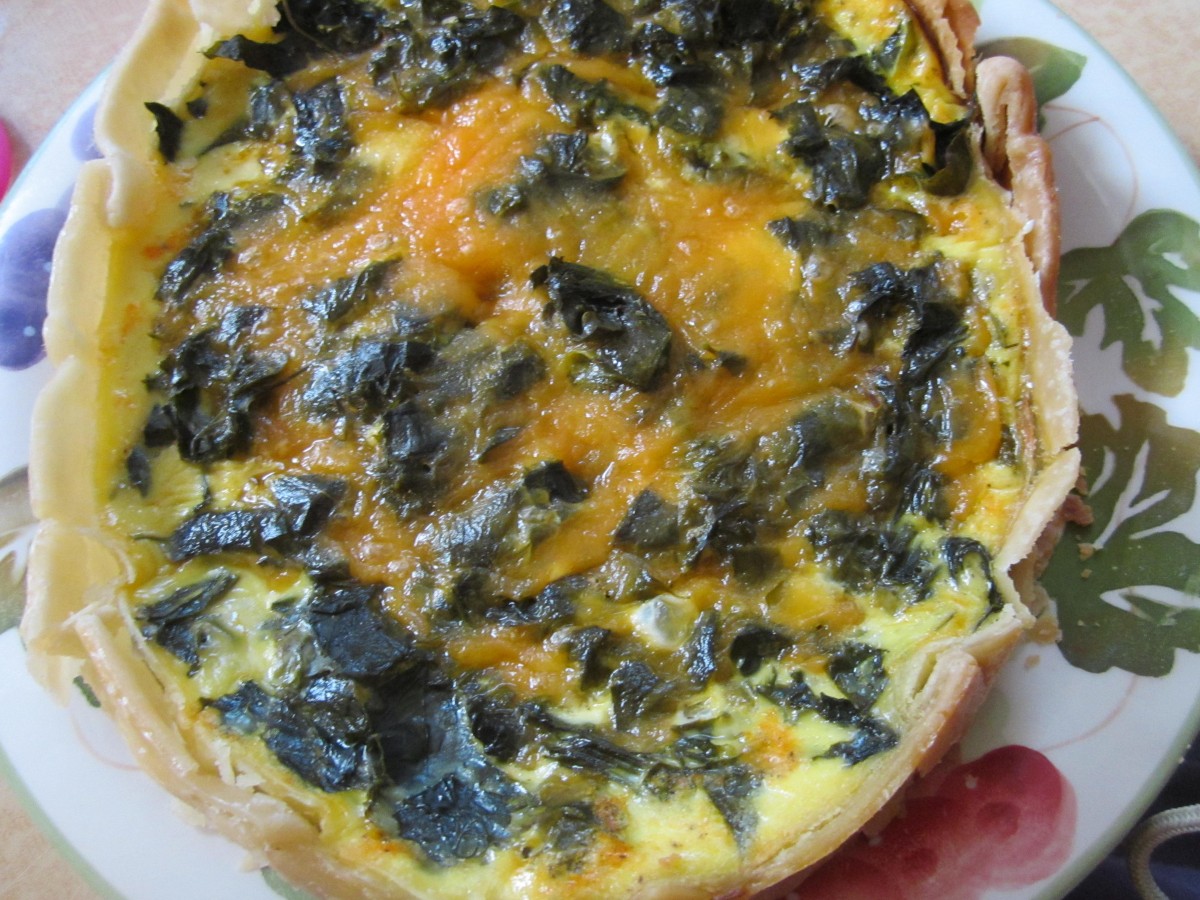
Lambsquarters Quiche

Lambsquarters Quiche
I was going to title this one Weed Quiche- but decided against it. I could already imagine the comments that would get!! I made 2 quiches yesterday- one baked conventionally and one baked in my crock pot. Both worked out great and both had one special ingredient- lambsquarters. Lambsquarters are a common plant- found almost anywhere soil has been turned. Most consider it a weed but I almost hate to call it that. Rather, I’ll borrow a term I got from Dr. Peter Gail and call it instead a volunteer vegetable. When cooked it tastes just like spinach. I love it for its flavor but also because long after summer heat has cooked the spinach in the garden lambsquarters continue to grow and thrive. There is a picture of them at the end of this post so you will know what they look like. If you don’t have them you can sub out with a 10 oz. package of frozen spinach, thawed and squeezed dry or about a pound of fresh spinach, cooked, chopped and drained well. Here is the recipe, as promised.
Lambsquarters Quiche
1 unbaked pie crust
3 c. shredded cheese, divided
2 T. flour
1 leek, white part only, sliced and sauteed in oil until tender
4-5 cups lambsquarters leaves, washed and steamed until wilted
3 eggs
1 c. milk or half and half
salt and pepper to taste
hot sauce to taste
For conventional cooking preheat oven to 400 degrees. Place crust in a 9-inch deep dish pie pan. Toss 2 cups of the cheese with the flour and place in pie crust. Add the leeks and lambsquarters. Combine eggs with milk and seasonings, beat until smooth and pour over the ingredients in the pie crust. Top with remaining cheese. Place on a baking sheet and bake 45 minutes to an hour. Check quiche for doneness by inserting a knife off center. If it is clean quiche is done. Serve 4-5.
Crock pot directions: I started by spraying the inside of the crock pot with non- stick baking spray. I am sure I could have oiled it instead or maybe rubbed it with butter. Then I placed the pie crust in- trying to fit it as best I could. It was pretty easy. I added the fillings like I normally would, put on the lid and set it on high. I let the quiche bake for 2 hours. Leave it in longer if the crust is not brown enough.
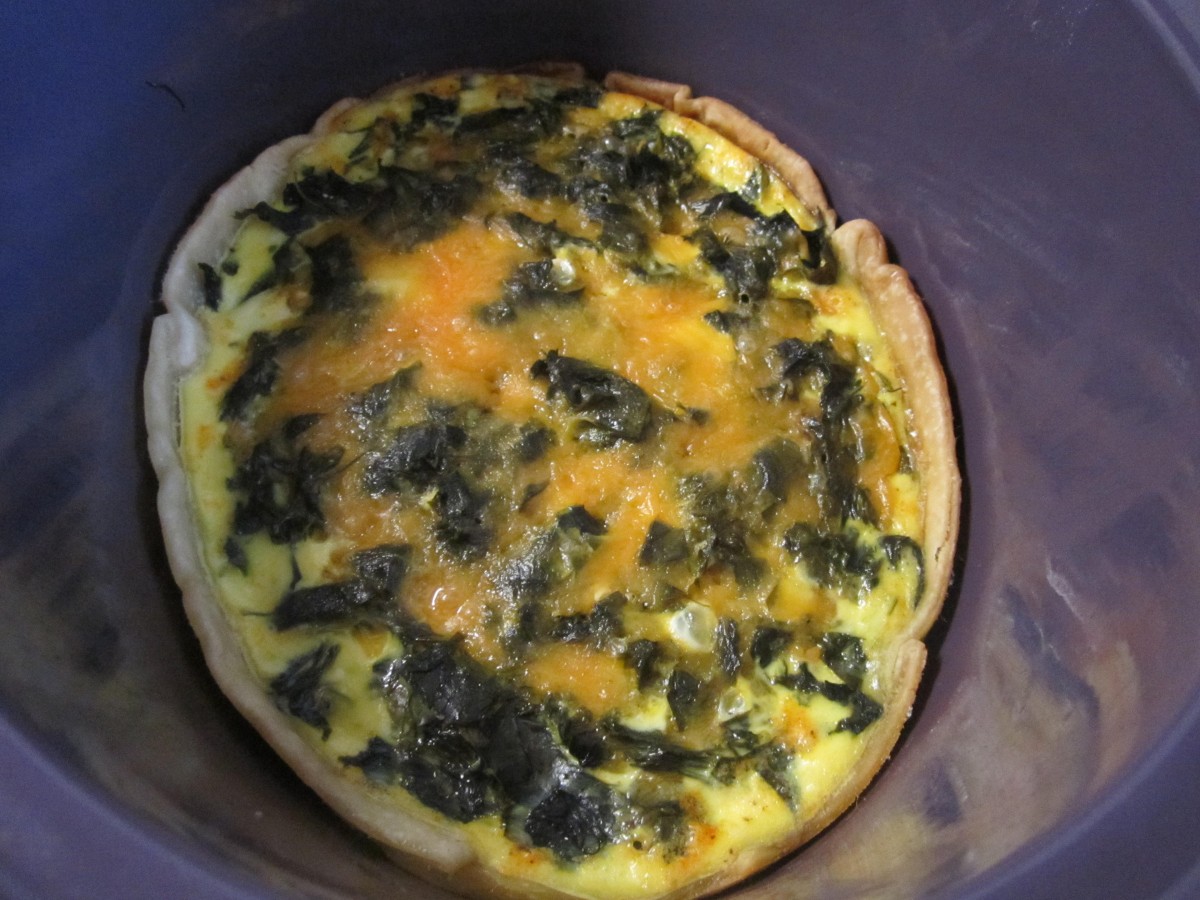
Crock Pot Quiche
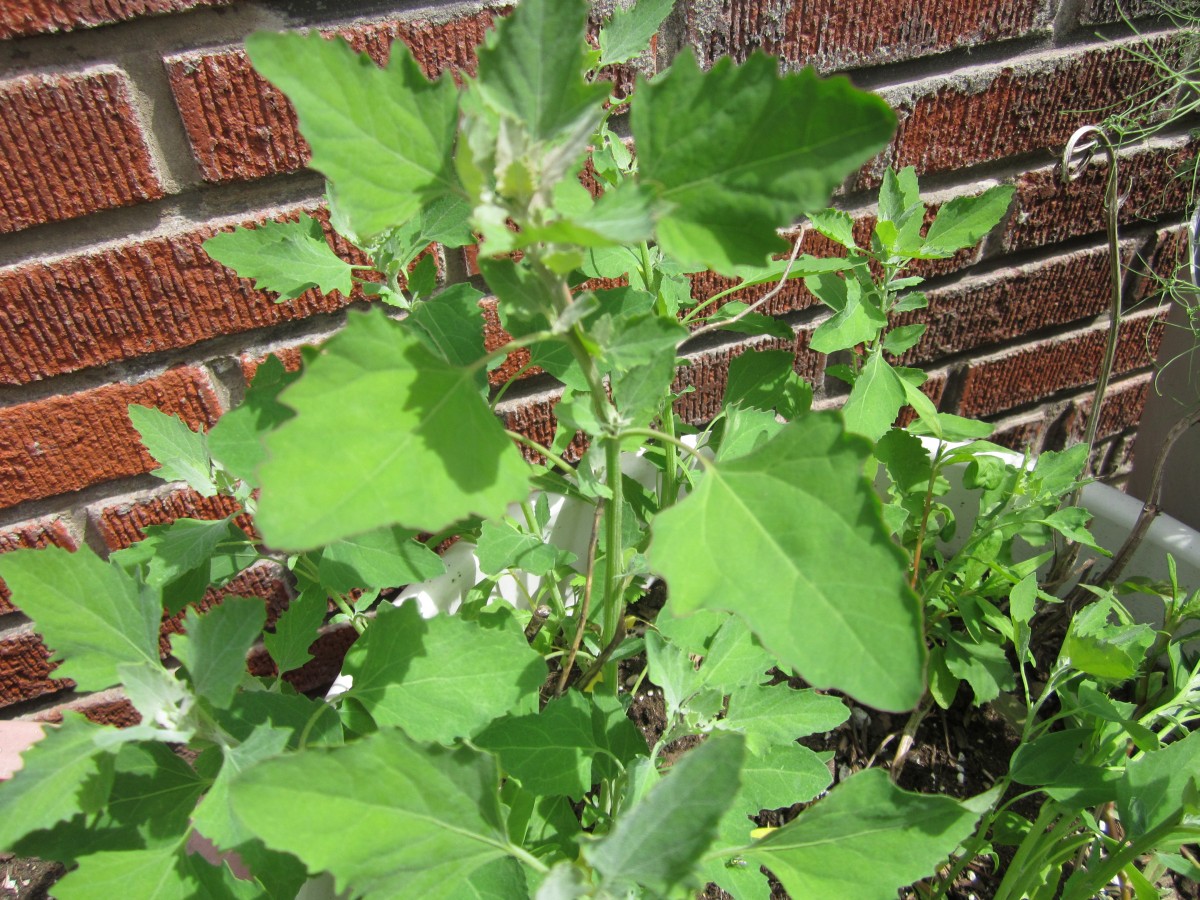
Lambsquarters
Crock Pot Quiche
Crock Pot Quiche
I have to give credit for the inspiration on this one to Harlan Cheek. Last week he posted a recipe for baking a pecan pie in a crock pot. I was intrigued. It certainly would be cooler than turning on the oven. If it worked for pie would it work for a quiche? I had to find out. I followed his directions as best I remembered them. I started by spraying the inside of the crock pot with non- stick baking spray. I am sure I could have oiled it instead or maybe rubbed it with butter. Then I placed the pie crust in- trying to fit it as best I could. It was pretty easy. I added the fillings like I normally would, put on the lid and set it on high. I let the quiche bake for 90 minutes- then gave it a look. Harlan’s recipe said to bake for 2-3 hours. It was set but the crust needed a little more time so I let it go another 30 minutes.
It worked!! A perfectly “baked” quiche in the crock pot.
OK- I can hear the question you want to ask-how do you get it out? We had errands to run so I turned it off and left it in the crock pot, uncovered, for an hour or so. It was still warm. I loosened the edges and removed the crock from the base. I placed my hand on the top of the quiche and turned the crock over. It came out right into my hand and I placed it on a serving plate. A little of the crust crumbled- but it mostly held together. Next time I might try 2 spatulas. Hindsight….
If you haven’t tried this before I urge you to try. I’ll post the recipe for the quiche soon. It was made with a weed from my yard- and lots of cheese. I would love to hear what you baked in your crock pot and how it turned out.
Quiche on the serving plate
Drying Plums

Drying Plums
Plums are abundant right now and I recently got some Italian or prune plums. They’re small and very sweet. They also dry easily and turn into prunes. I’ve noticed lately that commercially they are often marketed as dried plums. Maybe they think it sounds nicer than prunes. Well, no matter. To dry the plums I first placed them in boiling water for a minute.This helps to crack the skin and makes them dry easier. Especially important if you want to dry them with the pits intact. Since I was pitting them it probably wasn’t critical but old habits die hard. I made a small cut in each and removed the pits. I then made a solution of 2 cups water and 1 t. crystalline ascorbic acid ( Vitamin C). I soaked them in the solution for a couple of minutes then drained them. I then put them in my dehydrator and 14 hours later I had prunes, or maybe I should say dried plums. Either way they are moist and sweet and I can enjoy them long after their season in over. I’ll pop them in the freezer- just to be extra safe and extend their shelf life. I also have some larger plums. I’ll dry those next. I’ll pit and slice them and give them the same ascorbic acid dip- although I could also have used lemon juice and water or citric acid. They’ll also be dried for use later in baking, granola and just for snacks.


