Groundhog Day Cookies

Groundhog Cookies
Well it’s just around the corner. I like to celebrate this holiday by making up a batch of groundhog cookies. Not made from groundhogs, mind you, but shaped like them. The recipe comes from my dear friend, Cindy Kotula, whose late husband Mike was from Punxsutawney, P.A. She also gave me a groundhog shaped cookie cutter. Even if you don’t have one of those- I’d be surprised if you did- you can still make these wonderful ginger-snap cookies. Cookie cutters are available at some baking supply stores and online. They come out a lovely groundhog brown and are positively yummy. We enjoyed them today with lunch.
Spicy Groundhog Cookies
2 c. flour
2 t. cinnamon
1t. each ground ginger, ground cloves, ground allspice and baking powder
1/2 t. each baking soda and salt
1/2 c. butter, softened
1 c. sugar
1/2 c. molasses
1 egg yolk
Sift dry ingredients together and set aside. Beat sugar and butter until smooth and stir in molasses and egg yolk. Stir in dry ingredients and chill dough at least an hour. Preheat oven to 350 degrees. Roll out dough 1/8-inch thick on lightly sugared surface. Cut out with cookie cutter and place cookies on greased baking sheet. Bake 8-10 minutes. Cool slightly before removing from baking sheet. Makes 12-15 large groundhogs or 3-4 dozen small ones.
Note: I have the small groundhog cookie cutter- you can borrow it if you promise to return it promptly.
Happy Groundhog Day!

Cookie and the cutter

A tray full of groundhogs
ElderberryTea

Elderberry Spice Tea
Needing something to warm me up today so I decided to make some elderberry tea. Should really call it an Elderberry Spice Tea. I started with a couple of cups in water in a saucepan then added 1/2 cup of elderberry syrup, a cinnamon stick, some pieces of nutmeg, cloves, fennel seeds and a dash of cardamom. Let it come to a simmer and cooked it over low heat for 5 minutes. Strained it and ready to go. Super yummy and supposed to help fight off germs!!!! All medicine should taste this good . 🙂 You can sweeten it with additional honey- but it really does not need it. Feel free to swap up the spices. You could also add citrus peel, red pepper flakes, rose hips, turmeric, vanilla, allspice- well, you get the idea.

Simmering tea
Melting Snowman Cupcakes

Melting Snowmen Cupcakes
I am going to dinner with friends tonight and offered to bring dessert. With storms looming in the near future I decided to make something with a winter theme. I ended up making Melting Snowmen Cupcakes- or Global Warming Cupcakes- you decide. They were pretty easy to make. I just baked some vanilla cupcakes- you can make whatever kind you like. I had 2 containers of marshmallow cream a friend had given me so I used them for the frosting. You could just as easily use vanilla frosting- store bought or homemade. I set a marshmallow on the top and decorated them with frosting for eyes, scarves and carrot “noses” . Since I had some kisses I used them for hats.
Melting Snowman Cupcakes
24 prepared cupcakes
2 jars marshmallow cream- or 2c. white frosting
24 marshmallows
1/2 c. chocolate frosting- for eyes, mouths and scarves
small amount of orange frosting for carrot noses
24 kisses candies
If using the marshmallow cream, place in microwave-safe dish and warm up in the microwave for a minute or so- stir until smooth. Dollop cupcakes with a small amount of the cream and allow it to melt over the cakes. Place a marshmallow on top of each cupcake to form the snowman’s head- I used toothpicks to affix the marshmallows until the marshmallow cream set up. If you are using frosting,just frost the cupcakes allowing a little frosting to drip over the sides. Use a small writing tip with a decorating tube to make eyes and mouths with chocolate frosting. I used the same frosting for the scarves, but you can tint white frosting any color you like for the scarves. Use a small writing tip to make the orange carrot noses. If you have used toothpicks to affix the marshmallows- remove them. Affix the kisses to the heads of the snowmen with a little frosting- any kind you have extra of. Makes 24.

Marshmallow cream spreading over the cupcakes

Marshmallows are placed on top

A trio of snowmen
Winter Greens
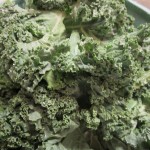
Fresh Kale
Its the time of year when we look to enjoy more comfort foods. Soups, stews, chowders. Many of the “winter” greens are perfect for these dishes. Often greens like kale, collards and chard are well suited for the longer cooking dishes of winter. I love kale but I must admit I get into a rut with it this time of year. I make a big pot of soup and end up adding handfuls of washed and chopped kale during the last 15 minutes of cooking. Very tasty, but I want more. I decided to share some of my favorite winter green recipes with you over the course of the next few weeks. I would love to hear from you. If you have a favorite recipe for greens that you would like to share- I would be delighted to post it.
Kale and Bean Stew
1½ lb. kale leaves, center ribs removed
3 T. oil
1 c. chopped carrots
1 c. chopped celery
1 c. chopped onions
2 garlic cloves, minced
1 c. dry white wine
2 (15 oz.) cans beans, rinsed and drained- I like butter beans
4-5 cups Vegetable or chicken stock
1 t. dried savory or thyme
1 bay leaf
1 T. white balsamic vinegar
2 T. fresh chopped herbs
Blanch kale in boiling water for 1 minute. Rinse under cold water. Drain and squeeze out excess water. Chop kale leaves coarsely. Heat oil in pot over medium heat. Cook vegetables and garlic until tender but not browned. Add wine and simmer until liquid is reduced by half. Add 4 cups of the broth, beans, savory and bay leaf and simmer over medium-low heat for 20 minutes. Add kale and simmer 5 minutes more. Add more stock if stew is too thick. Add vinegar, fresh herbs and salt and pepper to taste. Serves 6.
Radish Mice

radish “mice”
You know its time for me to go back to work when I have time to play with my food. I made some radish “mice” today. They are easy to make and kids love them. Just make sure someone who is old enough to handle a knife does the slicing part of this activity. It is not a job for younger kids. They can, however, do all the assemble parts. You can add cloves for eyes if you like.
Radish Mice
Radishes
Cloves
Choose radishes with the longest root pieces to be your mice. The roots will be the tails. Set them aside cut thin slices from the extra radishes. These will be the ears. You will need 2 per mouse. In the mouse radishes cut a small slice off one side so the “mouse” will lie on its side. Cut a slit in the top of the radish near the non-root side. Slip in the thin slices to form the ears. Add cloves for eyes and nose. Use these to decorate salad plates and party trays but don’t give them to little children because they could choke on small pieces.


slices for “ears”

waiting for ears

Making a slot for the “ears”

Ready for “eyes”
Broccoli Soup
Broccoli Soup
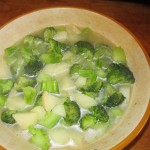
I have to admit it- I love broccoli. Love it steamed, in salad, stir fried. Still it is nice to try it as something other than a side dish.This soup will make it easy to get more veggies in your diet and it takes pretty good, too. I left it as is today, but you can also puree it for a different effect. No matter how you finish it off- it is yummy- but then I love broccoli.
Broccoli Soup
1 lb. Broccoli
2 leeks, trimmed, washed and cut in 1 inch pieces
1 T. butter
1 clove minced garlic
1/8 t. red pepper flakes
3 medium potatoes, peeled and diced
6 c. chicken or vegetable stock
¼ t. nutmeg
Salt and pepper to taste
Peel broccoli stems and cut into 1- inch strips. Cut flowerets into small pieces. Cook leeks in butter 4 minutes. Add garlic and cook 3 minutes. Add remaining ingredients and simmer, covered 20 minutes. Adjust seasonings and serve as is or puree if desired.. Serves 4-6.
Note: If you like your broccoli less cooked just add it 5-10 minutes after the rest of the ingredients.
Vegan Tomato Soup

Vegan Tomato Soup
I can already imagine what my meat loving friends are thinking. “Why bother?” Seriously this is awesome soup that even a die hard carnivore can love. On Christmas Eve I was given the task of preparing the vegan portion of the meal. The mains for the 2 vegans was not an issue. I cook meatless quite often. It was the fact that the soup course was also to be vegan for the 20 plus guests expected for dinner. Not just dinner- Christmas Eve dinner. The pressure was on. The hostess, Amy McWilliam, was thinking of a creamy tomato soup- made with either coconut or soy milk. I decided to do a rich vegetable base and then puree it with canned tomatoes. As I progressed I added spices to create a soup with layers of flavor to it. That really is the secret- and not just in vegan cooking. I didn’t use any “milk” in the end. It didn’t need it. I ended up with a soup that was very well received- even by Amy’s father-in law who had also just enjoyed prime rib. I decided to make it today- mostly because I wanted to make it again before I forgot what I did. Here is the recipe. I hope you give it a try. You might be surprised at just how much you like it. The side benefit is this is a great way to get a few more veggies in your diet.
Vegan Tomato Soup
1/4 c. olive oil
2 onions, chopped
2-3 garlic cloves, chopped
4 c. mixed vegetables, chopped- I used carrots, celery and cabbage, but use what you have and like
2 c. peeled, chopped sweet potato, about1 large- you can use white potatoes if you prefer
4 c. water
1 bay leaf
1T. sweet paprika
1T. Italian Seasoning
1 t. smoked paprika
1 t. cumin
1/4 -1/2 cayenne pepper
salt to taste
1 qt. canned tomatoes
fresh basil for garnish, optional
In soup pot saute onions in oil until just getting a little color on them. Add garlic and cook a couple of minutes longer. Add remaining vegetables, water and bay leaf and bring to a boil. Simmer, covered, until the vegetables are very tender- about 20-30 minutes. Add seasonings and adjust to your taste. remove the bay leaf. Add the tomatoes and puree the soup in batches in a blender or use an immersion blender. Once soup is smooth adjust seasonings, if needed. Warm soup before ladling into bowl. Garnish with basil, if desired. Makes about 4 quarts. Freezes well.
Note: When blending a hot soup in a blender remove the plastic insert in the middle of the lid and cover the lid with a towel. Hot liquids will splash up when the blender is turned on. The reason I don’t add the tomatoes until the soup is cooked is to cool the soup down a little to make blending easier.
Simmering the soup
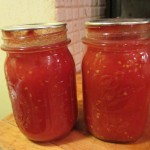
Home canned tomatoes

Blending the soup
Bread Pudding

Warm Bread Pudding
This time of year I think we are all looking for a little comfort. One of my favorite comfort foods is bread pudding. You don’t need and exact recipe and you can toss in extras like fresh or dried fruit, nuts, chocolate chips or toasted seeds. Spices add extra flavor, too. Have fun and be creative. For the recipe I made today I added extra raisins to a raisin Challah bread.
Bread Pudding
1 loaf Challah bread, cubed
4 eggs
2 c. milk- you can use regular milk, half and half or even a non- dairy milk. I used a mixture of almond milk and evaporated milk. You can even use a little fruit juice if that is what you like
1/4 c. sugar- or to taste. The almond milk I used was a little sweet so I cutback on sugar
2 t. vanilla
2 t. cinamomn
1/2 c. raisins
Place bread cubes in a large bowl. Combine remaining ingredients and mix well. Pour over the bread cubes and toss until evenly coated. Place in a buttered casserole dish and bake, covered in a 350-degree oven for 25 minutes. Remove cover and bake another 15 minutes or so- until top browns up a little. Serves 6-8.
Winter Greens Soup
 I think one of my favorite foods is soup. I’d eat it on all but the hottest days- and even then I’d eat a cold soup. Many soups are a whole meal all by themselves. As an added bonus they can be an easy way of eating more of the foods we all know we should eat more- vegetables. Seriously, do you like to eat vegetables without butter on them? I don’t. But if you simmer veggies in a rich stock you don’t need the added butter. Super healthy and easy, too. Win win.
Winter Greens Soup
I made this soup this morning and I am enjoying a bowl as I am writing this. It is so wonderful. Always a hit with friends, too.
2 T. olive oil
2 onions, chopped
3 carrots, peeled and sliced
1 c. chopped celery
2 qts. chicken stock
1 bunch collard greens, rinsed, trimmed and sliced into strips. About 8 cups
4 c. chopped cooked chicken
1 sweet potato, peeled and diced
3 cloves garlic, chopped
1/4 c. nutritional yeast*
2 T. Tuscan seasoning
salt and pepper to taste
healthy dash- or more- of hot sauce
Saute onion in oil until just turning brown. Add carrots and saute a few minutes longer. Add celery and stock and cook a few minutes before adding greens and chicken. Add remaining ingredients and cook until veggies are tender. Collard greens do not need to be cooked until mushy. They will be tender in 10-15 minutes. Makes 6-8 servings.
* Nutritional yeast adds nutrients and great flavor.It is available in health food stores and some grocery stores.
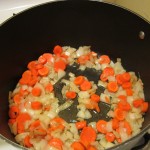
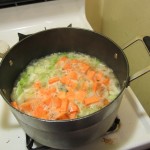
Onions and carrots cooking

Collard greens
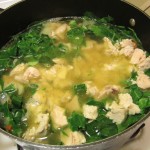
Chicken simmering

Nutritional yeast
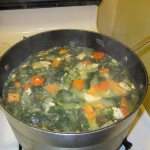
Ready to Serve
Candy Trays

Peppermint Candy Tray
My friend Sue saw someone make these on TV and wanted to try it- so we did. The trays are just peppermint candies that are melted in the oven and cooled. Cool, huh? we also made a bowl. The process is pretty simple. Preheat your oven to 350-degrees. Line a baking sheet with parchment paper or a silicone baking sheet. Unwrap the candies and place them about 1/4 -1/2 – inch apart on the baking sheet. We set the timer for 5 minutes- but they actually took about 10 minutes to melt and come together in a flat “tray.” Remove from the oven and cool a few minutes- you can trim the edges once they have cooled a little- but before they are completely cool or they will have gotten hard and will shatter. The first attempt was super easy. The second time we arranged them in a circle and melted them as the first batch. Took it out of the oven and placed it on top of a metal bowl to cool. The result is a bowl made from candy. Fun project to do with kids. Special thanks to Sue Larick for her help- and the fact that she actually had peppermints, Martha Shaw for helping in unwrapping them all and Kat Ro- well just for being here in time to “Ooh and Ah.”

Lined up for baking

Melting in the oven

Making the bowl

Melted and HOT!

Cooling over a metal bowl

My finished “candy” bowl


