Spiced Applesauce Cake
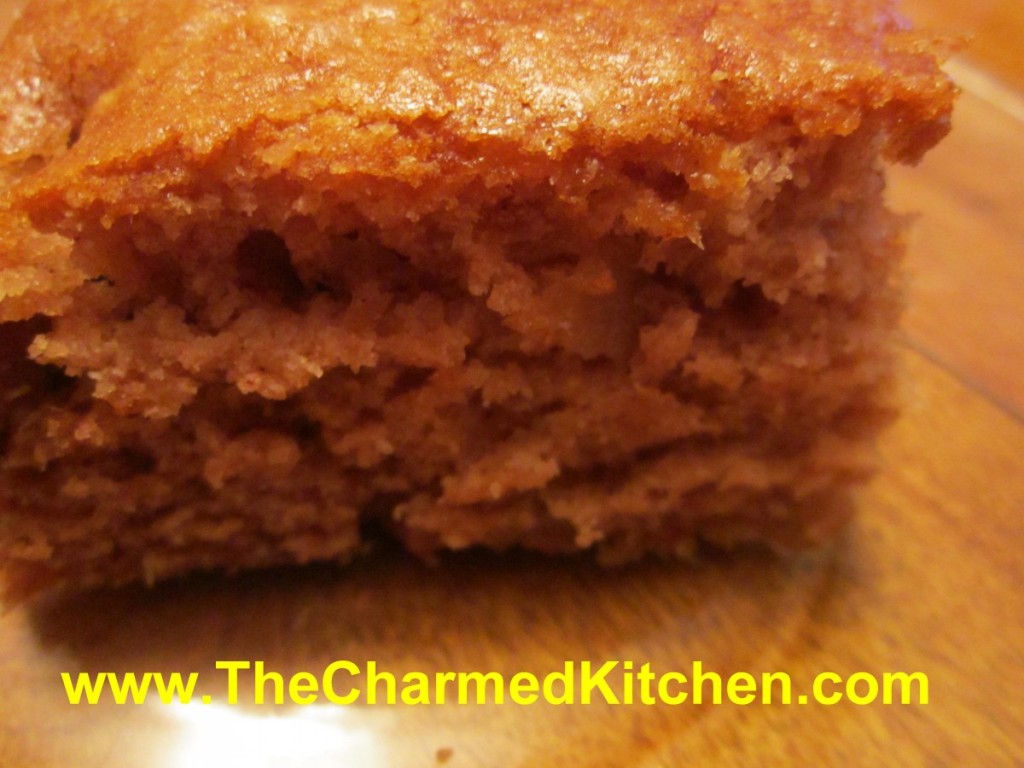
You don’t have to limit yourself to just eating applesauce. You can also bake with it. This cake is a fun way to eat applesauce, using homemade or store-bought. This cake is so simple to make and very tasty, too.
I used butter in the recipe, but if you used coconut oil instead, the recipe would be vegan. The spices work so well together. Sometimes simple is the best. Before someone asks, it is not a misprint, there are no eggs in the recipe.
I wish I remembered where this recipe came from. I have a piece of flowered stationery, a little crinkled around the edges, creased from being folded many times, with the recipe written on it. It is not my handwriting. I would love to credit the source of this wonderful recipe.
Spiced Applesauce Cake
2 c. unsweetened applesauce
½ c. butter
2 c. sugar
3 c. flour
1 T. baking soda
½ t. salt
1 t. each cinnamon, allspice and nutmeg
¼ t. cloves
1 c. raisins or chopped nuts
Heat together applesauce and butter until butter melts. Cool down a bit. Preheat oven 375 and grease 9×13-inch pan. Stir all ingredients together bake 30 minutes. Cool in pan.
Stuffed French Toast with Warm Apple Compote
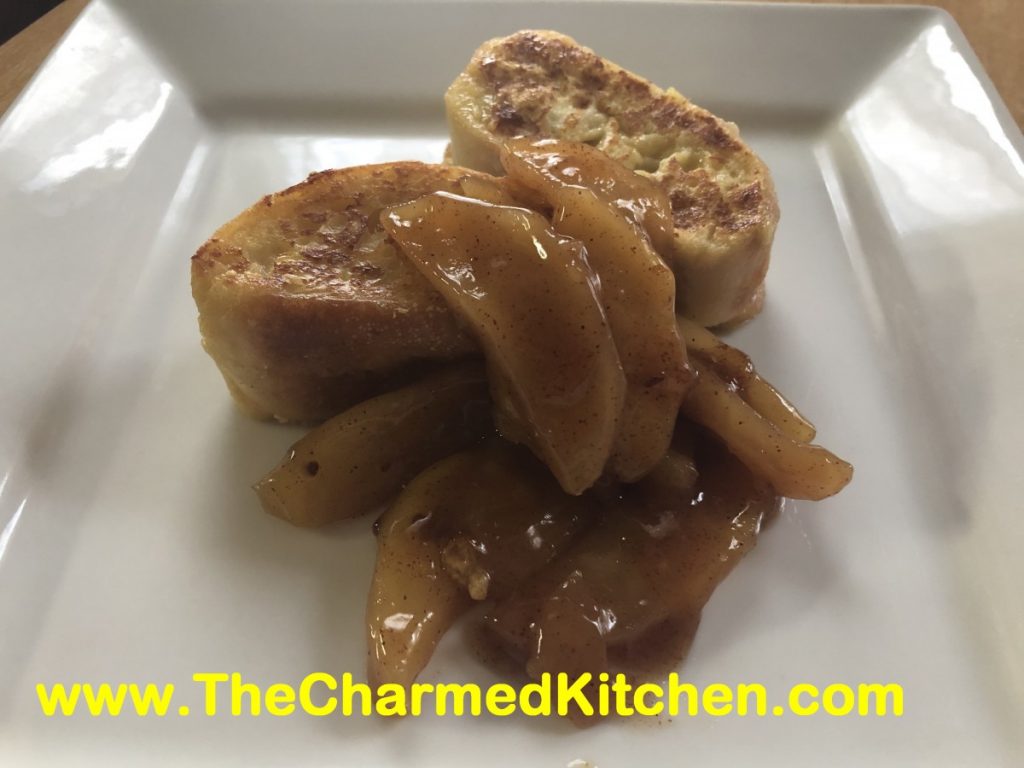
Made this for breakfast this morning. A friend was coming over and wanted to make something special. I was so pleased she and her sweet dog were stopping by. I wanted food I could prep ahead and then just warm up. I also wanted something autumnal. It is the beginning of October, after all.
The Stuffed French Toast is one of my favorite breakfast/brunch dishes. You can make it and serve it right away. It can also be made ahead and just reheated. The apple compote can also be made ahead and warmed up when you are ready to eat. I prefer when I can get things done ahead for breakfast. I am not always the peppiest person in the morning.
The compote could also be made with pears or a combination of apples and pears.
Stuffed French Toast
1 (8 oz.) package cream cheese, softened
1 t. vanilla
½ c. chopped nuts- I used slivered almonds
1 16-oz. loaf French bread
4 eggs
1 c. whipping cream or half and half
1/2 t. vanilla
½ t. nutmeg
Mix together cream cheese, vanilla and nuts. Set aside. Cut bread into 10-12 1½-inch slices. Cut pocket in each slice and fill with 1½ T. filling. Combine eggs and whipping cream with remaining vanilla and nutmeg. Use tongs to dip the bread, taking care not to squeeze out the filling. Cook toast on lightly greased griddle until browned on both sides. Keep toast warm in oven until ready to serve. Makes 10-12 slices.
Apple Compote
4-5 apples
½ c. honey
¼ c. brown sugar
¼ c. butter
3 T. lemon juice
1-2 t. cinnamon
1 t. vanilla
Pinch of salt
Peel, core, and slice apples. Place apples in a bowl of water with a little lemon juice in it, to keep them from discoloring. Once apples are all sliced, drain and place in a skillet with the remaining ingredients. Heat over medium-high heat until apples are tender and sauce has thickened. Stir occasionally to prevent sticking. Serve warm with the French toast. The compote can be served over cake, waffles or with ice cream.
Canning Applesauce
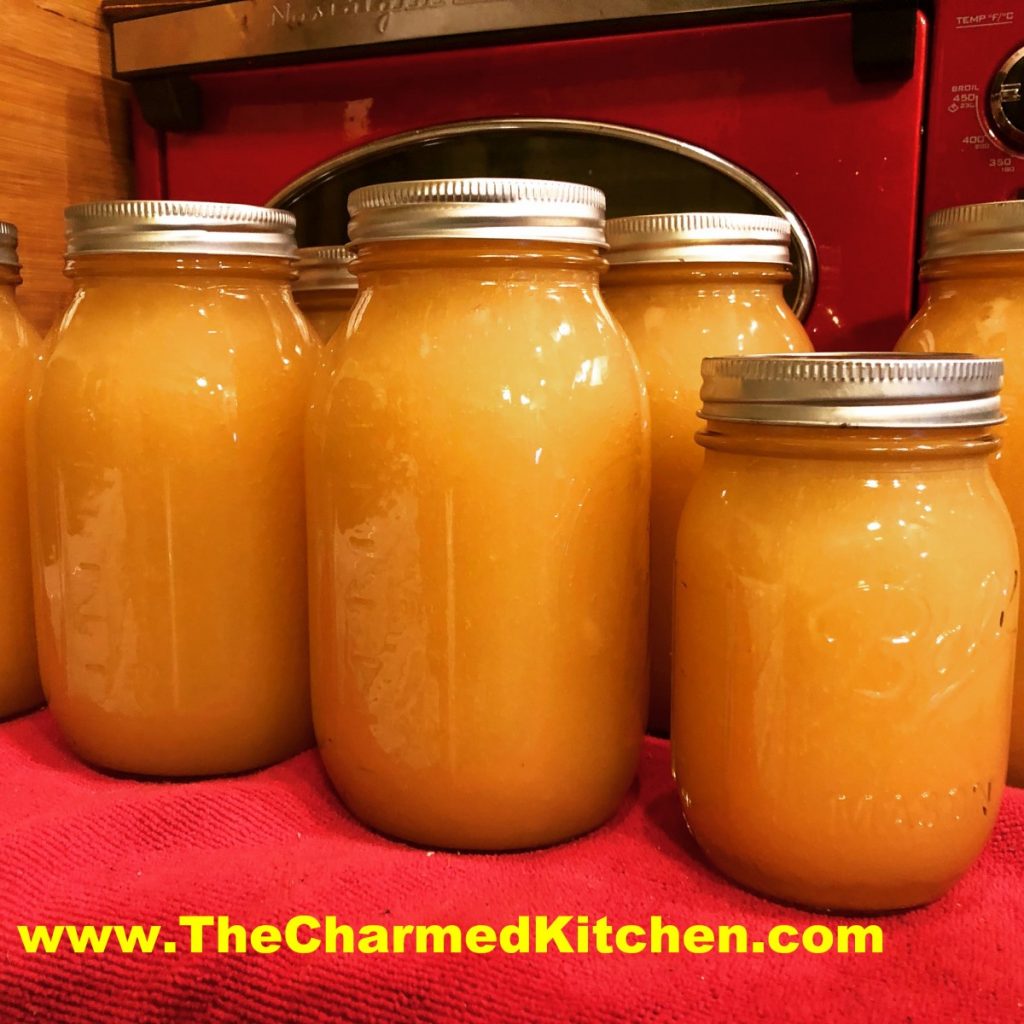
I love homemade applesauce so much better than anything I can buy at the store. It really is easy to make.
There is some disagreement about whether or not you have to peel your apples before making applesauce. It is a personal choice. You can cut up your apples without peeling them, if you are running them through a food mill. The food mill will remove the skins. If you use red-skinned apples, the skins will give your sauce a rosy tint.
I actually peeled my apples, mostly because I knew I was not using a food mill, but was using an immersion blender to make my sauce smooth. Either method is fine.
Sweetening is also a personal choice. You can leave your applesauce unsweetened, if you like. I normally use sweet apples for my sauce, so I don’t need a lot of sugar. Plus, I’ll let you in on a little secret. You need some water to help cook down the apples and keep them from sticking to the pot. Instead of water, I use apple juice or cider. It adds natural sweetness to the applesauce and a more intense apple flavor.
You can also add a couple of cinnamon sticks to the batch- don’t forget to remove them before processing.
Home Canned Applesauce
12 lbs. apples, I used Melrose and Mutsu
Water*
2-3 cinnamon sticks, optional
4 T. lemon juice
sugar to taste
Peel and core apples. Put in water with some ascorbic acid, citric acid or lemon juice to prevent discoloration. Place apples in a pot with enough water* to prevent sticking. Add the cinnamon sticks, if using, and lemon juice. Cook over medium high heat until soft. Time will vary depending on the type of apples you are using, and how large the apples are. Turn off the heat and remove cinnamon sticks. I wanted smooth applesauce, so I used an immersion blender. Return apple mixture to a boil. Sweeten with sugar, if you like, or leave unsweetened. Have water bath full of boiling water and have hot, clean canning jars and lids and rings ready. Ladle hot applesauce into hot jars, leaving 1/2 inch of headspace. Wipe rims and apply lids. Process in a boiling water bath for 20 minutes for pints or quarts. Turn off heat and let jars stand in water bath 5 minutes before removing. Set in a draft free area to cool down. Yield: 4 quarts or 8 pints.
*rather than add water, to prevent the apples from sticking, you can use cider or apple juice instead.
Cooking with Honey
Honey has been a favorite sweetener since prehistoric times and still has advantages over sugar even today. Honey is composed of two simple sugars, glucose and fructose. Honey is absorbed in a different manner and therefore causes a slower, more gradual rise in blood sugar. Because honey has a slightly higher percentage of fructose than sugar, it tastes sweeter, and less is required for equal sweetness.
Honey contains small amounts of numerous vitamins and minerals, but not enough to fulfill any of the body’s daily needs. Remember that honey does contain calories, cannot be used freely by a diabetic and is not recommended for infant formulas.
The flavor, aroma and color of honey vary with the kind of flowers from which the bees gather the nectar used to make the honey. The fructose gives honey its sweet flavor, and the nectar adds the characteristic taste of the floral source to your recipes. Generally, the lighter the honey, the milder the flavor. If a stronger flavor is desired for your recipe, use a darker, stronger flavored honey; if a more delicate flavor is desired, use a lighter, milder flavored honey.
Honey can easily be substituted for sugar. Due to honey’s ability to retain water, products made with honey tend to remain moister longer than similar products made with sugar or other sweeteners.
Some minor adjustments may need to be made to a recipe when substituting honey for sugar:
- Use equal amounts of honey for sugar up to one cup. Over one cup, replace each cup of sugar with 2/3 to 3/4 cup over honey depending upon the sweetness desired.
- Lower the baking temperature 25 degrees and watch your time carefully since products with honey brown faster.
- In recipes using more than one cup honey for sugar, it may be necessary to reduce liquids by 1/4 cup per cup of honey.
- In baked goods, add 1/4 teaspoon of baking soda per cup of honey if baking soda is not already included in the recipe. This will reduce the acidity of the honey, as well as increase the volume of your product.
Moisten a measuring spoon or cup first with water, oil, or an egg before measuring the honey to prevent it from sticking to the measuring utensil. Honey is heavy by weight. A 12 ounce jar equals one standard 8 ounce cup. A quart weighs 3 pounds.
Honey Saves the Day
When you are melting chocolate, it will sometimes seize. This normally happens when liquid gets in the melted chocolate. That’s why you have to be careful when using a double boiler. A few drops of water can spell disaster. It becomes grainy and hard and usually just gets tossed out. But, if you add a little honey to the chocolate and stir it in gently the chocolate softens and can still be used!!!!
Mom’s Cold Remedy
When I was a kid I remember my mother making her all-purpose combination for making her feel better, if she had a cold or sore throat. She would mix equal parts of honey, whiskey and lemon juice. She said the secret was just to take small sips throughout the day. Not sure if it really helped, but you certainly felt better if you sipped it all day!! For a non-alcohol version try equal parts honey, lemon juice and apple cider vinegar.
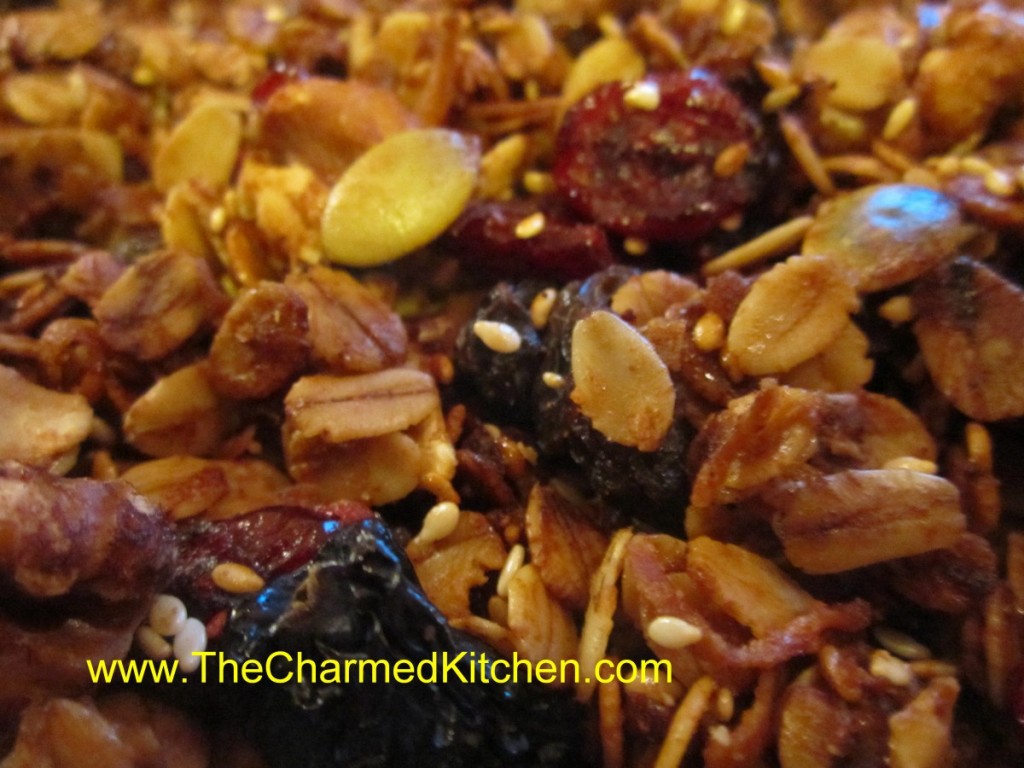
Homemade Granola
3 c. rolled oats
1/4 -1/2 c. each of any of the following to equal 1-2 c. total
Sesame seeds, sunflower seeds, chia seeds, wheat germ, peanuts, pecans, almonds, hazel nuts, pumpkin seeds, walnuts, coconut… you get the idea. Don’t forget to chop up any big pieces.
1 t. cinnamon
1 t. orange peel
1/2 t. nutmeg
pinch of salt, optional
1/4 c. oil
1/4 c. honey- or add a little more if you like a sweeter granola
2 t. vanilla
Dried fruit to equal 1 -1 1/2 cups. Some choices could include: raisins, dried cranberries, cherries, pineapple, dates, figs, apricots, bananas, blueberries etc.
In large bowl combine oats with seeds and nuts and toss well with seasonings. Heat together oil, honey and vanilla and pour over oat mixture, tossing to coat evenly. Spread on a cookie sheet and bake in a 300-degree oven for 30 minutes. Halfway through the baking time stir mixture so the edges won’t burn. Remove from oven and return to large bowl. Toss with the dried fruit and allow to cool before storing in an airtight container in a cool, dry place. Use in 1 month or store in freezer or fridge to keep longer. Makes 5-7 cups.
Honey Date Nut Bread
3/4 c. boiling water
1 c. pitted whole dates, chopped
1 egg
1 c. honey
1 T. butter, melted
1 t. vanilla
2 c. flour
1 t. baking soda
1/2 t. salt
1 c. chopped nuts
In small bowl pour water over dates and let stand until cool. Do not drain. You can do this early in the day or day ahead and refrigerate until ready to use. In small bowl beat eggs until lemon-colored, about 2 minutes. Beat in honey, butter and vanilla. Stir in dates and water. Combine dry ingredients and add to batter until smooth. Stir in nuts. Pour batter into 2 7×3-inch greased loaf pans or 1 9×5-inch greased loaf pan. Bake in preheated 350-degree oven 50 minutes for small pans and 65 minutes for large. Test for doneness with a toothpick. Cool in pan 10 minutes then turn out of pan and cool on wire rack. Makes 2 small or 1 large loaf.
Honey Cake
1 3/4 c. flour
1 t. cinnamon
3/4 t. each baking soda and salt
1/2 t. ground ginger
1 c. honey
2/3 c. oil
1/2 c. strongly brewed fresh coffee
2 large eggs
1/4 c. packed brown sugar
1T. whiskey or Bourbon
Preheat oven to 350. Grease a 9×5-inch loaf pan and set aside. Whisk together dry ingredients and set aside. Whisk together the honey, oil and coffee and set aside. In mixing bowl beat eggs and brown sugar together for 3 minutes. Beat in honey mixture and whiskey until well blended, about 1 minute. Using a rubber scraper stir in flour mixture until just combined. Pour batter into prepared pan and bake 30 minutes. Cover pan with foil and continue baking until cake starts to pull away from the sides of the pan and wooden pick inserted in center comes out clean about another 30 minutes. Cool on a rack for 1 hour before running a knife around the sides of the cake to loosen. Invert onto a rack then place upright to continue cooling. Serves 8-10.
Honey Ginger Cough Drops
½ c. honey
2 T. lemon juice
1 t. freshly grated ginger root
Optional for dusting: ¼ cup powdered sugar and 1 t. powdered vitamin C
Kitchen items you will need: a candy thermometer, a candy mold with small openings. You can make the cough drops without the mold; oil a piece of parchment paper and pour the candy onto it. Let it harden, and then break it up into small pieces.
Measure the honey, lemon juice, and grated ginger and pour it all into a saucepan.
With a wire whisk, stir the mixture as it heats to a boil. It will become foamy and start to climb up the sides of the pan, remove it from the heat and continue to whisk it until the foam reduces and then put it back over the heat. Repeat this until a candy thermometer reads 300 degrees. You will want to check frequently because the honey heats fast and scorches easily!
If you don’t have a candy thermometer, you can also test for readiness this way. Drop a bit of the mixture into a glass of ice water (or, dip a spoon into the mixture and then quickly dip it into the ice water). If the mixture forms a hard, crunchy ball, it’s ready! If not, keep up with the whisking and heating and try again in a minute or so. Once a hard ball forms in the ice water, you’re good to go!
Let the mixture cool until the foam has reduced. Then, very carefully, drizzle the candy into the mold (or onto the oiled parchment paper). Let it cool at room temp until the cough drops are hard. When they are hard, press on the back of the mold to release. Or, if you’re not using a mold, break the cough drops up into pieces.
Optional (to prevent sticking): In a small bowl, mix the powdered sugar with the vitamin C powder. Drop the finished cough drops into the mixture to coat. Pour the sugar and cough drops into a sieve and sift to remove extra sugar. Store in an airtight container. These actually do better in the fridge, as they attract moisture and tend to get sticky if left out.
Pear and Pecan Coffee Cake
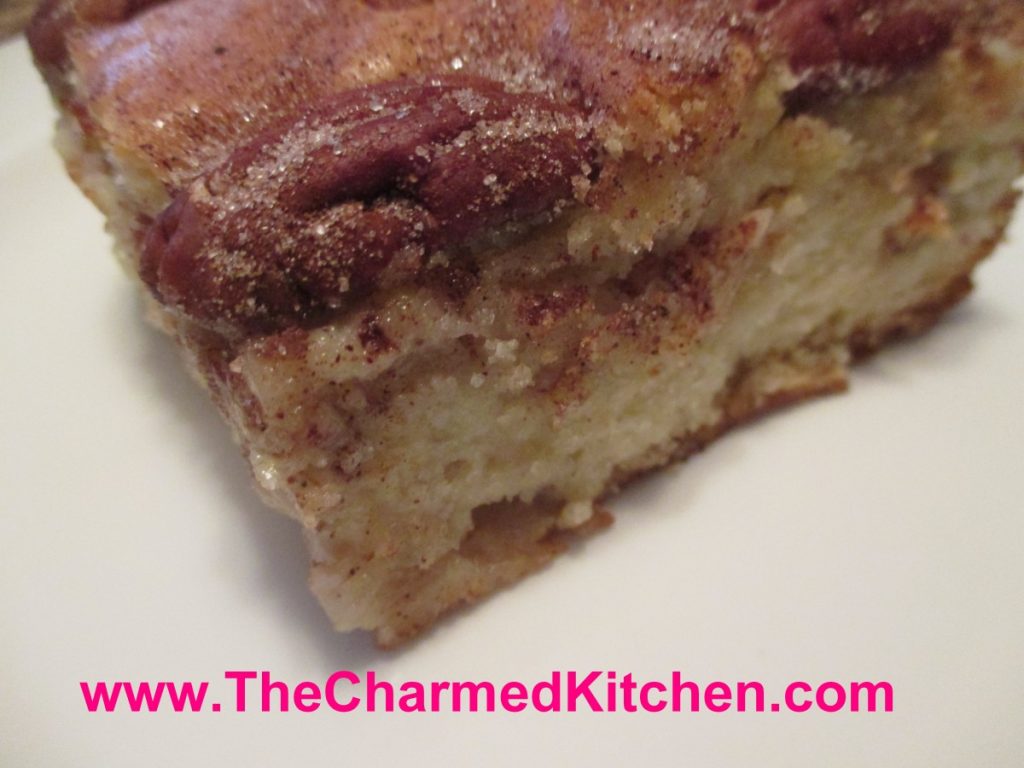
This may be one of my favorite pear desserts. I combined ripe pears with pecans and cinnamon sugar to create this moist and flavorful cake. I had both Bosc and Bartlett pears, but use whatever pears you have on hand. They should be ripe, but still firm. In the recipe directions I say to have the pears peeled and sliced, and ready to go in the cake. I actually made the batter first, then prepped the fruit. Mostly because I was distracted and forgot. It worked out just fine. The upside was that the pears did not have a chance to discolor, and I didn’t have to put them in lemon water until ready to use.
The cake is wonderful served all on its own, but I also enjoy topping it with a scoop of ice cream or whipped cream.
Pear and Pecan Coffee Cake
1 c. oil- I like to use olive oil
4 eggs
1 t. vanilla
1/3 c. orange or lemon juice
3 c. flour
2 c. sugar
3 t. baking powder
¼ t. salt
3-4 pears, peeled, cored and sliced
½ c. sugar
1 T. cinnamon
¾ c. pecan halves or pieces
Grease a 9×13 inch pan. Preheat oven to 350-degrees. Combine oil with eggs, vanilla and juice until well blended. In a separate bowl, mix dry ingredients and add to egg mixture. Beat together until batter is smooth. Batter will be thick. Combine the ½ cup sugar with the cinnamon. Set aside. Place ½ of batter in prepared pan. Arrange pear slices on batter and sprinkle on ½ of the cinnamon mixture. Pour on remaining batter and top with the pecans. Sprinkle with remaining sugar mixture. Bake 50- 60 minutes or until toothpick inserted in cake comes out clean. Cool before slicing. Serves 10-12.
Pumpkin Bread
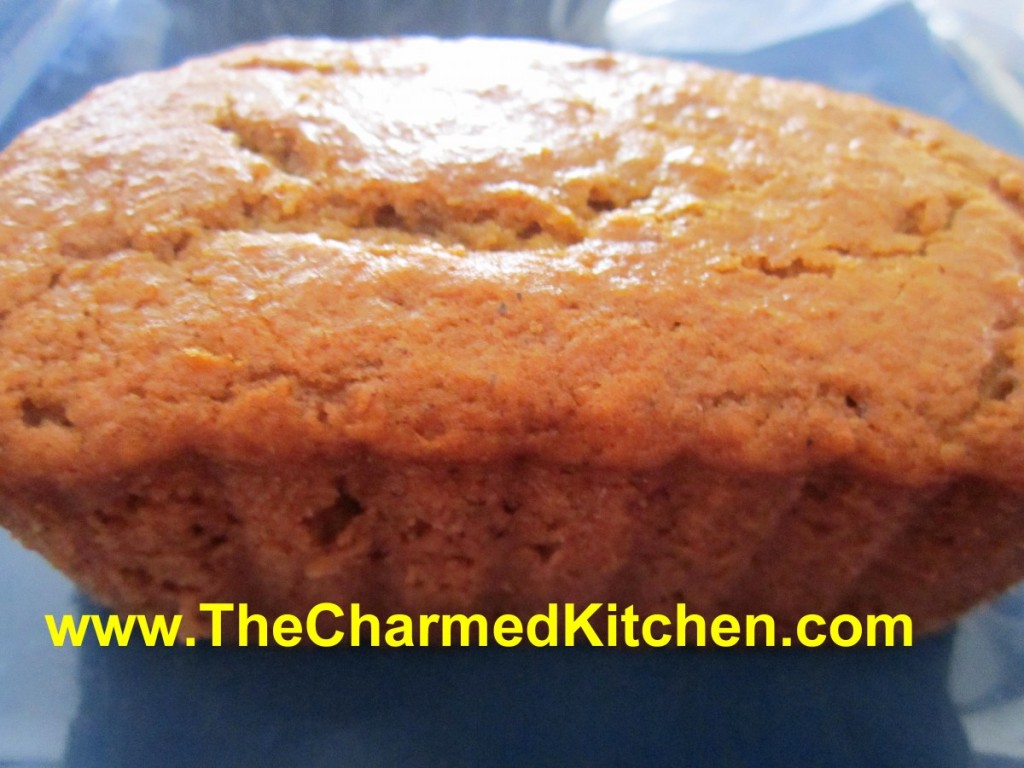
This is one of my favorite quick breads. I often make it with butternut or Hubbard squash, instead of the pumpkin. For some reason, squash bread does not sound as fun as pumpkin bread.
I like to make several batches at a time, and freeze the extra. Of course, if word gets out that I have freshly baked pumpkin bread it never makes it to the freezer. Every year I get a lot of requests. Everyone seems to love it.
It is versatile. Served plain, it is a great breakfast. Topped with a dusting of powdered sugar or sweetened fruit and whipped cream or ice cream, it becomes dessert. I often bake smaller loaves for gift giving.
I do find myself adding more spices, sometimes. Play around to find the combination of flavors you like. I often add cloves, allspice or mace.
Pumpkin Bread
1 ¾ c. flour
1 ½ c. sugar
1 t. baking soda
¾ t. salt
1 t. each cinnamon and nutmeg
½ c. softened butter
2 eggs, beaten
1 c. pumpkin
1/3 c. water
Mix dry ingredients and set aside. Beat together butter and eggs until fluffy. Beat in pumpkin and water until smooth. Stir in dry ingredients until smooth. Pour into a greased 9×5-inch loaf pan. Bake in a preheated 350-degree oven for 60-65 minutes. Cool in pan 10 minutes before removing from pan and placing on cooling rack. Wrap in plastic, best served the next day. Freezes well. Makes 1 loaf.
As with other quick bread you can make this recipe and bake it in smaller pans for gift-size loaves. Baking temperature is the same. Time will vary, so check after 30 minutes and test for doneness as usual.
Banana Bread
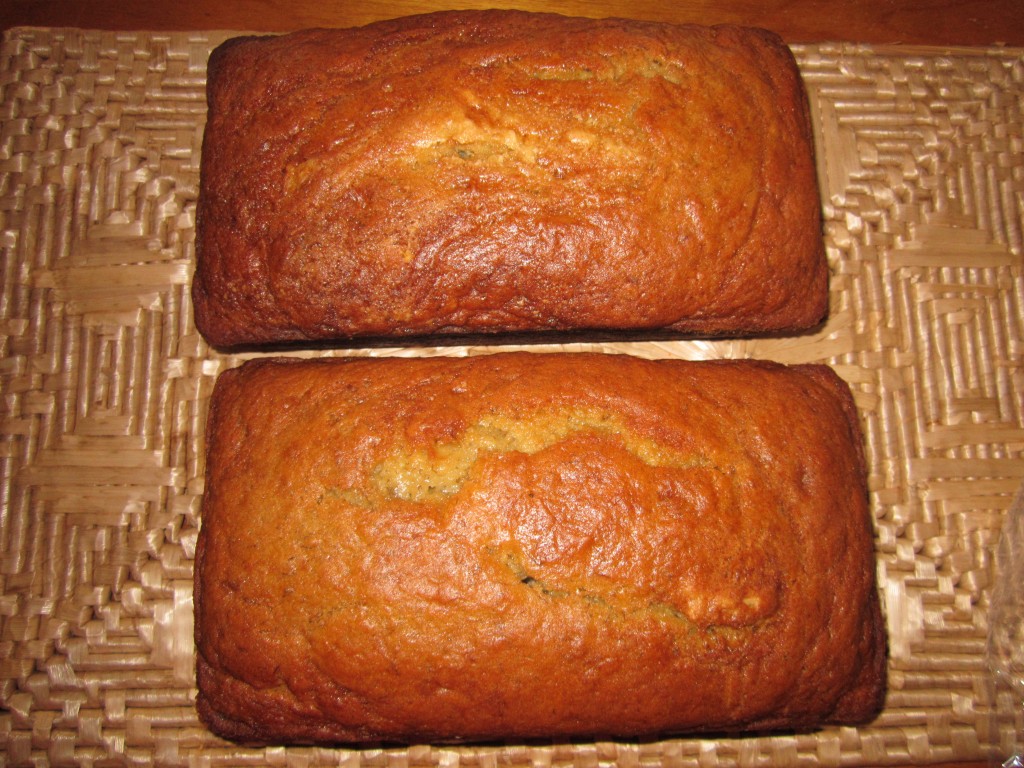
Checking the freezer, I found some frozen bananas so I opted to make banana bread. It’s my favorite way to eat them, other than fresh. The recipe is simple and this bread freezes well so why not make a few and freeze some for later? Also, a great thing to do with bananas that are overripe.
Banana Bread
1 ¾ c. flour
1½ t. baking powder
¾ t. salt
½ t. baking soda
2/3 c. sugar
1/3 c. butter, softened
2 eggs
2 T. milk
1 c. mashed ripe banana
¼ c. chopped nuts, optional
Combine dry ingredients and set aside. Combine sugar with butter and beat until fluffy. Beat in eggs. Beat in eggs until mixture is smooth. Beat in flour mixture alternately with bananas. Fold in nuts, if desired. Pour batter into greased 9×5 -inch loaf pan. Bake in a preheated 350-degree oven for 60-65 minutes. Use toothpick to test for doneness. Cool in pan 10 minutes before placing on rack to cool. Store in plastic wrap to preserve moisture. Makes 1 loaf.
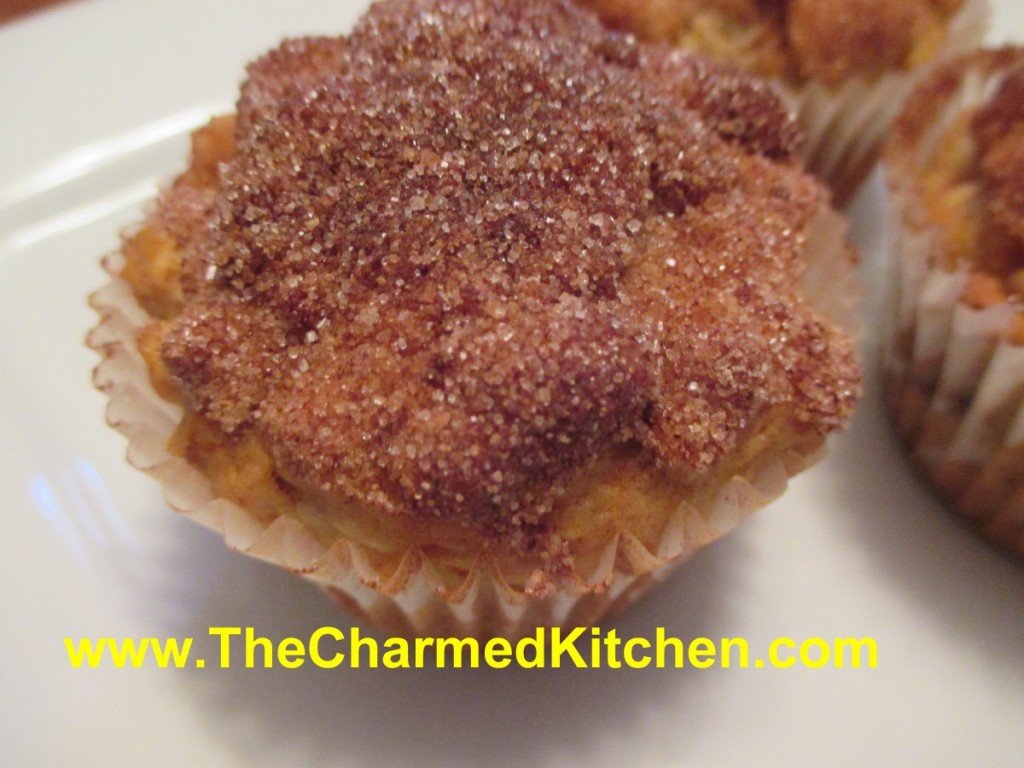
Spiced Pear and Oatmeal Muffins
It is pear season. While apples seem to get more attention, pears are a wonderful, versatile fruit.
Pears will ripen off the tree and are often picked unripe and allowed to ripen after harvest. Unlike a lot of other fruits, pears do not suffer from being picked before they are ripe. As they ripen, pears become very sweet.
I like to pick out both ripe and unripe pears at the local market. That way, I’ll have ripe pears over a longer period of time.
I had some ripe pears and wanted to do something with them. Since I had a friend coming for over breakfast, I thought muffins. It’s always nice to have an easy breakfast option on hand.
I started with a basic muffin recipe, and added some diced pears, cinnamon, orange zest, nutmeg and a cinnamon sugar topping, to make them special. And yes, you could substitute apples for the pears!!!
I was really happy with how they turned out. Not overly sweet, moist and tender. Here is the recipe.
Spiced Pear and Oatmeal Muffins
1 ½ c. flour
1 c. rolled oats
1 T. grated orange peel
2 t. baking powder
1 t. cinnamon
½ t. each nutmeg and salt
½ t. baking soda
1 egg, beaten
1/3 c. honey
1/3 c. oil
¼ c. orange juice
1½ cups of peeled, diced pears – 2 or 3 pears should do it
2 T. melted butter, optional
cinnamon sugar, optional
Combine flour with the dry ingredients. Set aside. Combine egg with the honey, oil and juice. Add egg mixture to flour mixture and stir until flour is just moistened. Fold in pears. Batter will be thick. Divide batter among 12 greased muffin cups. Bake in a preheated 375- degree oven for 20-25 minutes. While the muffins are warm, dip tops in melted butter and then dip in the cinnamon sugar, if you like. They are tasty, with or without the cinnamon sugar topping, but I like to add this last step. Makes 12.
Roasted Beet Salad
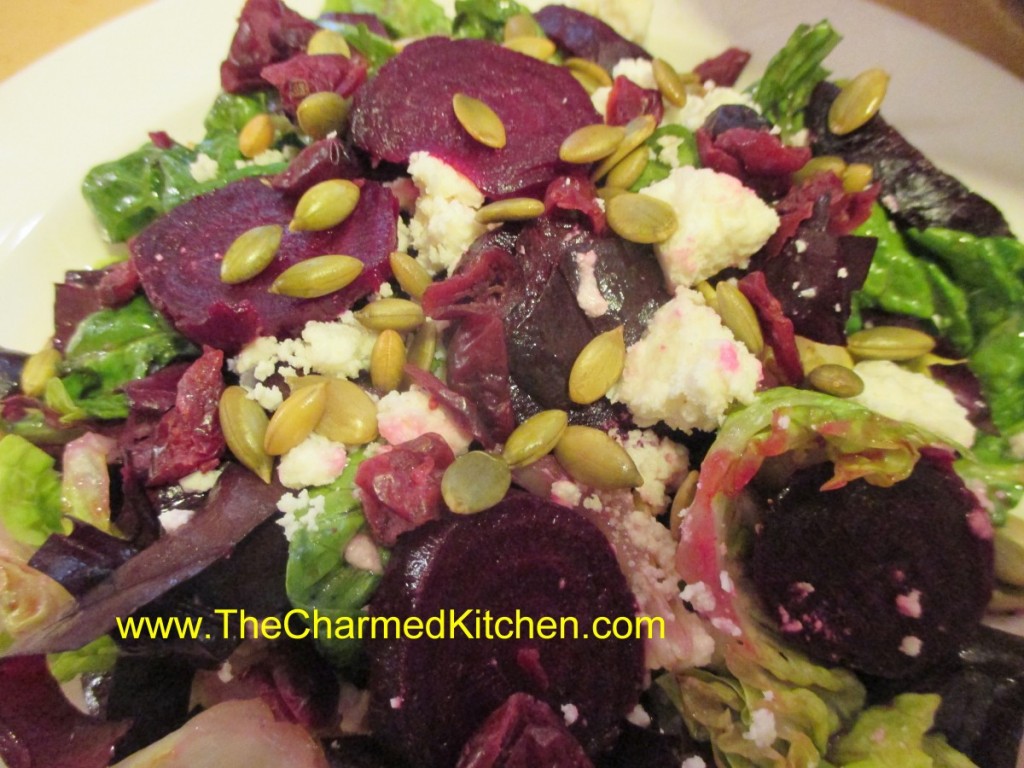
I picked up a couple of bunches of beets the other day. I wasn’t sure what I wanted to do with them at the time. They just looked so fresh. I decided to roast some, and then go from there.
To roast beets: just wash them and trim off the greens- leaving about an inch of the stems to reduce bleeding. The beet greens could be added to the salad.
Place beets in a roasting pan and drizzle with a little oil. I used avocado oil. Cover pan and place in a 350 degree oven for about 45 minutes. Smaller beets will be cooked in less time- about 35 minutes. Really large beets could take up to an hour. I always check by poking one of the beets with a fork. Let the beets cool a little and then remove the peels. I use a knife to do this. They come off quite easily.
I used three small beets to make this salad for lunch. I shared it with a neighbor.
Roasted Beet Salad
1 small head Bibb lettuce, washed and sliced into thin slices
2 c. spinach, torn into bite sized pieces
1/4 c. olive oil
3 T. red wine vinegar
2 t. sugar, optional
3 small roasted beets, peeled
1/2 c. crumbled feta cheese
1/4 c. hulled pumpkin seeds, toasted
1/4 c. dried cherries
coarse salt- I used pink salt
Place lettuce in a mixing bowl. Combine olive oil with vinegar and sugar, if using. Add salt and pepper to taste and toss over the greens. Slice beets. Divide greens on 2 salad plates. Arrange half of the beets on each salad and top with the rest of the ingredients. Sprinkle with a few grains of the sea salt and serve. Makes 2 luncheon salads.
Apple Galette

If you like apple pie, you will like apple galette. A galette is made by rolling out your crust, adding filling and folding up the edges. No pie pan involved.
I actually find a galette easier to make than pie. You don’t have to try to roll out your dough to fit into the pie pan. Nor does you dough have to be rolled into a perfect circle.
That takes a lot of pressure off, if rolling a perfect circle of dough is not your best talent. I must confess to liking its rustic charm. I make my own crust, but you can used purchased crusts, if you prefer.
You can serve your galette with ice cream, whipped cream or dusted with powdered sugar. You can make it with other fruits, as well. Any fruit pie can become a galette.
Apple Galette
Flaky Pie Crust
2 c. flour
1 t. salt
3/4 c. butter, chilled
1 T. cider vinegar
4-5 T. cold water
Combine flour and salt and cut in butter. Toss in vinegar and water 1 tablespoon at a time until dough holds together. Use a fork to toss the ingredients together and as soon as the mixture holds together stop adding water. Makes 2. Chill well before using.
Filling:
5-6 medium apples- I used Jonathan, Gala and Macintosh
2/3 c. sugar- plus extra for sprinkling
3 T. cornstarch
1 T. cinnamon
1 T. Lemon juice, plus extra for treating the apples
1 t. nutmeg
1 t. vanilla
1/2 t. salt
Prepare dough. Roll half the dough into a 10-inch circle- repeat with remaining dough. Keep covered with plastic wrap until ready to use. Peel and core apples and slice thin. Place apples in water with lemon juice added to prevent browning. Drain apple slices well and place in a bowl. Toss with the sugar, cornstarch, lemon juice and seasonings. Place one of the crusts on a baking sheet. Pile half of the prepared apples on the center of the crust. You should have about a 2-inch circle of dough around the edges that is uncovered. Fold edges of the crust up over the apples pressing lightly to hold in place. Sprinkle with a little extra sugar. Repeat with the remaining crust and apples. You will have a little liquid in the bowl from the apple mixture- save that for now. Place the galettes in a preheated 425 degree oven and bake for 15 minutes. Turn down heat to 350 and bake for another 40 minutes or until crust is golden brown. While galettes are baking take the liquid left from the apples and cook in a small saucepan until thickened- it will take a minute or two. This will be used to glaze the galettes. When galettes come out of the oven brush the apples with the thickened glaze. Cool on wire rack. Makes 2.


