Creamy Fresh Tomato Soup

Tomatoes are in season and I am loving it. I have been enjoying tomato sandwiches, tomato salad and fresh tomato sauce.
This is a great recipe for some of those tomatoes. A simple soup, with lots of flavor, it is a favorite of mine. So much better than the canned tomato soup of my childhood.
I enjoy it served hot, but this soup can also be served cold. On a hot day, this soup, served chilled, is a wonderful change from a salad with dinner.
I prefer to use fresh tomatoes, but I have used my home canned tomatoes, in a pinch.
If you want a stronger tomato flavor- use a couple extra tomatoes.
Creamy Fresh Tomato Soup
3 medium-sized ripe tomatoes
1 small onion, chopped fine
1 rib celery, chopped fine
1/4 t. ground cloves
1 small bay leaf
3 T. butter
3 T. flour
1 t. salt
3 c. milk or half and half
Peel and chop tomatoes. Place tomatoes in saucepan with onion, celery, cloves and bay leaf. Bring mixture to a boil; reduce heat and cover, simmering 15 minutes. Melt butter in a large saucepan then stir in flour and salt. Cook mixture until bubbly. Add milk and cook until thickened, stirring constantly. Remove bay leaf. Puree tomato mixture through a strainer, food mill or in a blender or processor. Add to milk mixture and heat through. Serves 6.
Cinnamon Pear Coffee Cake

This pear-studded cake is perfect to have with that morning cup of coffee- or for dessert. The tender cake is topped with chopped pears, cubes of cream cheese, cinnamon sugar and a vanilla glaze. The taste is amazing. I used Bartlett pears, but any ripe pear would work.
I will say up front, that this is not the prettiest cake out there. It comes out of the oven kind of lumpy, from all those pears and the tiny cubes of cream cheese. Once you top it with the cinnamon sugar, and later the glaze, it looks a lot better. It is one of the tastiest cakes, though, and isn’t that what’s important?
So if you want to enjoy one of my favorite late Summer/early Autumn fruits in a new way- try making this simple, tasty pear coffeecake. I don’t think you will be disappointed.
Cinnamon Pear Coffeecake
1 stick (½ cup) butter
1 egg, lightly beaten
1 c. half and half
1 c. all-purpose flour
1 c. sugar
2 t. baking powder
2 t. cinnamon
1 t. vanilla
½ t. salt
2 lbs. pears, about 4 large, cored, peeled and sliced *
8 oz. cream cheese, cut in small pieces
Topping
3 T. cinnamon sugar
Glaze:
½ c. powdered sugar
1-2 T. milk
½ t. vanilla
Preheat oven to 350 degrees. Melt butter and pour into a 9-by-13-inch glass baking dish. In a small bowl, mix together the egg, half and half, flour, sugar, baking powder, cinnamon, vanilla and salt. Pour directly over the butter in the baking dish, but do not stir. Drain pears well. Add the pears, arranging in a single layer as much as possible. Sprinkle cream cheese pieces over fruit. Place in preheated oven and bake for 45 minutes, or until top is golden brown and edges are bubbling. When you remove the cake from the oven, sprinkle with the cinnamon sugar. Set cake aside to cool. Make glaze by combining glaze ingredients. Add just enough milk for a nice consistency for drizzling. Drizzle over cooled cake. Store leftovers in fridge. Serves 12.
* To keep pears from discoloring place in a bowl with 2 cups of water and 2 tablespoons lemon juice
Pasta and Corn Salad
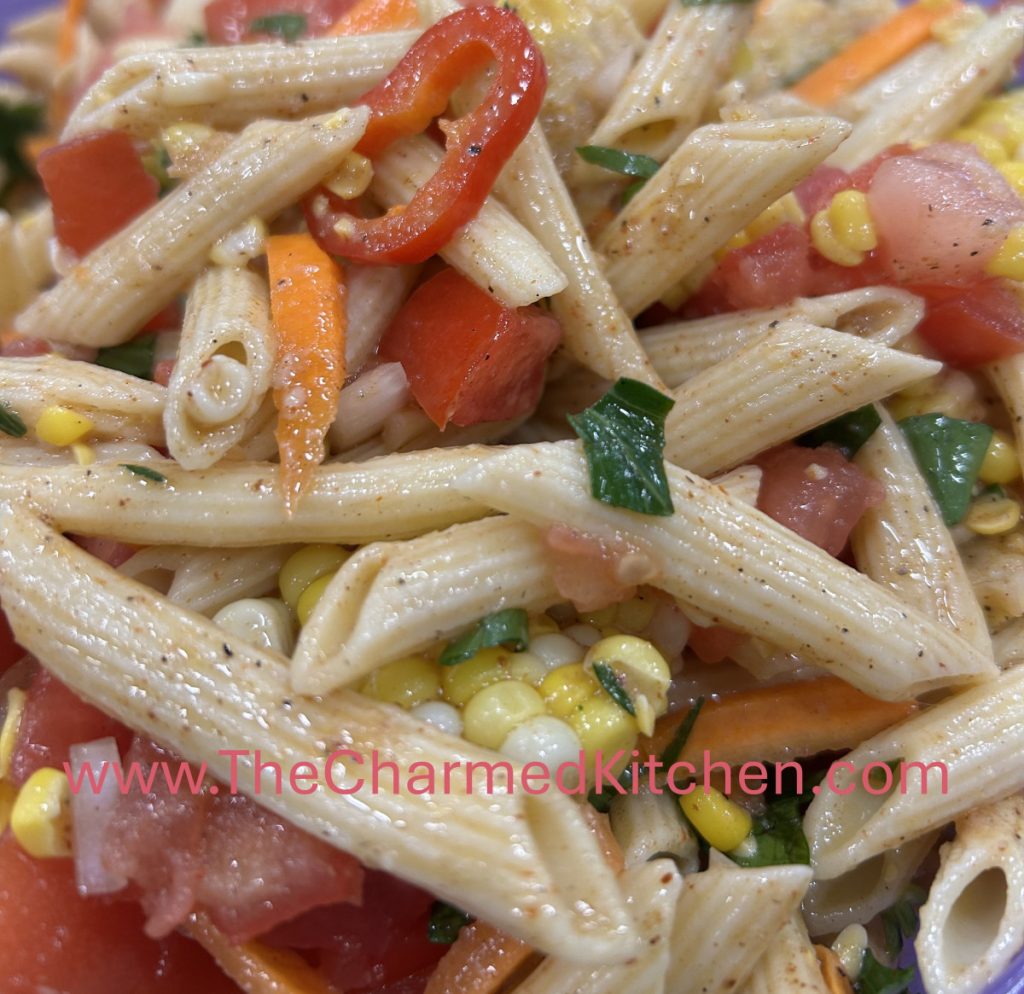
We had this salad in class on Monday. It tastes lighter than you might expect. It’s a combination of pasta, corn and plenty of other veggies. The dressing is simple, but packed with flavor. Oil, lime juice, mustard, chili powder, cumin…. so good. You could easily add a protein like chicken, ham or shrimp to make it a main dish. Or add a plant based protein like black beans or cooked lentils and keep it vegetarian. So here is the recipe. I hope you like it.
Pasta and Corn Salad
1 1/4 lbs. pasta
1 1/2 T. oil
4 large tomatoes, seeded and diced
3 c. corn, fresh or frozen, thawed
3 large carrots, cut in matchstick pieces
1 sweet pepper, seeded and sliced thin
1/2 large sweet or red onion, chopped
Dressing
1/3 c. olive oil
2 T. Dijon mustard
2 T. Lime juice
1 1/2 t. chili powder
1 1/2 t. cumin
1 bunch fresh cilantro, chopped, optional, or parsley.
Cook pasta according to package directions. Drain and toss with the 1 1/2 T. oil. Add vegetables and mix well. Combine dressing ingredients and blend well. Toss with pasta mixture and serve or chill until later. Serves 8.
Fresh Tomato Pasta
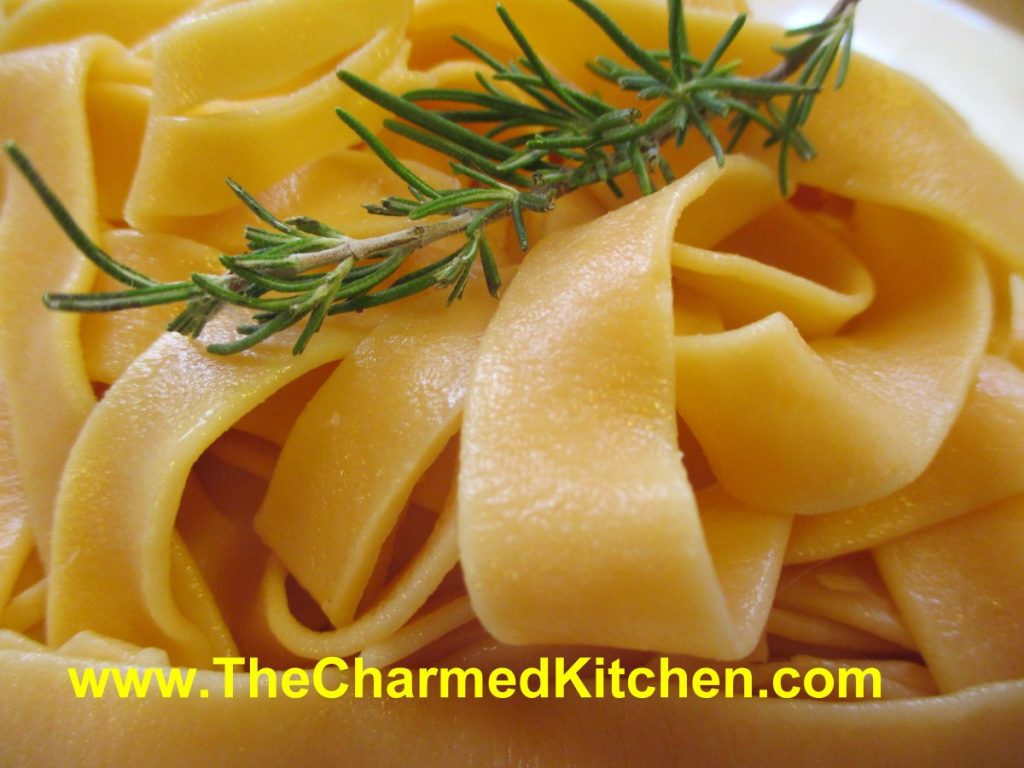
I really enjoy making fresh pasta. I often use vegetables and herbs in homemade pasta for added flavor. I decided to make a fresh tomato pasta today, using, well, a fresh tomato or two. You could use tomato juice in this recipe, but since I had fresh tomatoes, I just used fresh tomato. I also use tomato powder in this recipe sometimes. I make tomato powder out of the skins of the tomatoes I canned. I put them in the dehydrator and powder them up once dried.
I put a medium sized tomato in the blender and pureed it until smooth. I left the skin on and the seeds in. I didn’t have quite enough liquid, so I added a couple cherry tomatoes and blended again.
The pasta might look a little pale to you. I assure you, it was made with tomatoes. The pasta color fades a little when cooked. I also used an orange tomato, so it was never going to be a bright red color. The flavor, however is quite nice. Subtle, but definitely tomato. Here is the recipe.
Fresh Tomato Pasta
2 c. flour
1 t. salt
½ -2/3 c. tomato juice- I just pureed a fresh tomato in the blender, seeds, skin and all. You might need a little more.
Fresh minced herbs, like chives, basil, parsley, rosemary, optional
Place flour and salt in bowl and stir to blend. Start adding the tomato juice, stirring to form a firm dough. Knead until smooth and cover dough, allowing to rest at least 20 minutes. I like to mix the dough in a food processor. Just mixes faster. You can also mix in a stand mixer using the dough hook.
Once dough is rested, roll out to desired thickness and cut into noodles or use as the base for ravioli. Fresh pasta cooks in just a couple of minutes. Watch carefully.
Serves 3-4.
Green Tomato Sweet Relish
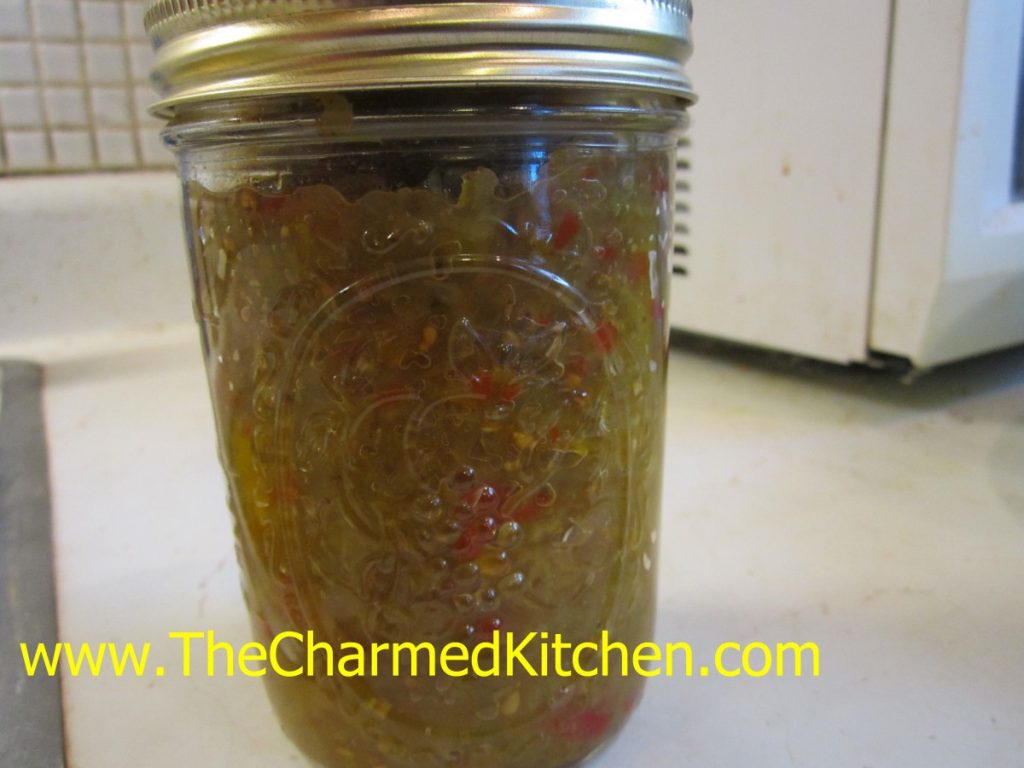
This sweet relish is a great way to preserve those last of the season tomatoes. It is every bit as good as relishes made from cucumbers.
Someone asked me for the recipe- so here it is.
Green Tomato Sweet Relish
6 pounds green tomatoes, about 22 medium
2-3 medium onions
2 medium sweet red peppers
1 sweet green pepper
1 large rib celery
1 3/4 c. white or cider vinegar ( 5% acidity)
1 2/3 c. sugar
3 T. canning salt
1 1/2 t. celery seeds
1/2 t. each cinnamon, cloves, allspice and turmeric
1/4 t. cayenne pepper
Wash trim and quarter vegetables. Put vegetables through food grinder using medium blade or pulse in food processor to chop finely. Drain, discarding liquid. Wash jars in hot, soapy water. Rinse and set aside. Combine vinegar with remaining ingredients in large saucepan and bring to a boil. Add vegetables and simmer 10 minutes, stirring occasionally. Continue simmering while packing hot jars, one at a time. Fill to within 1/2 -inch from top of jar. Wipe rims and place on lids. Process 10 minutes in a boiling water bath. Makes 5-6 pint jars.
Green Tomato Pickles
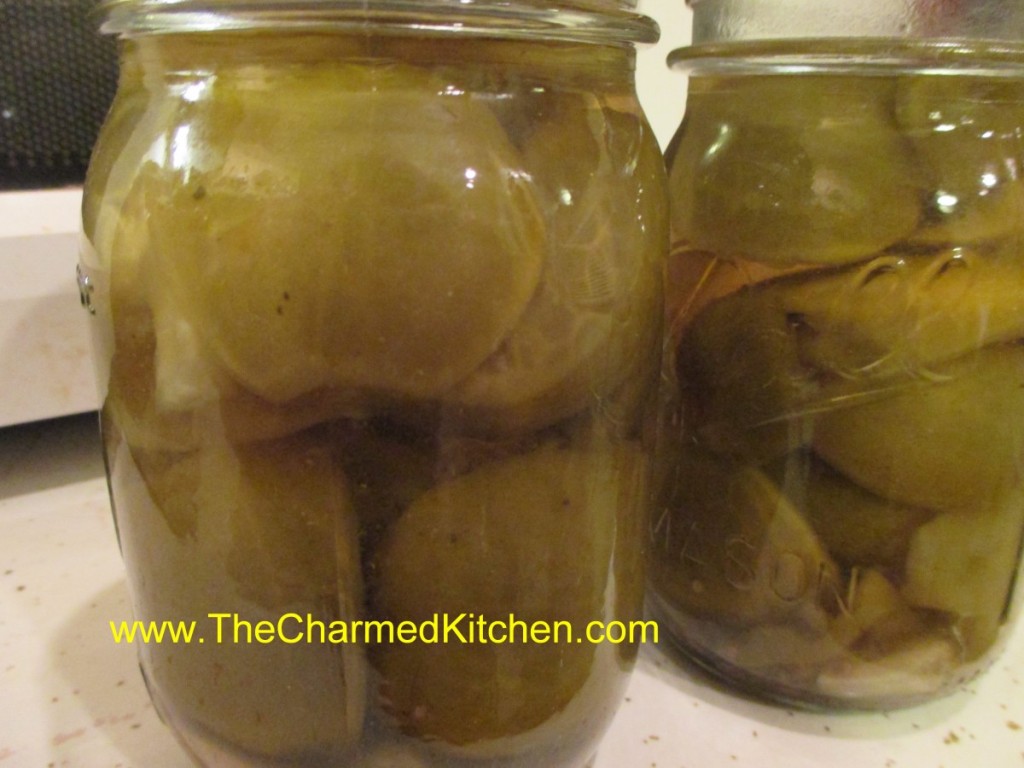
The garden season is winding down around here. A number of friends have posted pictures of their last ripe tomatoes of the year. That is a sad time. But, don’t forget about those green tomatoes. You can make fried green tomatoes, which are great. You can also make these pickles. That way, you can enjoy those home grown tomatoes a little longer.
The recipe is pretty simple. I sometimes add a teaspoon of red pepper flakes to each jar for a spicy version. The hardest part is waiting. Once the tomatoes are canned, you have to give them 4-6 weeks for the pickling to finish. Trust me, it is worth the wait. While the recipe calls for using quart jars, you can use pints. Process for the same time as the quart jars. I like to use pints for the green cherry tomatoes.
Just because your ripe tomatoes are done for the year, harvest those green ones and get a little something more from your garden.
Green Tomato Dill Pickles – Kosher Style
Green tomatoes
6 ribs celery, cut in 2-inch pieces
6 Sweet green peppers
6 cloves Garlic, peeled
2 quarts water
1 quart vinegar- 5% acidity- you can use white or cider vinegar
1 cup canning or pickling salt
Dill, optional
Use small firm green tomatoes. Pack into hot, clean canning jars. Add to each quart jar a clove of garlic, 1 piece of celery, and 1 green pepper cut into fourths. Make a brine of the water, vinegar, and the salt. Boil with the dill for 5 minutes. Pour the hot brine over the pickles to within 1/2 inch of the top of the jar. Put on cap, screw band firmly tight. Process in a boiling water bath for 15 minutes. These pickles will be ready for use in 4- 6 weeks. Yield: About 6 quarts. Source: NCHFP
Fresh Plum Torte

I got this recipe from a friend a couple of years ago and then somehow lost track of it. With Italian plums at the market this time of year I wanted to share this recipe with you. It really is one of the best plum desserts I have ever had. Plenty of plums that give the torte a wonderful flavor and texture, too. Fine on its own, or even better served with a scoop of ice cream. So here is the recipe.
Enjoy.
Fresh Plum Torte
1 stick unsalted butter, softened
3/4 c. plus 1-2 T. sugar
1 c. flour
1 t. baking powder
2 eggs
dash salt
24 halves pitted Italian prune plums (or 6-7 larger red or black plums, pitted, quartered)
1 t. cinnamon
ice cream, optional
Place rack in lower third of oven and preheat to 350 degrees. Cream together butter and 3/4 cup sugar. Add flour, baking powder eggs and salt and beat to mix well. Spoon batter into 9- or 10-inch ungreased springform pan. Place plums on top, skin side down. Combine remaining sugar (add what you like based on taste and sweetness of plums) with the cinnamon and sprinkle over the top of the torte.
Bake 40-60 minutes, or until pick tests clean. Serve at room temp or a little warm. Refrigerate or freeze leftovers. Serves 6-8.

Spelt and Walnut Biscotti

Biscotti are so easy to make. I don’t know why more people don’t bake their own. They are always nice to have with coffee, tea or a cold glass of milk. These aren’t too sweet, so biscotti make a nice breakfast. They stay crisp for a long time, if stored in an air tight container.
Biscotti are twice baked. First in a loaf shape, then they are sliced and baked again. Most recipes will tell you to bake the slices half way, then turn them over to finish baking. A little time saving trick- just place a cooling rack on the baking sheet, then place the sliced biscotti on the rack. That way, they get crisp on both sides at once and there is no need to turn them.
These biscotti are made with spelt flour. Spelt is an ancient grain that is very closely related to wheat. It does contain gluten, so not an option for people with wheat allergies or Celiac, but a nice way to add a whole grain to your menu if you do eat wheat. Unlike whole wheat flour, which tends to be heavy in baking, spelt has a lighter texture and acts more like white flour. I used it to make these biscotti and they are crisp, light and very tasty.
Spelt Biscotti – with Walnuts
1 ¼ c. spelt flour*
⅓ c. sugar
1 t. baking powder
¼ t. salt
½ c. walnuts
¼ c. golden raisins- I often use dried cranberries or other dried fruit -optional
2 eggs
1 t. vanilla
Combine dry ingredients with nuts and raisins in medium mixing bowl. In small bowl combine eggs and vanilla and add to dry ingredients. Stir together to make a slightly sticky dough. With oiled hands shape into loaf (2”x11”) on oiled sheet. Bake at 350-degrees for 20 minutes. Remove from oven. Slice the loaf thin using a serrated knife and place slices on a rack on a baking sheet then return to oven, reduce heat to 300-degrees bake 25 minutes. Remove from oven and allow to cool. Store in an airtight container to retain crunch. Makes about 16.
* If you can’t find spelt flour you can use 3/4 c. all purpose flour and 1/2 c. whole wheat flour instead or substitute the entire amount of flour with whole wheat pastry flour.
Spiced Beet and Tomato Soup
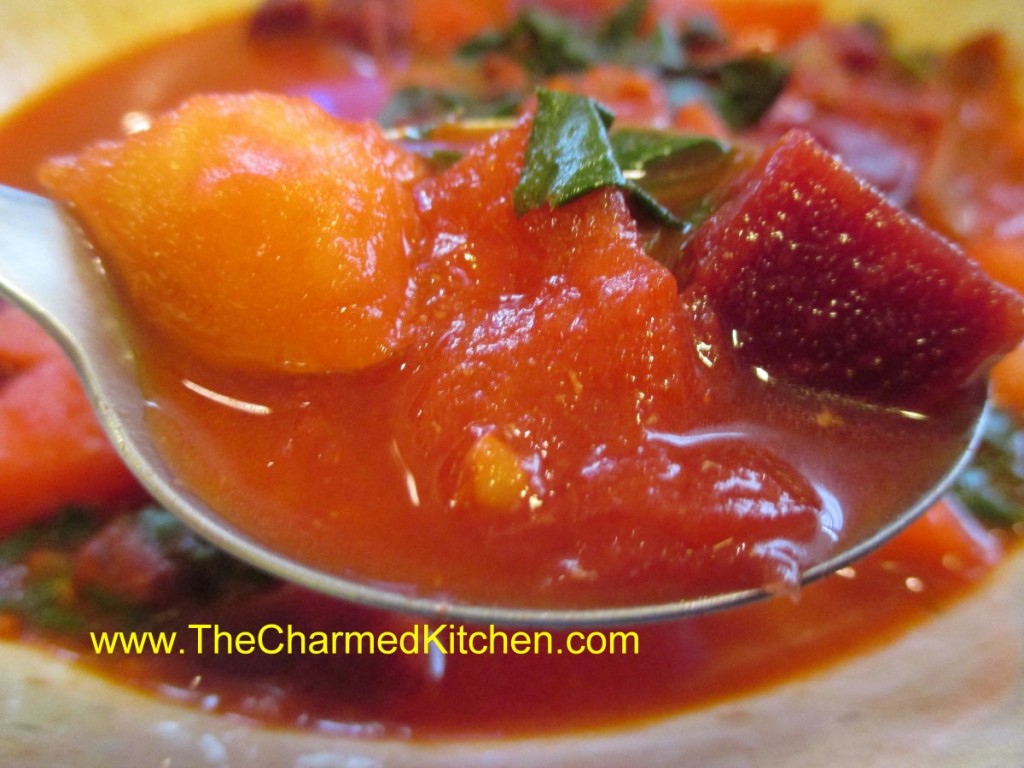
I had picked up some beautiful fresh beets at the market a few days ago. Since it’s was a little cool today, I thought I’d make soup with them. I took inspiration from what I had on hand including onions, potatoes and home canned tomatoes. Adding the tomatoes was a last minute decision that worked out really well. The tomatoes added just the right amount of tart/sweet flavor. The color was pretty, too. This soup would work great with fresh tomatoes, too.
I know beets aren’t everybody’s favorite, but I love them. I love how they taste. I love the color. I love how everything I cook with beets turns out the most gorgeous color.
I don’t, however, love the way my kitchen looks whenever I cook with beets. It’s like something out of a crime scene. Not blaming the beets. Just wondering how it is I can clean up everything, then walk in the kitchen the next day and find flecks of red all over?
Here is the soup recipe. It was a small bunch of beets, so I just made a small batch of soup, but it could easily be doubled.
Spiced Beet and Tomato Soup
1 bunch beets, about 1 lb.
oil
1 onion, chopped
1 t. cumin seeds
1 t. fennel seeds
3-4 c. stock- I used chicken
1 potato, cubed
1 pint canned tomatoes – or 2 c. diced tomatoes – or 14 oz. can of diced tomatoes
1t. dill
1/4 t. cayenne, or to taste
salt and pepper to taste
Wash beets and trim leaving about 1 inch of the stem attached. Reserve greens. Place beets in a saucepan of boiling water and simmer for about 20 minutes. Remove beets and cool in cold water until you can handle them. While beets are cooling, cook onion in oil until tender. Add seeds and cook until they are toasted and onions are golden. Peel and cube the beets. Add to the onions along with the stock, potatoes and tomatoes and cook until potatoes are tender, about 15 minutes. Rinse and chop up about 1 cup of the beet greens and add them to the soup along with the seasonings. Cook until greens are tender, about 5 minutes. Adjust seasonings and serve. Serves 3-4.
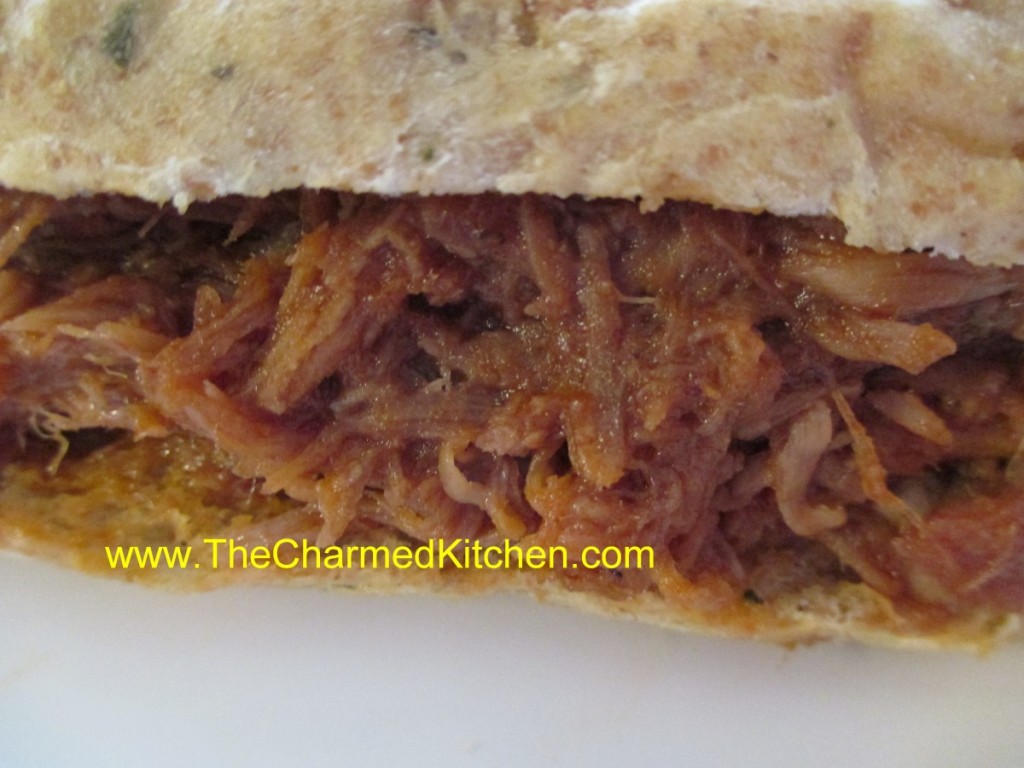
Plum and Pomegranate Sauce

Pulled Pork with Plum and Pomegranate Sauce
For a recent dinner I wanted to use a pork shoulder. I had plums and wanted to use them, too. I like pairing fruits with meats and other savory ingredients. I pureed the plums, then used them as the base for a sauce I needed for pulled pork. One of my dinner guests was not a big fan of more tomato based barbecue sauces, so I figured plum sauce might be a better option. I added pomegranate syrup for more tang- and for its pretty color, along with a handful of other ingredients. I let it simmer down until nice and thick, then stirred it into my pulled pork. Even the guest who said she is not normally a fan of pulled pork liked it with this sauce. It would also go well with poultry and lamb.
Plum and Pomegranate Sauce
3 T. oil- you could use butter or bacon fat, if you like
1 medium onion, minced
2 gloves garlic, minced
2 c. plum puree*
½ c. pomegranate molasses**
½ c. apple cider vinegar
2 T. honey- or a little more to taste
2 t. hot sauce- or to taste
1 t. grated ginger
Salt and pepper to taste
Heat oil in pan and cook onions until very tender. Add the garlic and cook another minute or two, being careful not to burn the garlic. Add remaining ingredients and cook until sauce is thickened, about 30 minutes. I simmer the sauce and stir more often as it reduces to avoid scorching. You should cook it down to around 2 cups. Adjust seasonings once it is cooked down. Use with pulled pork, on chicken or as a glaze for duck or even lamb.
* To make the plum puree- dip plums in boiling water for 30 -60 seconds. Remove them to a bowl with ice water to cool. Slip off skins and discard. Remove pits and discard them, too. Place plums in a blender or food processor and puree until smooth. You’ll need about 1½ pounds of plums for 2 cups of puree.
** Pomegranate molasses can be found in some grocery stores and in specialty stores. It is pomegranate juice that is boiled down until it becomes thick and syrupy. You can just boil down pomegranate juice to make your own pomegranate molasses, if you can’t find it.