Banana Fritters

Banana Fritters
I had some ripe bananas and wanted to do something different with them. I wasn’t in the mood for banana bread. I had a class with kids recently and we had made doughnuts. That is where the idea for these fritters came from. Only a few ingredients, too. Simple to make and a nice change from banana bread.
I started with a couple of bananas, which I peeled and mashed with a fork. I purposely left some small chunks of banana. Then I added eggs and sour cream. I knew the sour cream would add richness and help keep the fritters tender. I also used cinnamon, both in the batter and in the powder sugar I rolled the finished fritters in. I like the combination of banana and cinnamon.
The fritters puffed up beautifully when fried. They were just a little crisp on the outside, tender and light in the middle. There is no sugar in the batter. The only sweetness comes from the bananas and the cinnamon powdered sugar I rolled them in. I think they would be great with a powdered sugar glaze, too.
So here is the recipe. A fun way to use ripe bananas.
Banana Fritters
2 large ripe bananas
2 eggs, beaten
½ c. sour cream
1 t. cinnamon
2 c. flour
2 t. baking powder
1 t. baking soda
Oil for frying
1 c. powdered sugar
1 t. cinnamon
Peel bananas. Mash bananas with a fork, leaving some smaller chunks. You should end up with about a cup of mashed bananas. Combine in a small bowl with the eggs, sour cream and cinnamon. Combine flour with the baking powder and baking soda and stir into the banana mixture. Heat oil in a pot to 350 degrees. Oil should be at least a couple of inches deep. By rounded tablespoonful drop batter into the hot oil to fry. Only do a few at a time, so you don’t overcrowd them, or bring the temperature of the oil down too much. Fry until golden brown. It will take several minutes. Remove with slotted spoon and drain on paper towels. Repeat with all the batter. You will end up with 2-3 dozen fritters.
Once the fritters are cooled down you can roll them in powdered sugar, cinnamon sugar or even make a powdered sugar glaze. I combined cinnamon with a little powdered sugar and rolled the fritters in that. The cinnamon worked nicely with the bananas.
Corned Beef Quesadillas

Corned Beef and Spinach Quesadilla
For those of you with leftover corned beef, you might want to try making corned beef quesadillas. You could use a number of fillings, including a maybe Reuben quesadilla.
I used a combination of cheese, corned beef, caramelized onion and spinach. It came out so tasty.
The quesadilla make a great lunch dish- maybe served with a salad. You can also serve them as appetizers or a fun snack.
Make sure any fillings are not too wet- they will cause the tortilla to be soggy, instead of crisp. I like to cook most of my veggies first, to wilt them down and remove some moisture. I also drain any veggies that are really wet.
Cheese can be sliced thin, or shredded. Corned beef should also be in thin slices or shredded.
You have options for how you want to cook your quesadillas. You can cook in a little oil, in a skillet, cooking until golden brown on both sides. You can brush them with oil and bake in the oven. You can also grill them. The important thing is to get them crisp. No microwave cooking for this recipe.
Don’t be afraid to be a little creative. You can serve them as is, or with a dipping sauce on the side.
Corned Beef Quesadillas
4 large flour tortillas- 8-inch or larger
8 oz. corned beef, sliced thin or shredded
1½ c. shredded cheese or 6 oz. sliced cheese- I used sharp cheddar
12 oz. fresh spinach, cooked down in a little oil or 10 oz. box frozen spinach, thawed and squeezed dry
1 sweet pepper, seeded and diced
2 medium onions, sliced thin and cooked in oil or butter until wilted down and golden- season with salt and pepper
Whole grain mustard, optional
Mayo- mustard
Oil for frying or brushing the tortilla before grilling
Get all your ingredients prepped before starting. If baking in the oven- have oven preheated to 425 degrees. Place tortilla on a work surface and brush with mustard and mayo, if you are using them. Place 2 oz. of corned beef on the tortilla. Keep all the ingredients on one half of the tortilla, since you will be folding it in half. The mayo and mustard can be spread over the whole tortilla. Top the corned beef with ¼ of the cheese, spinach, pepper and onions. Fold in half, set aside. Repeat with remaining ingredients. You will have 4 tortillas, filled and folded in half. Cook one of several different ways. I heated a skillet, added oil, and cooked the quesadillas until golden brown on both sides. You can place them on a baking sheet and bake in the oven until crisp and golden. You can also brush the outsides of the quesadillas with a little oil and grill, turning until golden on both sides. Cut in wedges to serve. Makes 4.
Corned Beef on Rye Salad
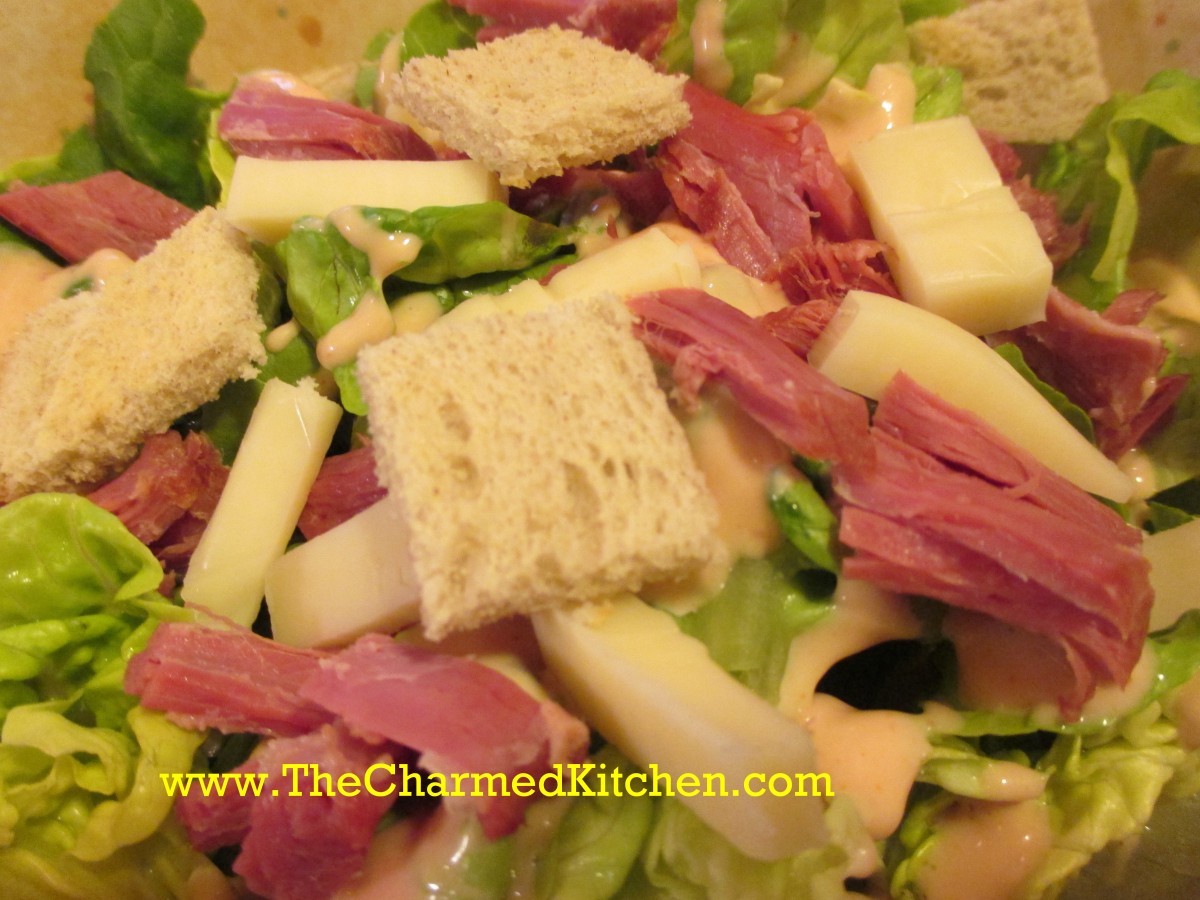
Corned Beef on Rye Salad
If you have leftover corned beef, you might want to try using it in a salad. This recipe came about when I had some corned beef that I was planning on using in a sandwich. But I was more in the mood for a salad. Since I also had some lovely salad greens, I decided to combine them in one dish.
The end result was very tasty.
I prepped my greens, then topped them with the corned beef and Swiss cheese. I made croutons out of the rye bread and dressed the salad with homemade thousand island dressing. A nice Russian dressing would have worked, too. Perhaps, even a simple oil and vinegar dressing. The thousand island dressing made it like a Reuben sandwich, minus the sauerkraut.
Corned Beef on Rye Salad
6-8 c. mixed salad greens, washed and dried off
6 oz. corned beef, cut in bite sized pieces
4 oz. cubed Swiss cheese
2 slices rye bread, toasted and cubed
4 T. Thousand island dressing- recipe follows
Place greens in a bowl. Top with the meat, cheese, rye bread and drizzle with the dressing. Serves 2.
Homemade Thousand Island Dressing
Combine equal amounts of mayo, ketchup and sweet pickle relish. Stir to combine. I like to add capers sometimes, too. Store unused portion in the fridge.
Pecan Crusted Salmon

Pecan Crusted Salmon
If you aren’t a corned beef person, this might be a nice alternative for St. Patrick’s day dinner. Salmon is a very popular fish in Ireland. Of course, any day is a good day for pecan-crusted salmon.
If you love salmon like I do, this is a fun way to prepare it. The crunch from the nuts adds a nice contrast to the texture of the fish. The flavors work well together, too.
You don’t have to use pecans. I prefer them, but finely chopped walnuts, hazelnuts, almonds or even pumpkin seeds might be fun.
A combination of Dijon mustard, butter and honey helps the nuts to stick to the fish. There are a few bread crumbs in there as well.
This dish is simple enough to prepare any night of the week, but special enough to make for company.
I used salmon fillets. You could use a whole side of salmon. You just have to increase the baking time to about 20-25 minutes and reduce the oven to 425 degrees. Depending on the size of the piece of salmon, it might take a few more minutes.
Salmon Bake with Pecan Crunch Coating
2 T. Dijon Mustard
2 T. melted butter
4 t. honey
1/4 c. fresh bread crumbs
1/4 c. finely chopped pecans or walnuts
2 t. chopped parsley
4 salmon fillets
Salt and pepper
Lemon wedges
Mix together mustard, butter and honey and set aside. Mix together bread crumbs, nuts and parsley and set aside. Season each fillet with salt and pepper. Place on lightly greased baking or broiling pan. Brush each fillet with mustard mixture. Divide crumb mixture among fillets, patting to hold. Bake in 450 degree oven for 10 minutes per inch thickness of fillets. Serve with lemon wedges. Serves 4.
Irish Soda Bread – Bread Pudding
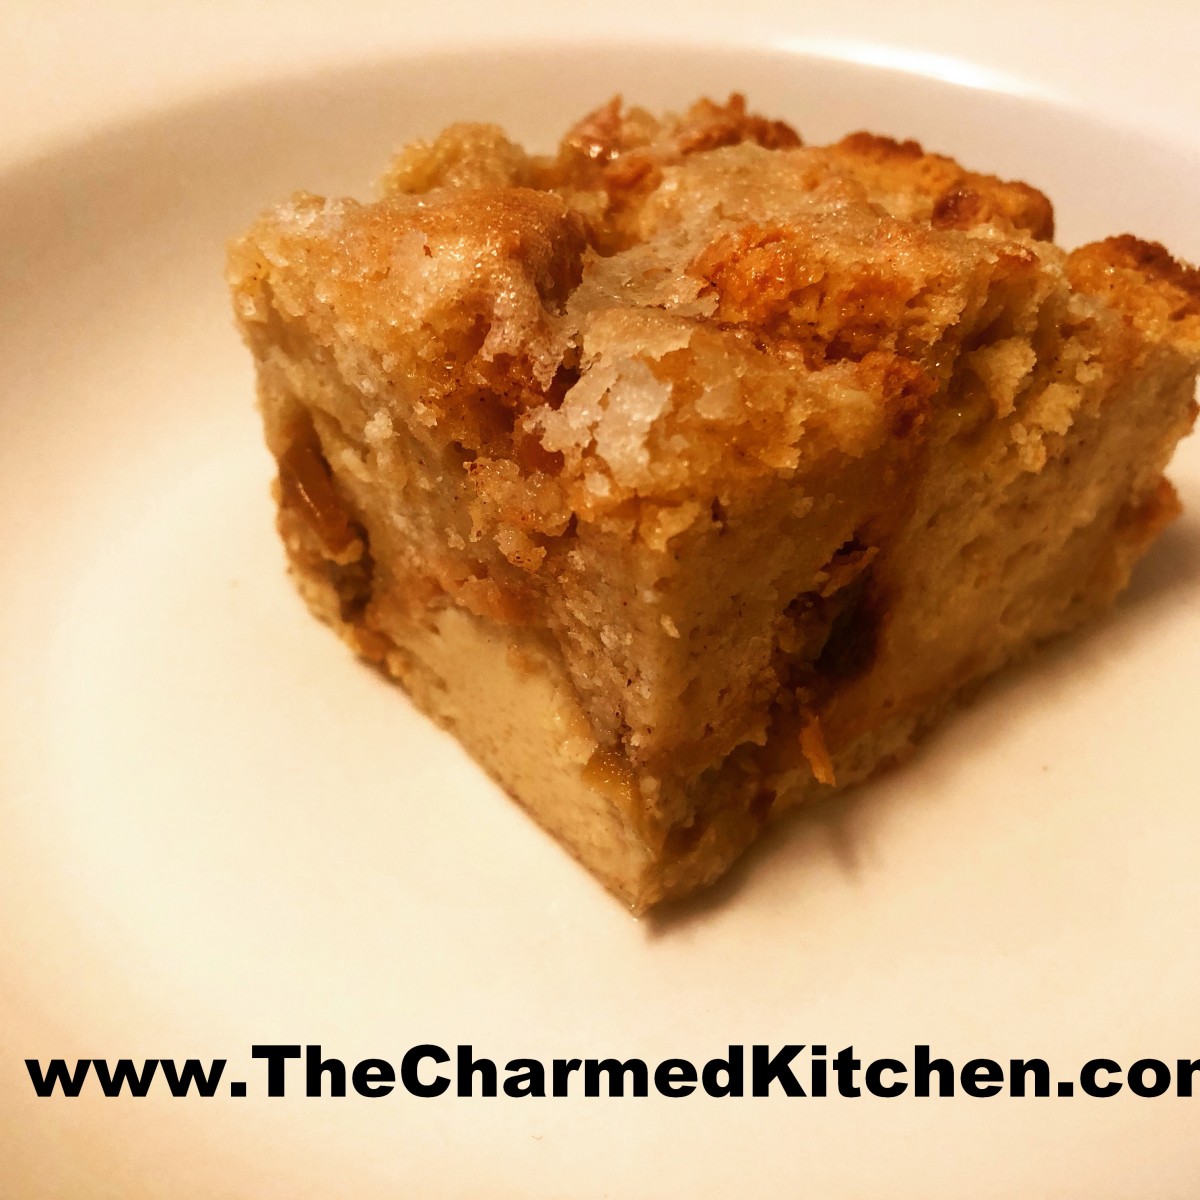
Irish Soda Bread- Bread Pudding
This is a great dessert for St. Patrick’s Day. Simple and not too sweet, it is a perfect way to finish your holiday meal. It is made with a traditional Irish soda bread. I used a loaf of soda bread I had baked the day before. You could just buy a loaf of soda bread, if you prefer.
The bread was cubed up and allowed to sit around for a day, to dry out a little. You can also cube the bread and toast it in a low oven for 10-15 minutes. A slightly dried bread will stand up better to the custard.
For the custard I used milks, eggs, flavorings and a little whiskey. I would have added Bailey’s, if I had it. The addition of alcohol is optional.
Store cooled bread pudding in the fridge, but take out before serving- or warm a little before serving.
Irish Soda Bread – Bread Pudding
6-8 c. cubed, day-old soda bread- recipe follows
2½ c. milk or half and half
5 eggs
½ c. sugar, plus extra for sprinkling on top
¼ c. whiskey, optional
1 T. vanilla
1 T. cinnamon
Preheat oven to 350. Grease 9×9-inch baking pan. Place cubed soda bread in prepared pan. Set aside. Beat together remaining ingredients and pour over the soda bread. Sprinkle top with a little extra sugar. Bake for 25-30 minutes or until bread pudding is set and a little golden on top. I used a glass pan- it might take a little longer in a metal pan. Bread pudding should be golden around the edges, too. Cool a bit before serving. Serve as is, or with whipped cream or ice cream. Serves 6-8.
Soda Bread
2 c. flour
½ t. each baking powder and baking soda
¼ t. salt
2 T. butter
¾ c. raisins, currants or golden raisins
2 t. caraway seeds
1 egg, beaten
1 c. buttermilk
melted butter, optional
Preheat oven to 400 degrees. Dust a baking sheet with a little flour. Combine dry ingredients in bowl and cut in butter to resemble coarse crumbs. Add raisins and caraway seeds. Combine egg and milk and set 2 tablespoons of this mixture aside. Add remaining milk mixture to flour mixture and combine just until dough forms into a ball. Place on baking sheet, brush with reserved egg mixture and cut a crisscross on top of loaf. Bake about 25 minutes or until bread sounds hollow. Place on rack to cool. You can brush the loaf with a little melted butter, if you like. Makes 1.
Pi Day Blueberry Pie
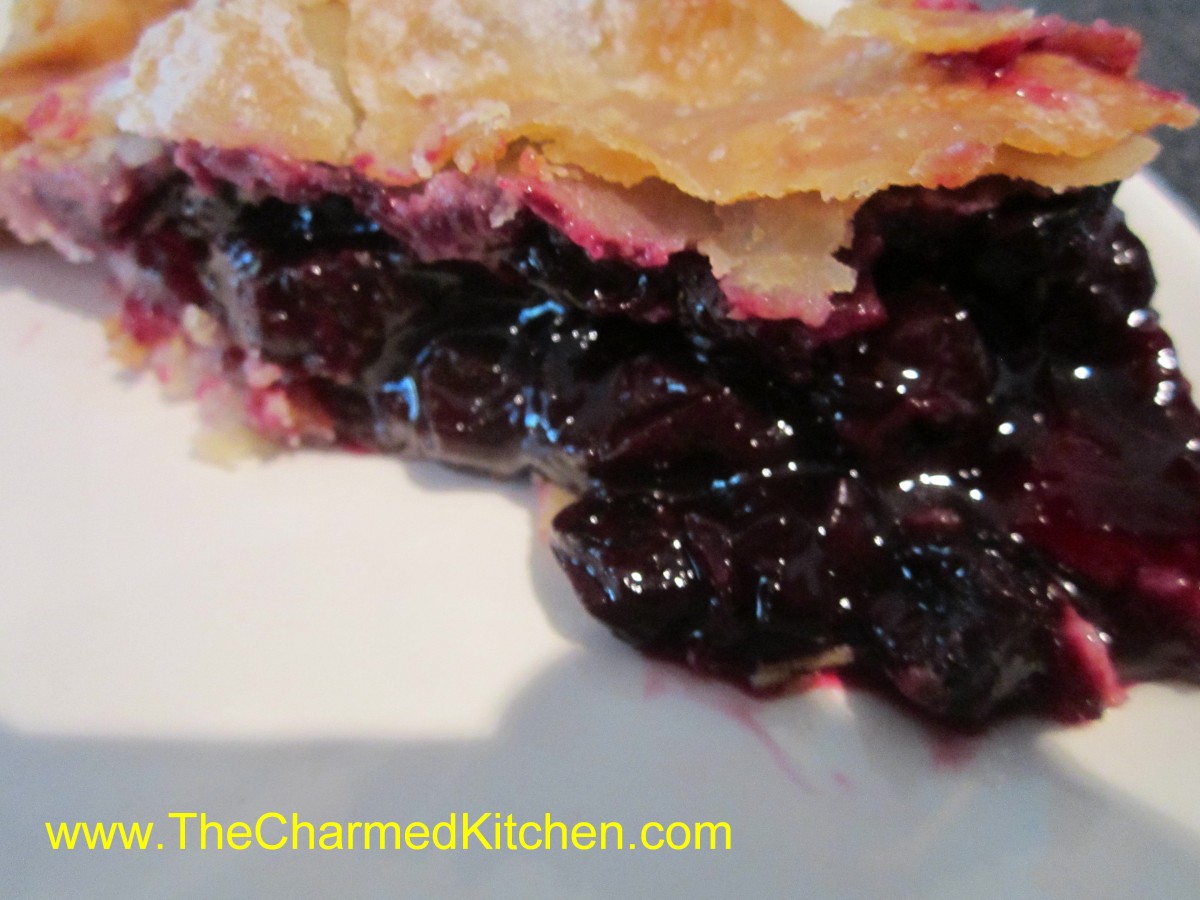
Blueberry Pie
March 14th is sometimes referred to as Pi day. It’s a math nerd kind of thing, 3.14 being the value of pi and March 14 is 3/14.
I was explaining it to a friend last night. My friend’s response was that ANY day was Pie Day!!
I had some blueberries in the freezer and decided maybe today was Pie Day after all.
You could certainly use fresh berries for this pie, but frozen was what I had. Also, since it is a rainy day today, baking a pie seemed like a nice way to spend the morning. My friend is home from work today. I think she will be happy when I invite her over to have some “Pi” Day blueberry pie. It is time to put on a pot of coffee, and make a call.
Blueberry Pie
Pastry for 2 crust pie- recipe- The crust recipe I used is at the bottom of the page
2 ½ T. cornstarch
1 c. sugar
3 c. fresh or frozen blueberries
1 T. lemon juice
1 T. butter
1 T. sugar, for sprinkling
Roll out half of the crust and place in 8 or 9-inch pie pan. You can roll out the top crust ahead of time, or even cut into strips for a lattice top. Cover remaining crust to keep it from drying out. In medium bowl mix cornstarch and sugar. Toss in berries and then sprinkle in the lemon juice. Allow to stand 15 minutes. If berries were frozen be sure they are not clumped together. Spoon mixture into prepared crust and dot with the butter. Top with the second crust or place strips on in a lattice design. If using a whole crust cut in decorative slits for ventilation. I used a tiny heart-shaped cutter for my pie. Moisten then crimp edges and shape decoratively or use a fork to seal. Place pie in lower half of hot oven. Bake in a preheated 425-degree oven for 15 minutes. Reduce heat to 375 and bake an additional 40-50 minutes or until crust is brown and juices begin to bubble through the slits. Cool a little before serving.
Flaky Pie Crust
2 c. flour
1 t. salt
3/4 c. butter, chilled – you can use coconut oil, lard or shortening
1 T. cider vinegar
4-5 T. cold water
Combine flour and salt and cut in butter. Toss in vinegar and water 1 tablespoon at a time until dough holds together. Use a fork to toss the ingredients together and as soon as the mixture holds together stop adding water. Makes 2. Chill well before using.
Soda Bread
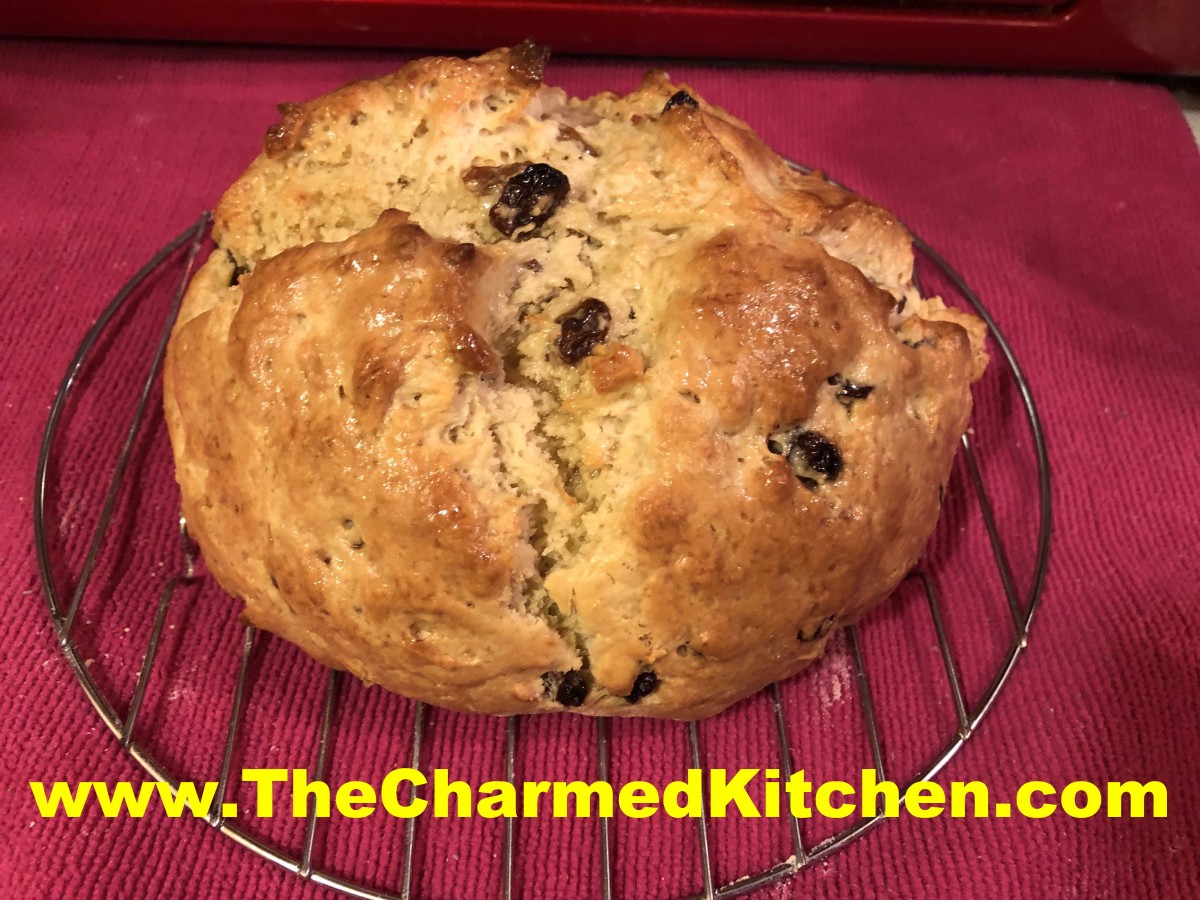
Soda Bread
It’s that time of year. Irish food in on the mind. This soda bread is a classic. Simple and fast to make, it can be served with breakfast, lunch or dinner.
Soda bread is like a big scone or biscuit. It has a crisp, outer crust, with a crumbly, soft center. The name refers to how the loaf is leavened. Baking soda and baking powder are used to make this bread rise, not yeast.
I like to serve soda bread with butter and jam. A friend tells me she likes to make toasted cheese sandwiches with hers, using a good Irish cheddar, of course.
I used golden raisins, but you can substitute currants, dark raisins, dried cherries, or just leave them out, if you prefer.
I make soda bread all through the year, not just for St. Patrick’s Day.
Soda Bread
2 c. flour
½ t. each baking powder and baking soda
¼ t. salt
2 T. butter
¾ c. raisins, currants or golden raisins
2 t. caraway seeds
1 egg, beaten
1 c. buttermilk
melted butter, optional
Preheat oven to 400 degrees. Dust a baking sheet with a little flour. Combine dry ingredients in bowl and cut in butter to resemble coarse crumbs. Add raisins and caraway seeds. Combine egg and milk and set 2 tablespoons of this mixture aside. Add remaining milk mixture to flour mixture and combine just until dough forms into a ball. Place on baking sheet, brush with reserved egg mixture and cut a crisscross on top of loaf. Bake about 25 minutes or until bread sounds hollow. Place on rack to cool. You can brush the loaf with a little melted butter, if you like. Makes 1.
Reuben Calzones

Reuben Calzone
There is more than one way to enjoy corned beef. This time of year, because of the St Patrick’s Day specials, corned beef is on sale at lots of stores. These calzones are a fun way to serve corned beef.
While more often made with Italian ingredients, you can make calzones with other fillings, too. I made these for a friend a while back and we were talking about them the other day. I decided to make them again.
These are a fun way to make a Reuben, but with a twist. You can leave the sauerkraut out, if you like. I add some thousand island dressing to the calzones, but serve extra on the side. They also freeze well, so you can make a batch, enjoy some fresh, and freeze some for later. I thought I would share the recipe with you.
Corned Beef Calzones
3 ¼ c. flour
1 c. rye flour
1 T. sugar
1 t. salt
1 package quick-rising yeast
1⅓ c. hot water
1 T. oil
1 c. Thousand Island dressing, recipe follows
1 lb. thin sliced corned beef
8 oz. shredded Swiss cheese
1 c. sauerkraut, squeezed dry
1 egg , beaten
Caraway seeds, optional
Set aside 1 cup of the all-purpose flour. Combine remaining flour with the other dry ingredients in a medium bowl. Stir in water and oil and gradually stir in enough flour to make a soft dough. Turn onto lightly floured surface and knead until dough is smooth and elastic, about 5 minutes. Cover dough and let rest 20 minutes. Divide dough into 8 pieces and roll one piece into a 6-8 -inch circle. In the middle of the dough, add a spoonful of Thousand Island dressing, place 1 ounce of the Swiss cheese and 2 ounces of the corned beef. Add a tablespoon or two of the sauerkraut, if using. Brush the edge of the dough with water. Fold over the dough in half and press the edges to seal. Brush the edge again with water and roll the edge over again. It will give you a prettier look and seal the calzone better. Repeat with remaining dough and fillings. Place calzones on greased baking sheets- or on a baking sheet with a silicone liner or parchment paper liner. You will end up with 8 calzones in all. Only put 4 on one baking sheet. Cover and let rest 15 minutes while preheating the oven to 400 degrees. Before placing calzones in the oven brush with beaten egg and sprinkle with the caraway seeds, if you like. Also poke a few holes in the tops with a fork to help steam to escape while baking. I put both baking sheets in the oven at the same time and switch them halfway through baking. Bake in a preheated 400-degree for 20-25 minutes or until golden brown. If baking both at once switch them after 10 minutes or so. Cool slightly before eating. Serve warm and refrigerate leftovers.
If you want to use regular yeast use warm, rather than hot water. Also, allow a little more time for the dough to rise the first time, about 40 minutes. Everything else will work the same.
If you want to make your own dressing, here is the recipe
Thousand Island Dressing
1/2 c. ketchup
1/2 c. mayo
1/2 c. sweet pickle relish
Mix ingredients together and serve, or chill until needed.
Irish Shortbread
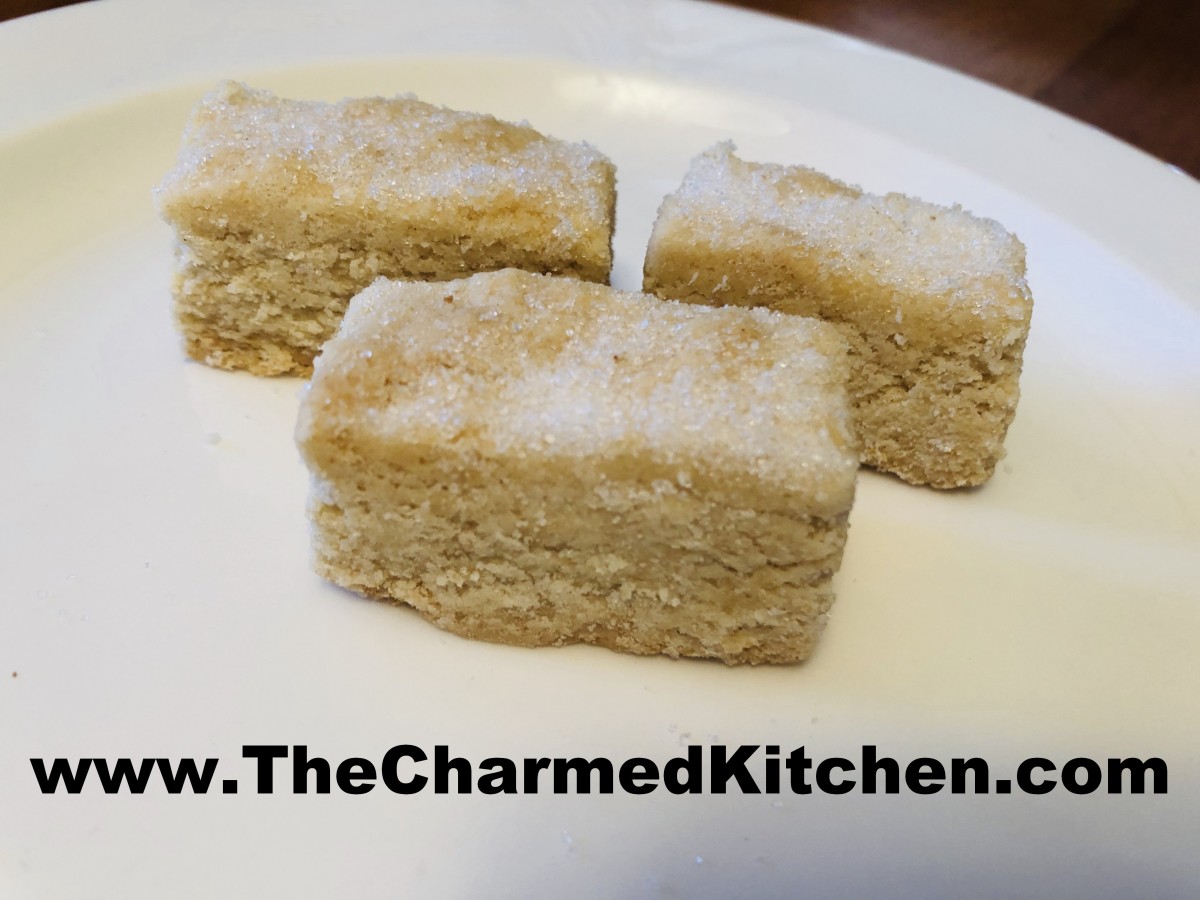
Irish Shortbread
If you are looking for an Irish dessert for St. Patrick’s Day, you might want to make these shortbread cookies. They are everything a shortbread should be. They have the classic shortbread crumbly, tender texture that is buttery at the same time. I think the phrase is melt in your mouth.
These are a little different than other shortbread, though. For starters, you add cornstarch to the dough. The cornstarch helps the cookie to be extra tender. You also melt the butter before adding it to the rest of the ingredients.
It could not get any easier. I pressed the dough into a 9×9-inch pan to bake. Once in the pan, I score the dough before baking, then cut the shortbread again once baked and cooled.
I will say that shortbread aren’t the prettiest cookies on the plate- but they are wonderfully tasty.
So here is the recipe. They also call for self-rising flour. If you don’t have self-rising flour- the recipe for making your own follows the shortbread recipe.
Irish Shortbread
1 c. butter (preferably unsalted)
2 1/4 c. self- rising flour (see note)
3/4 c. cornstarch
1/3 c. sugar, plus extra for sprinkling on top
Melt butter and allow to cool slightly. In medium bowl combine remaining ingredients. Stir in butter and mix until dry ingredients are thoroughly coated. Press into 7×11-inch glass pan (8×8 or 9×9-inch pans are OK). Sprinkle with extra sugar and score with a knife into 1×1-inch pieces. Bake in a preheated 325-degree oven for 30-40 minutes, until edges begin to brown. Cool in pan and cut on score marks. Makes about 6 dozen squares, depending in pan size used.
Note: If you don’t want to buy self-rising flour here is an easy recipe to make your own. It works in any recipe that calls for self-rising flour.
Self-Rising Flour
8 c. flour
5 T. Baking powder
2 T. sugar
1 T. salt
Combine all ingredients and store in an airtight container. Keeps for several months.
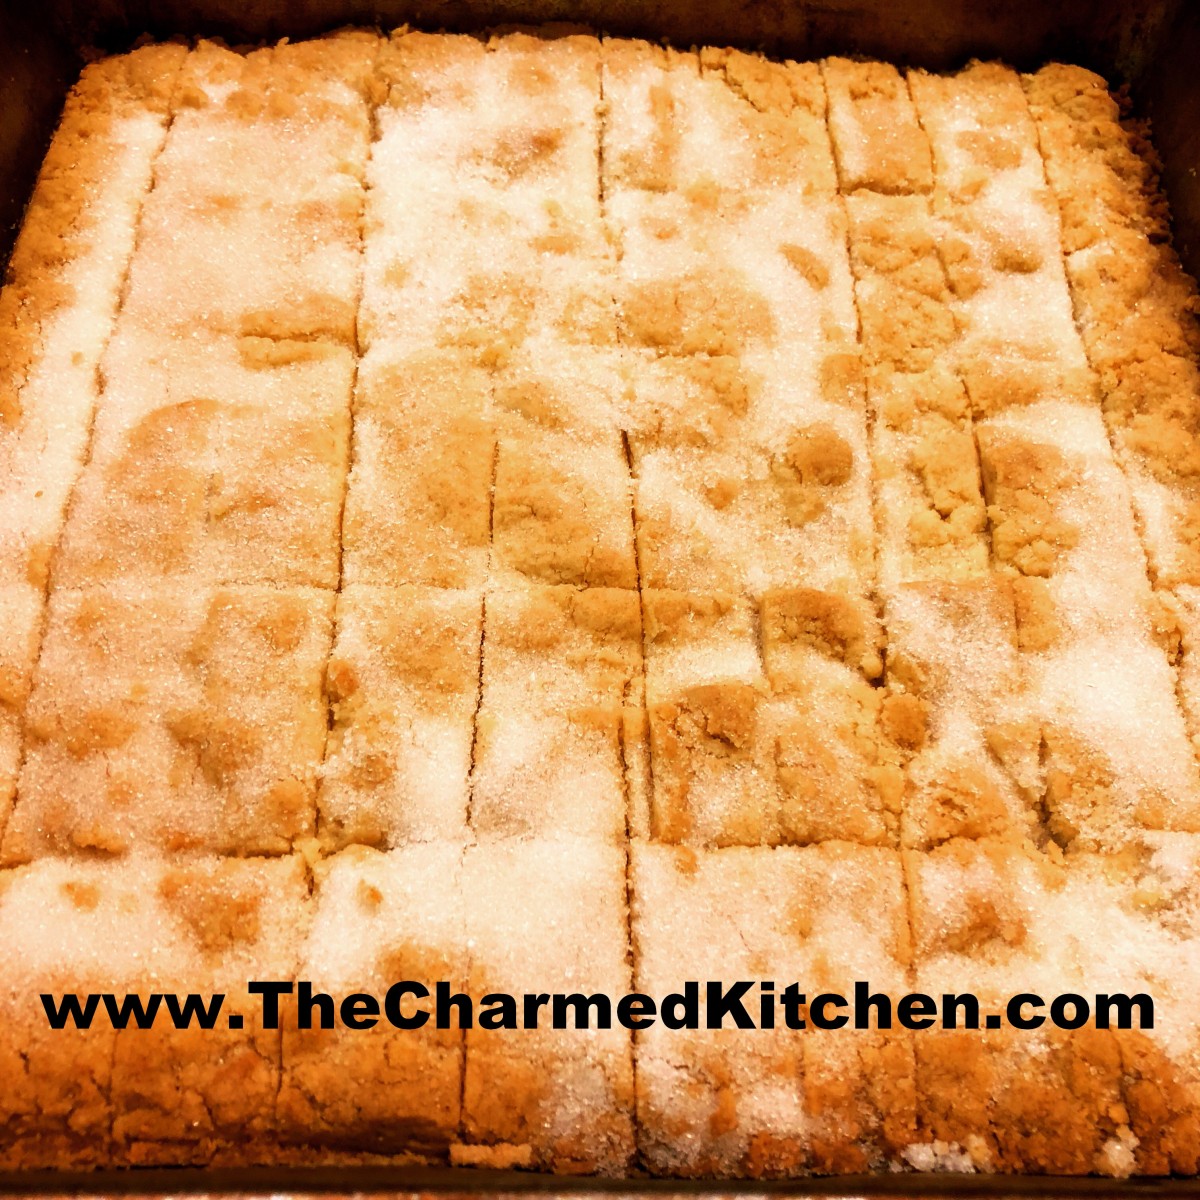
Right out of the oven
Mom’s Pierogi

Mom’s Pierogi
My mother taught me how to make pierogi, the way her mother taught her. They are part of my family’s food traditions.
Pierogi, if you didn’t know, are pasta, filled with different fillings, often potato based. They are also sometimes stuffed with prune filling or sauerkraut. Today you can find pierogi filled with all sorts of fillings.
Filled with potato and cheese, they make a great meat-free meal, too. We often had pierogi on Fridays in Lent when I was a kid.
There are variations in the dough, too. Some use just eggs, flour, water and salt. Others add some dairy, in the form of milk or sour cream.
Once the pierogi are made, you can boil them and just serve them up, or brown the boiled pierogi in butter and serve with caramelized onions and sour cream. My mother used to make sweet and sour cabbage and serve it with the pierogi, or sometimes even use it as a filling. I can’t make them without remembering her.
Pierogi
Dough:
2 c. flour
1 t. salt
½ c. water (you can also use half milk and half water)
1 egg
Mix all ingredients together and knead on floured surface until smooth. Cover and let rest at least 15 minutes. Roll out thin and cut into circles. Re-roll scraps. You should get between 20-30. Spoon filling of your choice on center of dough circle. Fold dough in half over filling and press edge with fork to seal. Wetting the edge of the dough will help the dough to stick. Don’t overfill or the pierogi will split. Test a couple first to get the hang of it. Place a few at a time into salted boiling water and cook until they float. You can eat them as is or brown cooked pierogi in butter in a skillet. Serve with grilled onions and/or sour cream. We would often make a larger batch and then freeze them, uncooked on wax paper-lined baking sheets. When frozen they would be transferred to a freezer bag or container. Place right from the freezer into boiling water when ready to use.
Potato filling:
2 lbs. Potatoes, peeled and boiled
½ onion, minced
2-3 T. cottage cheese or farmer’s cheese, optional
salt and pepper to taste
Mash potatoes with other ingredients and season to taste.
Note: you can also add cheddar cheese if you like. In class we had some with cheddar cheese and added ham, too.

Fresh made pierogi


