Secret Ingredient Butter Cookies

Secret Ingredient Butter Cookies
If you are looking for a truly tender cookie, this may be it. These cookies are so delicate, they just melt in your mouth!! We made them in class the other night, and everyone loved them.
The secret ingredient might surprise you. It is oil. Yes, I know I said butter cookies – they also contain butter. But the combination of oil and butter makes them soft and delicate, even days after baking.
They also contain both granulated and powdered sugar. Not your typical cookie recipe, for sure. This just may be my “go to” butter cookie recipe from now on.
I found a sheet of paper with the ingredients written on it. No directions, just ingredients listed and a notation about cooking time and oven temperature. I wish I knew where I got the recipe. I would certainly give the source credit. I did increase the amount of vanilla a little. You don’t have to chill the dough and they roll very easily, without sticking to your fingers. You could chill the dough, but let it warm up a little before rolling. The dough can also be made ahead and frozen- I tested it.
I dipped the tops of the raw cookies in sprinkles, then baked them. You could leave them plain, then roll in powder sugar, once baked and cooled, or drizzle with melted chocolate.
Soft Butter Cookies
1 c. butter
1 c. oil, I used avocado oil
1 c. sugar
1 c. powdered sugar
2 eggs
1 T. vanilla
1 t. baking soda
1 t. cream of tartar
½ t. salt
4 ½ c. flour
In mixing bowl, beat together butter, oil, sugars and vanilla. Once well blended, beat in eggs. Stir in the baking soda, cream of tartar and salt, then add the flour, mixing until well combined. Heat oven to 350 degrees. Roll dough into one inch balls and press tops of cookies in sprinkles or colored sugar, if desired. Place one inch apart on ungreased baking sheets. Bake for 12 minutes, or until light golden on bottom. Leave cookies on baking sheets 3 minutes before placing on cooling rack. Makes about 6 dozen cookies.
Bacon, Corn and Shrimp Chowder

Bacon, Corn and Shrimp Chowder
I love the combination of shrimp and bacon. When I was looking for a quick dinner the other night, I knew I would be using them together. It was a really cold night so I decided to go with a chowder.
I rooted around my fridge and pantry for the rest of the ingredients and ended up with a very satisfying dinner. Even better because a friend was able to come over and share it with me.
Some of my favorite dinners have happened by accident. Just looking at what I have on hand, and creating something tasty with it.
Bacon, Corn and Shrimp Chowder
6 thick slices bacon, cut into 1-inch pieces
1 onion, sliced
2 carrots, peeled and sliced
2 medium potatoes, peeled and cubed
1½ c. chicken stock
1 can cream corn*
½ c. corn- fresh or frozen
1½ c. half and half
½ c. chopped fresh parsley
12 oz. raw shrimp, peeled and deveined
Salt and fresh ground pepper to taste
Dash of hot sauce
In soup pot, cook bacon until almost done. Add onion and continue cooking until onion is cooked. Spoon out most of the bacon fat. Add the carrots, potatoes and stock and simmer, covered, until the veggies are tender. Add cream corn, corn and half and half and bring up to a simmer. Add parsley and simmer, covered, 10 minutes. Add shrimp and cook another 5 minutes or until shrimp is just cooked. Adjust seasonings and serve. Serves 3-4.
*I decided to use a can of cream corn as the base. When I was a kid my Mother would make me something she called cream corn soup. She rarely used prepackaged foods and made wonderful homemade soups all the time. I think it was on one of those days when she was just really busy. To make her cream corn soup she would empty the can of corn into a saucepan. Then she filled the can with milk and added that, too. A little salt and pepper and the soup was done. Just before serving she’d put a small pat of butter in the soup. As a kid I just loved it. I must admit I don’t eat cream corn soup anymore, but as a base the cream corn can really make a nice chowder.
Holiday Craft Show

I will a part of this wonderful show tomorrow. I will have jams and jellies for sale, along with seasoning packets, books, doughnuts and more. Hope to see you there.
Sugared Nuts
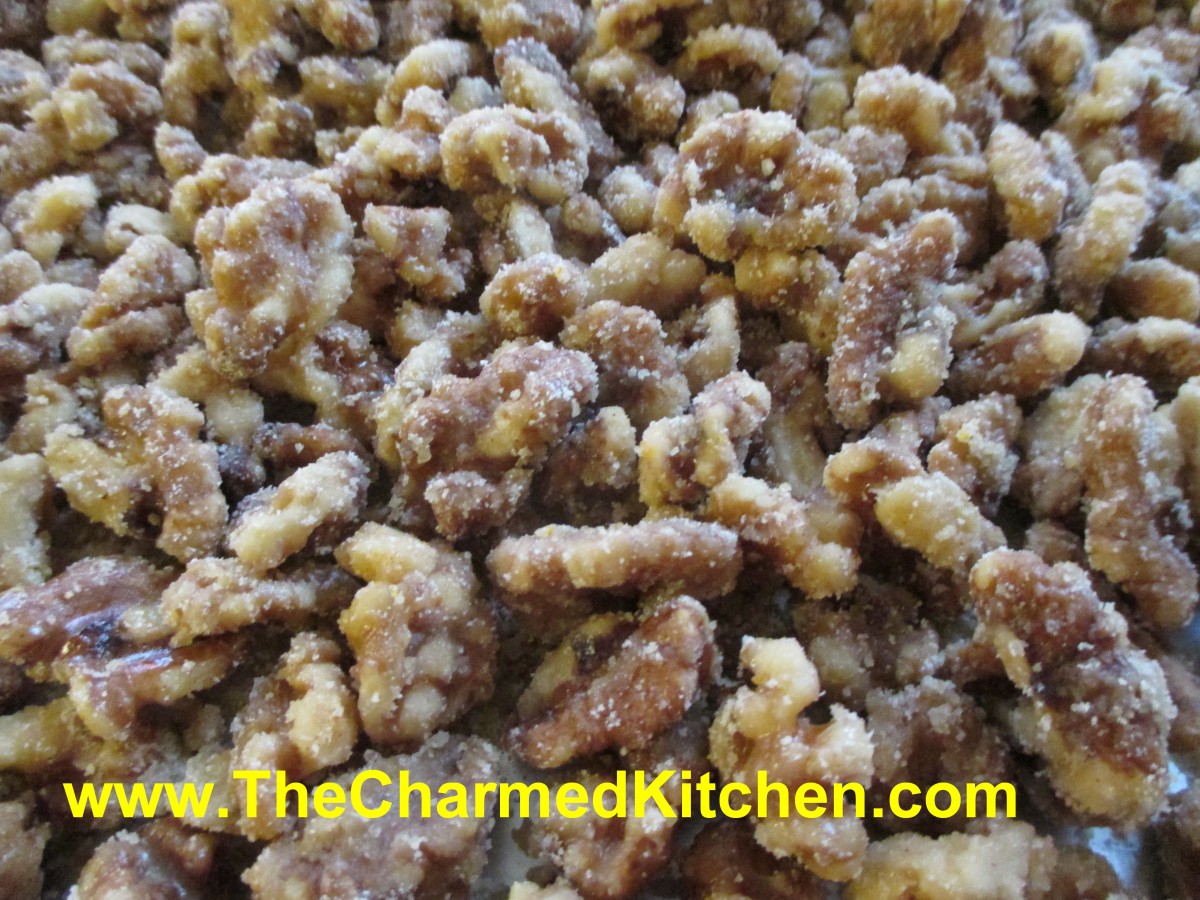
Sugared Nuts
If you are looking for a quick, homemade food gift, make these nuts!!!! Or forget the gift giving- just make a batch for yourself.
Many years ago, my sister Cindy gave me the recipe for making these nuts. I make at least a few batches every year.
I will admit to tweaking the recipe a little over time, but the basics are still the same. Nuts are placed in a heavy skillet with sugar, water and seasonings. The mixture is then brought to a boil and cooked until most of the liquid cooks off.
This takes about 10 minutes, give or take. You dump the nuts onto a cookie sheet, and start stirring immediately. If you don’t stir them, they will stick together.
This is where the magic happens. The nuts look wet when you pour them out and start stirring, but in a few minutes, they cool and dry, and the sugar crystallizes on the nuts.
Once cooled, the nuts are crunchy and sweet and very tasty. You can use them as a snack, or in all sorts of recipes. This is a really fast confection to make, and is a nice gift, too.
Sugared Nuts
4-5 c. nuts, I like walnuts or pecans
2 c. sugar
1 c. water
1 t. cinnamon
1 t. orange peel
1 t. salt, optional
Place all ingredients in heavy skillet and cook over medium heat, stirring often, until all the water disappears. Whatever liquid in the pan will be clinging to the nuts and syrupy. Dump nuts onto a large cookie sheet and break apart with a wooden spoon to prevent clumping. As nuts cool, stir once or twice to remove any remaining clumps, and to cool faster. Nuts will lose their glossy appearance and attain a sugary crust. If it looks like nut soup, you didn’t cook them long enough, and you must return all to the skillet and cook longer. As the nuts start to get drier during cooking, you can turn down the heat a little to prevent burning. Once you’ve made a few batches, though, you will get good at judging when to stop cooking. You can also make a spicy version by adding a teaspoon of cayenne pepper along with the other ingredients. Store in cool, dry place to keep nuts fresh longer.
The Fine Art of Biscuits
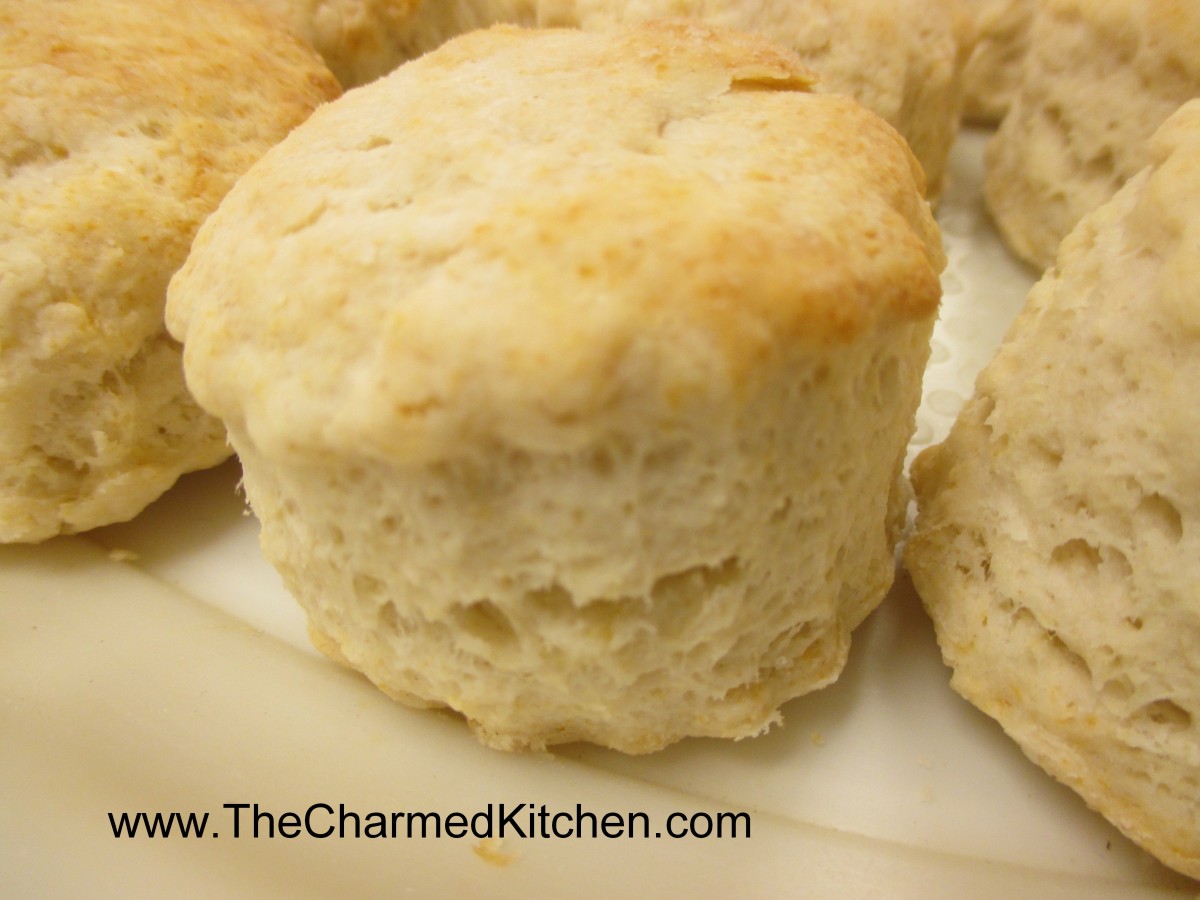
Biscuits Supreme
Biscuits are easy to make. They really are. Fast, too. You can mix up a batch of biscuits in the time it takes the oven to preheat. Yet, I know people who seem to struggle with them. The other night, a friend and I were talking about the secret to a light and flaky biscuit.
So what goes wrong? How do you make light, flaky biscuits every time?
For the moment I’ll assume you have a decent recipe. There are a lot of great biscuit recipes out there. I know people that have treasured family recipes. Biscuits that have been made the same way for generations.
Assuming also, that the baking powder is fresh*, there has to be some other reason that some folks just seem to struggle with biscuits.
The problem is, more than likely, over-mixing the dough. When I talk to someone who tells me that their biscuits are always heavy or tough, I first ask about how they are put together.
Once the dry ingredients have been mixed and the fat cut in, there is just liquid to be added. I prefer to chill whatever fat I am using.
At this point the dough should be handled just enough to hold together. A light hand means a light biscuit. The same is true for making scones. The more you knead the dough, handle the dough and roll the dough, the less flaky biscuits become.
Don’t treat biscuit dough the way you would a yeast-based dinner roll. The two are very different in how they are handled. Yeast-based doughs benefit from kneading and “working” the dough. Biscuits are the opposite.
Even when cutting out the biscuits, it will help if you cut them out as close together as you can. That way you have fewer scraps to re-roll. Every time you roll the dough out- it becomes a little tougher.
Here is a recipe for one of my favorite biscuits. They are light and very flaky. Is there anything better than a fresh, warm biscuit with some butter?
Biscuits Supreme
2 c. flour
4 t. baking powder
2 t. sugar
½ t. cream of tartar
½ t. salt
½ c. cold butter, shortening or coconut oil – you can even use lard
2/3 c. milk
Stir together dry ingredients and cut in butter to resemble coarse crumbs. Make a well in the center and add milk all at once. Stir until dough sticks together and knead on lightly floured surface 10-12 strokes. Roll or pat to ½ inch thickness. Cut with 2-21/2 inch biscuit cutter and place on ungreased baking sheet. Bake in 450-degree oven for 10-12 minutes. Serve warm. Makes 10-12.
*If your baking powder might be old, you can test it. Place a couple of tablespoons of boiling water in a cup. Add a teaspoon, or two, of baking powder. The mixture should bubble vigorously. If there are no bubbles, or very few bubbles, you might want to get a new container of baking powder.
Homemade Mustard Recipes
Homemade Bavarian Mustard
I love making food gifts for the holidays. I often make cookies or other baked goods. But not everyone wants sweets. For those friends and family, I often make them homemade mustard. I have included recipes for 4 of my favorite mustards.
I wasn’t a big fan of mustard, when I was a kid. I am now. I enjoy using all types of mustard in all sorts of dishes, not just on hot dogs.
Mustard is great on sandwiches and sausages. It is a versatile ingredient for salads, salad dressings, marinades and all sorts of sauces. I lean towards spicy brown mustard myself.
I also enjoy making my own mustard. That way, I can tweak the seasonings.
So here are four of my favorite homemade mustard recipes. If you never made mustard before- you might want to try. It is easy, and fun. All of them are stored in the fridge- and will keep for months. For gift-giving, look for decorative jars or cracks to put them in.
Horseradish Mustard
1 c. dry mustard
3/4 c. white wine vinegar
1/3 c. dry white wine or dry sherry
1/4 c. brown sugar
1/4 c. granulated sugar
1 T. dried minced onion
2 t. caraway seeds
1 1/2 t. salt
1/4 t. coarse ground mustard
2 eggs, slightly beaten
1 T. prepared horseradish
Combine all ingredients, except eggs and horseradish in top of double boiler and let stand at room temperature for 2 hours. Whisk in eggs and cook over simmering water until mixture has thickened and eggs are cooked, about 10 minutes. Remove from heat and stir in horseradish. Pour into sterilized jar, cool and cover. Store in fridge for up to 3 months. Makes 2 cups.
Bavarian Mustard
3/4 c. beer
2/3 c. dry mustard
2 T. sugar
2 T. cider vinegar
2 t. salt
1-t. celery seeds
1/2 t. fresh grated ginger or 1/4 t. dry
1 egg, beaten
Combine all but the egg in the top of a double boiler and let stand 2 hours at room temperature. Stir in egg and cook over simmering water. stirring constantly until mixture thickens and egg is cooked, about 10 minutes. Pour into sterilized jars and cool before covering. Store in fridge for up to 2 months. Makes 2 cups.
Spicy Mustard
1 c. dry mustard
2/3 c. dry white wine
1/2 c. vinegar, flavored with herbs or garlic
1/2 c. sugar
2 t. salt
1 t. basil
1 t. chili powder
1 t. dried minced garlic
1 t. oregano
1/2 t. cracked pepper
2 eggs, slightly beaten
Mix all ingredients, except eggs, in top of double boiler and let stand 2 hours at room temperature. Add eggs and cook over simmering water, stirring constantly until mixture thickens and eggs are cooked, about 10 minutes. Pour into sterilized jars and cool down before covering and refrigerating. Keeps in fridge for up to 2-3 months. Makes 2 cups.
French Herb Mustard
1/4 c. dry mustard
1/4 c. white wine vinegar
1/4 c. white wine or dry sherry
1/4 c. brown sugar
1/2 t. salt
1/2 t. tarragon
1/4 t. dill seed
1/4 t. celery seed
1/4 t. ground cloves
3 egg yolks or 1 whole egg
Combine all ingredients, except eggs, in top of double boiler and let stand at room temperature 2 hours. Whisk in eggs and cook over simmering water, stirring constantly, until mustard thickens and eggs are cooked, about 5 minutes. Store in crock or jar in fridge for up to 1 month. Makes 1 cup, recipe can be doubled.
My Favorite Cashew Brittle
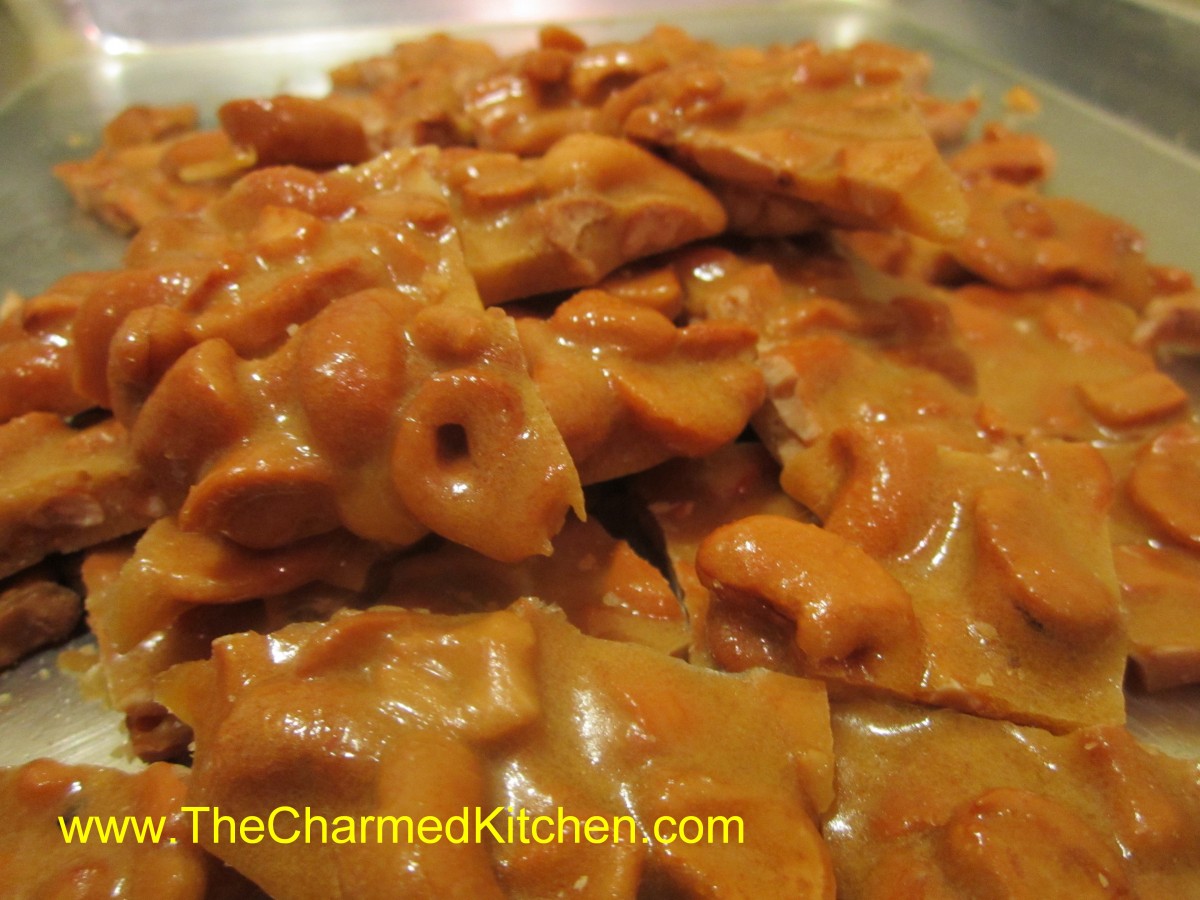
Homemade Cashew Brittle
If you need a great food gift- perhaps something to bring to a holiday party- this brittle might just be the answer. This is also a wonderful option when you just don’t have a lot of time. It is fast and easy to make.
I was given this recipe at a craft show a few years ago. The brittle is cooked in the microwave. No special thermometers or equipment required. Just a glass bowl and a few minutes of your time. It could not be simpler. It is really good, too.
You can use other nuts, if you prefer, or peanuts. You can add a little cayenne pepper, if you want a spicy version. You can also dress it up with a drizzle of chocolate, once cooled. So many ways to enjoy it.
Stored in a covered container, in a cool, dry place, the brittle will stay crunchy for weeks.
Homemade Cashew Brittle
2 c. cashews*
1 c. sugar
1/2 c. corn syrup
1/8 t. salt
1 t. butter
1 t. vanilla
1 t. baking soda
Butter or oil a large baking sheet and set aside. In a 3-4 quart glass bowl combine the nuts, sugar, corn syrup and salt. Microwave on high for 3 minutes. Remove from microwave, stir well and return to microwave. Cook 3 more minutes in microwave. Remove and stir in butter and vanilla, stirring until butter has melted. Return to microwave and cook for 2 more minutes. Remove from microwave and stir in baking soda. Stir until well blended and pour mixture onto prepared baking sheet. Spread out quickly, then allow to cool. Once cool, break into pieces. Store in a cool, dry place. I normally store it in a tin or plastic container with a tight-fitting lid.
* I used salted cashews but feel free to experiment with other nuts
Note: Use high power setting on microwave.
Cinnamon Shortbread Cookies- Gluten Free

Gluten Free Cinnamon Shortbread
These shortbread cookies are a favorite of mine. They have a nice crunchy texture and a wonderful cinnamon flavor. They are also gluten-free, so everyone in my family can enjoy them. Just in time for holiday baking.
If you, or someone you love, can’t have gluten, the options are getting better. Even a few years ago, it was hard to find decent gluten-free baked goods. Now they seem to be everywhere.
Gluten-free home baking has gotten easier too. Rather than mixing up numerous ingredients, you can buy a bag of gluten-free flour, ready to bake with.
There are some differences. I find things made with gluten-free flour brown faster. I often bake at a slightly lower temp, or for a shorter time. This recipe has already been adjusted for that.
Last night I made a shortbread-type cookie and was really pleased with the results. Not because these cookies are OK, but because these cookies are GREAT. I would make them again in a minute. Super crisp and not too sweet, they were also very easy to make. Gluten-free flour is getting easier to find, too.
Cinnamon Shortbread Cookies- Gluten Free
1/2 c. butter, softened
1/2 c. sugar
1 t. vanilla
pinch of salt
1 c. gluten-free flour
2 t. cinnamon
extra sugar for topping the cookies
Preheat oven to 325 degrees. In mixing bowl cream together the butter and sugar until smooth. Stir in the vanilla and salt. Stir in the flour and then stir in the cinnamon. Roll dough into 1-inch balls and place on an ungreased baking sheet. Flatten the cookies out by dipping the bottom of a glass in some sugar and pressing down on the dough. To help the sugar to stick to the bottom of the glass rub a tiny bit of butter on the bottom of the glass. I used the paper the butter was wrapped in. After you dip the glass the first time the sugar will stick to it. Bake cookies for 12-15 minutes- or until golden around the edges. Cool on wire rack. Makes 30.
Cranberry Juice and Cranberry Roll-ups
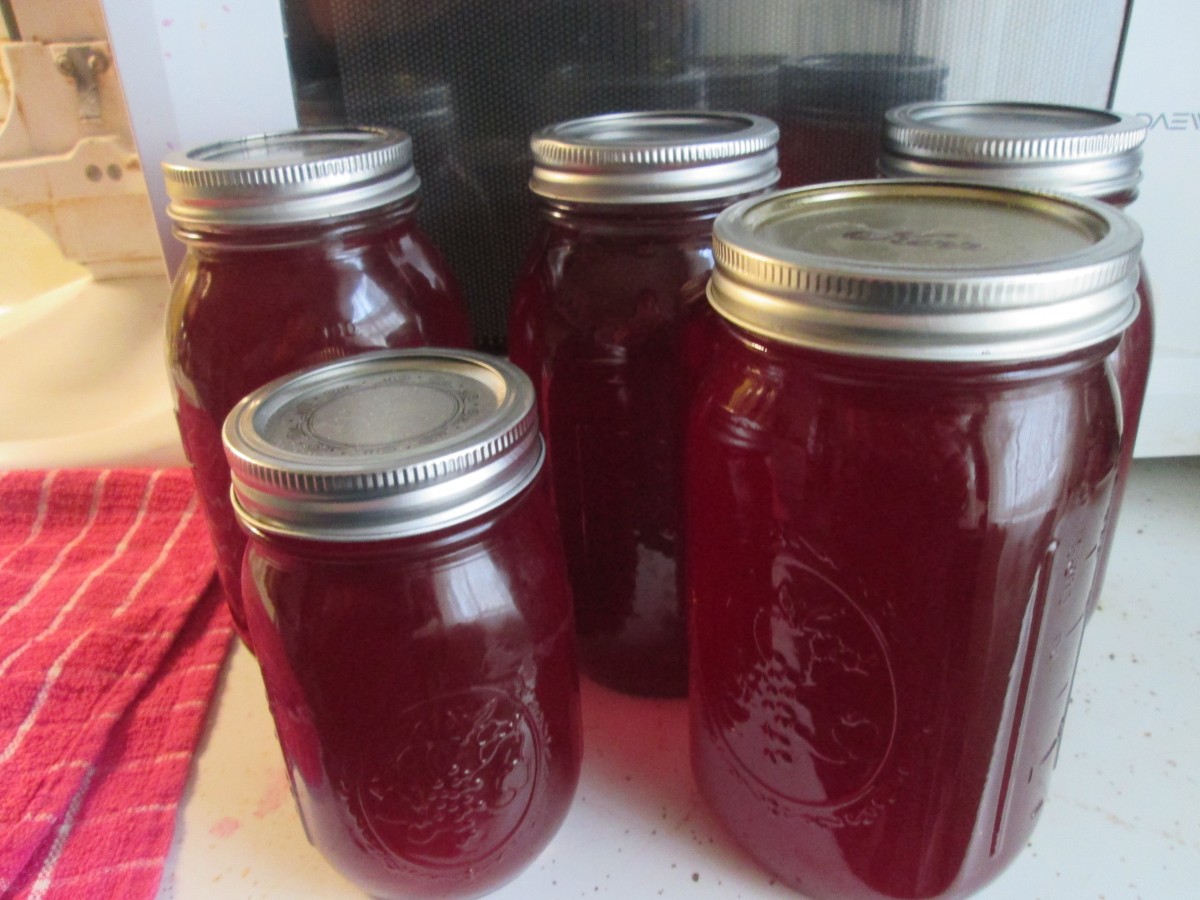
Cranberry Juice
I bought quite a few bags of cranberries right before Thanksgiving. I popped a few in the freezer to enjoy later. I also wanted to preserve some of them in a couple of other ways. I decided to can cranberry juice. I used the leftover pulp (after I strained the juice) for cranberry fruit roll ups.
The juice came out great. Nothing like store-bought. It was really easy, too.
I started with 5 (12oz.) bags of cranberries. I measured them out and added the same amount of water- each bag was just under 4 cups of berries so I added 3 1/2 cups of water for each bag. I brought this mixture to a boil and let it cook until the berries starting popping. I strained the juice twice. First time through a fine strainer and second time through a strainer lined with cheesecloth. Set the pulp aside for now.
I returned the juice to the pot and brought it up barely to a simmer. To sweeten it, I added 6 oz. of frozen apple juice concentrate and less than a cup of sugar. Once the juice was up to a simmer, I let it cook 5 minutes and then ladled it into clean, hot quart canning jars. I filled them to about 1/4 inch from the top, wiped the rims and closed the jars. I also used the last of it to fill a pint jar. Processed in a boiling water bath for 15 minutes. Ended up with 4 quarts and 1 pint for my efforts.
After making cranberry juice I was left with a lot of pulp. I didn’t want to toss it, so I decided to make cranberry fruit roll ups with it. I ran the pulp through the coarse blade of my food mill. I then sweetened just a little- less than a cup of sugar. I spread the mixture on plastic wrap placed on the trays of my dehydrator. I ended up with 7 in the end. I dried them at 120 degrees for 6 hours. They should be pliable but not sticky to the touch when done. A friend stopped over today and got a chance to taste them. He said he liked that the roll ups were not too sweet- they had a nice tartness to them. Once finished, I rolled them up in the plastic wrap and will store them in the fridge. Honestly, they aren’t going to be around long.
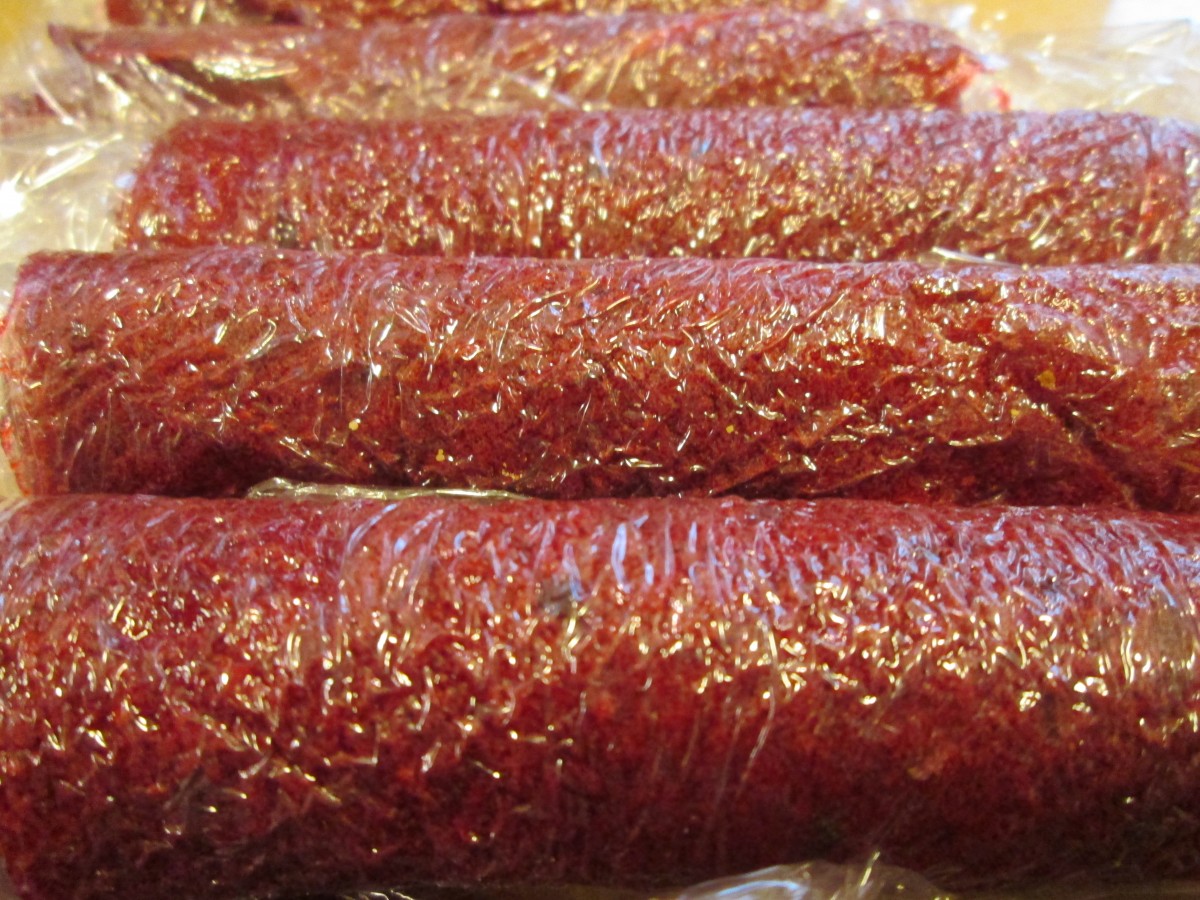
Cranberry Roll-ups- wrapped in plastic wrap
Cranberry Rosemary Vinegar
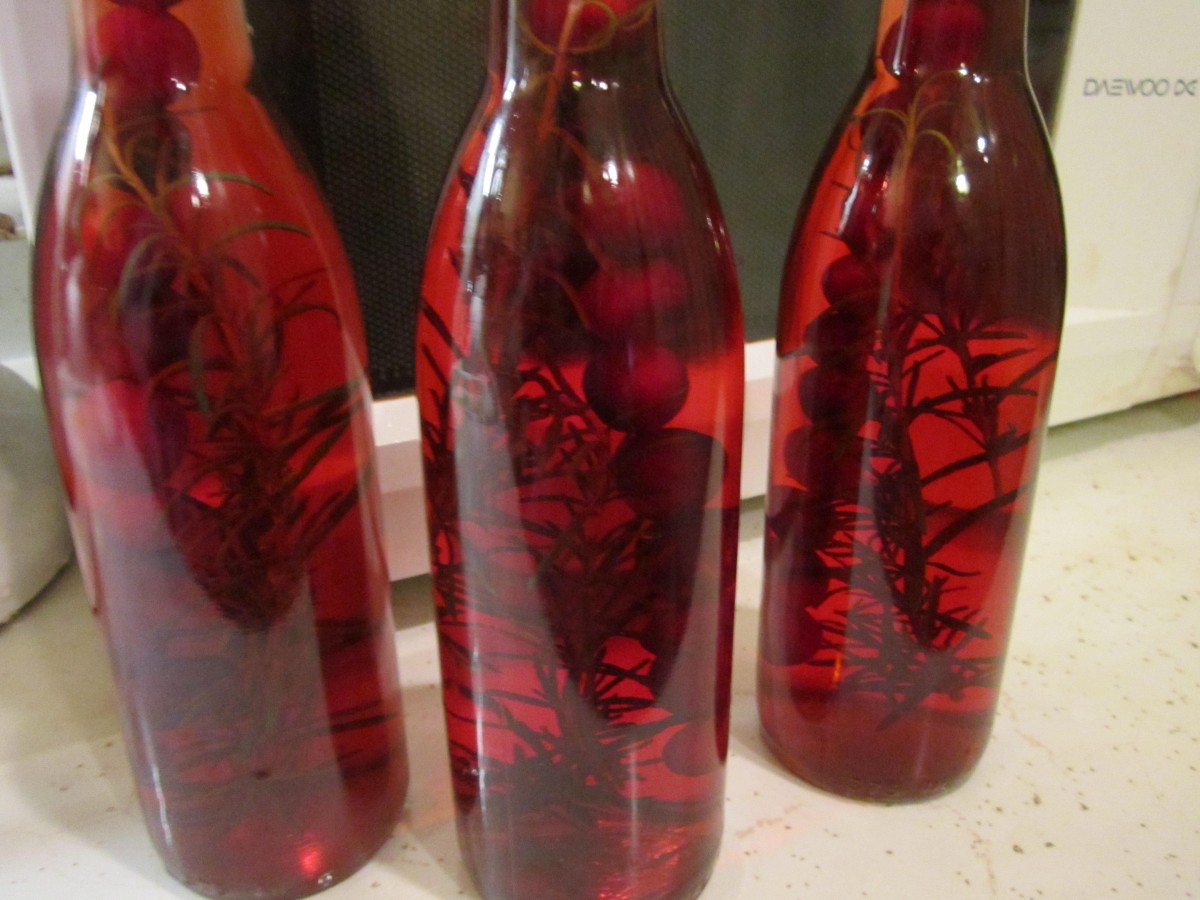
Cranberry-Rosemary Vinegar
This is a favorite food gift of mine. It is so festive and it tastes good, too.
I happen to love cranberries. I buy a lot of them this time of year. They are in season, so the price is good. I buy extra, and throw a few bags in the freezer to enjoy all year long
I make all sorts of baked goods with them, the cranberry sauce we have with Thanksgiving dinner and a liqueur made with cranberries and vodka. Cranberries make wonderful relish and jam and add a great tartness to baked goods. I even preserve some by making, and canning, my own cranberry juice.
I also preserve some by using cranberries to flavor vinegar. By adding rosemary, the end result is a great tasting vinegar that is perfect for winter salads. It is also a lovely gift.
I love to give homemade gifts. Time isn’t always on my side, though. I doubt my niece will be getting that scarf I was going to crochet for her. But I can get several bottles of this vinegar made in no time.
All you need are bottles with corks or screw top lids. If using corks, be sure they are food grade. You’ll also need cranberries, bamboo skewers, fresh rosemary and vinegar- 5% acidity. I use red wine vinegar. Other vinegar will work, too. If you use white vinegar or cider vinegar they will pick up color from the berries and turn a pretty reddish shade. Not as red as with the wine vinegar, but still very pretty.
Since I bring my rosemary plants inside for the winter, I have access to fresh rosemary. Your local grocery store probably has some in the produce department. You can use other herbs, if you can’t find rosemary.
Make sure the skewers will fit in the bottles. Cut them down to fit, if needed. Skewer the berries on the skewers leaving a little room on the top of the skewer. If your cranberries are really big, test to make sure they will fit the neck of the bottle. The skewers keep the berries from floating around.
Place a few sprigs of rosemary in each bottle and then add the berry- filled skewers. Pour in the vinegar, leaving a little room for the cork. Sometimes you need to add a little more vinegar the next day as some will absorb into the cranberries and the skewers. I make decorative labels and give them as gifts. Ready to use in a week.


