Blueberry Galette

Blueberry Galette
I made this galette for dessert last night. It was very well received. I served it plain, but it could be served topped with ice cream or whipped cream, if you like.
A galette is a cross between a pie and a tart. Rather than placing the crust in a pie pan, the crust is rolled out and the fruit is placed in the middle. The edges of the crust are folded over the fruit, leaving them exposed in the middle. Galettes have a rustic charm.
I had homemade blueberry pie filling, but you could use store bought, if you prefer.
The ingredients are pretty simple, pie crust and pie filling. You’ll need enough pie crust dough for one pie and one cup of blueberry pie filling per galette. After I folded over the edges, I brushed them with a little milk and sprinkled the edges with sugar, to help the crust brown nicely.
Blueberry Galette
Crust for one pie- recipe follows
1 cup blueberry pie filling
milk
2-3 T. sugar
Roll out crust like you would for a pie, about a 10 or 12 inch circle. Place crust on a baking sheet. Spoon filling into the middle of the crust. Fold edges of the crust over the fruit filling, leaving about a three inch circle exposed in the middle. Brush crust with milk and sprinkle with the sugar. Bake in a preheated 375 degree oven for 30 minutes, or until crust is golden brown. Remove to a rack to cool. Serves 4-6.

Blueberry Galette ready to serve
Here is the recipe I used for the crust. It would make enough for about 3-4 galettes. I was making tarts for another dinner, so I used some of the crust to make the galette. I use this dough for kolachy, too.
Eva’s Kolachy Dough
3 c. flour
1 t. baking powder
½ t. salt
1 c. butter
3 eggs
2 pkts. Yeast
½ c. warm milk
In mixing bowl, combine flour with baking powder and salt. Cut butter into flour until mixture looks like coarse crumbs. Set aside. Place eggs in a small bowl and beat until smooth. In small bowl, dissolve yeast in warm milk. Add to egg mixture and stir to combine. Add egg mixture to flour mixture and stir until combined. If mixture is sticky add a small amount of flour. Roll dough out on floured board. Thinner the better, as this dough will puff some when baked. Unlike a traditional pie crust dough, this one does not need to be chilled. It is also very easy to roll out.
Rhubarb Glazed Chicken

Rhubarb Glazed Chicken
It is rhubarb season around here. Rhubarb is turning up at local farm markets and even in some grocery stores.
Like a lot of people, when I think of rhubarb, I first think of dessert, like pie or cobbler. But rhubarb’s tangy, tart flavor, lends itself to lots of savory uses.
I had some rhubarb and could not decide what to do with it. I chopped it up, and cooked it in a little water until tender. I ended up with 2 cups of cooked rhubarb.
I used this as the base for the glaze. I added the other ingredients, cooked it down until it was thick, and ended up with about 2 cups of sauce. It had a nice balance of sweet, tart and heat.
I used some of it as a glaze for chicken I was cooking. I froze the rest. It would also be good on other meats or even on grilled veggies.
Rhubarb Glazed Chicken
8 chicken thighs or 1 whole chicken, cut up
1 cup rhubarb glaze (recipe follows)
salt and pepper to taste
Place chicken pieces in roasting pan, season to taste and bake in a preheated 375 degree oven for 30 minutes. Remove from oven and drain any fat out of the pan. Pour over the rhubarb glaze and return chicken to oven for an additional 35 minutes. Baste the chicken with some of the glaze in the pan and return to oven for 15 minutes more. Serves 4.
Rhubarb Glaze
2 c. cooked rhubarb
1 c. apple cider vinegar
1/4 c. brown sugar
2 T. honey
2 T. dried minced onion
1 T. hot sauce
1 T. paprika
2 t. minced garlic
1 t. Worcestershire sauce
1 t. cumin
1 t. cinnamon
salt to taste
Place all ingredients in a saucepan and cook over medium heat until thickened. Stir more often as mixture thickens. Cook until sauce has reduced to about 2 cups. Use as a glaze on meats and vegetables. It was great on chicken but would also go well on pork or duck. I could also imagine it on portobello mushrooms. Note: I liked the tang of it but you could make it a little sweeter to suit your own taste. Makes 2 cups. Will keep a few weeks in the fridge or can be frozen.
Herbal Cocktails

Lemon Verbena Gimlet
If you don’t think of using herbs in cocktails, maybe you should. They add a depth of flavor that can take things to a whole new level.
Of course, minty mojitos and mint juleps are classics. Still, there are even more ways you can use herbs in drinks.
I put together three recipes that use herbs in drinks. The classic mojito, a gin cocktail that uses lavender syrup, and a spin on a gimlet, using lemon verbena.
These are great drinks for summer, or any time, really.
Try adding other herbs to your cocktails. You might be surprised at just how tasty they can be.
You can plant a few herbs, too. That way, they will be handy for making drinks.
So here are the recipes. I hope you try them and enjoy them as much as I do.
Classic Mojito
10 mint leaves, I used a variety called Mojito mint, that has a slight lime flavor
½ a lime, cut in 4 wedges
2 T. sugar
1½ oz. rum
1 c. ice cubes
½ c. club soda
In glass place mint leaves and one wedge of lime. Muddle to release juices and bruise mint leaves. Add sugar and 2 more wedges of lime. Muddle until limes are crushed. Add rum, stir well. Add ice, stir and top with club soda. Garnish with lime wedge.
Lemon Lavender Cocktail
2 oz. gin
1 ½ oz. lemon juice
1 ½ oz. lavender syrup (recipe follows)
splash of club soda
some ice
one lemon slice, for garnish
Pour gin, lemon juice and lavender syrup into a glass and stir. Top with club soda, add some ice and garnish with a lemon slice.
For the lavender syrup:
¾ c. water
¾ c. sugar
1 tablespoon dried lavender buds
Combine sugar and water in a small saucepan. Add lavender and cook on low heat until sugar is dissolved. Bring to a boil and cook for 2-3 minutes, just until it starts to thicken a bit. Then set to the side to cool. Strain out the lavender and refrigerate. Yields just under a cup of syrup.
Lemon Verbena Gimlet
1 cup water
¼ c. sugar
¼ c. torn verbena leaves
¾ c. dry gin
¾ c. club soda, chilled
¼ c. fresh lime juice (about 2 limes)
Lemon verbena sprigs (optional)
Lime slices (optional)
Combine 1 cup water and sugar in a small saucepan. Rub torn verbena to bruise; add to pan. Bring sugar mixture to a boil, stirring gently as needed to dissolve sugar evenly; cook 30 seconds. Remove from heat; cool completely. Strain mixture through a sieve over a bowl; discard solids. Combine sugar mixture, gin, soda, and juice. Serve over ice. Garnish with verbena sprigs and lime slices, if desired.
My Mom’s Breaded Chicken

Mom’s Breaded Chicken
With the holiday weekend approaching, I thought I would share this recipe again. It always brings back great memories of childhood picnics/cookouts with my family. I love this recipe and I hope you do, too.
I loved the big family picnics we had when I was a kid. My Dad and I would go early in the morning to pick out our favorite location, and get tables arranged. Then he would start a fire in the grill and make us bacon and eggs in the cast iron skillet. Everyone started arriving soon after that. Well, not everyone. My Mom, and one of my aunts, would always come a little later. That is because they were finishing up the breaded chicken that was always a part of these picnics. She wanted it to be served nice and warm.
It would have been breaded the day before. My mom felt that when you breaded the chicken ahead of time it seemed to help the breading to stick better. I do it the same way today.
This isn’t fried chicken. The breaded chicken is lightly browned in a skillet, then finished off in the oven. It is crispy on the outside and nice and juicy inside. It is also a lovely memory for me of time spent with family. Here are the directions for how she made it.
Mom’s Breaded Chicken
Chicken pieces, I often use a whole bird, cut into pieces, or just thighs and drumsticks.
salt and pepper to taste
flour
Parsley
Paprika
Garlic powder
eggs
Milk
Bread crumbs
oil
Pat chicken pieces dry. Season with salt and pepper. In a bag, combine flour- about ½ c. per 8 pieces of chicken should be about right. Season flour with a little salt and pepper. In bowl combine milk and eggs with the rest of the seasonings, including more salt and pepper. I use 1 egg with enough milk to make a thin batter for every 4-5 pieces of chicken. Keep in mind that the size of the pieces matters. Wings will need less batter than legs. Place bread crumbs in a shallow dish or in a plastic bag. Place a few pieces of chicken in bah with the flour and shake to coat, dipping off the excess. Then dip chicken pieces (1-2 at a time) in egg mixture, turning to moisten completely. Then place in crumbs and turn or shake to coat evenly. Repeat with remaining chicken until all of it is breaded.
At this time you can cover and refrigerate the chicken for several hours or overnight if desired. You can also go ahead and cook it right away. Mom suggests you bread the chicken the night before so it will stick better, but hey, you’re an adult, do what you want.
To cook the chicken, heat ½- inch of oil in a heavy skillet and preheat the oven to 400 degrees. Foil a roasting pan and then place a rack inside. Once the oil is hot, brown the chicken pieces several at a time, turning to brown evenly. Place the browned chicken on the rack in the baking dish and continue to brown remaining chicken. Place chicken in oven and bake until chicken is cooked and juices run clear when chicken is poked. Cooking time will vary depending on the size of the pieces, how much you browned them and how many you are cramming in one pan. Baking time will be about 45 minutes. Check a large piece of chicken, near the middle of the pan to be sure.
This is a real summer favorite and the baking on the rack helps fat to drip off, giving you fried chicken flavor with fewer calories. This chicken can be served hot, warm or cold.
A Dozen Summer Salad Recipes

Pink and Purple Potato Salad
If you are looking for a salad for the holiday weekend – or any time – I think you will find one here that you and your family will enjoy.
Between cookouts and picnics, it seems there is always a need for more salads. Maybe, something you haven’t made before. And of course, a recipe that the family will like.
These are some of my favorite salads. Some are pretty traditional. Others are a little different. I am sure you will find one that is just right for your family and friends.
Purple and Pink Salad
1 lb. purple potatoes
1 lb. red onions
1 c. apple cider vinegar
1/2 c. sugar
1/4 c. water
salt and pepper to taste
1 t. celery seed
1/4 c. oil
Bake potatoes until tender. I used the microwave and it took about 7 minutes, but you can bake in a conventional oven, too. While potatoes are baking, peel, then slice onions thin and place in a saucepan with the rest of the ingredients, except the oil. Bring to a boil, then simmer for about 5-8 minutes until onions are just tender. Some of the liquid will cook off. Peel and cube potatoes and place in a bowl. Drizzle with the oil. Add the onion mixture and stir gently. Adjust seasonings, if needed. Chill. Serves 4.
Curry Cauliflower Salad
1 head cauliflower, cooked
½ c. chopped green onions
¾ c. mayo – or less or more depending in the size of the head of cauliflower
1 T. curry powder- or to taste
1 t. hot sauce, or to taste
Salt and pepper to taste
1 c. peanuts
First break the cauliflower into florets. Cook the cauliflower any way you like. I steamed mine for about 5 minutes. You could roast it, or sauté it in a little oil. You want it tender, but still a little crisp. Don’t cook it to mush. I would also advise against boiling it, as it gets too wet. Once the cauliflower is cooked, let it cool down before proceeding. Combine the cauliflower with the green onions, the mayo and seasonings. It was hard to be exact because your head of cauliflower might be bigger or smaller than mine. I could have said 5 cups of cooked cauliflower- but would that really help? Then you’d have leftover cooked cauliflower. Or perhaps not enough. So add a little more mayo, if needed, and adjust the seasonings to suit your taste and the amount of cauliflower you have. Chill and toss the peanuts in closer to serving time. They are fine, even when in the salad for a while, but the peanuts crunchier when first put in.

Curry Cauliflower Salad
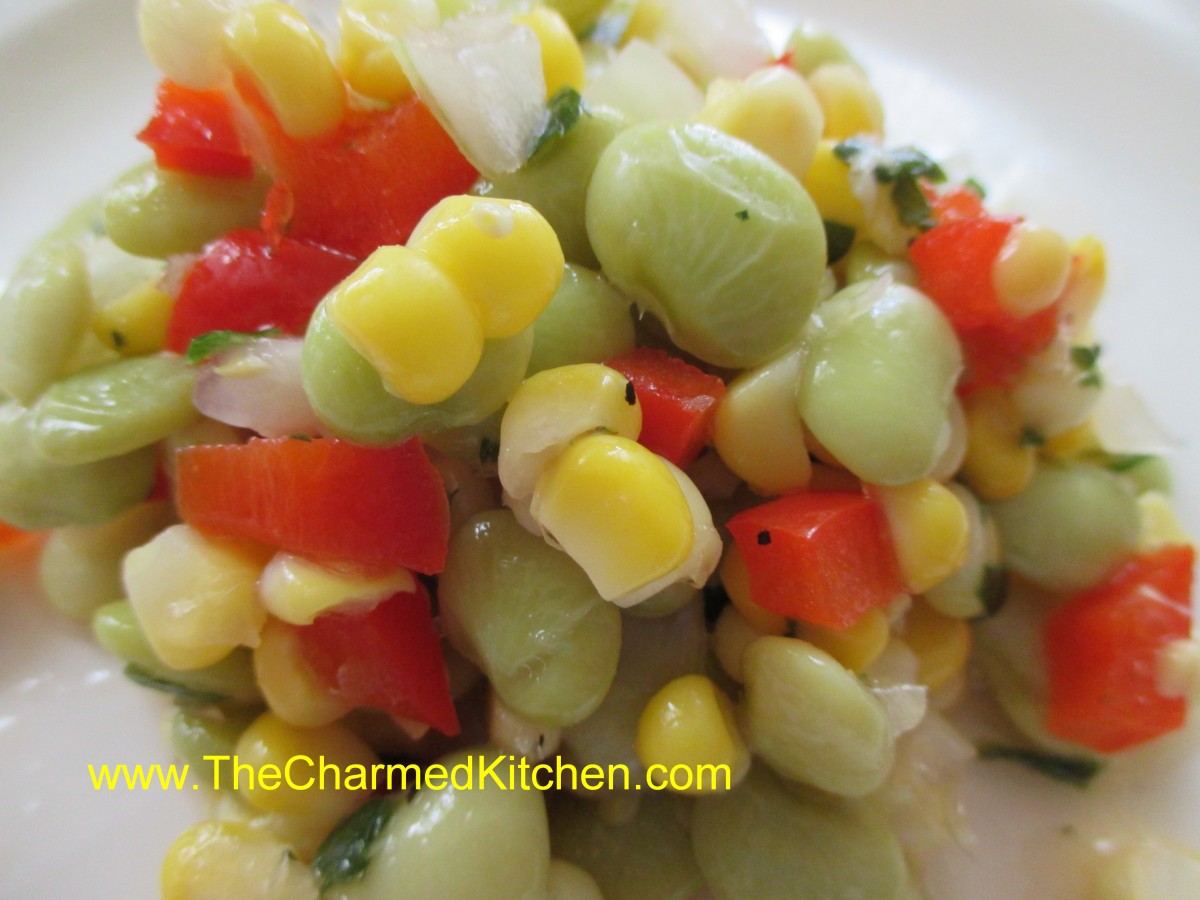
Succotash Salad

Cauliflower and Broccoli Salad
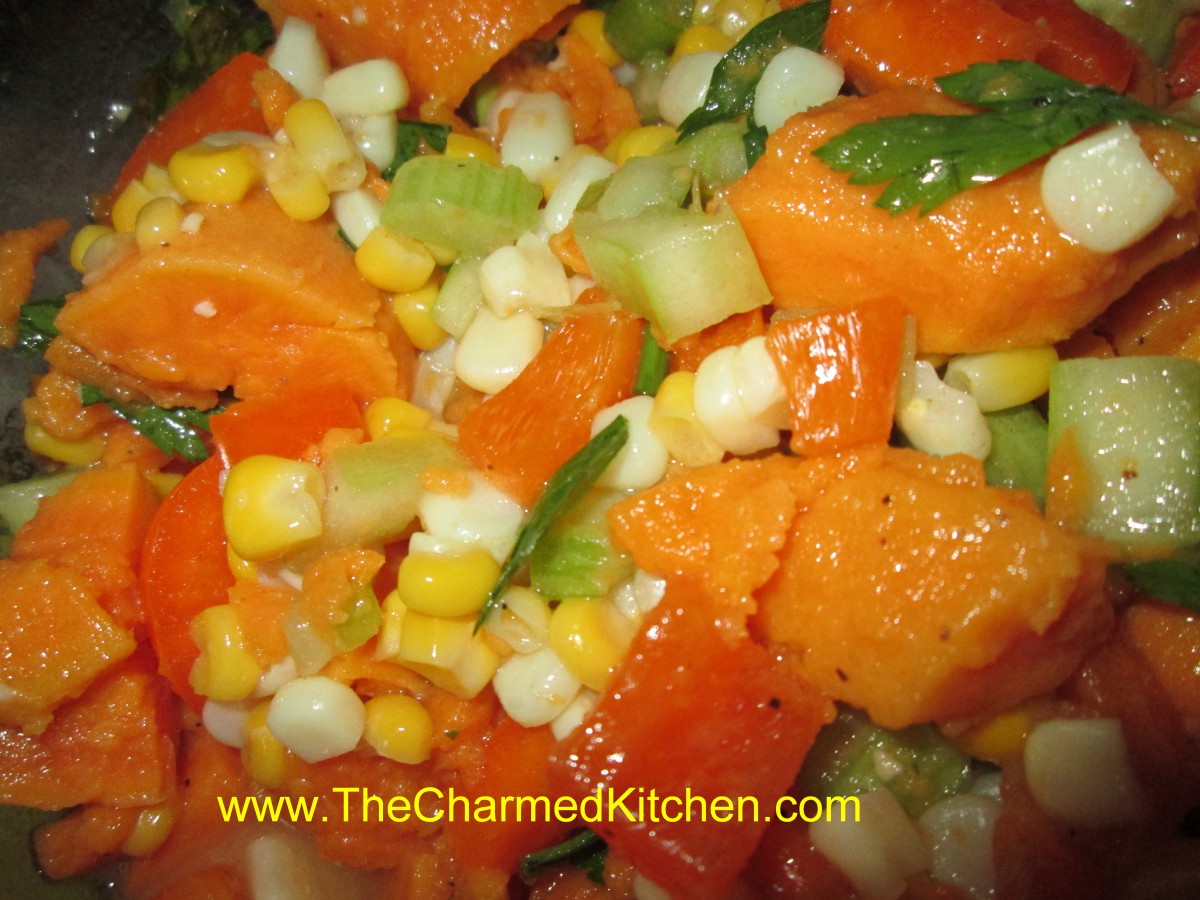
Sweet Potato Salad
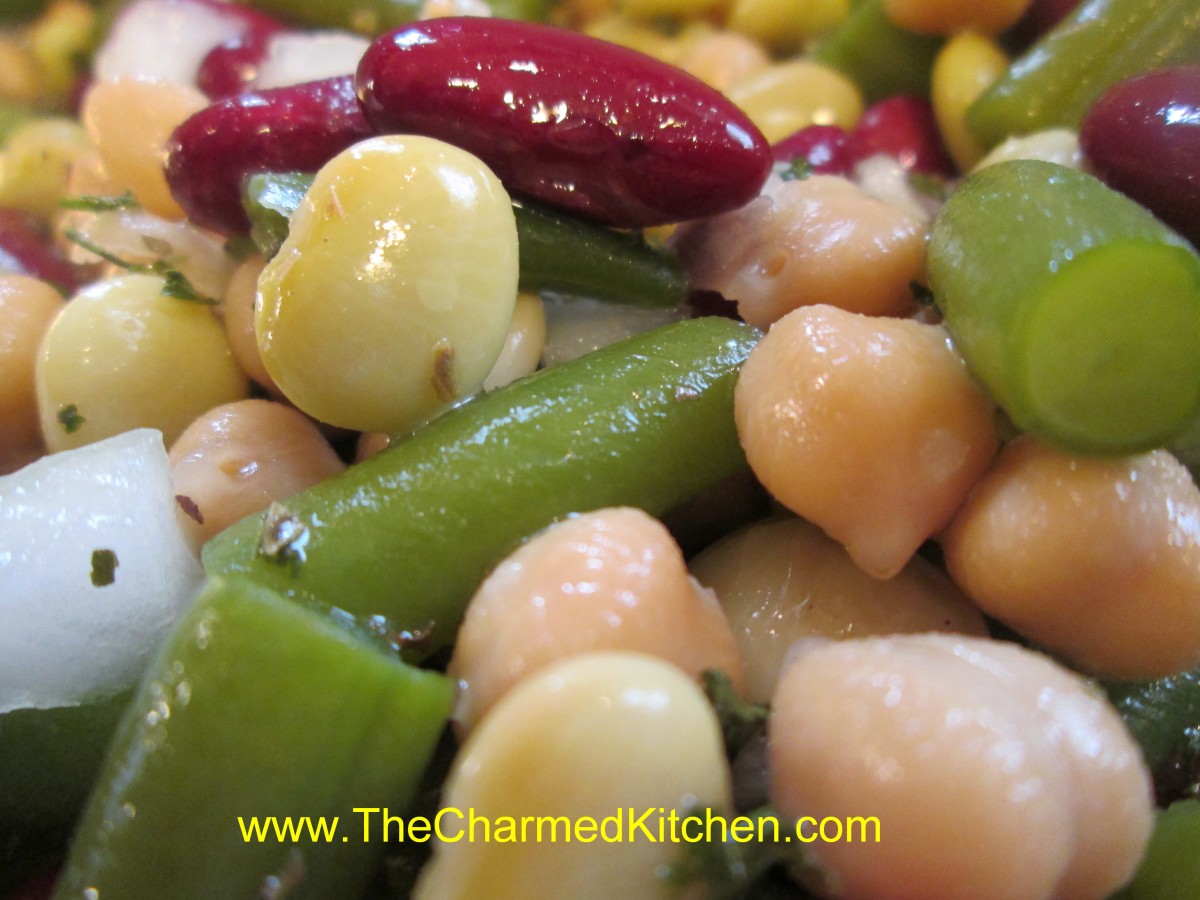
Multi Bean Salad
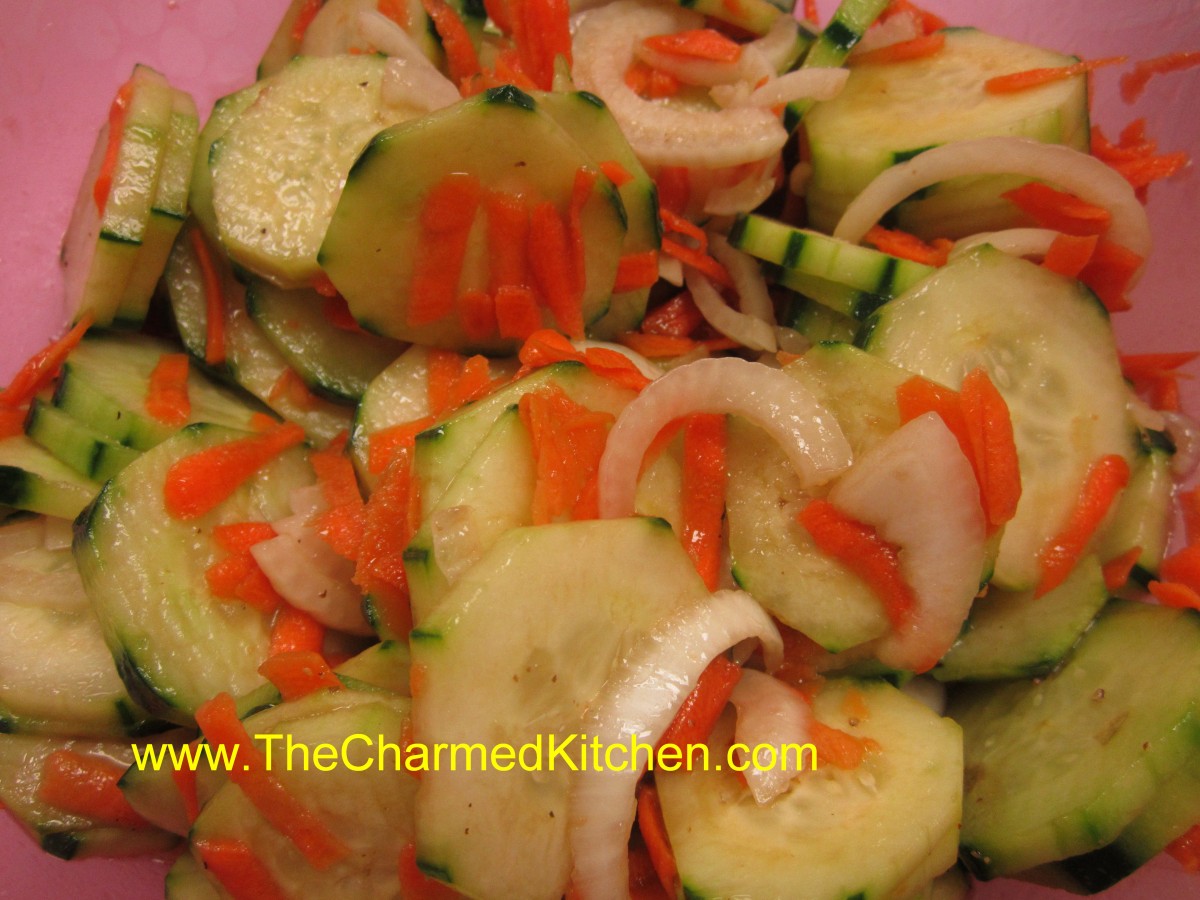
Cucumber and Carrot Salad

Pesto Potato Salad

Artichoke and Edamame Salad
Cucumber and Carrot Salad
This refreshing salad combines carrots and cucumbers in a simple dressing. So easy and fast. Perfect side for your picnic or barbecue.
4 cucumbers, peeled, leaving strips of skin
1 c. coarsely shredded carrots
1 c. thin sliced sweet onion
1/3 c. vinegar- I like cider vinegar in this dish
2 T. Balsamic vinegar
¼ c. oil
1 T. sugar
1 ½ t. salt
Fresh ground pepper
Slice cucumbers. Combine vegetables in bowl. Combine dressing ingredients and pour over the vegetables, tossing to coat well. Chill at least 1 hour before serving, Spoon over lettuce, if desired. Serves 4-6.
Cornbread Salad
A little different- people always seem to like this salad. A nice way to use up stale cornbread, too. ?
4 c. crumbled cornbread or corn muffins
1 c. shredded mild cheese
1 sweet red pepper seeded and diced
1 c. diced celery
½ c. diced green onion
4 hard-cooked eggs, peeled and chopped
¼ c. chopped parsley
1-1 ½ c. mayonnaise or salad dressing, sometimes I use potato salad dressing or even slaw dressing
2 c. diced fresh tomatoes
1 c. toasted pecans
paprika for sprinkling on the top, optional
Place cornbread and next 6 ingredients in a medium bowl. Stir in dressing until desired moistness is achieved. Chill and stir in tomato and nut just before serving. Sprinkle with paprika if you like. Serves 6.
Note: You can add whole kernel corn also if you like.
Sweet Potato Salad
A nice twist on potato salad.
3 large sweet potatoes
2 c. corn kernels, fresh off the cob preferred but frozen is O.K.
2 ribs celery, sliced
1 sweet onion, diced
1 c. sweet pepper, seeded and chopped
2-3 T. fresh parsley
1/3 c. oil
1 t. Dijon mustard
3 T. apple cider vinegar
1 T. lemon juice
1 clove garlic, minced
Salt and pepper to taste
½ c. cashews
In medium saucepan boil or steam potatoes until tender, about 20-25 minutes. Remove with slotted spoon and place in a large bowl of ice water. Add corn to saucepan and cook until just tender about 2-3 minutes. Drain corn and add to ice water with the potatoes. Once the vegetables have cooled down drain them and peel and cut the potatoes into bite-sized pieces. Place potatoes and corn in a mixing bowl with remaining vegetables. Combine remaining ingredients, except cashews, in a jar with a tight-fitting lid and shake well before pouring over the sweet potato mixture. Toss to blend and chill until ready to serve. Add cashews just before serving. Serves 6.
Multi- Bean Salad
1 lb. cooked green beans, sliced
1 can lima beans, rinsed and drained
1 can dark red kidney beans, rinsed and drained
1 can garbanzo beans, rinsed and drained
1 medium sweet onion, chopped
1/2 c. chopped fresh parsley
1 c. apple cider vinegar
1/4 c. sugar
1/4 c. oil
2 T. Italian seasoning- or whatever herb blend you like
1 T. hot sauce, or to taste
Salt and pepper to taste
Combine beans with onions and parsley in a medium bowl. Combine remaining ingredients in a small bowl and pour over the bean mixture. Stir well and chill a couple of hours before serving. Serves 8.
Pesto Potato Salad
2 lbs. Boiling potatoes, cut into bite sized pieces
1 c. basil leaves
3 T. pine nuts, walnuts or pecans
3 T. olive oil
2 garlic cloves, minced
1/3 c. Parmesan cheese
Salt to taste
Cook potatoes until tender. Cool. In blender combine remaining ingredients, except 1 tablespoon of the nuts. Pour blended mixture over potatoes and sprinkle with the reserved nuts. Chill. Serves 6-8.
Just in Thyme Potato Salad
2 lbs. boiling potatoes, cut into bite sized pieces*
½ c. olive oil
¼ c. red wine vinegar
1 T. fresh lemon juice
2 t. fresh thyme leaves
Salt and pepper to taste
Cook potatoes until tender. Drain and toss with the rest of the ingredients and serve right away or chill to serve later. Serves 6-8.
* You can really use any potato you like. I often bake the potatoes whole and then peel and cut up. Cook them any way you prefer.
Mustard Potato Salad
4 lbs. potatoes- I used Klondike Rose and I did not peel them
4 hard cooked eggs, peeled and chopped
1 sweet pepper, seeded and chopped
1 c. mayo- maybe a little less
1/4 c. prepared mustard
salt and pepper to taste
dash of hot sauce
Bake whole potatoes until tender and allow to cool. Cube potatoes into large bowl and combine with remaining ingredients. Chill until ready to serve. Serves 8.
Artichoke and Edamame Salad
1 lb. edamame (fresh soybeans)*
1 can artichoke hearts, drained and chopped
2 c. cooked corn
1 c. chopped sweet onion
1/3 c. olive oil
1/2 c. cider vinegar
1 t. sugar, optional
fresh chopped parsley
fresh chopped basil
salt and pepper to taste
To prepare edamame steam them, in their pods, until tender, about 8 minutes. Place in cold water. Once cool enough to handle slip the edamame out of their pods. Discard pods and place edamame into a mixing bowl. Add remaining ingredients and stir to mix well. Chill until ready to serve. Serves 4-6.
* A lot of stores have them in the freezer section. They are in the pods. The pods are not edible. If you don’t have edamame you can substitute fresh lima beans.
Cauliflower and Broccoli Salad
1 small head cauliflower, trimmed and broken into bite- sized pieces
2 broccoli crowns, cut into bite- sized pieces
1 sweet pepper, seeded and chopped
1 c. shredded cheese- I used a sharp cheddar
8- 10 slices of bacon, cooked and chopped
1/2 cup of mayo – or more according to your taste
salt and pepper to taste
Steam the cauliflower and broccoli until just tender/crisp. About 5 minutes in a microwave steamer, 6 minutes in a conventional steamer. Place in a bowl to cool down then combine with remaining ingredients and stir to combine well. Adjust seasonings, if needed. Serves 6-8.
Smoky Succotash Salad
1 lb. lima beans, cooked and cooled
4 c. corn off the cob, cooked and cooled
1 sweet pepper, seeded and chopped
1-2 c. cooked ham, diced
Dressing:
2/3 c. sour cream
3 T. apple cider vinegar
2 T. sugar
1 t. grated ginger
1 t. hot sauce, or to taste
salt and pepper to taste
Combine veggies with the ham in medium bowl. In small bowl stir together dressing ingredients until smooth and toss with the veggie mixture. Chill until ready to serve. Serves 6.
Strawberry Ice Cream Cake Roll

Strawberry Ice Cream Cake Roll
This is the perfect summer dessert. Fresh berries, a light, citrus scented cake and ice cream. What more could you want?
When you say cake roll, I think a lot of people first think of a pumpkin roll or Buche de Noel (yule log).
There are so many more desserts you can make with them. Cake rolls can be made in many flavors and they can be filled with custard, frosting, fruit, ice cream and more.
For this sponge cake roll, I used homemade strawberry ice cream to fill it, recipe follows. You could use store bought ice cream, if you prefer.
Start with the sponge cake roll recipe below, and use whatever flavor ice cream you like. You’ll need about a quart of ice cream- or a little more.
Once finished, you just wrap it up and pop the cake in the freezer until needed. Great to have on hand for summer parties and cook outs. You can decorate with fresh berries when serving. Blueberries would make this a fun red, white and blue dessert for Memorial Day or the 4th of July.
Sponge Cake Roll
This sponge cake roll can be filled with whipped cream or ice cream, or use your favorite filling.
5 eggs, separated
2/3 cup granulated sugar
1 teaspoon lemon juice
1/2 teaspoon finely grated lemon zest
2/3 cup cake flour*
1/4 teaspoon salt
1 teaspoon baking soda
3 tablespoons melted butter
Beat egg yolks until thicken and lemon colored; gradually add 1/3 cup of the granulated sugar, the lemon juice and the lemon zest. Beat egg whites until almost stiff then gradually beat in the remaining 1/3 cup sugar. Beat until stiff peaks form. Fold yolk mixture into whites. Sift dry ingredients into a separate container; add to egg mixture, folding in carefully. Fold in melted butter. Pour batter into waxed paper-lined 10x15x1-inch jelly roll pan. Bake at 375° for 12 minutes. Sprinkle with confectioners’ sugar. Turn onto a clean kitchen towel which has been generously dusted with confectioners’ sugar. Trim edges, if necessary; roll cake up, towel and all, while still warm. Let cool completely. Unroll and fill with whipped cream or ice cream then re-roll cake. The trick is to let the ice cream soften up a few minutes before spreading it on the cake. But don’t wait too long. Rather than trying to let the ice cream get soft enough to spread I used a spatula to sort of cut slices of ice cream and place them on the cake. Store ice cream cake roll in freezer until ready to slice and serve.
*If you don’t have cake flour you can make your own. Measure out a cup of all purpose flour, remove 2 tablespoons of flour and replace them with 2 tablespoons of cornstarch. For larger amounts place 7 cups of flour in a bowl and combine with 1 cup of cornstarch. Mix well or even sift together. Store in an airtight container.
Strawberry Ice Cream
2 c. chopped strawberries
1 c. sugar
1 T. vanilla
2 c. cream or half and half or a combination. You can also use some milk or even almond or rice milk.
Additional sugar to taste
Place strawberries, vanilla and sugar in saucepan and bring to a simmer, stirring occasionally. Remove from heat and chill. Combine chilled berry mixture with cream. Add additional sugar if you like. Remember that once it is frozen the ice cream will not taste as sweet so make this mixture a little sweeter than you want the final product to be. How much sugar you add varies with personal taste, and how sweet the berries are. Place in an ice cream maker and process according to manufacturer’s directions. Once finished put in an air- tight container and place in freezer. Makes about 1 quart.
“Melon Ball” Sorbets

“Melon Ball” Sorbets
I remember making melon balls for fruit salad, when I was a kid. My mom showed me how. It always seemed like a special occasion when we made them. I will admit, I haven’t made melon balls in a long time, but I still like the way they look.
I used melon balls at the inspiration for this dish. Funny thing is- there isn’t any melon in them. I made three different sorbets- strawberry, mango and kiwi. Each one is meant to resemble a different melon.
They can be served alone and make a light, wonderful dessert. You can add a scoop of ice cream or whipped cream, if you like. They can also be served with cake or cookies. You can even add some to a glass of lemonade or a summer cocktail, just for fun.
This dessert is easy to make and a nice alternative to ice cream. Don’t get me wrong, I love ice cream, but sometimes I want something lighter. Nice for those who are lactose intolerant, too. Once made, you can have them on hand for dessert anytime.
Strawberry Vanilla Sorbet
2 c. fresh or frozen strawberries (allow frozen berries to thaw a little first)
1/4 c. sugar, or to taste
3 T. fresh lemon juice
1 t. vanilla
Place ingredients in food processor and process until smooth. Place in shallow pan and freeze. If you are using frozen berries re-freezing will take only about 1 hour. Up to 30 minutes before serving remove sorbet from freezer and allow to soften enough to break into chunks. Place in processor and blend again until very smooth. Return to freezer until needed.
Mango Honey Ginger Sorbet
2-3 large, ripe mangoes, seed and peeled
1/4 c. honey, or to taste
2-3 t. fresh grated ginger
Place ingredients in food processor and process until smooth. Place in shallow pan and freeze. Up to 30 minutes before serving remove sorbet from freezer and allow to soften enough to break into chunks. Place in processor and blend again until very smooth. Return to freezer until needed. For an even smoother sorbet, you can blend it another time.
Kiwi Lime Sorbet
6 kiwi, peeled
juice of 1 lime
1/4 c. sugar, or to taste
Place ingredients in food processor and process until smooth. Place in shallow pan and freeze. Up to 30 minutes before serving remove sorbet from freezer and allow to soften enough to break into chunks. Place in processor and blend again until very smooth. Return to freezer until needed.
To serve the sorbets, use a cookie scoop to make the “melon” balls. I made them as I was serving them, but you can also make the balls and return them to the freezer until ready to serve.
Hot Fudge Sauce

Hot Fudge Sundae
Yesterday, I did a cooking program with about 50 kids. It was our last session of the school year, and we always finish up with ice cream. We had fresh strawberry milkshakes and sundaes, topped with hot fudge sauce and whipped cream. The sundaes were a big success.
On a hot summer day, I am not sure anything is better than ice cream. When it comes to topping ice cream, hot fudge sauce is one of my favorites. The warm, rich sauce on the cold ice cream is such a great combination.
When I was a kid, getting a hot fudge sundae was the ultimate treat. I knew the kids would love it, too.
This simple recipes duplicates that sauce. It is easy to make and will keep for a couple of weeks in the fridge. I doubt it will last that long, once you taste it.
Hot Fudge Sauce
1 c. unsweetened cocoa powder
¾ c. sugar
½ c. brown sugar
1/8 t. salt
1-c. heavy or whipping cream
½ c. butter, cut into pieces
1 t. vanilla extract
In saucepan , stir together dry ingredients then stir in cream and butter. Heat to boiling and boil 1 minute. Remove from heat, cool 5 minutes and stir in vanilla. Store leftovers in fridge. Rewarm before using. Makes 2 ½ cups.
Lilac Vinegar
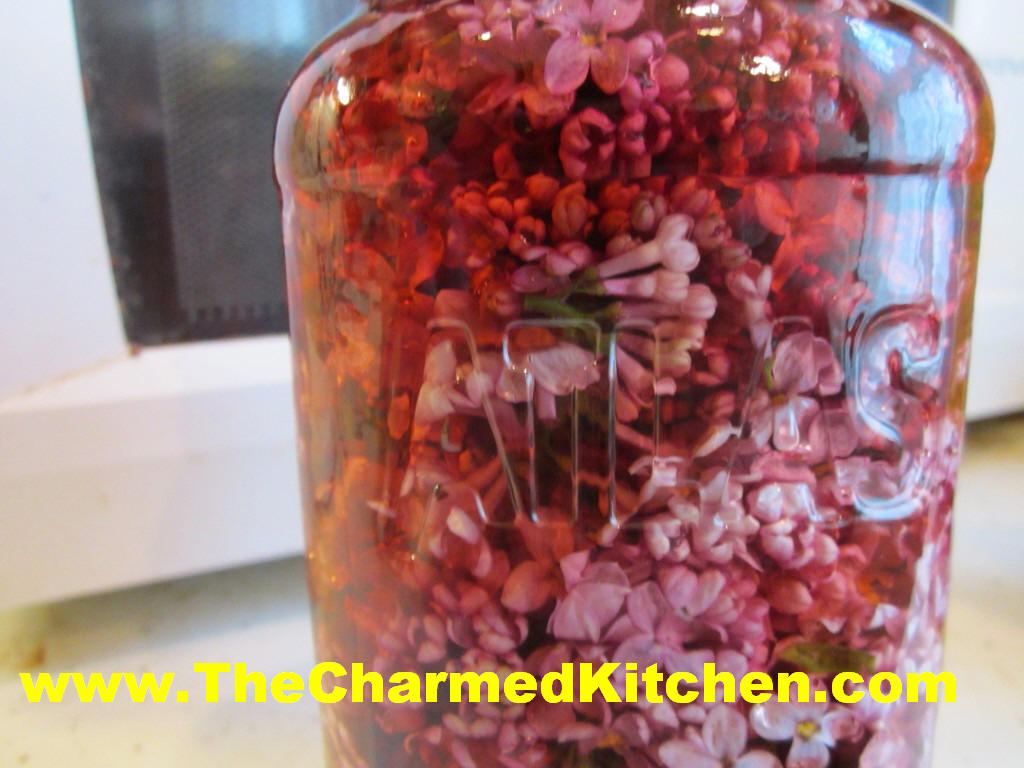
Lilac Blossoms Steeping in Vinegar
Since the lilacs are in bloom, I decided to preserve some of them and make lilac vinegar. As long as they are grown where chemicals haven’t been sprayed, lilacs blossoms are edible. The flavor is floral, with a touch of spice.
I use the lilac vinegar in salad dressings, marinades and in pickling. I also like to add a splash to soups or chili, to brighten them up.
To make lilac vinegar, just place clean lilac blossoms in a jar and cover with red wine vinegar.* Put a lid on the jar and store in a cupboard for 10 days or longer. Ideally, you want at least one cup of blossoms for every 2 cups of vinegar- to get enough lilac flavor into the vinegar. A one to one ratio- one cup blossoms, one cup vinegar, will give you an even more flavorful vinegar in the end.
When ready to use, strain out the blossoms and discard them. Pour the vinegar through a coffee filter to get out any remaining plant material. You can transfer the lilac vinegar to a decorative bottle. It can be stored at room temperature but will hold its color longer if kept cool, even refrigerated.
* always use vinegar that is 5% acidity. You can use white wine vinegar, cider vinegar or whatever vinegar you like.
Spinach and Artichoke Quiche

Spinach and Artichoke Quiche
I love quiche. It is a perfect brunch dish, with endless variations. Also a nice dish to serve for dinner or lunch. I often make two at a time. That way I can freeze one to enjoy later on. Leftover quiche is a favorite breakfast of mine.
I had planned to make a quiche with artichoke hearts. When I was starting to put the quiche together it occurred to me that I had just brought home a giant bag of spinach.
Made sense to put the two together. Sort of like spinach and artichoke dip. I used about a pound of fresh spinach, cooked, drained and chopped, but a box of frozen spinach would work, too.
This one was a big hit. Here is the recipe.
Spinach and Artichoke Quiche
1 unbaked pie crust – enough for a deep dish pie
4 oz. diced cheddar cheese – I like a sharp cheddar
2 T. flour
1 lb. fresh spinach or 1 (10 oz.) package frozen spinach, cooked, chopped and squeezed dry
3-4 artichoke hearts, drained and chopped coarsely (about 1/2 of a 14 oz. can)
1 c. milk or half and half
3 eggs, beaten
2 T. fresh chopped parsley
Hot pepper sauce to taste
salt and pepper to taste
In 9-inch (deep dish) pie pan place the crust. Toss cheese with the flour and place in crust. Add the spinach and artichoke hearts. Combine milk with the eggs and add seasonings to taste. Pour over the spinach mixture. Place pan on a baking sheet to collect any drips and place in a preheated 400 degree oven. Bake for 30 minutes then turn down oven to 325 and continue baking until quiche is firm near the middle, about 25-30 minutes more. To test for “doneness” insert a butter knife about an inch from the center of the quiche. If it comes out clean, the quiche is done. Serves 4-6.


