Cranberry Orange Scones
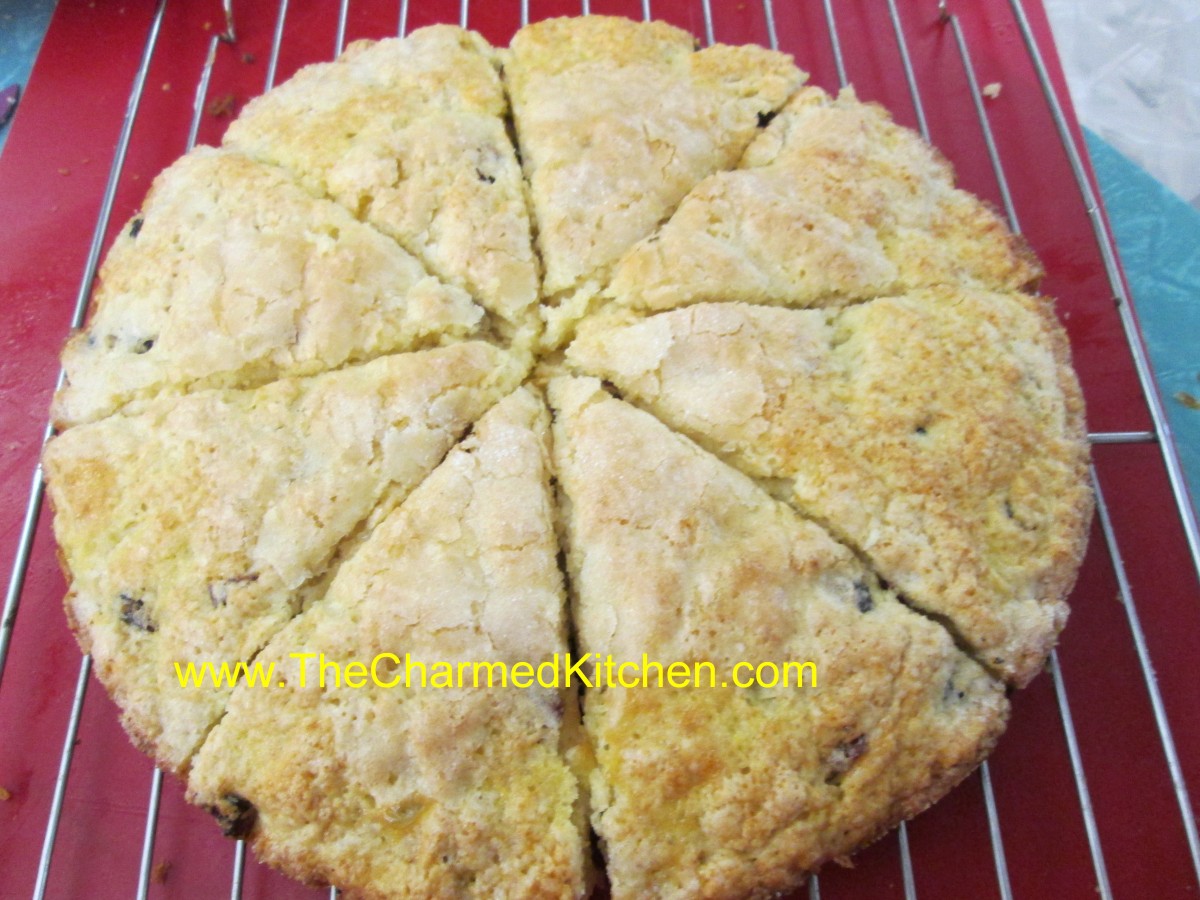
Cranberry Orange Scones
I make scones pretty often. There is nothing quite like the taste of fresh baked scones. Plus, baking them makes the house smell wonderful.
I taught a class last week on scones, and we made these in class. Someone in class asked me what scones are. I told her I think of scones as biscuits for company. The procedure for making both is the same. You just put more fun ingredients in scones. Although scones can be plain, they often contain fruits, nuts and spices.
These scones are shaped by pressing the dough in a round cake pan, then cut into wedges before baking.
They come out looking great and tasting great, too. If you don’t have buttermilk just add a little lemon juice to regular milk. I actually used half and half instead of milk, and added 1 tablespoon of lemon juice to the half and half. It worked great.
Perfect breakfast for this weekend. Serve warm with butter and jam.
Cranberry-Orange Scones
2 c. flour
4 T. sugar
2 t. baking powder
1 t. baking soda
1 t. grated orange peel
½ t. salt
¼ c. butter
1 c. dried cranberries
2/3 c. buttermilk
1 egg
Extra milk and sugar, for topping
Preheat oven to 425 degrees and lightly grease a baking sheet. Combine dry ingredients in medium bowl and cut in butter to resemble coarse crumbs. Stir in cranberries. Beat together milk and egg and add to flour mixture, stirring with fork until just coming together. Turn onto floured surface and knead 5-6 strokes or until ball of dough holds together. Transfer dough to prepared sheet and with floured hands, press dough into an eight-inch circle. I place dough in floured 8-inch cake pan, then invert onto the baking sheet- for a nice, even circle. With a sharp, floured knife cut dough into 8 wedges. Brush top of dough with a little extra milk, then sprinkle tops with a bit of sugar. Bake 14-16 minutes. Makes 8.
Dough can also be patted out on work surface and cut into circles or pressed into a square and cut into smaller squares.
Homemade Mustard Recipes
Homemade Bavarian Mustard
With baseball season here, there has been a lot of talk about hot dogs and mustard lately. I thought I would share these recipes for homemade mustard. Mustard is actually pretty easy to make.
I will admit to not being a big fan of mustard when I was a kid. I am now. I enjoy using all types of mustard in all sorts of dishes. Mustard is great on sandwiches and sausages. It is also a versatile ingredient for salads, salad dressings, marinades and all sorts of sauces.
I lean towards spicy brown mustard myself. I also enjoy making my own mustard. That way I can tweak the seasonings.
So here are a few of my favorite homemade mustard recipes. If you never made mustard before- you might want to try. It is easy and fun.
Horseradish Mustard
1 c. dry mustard
3/4 c. white wine vinegar
1/3 c. dry white wine or dry sherry
1/4 c. brown sugar
1/4 c. granulated sugar
1 T. dried minced onion
2 t. caraway seeds
1 1/2 t. salt
1/4 t. coarse ground mustard
2 eggs, slightly beaten
1 T. prepared horseradish
Combine all ingredients, except eggs and horseradish in top of double boiler and let stand at room temperature for 2 hours. Whisk in eggs and cook over simmering water until mixture has thickened and eggs are cooked, about 10 minutes. Remove from heat and stir in horseradish. Pour into sterilized jar, cool and cover. Store in fridge for up to 3 months. Makes 2 cups.
Bavarian Mustard
3/4 c. beer
2/3 c. dry mustard
2 T. sugar
2 T. cider vinegar
2 t. salt
1-t. celery seeds
1/2 t. fresh grated ginger or 1/4 t. dry
1 egg, beaten
Combine all but the egg in the top of a double boiler and let stand 2 hours at room temperature. Stir in egg and cook over simmering water. stirring constantly until mixture thickens and egg is cooked, about 10 minutes. Pour into sterilized jars and cool before covering. Store in fridge for up to 2 months. Makes 2 cups.
Spicy Mustard
1 c. dry mustard
2/3 c. dry white wine
1/2 c. vinegar, flavored with herbs or garlic
1/2 c. sugar
2 t. salt
1 t. basil
1 t. chili powder
1 t. dried minced garlic
1 t. oregano
1/2 t. cracked pepper
2 eggs, slightly beaten
Mix all ingredients, except eggs, in top of double boiler and let stand 2 hours at room temperature. Add eggs and cook over simmering water, stirring constantly until mixture thickens and eggs are cooked, about 10 minutes. Pour into sterilized jars and cool down before covering and refrigerating. Keeps in fridge for up to 2-3 months. Makes 2 cups.
French Herb Mustard
1/4 c. dry mustard
1/4 c. white wine vinegar
1/4 c. white wine or dry sherry
1/4 c. brown sugar
1/2 t. salt
1/2 t. tarragon
1/4 t. dill seed
1/4 t. celery seed
1/4 t. ground cloves
3 egg yolks or 1 whole egg
Combine all ingredients, except eggs, in top of double boiler and let stand at room temperature 2 hours. Whisk in eggs and cook over simmering water, stirring constantly, until mustard thickens and eggs are cooked, about 5 minutes. Store in crock or jar in fridge for up to 1 month. Makes 1 cup, recipe can be doubled.
Collard Green Omelet
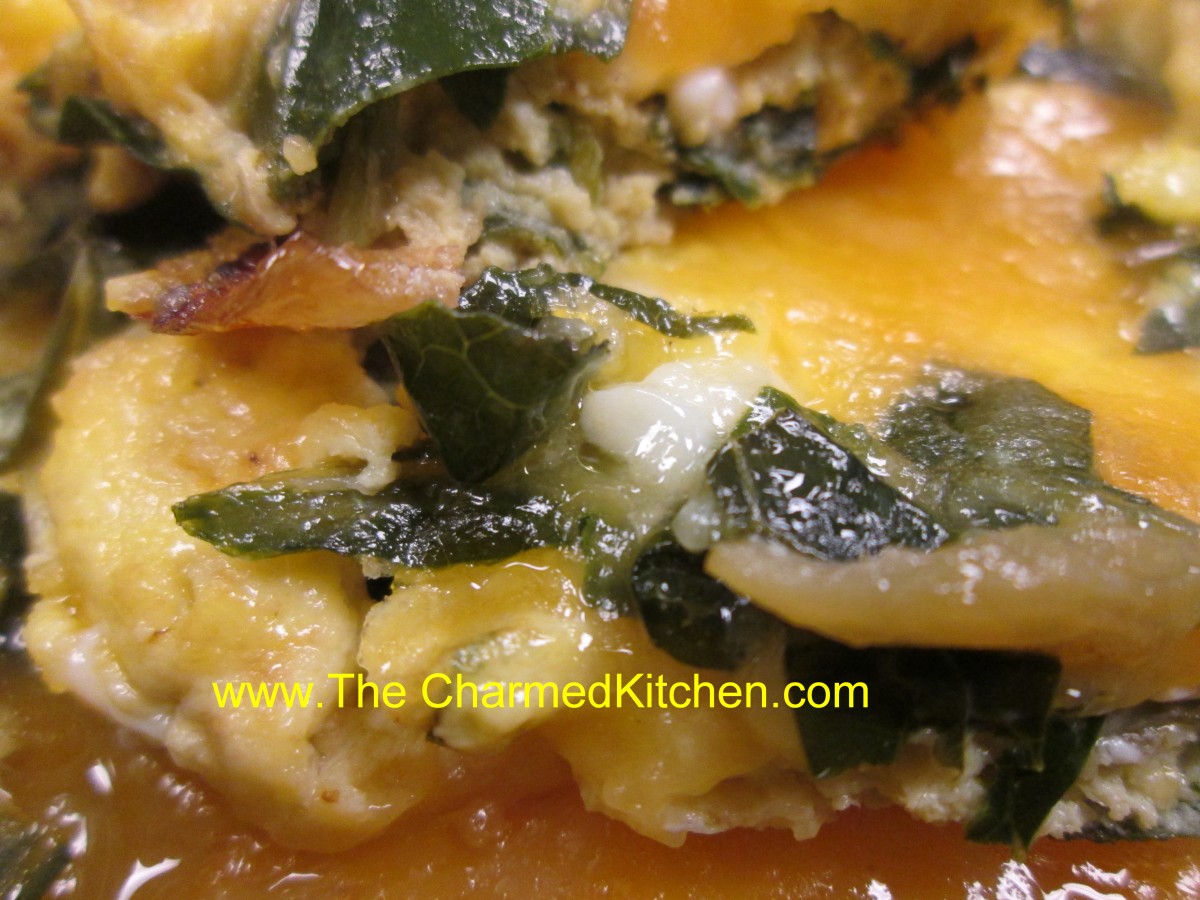
Collard Green Omelet
I really love collards. Collards are full of nutrition and great flavor. I think they sometimes get overlooked. Why should kale get all the attention? Collards are every bit as good- and easier to clean!!
The way I first tasted collard greens was traditionally cooked- long and slow.
I’ll still eat greens cooked for hours with a ham hock or smoked turkey, but I prefer to cook them less.
This is how I like to prep collards. Once cooked, I can add them to lots of dishes.
Rinse the greens well and remove larger ribs. Slice into thin strips. Heat oil in a skillet and add the greens, cooking for several minutes until they have wilted. Season with some salt and add a small amount of water to the skillet. The greens will cook down a lot. As they cook down, taste after 10 minutes or so to see if they are tender enough for your taste. Sometimes they take longer, but I like them with a little bite left in them. Season with more salt and some pepper or hot sauce and enjoy, or save to use in other recipes.
I will often cook up a lot of collards and then freeze them until needed.
Variations: you can sauté an onion or some peppers in the skillet before adding the greens. You can also add some bacon fat in place of the oil for a smoky flavor.
Collard Green Omelet
Oil or butter
¼ c. chopped onion
2 c. cooked collard greens
4 eggs
Salt and pepper to taste
1 T. water
1 c. shredded cheese- any type you like
Heat oil or butter in skillet. Add onion and sauté until tender. Add collards and cook until heated through. Remove from pan and set aside. Meanwhile wipe out pan and add fresh oil or butter. Heat pan and while pan is heating up combine eggs with water in a medium bowl and beat until smooth. Add salt and pepper to taste. Pour eggs into hot pan rolling around to coat pan evenly. Using a spatula lift the eggs as they cook allowing uncooked eggs to reach bottom of pan. Once eggs are almost cooked add the vegetables and cheese to one half of the eggs. Using spatula gently fold the uncovered half of the omelet over the side with the cheese and veggies. Turn heat down and allow middle to heat through and eggs to finish cooking. You can also turn the whole omelet over to brown evenly on both sides. Slide omelet onto a serving plate. Serves 2-3.
Ham and Asparagus Quiche

Ham and Asparagus Quiche
I had some fresh asparagus and wanted to make something special with it. I decided to make a quiche. I also had some ham, so combining the two ingredients in a quiche seemed like a good idea. It was a very good decision.
Quiches are so versatile. You can fill them with almost any ingredients. They can also be served for breakfast, brunch, lunch or dinner. You can also bake it right away, or freeze it for later. I often make two quiches, just so I can freeze one for later use.
The mix of ham, asparagus and Havarti cheese worked well together. You could use any number of cheeses that you like. Swiss would be nice, Gruyere or even a sharp cheddar would also work.
I use a homemade crust, but you can use a store bought crust, if you prefer.
Ham and Asparagus Quiche
1 (9-inch) unbaked pie crust
1½ c. shredded cheese – I used Havarti
4 t. flour
1½ c. diced cooked ham
12 oz. asparagus, trimmed, cut in ½- inch pieces and steamed 3 minutes
4 eggs
1 c. milk or half and half
2 T. fresh chopped parsley or 2 teaspoons dried
¼ t. salt
1T. Dijon mustard
1 t. hot sauce
Toss cheese with flour in a bowl and place in pie crust. Sprinkle the ham and asparagus over the cheese and set aside. Combine remaining ingredients in a small bowl beating well to combine. Pour over the ham and asparagus mixture and bake in a preheated 400-degree oven for 15 minutes. Turn down heat to 350-degrees and bake until knife inserted off-center comes out clean, about 30 minutes more. Makes 1.
Note: This quiche freezes well. After adding the fillings just wrap in heavy foil and freeze solid until ready to bake. When ready to bake unwrap and allow to sit at room temperature for 30-60 minutes. Bake as with the fresh version, but add another 10-15 minutes to the baking time. If you don’t want to freeze the pie pan, you can line the pie pan with foil before you add the crust. Once it is frozen you can remove the frozen quiche from the pie pan and wrap, returning to freezer. When ready to use unwrap and put the quiche back in the pie pan before baking. Or, if you are planning on freezing it, you can use a foil pie pan.
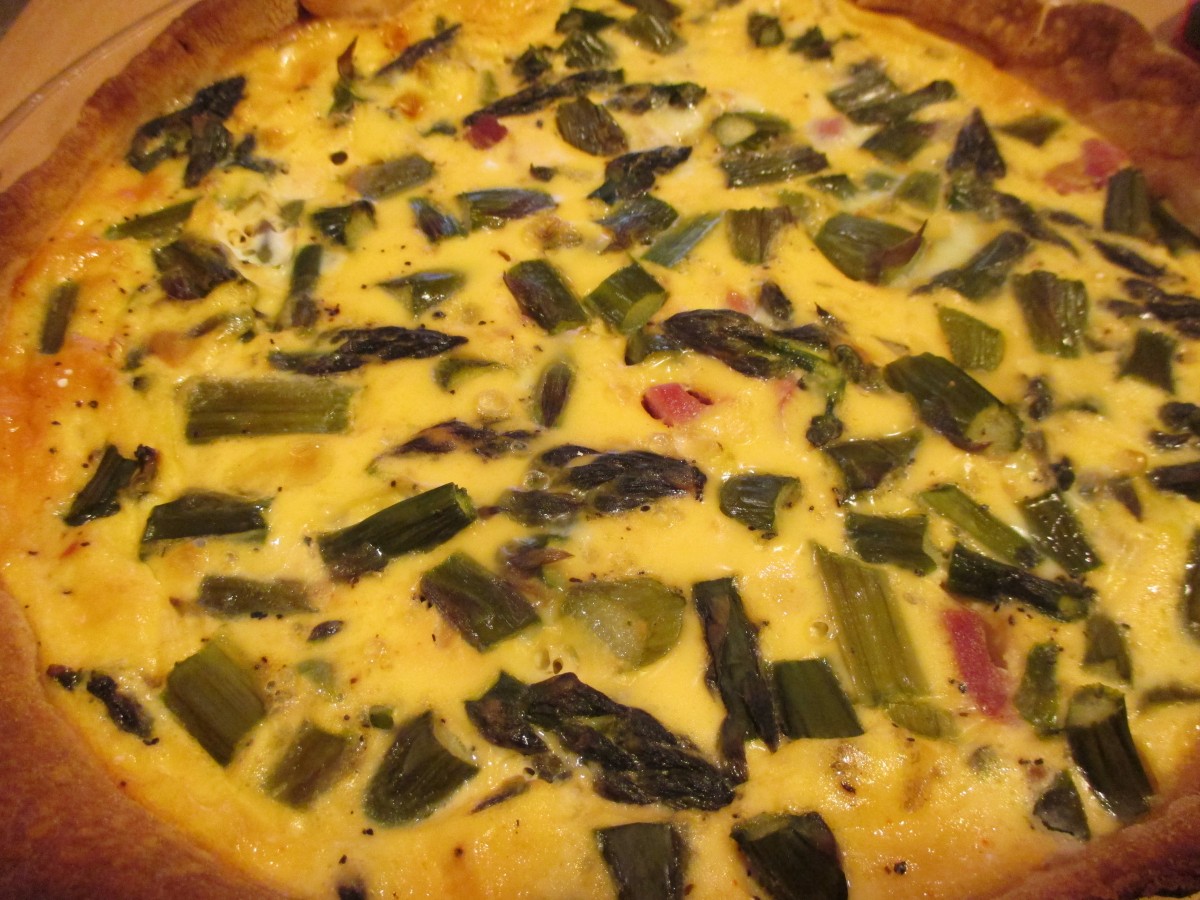
Fresh from the oven
Microwave Hollandaise Sauce
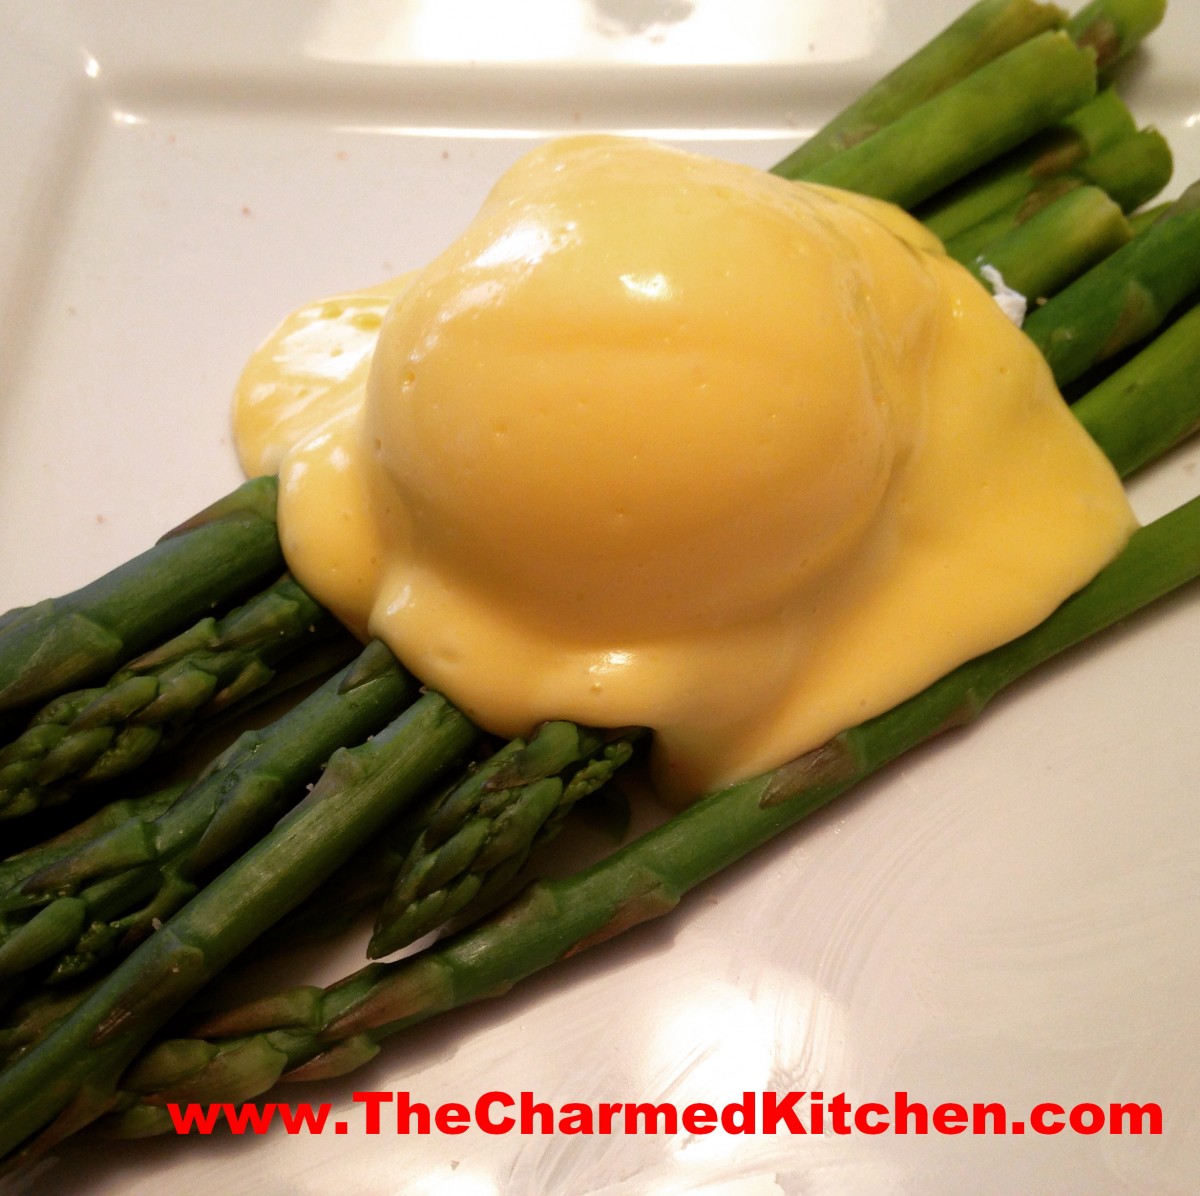
Asparagus with Poached Egg and Hollandaise
When you serve Hollandaise sauce, everyone seems happier. For the first course on Easter, I served fresh asparagus, topped with poached eggs and Hollandaise sauce. It was a special request, and much appreciated.
It was not difficult at all. Really.
I have made Hollandaise the traditional way, whisking over simmering water, being careful not to scramble the eggs. I always felt a good Hollandaise was worth the effort. But why not make things easier on yourself, if you can?
This is probably the easiest Hollandaise sauce I have ever made. So much simpler than whisking over simmering water. The end result is every bit as yummy as the traditional method. The whole sauce is made in a microwave oven, and in just a few minutes.
I love my microwave. Every time microwave ovens come up in discussion on food-related social media, the haters pop up. People proudly proclaiming how they would NEVER own one. Really? You never get that response about food processors or juicers.
While there are limits to what you can cook in a microwave oven, there are plenty of great uses, too. I make cashew brittle in mine. I also love to cook rice in my microwave. My usual breakfast of oat bran is made in the microwave almost every morning.
If only to make this Hollandaise sauce, I would still own a microwave.
So here is the recipe. I hope you like it as much as I do.
Microwave Hollandaise
1 stick ( 1/2 cup) butter
3 egg yolks
1 1/2 T. lemon juice
pinch of salt
fresh ground pepper, optional
In microwave safe bowl, soften butter. This will take 10-15 seconds. Don’t melt the butter, just soften it. Watch carefully. It may take less time if the butter is already room temperature, longer if butter is cold. I often make a double batch, so allow a few more seconds for larger quantities. Whisk together the egg yolks and lemon juice. Whisk the yolk mixture into the softened butter. Let stand on the counter a minute or two. Place in microwave and cook on high heat for 15 seconds. Be careful- only 15 seconds at a time. Whisk the mixture and return to the microwave, cooking 15 seconds. Repeat this process until sauce is thickened, smooth and shiny. It should take 3-4 of these 15 second cooking sessions, but ovens vary. It takes a little longer if you double the batch. Don’t worry if the sauce doesn’t look smooth the first time you whisk all the ingredients together. It gets smoother upon further cooking/whisking. Season with salt and pepper to your own taste. Enjoy with Eggs Benedict or as a sauce for steamed veggies.
10 Recipes for Leftover Ham
Ham and Swiss Calzone
Of course, ham makes a great sandwich, but there are a lot more things you can do with it.
If you enjoyed a ham over the holidays, you may find yourself with leftovers. Here are some recipes for all that ham.
Ham is versatile and can be used in all sorts of dishes. Added to soups, stir fry, breads, salads and omelets, it adds a wonderful smoky flavor to every dish. And of course, the ham bone can flavor a whole pot of soup.
So here are ten recipes you might want to try.
Ham and Swiss Calzones
4 c. flour
2 c. rye flour
2 T. sugar
2 t. salt
2 packages quick-rising yeast
2⅓ c. hot water
2 T. oil
2 lb. thin sliced ham- more or less
1 lb. sliced Swiss cheese
Thousand island dressing- recipe follows
1 egg , beaten
Set aside 2 cups of the all-purpose flour. Combine remaining flour with the other dry ingredients in a medium bowl. Stir in water and oil and gradually stir in enough flour to make a soft dough. Turn onto lightly floured surface and knead until dough is smooth and elastic, about 5 minutes. Cover dough and let rest 20 minutes. Divide dough into 12 pieces and roll one piece into a 8 -inch circle. In the middle of the dough place 1 1/2 ounces of the Swiss cheese, a spoonful of the dressing and 2-3 ounces of the ham. Brush the edge of the dough with water. Fold over the dough in half and press the edges to seal. Brush the edge again with water and roll the edge over again. It will give you a prettier look and seal the calzone better. Repeat with remaining dough and fillings. Place calzones on greased baking sheets- or on a baking sheet with a silicone liner or parchment paper liner. You will end up with 12 calzones in all. Only put 4 on one baking sheet. Cover and let rest 15 minutes while preheating the oven to 400 degrees. Before placing calzones in the oven brush with beaten egg and make a few slashes with a knife to help steam to escape while baking. I put 2 baking sheets in the oven at the same time and switch them halfway through baking. Bake in a preheated 400-degree for 20-25 minutes or until golden brown. If baking 2 at once switch them after 10 minutes or so. Cool slightly before eating. Serve warm and refrigerate leftovers. Makes 12.
If you want to use regular yeast use warm, rather than hot water. Also, allow a little more time for the dough to rise the first time, about 40 minutes. Everything else will work the same.
Thousand Island Dressing
Combine equal parts of ketchup, mayo and sweet pickle relish. You likely need at least a cup for this recipe. I made extra so the sandwiches could be dipped in extra dressing, if desired.
Tortellini and Ham Salad
¼ c. olive oil
¼ c. red wine vinegar
1 t. fresh rosemary
1 clove garlic, minced
1 t. sugar, optional
1/2 t. red pepper flakes
12 oz. mushroom or cheese tortellini, cooked
1½ c. diced ham or turkey ham
1 red pepper, seeded and diced
1 c. sauteed, sliced mushrooms, cooled
4 green onions, chopped
Parmesan cheese, optional
Combine first 6 ingredients in large bowl and whisk to blend well. Add next 5 ingredients and toss to coat. Add salt and pepper to taste. Chill at least 30 minutes before serving. Serve with Parmesan cheese on the side. Serves 4.
Corn and Ham Saute
1 T. oil
1 small onion, diced
1 c. diced ham
4 c. corn- fresh or frozen
salt and fresh ground pepper to taste
In pan cook onion in oil until tender. Add the ham and cook a few minutes longer. Add corn and continue cooking until corn is heated through. Season to taste and serve. Serves 3-4.
Ham and Swiss Bread Florentine
3 ¼ c. flour
1 T. sugar
1 t. salt
1 package quick-rising yeast
1 c. hot water
1 T. oil
¼ c. Dijon mustard
6-8 oz. sliced ham
4 oz. sliced Swiss cheese
1 large bunch fresh spinach, rinsed and steamed a few minutes to wilt, drained well.
Set aside 1 cup of the flour. Combine remaining flour with the other dry ingredients in a medium bowl. Stir in water and oil and gradually stir in enough flour to make a soft dough. Turn onto lightly floured surface and knead until dough is smooth and elastic, about 5 minutes. Roll dough into a rectangle about 16 x 8. Spread mustard down center middle of dough. Top with meat slices, cheese and spinach. Cut one-inch wide strips of dough from filling to edge on both sides. It will sort of look like fringe. Alternating sides, fold strips up and over the filling at an angle. Carefully lift loaf onto greased baking sheet and place at an angle. Cover with a towel and place sheet on top of a roasting pan half-filled with simmering water for 15 minutes. Bake in a preheated 400-degree for 20-25 minutes or until golden brown. Cool slightly before slicing. Serve warm and refrigerate leftovers.
Note: The variations for this bread are almost endless. Some favorite combinations are Corned beef and Swiss with sauerkraut and thousand island dressing., roast beef and cheddar, chicken, broccoli and cheese, Spinach with ricotta or feta and onions, pizza, assorted fillings. You get the idea. Use your imagination and have fun. Just be careful not to overfill, or the bread will be hard to move, use fillings that aren’t too runny and always use cold fillings.
If you want to use regular yeast use warm, rather than hot water. Also, don’t let dough rise over boiling water. After kneading cover dough and let rise 45 minutes. Punch down and assemble as in original recipe. Cover with a towel and let rise until dough looks puffy, about 40 minutes. Bake as directed above. These breads can also be frozen.
Ham and Corn Chowder
I was looking for a quick soup for dinner the other night. Inspiration hit when I came across some corn in the freezer. I had blanched and frozen it during the summer at the peak of corn season. I had a little ham in the fridge I was wanting to use up and the pairing was a natural. I started by sauteing an onion in a little butter. Once the onion was tender I added a peeled and diced potato, the corn, the diced ham and about 2 or 3 cups of chicken stock. I covered the soup and let it simmer until the potato was tender, about 15 minutes. I then took 4 tablespoons of flour and put it in a jar. I added a cup of milk, put on the lid and shook it until the flour was well mixed in. I poured the flour mixture into the pot and brought the mixture up to a gentle boil. I stirred it as it thickened up. I cooked it for a few minutes and adjusted the seasonings adding salt, fresh ground pepper and a dash of hot sauce. I also added some chopped parsley. The end result was a wonderful chowder that took almost no time at all. Sometimes the best dishes come from just looking at what we already have. In this case some frozen veggies and a bit of leftover ham.
Ham and Veggie Stir Fry
2 T. oil
1 medium onion, sliced
1 medium carrot, peeled and sliced thinly
1 c. sliced cabbage
1 clove garlic, peeled and chopped
1 sweet red pepper, seeded and cut into thin strips
2 c. sliced bok choy
1 1/2 c. cubed cooked ham
2 green onions, trimmed and sliced
1/2 c. whole almonds
fresh grated ginger- or powdered, to taste
soy sauce to taste
dash of hot sauce
Heat oil in wok or skillet and cook onion and carrots for 3 minutes. Add cabbage add garlic and stir fry 2-3 minutes longer. Toss in the pepper and bok choy and cook 3 more minutes. Add ham, green onions and almonds along with seasonings and soy sauce and cook until ham is heated through. Serve over hot cooked rice or pasta. Serves 3-4.
Ham with Brussels Sprouts
I started by trimming the Brussels sprouts and cutting small ones in half. I quartered the larger ones. I heated a little butter in a skillet and added 3 cups of prepared Brussels sprouts. I cooked them until they were getting a little color on them. I think their flavor is enhanced by sauteing. I then added 1 1/2 cups of diced cooked ham and 1/2 cup of water. The water helps steam the sprouts so they are tender. I like Brussels sprouts tender. You can skip the water, if you like. The water evaporates quickly and as soon as the ham starts to brown a little the dish was pretty much done. I added a little freshly ground pepper- but it didn’t need salt. I also served it with fresh grated Romano cheese. You could serve it as is or toss in some cooked pasta with the ham. Simple and really good. You might even get a Brussels sprout hater to give this one a try.
Swedish Yellow Split Pea Soup
1 lb. yellow split peas, rinsed
2 qts. Boiling water or stock
1 bay leaf
2 c. chopped onion
2 c. sliced carrots
1 tsp. dried marjoram
1/4 t. ginger
dash nutmeg
1/2 t. pepper
1 T. salt, or to taste
2 cups diced ham
Note: you can use 1 teaspoon liquid smoke if omitting meat.
Combine peas, boiling water or stock and bay leaf and simmer, covered, about an hour, stirring occasionally. Remove bay leaf. Add remaining ingredients, except diced meat and salt, and cook, covered, over low heat for about 30 minutes. Add meat and cook 1 hour more, stirring occasionally. Season to taste. Serve with a pumpernickel bread. Freezes well. Serves 6-8.
Ham and Cheese Strata
12 slices bread, crusts removed if desired – I used rye
6 slices cheese – I used Swiss
1/4 c. diced green onions
1/2 c. chopped sweet pepper
2 c. diced cooked ham or turkey ham
3 eggs
2 c. milk
1 t. salt
1/8 t. pepper
Place six slices of bread on bottom of 2-quart oblong casserole. Top each slice of bread with a slice of cheese. Top cheese with the onions, peppers and ham. Top with remaining bread and cut each “sandwich” in half diagonally. Combine remaining ingredients and pour over sandwiches. Cover dish and let stand several hours or overnight in the fridge. Bake uncovered in a 350-degree oven for 40-45 minutes, or until puffed and set. Serves 6.
Ham and Swiss Quiche
1 (9-inch) unbaked pie crust
1½ c. shredded Swiss or Gruyere Cheese
4 t. flour
1 c. diced cooked ham or turkey ham
3 eggs
1 c. milk or half-half or evaporated milk
2 T. fresh chopped parsley or 2 teaspoons dried
¼ t. salt
¼ t. dry mustard
Dash of hot sauce
Toss cheese with flour in a bowl and place in pie crust. Sprinkle the ham over the cheese and set aside. Combine remaining ingredients in a small bowl beating well to combine. Pour over the ham and cheese mixture and bake in a preheated 400-degree oven for 15 minutes. Turn down heat to 350-degrees and bake until knife inserted off-center comes out clean, about 30 minutes more. Makes 1
Note: This quiche freezes well. After adding the fillings just wrap in heavy foil and freeze solid until ready to bake. When ready to bake unwrap and allow to sit at room temperature for 30-60 minutes. Bake as with the fresh version, but add another 10-15 minutes to the baking time. If you don’t want to freeze the pie pan, you can line the pie pan with foil before you add the crust. Once it is frozen you can remove the frozen quiche from the pie pan and wrap, returning to freezer. When ready to use unwrap and put the quiche back in the pie pan before baking. You can also use a foil pie pan.
Goldenrod

Goldenrod
If you are looking for a recipe using hard-cooked eggs you might want to make some Goldenrod. It is a simple dish, but very pretty and quite tasty.
You just make a white sauce, then add chopped up egg whites. Season with salt and pepper. When ready to serve, pour the hot egg white mixture over toast and then put the egg yolks in a small strainer or sieve and press them through the strainer over the egg whites.
The yolks turn into a powder and the end result looks quite pretty. I like goldenrod served over English muffins, but you can serve it over toasted bread, biscuits or bagels.
This is a very sentimental dish for me. In my family, it was a tradition every year, after Easter. Goldenrod was a way of using up some of the eggs we had decorated. My Busha, (Polish grandmother) made it, as did my mother. I remember them both when I make goldenrod.
Goldenrod
4-6 hard cooked eggs
2 T. flour
2 T. butter
1-1 1/2 c. milk
salt and pepper to taste
2-4 slices bread, toasted
Peel eggs and separate whites from yolks. Chop egg whites and set aside. In saucepan cook flour and butter together until smooth. Stir in milk and cook until thickened and bubbly. Be careful not to burn the sauce. Season to taste and add reserved egg whites, heating through. Arrange toast on serving dishes and cover with the sauce. Place reserves egg yolks in a fine sieve and press through over sauce, dusting as evenly as possible. Serves 2-4.
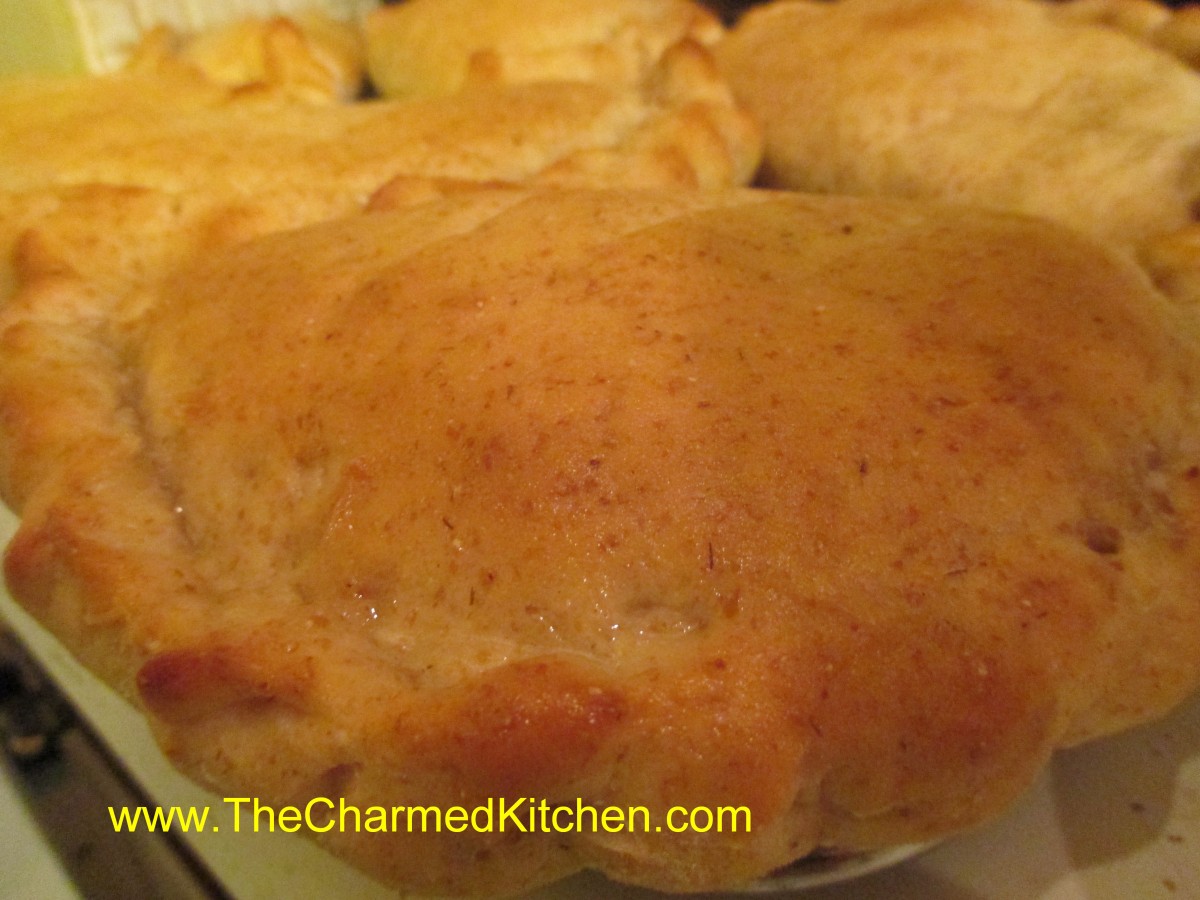
Chocolate Easter Egg Biscotti
Chocolate Easter Egg Biscotti
After a friend mentioned that she would love my Easter Egg Biscotti even better if they were chocolate, I decided to try to make her some.
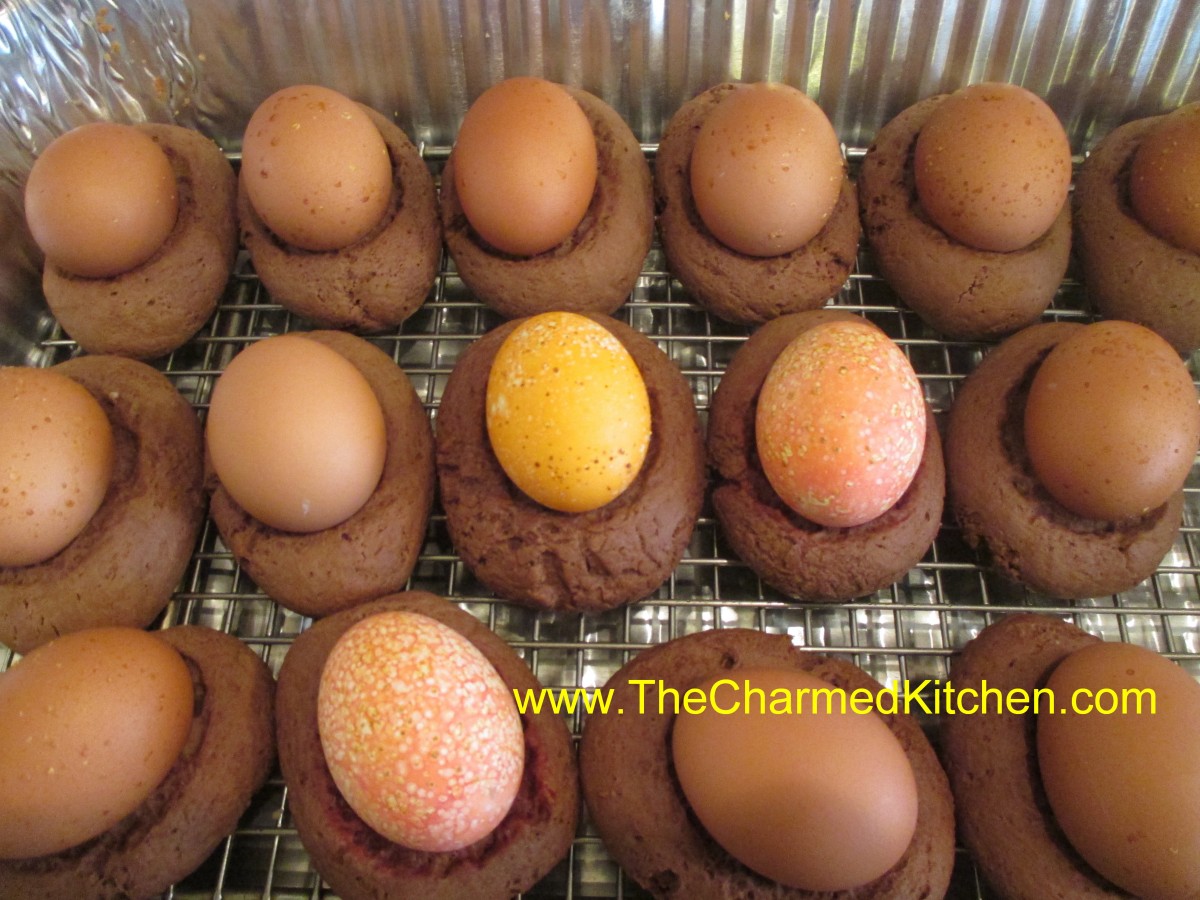
The biscotti are really just a big cookie, baked around an egg. Once cooled, I drizzle with a powdered sugar glaze. They are such a fun treat for Easter.
You don’t have to precook the eggs used in the middle. They will cook when the biscotti bake around them. If your eggs are already hard- cooked, that is fine, too.
This is the end result of my experiment. I used the original recipe, and added cocoa powder. Worked out really nice, so I thought I’d share them with you.
The original recipe came from the mother of a childhood friend. Rose made them with shortening. Over time I started making mine with butter, instead. The only change is, I chill the dough 30 minutes, or so, before using.
Chocolate Easter Egg Biscotti
1 c. shortening or butter – I use butter
1 ½ c. sugar
4 eggs
5 t. baking powder
1 t. salt
2 t. vanilla
1 c. milk
6 c. flour
¾ c. cocoa powder
24-30 eggs, plain or dyed
Powdered sugar glaze- recipe follows
Preheat oven to 350 degrees. Cream together shortening and sugar. Beat in eggs. Add next 4 ingredients and blend until smooth. Mix flour with cocoa. Stir in flour mixture 2 cups at a time. Dough should be pliable. If dough is too sticky add a little more flour. If using butter in the recipe, chill dough at this point. Take a piece of dough about the size of a large egg and roll until smooth. Place on a greased baking sheet. Indent middle slightly and then place an egg in the center, pressing down slightly. It should look like a nest. Continue with remaining dough allowing about 2-3 inches in between, as they will spread some. You can fit 6-8 on a large baking sheet. Bake 20 –25 minutes or until browned on the bottom. Cool on wire rack before drizzling with frosting. Makes 24-30. Store in the fridge.
Sugar glaze
2 c. powdered sugar
2-3 T. milk or orange juice
1 t. vanilla
Food coloring, if desired
Mix together until smooth and of drizzling consistency.

Chocolate and original biscotti waiting to be baked
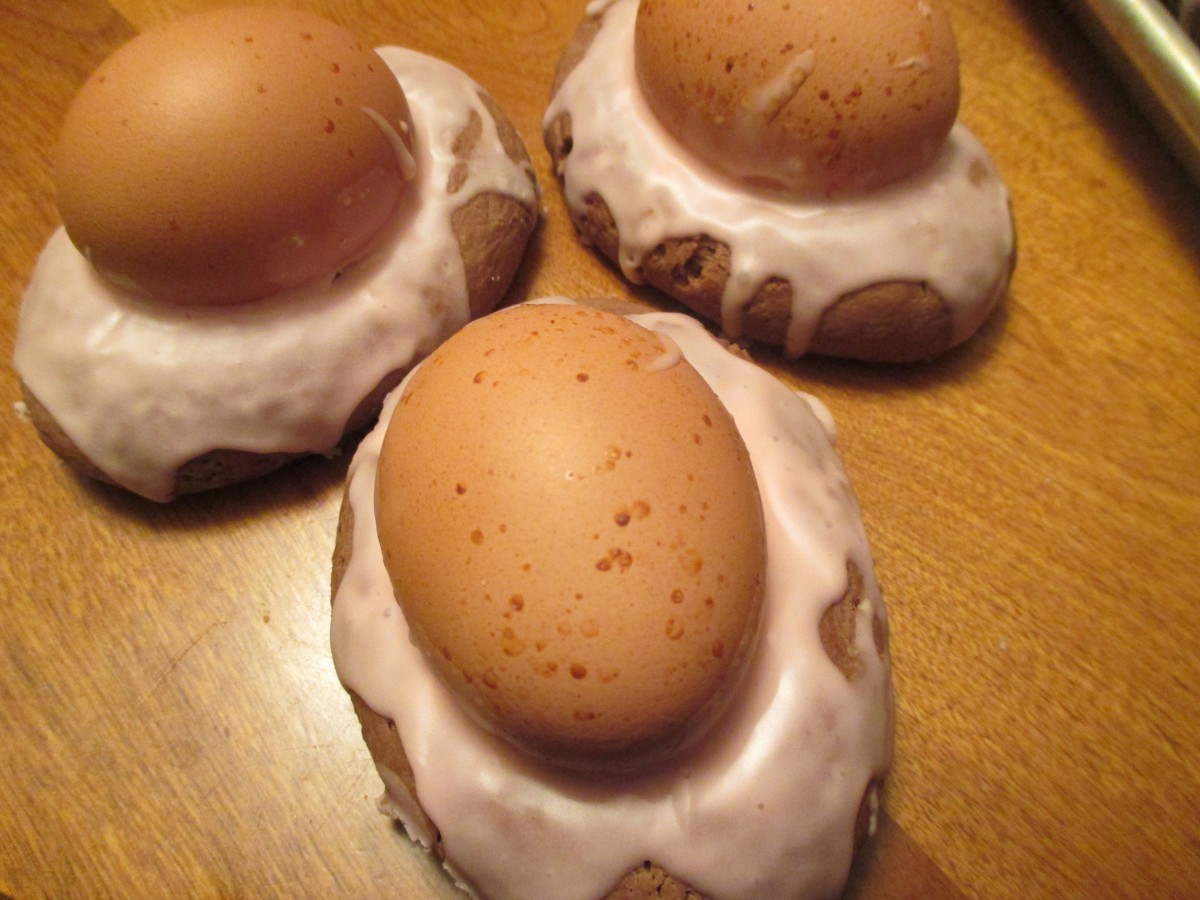
Glazed and ready to enjoy
Avocado Gelato
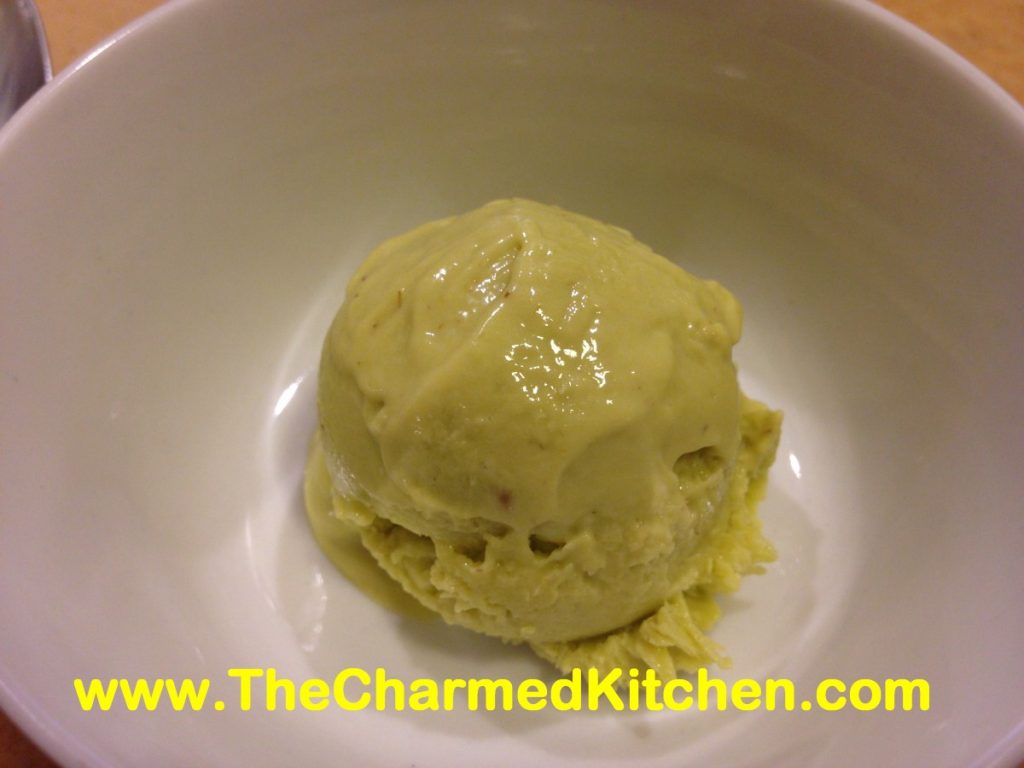
I needed a dessert and somehow this is what I came up with. It worked out so well. The gelato is silky smooth, not too sweet and has a rich, buttery flavor.
It started awhile back, when a sweet lady gave me a dozen perfect avocados. I knew I would not be able to use them up quickly enough, so I froze some of them.
It is easy to freeze avocados. Just cut them open, remove the pit and the skins. Then just place avocado in small freezer bag or container and drizzle with a little lemon juice. That will prevent the avocados from discoloring. Freeze until you want to use them.
You could, of course, use fresh avocados as well.
I just blended the gelato twice, for a creamy texture. If you have an ice cream machine, you can blend up the mixture, then freeze in the ice cream maker. Either way will give you a wonderful finished project.
Since I still have some frozen avocados, I will definitely be making this recipe again.
Avocado Gelato
3-4 avocados- you want to end up with 2 c. avocado
1 ½ c. half and half
¾ c. sugar- or to your taste
2 T. lemon juice
2 t. vanilla
Place all ingredients in a blender or food processor, then process until smooth. If you use frozen avocado, you will have something like an avocado milkshake at this point. Taste it for sweetness level. Once frozen it will taste less sweet, so keep that in mind. You could use honey to sweeten, if you prefer. Just use less. Honey is a lot sweeter than sugar. Put in the freezer. Sometime after it is frozen, you are going to want to process it again. Remove from the freezer. Let stand a few minutes to soften a little. Break into chunks and place in a food processor and process until smooth and creamy. Freeze again until ready to serve- or eat right away. Makes 1 qt.
Easter Egg Biscotti

Easter Egg Biscotti
I get so many requests for this recipe, I decided to post it again. This is a treat from my childhood. Rose Dieglio was the mother of my best friend, Debbi. Rose made these every year, and I loved them. Years later, she was kind enough to share her recipe with me. I always make a bunch to hand out to friends and family. It is a tradition I enjoy very much.
The dough is a type of cookie. You roll the dough out in pieces about the size of eggs. Make an indent in the dough and press in a tinted egg. The egg does not have to be cooked- it will cook when the biscotti bakes.
The dough is a little sticky. Just add a little flour to your fingers when shaping the dough, if needed.
The original recipe calls for shortening. I make them with butter, instead. If you use butter in the dough- chill it before baking.
Once baked, the biscotti can be topped with a powdered sugar glaze and sprinkles, if you like.
Easter Egg Biscotti
1 c. shortening or butter- I use butter*
1 ½ c. sugar
4 eggs
5 t. baking powder
1 t. salt
2 t. vanilla
1 c. milk
6 c. flour
24-30 eggs, plain or dyed
Powdered sugar glaze
Preheat oven to 350 degrees. Cream together butter or shortening and sugar. Beat in eggs. Add next 4 ingredients and blend until smooth. Stir in flour 2 cups at a time. Dough should be pliable. If dough is too sticky add a little more flour. Take a piece of dough about the size of a large egg and place on a greased baking sheet. Indent middle slightly and then place an egg in the center, pressing down slightly. It should look like a nest. Continue with remaining dough allowing about 2-3 inches in between as they spread when baking. You can fit 6-8 on a large baking sheet. Bake 20 –25 minutes or until browned on the bottom. Cool on wire rack before drizzling with frosting. Makes 24-30. Store in fridge.
* If using butter- chill dough a couple of hours before baking.
Sugar glaze
2 c. powdered sugar
2-3 T. milk or orange juice
1 t. vanilla
Food coloring, if desired
Mix together until smooth and of drizzling consistency.

Cooling down


