Sweet and Sour Chicken Wings

Sweet and Sour Chicken Wings
Rumor has it that chicken wings are one of the most popular appetizers served on Super Bowl Sunday. I don’t think you need to wait for a football game to enjoy these.
If you want something different than Buffalo Style wings, you might want to try this recipe. The wings are baked in a pineapple sweet and sour glaze. They are just the right combination of sweet, sour and a little salty. No matter who you are cheering for- your guests will cheer for these.
They are pretty simple to make and you can even make them the day before, then just reheat before serving.
Sweet and Sour Glazed Chicken Wings
12 chicken wings
1 medium onion, chopped
1 can (or jar) of pineapple chunks, drained, reserving liquid- I used a pint jar- if using store bought use the 20 oz. can.
salt and pepper
Sauce:
1/2 c. apple cider vinegar
1/2 c. sugar
3 T. ketchup
3 T. sherry
2 T. soy sauce
1 t. minced garlic
1 t. red pepper flakes
reserved pineapple juice
3 T. cornstarch
Preheat oven to 400 degrees. Place wings in pan and season with salt and pepper. Bake chicken wings in roasting pan for 20 minutes. Add the onions and pineapple chunks to the pan with the chicken wings and return to the oven for 30 minutes longer. While chicken is cooking combine the first seven sauce ingredients in a small pot and bring to a boil. Check baking pan for any juices- Spoon them out and add to the sauce. Combine pineapple juice and cornstarch in small bowl, stirring until smooth and add to the sauce. Return to boil and stir until sauce is thickened and bubbly. Pour hot sauce over chicken and return to the oven to bake 20-30 minutes longer or until wings look nicely glazed and sauce has started to brown. Serves 3-4.
Orange Tea Bread
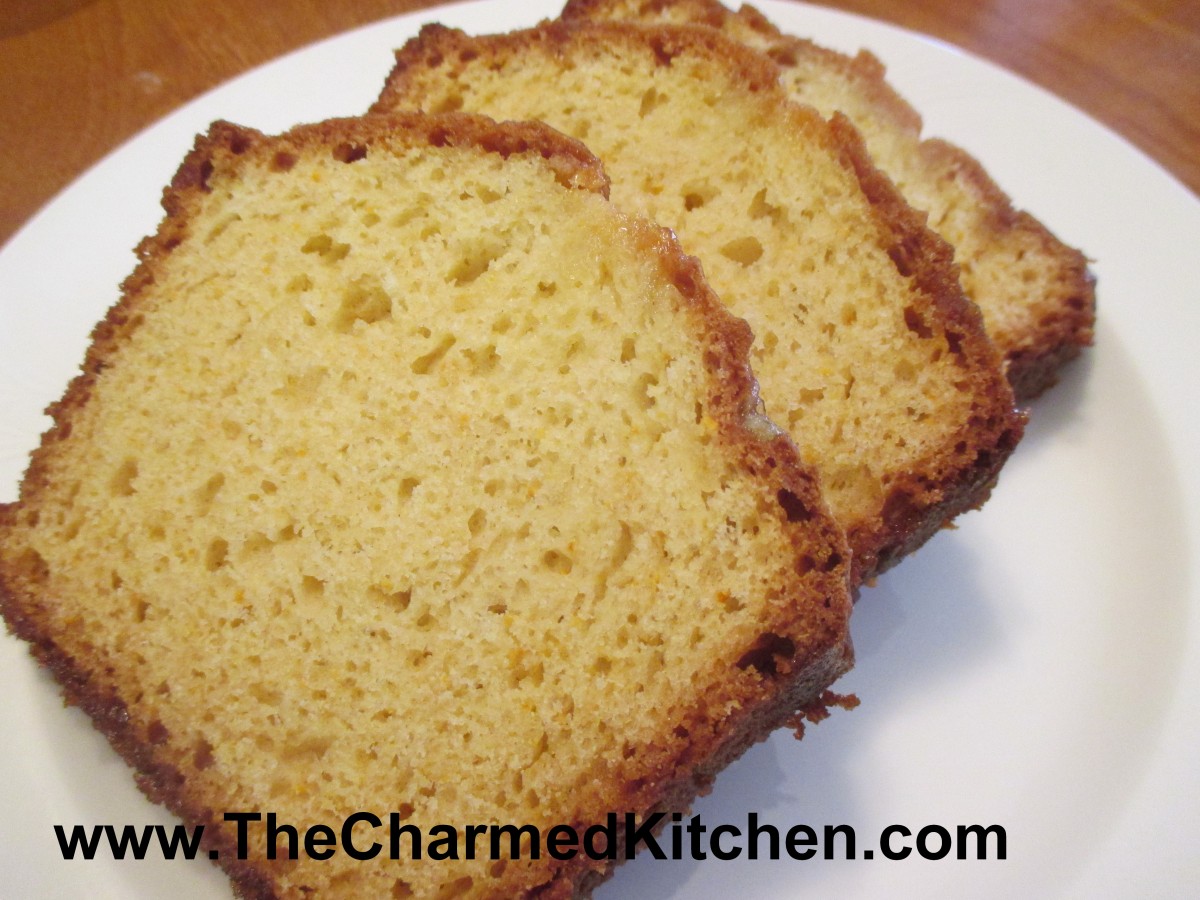
Orange Tea Bread
Winter is citrus season and I have been eating a lot of oranges lately. Besides eating them fresh, I also like to cook with oranges. If you are looking for a new recipe for a quick bread, and like oranges as much as I do, I would recommend trying this one.
The bread is flavored with orange zest in the batter, then a warm orange syrup is drizzled over the bread, right out of the oven. This makes for a bread that is flavorful and moist. It can be breakfast, a brunch dish or even a dessert, when topped with ice cream or whipped cream. The recipe makes one loaf, but I often double the recipe and make two. It seems to disappear around here pretty quickly. The bread freezes well, too.
Orange Tea Bread
2 cups all-purpose flour
1-1/2 teaspoons baking powder
1 teaspoon baking soda
1/2 teaspoon salt
2/3 cup Greek yogurt or sour cream
2/3 cup sugar
2 large eggs
3 tablespoons melted unsalted butter
1 tablespoon grated orange zest
Syrup:
1/2 cup orange juice
1/4 cup sugar
Preheat oven to 350 degrees. Grease an 8-1/2″x4-1/2″x2-5/8″ loaf pan. Line pan with wax paper or parchment and set aside. Sift flour, baking powder, baking soda and salt into a bowl. In a separate bowl, whisk together yogurt, sugar, eggs, butter and orange zest. Add liquid ingredients to dry ingredients, and stir mixture until well combined. Transfer batter to loaf pan, smoothing top, and bake in oven for 45 to 50 minutes, or until skewer inserted in middle comes out clean. While the bread is baking, combine orange juice and sugar in a saucepan. Bring mixture to a boil over moderate heat while stirring, and simmer for 1 minute. Keep syrup warm. Make holes in top of bread with a thin wooden skewer and drizzle with syrup. Let stand in pan until cool. Makes 1 loaf.
Brussels Sprouts and Bacon Salad

Brussels Sprouts and Bacon Salad
I thought about giving the bacon top billing, but truth be told, the Brussels sprouts really are the star of this dish. I know some people don’t like Brussels sprouts. I am not one of them. I have always loved them, even when I was a kid. I like them steamed with butter, roasted, pan fried and even raw.
This salad is a great way to enjoy their crunchiness in raw form. The bacon adds a wonderful smoky flavor. I also added an orange, some dried cranberries and toasted almonds. The dressing, sweetened with maple syrup, rounds out the dish.
An added bonus, it tastes good even the next day. The sprouts are like little cabbages. Unlike lettuce, which wilts quickly once dressed, the sprouts soften some, but retain most of their crunch. I have been known to eat this salad for breakfast the next day.
Brussels Sprouts and Bacon Salad
8- 10 oz. Brussels sprouts
1 large orange, peeled and cubed
4 slices bacon, cooked and crumbled
¾ c. dried cranberries
½ c. toasted slivered almonds*
Dressing:
¼ c. olive oil
¼ c. apple cider vinegar
2 T. maple syrup
1 T. fresh chopped parsley- or 1 t. dried
2 t. hot sauce, or to taste
½ t. dried thyme
½ t. dried basil
Salt and pepper to taste
Trim bottoms off the sprouts, cut in half and slice thin. You should end up with about 4 cups of sliced sprouts. Place in large bowl with the remaining salad ingredients. Place dressing ingredients in a jar with a tight fitting lid and shake well to combine. Toss over Brussels sprout mixture.
Note: The salad ingredients can all be assembled a day ahead, then just dressed when ready to serve. This salad is also good the next day.
*To toast the almonds, place in a skillet over medium low heat and stir occasionally, until toasted. Be careful, once they start to brown, they can burn easily.
Pink and Purple Salad

Pink and Purple Potato Salad
Sometimes we just need a little extra color in our day. My pop of color came in the form of a potato salad. Yes, a potato salad. I had picked up some purple potatoes at a local produce market. I’ve had them before.
Normally, the purple potatoes lose a little color once cooked. For whatever reason, these potatoes retained all of that purple color. I cooked them in the microwave, and maybe that is why. Maybe they were just a brighter color to begin with. All I know, is that when I started cutting them up for my salad, I was amazed at how purple they were.
Since I had some red onions, I decided to use them with the potatoes for my salad. I ended up with a purple and pink salad. Pretty and quite tasty.
A salad made with less colorful veggies, would still taste as good, but it would not be nearly as much fun to eat.
Pink and Purple Salad
1 lb. purple potatoes
1 lb. red onions
1 c. apple cider vinegar
1/2 c. sugar
1/4 c. water
salt and pepper to taste
1 t. celery seed
1/4 c. oil
Bake potatoes until tender. I used the microwave and it took about 7 minutes, but you can bake in a conventional oven, too. While potatoes are baking, peel, then slice onions thin and place in a saucepan with the rest of the ingredients, except the oil. Bring to a boil, then simmer for about 5-8 minutes until onions are just tender. Some of the liquid will cook off. Peel and cube potatoes and place in a bowl. Drizzle with the oil. Add the onion mixture and stir gently. Adjust seasonings, if needed. Chill. Serves 4.
Rich Blueberry Muffins

Rich Blueberry Muffins
I froze a lot of blueberries when they were in season. This time of year I often enjoy using some of those frozen berries in baked goods.
This muffin recipe is one of my favorites. The secret, I think, is the cup of melted butter that is folded into the batter. I also add a little cinnamon, which goes so well with the berries.
You end up with a rich muffin with a crumbly, tender texture and a great flavor. This recipe makes 36 muffins, so you will have extra to freeze. They freeze great.
Rich Blueberry Muffins
4 c. flour
2 T. baking powder
1 ½ t. salt
1 t. cinnamon
1½ c. sugar, plus extra for sprinkling
2 eggs
1 ½ c. milk
2 sticks (1 cup) butter, melted
4 c. blueberries -fresh or frozen
Paper line 36 muffin cups or grease lightly and preheat oven to 375 degrees. In large bowl mix dry ingredients. In smaller bowl mix eggs and milk and beat until smooth. Stir into flour mixture with a fork and mix until just moistened. Fold in melted butter and blueberries divide batter among cups. Sprinkle muffins with a little extra sugar. Bake 25 minutes, or until light golden. Makes 36.
Homemade Spelt Bread

Spelt Bread
I made this spelt bread the other night. Shared it with a few friends. Everyone loved it. I am always interested to learn how many people have never heard of spelt flour, let alone baked with it.
Spelt flour is a close relative to wheat. I love cooking with it because it is so easy to work with. It doesn’t require much, if any, kneading when you make yeast bread out of it. Spelt has a texture much closer to white flour in baking other things, like muffins or biscuits. It does contain gluten, so it’s not an answer for people with gluten issues. For those who do cook with wheat, spelt provides whole grain nutrition in a delicate, less heavy package. The bread I baked was so easy to make and gives me all the taste and fiber of whole wheat bread with less work. Spelt flour is still tricky to find. Some larger grocery stores carry it, but you might have to go to specialty markets. Bob’s Red Mill is my usual source, so if your store carries their products, you should be able to locate it.
Spelt Bread
3 ¼ c. whole spelt flour
1 pkt. Active dry yeast
1 c. water
1/3 c. honey
¼ c. oil
1 t. salt
1 egg
Place 2 c. flour, yeast and salt in a medium bowl. Heat together water, honey and oil until warm (120-130 degrees) Add water mixture to spelt mixture and beat on low speed of electric mixer for 30 seconds, or until moistened. Add egg and beat on high 3 minutes. Stir in enough spelt to make a soft dough. Cover bowl with towel and allow to rise until doubled, about 1 hour. Grease a 9×5 inch loaf pan and use a rubber scraper to transfer dough into prepared pan. Cover and let rise until doubled, another hour. Bake in a pre-heated 375 degree oven for 25-30 minutes. Cover top with foil during last 10 minutes of baking. Bread is done when it sounds hollow when lightly tapped. Remove from pan and cool on wire rack. Makes 1 loaf.
Whole Wheat Bread
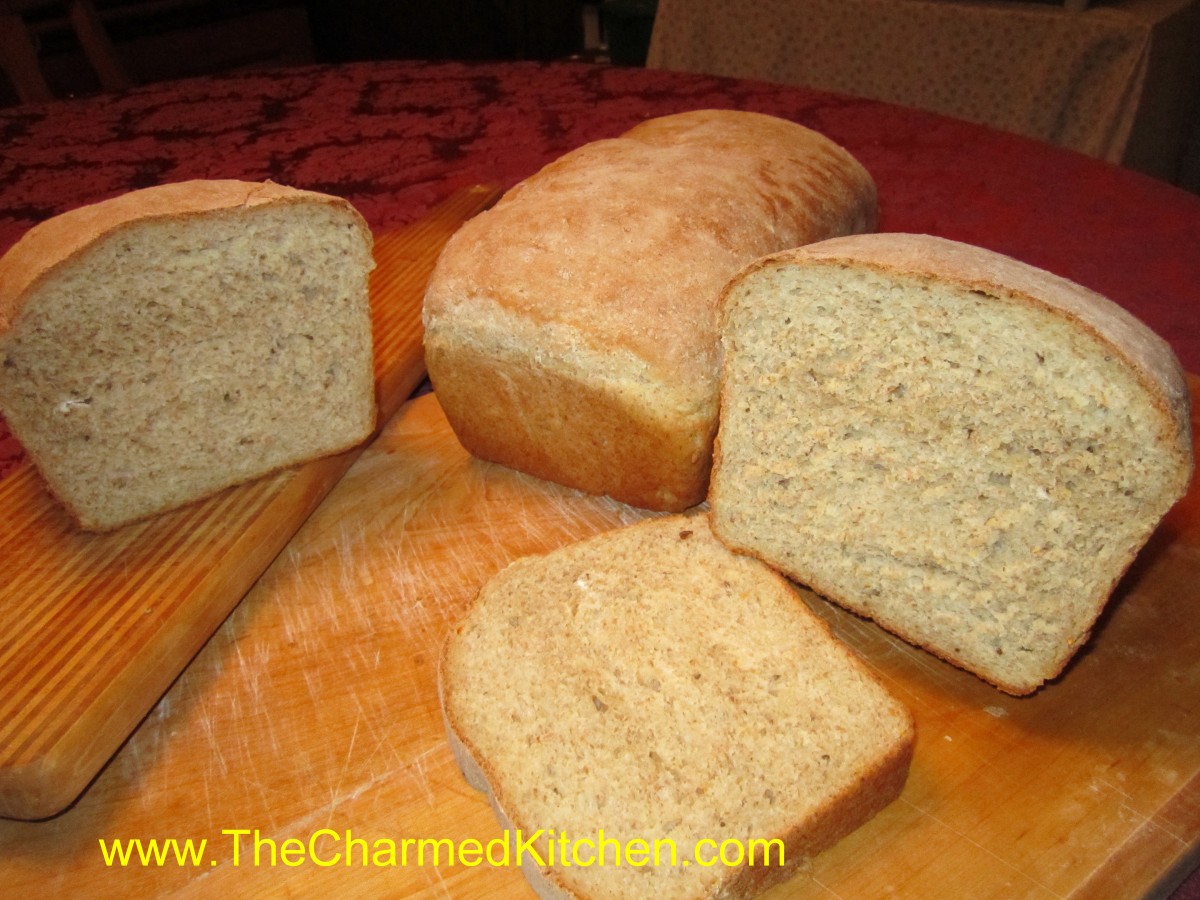
100% Whole Wheat Bread
A lot of us want to eat more whole grains, but are unhappy when we try to make 100% whole wheat bread at home. There is a secret to baking whole wheat bread that is both tender, and slices easily.
Whole wheat flour, high in gluten, also is high in fibers, which make it harder to get the gluten to that stretchy state. If you knead whole wheat bread dough for 5- 10 minutes, like white bread dough, you’ll have a dough that is far from elastic.
The secret? Knead it longer. I knead my whole wheat bread dough about 20 minutes. That is easy if you have it in a stand mixer. Just set it on low and let the dough hook do the work. Not so easy if you are kneading by hand. When kneading for 20 minutes by hand, more and more flour gets added to the dough, to keep it from sticking. The extra flour results in a heavy dough, and a loaf of bread that is best used as a door stop. If you have to knead by hand- knead on a wet surface. The dough won’t stick to your hands or the board and you can knead it long enough to get a properly worked dough. How do you know your dough has been worked long enough? Hold the dough up to light and pull it. It should stretch thin enough so that you can see the light through it, without tearing. Here is one of several recipes I have for 100% whole wheat bread. I love it and I think you will, too.
100% Whole Wheat Bread
2 packets active dry yeast
2 2/3 c. warm water
½ c. oil
½ c. honey, molasses or maple syrup
6 ½ -7 c. whole wheat flour
½ c. non fat dry milk
2½ t. salt
Combine first 4 ingredients in a mixing bowl and stir in 3 cups of the flour the dry milk and the salt. Beat with electric mixer for 3 minutes. Stir in enough flour for mixture to form a thick batter and continue mixing on low in mixer for 15-20 minutes. Dough takes time to become elastic. Add extra flour slowly until dough comes away from the sides of the work bowl, but not too soon. Note: if you must do this by hand add flour until dough starts to come away from the sides of the bowl and knead with wet hands on wet work surface for 15-20 minutes. Transfer dough to lightly greased bowl and cover, allowing to rise until puffy, about 1 hour. Punch dough down and transfer to a lightly floured surface. Divide in half and shape each half into a loaf. Place in a lightly greased 9×5 – inch pan. Brush top with oil and place a piece of plastic wrap over the top. Allow to rise until doubled. Bake in a preheated 350 degree oven for 40 minutes. Tent with foil after 20 minutes to prevent over browning of the top. Test for doneness by removing bread from pan and thumping on the bottom. Bread should sound hollow. Makes 2.
Farewell Aunt Tillie
 I’ve spent the last two days in Columbus. I went down for the funeral of my Aunt Tillie. It was sadly, also the funeral for my cousin Diane. I don’t post a lot of really personal stuff on my website, but I would be remiss to not acknowledge Aunt Tillie and the woman that she was.
Aunt Tillie was my Mother’s sister. They were less than two years apart and in many ways were like twins. They finished each other’s sentences and always spoke so highly of each other. They could not have been closer.
All of the childhood Thanksgivings I can remember were spent with our two families together. We alternated houses, so each sister had the chance to host. It was very much a communal meal. The visitor always provided dessert- and a cranberry salad that we still make every year. We always had the best time on Thanksgiving. I looked forward to it every year.
In recent years, Aunt Tillie developed problems with her short term memory. The last time we spoke she talked a lot about her childhood and about my mother. Every few minutes she would stop and ask who it was she was talking to. I loved our chats. I will miss them.
She was kind, sweet and I never heard her speak badly of anyone. She was a gracious, caring human being.
Like my mom, she loved animals. She started feeding a squirrel one year. The squirrel would climb the tree by their kitchen window and scratch on the window when it wanted to be fed. As the season went along the squirrel got quite big. As it climbed the branch to the window, the brand bowed under the weight of the squirrel. It would have to reach up to get to the window. Every time she heard it scratching, she would run out to feed it. Baby squirrels that fell out of the giant oak tree in their front yard were cared for until they could fend for themselves.
Her daughter, Diane preceded her in death by a few days. Diane was so smart and very crafty. Over the years she gave me numerous gifts that she had made. I will always treasure them.
So today was a sad day for my family. It was also a chance to see some cousins I haven’t seen in awhile. It was nice to see them, even if the reason was sad.
So no big lessons or profound words to share. Just spend time with those you love. Tell them you love them- often.
Farewell Aunt Tillie and Diane. You were loved- and you will be missed.
Spelt Dinner Rolls

Spelt Rolls
Spelt flour is one of my favorites for making yeast breads and rolls. Spelt is a whole grain flour, with all the fiber and nutrition of whole wheat flour. Spelt has a softer texture than whole wheat flour. It is easy to work with and rises light and tender.
Spelt also doesn’t require as much kneading as other flours.
For this recipe, I just divided the dough into 12 pieces for pretty good sized rolls. You could divide the dough into up to 18 pieces if you prefer smaller dinner rolls. If you have family members who aren’t crazy about the heavier texture of whole wheat you might want to give spelt flour a try.
Spelt Dinner Rolls
3 ¼ c. whole spelt flour
1 pkt. Active dry yeast
1 c. water
¼ c. honey
¼ c. oil
1 t. salt
1 egg
Place 2 c. flour, yeast and salt in a medium bowl. Heat together water, honey and oil until warm (120-130 degrees) Add water mixture to spelt mixture and beat on low speed of electric mixer for 30 seconds, or until moistened. Add egg and beat on high 3 minutes. Stir in enough spelt to make a soft dough. Cover bowl with towel and allow to rise until doubled, about 1 hour. Grease a baking sheet and set aside. Use a rubber scraper to transfer dough onto floured surface. Divide dough into 12 pieces. Shape each piece into dinner roll shapes, using extra flour to prevent sticking. Place on baking sheet and cover with a towel. Allow to rise until doubled, about 1 hour. Cover and let rise until doubled, another hour. Bake in a pre-heated 375 degree oven for 15 minutes or until rolls are light brown on top. Remove from pan and cool on wire rack. Makes 12 rolls.
Homemade Lemon Curd

Lemon Curd
Lemons are in season and it is a perfect time to make lemon curd. Lemon curd is such a versatile dish. It’s a sort of lemon pudding and can be served plain, or with a dollop of whipped cream. It is also great in trifle or served as a topper for any number of cakes and sweet treats. I especially like to make lemon curd to serve with scones. It is also really nice served with berry shortcakes.
It is easy to make and packed with fresh lemon flavor. Lemon curd is just a few ingredients, cooked over low heat until it thickens up. You can make a batch in under 10 minutes. The longest part of the prep time is just waiting for it to cool down after cooking.
So here is the recipe for the lemon curd. If you never made your own- you might want to give it a try. Certainly worth the effort.
Lemon Curd
1/2 c. lemon juice
zest from one good sized lemon- you should have 2-3 teaspoons
1/2 c. sugar
3 eggs
6 T. unsalted butter- cut into little cubes
In medium saucepan combine all ingredients. Whisk the mixture until the eggs are well blended. Cook over medium low heat, whisking often, until the mixture thickens. This will take 5-7 minutes. Whisk more often as mixtures warms and starts to thicken. Better to heat over lower heat and take longer than over too high a heat. You don’t want the eggs to scramble. Once the mixture is thickened , transfer to a bowl or jar. Cover the surface with a piece of plastic wrap to keep the surface from developing a skin- like any pudding will do. Chill until ready to use. Makes about 2 cups. Will keep in fridge a week or two.


