Lovage: Growing and Using

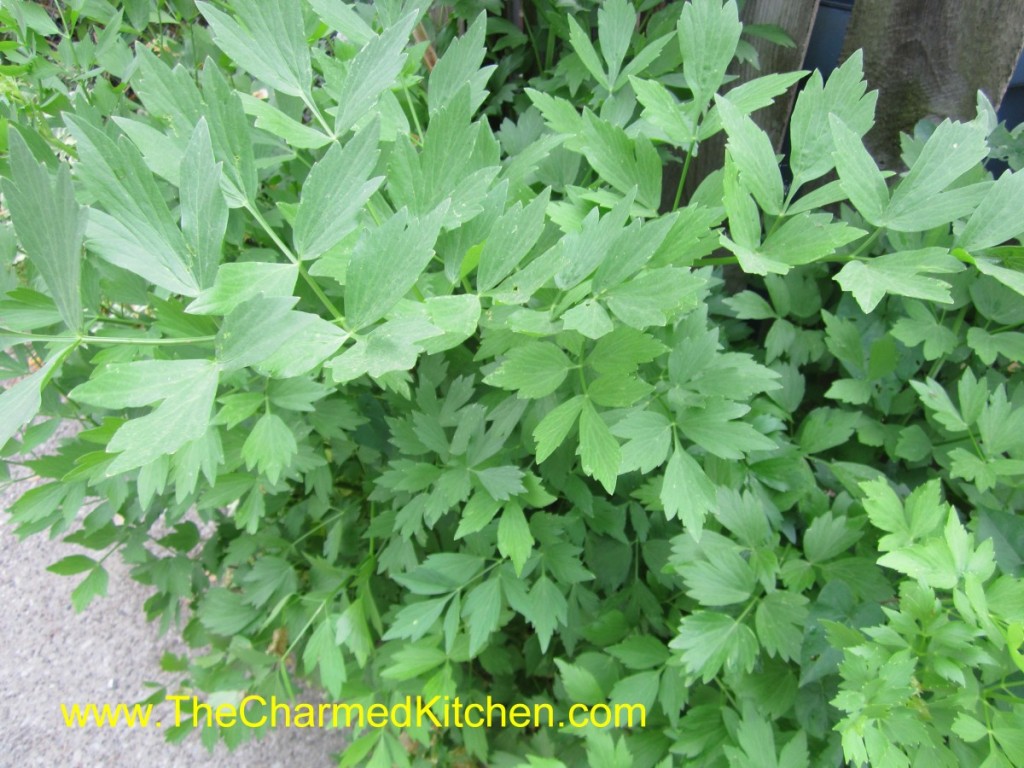
Lovage is one of my favorite herbs. I feel like it doesn’t get enough attention. So many people have never even heard of lovage. Its leaves taste just like celery leaves, so it is very useful in the kitchen. As an added bonus, lovage is easy to grow- and it is a perennial.
I love celery in so many foods. I don’t think you can make a decent stock without it. I especially like using celery leaves. Problem is, often the celery I see in the store has few, if any, really nice leaves. The solution? Lovage.
Lovage leaves can be used in any dish you would use celery leaves: soups, stews, stocks and salads. The seeds can also be used as a substitute for celery seeds in recipes.
Lovage grows to a height of 2-3 feet, except when it is in bloom. When blooming, lovage sends up stems that can reach 6 feet!
The stems of lovage are tough, almost woody. While they can’t be used chopped like celery, the stems are hollow and can be cut to size and used as straws in drinks like Bloody Marys or vegetable juices.
I’ve never seen lovage sold as a fresh herb. As far as I know, the only way you can enjoy this lovely plant is to grow it yourself. It thrives in sun, but will tolerate some shade. For a little effort you can have fresh “celery” leaves whenever you want. I also freeze plenty for use throughout the year.
Here is a favorite recipe of mine using lovage. Perfect for Spring.
Fresh Pea Soup with Lovage
2 T. butter or oil
1 medium onion, chopped
2 c. fresh English peas, pea pods (sliced), or sugar snaps (sliced)
¼ –½ c. fresh lovage leaves, chopped fine
3 c. chicken stock or veggie stock
salt and pepper to taste
1 c. sour cream
Heat butter or oil in medium saucepan. Sauté onion until tender. Add peas, lovage, stock, and salt and pepper. Cook until peas are the desired tenderness, about 3 – 7 minutes. Puree soup in batches until smooth. Place sour cream in a small bowl. Ladle 1 cup of hot soup into the sour cream, and stir to smooth. Pour this mixture into the soup and cook, barely simmering, until soup is heated through, about 2 minutes. To serve, ladle into bowls and garnish with lovage sprigs. Serves 3 – 4.
Note: You can also serve this soup cold.

Strawberry Sorbet

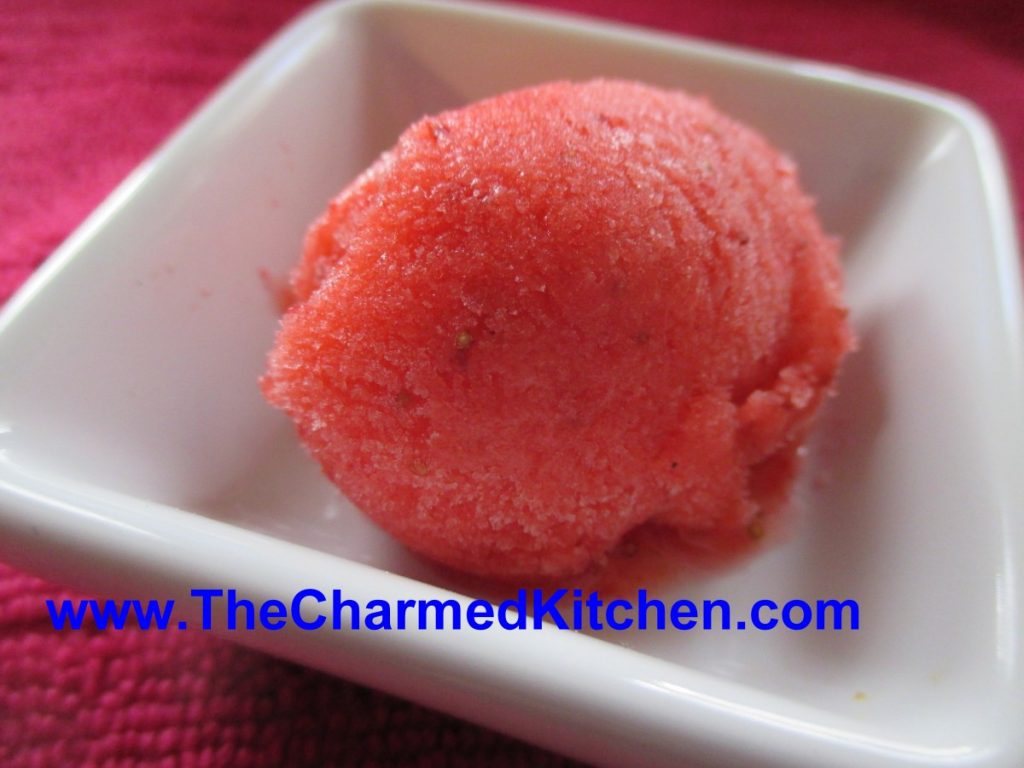
Strawberry sorbet is a wonderful dessert to keep around, especially in summer. It is sweet and a little tart and very refreshing. It is such a pretty color.
You can play around with adding other flavors. I sometimes add fresh herbs, like mint or pineapple sage. Vanilla or citrus zest are nice add ins, too. I added a few lavender blossoms to this batch.
Sorbets can be served on their own, with cake, or drizzled with chocolate sauce. I sometimes add a scoop of sorbet to a glass of lemonade or ice tea on a hot day. So refreshing. Sorbet can be a fun topper in cocktails, too.
You can make sorbet in an ice cream machine, if you have one, but you don’t need to. I don’t. It really is simple. As an added bonus, once your sorbet is made, you have it on hand whenever you need a dessert. The secret is to blend the sorbet a couple of times after it is frozen, if you can. Each time, the sorbet gets smoother and creamier. I use my food processor.
Strawberry Sorbet
1 1/2 lbs strawberries, fresh or frozen
1/2 c. sugar, or to taste – you could also sweeten with honey, if you prefer, or use no sweetener
1 T. lime or lemon juice
Wash and stem berries. Place in food processor with juice and blend until smooth. Sweeten to taste, stirring until sugar is dissolved. Place in a container with a lid and freeze. Once frozen, remove strawberry mix from freezer and sit it on the counter to soften a little bit. This is really the important part. You don’t want it to thaw, but you do want it soft just enough to break into chunks. Place chunks in food processor and blend it again. It will actually start to look a little creamy and lighter in color. You can serve it right away- or put it back in the freezer to serve later. At this point the sorbet is ready- but you can repeat the soften/process step once more, if you like, for even creamier sorbet. Makes 3-4 cups.
Note: If you have an ice cream maker, you can just pour the chilled mixture into it, and process as you would for ice cream.
Picnics- Food Safety Tips

With picnic and cook-out season here-I thought it would be a good time to post some tips to keep your picnic safe.
Common Picnic Problems
Besides ants, the biggest concern at a picnic should be food safety. While most of us know to keep cold foods cold, and hot food hot, there are some basic things we should all do to insure a safe, happy day.
Away from home and refrigeration, it is can be tricky to keep foods cold until ready to serve. Bring plenty of ice and coolers for all perishable food. Keep food cold until you are ready to cook or eat it. Get food back into coolers as soon as everyone has finished eating.
Package raw meats extra carefully. Raw meat juices, spilling on salads, will make them inedible. Pack raw meats separately if you can, or on the bottom of the cooler in a leak-proof container. You might also consider bringing meats, like burgers, frozen to thaw on the grill or in the cooler. Smoked meats are safer than their non-smoked counterparts but both types can spoil. The ideal situation is to have one cooler only for raw meats.
Don’t make burgers on site. Outdoor prep is always tricky. Better to form burgers at home, where you can wash all surfaces, as well as your hands, thoroughly. If you make them there- bring disposable gloves and a lightweight cutting board to work on.
Never use ice for drinks that has been in contact with raw meat, or even if any raw meats have been stored in the ice. Keep beverage ice in its own cooler, or keep it bagged to insure it is clean and safe.
Solid blocks of ice melt more slowly than cubes, and make good cooler inserts for long, hot summer days. Also, keep coolers in the shade to offset the power of the sun.
Meat should be cooked thoroughly and ground meat is always more at risk for contamination. Make sure your fire is hot enough. Allow for chilly, windy days and pack extra coals or other fuel, to keep the fire hot throughout the cooking process.
Make sure you don’t put cooked meats on the tray that the raw meat was on. Also have different prepping and serving utensils for both the raw and cooked meats.
You can also precook meats (like chicken pieces or ribs), cool and chill until ready for dinner. Then just heat them up over the coals. This way you don’t have the worry of bringing along raw meats and you’ll spend less time cooking and more time having fun.
Mayo is not the evil purveyor of bacteria some people think. Mayo from a fresh jar, can actually retard the growth of bacteria. This does not mean you can leave the potato salad in the trunk for 3 hours because it has mayo in it. It just means that mayonnaise is not the culprit for food spoilage- bad handling was likely the cause.
While 2 hours is the maximum for food to be left out before being refrigerated again, use common sense. Obviously, on a 95 degree day that time is much shorter. Rather than one big bowl of pasta salad, bring several smaller ones that you can switch out. That way you always have cold salad that is safe. And bring plenty of serving spoons. It does no good to swap out the bowls of pasta salad for a fresh bowl, if you keep using the same serving spoon. Try to stay in the shade, too. Bringing some sort of canopy can keep food cooler than sitting in direct sunlight.
I am a big believer in a good hand washing being the best way to clean your hands- but you might not have running water where you are. Hand sanitizers are great when you don’t have hand washing as an option. I also bring a package of sanitizing wipes, in case a surface needs cleaning up, too.
If it is a hot day- you might want to have a large container, filled with ice, that you can put the bowls of salad into when serving, to keep them colder. That way the salads are surrounded by the ice and stay cold a lot longer. You can use a small baby pool. I like to use a container designed for under the bed storage. Nice size.
In the end, it is about using common sense, and copious amounts of ice. Remember, that if you lose track of time, forget to put something back in the cooler or leave something in the trunk, it is always better to play it safe. When in doubt-throw it out.
Rich and Chewy Brownies

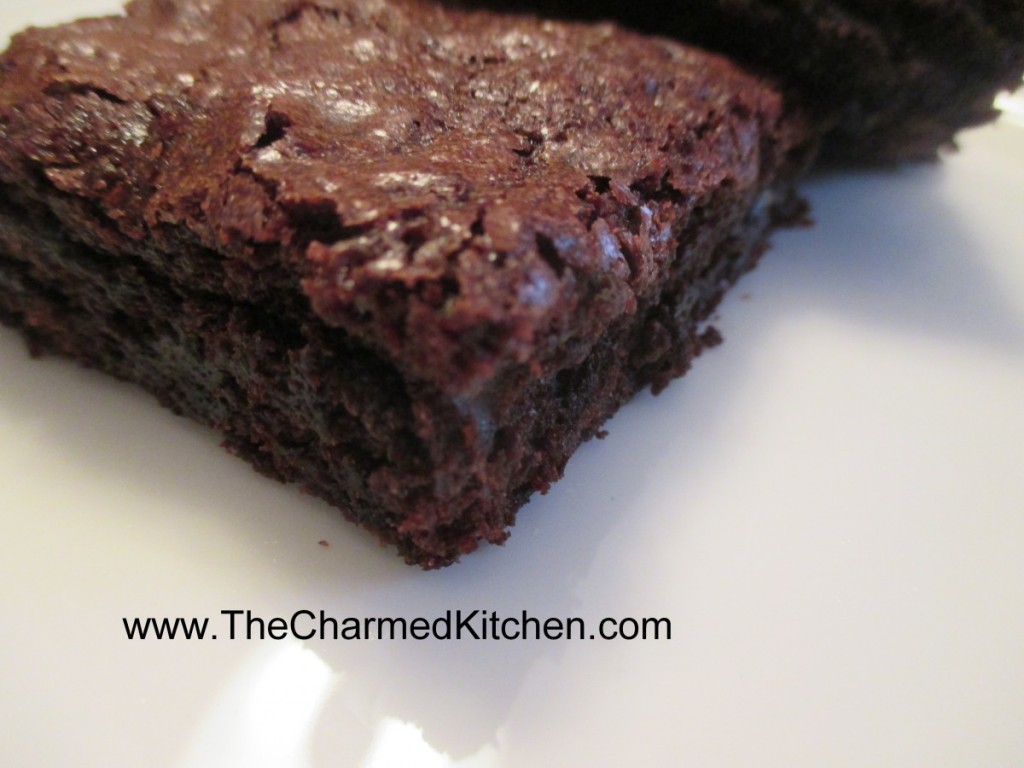
Brownies have been around for almost 100 years. The story about the creation of brownies, is that they were an accident. A woman was making a chocolate cake. She couldn’t find her recipe, so she made the cake as best she could from memory. The cake didn’t rise- and brownies were invented.
What a happy accident that was for the rest of us.
There are a lot of versions of brownies around. Some are more like a chocolate cake, just a little denser. Others are moist, and so dense they are almost fudge like.
I have a lot of brownie recipes. This is one of my favorites. If you make them, you will understand why. They are soft, rich and a little chewy. They can be served plain, dusted with powdered sugar, or frosted. There is a lovely chocolate buttercream recipe below the brownie recipe.
Rich and Chewy Brownies
3 sticks butter, melted and cooled
3 c. sugar
1 T. vanilla
6 large eggs
1½ c. flour
1 c. cocoa
1 t. baking powder
1 t. cinnamon
1 c. chocolate chips
Heat oven to 350 degrees and grease a 13×9 inch pan. Beat together butter, sugar and vanilla. Whisk in eggs one at a time. Combine dry ingredients and stir into batter. Stir in chocolate chips and spread batter in prepared pan. Bake 40-45 minutes, or until brownies pull away from sides of pan. Cool brownies completely in pan, on a rack and cover with foil. Let stand 6 hours before serving. Makes 24.
To serve, you can leave them plain, dust with powdered sugar, or frost. Here is a great frosting recipe for these brownies.
Easy Chocolate Butter Cream
6 T. butter, softened
1/3 – 3/4 c. cocoa, depending on how dark you want your frosting.
2 2/3 c. powdered sugar
1/3 c. milk
1 t. vanilla
Cream butter. Combine cocoa and sugar. Beat cocoa mixture in alternately with the milk until frosting is spreading consistency. Beat in vanilla. You may need an additional tablespoon of milk. Makes about 2 cups.
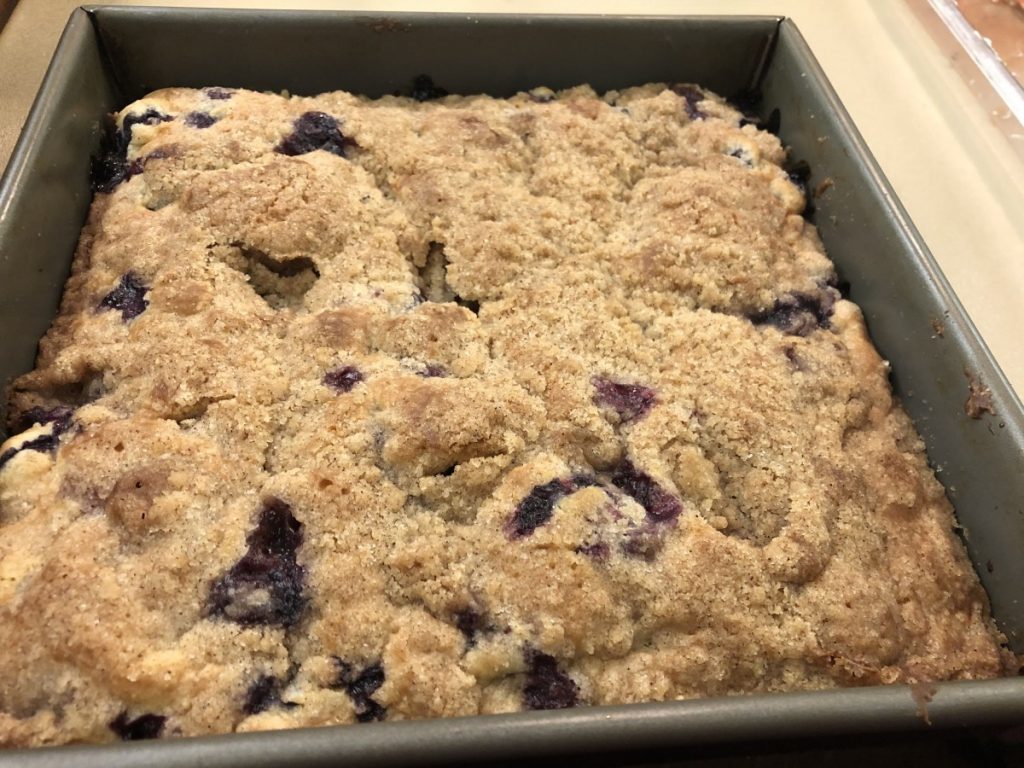
Blueberry Crumb Cake

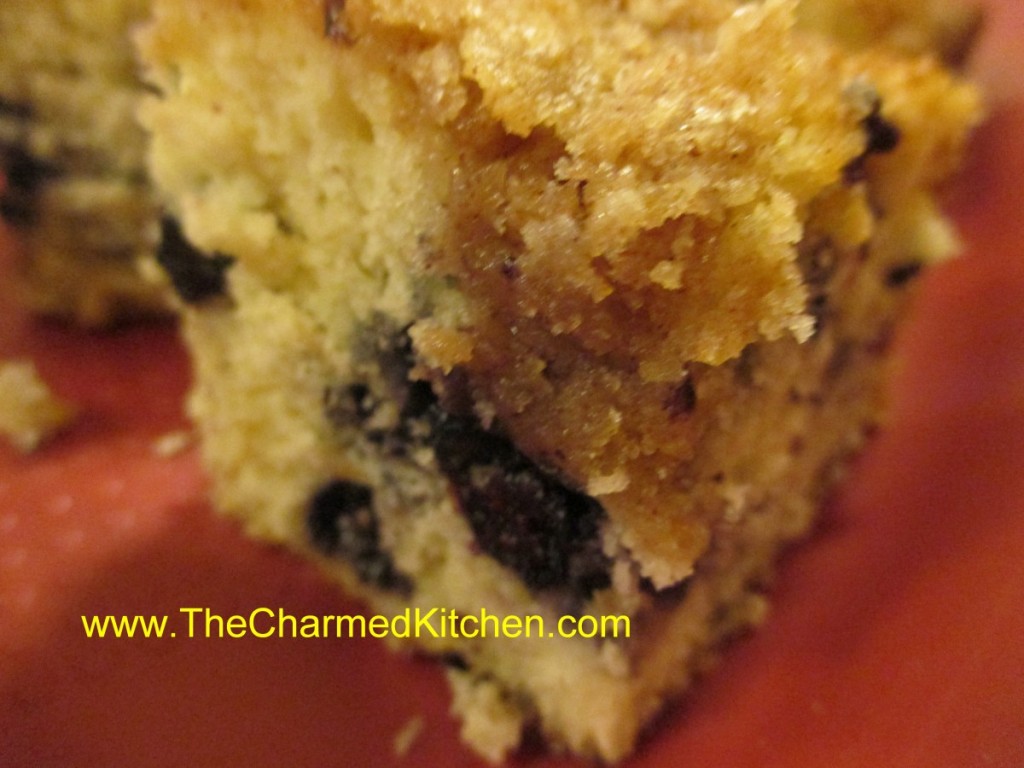
This has always been a favorite cake of mine. The mixture of moist cake and berries would be great on their own, but that crunchy, crumb topping- oh my! Talk about a wonderful combination.
It isn’t a difficult cake to make at all. It is an extra nice cake to take along to picnics and cook outs since there is no frosting to worry about. It can be served plain, or served with a scoop of ice cream of some whipped cream.
So here is the recipe. Enjoy!!
Blueberry Crumb Cake
For cake batter:
2 c. flour
2 t. baking powder
½ t. salt
½ stick (¼ cup) butter, softened
¾ c. sugar
1 egg
½ c. milk
1 pint blueberries, fresh or frozen
For topping:
½ c. sugar
¼ c. flour
½ t. cinnamon
½ stick (¼ c. butter, chilled and cut into bits)
Combine dry ingredients and set aside. In mixing bowl with electric mixer, beat butter and sugar until light and fluffy. Beat in egg and milk. Add flour mixture gradually until just mixed in. Fold in blueberries. Grease and flour an 8 or 9-inch square baking pan and add prepared batter. Combine topping ingredients until they resemble coarse crumbs. Sprinkle over batter in pan and bake in a preheated 375-degree oven and bake for 35-45 minutes. Use toothpick to test.
Note: I have used a 9-inch round pan and it worked fine.
Mini Strawberry Shortcakes


These little shortcakes are as cute as they are tasty. You can have all the components ready, then just assemble when ready to serve.
Fun to serve at parties, picnics and cook outs. Because these are small, they work well with other desserts on larger dessert trays.
I made the shortcake base with a scone recipe, and used a small ice cream scoop to put the batter on the baking sheet. They ended up looking like little sandwich buns. One friend said they looked like sliders.
I split them, and filled with sweetened strawberries. I replaced the top and added chocolate ganache and whipping cream to finish them off.
The scone is tender and not too sweet. Satisfying and light at the same time.
Mini Strawberry Shortcakes
The shortcakes
2 c. flour
1/4 c. sugar
½ t. salt
1 T. baking powder
1 1/4 c. heavy cream or 1 cup half and half
Preheat oven to 425 degrees. Sift together dry ingredients and gradually add cream to form soft dough. Stir mixture until it just holds together. Using an ice cream scoop place batter on baking sheet a couple of inches apart. You should get about a dozen. Bake 10-12 minutes or until golden. Makes about 12. Cool on rack until ready to use.
The berries
2 lbs. strawberries, sliced thin
1/2 c. sugar, or to taste
Combine berries and sugar in medium bowl and place in fridge until ready to use. Berries should be in the sugar for at least a couple of hours and can even be prepped a day ahead to allow the juices to come out of the berries.
The ganache
1 c. semi sweet chocolate chips or 6 oz. semi sweet chocolate, chopped
1/2 c. heavy whipping cream.
Combine both in double boiler or in microwave and heat until mixture is just warm enough to melt the chocolate. Stir until smooth.
The whipped cream – use whipped cream, sweetened or unsweetened according to your taste.
Assembly: Slice the caps off the tops of the shortcakes. Place a generous spoonful of the sliced berries on the bottoms of the shortcakes and spoon some of the strawberry liquid over them as well. Place the tops of the shortcakes back on and spoon on a dollop of the chocolate ganache. I let me get to room temperature so it didn’t drip down exactly as I had planned. Top with some whipped cream and serve. Makes about 12.
Cucumber and Carrot Salad

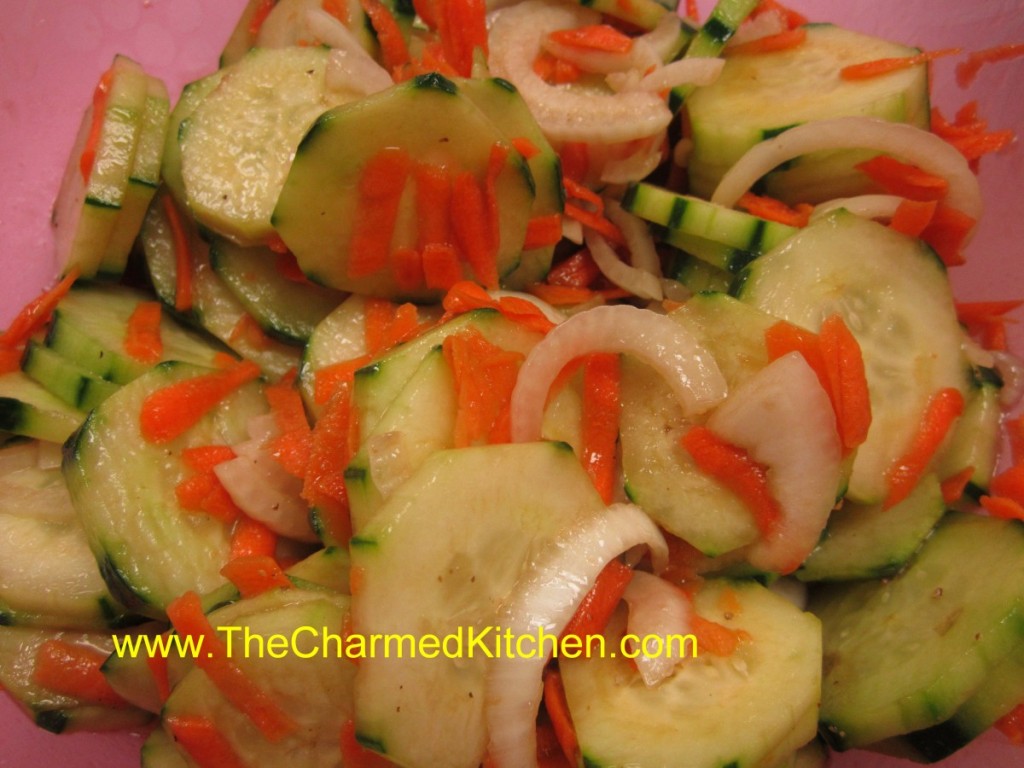
With summer approaching I am always thinking about salads and outdoor dining. I love a dish that is easy to take along to picnics, barbecues and cook outs. This refreshing salad combines carrots and cucumbers in a simple dressing. So easy and fast. Perfect side for your picnic or barbecue.
Cucumber and Carrot Salad
4 cucumbers, peeled, leaving strips of skin
1 c. coarsely shredded carrots
1 c. thin sliced sweet onion
1/3 c. vinegar- I like cider vinegar in this dish
2 T. Balsamic vinegar
¼ c. oil
1 T. sugar
1 ½ t. salt
Fresh ground pepper
Slice cucumbers. Combine vegetables in bowl. Combine dressing ingredients and pour over the vegetables, tossing to coat well. Chill at least 1 hour before serving, Spoon over lettuce, if desired. Serves 4-6.
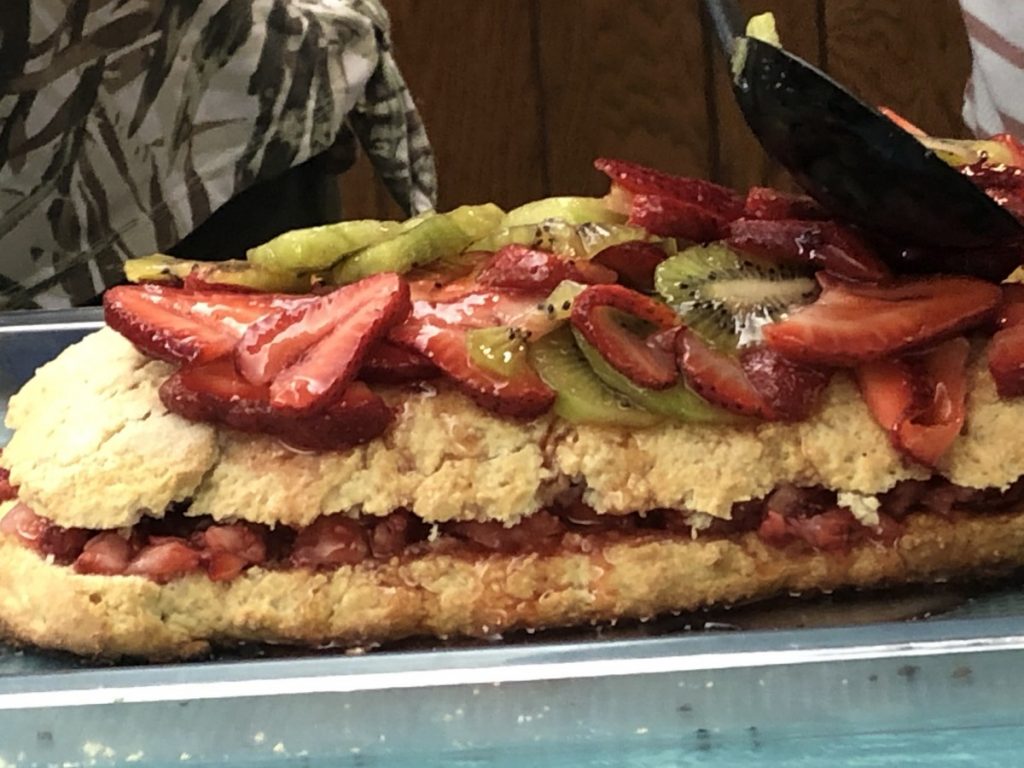
Giant Strawberry Shortcake

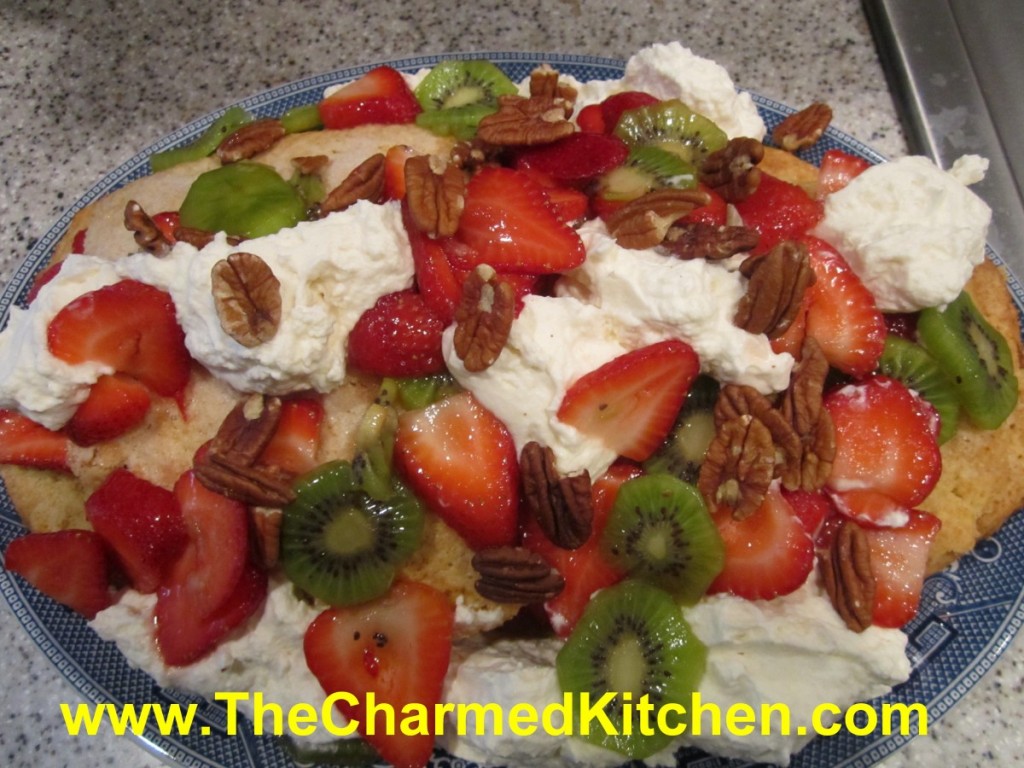
This is a great dessert for a party, picnic or barbecue. Instead of making a bunch of individual shortcakes, make one really big one. It makes quite an impression.
When ready to serve it, just cut into slices, like cake or pie. I often serve this shortcake with ice cream on the side. Feel free to switch up which fruits you use. I used kiwi fruit with the strawberries, but you can add different fruits. Peaches would go well with the strawberries or blueberries. Just have fun and use fruit combinations you like.
For Memorial Day or the 4th of July, you could use a combination of strawberries, raspberries and blueberries.
Giant Strawberry Shortcake
1 egg
3/4 c. milk
1/2 t. lemon juice
2 c. flour
1/4 c. brown sugar
1 T. baking powder
1/2 stick cold butter plus 1 T. softened
1/2 c. plus 1 T. sugar
1 qt. strawberries, sliced thin
2 kiwi fruit, peeled and sliced thin
1/4 c. nuts, toasted, I left the nuts whole
whipped cream, optional
In small bowl combine egg, milk and lemon juice and set aside. In larger bowl combine the flour, brown sugar and baking powder. Cut in cold butter to resemble coarse crumbs. Add egg mixture and stir until mixture forms into a soft dough. Knead dough gently on a lightly floured surface about 10 times. On greased baking sheet pat dough into a 15×6-inch oval. Sprinkle dough with the 1 tablespoon of sugar and dot with the softened butter. Bake in a preheated 400 degree oven for 20-25 minutes, or until lightly golden. Place on wire rack to cool. Toss the berries with the remaining 1/2 cup of sugar. Allow to stand 30 minutes. Split the shortcake lengthwise and remove the top. Spoon over the half the berries and replace top of shortcake. Combine the kiwi with the remaining berries.Spoon over the remaining fruit and sprinkle with the nuts. Dot with whipped cream, if desired. Cut in wedges to serve. Serves 8.
Note: you can bake shortcake day ahead and prep the fruit day ahead, keeping it chilled and just assemble when ready to serve.
Amy’s Baked Beans

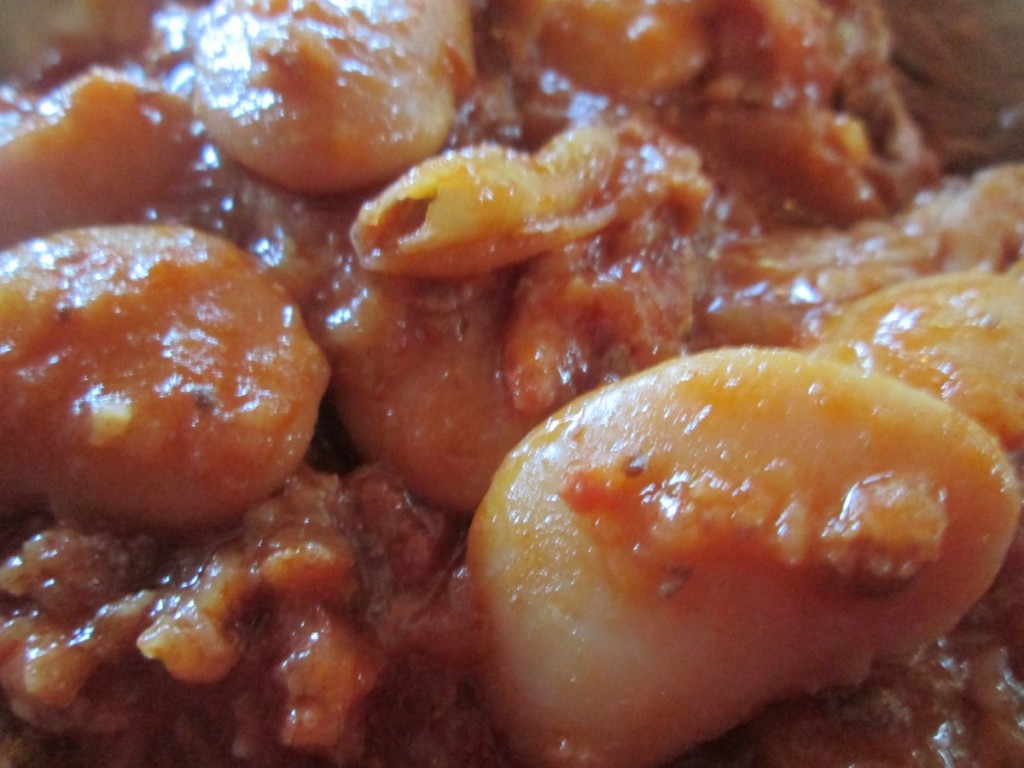
This is a wonderful recipe for baked beans. I got the recipe from my friend Amy. She used to make them for almost every summer barbecue. Unlike traditional “baked” beans, this recipe starts with canned beans.
I love traditional baked beans. The ones baked all day, until the beans get tender and the flavors are perfectly blended. But I don’t always have time to make them. By starting with canned beans, it saves a whole lot of time, without compromising flavor. When I serve these beans, everyone comes back for seconds.
It’s a simple recipe, with relatively few ingredients. It can be baked in the oven, or done in a crock pot.
Super easy and very tasty.
Amy’s Baked Beans*
6 c. chopped onion
1 lb. ground meat
1 lb. bacon, cut into 1-inch pieces
1/2 c. brown sugar
2 cans tomato soup
3 can butter beans, rinsed and drained
Mix onion, meat and bacon in skillet and cook until onions are translucent. Drain off excess fat. Place in Dutch oven with remaining ingredients and cook, covered, in a 350 degree oven for 90 minutes.
Note: You can also cook in a crock pot on high for 4 hours or longer. Uncover, for awhile, if you like, for thicker sauce.
*This recipe has been in the McWilliam family for several generations. They are also called Grandma McWilliam’s Beans and before that Aunt Elizabeth’s Beans.
Coconut Chocolate Bowls

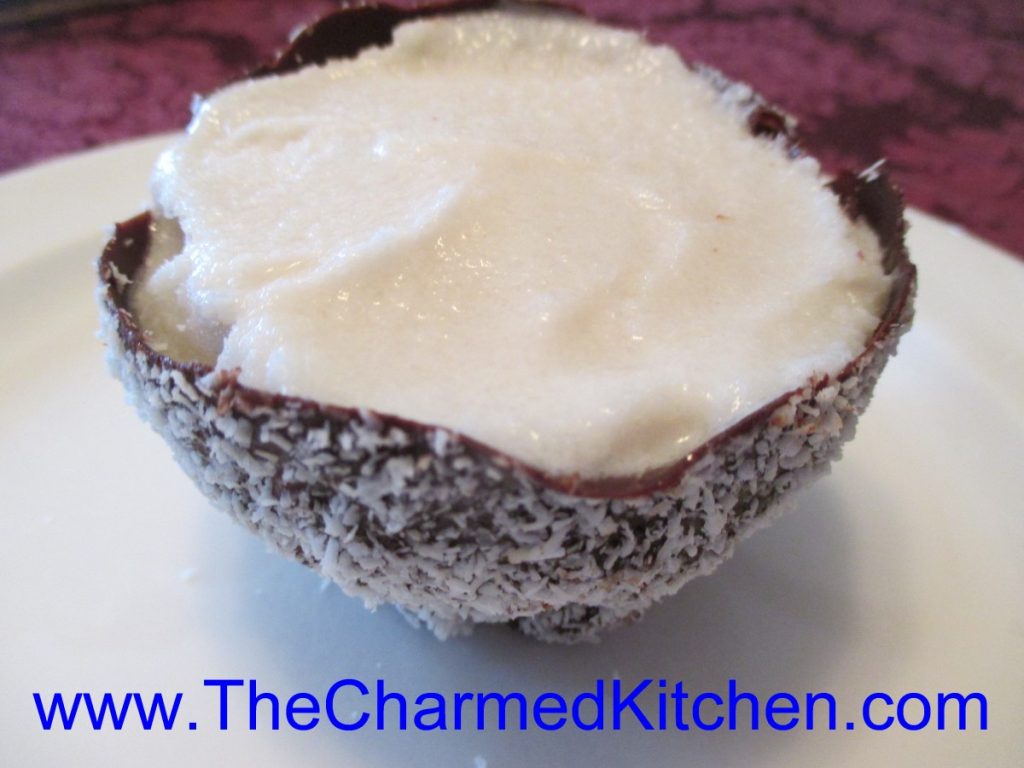
Now this is fun. Coconut almond sorbet served in chocolate bowls. The idea is to make the dessert look like coconuts. It worked out well and tasted great. The whole dessert is dairy free and vegan as well. Great for people who have issues with dairy. You won’t miss the dairy in this recipe. The sorbet is smooth and creamy.
These are fun to serve for summer parties. You can make everything ahead of time, assemble and keep in the freezer until you want them. I served them at an April Fool’s Dinner a while back.
So here are the directions for the bowls and the recipe for the sorbet.
The bowls are made by dipping inflated balloons in melted bittersweet chocolate. Then you coat them is desiccated coconut to cover the chocolate. Desiccated coconut is dry and unsweetened. It looks like white bread crumbs. You can find it at Asian markets (it is the type of coconut used for coconut shrimp) . It is also found at cake decorating and candy making stores.
Place them on wax paper. Let the bowls set- in fridge or freezer- until the chocolate hardens. Then you just pop the balloons and remove them. You are left with a chocolate bowl. I have the best luck removing the balloons when I put the bowls in the freezer to set. Fill the bowls with the sorbet- you could use vanilla ice cream, I suppose, but the coconut sorbet really is better in this dish.
You can serve them as is- or top with some fresh fruit or chocolate sauce.
Inspired by a friend who can’t have dairy, I made this coconut sorbet. I started with a can of coconut milk, added some almond milk, sweetened it, and added vanilla for a little added flavor. So simple and really tasty.
It has a lot of the creaminess of a dairy based dessert. In fact, if you didn’t know, you would probably think there is some milk or cream in this sorbet, even though there isn’t.
Looking forward to making some for my vegan niece the next time she comes to town.
Coconut Almond Sorbet
1 can (13.5 oz.) coconut milk
1 c. almond milk
¼ c. sugar- or to taste
2 t. vanilla
Combine all ingredients in bowl and stir until sugar is dissolved. Place in an ice cream maker and freeze according to manufacturer’s instructions. Makes 1 quart.
Note: If you don’t have an ice cream machine, you can freeze the sorbet in a shallow tray. Once frozen, remove from freezer and let it soften a few minutes. Break into chunks and process in a food processor to soften. Return to freezer until ready to eat.


