Spiced Pear and Oatmeal Muffins


It is pear season. While apples seem to get more attention, pears are a wonderful, versatile fruit.
Pears will ripen off the tree and are often picked unripe and allowed to ripen after harvest. Unlike a lot of other fruits, pears do not suffer from being picked before they are ripe. As they ripen, pears become very sweet.
I like to pick out both ripe and unripe pears at the local market. That way, I’ll have ripe pears over a longer period of time.
I had some ripe pears and wanted to do something with them. Since I had a friend coming for over breakfast, I thought muffins. It’s always nice to have an easy breakfast option on hand.
I started with a basic muffin recipe, and added some diced pears, cinnamon, orange zest, nutmeg and a cinnamon sugar topping, to make them special. And yes, you could substitute apples for the pears!!!
I was really happy with how they turned out. Not overly sweet, moist and tender. Here is the recipe.
Spiced Pear and Oatmeal Muffins
1 ½ c. flour
1 c. rolled oats
1 T. grated orange peel
2 t. baking powder
1 t. cinnamon
½ t. each nutmeg and salt
½ t. baking soda
1 egg, beaten
1/3 c. honey
1/3 c. oil
¼ c. orange juice
1½ cups of peeled, diced pears – 2 or 3 pears should do it
2 T. melted butter, optional
cinnamon sugar, optional
Combine flour with the dry ingredients. Set aside. Combine egg with the honey, oil and juice. Add egg mixture to flour mixture and stir until flour is just moistened. Fold in pears. Batter will be thick. Divide batter among 12 greased muffin cups. Bake in a preheated 375- degree oven for 20-25 minutes. While the muffins are warm, dip tops in melted butter and then dip in the cinnamon sugar, if you like. They are tasty, with or without the cinnamon sugar topping, but I like to add this last step. Makes 12.
Roasted Beet Salad

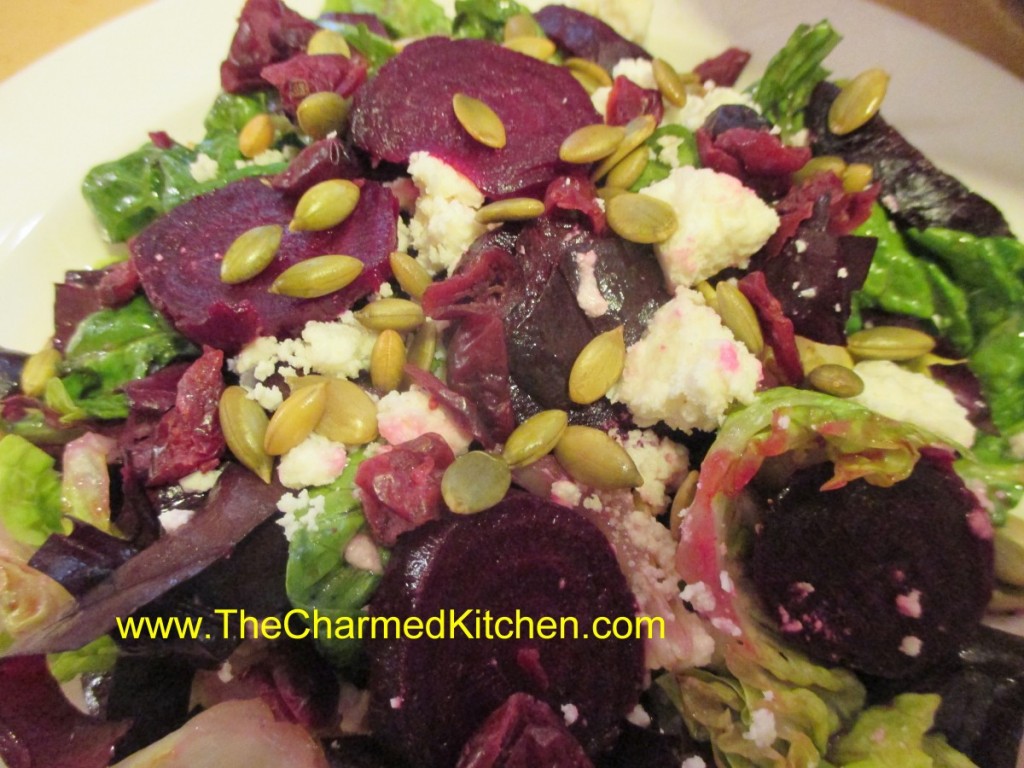
I picked up a couple of bunches of beets the other day. I wasn’t sure what I wanted to do with them at the time. They just looked so fresh. I decided to roast some, and then go from there.
To roast beets: just wash them and trim off the greens- leaving about an inch of the stems to reduce bleeding. The beet greens could be added to the salad.
Place beets in a roasting pan and drizzle with a little oil. I used avocado oil. Cover pan and place in a 350 degree oven for about 45 minutes. Smaller beets will be cooked in less time- about 35 minutes. Really large beets could take up to an hour. I always check by poking one of the beets with a fork. Let the beets cool a little and then remove the peels. I use a knife to do this. They come off quite easily.
I used three small beets to make this salad for lunch. I shared it with a neighbor.
Roasted Beet Salad
1 small head Bibb lettuce, washed and sliced into thin slices
2 c. spinach, torn into bite sized pieces
1/4 c. olive oil
3 T. red wine vinegar
2 t. sugar, optional
3 small roasted beets, peeled
1/2 c. crumbled feta cheese
1/4 c. hulled pumpkin seeds, toasted
1/4 c. dried cherries
coarse salt- I used pink salt
Place lettuce in a mixing bowl. Combine olive oil with vinegar and sugar, if using. Add salt and pepper to taste and toss over the greens. Slice beets. Divide greens on 2 salad plates. Arrange half of the beets on each salad and top with the rest of the ingredients. Sprinkle with a few grains of the sea salt and serve. Makes 2 luncheon salads.
Apple Galette


If you like apple pie, you will like apple galette. A galette is made by rolling out your crust, adding filling and folding up the edges. No pie pan involved.
I actually find a galette easier to make than pie. You don’t have to try to roll out your dough to fit into the pie pan. Nor does you dough have to be rolled into a perfect circle.
That takes a lot of pressure off, if rolling a perfect circle of dough is not your best talent. I must confess to liking its rustic charm. I make my own crust, but you can used purchased crusts, if you prefer.
You can serve your galette with ice cream, whipped cream or dusted with powdered sugar. You can make it with other fruits, as well. Any fruit pie can become a galette.
Apple Galette
Flaky Pie Crust
2 c. flour
1 t. salt
3/4 c. butter, chilled
1 T. cider vinegar
4-5 T. cold water
Combine flour and salt and cut in butter. Toss in vinegar and water 1 tablespoon at a time until dough holds together. Use a fork to toss the ingredients together and as soon as the mixture holds together stop adding water. Makes 2. Chill well before using.
Filling:
5-6 medium apples- I used Jonathan, Gala and Macintosh
2/3 c. sugar- plus extra for sprinkling
3 T. cornstarch
1 T. cinnamon
1 T. Lemon juice, plus extra for treating the apples
1 t. nutmeg
1 t. vanilla
1/2 t. salt
Prepare dough. Roll half the dough into a 10-inch circle- repeat with remaining dough. Keep covered with plastic wrap until ready to use. Peel and core apples and slice thin. Place apples in water with lemon juice added to prevent browning. Drain apple slices well and place in a bowl. Toss with the sugar, cornstarch, lemon juice and seasonings. Place one of the crusts on a baking sheet. Pile half of the prepared apples on the center of the crust. You should have about a 2-inch circle of dough around the edges that is uncovered. Fold edges of the crust up over the apples pressing lightly to hold in place. Sprinkle with a little extra sugar. Repeat with the remaining crust and apples. You will have a little liquid in the bowl from the apple mixture- save that for now. Place the galettes in a preheated 425 degree oven and bake for 15 minutes. Turn down heat to 350 and bake for another 40 minutes or until crust is golden brown. While galettes are baking take the liquid left from the apples and cook in a small saucepan until thickened- it will take a minute or two. This will be used to glaze the galettes. When galettes come out of the oven brush the apples with the thickened glaze. Cool on wire rack. Makes 2.
Old-Fashioned Pear Cobbler


Cobbler is one of my favorite desserts for this time of year. I really enjoy making this pear cobbler for family and friends. Like apples, pears always remind me of Fall.
While cobblers can be made with any number of different fruits, I love using pears. It is one of the simplest desserts you can make from scratch, and one of my favorites, for sure.
In the time it takes to preheat the oven, you can have it ready to bake. This recipe calls for baking mix, like Bisquick or Jiffy Mix. I make my own- recipes follows- but use what you like.
The cobbler is fine served plain, or with a dollop of whipped cream or ice cream. It can also be served cold, but I like to serve it warm.
If you prefer, you can also make the cobbler with a combination of pears and apples.
Pear Cobbler
4 c. peeled and sliced pears
½ c. sugar
1 T. plus 2/3 c. baking mix (Like Bisquick or Jiffy Mix or even homemade)- recipe follows
1-2 t. cinnamon
2 T. packed brown sugar
¼ c. butter
2 T. milk
In 1-quart shallow casserole, combine fruit, sugar, 1 tablespoon of the biscuit mix and cinnamon. In medium bowl combine remaining biscuit mix with sugar. Cut in butter to resemble coarse crumbs. Stir in milk to make a soft dough. Drop by spoonfuls over fruit mixture. Bake in a preheated 400-degree oven for 30 minutes, or until toothpick inserted into dough comes out clean. Let stand 5 minutes. Serves 4-6.
Baking/ Biscuit Mix
8 cups sifted, all-purpose flour
1 c. powdered milk
1 c. powdered buttermilk
¼ c. baking powder
1 T. salt
2 c. shortening*
Sift dry ingredients together 3 times. Cut in shortening to resemble cornmeal. Keep in an airtight container. Store in a cool dry place and use within six months.
*You can use butter or coconut oil in place of the shortening. Just store in the fridge, if you do. I use coconut oil.
Creamy Veggie Soup


For all the soups I make, this is one of my favorites. The blend of vegetables and seasonings work so well together. The soup is creamy and full of flavor. I eat the soup hot, most of the time, but in hot weather, I eat it cold. It is an easy way to eat more veggies.
I have a friend who is trying to eat more veggies, so I shared some of this soup with her. She really liked it. The soup freezes well, so you can make a big batch and freeze some for later. While I have the recipe below- you can add other veggies and play around with the soup. For texture, you can serve it with croutons on top. This is also nice served with a grilled cheese sandwich.
Creamy Veggie Soup
3 T. oil
2 onions, chopped
3 carrots, peeled and sliced
2 ribs celery, sliced
3-4 sweet potatoes, peeled and cubed
1 medium cauliflower, chopped
6 c. stock- I used chicken, but you could use vegetable
1 qt. tomatoes- I used home canned but you could use 1 (28 oz.) can
2 T. Tuscan seasoning* recipe follows
¼ c. hot sauce- or to taste
Salt and pepper to taste
In large pot, heat oil and cook onions until tender. Add carrots and celery and cook a few minutes longer. Add remaining vegetables, stock, and seasonings and simmer, covered for an hour or longer. Puree soup in blender in batches until smooth or use an immersion blender to puree the soup. Warm up soup before serving. Adjust seasonings and serve. Makes a lot of soup – but freezes well.
*Tuscan Seasoning
½ c. dried basil
½ c. dried oregano
½ c. dried marjoram
3 T. dried minced onion
2 T. dried minced garlic
2 T. dried rosemary
2 T. dried parsley
1 t. crushed red pepper
Combine all ingredients and store in an air tight container. Use this blend in tomato sauce or other Italian dishes. Also, you can add to vinegar and oil with a little salt, if desired, to make a quick salad dressing.
Homemade Calzones

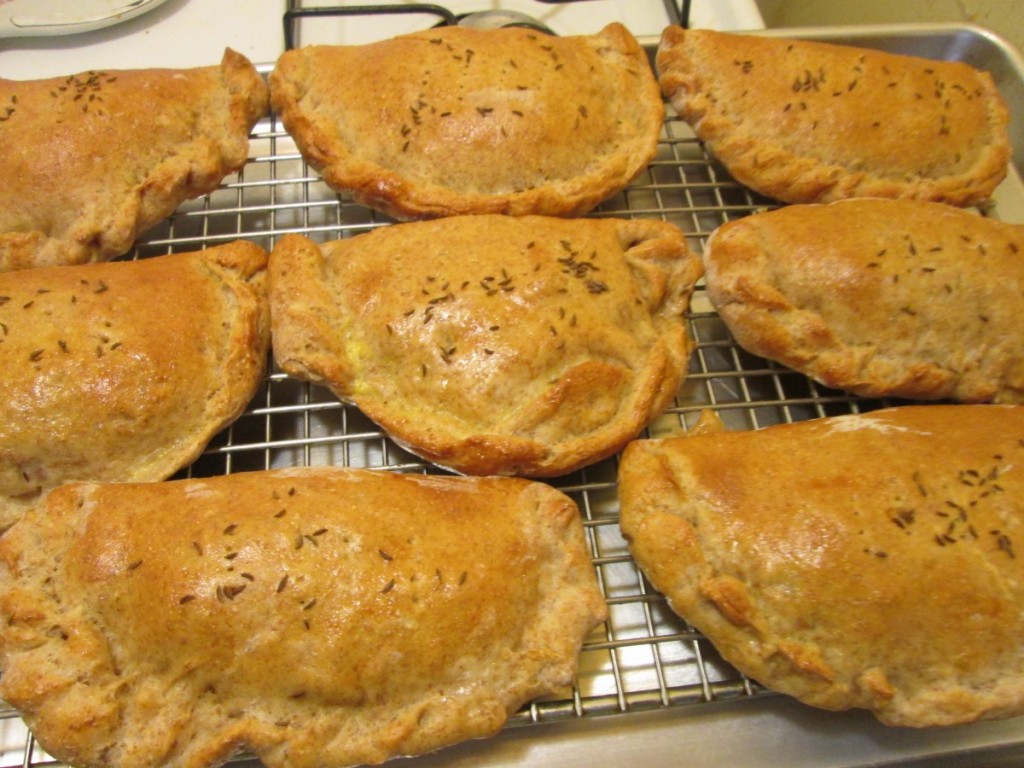
Calzones are traditionally made with Italian/pizza type fillings, but you can fill them with all sorts of other ingredients. They are kind of a cross between a sandwich and a pizza.
I like to get creative when making calzones. I often use what I have on hand. I think about what ingredients would go well together.
Calzones are wonderfully portable, and great to pack for lunch. They are also great food to serve at parties.
I like to make a batch and freeze some of them. I use one of three recipes for dough, listed below, then swap out fillings depending on what I am in the mood for. Get creative and have fun.
Basic Homemade Dough
This recipe is enough for 8 large calzones, more if you make them smaller.
1 packet active dry yeast
1 t. sugar
1 2/3 c. warm water
4-4½ c. flour
2 t. salt
In mixing bowl combine yeast with 3 cups of flour, sugar and the salt. Add the warm water and stir together, mixing well. Gradually add more flour until soft dough forms. Place dough on floured surface and knead until stretchy and smooth, about 10 minutes. Allow dough to rest 3 minutes and knead a few more times. Place in bowl and cover. Let rise until doubled in bulk, about 45 minutes. Punch dough down.
Assembly: Divide into 8 or more pieces. Cover pieces until ready to roll out. Roll out a piece of dough into an 8-inch circle. Add fillings to half of the dough and wet edges with water. Fold over and press edges firmly to seal. Cut a couple of slits in top of calzone to allow steam to vent. Repeat with remaining dough.
Finishing /Baking: Place calzones on greased baking sheets. Cover calzones and allow to rise 30 minutes or so. Bake in a 400-degree oven for 20-25 minutes or until golden brown.
Variations:
Whole Wheat: You can add 1-2 cups whole wheat or spelt flour to replace the same amount of white flour for a whole grain calzone.
Rye: Add 1-2 cups of rye flour to replace the same amount of white flour. This is great for the Reuben calzones.
Fillings: Traditional fillings could include shredded mozzarella cheese, mushrooms, pepperoni, cooked sausage, chopped onions or peppers, pizza sauce (some prefer to serve sauce on the side) olives or anything you might top a pizza with.
Note: For any filling, use ingredients that are cold or at room temperature. Vegetables should be cooked as raw veggies will give off water and may make your calzone soggy. If using a sauce, make sure it is on the thick side. Sometimes I brush the dough with a little oil first to keep the dough from getting soggy.
Toppings: You can brush the top of the calzones with an egg wash if you like for a shinier top. Apply just before baking. If you want, you can also sprinkle the tops with seeds- but use an egg wash to make sure the seeds will stick.
Ham and Swiss Calzones
1 recipe calzone dough, rye variation preferred
1 1/2 -2 lb. thin sliced ham- more or less
3/4 lb. sliced Swiss cheese
Thousand island dressing- recipe follows
1 egg , beaten
In the middle of the dough place 1 1/2 ounces of the Swiss cheese, a spoonful of the dressing and 2-3 ounces of the ham. Brush the edge of the dough with water. Fold over the dough in half and press the edges to seal. Brush the edge again with water and roll the edge over again. It will give you a prettier look and seal the calzone better. Repeat with remaining dough and fillings. Place calzones on greased baking sheets- or on a baking sheet with a silicone liner or parchment paper liner. You will end up with 8 calzones in all. Only put 4 on one baking sheet. Cover and let rest 15 minutes while preheating the oven to 400 degrees. Before placing calzones in the oven brush with beaten egg and make a few slashes with a knife to help steam to escape while baking. I put 2 baking sheets in the oven at the same time and switch them halfway through baking. Bake in a preheated 400-degree for 20-25 minutes or until golden brown. If baking 2 at once switch them after 10 minutes or so. Cool slightly before eating. Serve warm and refrigerate leftovers. Makes 8.
Thousand Island Dressing
Combine equal parts of ketchup, mayo and sweet pickle relish. You likely need at least a cup for this recipe. I made extra so the sandwiches could be dipped in extra dressing, if desired.
Reuben Calzones
1 recipe homemade dough, rye version
1½ -2 lbs. sliced corned beef
½ lb. sliced Swiss cheese
2 c. rinsed and drained sauerkraut
Thousand Island dressing
Caraway seeds, optional
Make dough and assemble 8 calzones dividing the ingredients among them. Dressing can be added in the calzones or served on the side. Use an egg wash and sprinkle on a few caraway seeds , if desired. Makes 8.

Curried Vegetable Calzones
1 recipe calzone dough
2 T. oil
1 onion, sliced
1 c. sliced carrots
1c. chopped cauliflower
1 c. green beans, sliced
1-2 T. curry powder, or to taste
Salt and pepper to taste
Heat oil in skillet and sauté onion until tender. Add the rest of the veggies and cook until tender. Sometimes I cover the pan and turn down the heat to steam them. Once veggies are tender drain and set aside to cool. Season to taste with curry powder and salt and pepper. Divide mixture among 8 calzones. Makes 8.
Spinach and Artichoke Calzones
1 recipe calzone dough, whole wheat works well in this recipe.
1 can (about 15 oz.) artichoke hearts, drained well and chopped
1 package (10 oz.) frozen spinach, thawed, and drained well
2 c. shredded mild cheese or 1c. crumbled feta cheese
1 T. lemon juice
Salt and hot pepper sauce to taste
Combine ingredients and mix well. Divide among 8 calzones. Makes 8.
Freezing Calzones: Note: you can freeze them baked or unbaked. Just place calzones on wax paper on a baking sheet and place in the freezer until frozen. Remove from baking sheet and wrap in plastic wrap, foil or wax paper and place in freezer bags. Label and place back in the freezer.
If you froze them unbaked- thaw in fridge overnight- unwrap but cover loosely with plastic wrap and a towel. Thaw in fridge at least 8- 12 hours. Place on greased baking sheet and place on counter at room temperature for another hour or two, covered with a towel. Bake in oven as normal.
If you froze them baked- you can heat up in a microwave- about 3 minutes per calzone. You can also warm them in a conventional oven. Place on baking sheet and bake in a preheated 350-degree oven for 20-25 minutes. Cover with foil if it starts to get too brown.

Sweet and Sour Pork


For dinner with friends last night, I decided to make sweet and sour pork. It takes a bit of work- but it is worth the effort. I used a fresh pineapple, which I prefer, but canned pineapple could be used, too.
I have to admit to loving all things sweet and sour. You can buy sweet and sour sauce in most grocery stores, but I like my own better.
Make the sauce first, so you can just toss it over the pork and veggies when ready to serve.
The pork is cubed and marinated overnight in a mixture of soy sauce, cornstarch and an egg. The pork comes out very tender, when prepared this way. You could substitute cubed chicken, for the pork, if you prefer.
Sweet and Sour Pork
1-2 lbs. boneless pork
1 egg
1 t. cornstarch
2 t. soy sauce
Additional cornstarch for dredging
oil for frying
1 medium onion, chopped
1 sweet red or yellow pepper, seeded and chopped
2 cups peeled and cubed fresh pineapple, or 1 can pineapple in juice, drained, reserving juice for sauce
Sweet and Sour Sauce, recipe follows
Chopped green onions
Cut meat into cubes and place in bowl. Combine egg, 1-t. cornstarch and soy sauce and pour over the meat, stirring to coat. Allow marinating at least 1 hour in fridge, but best if done the day before, or early in the day.
When ready to cook, heat 1-2 inches of oil in a medium sauce pan to 350 degrees. Dredge the pork in corn starch to coat. Set aside. Heat 1T. oil in large skillet or wok. In wok, sauté onions on high until tender. While you are cooking the onions and other vegetables, start cooking the cubed pork in the sauce pan in the 1-2 inches of hot oil. It will take several batches to cook the pork. As the pork cooks- it will take about three minutes per batch- remove the pork from the pan and drain on paper towels. Continue to cook the pork in batches while finishing the veggies and pineapple in the wok. Add pepper to onion and sauté 3 minutes more. Add pineapple and cook until pineapple starts to brown a little. Add the cooked pork to the onion mixture. Then and some of the sweet and sour sauce and toss until coated. There is usually extra sauce for a later use. Serve over rice, and top with some green onions. Makes 4-6 servings.
Sweet and Sour Sauce- see note
1/2 c. apple cider vinegar
1/2 c. sugar
1/2 c. pineapple juice
3 T. ketchup
2 T. soy sauce
2 T. cornstarch
1 t. dried minced garlic
1-t. fresh grated ginger
Hot pepper flakes to taste
In saucepan combine all ingredients. Cook over medium heat, stirring as mixture gets hot, until sauce begins to bubble. It will also get much clearer. Boil gently 1 minute, stirring constantly before removing You may also want to use only some of the sauce and save the rest for another use.from heat. Makes 1 1/2 c. Keeps in the fridge for a couple of weeks.
Note: If you make the sweet and sour sauce ahead of time it will get runny when reheated if made with regular cornstarch. Either use modified cornstarch (Clear Gel ) or make sauce just before using.
Honey Ice Cream


I love this ice cream. The richness of the custard works wonderfully with the sweet flavor of the honey. I don’t use all that much honey in this recipe. It is sweet, but not overly so. You could make it sweeter if you like.
I was recently given some local honey (thanks, Richard). I wanted to use some of it in a special dish. This ice cream is certainly special. I am pairing it with coffee waffles for dessert.
So here is the recipe. I hope you give it a try.
Honey Ice Cream
1 ½ c. whipping cream
1 ½ c. half and half
2/3 c. honey
6 large egg yolks
pinch of salt
Heat together cream and half-and-half to simmer . Whisk honey, yolks and salt in a medium bowl. Gradually whisk in hot cream mixture. Return to pan and heat until mixture thickens (about 170 degrees). Do not boil. Strain into large bowl. Chill until cold. Process in ice cream maker. Makes 4 ½ c.

Copper Pennies-Carrot Salad


A very long time ago, I was served a salad called copper pennies. The name came from the rounds of carrots that were the main ingredient. I know the salad had a sweet and sour tomato-based dressing. I liked it a lot.
The original dressing was made from canned tomato soup. I didn’t have tomato soup, but I had tomato sauce. I winged it and came up with a dressing I really like. It reminds me of a sweet French dressing. There is enough dressing that I spooned some out and used it on a lettuce salad.
So here is my version of copper pennies. Fun name, tasty salad.
Marinated Carrot Salad- Copper Pennies
1½- 2 lbs. of carrots, peeled and sliced
1 sweet pepper, seeded and chopped
1 small sweet onion, chopped
1-2 green onions, chopped, optional
Dressing
1 c. tomato sauce
¾ c. apple cider vinegar
¾ c. sugar
½ c. oil
2 T. prepared mustard- I like Dijon
2 t. salt
1 t. hot pepper sauce, or to taste
pepper to taste
Steam or boil carrots until just tender. While carrots are cooking place veggies in a large bowl. In a medium bowl, combine dressing ingredients and whisk until smooth. When carrots are cooked, drain and place them in the bowl with the veggies. While carrots are still hot, pour over the dressing and stir to cover them well. Allow carrots to cool down a little before covering the bowl and placing in the fridge to chill thoroughly. Serves 10-12. Keeps for a couple of weeks.
Coffee Waffles


Yes, you read that right. Coffee waffles. Waffles with coffee already inside them. They are quite wonderful actually. Great for breakfast, which is obvious, I suppose. These waffles also make a fun base for desserts. I am serving them with honey ice cream as a dessert later this week.
I wanted to add coffee flavor to waffles, but I knew even strong coffee would water down the batter too much. The only solution was to use either instant coffee or espresso powder. I knew I could get enough coffee flavor into them, without affecting the batter in a negative way.
It worked!! Plenty of coffee flavor and a nice, crispy waffle. I was thinking it might be fun to add cinnamon to the next batch. I got 10 rectangular waffles out of the recipe. Froze most of them for later.
You can serve them topped with butter, syrup, whipped cream or powdered sugar.
So here is the recipe. Hope you give them a try.
Coffee Waffles
1¾ c. flour
¼ c. brown sugar
1½ t. baking powder
½ t. salt
1½ c. half and half or milk
1 egg, beaten
1/3 c. oil
1 T. instant coffee or espresso powder
1 T. vanilla
Non-stick spray or oil for coating the waffle iron
In medium mixing bowl, mix dry ingredients together and set aside. In a separate bowl, combine the half and half with the remaining ingredients. The dry coffee granules will not dissolve right away. You can let the wet ingredients sit a few minutes and whisk again, if you like. While they are just sitting there, you can heat up the waffle iron. Coat the waffle iron with a non-stick cooking spray or brush with a little oil. Add the wet ingredients to the dry ingredients and stir until mixed together. Don’t get crazy over mixing. That will give you tough waffles, and nobody wants that. Just stir until you don’t see any dry bits in the mix. I like to use a rubber scraper to get to the bottom of the bowl. Ladle some batter into the waffle iron and cook until golden brown. When the steam stops coming out of the waffle iron, or lessens a lot, it is usually good indicator that your waffles are done. Yield depends on the size of your waffle iron. I got 10 waffles, about 4×5 inches.
Note: The instant coffee breaks down more when mixed with the dry ingredients. Espresso powder will dissolve quickly, but if you use instant coffee like I did, expect a few “flecks” of coffee in the batter. I kind of liked the way it looked.


