Hawaiian Wedding Cake


I get a little nostalgic when I make Hawaiian Wedding Cake. This recipe was very popular when I was a kid. I don’t know a lot of people making it anymore- and that is a shame. The cake is very tasty and quite easy to make.
This recipe proves that you don’t always need a lot of time, to bake a homemade dessert. You can make this moist and tasty cake in less time than it takes to make a box mix cake. Really. The ingredients are all combined at once in a mixing bowl, and stirred by hand until mixed.
Of course, time saving means nothing if the dessert doesn’t taste good. The cake is really good. It is studded with nuts, coconut and has plenty of pineapple in it, too. Once baked and cooled, it can be topped with cream cheese frosting, powdered sugar or cinnamon sugar. You can even leave it plain.
The cake can make a nice gift, too. Use small foil loaf pans- and divide the batter among them, filling half way. Bake at the same temperature, but for a shorter time.
The mix of tropical ingredients certainly inspired the name of this cake. I don’t really know if people in Hawaii actually ever serve this cake at weddings. I like to think that they did. I do know how much I like it. I think you will, too.
Hawaiian Wedding Cake
2 c. flour
2 eggs
1 (20oz.) can crushed pineapple in its own juice, undrained
1 c. shredded coconut
1 c. sugar
1 c. chopped walnuts
2 t. baking soda
Preheat oven to 350 degrees. Grease a 9×13 inch pan. Combine all ingredients in a bowl and mix well. Pour into prepared pan and bake 35 minutes or until golden brown on top. Cool and dust with cinnamon sugar, powdered sugar, or frost. Serves 12.
Frosting recipe:
8 oz. Cream cheese, softened
3/4 c. powdered sugar
1 stick butter, room temperature
Beat all together until fluffy. Frost cake and refrigerate until ready to eat.

Cake should be golden brown on top when baked
Chocolate-Covered Frozen Bananas


These are a great snack for hot days. It is a nice treat for kids to make- all ages can do it. All you need are ripe bananas, chocolate and some toppings/decorations. The kids really loved making these chocolate-covered frozen bananas.
Start by melting the chocolate. You can use a double boiler or the microwave. Slice the bananas and dip the slices into the melted chocolate. Place on wax paper and sprinkle with decorations, if you like. We sprinkled our bananas with granola we had made earlier. You can also use sprinkles or nuts. Coconut works well, too. Then just pop them in the freezer to harden. These are great eaten right out of the freezer.
Freezing Green Beans


With so many vegetables and fruits in abundance now, I think its important to consider putting some away for winter. I had a request from a friend to post this info. She wants to have green beans from her garden at her Thanksgiving dinner. Not a problem at all. You could can green beans, lots of people do. Canning them does require a pressure canner, which my friend doesn’t have. You could also pickle them or dehydrate them, but for the green bean dish my friend wants I think freezing them is the way to go.
Unlike canning, safety is not the primary concern when freezing. Quality is, however, and by following a few steps you can enjoy your harvest all year round.
To freeze green beans start by washing the beans and trimming off the ends. You can freeze them whole or cut. Beans are best when blanched in boiling water before freezing. Have a large pot of water boiling and a bowl of ice water ready. Place prepped beans in the boiling water for 3 minutes. Remove with a slotted spoon and place in the ice water to cool down. If you are blanching a lot of beans do them in batches. Placing too many will bring the temp of the boiling water down too much. Once beans are cooled down drain them and place in freezer bags or containers, label and date then place in freezer. When ready to use them take from the freezer and place beans in boiling water until tender- about 5 minutes.
Advantages of freezing are that you don’t need to buy a canner or worry about spoilage. You will, however, need freezer space and freezer containers to prevent freezer burn. And of course in the event of a prolonged power outage you could lose it all. I think some foods are better when frozen than canned, like green beans which must be processed for a very long time when canned.
Always label what you freeze and date it. It’s amazing how time flies. While food remains safe for ages in the freezer it is best to use most home-frozen foods within a year of freezing.
Some foods need to be blanched before freezing. Blanching is simply putting the food in boiling water steaming for a few minutes and then plunging the food into ice water to stop the cooking. Blanching kills surface bacteria and also causes the produce to wilt, thus making it easier to pack. Blanching also stops the action of ripening enzymes, thus keeping that just-picked taste. The issue with fruits and vegetables is whether to blanch before freezing or not. As a rule, fruits are not blanched and most vegetables are. Peppers and onions can be frozen without blanching.
For best long-term storage, the colder your freezer, the better. Generally, separate freezers tend to be colder than freezers connected to a fridge. Ideally you want your freezer to be somewhere around -10 to -20 degrees F.
S’mores Ice Cream Sandwiches


Summer is the time for picnics, campfires and S’mores. Summer is also the time of year to eat lots of ice cream and other frozen treats.
This dessert combines the ingredients of S’mores in a frozen treat. How fun is that?
They aren’t hard to make, but you need to allow time for ingredients to freeze. The mixture is frozen, then cut into squares and sandwiched between Graham crackers. They get returned to the freezer to harden up.
We made these in a cooking camp recently. The kids loved them. Of course the we skipped the step where the sandwiches are assembled and put back the freezer to harden. The kids just ate them right away. A little messy, but a LOT of fun.
So here is the recipe.
S’mores Ice Cream Sandwiches
1 (14 oz.) can sweetened condensed milk
2/3 c. chocolate syrup
1 c. coarsely crushed graham crackers
1 c. mini marshmallows
2 c. whipping cream, whipped
72 graham cracker square halves
In large mixing bowl combine sweetened condensed milk and syrup. Fold in crackers, marshmallows and whipping cream. Pour in foil lined 9×5-inch loaf pan and freeze until firm, about 6 hours, or longer. Remove from pan and peel off foil. Slice loaf in half lengthwise and then each half into 18 (½ inch) slices. Place one slice between two crackers and repeat with rest. Wrap and freeze until ready to eat. Makes 36. Note: You can slice the filling thicker. You’ll have fewer “sandwiches”, but they will have more filling.
Warm Pasta and Tomato Salad

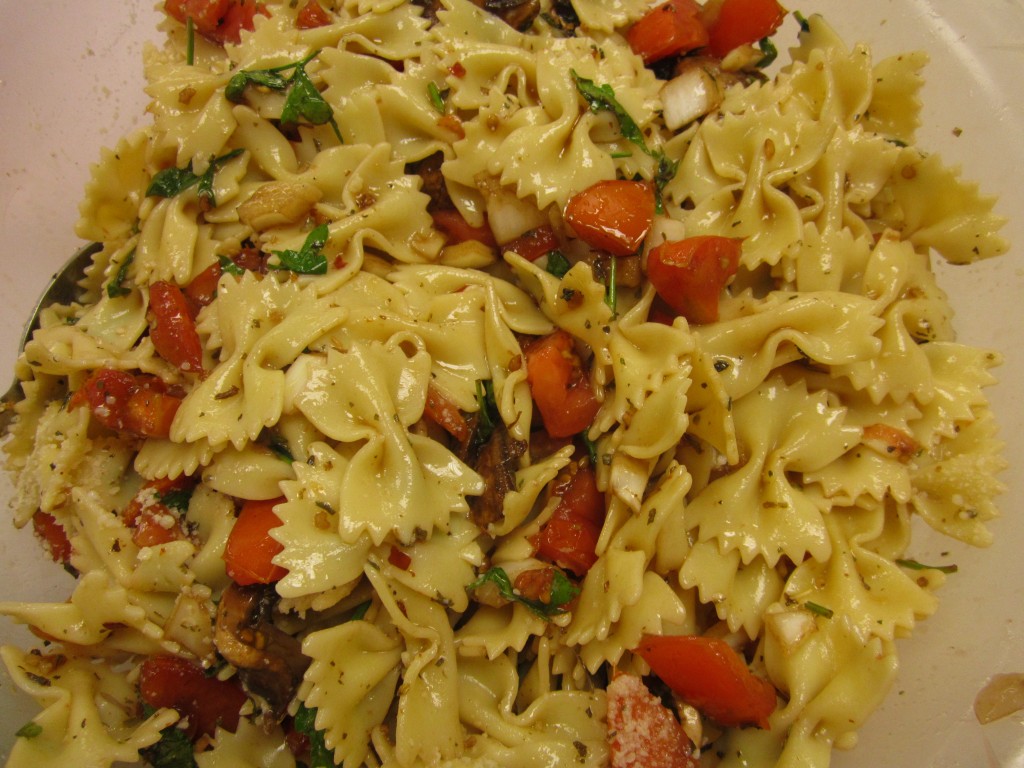
This salad has been a favorite of mine for a long time. I make it when fresh tomatoes are in season. You can serve it on its own, or as a side to grilled meats. It’s not like most salads, in that it is served warm.
The start of the salad is a mix of fresh tomatoes, mushrooms, oil, seasonings, vinegar. A lot of the typical ingredients you might find in a salad. These ingredients are mixed together and chilled, allowing enough time for the flavors to blend.
When you are ready to serve the salad, you toss the tomato mixture with fresh cooked, hot pasta. The result is a warm salad. Of course, you can serve leftovers cold, if you like.
Sometimes I top the salad with Parmesan cheese, too.
So here is the recipe. If you have some fresh tomatoes, you might want to try this salad. It really is tasty.
Warm Pasta and Tomato Salad
1 lb. Plum tomatoes, chopped
1 medium sweet onion, chopped
4 oz. Fresh mushrooms, sliced
2 cloves garlic, minced
¼ c. fresh parsley, chopped
1 T. dried basil or 1/4 c. chopped fresh basil
1 T. capers, optional
1 t. dried oregano
½ c. olive oil
¼ c. red wine vinegar
3 T. balsamic vinegar
Dash of hot red pepper flakes
Salt to taste
1 lb. Uncooked pasta
Combine all ingredients, except pasta, and chill overnight. Cook pasta, drain and toss with tomato mixture. Mixture should be served right away. Serves 6.
Waffling Around


I love to cook, but I don’t like to heat up my kitchen on hot days. Inspired by a friend, (thanks, Kevin), I decided to start using my waffle iron to do some of my cooking. It was a fun experiment. With another hot week ahead, I am sure I will be cooking in my waffle iron again.
I started by making potato pancakes in my waffle iron. They worked great. Crispy on the edges, tender in the middle. After that I made cornbread, sweet potato waffles, a cheesy omelet and zucchini waffles. All were simple to make, ready in minutes and kept the kitchen a lot cooler than other cooking options. The experiment with brownies was not so successful.
Below are the recipes I used that worked. Cooking times and how many waffles vary with the waffle maker you are using. I used an inexpensive waffle maker I have had for years. Generally, once the steam stops coming out, or lessens, it is a sign your waffle is ready. Don’t peak too often. Some are harder to remove from the waffle iron than others. The sweet potato waffles were tricky, but I got them out. Be gentle and have a plate ready to slide them onto.
Sweet Potato Waffles
2 small sweet potatoes, peeled and shredded- you want to end up with 3-4 cups of shredded sweet potatoes- 1 medium /large one would also work
2 eggs
½ c. panko bread crumbs
1 T. parsley flakes
1 t. hot pepper sauce, or to taste
½ t. garlic powder
½ t. onion powder
Salt and pepper to taste
Oil for coating the waffle iron
Combine all ingredients in a mixing bowl and stir until well mixed. Brush oil all over waffle iron- you can also use non-stick spray. Make sure to heat up waffle iron before adding batter. Spoon batter into waffle iron, filling almost full. Close iron and cook until waffles are golden brown. Make sure they are golden brown and crispy. Remove carefully. Repeat with remaining batter. Makes 4-5

Zucchini Waffles
2 c. shredded zucchini
1 medium onion, diced
2 eggs
1/2 c. flour- you made need a little more or less depending on how wet the zucchini is
2 t. hot pepper sauce, or to taste
1 t. baking soda
salt to taste
oil for coating the iron
Combine all ingredients, except the oil, in a medium bowl. Brush oil all over waffle iron- you can also use non-stick spray. Make sure to heat up waffle iron before adding batter. Spoon batter into waffle iron, filling almost full. Close iron and cook until waffles are golden brown. Make sure they are golden brown and crispy. Remove carefully. Repeat with remaining batter. Remove to platter and keep warm. Repeat with remaining batter. Serve with salsa or sour cream. Makes 6-8.

Cornbread Waffles
1 c. cornmeal
1 c. flour
2 T. sugar, optional
4 t. baking powder
¾ t. salt
2 eggs
1 c. half and half
¼ c. oil- or melted butter or bacon fat
½ c. chopped sweet peppers, optional
¼ c, chopped green onion, optional
Extra oil to coat waffle iron
Combine dry ingredients in medium bowl, and set aside. In small bowl, combine eggs, half and half and oil and beat until smooth. Stir egg mixture into dry ingredients, stirring until combined. Don’t over-mix. Make sure to heat up waffle iron before adding batter. Pour some of the batter into well oiled waffle iron. Close iron and cook until waffles are golden brown. Repeat with remaining batter. Remove to platter and keep warm. Repeat with remaining batter. Makes about 4.

Potato Waffles
1 1/2 lbs. potatoes, peeled and grated
1/4 c. flour
salt and pepper to taste
1 egg, beaten
oil for frying
When grating potatoes place them in a bowl of ice water to hold their color. Drain and squeeze out all the water you can. Place in a bowl and mix in remaining ingredients. Brush oil all over waffle iron- you can also use non-stick spray. Make sure to heat up waffle iron before adding batter. Spoon batter into waffle iron, filling almost full. Close iron and cook until waffles are golden brown. Make sure they are golden brown and crispy. Remove carefully. Repeat with remaining batter. Remove to platter and keep warm. Repeat with remaining batter. Serve with sour cream. Makes 6-8.

Cheese Omelet Waffles
2-3 eggs
2 T. milk or water
Salt and pepper to taste
Dash of hot sauce
2-3 T. Fine chopped sweet pepper, optional
2-3 T. green onion, minced, optional
½ c. shredded cheese
Oil for the waffle iron
Beat eggs until fluffy. Add remaining ingredients and stir well. Brush oil all over waffle iron- you can also use non-stick spray. Make sure to heat up waffle iron before adding egg mixture. Spoon eggs into waffle iron, filling almost full. Close iron and cook until eggs are set. Fold one waffle over the other to create a stacked waffle. Remove carefully to platter. Makes 1.
Eggplant Parmesan


I have been making this dish for a long time and it is always a favorite. Eggplant Parmesan is a cheesy and satisfying vegetarian meal, even for the die-hard meat lovers among us.
The recipe has changed over time. I used to dredge the eggplant slices in flour before baking. It was very good that way. My mom used to bread eggplant slices for my father, using bread crumbs. She would serve the eggplant with a little tomato sauce on top and sprinkled with mozzarella cheese. He loved them.
That is what first inspired me to bread the eggplant slices, rather than just using the flour dredge. I think the breaded eggplant slices stand up well to the other ingredients. They stay a little crunchier than the “flour only” version.
I also used to just use mozzarella cheese and the Parmesan. A friend said she added ricotta, like you would for a lasagna. I tried it and liked the addition of the ricotta. Now I make it that way all the time.
The biggest change might have been how I cook the eggplant before adding them to the rest of the ingredients. I used to pan fry the eggplant. Let me just say that eggplant soak up oil like a sponge. I remember making Eggplant Parmesan for a group of 250 once and went through an enormous amount of oil. Now, I just place the breaded eggplant slices on a baking sheet and drizzle oil all over them, before baking them in the oven. I use a lot less oil that way. It is also a lot simpler than pan frying.
So here is my often revised recipe for Eggplant Parmesan. In my family, we just call it E.P.
Eggplant Parmesan
2 large eggplants
salt
flour
1 egg
½ c. half and half or milk
Pepper
1 T. Tuscan seasoning- recipe follows
About 2 c. of bread crumbs
oil
1 (15 oz.) container ricotta cheese
3 c. tomato sauce or marinara sauce
12 oz. mozzarella cheese
Parmesan cheese – you could also use Asiago or Romano cheese, if you prefer
Peel and slice eggplant about ¾ -inch thick. You don’t have to peel the eggplant if you don’t want to. Place about 1/2 cup of flour in a bowl and season with salt. Set aside. Combine egg, half and half, pepper to taste, and half of the Tuscan seasoning in bowl. Whisk to combine. Set aside. Place bread crumbs in a shallow dish, set aside. Dredge eggplant slices in flour, dip each slice in egg wash, then dip in bread crumbs, turning to coat evenly. Place eggplant slices on a baking sheet lightly coated with oil. Once all the slices are in the pan, drizzle with a little more oil. Bake in a 400-degree oven, turning once, until browned and tender, about 20 minutes. Drain. Place a small amount of sauce in the bottom of a casserole dish. Add a layer of eggplant slices. Combine ricotta with remaining Tuscan seasoning and spread over the eggplant. Top cheese with a little more sauce and another layer of eggplant. Top with mozzarella, remaining eggplant and remaining sauce. Sprinkle generously with Parmesan cheese and bake, uncovered in a 350-degree oven for about 40 minutes, or until bubbly and browned around the edges. Serves 6-8.
Tuscan Seasoning
½ c. dried basil
½ c. dried oregano
½ c. dried marjoram
3 T. dried minced onion
2 T. dried minced garlic
2 T. dried rosemary
2 T. dried parsley
1 t. crushed red pepper
Combine all. Store in a cool, dry place. Use for any number of recipes, from marinara sauce, to salad dressings.
Basil Butter Cookies


I love basil so much I once owned a cat named Basil. I make pesto and use basil in almost every tomato dish I make.
This time of year, I am also freezing and drying basil, so I will have it year round.
You don’t always have to use basil in savory dishes. Its flavor actually compliments sweet dishes, too.
I used fresh basil in these butter cookies and the flavor is wonderful. You could use dried basil, too. Just decrease the amount to 1 tablespoon of dried basil. Chop the fresh basil finely, just before adding it to the dough.
To add a little extra pop of flavor, I finished the cookies with a lemon glaze.
Here is the recipe. I hope you like it.
Basil Butter Cookies with Lemon Glaze
1 c. butter
1 c. sugar
1 egg
1 t. vanilla
2 ¼ c. flour
3 T. fresh basil, chopped fine
1 t. baking powder
¼ t. salt
Glaze
2 c. powdered sugar
2-3 T. lemon juice- or enough to make a thin glaze.
Beat sugar and butter together until fluffy and then beat in egg and vanilla. Combine dry ingredients and stir into butter mixture. Chill dough at least a couple of hours. Roll dough into ¾-1 inch balls. Place 2 inches apart on ungreased baking sheet and bake in a preheated 375 –degree oven for 8-10 minutes. Cookies will flatten somewhat. Make glaze and dip the top of the cooled cookies in the glaze. Glaze will harden a little as the cookies set. Makes about 6 dozen cookies.
Lentil and Brown Rice Stuffed Peppers

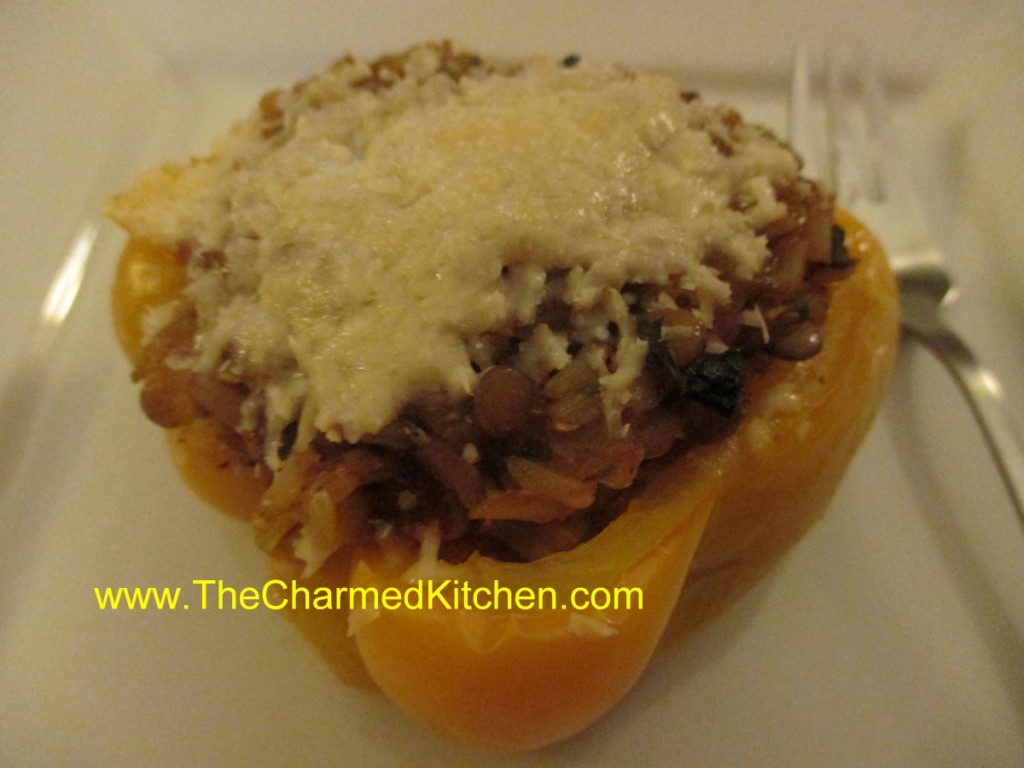
A friend was in town and stopping by. I wanted to offer her dinner. Since I know she doesn’t eat meat- I knew we’d be going vegetarian. I had just picked up some beautiful sweet peppers at the local produce market. I knew I would use them in the dish. Stuffed peppers seemed like a fun way to go. I precooked most of the ingredients so I wouldn’t have to watch them too carefully once in the oven. That way, we were free to visit. I did top them with cheese- but you could omit the cheese, if you prefer.
Lentil and Brown Rice Stuffed Peppers
1 onion, chopped
Oil
¾ c. uncooked brown rice- I used brown jasmine rice
Water or vegetable stock – probably around 3 cups or a bit more
¾ c. lentils, rinsed and drained
2 c. peeled and chopped fresh tomatoes- or 2 c. canned tomatoes
2 – 3 sweet peppers, cut in half and seeded
3 garlic cloves, peeled and chopped
¼ c. Marsala wine
2 T. apple cider vinegar
¼ c. chopped parsley
2 T. fresh chopped basil
1 T. fresh oregano or 1 t. dried
1 t. chopped rosemary
Hot sauce to taste
Salt and pepper to taste
Romano or Parmesan cheese- optional
In soup pot, heat oil and cook onion until it gets tender and a little golden. Add the rice and stir to coat the rice in the oil. Toast the rice a couple of minutes. Add 2 cups stock or water to cover the rice, and then bring up to a simmer. Reduce heat and cook, covered, for about 20 minutes. While rice is cooking, place the peppers in a pot of boiling water and cook for 3-4 minutes. Remove from heat and drain peppers. After the rice has been cooking for 20 minutes, add the lentils, garlic and tomatoes, wine, vinegar and seasonings and continue cooking, covered, until the rice and lentils are tender, about 25 more minutes Add more stock, if needed. Rice mixture should be a little runny. Place peppers, cut side up in a shallow baking dish. Spoon in the lentil mixture, dividing it among the 4 pepper halves. Cover dish with foil and bake in a 350 degree oven for 30-40 minutes. Mixture will be heated through and peppers will be tender. Serve as is – or top with some cheese and return to the oven until cheese melts- about 5 minutes. Makes 4 pepper halves.
Tomato Pasta Salad


I have been enjoying plenty of fresh, local tomatoes and I am always looking for new ways to enjoy them. This salad really celebrates the tomato.
I used tomatoes three different ways in this one salad. I started with a homemade tomato pasta, added fresh diced tomatoes and finished it with a tomato salad dressing.
The salad has fresh mozzarella cheese added to it, along with some hard cooked eggs. You could easily add cooked chicken or shrimp, if you prefer.
Here is the recipe for the salad and the dressing. I posted the recipe for the homemade tomato pasta at the bottom of this post. You can, of course, use store-bought pasta, if you prefer.
Tomato Pasta Salad
8 oz. tomato pasta or tri-color pasta, I used homemade
12 oz. diced tomatoes
2 sweet peppers, seeded and chopped
½ c. sliced green onions
4 oz. mozzarella cheese, cubed or shredded
3-4 hard cooked eggs
Tomato herb dressing- recipe follows- or use the vinaigrette of your choice.
Cook pasta according to package directions. Drain. Combine with remaining ingredients and toss. Serve immediately or chill. Serves 4.
Tomato and Herb Dressing
1 c. tomatoes, peeled and seeded, fresh or canned
½ c. chopped parsley
2 green onions, chopped
2 T. fresh celery or lovage leaves
2 T. fresh basil leaves or 2 t. dried
½ t. each salt and garlic powder
½ c. olive oil
Dash hot pepper sauce
Combine all ingredients in blender until smooth. Makes 1½ cups.
Fresh Tomato Pasta
2 c. flour
1 t. salt
½ -2/3 c. tomato juice- I just pureed a fresh tomato in the blender, seeds, skin and all. You might need a little more.
Fresh minced herbs, like chives, basil, parsley, rosemary, optional
Place flour and salt in bowl and stir to blend. Start adding the tomato juice, stirring to form a firm dough. Knead until smooth and cover dough, allowing to rest at least 20 minutes. I like to mix the dough in a food processor. Just mixes faster. You can also mix in a stand mixer using the dough hook. Once dough is rested, roll out to desired thickness and cut into noodles or use as the base for ravioli. Fresh pasta cooks in just a couple of minutes. Watch carefully. Serves 3-4.


