Rainbow Bean Salad

Rainbow Bean Salad
When you hear green or yellow split peas- do you think of soup? You probably do. But when cooked until just tender, split peas make a great salad ingredient. I often just add some cooked split peas to a tossed salad. They add flavor, protein and a nice texture to salads. An added bonus is that split peas can be cooked from dry to tender in about 20 minutes. That makes them a great choice when time is tight.
This is one of my favorite salads using both green and yellow split peas. Fresh and colorful, it is a big hit with vegetarian and non-vegetarian friends. If some of you are looking for new meatless meals ideas, this one is a winner.
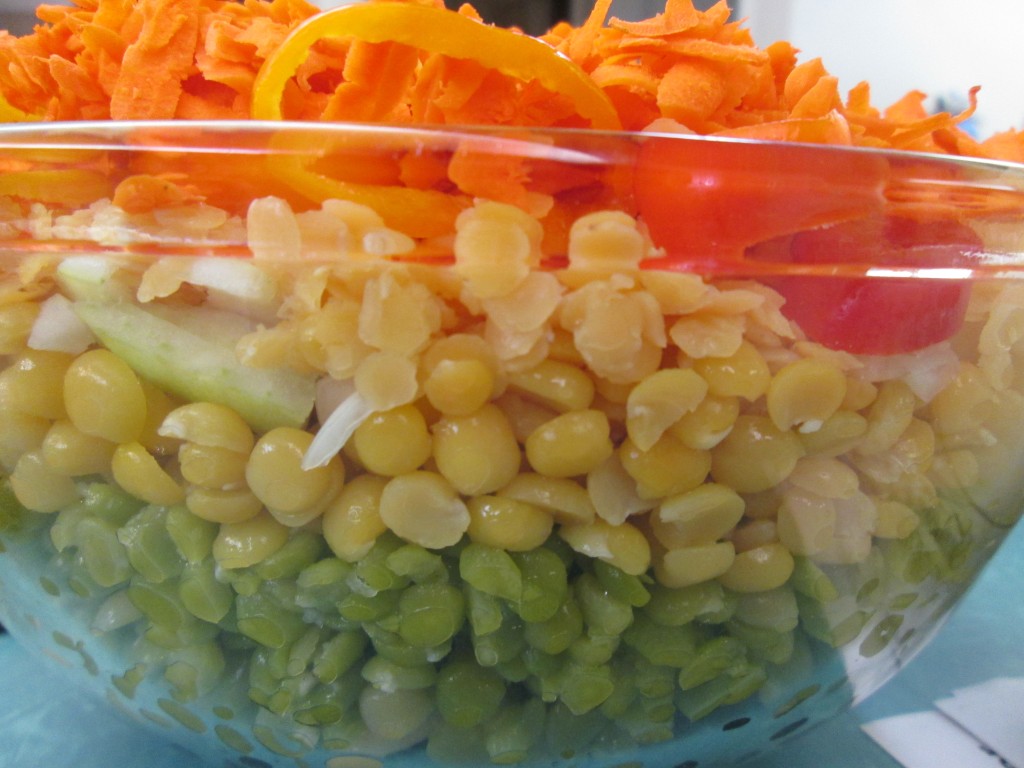
The salad uses both green and yellow split peas, along with black beans, butter beans, red lentils and assorted veggies. It is a great combination of colors and textures. It does make a lot, but you can easily cut the recipe in half.
The dish was inspired by my nephew Danny’s love of sand art when he was a kid. The ingredients are layered in the bowl for a pretty presentation. It is also an homage to the layered salads I remember from my youth. I like this one a whole lot more.
Rainbow Bean Salad
1 c. each green split peas, yellow split peas and red lentils
1 can black beans, rinsed and drained
1 can butter beans, rinsed and drained
1 c. diced sweet onion
1 c. diced sweet pepper
1 c. grated carrot
Cook split peas and lentils separately just until tender. Split peas, both green and yellow will take 20 minutes. Red lentils will take about 8-10 minutes. Drain and rinse each under cold water when done and set aside until ready to use, or you can cook them a day ahead and keep chilled. Each will yield about 2 1/2 c. cooked.
In large glass bowl, place the following ingredients in this order.
Black beans, butter beans, green split peas. yellow split peas. onion, red lentils. carrots and peppers. Pour over dressing and chill several hours or overnight. Serve on a bed of greens.
Dressing *
1/2 c. oil
1/2 c. vinegar
1 (14 oz.) can diced tomatoes, undrained
2-3 T. sugar
1/2 c. parsley or cilantro
1 t. each chili powder, cumin and salt
dash hot sauce
Combine in a blender or food processor until smooth.
*Note: Any fresh or bottled dressing you like can be used. Balsamic works very well. I often serve it with homemade Italian dressing.
White Chili


White Chili
There are so many variations of chili, I am thinking you could make a different version every day for months. Some are pretty traditional and some, like this White Chili, are not the norm. It is very good, though.
The base for this dish is white beans with veggies, chicken and seasonings to evoke that comfort food feeling that chili brings to the table.
I like to add enough cayenne pepper to also bring a little heat to this dish. I serve it topped with a little salsa, some shredded cheese and green onions.
It is a windy day here, with temps dropping and rain pelting the house. Chili just seems like a great dish to make on a day like this. It might be cold and windy outside, but this chili will keep me feeling warm and toasty.
So, if you need something to warm you up inside, you might want to give this chili a try.
White Chili
1 lb. dry navy or great northern beans
1 large onion, chopped
1 (4 oz.) can mild green chilies, drained and chopped
2 cloves garlic, minced
2 T. oil
5-6 c. chicken broth
1 t. cumin
1 t. oregano
Cayenne pepper to taste
Salt to taste
½ lb. boneless, skinless chicken breasts, diced fine
Toppings
Fresh salsa
Sour cream
Shredded Monterey Jack cheese
Shredded Colby cheese
Chopped green onions or fresh chives
Soak beans in 8 cups water overnight. Drain and rinse. In large kettle cook onions, chilies and garlic in hot oil until onions are tender. Add beans, broth, cumin, oregano and pepper. Bring to a boil, reduce heat, simmer, covered, for 1 ½ – 2 hours or until beans are tender. Mash beans slightly to thicken soup. Add chicken and salt and cook 10-15 minutes more. Serve with toppings of your choice. Serves 6-8.
Orange and Oatmeal Scones


Orange and Oatmeal Scone
I love fresh scones, still warm from the oven. Since it is citrus season, I decided to make scones with some seasonal orange flavor. These scones have a nice, crunchy outside and crumbly, tender middle.
The orange juice and orange zest gives them a wonderful flavor. The oatmeal gives them a lovely texture and the raisins add just a bit if sweetness. A very nice combination.
These are great served warm, topped with sweet butter and jam. They are perfect for breakfast or brunch.
You can also use these scones as the base for a berry shortcake. Split, topped with sweetened berries and some whipped cream, they turn into a simple and tasty dessert.
Orange and Oatmeal Scones
2 1/2 cups flour
2 cups rolled oats
1 cup sugar
1 teaspoon salt
1 tablespoon baking powder
1/2 teaspoon baking soda
1/2 cup very cold, unsalted butter – cut into chunks
1 egg
1/2 cup orange juice
2 t. grated orange peel
1 cup raisins – plumped and well dried
Glaze
milk, sugar, orange zest
Line a large baking sheet with parchment paper (double two sheets if you have them – one inside the other). Preheat oven to 425 F. In a large bowl, place flour, oatmeal, sugar, salt, baking powder, baking soda and mix together. Cut or rub in butter to make a mealy mixture. Stir in egg and orange juice. Add orange peel and raisins. Mix to make a soft dough. Turn out onto a lightly floured board and knead for a few minutes. Roll or pat out into a thickness of 1/2 inch. Using a serrated cookie cutter cut into disks or rounds. Brush with milk and sprinkle with sugar and orange zest. Bake until nicely browned – about 14 minutes. Makes about 24.
Spelt and Walnut Biscotti


Spelt and Walnut Biscotti
These biscotti are made with spelt flour. Spelt is an ancient grain that is very closely related to wheat. It does contain gluten, so not an option for people with wheat allergies or Celiac, but a nice way to add a whole grain to your menu if you do eat wheat.
Unlike whole wheat flour, which tends to be heavy in baking, spelt has a lighter texture and acts more like white flour. I used it to make these biscotti and they are crisp, light and very tasty.
Biscotti are so easy to make. I don’t know why more people don’t bake their own. They are always nice to have with coffee, tea or a cold glass of milk. These aren’t too sweet, so biscotti make a nice breakfast. They also stay crisp for a long time, if stored in an air tight container.
Biscotti are twice baked. First in a loaf shape, then they are sliced and baked again.
Most recipes will tell you to bake the slices half way, then turn them over to finish baking. A little time saving trick- just place a cooling rack on the baking sheet, then place the sliced biscotti on the rack. That way, they get crisp on both sides at once and there is no need to turn them.
Spelt Biscotti – with Walnuts
1 ¼ c. spelt flour*
⅓ c. sugar
1 t. baking powder
¼ t. salt
½ c. walnuts
¼ c. golden raisins- I often use dried cranberries or other dried fruit
2 eggs
1 t. vanilla
Combine dry ingredients with nuts and raisins in medium mixing bowl. In small bowl combine eggs and vanilla and add to dry ingredients. Stir together to make a slightly sticky dough. With oiled hands shape into loaf (2”x11”) on oiled sheet. Bake at 350-degrees for 20 minutes. Remove from oven. Slice the loaf thin using a serrated knife and place slices on a rack on a baking sheet then return to oven, reduce heat to 300-degrees bake 25 minutes. Remove from oven and allow to cool. Store in an airtight container to retain crunch. Makes about 16.
* If you can’t find spelt flour you can use 3/4 c. all purpose flour and 1/2 c. whole wheat flour instead or substitute the entire amount of flour with whole wheat pastry flour.
Buckwheat Waffles


Buckwheat Waffles
I really love these whole grain waffles. Buckwheat flour adds a different flavor from most waffles. They have a lovely crisp outer texture and are soft inside.
Buckwheat waffles have a savory side that makes them a nice base for sandwiches, in place of bread.
Dressed up with butter and syrup, they still work for breakfast or brunch.
So, if you are looking for something different, why not give buckwheat waffles a try?
Here is the recipe.
Buckwheat Waffles
1 cup of buckwheat flour
1 egg
1 cup of milk
1 tsp. baking soda
1/2 tsp. baking powder
1/2 tsp. salt
1/2 cup of sour cream
3 tablespoons of cooking oil or melted butter
Combine all ingredients. Cook in preheated waffle iron that has been oiled or sprayed with non-stick cooking spray.
Roasted Beet Salad


Roasted Beet Salad
I picked up a couple of bunches of beets the other day. I wasn’t sure what I wanted to do with them at the time. They just looked so fresh. I decided to roast some, and then go from there.
To roast beets: just wash them and trim off the greens- leaving about an inch of the stems to reduce bleeding. The beet greens could be added to the salad.
Place beets in a roasting pan and drizzle with a little oil. I used avocado oil. Cover pan and place in a 350 degree oven for about 45 minutes. Smaller beets will be cooked in less time- about 35 minutes. Really large beets could take up to an hour. I always check by poking one of the beets with a fork. Let the beets cool a little and then remove the peels. I use a knife to do this. They come off quite easily.
I used three small beets to make this salad for lunch. I shared it with a neighbor.
Roasted Beet Salad
1 small head Bibb lettuce, washed and sliced into thin slices
2 c. spinach, torn into bite sized pieces
1/4 c. olive oil
3 T. red wine vinegar
2 t. sugar, optional
3 small roasted beets, peeled
1/2 c. crumbled feta cheese
1/4 c. hulled pumpkin seeds, toasted
1/4 c. dried cherries
coarse sea salt- I used pink salt
Place lettuce in a mixing bowl. Combine olive oil with vinegar and sugar, if using. Add salt and pepper to taste and toss over the greens. Slice beets. Divide greens on 2 salad plates. Arrange half of the beets on each salad and top with the rest of the ingredients. Sprinkle with a few grains of the sea salt and serve. Makes 2 luncheon salads.
Scone “Bread” Pudding


Scone “Bread” Pudding
I hate to waste stuff, especially food. That is part of the reason this dish was created. I didn’t want these scones go to waste. I am so glad I made it. It really turned out to be a wonderful dish, that I would make again.
It is a bread pudding in every sense of the word, except for the bread part. I used scones instead of bread. It started when I was given a bag of beautiful scones. My friend, Nicole, had some extra scones that were given to her. She didn’t want them to go to waste, but could not use them all.
I took them home and gave some to friends. I had a few leftover and wanted to “make” something with them. They were a few days old by now. Scones, like biscuits, are really best eaten in the first day or two after baking. They were still very tasty, but had become somewhat dry.
I love bread pudding and have made bread pudding from leftover hot cross buns in the past. Why not do the same thing with these scones?
I am so glad I did. They came out better than I expected. The scones got really crunchy on the top, but the pudding part was soft and slightly sweet. I only put 1/2 cup of sugar in the whole recipe. That was intentional. I didn’t want a super sweet dessert. I wanted the flavor of the scones to be the star of the dish. They could always be dusted with powdered sugar, topped with a glaze or served with a drizzle with syrup, if someone wanted a sweeter dessert. In their less-sweet state, they could also make a nice breakfast or brunch dish. Here is the recipe.
Scone “Bread” Pudding
6 c. torn-up scones
1½ c. half and half
4 eggs, beaten
½ c. sugar- or a little more
1 T. vanilla
2 t. cinnamon
½ c. dried fruit, optional, if your scones don’t already have dried fruit in them
How many scones you will need depends on how big your scones are. I had 3 really large scones. Torn up, they measured 6 cups. You might need a couple more. Lightly grease or oil an 8×8-inch baking pan. Place scone crumbles in the prepared pan and set aside. Combine remaining ingredients in a mixing bowl and whisk together until smooth. The scones I was using had fruit in them already- raisins and dried cranberries. If your scones don’t have any fruit, feel free to add some. Pour egg mixture over the torn up scones in the pan. Try to pour it over all of them. Because you are using stale scones, you want to give them a few minutes to soak up some of the egg mixture. Set the oven to 350 now. The time it takes your oven to preheat, is perfect timing for letting the mixture sit a few minutes before baking. Bake about 30 minutes, or until top of the pudding is golden brown and set in the middle. Cool a few minutes before serving. Can be served warm or at room temp. You can dust with powdered sugar before serving, or drizzle with a little maple syrup. Serves 6 or less, depending on how hungry you are.

Right out of the oven
Coconut Ginger Soup


Coconut Ginger Soup
This recipe is inspired by a favorite dish at a local Thai restaurant. The recipe is pretty simple. Coconut milk and chicken stock are the base. The soup has a few veggies added and a healthy dash of lime juice and ginger. Then it is just a matter of adding some additional seasoning and the cooked chicken.
If you are starting with raw chicken, you could add it with the initial ingredients and just simmer long enough to cook the chicken. Small slices of chicken would cook in a few minutes. Since I had cooked chicken, I added it at the end. It was in the soup just long enough to warm it up. That way the chicken wouldn’t get tough from over cooking.
The soup is also meant to have a nice, citrus flavor from the lime juice. Adding the juice from three or four limes should be plenty, but all limes are not the same. If your limes are smallish, or not really juicy, feel free to add a little more.
For a soup thrown together so quickly, it really has a wonderful flavor. It is one of my favorite quick meals. So here is the recipe. Enjoy.
Coconut Ginger Soup
1 can, (13.5 oz.), coconut milk
2 c. chicken stock
1 can sliced water chestnuts, drained
1 jar bamboo shoots, drained
2 T. fresh grated ginger
Juice of 3-4 limes
Hot sauce to taste
3 T. fresh chopped cilantro- or parsley
3 T. chopped green onions
salt to taste
8 oz. cooked chicken, sliced in bite-sized pieces
Heat first 7 ingredients in a saucepan until heated through. Simmer about 5 minutes. Add cilantro and green onions and season to taste. My limes were pretty juicy. Feel free to add a little more lime juice, if you like. Add the chicken and simmer a few minutes longer. Serves 2-3.
Cinnamon Sticky Buns


Cinnamon Sticky Buns
What could be better than a warm sticky bun? These are even better with the addition of plenty of nuts and cinnamon.
I like this recipe because they are rich, soft and not too sweet. The rolls are full of brown sugar, butter and cinnamon and topped with a lovely later of soft caramel.
They aren’t hard to make, although they look tricky. While the recipe makes 12 rolls you can cut them bigger, or smaller, to suit your needs.
Cinnamon Sticky Buns
Dough:
1/3 c. milk
¼ c. sugar
½ t. salt
¼ c. butter
¼ c. warm water
1 package active dry yeast
1 egg
2 ½ c. flour
Topping:
¼ c. butter, softened
¼ c. brown sugar
½ c. pecan or walnut halves – I use a little more, maybe 2/3 cup
Filling:
¼ c. soft butter
½ c. brown sugar
½ c. raisins, optional
1 t. cinnamon
In small pan heat milk until bubbles just form around edges. Remove from heat; stir in sugar, salt and butter. Allow to cool to lukewarm. Dissolve yeast in warm water in medium bowl and stir in milk mixture, egg and 2 cups of the flour. Mix by hand until dough leaves sides of the bowl. Turn onto lightly floured surface and knead until dough is smooth and elastic, adding more flour if needed. Lightly oil dough in bowl and cover with a towel allowing to rise in a warm place until doubled, about 1-1 ½ hours. Meanwhile, make topping. Cream together butter and brown sugar and spread on bottom and sides of 9×9 inch baking pan. Sprinkle with nuts and set aside.
Punch down dough and roll into a 16×12- inch rectangle. Spread with the softened butter, sprinkle on the brown sugar, cinnamon and raisins. Roll up from long side. Cut crosswise into 12 pieces. Hint: Using a knife tends to flatten the rolls. Instead use a piece of thread, string or even dental floss. Slide piece of string under dough where you wish to slice. Holding string ends above roll cross the ends over each other and pull outward. String will cut through easily. Repeat with remaining rolls. Place in prepared pan and cover with cloth, allowing to rise until doubled, 1- 1 ½ hours.
Bake 25-30 minutes in a preheated 375 degree oven. Invert onto board and let stand 1 minute. Remove pan. Serve warm. Makes 12.
Pineapple Rum, A Tropical Treat


Pineapple Rum
I make all sorts of homemade liqueurs. This is one of my favorites. Pairing pineapple and rum is such a natural thing to do. Their tropical flavors blend together so well.
Pineapples are on sale this week, so it seemed like a good time to make a fresh batch. I want to have plenty made for summer parties.
You can flavor rum with any number of fruits, flowers and spices. I have paired rum with citrus fruit, vanilla and more.
I think my favorite rum flavoring is still pineapple.
So simple to make- just cut up pineapple and put in a jar. Add the rum- light or dark- and leave the jar in a cool, dark place long enough for the pineapple to flavor the rum. I like mine to sit at least a month before straining.
You can sweeten later, if you like. You can also add herbs for extra flavor, or a piece of vanilla bean.
The hardest part is just waiting for it to mature!!
Pineapple Rum
½ lb. fresh pineapple
3 c. rum
Cut pineapple into chunks and place in a jar with a tight-fitting lid. Add rum, close jar, and steep for 3 weeks. You can leave it longer, if you like. Strain out the pineapple. You can just toss out the pineapple, or sweeten it and use it in desserts. Once you have strained out the pineapple, you want to filter the rum to make sure it is clear. I filter mine through coffee filters or you can use layers of cheesecloth. Mature at least 1 month for better flavor. Makes 3 cups.


