Uncle Art and the Giant Turkey

 I posted this story last year and had a request to post it again….so here it is….
Rather than posting a recipe today, I wanted to share a fun Thanksgiving memory with you. Through most of my younger life, Thanksgiving was spent with my family and my Aunt Tillie and Uncle Art’s family. My mother and my Aunt Tillie were sisters. They were as close and loving as sisters could be. We took turns at each others homes, and shared the cooking duties.
There was a friendly rivalry every year to come up with a special dessert or to have a new side dish. The biggest part of this challenge though, was to get a really big turkey. My mother was convinced that a big bird was tastier than two small ones. Aunt Tillie agreed. So every year it was the quest of the host family to score a really large turkey.
My mom and dad would go to the local butcher to order the bird weeks in advance. I am sure Tillie and Art did the same. They always seemed to end up around 25 pounds, give or take. My dad and uncle kept track. Last year was 26 pounds and 4 ounces, but two years before, closer to 27 pounds. I swear, these birds had to be part ostrich.
The ultimate goal was to get a 30 pounder. It had eluded them all, until one year. Uncle Art had found a new guy. A turkey guy, who promised him the 30 pound bird of his dreams. We knew days before the big day, that the really big bird dream was going to happen. Then my mom got a phone call from Aunt Tillie.
My uncle had picked up the beast. He proudly brought it home. He looked at it, lovingly at first. Then he looked again. This was not Uncle Art’s first turkey. He felt something was wrong. Remember, this was something they had all dreamed about finding. Finding it first was cause for bragging rights, for sure. He was convinced that he had been duped, that the bird fell short of its promised weight. He told my aunt about his suspicions and they weighed the bird. It was too big for their kitchen scale, so my uncle weighed himself on the bathroom scale and then weighed himself again, this time holding the turkey.
Uncle Art had been right. He was short at least a couple of pounds of the promised 30 pounds. He went back to the turkey guy, irate. The man was defensive at first, but weighed the bird again. It weighed in somewhere in the area of 28 pounds. The man gave him some money back and lacking a bigger bird, Uncle Art brought it back home.
As I recall it was a perfectly lovely bird, cooked to juicy perfection. To my Uncle Art it was both a failure and a success. On one hand, he had not gotten the 30 pound bird he was hoping for. He did, however, take pride in the fact that he spotted it. That in the world of turkeys, he could see the difference between a 28 pound and a 30 pound bird.
I believe, some years later, a 30 pound bird was found. The story that year, around the Thanksgiving dinner table, was not so much about the 30 pound bird before us, but about the one that nearly was.
I hope you all have a great day, spent with those you love. I also hope you make memories to make you smile, when some of those we love are no longer here. Love and best wishes to all.
Happy Thanksgiving.
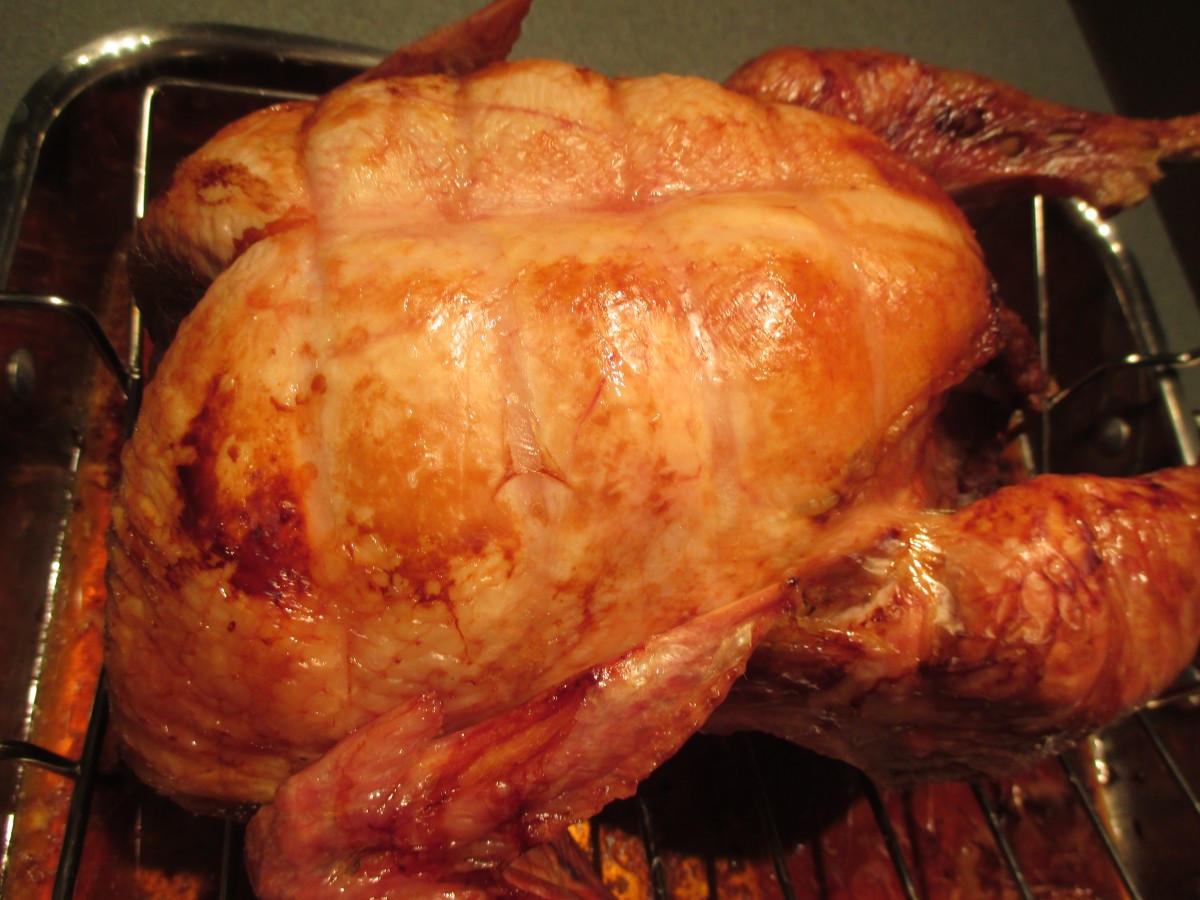
My Mom, Dinah Shore and the Upside Down Turkey

With Thanksgiving right around the corner, I thought I’d share how I came to roast my turkey breast side down. I must say, there are a number of ways to roast a turkey and have it come out nice and juicy.
I have no objection to any way you like to cook your bird including, but not limited to: frying, wrapped in bacon, cheesecloth wrapped, spatchcocked, sous vide etc. Stuffed, un-stuffed, brined are all OK by me, if that works for you. I have found over the years that cooking a turkey is a very personal decision, and folks get pretty passionate about how they cook their bird.
Many years ago a singer named Dinah Shore had a TV show, which my Mother really liked. Dinah, besides being a singer, liked to cook. She gave her turkey cooking tip one time on her show. She said she roasted her turkey breast side down for most of the time. The theory is that if the bird is breast side down the juices will flow into the breast- which eliminates the need to baste. It also slows down the cooking time for the breast- so it comes out cooked at the same time as the dark meat.
My Mother was intrigued, to say the least. She talked about it, a lot, leading up to Thanksgiving. We used to get a really big turkey and my Dad has his doubts about how easy turning over a hot, partially cooked turkey, would be. Mom was adamant. So it was that that Thanksgiving my Mom put her bird in the pan, on the rack, breast side down. She was excited and nervous at the same time.
Let’s face it- the turkey is the star of the meal and if it didn’t work it would be a disaster. But Mom trusted Dinah and they went ahead with this radical new plan. After about 3 hours of cooking, maybe a bit less, they managed to get the turkey turned over and returned it to the oven. Mom would look pensively through he oven window. I think giving birth was easier on her.
Well, in the end it worked out great. The bird was juicy and evenly cooked. No basting, so less work. She was delighted that she had held to her plan and had not been persuaded to cook it like before.
So every time I cook a turkey I cook it breast side down. How long I roast it that way depends on the size of the bird. Normally about 2 hours- because I am roasting a smaller turkey. I always remember my Mother when I cook it that way. I remember that first breast side down Thanksgiving and every one after that. Mom always was delighted- like the first time- and she always mentioned Dinah Shore.
Happy Thanksgiving to you all. May your turkey be juicy and most importantly, may you get to spend time with the people you love. I’ll be with family and I’ll think about my Mother and Father – and Dinah.
Brussels Sprout Chocolate Truffles

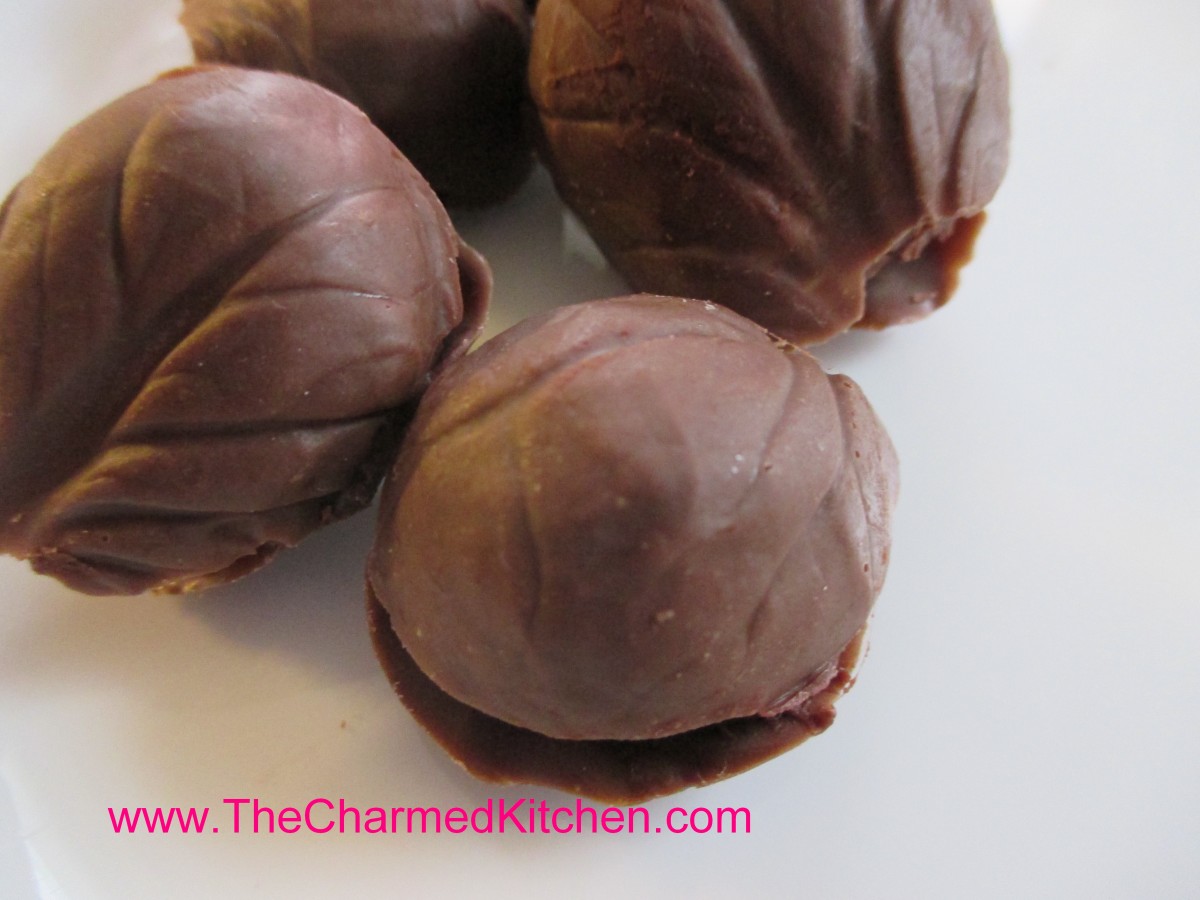
Brussels Sprout Truffles
Before you think these have any Brussels sprouts in them- they don’t. These truffles are all chocolate. The center is a chocolate truffle. The “leaves’ are made by painting Brussels sprouts leaves with melted chocolate. Once the chocolate hardens, the leaves are peeled off. What remains looks like a Brussels sprout!!
This might be one way to get someone to eat Brussels Sprouts. They would make a nice hostess gift for your next holiday party. It is also a project kids could do, with a little practice.
I made my truffle recipe and put it in the fridge to firm up. The recipe follows.
Then I took some of the larger outer leaves off Brussels sprouts. I trimmed the bottoms off to make peeling of the leaves easier. You’ll need two leaves for each truffle so be sure to have plenty. I had about 60.
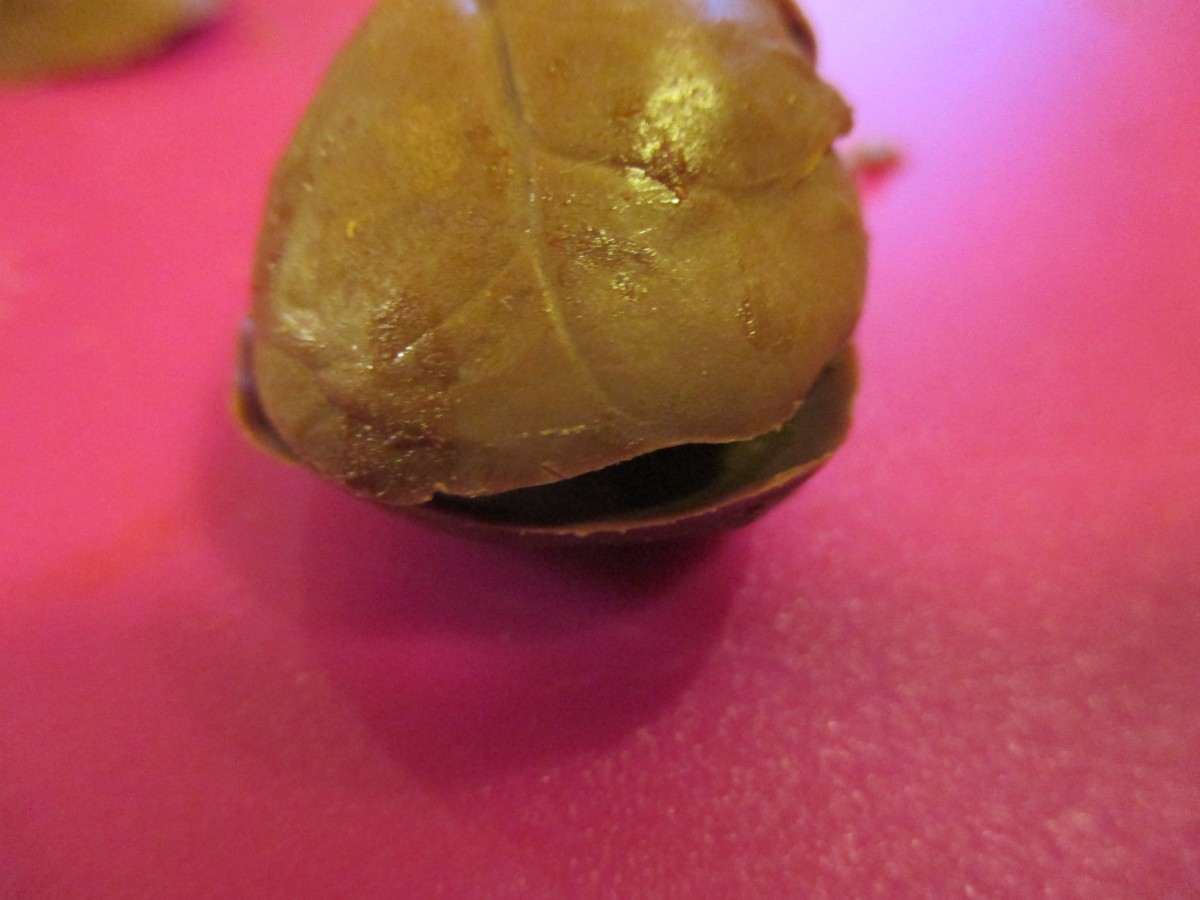
You’ll also need a few ounces of chocolate, for coating the leaves. Use whatever chocolate you like. The better quality of chocolate you use, the better the truffles. I wiped the leaves clean, and then melted several ounces of chocolate. I used a pastry brush to brush the insides of the Brussels sprout leaves with the melted chocolate. Once the chocolate had hardened, I gently peeled off the leaves and discarded them. Since the leaves were different sizes, I rolled out portions of the truffles that would fit the size of the leaves I was using. I pressed the truffle mixture in one leaf and then placed another leaf, of similar size, over the filling.
Normally I would roll the truffles in cocoa powder- but in this case, I didn’t. I wanted the truffles to stick to the leaves and leaving them plain seemed like the best way to do that. The end result was very cute. Store in fridge until ready to serve.
Chocolate Truffles
1/3 c. whipping cream
6 T. butter, cut into small pieces
2 c. chocolate chips- or 12 oz. bittersweet chocolate, grated or chopped coarsely
Unsweetened cocoa
Heat cream to boiling in small saucepan. Stir in butter and cook until melted. Remove from heat and stir in chocolate until melted. Place in shallow bowl and chill until firm, at least a couple of hours. Roll mixture into 1-inch balls and roll in cocoa. Sometimes the mixture is quite firm and hard to roll into perfectly smooth balls. You can roll them out as smooth as you can, roll in cocoa and then roll again to smooth out. You might want to give them another roll in the cocoa after that. Makes about 30.
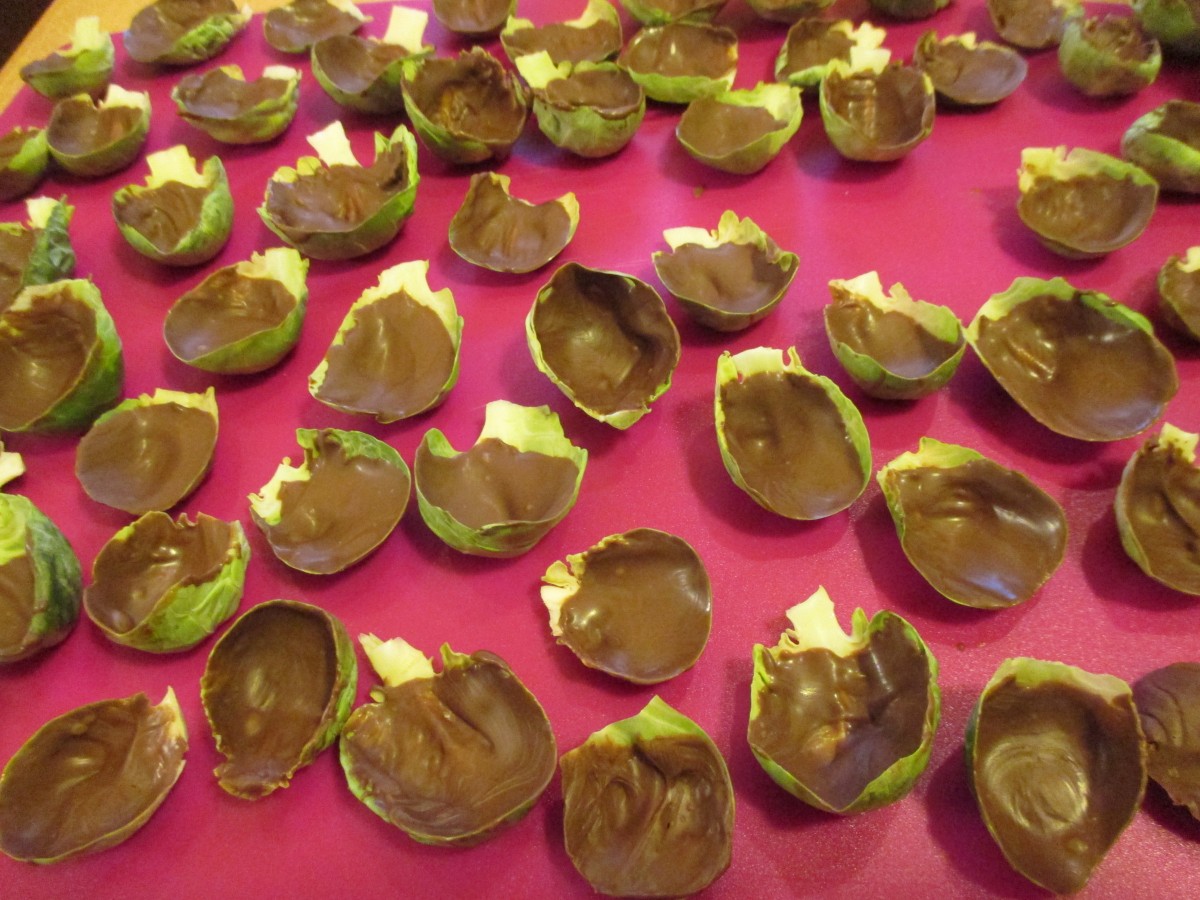
Leaves brushed with chocolate

Remove leaves gently
Press 2 leaves together over the truffle filling
Pumpkin Squares

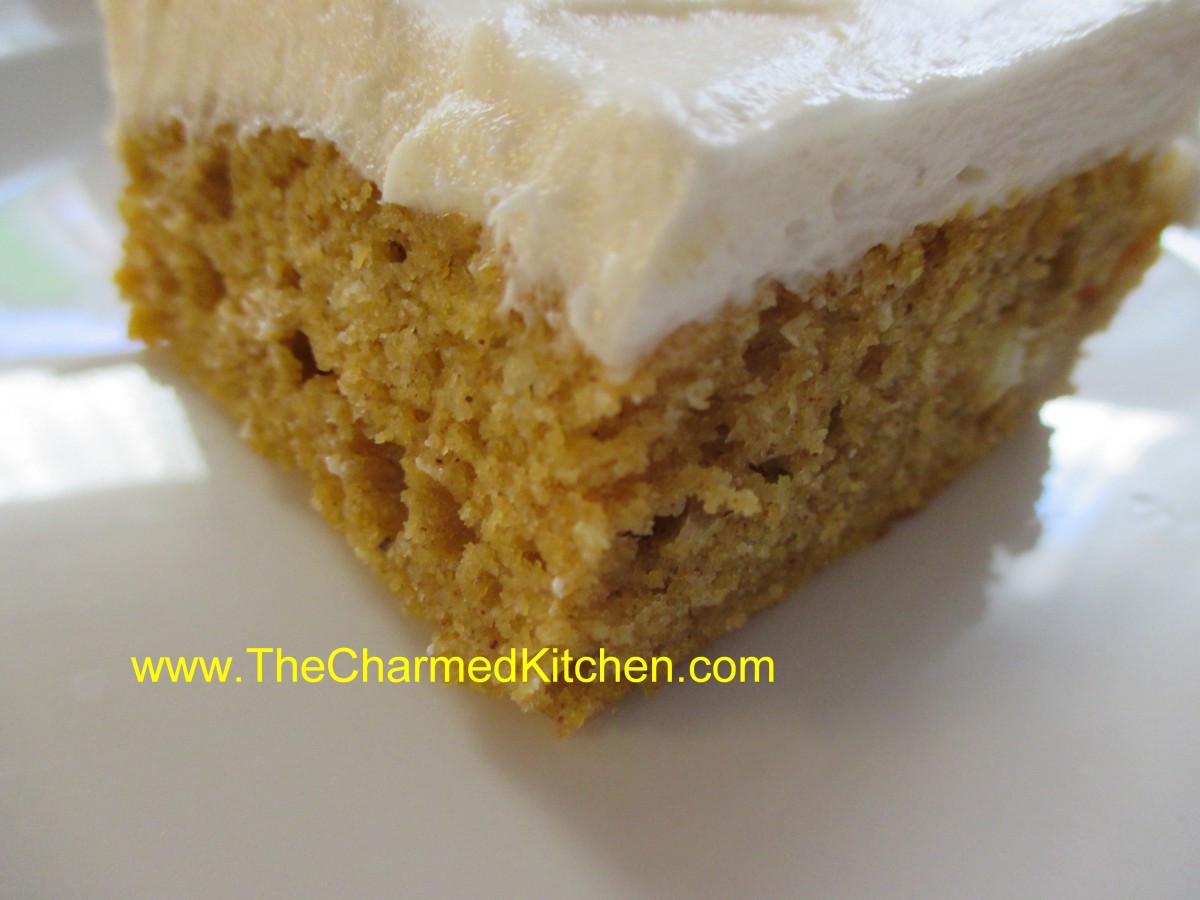
Pumpkin Squares
This recipe has been part of our family for years now. My mom made them for Thanksgiving every year- and I continue that tradition. Like my mom, I use fresh (or frozen) cooked pumpkin or winter squash. My mom didn’t care much for the taste of canned pumpkin. She would cut up the Halloween pumpkin, cook it, puree it and freeze it- so she could make pumpkin squares anytime she wanted.
The original recipe came from Bisquick, but it had 2 cups of sugar in it. My Mother’s sensibilities kicked in and she cut the sugar down to one cup. Great move on her part. The cake is still plenty sweet with less sugar.
It mixes and bakes up in no time. I normally top it with cream cheese frosting, but it would be good with a simple powdered sugar glaze, a buttercream frosting, or even just a dusting of powdered sugar mixed with a little cinnamon.
The texture is moist and tender and I think you’ll enjoy it as much as I do.
Pumpkin Squares
1 c. sugar
½ c. oil
16 oz. cooked pumpkin, canned, fresh (preferred) or frozen
4 eggs, beaten
2 c. biscuit mix (homemade or Bisquick or Jiffy Mix)
2 t. cinnamon
½ c. raisins, optional
Grease a jelly roll pan and set aside. Preheat oven to 350 degrees. Beat first 4 ingredients for 1 minute. Stir in mix, cinnamon and raisins. Pour in prepared pan and bake 25-30 minutes. Test for doneness with a toothpick. Cool and frost. Frosted cake must be kept refrigerated between servings.
Frosting:
8 oz. cream cheese
2/3 c. butter
2 T. milk
2 t. vanilla
3 c. powdered sugar, or more
Beat together until smooth.
Homemade Cranberry Liqueur


Cranberry Liqueur
You can do more with cranberries than make sauce. Not that I don’t like cranberry sauce, I do. I love cranberry season and find myself using them in all sorts of recipes. This is one of my favorites.
I got the recipe from my sister Cindy, many years ago. It is also called Cranberry Bounce. It tastes amazing and makes a great gift, too.
Cranberries, sugar and vodka. What a great combination. It’s simple to make and it makes a nice gift, too.
The color is absolutely beautiful. The sweet/tart finished product can be enjoyed by just sipping, on the rocks, or mixed with club soda. It can also be a nice addition to all sorts of cocktails.
Often after Thanksgiving, the price of cranberries goes down. I stock up on them, freeze some and make a batch, or two of cranberry liqueur. This year, even before Thanksgiving, prices have been good.
I hope you give it a try. I am sure you will be pleased with the results.
Homemade Cranberry Liqueur
1 lb. fresh cranberries (most bags are 12 oz.)
2 c. sugar
4 c. vodka- at least 80 proof
Grind berries fine in food mill or food processor. Place in large jar and combine with the sugar. Let stand, covered until sugar is dissolved completely, several hours or overnight. Add vodka and let steep 1-3 weeks, stirring occasionally. Strain and filter. Makes 5 cups.
Note: Fruit can be saved in fridge and used, sparingly, in desserts, fruit salads and on cake or ice cream.
Hazel’s Sweet Potato Pie

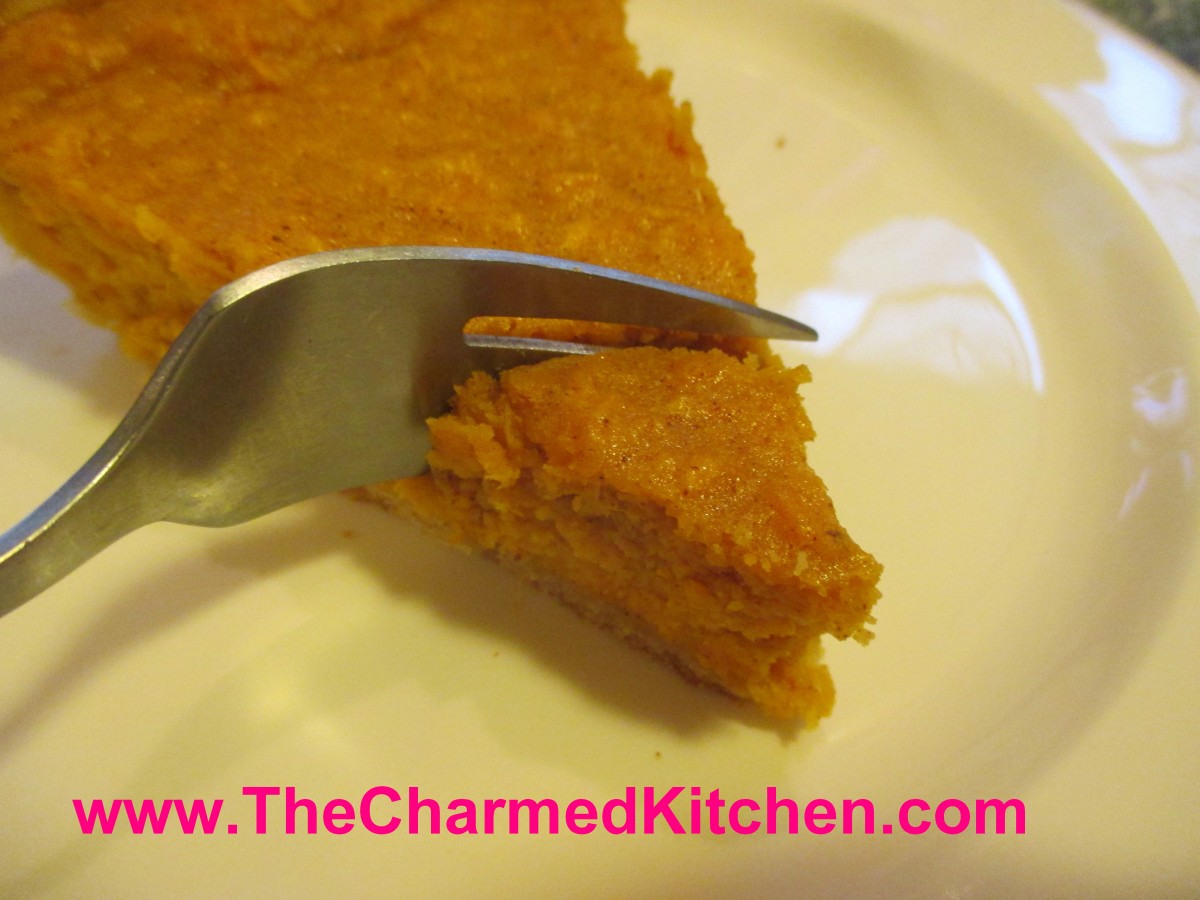
Hazel’s Sweet Potato Pie
I love sweet potato pie. I am always surprised when someone tells me they have never had it. It must be one of those north/south things. I have made it for friends several times, and there is always someone who says they never had a sweet potato pie before.
Once they taste it, they love it. Some people say that they prefer sweet potato pie over pumpkin pie. I like both, but it gives you another pie option for Thanksgiving.
I used to work with a wonderful woman named Hazel Pruitt. She grew up in Alabama and taught me so much about southern cooking. I first made collard greens with Hazel. She also taught me how to make sweet potato pie. This is her recipe and I want to share it with you. I think of her every time I make it.
I used Martha Stewart’s recipe for the crust, but use whatever crust you like. Her recipe makes two crusts, so I will use the other half of the dough for another pie.
Hazel’s Sweet Potato Pie
½ c. sugar
1 t. cinnamon
½ t. allspice
½ t. salt
¼ t. cloves
1 ½ c. cooked, mashed sweet potato
2 eggs, beaten
1 c. milk or almond milk
2 T. melted butter or 2 T. olive oil
1 (9-inch) unbaked pie crust
Combine sugar with seasonings. Stir in remaining ingredients and combine until smooth. Pour into pie crust and bake in a preheated 400 degree oven for 40 minutes, or until filling is set.
Martha Stewart’s Pie Crust Recipe
2½ c. flour
1 t. salt
1 t. sugar
2 sticks (1 cup) butter, very cold
About 6 T. ice water
Combine dry ingredients and cut in butter to resemble coarse crumbs. Using a fork to mix the dough start to add the ice water a tablespoon or 2 at a time until mixture just holds together. Wrap and chill until ready to use. Makes 2.
Pumpkin Bread


Pumpkin Bread
I find myself in the mood to bake, now that the weather has gotten cold. I also find myself with a pile of winter squash. Baking pumpkin bread is just the thing to do.
I often use pumpkin, but will also use butternut or Hubbard squash, instead of the pumpkin in the recipe. They all work just fine.
I like to make several batches at a time, and freeze the extra. Of course, if word gets out that I have fresh baked pumpkin bread it never makes it to the freezer. Every year I get a lot of requests for my pumpkin bread. Everyone seems to love it.
It is versatile, served plain, it is a great breakfast. Topped with a dusting of powdered sugar or sweetened fruit and whipped cream, it becomes dessert. I also often bake smaller loaves for gift giving.
I do find myself adding more spices, sometimes. Play around to find the combination of flavors you like. I often add cloves, allspice or mace.
Pumpkin Bread
1 ¾ c. flour
1 ½ c. sugar
1 t. baking soda
¾ t. salt
1 t. each cinnamon and nutmeg
½ c. softened butter
2 eggs, beaten
1 c. pumpkin
1/3 c. water
Mix dry ingredients and set aside. Beat together butter and eggs until fluffy. Beat in pumpkin and water until smooth. Stir in dry ingredients until smooth. Pour into a greased 9×5-inch loaf pan. Bake in a preheated 350-degree oven for 60-65 minutes. Cool in pan 10 minutes before removing from pan and placing on cooling rack. Wrap in plastic, best served the next day. Freezes well. Makes 1 loaf.
As with other quick bread you can make this recipe and bake it in smaller pans for gift-size loaves. Baking temperature is the same. Time will vary, so check after 30 minutes and test for doneness as usual.
Mom’s Pierogi

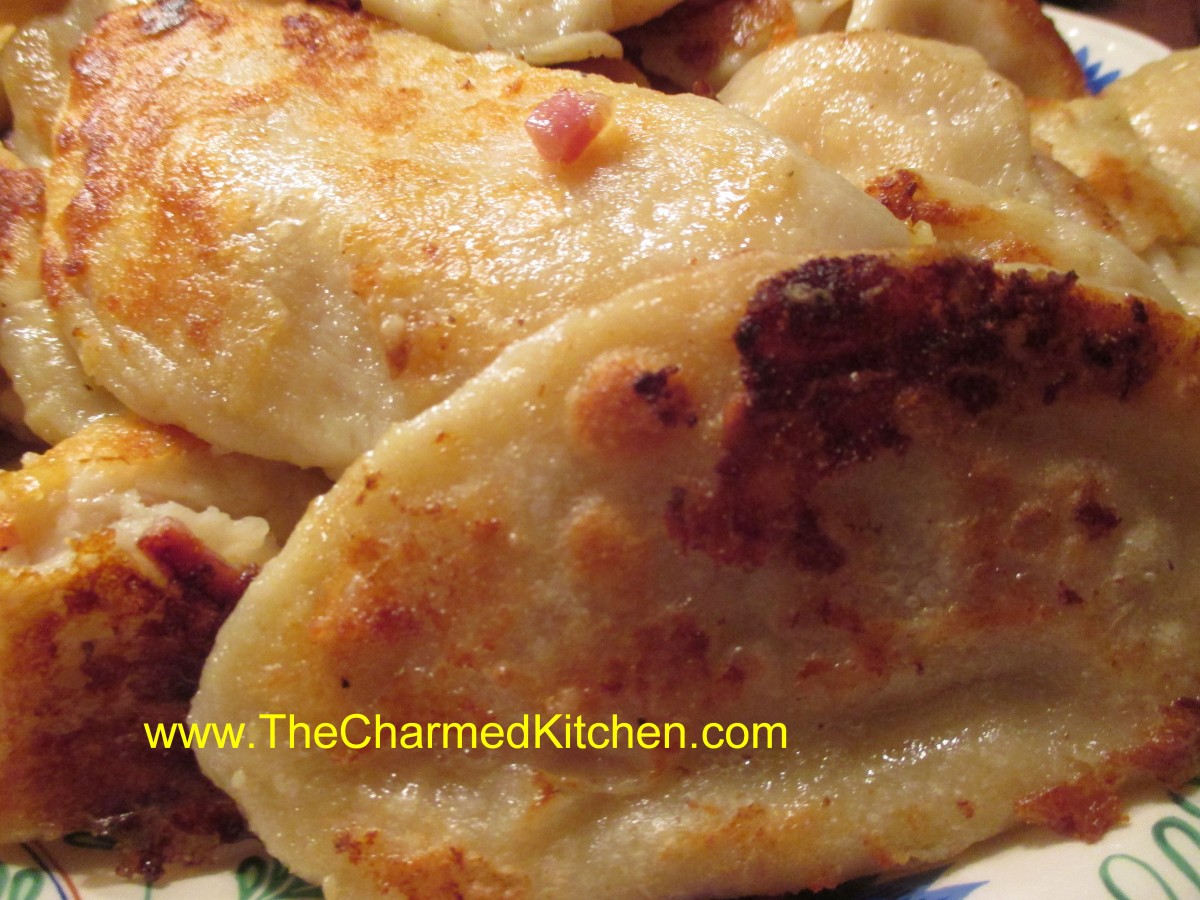
Pierogi
My mother taught me how to make pierogi, the way her mother taught her. They are part of my family’s food traditions.
Pierogi, if you didn’t know, are pasta, filled with different fillings, often potato based. They are also sometimes stuffed with prune filling or sauerkraut. Today you can find pierogi filled with all sorts of fillings.
There are variations in the dough, too. Some use just eggs, flour, water and salt. Others add some dairy in the form of milk or sour cream.
Once the pierogi are made, you can boil them and just serve them up, or brown the boiled pierogi in butter and serve with caramelized onions and sour cream. My mother used to make sweet and sour cabbage and serve it with the pierogi, or sometimes even use it as a filling. I can’t make them without remembering her.
Pierogi
Dough:
2 c. flour
1 t. salt
½ c. water (you can also use half milk and half water)
1 egg
Mix all ingredients together and knead on floured surface until smooth. Cover and let rest at least 15 minutes. Roll out thin and cut into circles. Re-roll scraps. You should get between 20-30. Spoon filling of your choice on center of dough circle. Fold dough in half over filling and press edge with fork to seal. Wetting the edge of the dough will help the dough to stick. Don’t overfill or the pierogi will split. Test a couple first to get the hang of it. Place a few at a time into salted boiling water and cook until they float. You can eat them as is or brown cooked pierogi in butter in a skillet. Serve with grilled onions and/or sour cream. We would often make a larger batch and then freeze them, uncooked on wax paper-lined baking sheets. When frozen they would be transferred to a freezer bag or container. Place right from the freezer into boiling water when ready to use.
Potato filling:
2 lbs. Potatoes, peeled and boiled
½ onion, minced
2-3 T. cottage cheese or farmer’s cheese, optional
salt and pepper to taste
Mash potatoes with other ingredients and season to taste.
Note: you can also add cheddar cheese if you like. In class we had some with cheddar cheese and added ham, too.

Fresh made pierogi
Maple Syrup Cookies

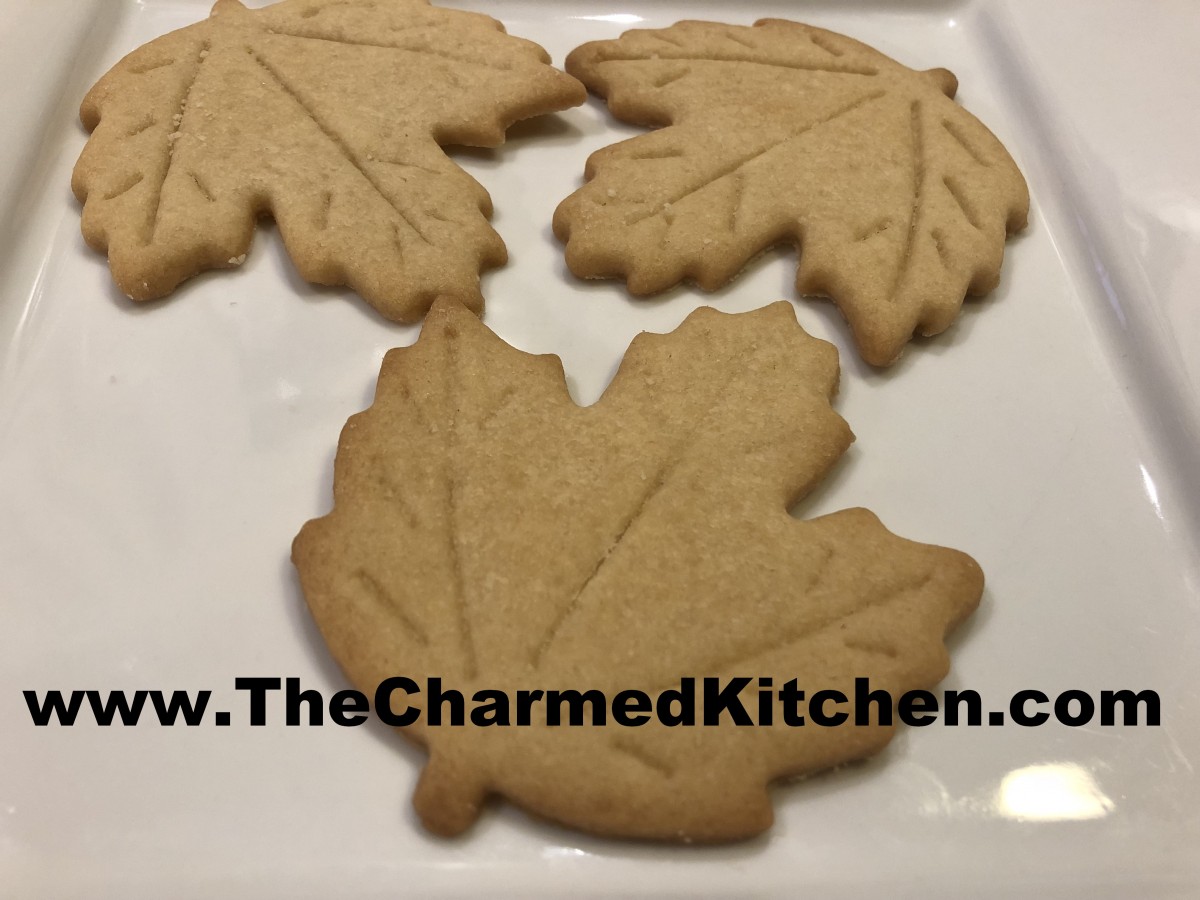
Unglazed Maple Syrup Cookies
The addition of maple syrup makes these cookies really special. They make a nice dessert for any Autumn dinner. They make a nice dessert for Thanksgiving, too.
Crisp and mildly sweet, they can be eaten plain, or you can coat them with a maple glaze, after they have cooled. Cookies are crisp but will soften slightly, if glazed. Either way, they are really tasty. You could also dust with powdered sugar.
A friend suggested making sandwich cookies with them. I used some of the glaze to sandwich two cookies together. I could see using a maple buttercream, too.
I used leaf-shaped cookie cutters, but cut them out in any shape you like. I am guessing I’ll be hearing from a couple of friends who will want to borrow my cookie cutters. 🙂
Maple syrup is one of my favorite natural sweeteners. Love the stuff. I even went to high school in a city that had a maple festival every Spring.
You can do a lot more with maple syrup than just a topping for pancakes and waffles. Maple syrup can be used in sauces, salad dressings and marinades. You can also use maple syrup in baking, like in these yummy cookies.
Maple Syrup Cookies
1 c. butter
1 c. sugar
½ c. maple syrup
1 egg yolk
3 c. flour
3/4 t. salt
Glaze:
2 c. powdered sugar
½ c. maple syrup
To make glaze: Beat sugar and syrup together until smooth.
Beat together butter, sugar and syrup. Beat in yolk. Combine flour and salt and add to butter mixture. Mix well. Wrap dough in plastic wrap and chill. Roll chilled dough 1/8 inch thick and cut out with assorted cutters. Leaves and other autumnal cutter shapes are best. Place on an ungreased baking sheet and bake in a preheated 350-degree oven for 12 minutes. Cookies should be lightly browned around the edges. Cool and decorate with glaze. Makes about 4 dozen cookies.
-
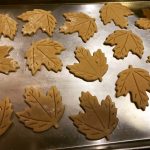
- Ready to be baked
-
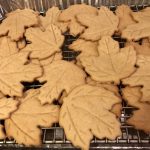
- Cooling down
-
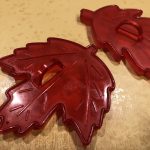
- Leaf cookie cutters
-
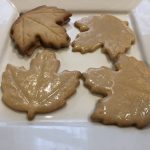
- Glazes cookies and a sandwich cookie
Duck Fat Bread

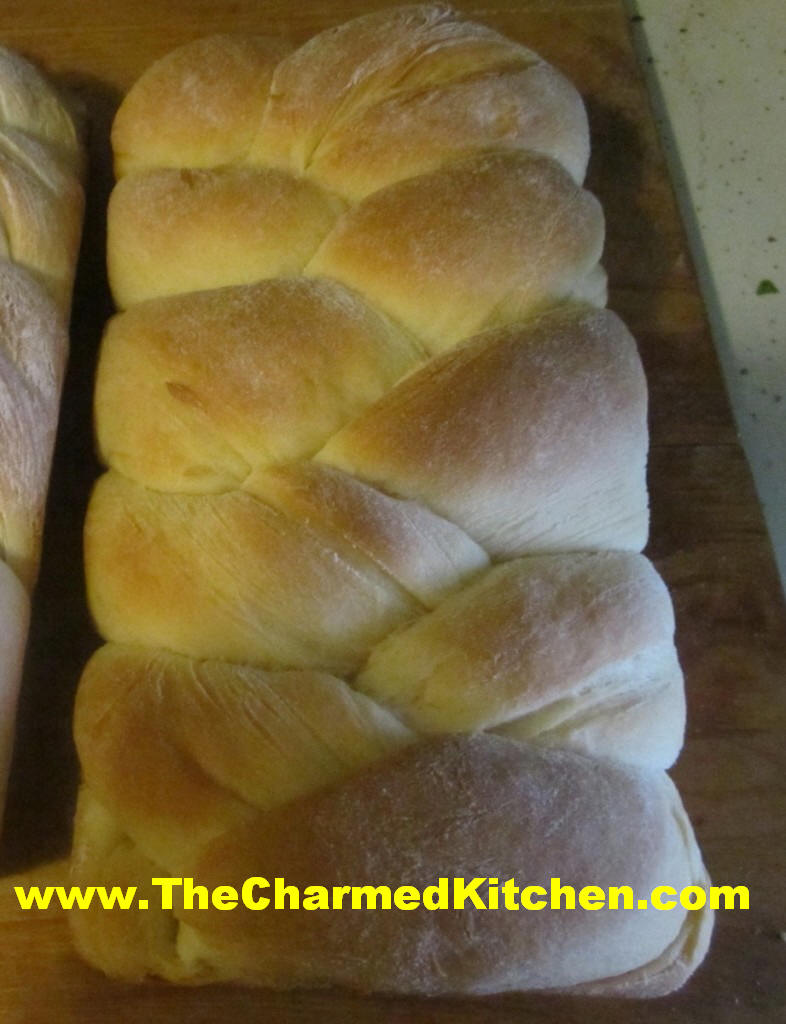
Duck Fat Bread
Today would be my Mom’s birthday. I still miss her. I thought I would share some of her favorite recipes this week. She was a great cook and I learned a lot from her. Here is a bread she was famous for in our family.
My Mom used to make this wonderful sweet bread. Made it for every family occasion. The recipe uses butter. She was a very frugal person. One day, she decided to render the skin from a duck she was using in soup. She didn’t want to just toss it. Too wasteful. Once it was cooled, the duck fat looked like butter. She was making her sweet bread and substituted the duck fat for the butter in the recipe. When my brother-in-law, Bob, tasted it he declared it was the best bread yet. My Mom told him what the secret ingredient was, and from that day on, we always called it duck fat bread, even when it was made with butter. Here is the recipe- wonderful even if made with plain old butter.
Mom’s Butter Coffeecake Braids aka Duck Fat Bread
4 1/2 c. flour
2 T. sugar
1 t. salt
½ c. butter or 1/2 c. cooled rendered duck fat
1 packet yeast
¼ c. warm water
2 t. sugar
1 c. evaporated milk
2 eggs, beaten
Combine flour with sugar and salt. Cut in butter or duck fat and set aside. Dissolve 2 teaspoons sugar in warm water. Dissolve yeast in warm water mixture and set aside. Allow to become bubbly, about 5 minutes. Combine milk with eggs. Stir in yeast mixture and add to flour mixture stirring well. Knead dough in bowl until smooth, about 10 minutes. Place on lightly floured surface and knead until smooth. Cover and let rise until doubled, about 1½ hours. Divide dough in half and then each half into thirds. Roll dough into ropes and braid three ropes together. Repeat with remaining 3 ropes. Place braids in 9×5 inch greased bread pans and cover with a towel. Place in a warm, draft-free place and allow to rise until doubled, about 1½ hours. Bake in a preheated 350 degree oven for 25 minutes. If you like glaze loaves while warm with a mix of powdered sugar, a little milk, butter, and vanilla. Toasted almonds or walnuts can be added, if desired. Makes 2 loaves.
Note: You can also refrigerate the dough after kneading it if you would prefer. Just place dough in an oiled bowl, cover with plastic wrap and chill overnight. Roll and shape dough into braids when cold from the fridge. Rise, covered, until doubled in bulk, about 2-3 hours. Bake as directed.
Note: You can also place loaves on a greased baking sheet for a longer, flatter bread rather than in loaf pan.


